1
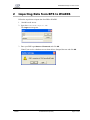
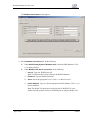
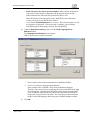
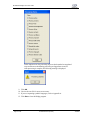
7677 Oakport Street Suite 800 Oakland, CA 94621 Ballot Printing System (BPS)/WinEDS Bridge Tool User’s Manual Document Version 1.06 July 6, 2005 Confidential and Proprietary Information BPS/WinEDS Bridge Tool User’s Guide Copyright 2005 Sequoia Voting Systems, Inc. All rights reserved. Disclaimer Sequoia Voting Systems, Inc. believes that this manual is accurate and reliable. Sequoia Voting Systems accepts no responsibility, financial or otherwise, for any consequences arising out of the information in or the use of this manual. The information contained in this manual is subject to change. Updates may be issued from time to time. This manual contains proprietary and confidential information. This document was prepared by Sequoia Voting Systems and is intended for the exclusive use of its clients and licensees. No part of this document may be photocopied or reproduced in any manner without the prior consent of Sequoia Voting Systems. Sequoia Voting Systems does not extend any warranties by this document. All product information and material disclosure contained in this document is furnished subject to the terms and conditions of a purchase or lease agreement. The only warranties made by Sequoia Voting Systems are contained in such agreements. Users should ensure that the use of this system complies with all legal or other obligations of their governmental jurisdictions. Version History Date Author Description Software Release Document Version 072904 Tech writer Final document n/a 1.00 111804 Tech writer Added Appendix A to include instructions for importing symbolic languages n/a 1.01 010705 Tech writer Applied D Anderson’s edits to Appendix A n/a 1.02 051005 Tech writer Applied D Anderson’s changes and inserted new graphics n/a 1.03 062905 Tech writer Applied D Davidson’s requested changes to Options tab documentation n/a 1.04 070105 Tech writer Applied D Anderson’s requested changes n/a 1.05 070605 Tech writer Applied D Anderson’s requested change to prerequisites n/a 1.06 Page 2 of 22 Confidential and Proprietary 7/6/2005 BPS/WinEDS Bridge Tool User’s Guide Contents About This Guide ..................................................................................................................... 5 Purpose .......................................................................................................................... 5 Audience ........................................................................................................................ 5 Scope ............................................................................................................................ 5 Related Documents ........................................................................................................ 5 1 Introduction................................................................................................................... 7 1.1 System Overview ................................................................................................ 7 1.1.1 1.1.2 1.2 1.3 1.4 Access Required ................................................................................................. 8 Run Frequency ................................................................................................... 8 Prerequisites to Running Wizard ......................................................................... 8 1.4.1 2 Data Flow ............................................................................................................................ 7 Database Setup .................................................................................................................. 8 Setting Up Ballot Header Fields in WinEDS (Optional) ....................................................... 9 Importing Data from BPS to WinEDS ........................................................................ 11 Appendix A Importing Symbolic Languages....................................................................... 17 Prerequisite to Importing Symbolic Languages ............................................................. 17 Importing Symbolic Languages ..................................................................................... 17 7/6/2005 Confidential and Proprietary Page 3 of 22 BPS/WinEDS Bridge Tool User’s Guide This page is intentionally left blank. Page 4 of 22 Confidential and Proprietary 7/6/2005 BPS/WinEDS Bridge Tool User’s Guide About This Guide Purpose The BPS Bridge Tool User’s Guide guides the user in importing BPS data into WinEDS. Audience Users of the bridge tool should have some understanding of Microsoft Access, Microsoft Word, and Microsoft Visio. They should also be familiar with BPS and WinEDS systems. Users should have a thorough understanding of their election data—especially data originating from a Voter Registration system, such as Integrity or DFM. Scope The BPS Bridge Tool User’s Guide contains instructions for operating the Bridge Tool wizard. It does not contain instructions on how to use the WinEDS, BPS, or Voter Registration software. Related Documents WinEDS 3.0 Reference Guide BPS User’s Manual BPS Help System 7/6/2005 Confidential and Proprietary Page 5 of 22 BPS/WinEDS Bridge Tool User’s Guide This page is intentionally left blank. Page 6 of 22 Confidential and Proprietary 7/6/2005 BPS/WinEDS Bridge Tool User’s Guide 1 Introduction 1.1 System Overview The BPS / WinEDS Bridge Tool is a Microsoft Access solution, designed to import as much data as possible from the Ballot Printing System (BPS) into WinEDS, thereby making the WinEDS profile and election database setup easier. 1.1.1 Data Flow An export job from the Voter Registration system feeds data, such as candidates, contests, voter registration numbers, and precincts, to BPS. The wizard moves this data from BPS to WinEDS databases. WinEDS / BPS Bridge Tool Data Flow Manual input Voter Registration system like Integrity or DFM BPS database Paper ballots Calls Microsoft Word Log File BPS / WinEDS Bridge Tool containing activity and error messages WinEDS Profile and Election Databases 7/6/2005 Confidential and Proprietary Page 7 of 22 BPS/WinEDS Bridge Tool User’s Guide 1.1.2 Database Setup The bridge program will setup most of the WinEDS databases at once. Due to the interrelationships between data elements, you cannot import subsets of the election database. The exceptions are symbolic language and voter registration data. 1.2 Access Required The BPS Bridge tool application is contained in BPSWinEDSBridgetool.mde The bridge links to three BPS files, which are also Microsoft Access database files. It also links to WinEDS Profile and Election databases, which are Microsoft SQL Server databases. You will need both physical and security access to these files and databases. 1.3 Run Frequenc y The Bridge Tool can be run unlimited times. Each time the Bridge Tool is run, it erases existing data in WinEDS before importing fresh data from BPS. Therefore, if you plan to run the Bridge Tool again, do not make changes directly to WinEDS data—it will be overwritten by imported BPS data. To maintain data consistency between BPS and WinEDS, you should always change BPS and re-run the bridge, rather than forming a habit of changing WinEDS after a transfer. In the long run, establishing a good data transfer from BPS to WinEDS will make future elections easier to setup. You can run a faster transfer for testing purposes by checking the Skip PSD Assignments checkbox under the Headers tab. Depending on the size of your county, this will significantly reduce processing time, allowing you to quickly view a test dataset. You can change WinEDS data directly only after you have run the Bridge Tool for the last time. 1.4 Prerequisites to Running Wizard Prior to running the Bridge Tool wizard, ensure you complete the following prerequisites: Ensure that your Microsoft Access workgroup information file is the same file used by BPS. This should already be established if you are using BPS on the same computer as the bridge tool. Incorrect workgroup files will result in security errors in the bridge tool. Note: For more information, see the Microsoft Access Help regarding workgroup information files. Set up ballot header fields in WinEDS (refer to Section 1.4.1). Create an Election database. Note: You can skip the step asking which offices are in this election, since all contest data will come from BPS. Add any Print-only contests. These contests can be used to display additional ballot information or instructions, such as election titles, footers or for partisan contest breaks. Ensure that at least one Edge machine exists in the WinEDS Profile screen, under Page 8 of 22 Confidential and Proprietary 7/6/2005 BPS/WinEDS Bridge Tool User’s Guide the Voting Machine tab. Backup the WinEDS Profile and Election database. Verify you have entered complete data in BPS. This task is especially important for Edge Review screen elements. 1.4.1 WinEDS Short Name fields for Office and Contest come from the BPS Review Title field found on the Office screen, Titles tab. Proposal Short Name comes from the BPS Questions screen, Ballot Design tab, Review Title field. Setting Up Ballot Header Fields in WinEDS (Optional) The Banner, Header, Subheader, Occupation, and Office Message fields in BPS are transferred to WinEDS as Ballot Header fields. To import these fields from BPS, follow the steps below: 1. Open WinEDS, and go to the System Setup screen. 2. Select the Ballot Header tab. 3. Open each contest header that you want to print the Banner, Header and Sub Header data. Microsoft Visio opens. 4. Drag a Text object from the stencil to your header. 5. Select the Text tool 6. Click on the text and rename Text to the term Banner. Note: Type the term exactly as it appears, with the first letter capitalized. 7. Repeat steps 4 and 6 to create the terms Header, Subheader, Occupation (for candidate header only), and Office Message fields. The Bridge Tool program searches for these fields in the ballot headers and, if found, inserts the data from BPS. 8. Click X to close the Visio window. 9. When prompted, click Yes to save changes. 10. Close WinEDS. 7/6/2005 Confidential and Proprietary Page 9 of 22 BPS/WinEDS Bridge Tool User’s Guide This page is intentionally left blank. Page 10 of 22 Confidential and Proprietary 7/6/2005 BPS/WinEDS Bridge Tool User’s Guide 2 Importing Data from BPS to WinEDS Follow the steps below to import data from BPS to WinEDS. 1. Start Microsoft Access. 2. Open the BPSWinEDSBridgetool.mdb The Logon screen appears. 3. Enter your BPS logon Name and Password, and click OK. Note: If you receive a database error as shown below, disregard the error and click OK. 7/6/2005 Confidential and Proprietary Page 11 of 22 BPS/WinEDS Bridge Tool User’s Guide The Database Connections screen appears. 4. On the Database Connections tab, do the following: a) Under Ballot Printing System II-Database links, link to the BPS databases. Click … to browse folders. b) Under WinEDS / SQL Server connection, do the following: i. User ID: Type your WinEDS user ID. Note: User ID must have full privileges to the WinEDS database. ii. Password: Type the database password. iii. Server: Select the appropriate server. Click … to browse servers. iv. Profile Database: Type or select the appropriate Profile database. Click browse databases. … to Note: The Bridge Tool opens the last election used in WinEDS. To open another election, open the election in WinEDS prior to using the Bridge Tool. Page 12 of 22 Confidential and Proprietary 7/6/2005 BPS/WinEDS Bridge Tool User’s Guide 5. Click Login. The Options screen appears. 6. On the Options tab, do the following: a) Under Ballot Printing System II Information, verify that the jurisdiction and election cycle is correct. i. To change, click Change. The Selection Control screen appears. ii. Select the desired jurisdiction and election information. iii. Click X to close the window. b) Under WinEDS information, verify the correct election is selected. c) Under Options, do the following: 7/6/2005 Keep print-only contests. When checked, existing print-only contests in the target election will not be removed. During import processing, the Bridge process will 'pause' allowing the user to assign a PSD to Print-only contests. This must occur before ballot style processing. When unchecked, the existing print-only contests in the target election will be removed. Keep precincts/location assignments. When checked, imported precincts with the same name as existing WinEDS precincts are re-assigned the same location. When unchecked, precincts will not be assigned to any locations. New or changed precinct names in BPS will not be assigned a location in WinEDS. Add election-wide PSD. When checked, a Political Subdivision is added called Election-Wide and all precincts are assigned to the PSD. Confidential and Proprietary Page 13 of 22 BPS/WinEDS Bridge Tool User’s Guide Make Selection Code same as precinct number. When checked, the Selection Code used for ballot layouts is populated with the precinct number in BPS. When unchecked, the Selection Code generated by BPS is used. Note: the Selection Code that appears on the WinEDS Precinct maintenance screens will always be the BPS Precinct Number. d) e) Page 14 of 22 Verify that the Proposal Response set is correct. The selected response set will be assigned to all proposals. After processing is complete, you can change individual proposals to the proper response set using WinEDS. Under the Special Processing section, click the Verify Language Cross Reference button. The Language Cross Reference screen appears. Note: You need only set up this screen once. i. Review tables on the left that contain data from WinEDS and BPS. ii. Create cross references using the right hand table. In the example above, WinEDS is setup for four additional languages. Therefore, four cross-reference records must be created in the table on the right for each language. Matching the WinEDS ID, name, and corresponding BPS Code, records are entered on the new record line (indicated by an asterisk on the grey bar on the left side of the table). The crossreference table enables the bridge to move BPS language data to the proper WinEDS database locations. Click OK. Confidential and Proprietary 7/6/2005 BPS/WinEDS Bridge Tool User’s Guide 7. Click Next. The Header screen appears. 8. On the Header screen, do the following: a) Select the appropriate WinEDS ballot headers. Note: The checkbox Add Print only contest for each party appears only if the election is a primary. b) Check or uncheck the desired options: Skip PSD Assignments. When checked, Political subdivisions will not be assigned to precincts. Depending on the size of your county, this will significantly reduce processing time, allowing you to quickly view a test dataset. Process BPS 2nd Language field. This option tells the bridge to process Spanish proposal data from the BPS second language fields. If you have only English and Spanish languages, you should check this option. For multiple and non-Spanish languages, leave this box unchecked. Proposal data will be processed using the BPS language tables instead of the second language fields. Open Primary. When checked, the Bridge will perform several processing steps necessary for an open or selective primary. Unchecked indicates a closed primary. This checkbox will not appear unless the WinEDS election type is Primary. Use EMS codes. Check this option to have the Bridge put EMS codes into the contest and precinct records. For contests, the EMS code will be placed in the Alternate Code field. For precincts, the Abbreviation field will contain the EMS code. Click Import Data. The Processing Status screen appears. c) 7/6/2005 Confidential and Proprietary Page 15 of 22 BPS/WinEDS Bridge Tool User’s Guide As the import occurs, the processing steps are check-marked as completed. Any errors that occurred during processing are logged into a text file. After processing is complete, the following message is displayed. 9. 10. 11. 12. Click OK. Review the text file for errors as necessary. If you are importing symbolic languages, refer to Appendix A. Click Exit to close the Bridge program. Page 16 of 22 Confidential and Proprietary 7/6/2005 BPS/WinEDS Bridge Tool User’s Guide Appendix A Importing Symbolic Languages To WinEDS, a symbolic language—also referred to as Unicode or a double-byte character set is a language that does not support the standard ASCII character set. In WinEDS, symbolic languages are implemented by either creating Microsoft Word documents or bitmap objects of the election elements. Importing symbolic languages using BPS is much the same as performing a mail-merge in Microsoft Word. The data is taken from BPS and put into a Word document, as a table in Word, and then merged—the same as a form letter would be merged. Therefore, it is helpful to know mail-merge functions in Microsoft Word before importing symbolic languages. The significant difference between a normal mail merge and using the BPS Bridge Tool to import symbolic languages is that WinEDS requires each item to be a separate file. Therefore, when you import symbolic languages using BPS, you will be creating many individual files what will be uploaded into the WinEDS database. Note: During Edge cartridge creation, images that are stored as Word documents are automatically converted to bitmaps. For significantly faster cartridge creation, it is recommended that you convert all Word objects to bitmaps. Because this action cannot be undone, you should convert Word objects only after all final proofing is complete. Prerequisite to Importing S ymbolic Languages WinEDS must be setup for the symbolic languages you are importing. These languages should appear on the Language tab of the System Setup window prior to starting. The Language Crossreference table must also be correct in the Bridge. See Section 6d for more information. Prior to importing symbolic languages, ensure that you have already imported data from BPS into WinEDS. Refer to Section 2, Importing Data from BPS to WinEDS. The symbolic language import depends on data stored by the bridge during the normal import. This data provides a cross-reference between BPS and WinEDS databases. Without this crossreference, data cannot be matched, or will be improperly matched. Importing S ymbolic Languages The following procedures are designed to import all symbolic elements at once. However, you may work on individual items as well. For example, in a typical import, all candidates are processed at once. If you notice that one candidate needs a minor adjustment, you can edit the Word document, make your changes, and upload only that candidate image. 1. 7/6/2005 Login to the BPS/WinEDS Bridge Tool. The Options tab is selected automatically. Confidential and Proprietary Page 17 of 22 BPS/WinEDS Bridge Tool User’s Guide 2. Click Import Symbolic Languages. The Language Import tab is displayed. 3. Complete steps 1 through 5 on the screen. STEP 1 Select translation From the drop down menu, select the object you want to create. The selections are contest header candidate header contest short name (for the Edge review screen) candidate short name proposal header proposal text STEP 2: Prepare BPS data From the drop-down menu, select the symbolic language to process. b) Click Go. Your screen flashes as data is extracted and stored in a Word document. Important: Be sure you have the correct options selected in steps 1 and 2 when performing steps 3, 4 and 5. Images are processed based on these options, not file names. a) Page 18 of 22 Confidential and Proprietary 7/6/2005 BPS/WinEDS Bridge Tool User’s Guide STEP 3: Edit merge document Edit merge document to create your ballot object. a) b) Enter a new document name, or click … to browse for an existing document. Click Go. Microsoft Word opens. The document is opened and prepared as a merge document. Depending on your version of Microsoft Word, the merge field area on your screen will appear similar to one of the following: Word 2000 Version Word 2002 Version 7/6/2005 Confidential and Proprietary Page 19 of 22 BPS/WinEDS Bridge Tool User’s Guide c) d) e) f) g) Page 20 of 22 Insert fields as they should appear on your ballot. Note: It is not necessary to insert a CheckMark (the circular voting target) in your objects. It will appear automatically in the same position as in the English object. To match the document with the proper item in WinEDS, insert the record ID field somewhere in the document. The ID is an internal database field (it is not the same as List Order.) It can be anywhere and any size, and it must begin and end with two vertical bars. For example, for a candidate object, type ||, then insert the CANDIDATE_ID field, followed by ||. The result should look like ||<<CANDIDATE_ID>>||. During upload processing, the program searches for the vertical bars, takes the ID number between the bars, removes this data, then saves the file, using the ID number as part of the file name. The ID is used when uploading to WinEDS. For proposals, use the CONTEST_ID merge field. Format your document as needed to correct the page size, margins, fonts, or other document attributes. Save your document and exit Word. To see how the merge will appear for all objects, click Test merge. This will perform a merge and open a new document. A screen similar to the following appears: Confidential and Proprietary 7/6/2005 BPS/WinEDS Bridge Tool User’s Guide h) Check the results of the merge. To make alterations that will affect all merge records close the document and repeat STEP 3 Edit Merge Document. To change to only a few of the objects, note the items needing changes. You can open the individual documents after completing Step 4. Note: the test merge document cannot be used for processing. Do not make changes to this document, since there is no way to use the data. STEP 4 Create images in: Create individual images. Select a folder to place the merge documents. b) Click Go. This step performs a merge and creates a document for each object. a) For example, if you have 30 candidates in your entire election, 30 Word documents will be created, one for each candidate header. Each document will be formatted the same as the test merge, except that each file will contain only one object. The file name consists of the object type, language and record ID. Warning: All existing files of this type will be deleted before processing begins. If you noted individual items that needed changes from Step 3, you can edit the individual Word documents before uploading them to WinEDS. You must know the record ID of the objects to change. Start Microsoft Word and open the documents you wish to edit. STEP 5: Upload to WinEDS Upload images to WinEDS. You have the option of uploading a single file, or all files in the folder specified in step 4. Note: The destination in WinEDS is based on the options selected in steps 1 and 2, not on the file name. Upload a single file a) Select the file. b) Click Go. Upload all files a) Specify the folder in step 4. b) Leave STEP 5 blank. c) Click Upload all images. All uploads overwrite existing data in WinEDS. After images are uploaded, the message Done is displayed. 4. Backup your databases! 5. When you are finished, click Exit. Converting all your images from Word documents to bitmaps in WinEDS will significantly improve the time it takes to create an Edge cartridge. This task is usually done after final 7/6/2005 Confidential and Proprietary Page 21 of 22 BPS/WinEDS Bridge Tool User’s Guide ballot proofing. Refer to the WinEDS Reference Guide, Chapter 10 Tools for more information. Page 22 of 22 Confidential and Proprietary 7/6/2005


![Section VII - Technical Specifications [ 920 KB]](http://vs1.manualzilla.com/store/data/005668651_1-8dca2c6e1104d59f56f239e80ee70ed9-150x150.png)