1
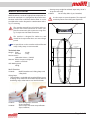
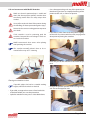
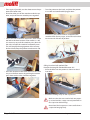
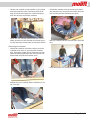
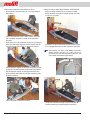
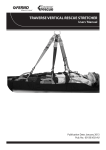
- a stretcher from
BM18101 Molift Stretcher English
Table of content
Molift Stretcher. ..................................................... 3
Technical data................................................... 3
Using the stretcher........................................... 4
Check before use............................................. 5
Lift and movement with Molift Stretcher........ 5
X-ray and CT scanning. ................................ 10
Cleaning instructions......................................11
Maintenance. ...................................................11
IMPORTANT!
The patient lifter is only meant to be used by
qualified personnel.
The manual shall not be handed over, or made
available to, any unauthorised third party, without a prior written consent from Molift Group
AS. Existing laws, conventions and agreements
protects all documents. No extract of this documentation can be reproduced, used or transferred without prior written consent from Molift
Group AS. Violation of these regulations may
lead to judicial repercussions and economic
responsibility. Industrial rights are reserved.
Molift Stretcher has CE label according to the Council
Directive 92/42/EEC for Medical Devices.
The Molift Stretcher is only ment to be used by qualified personnel.
Please read these operating instructions carefully before putting the product into operation. We assume no
liability for damage or malfunctions resulting from failure to comply with the instructions.
Molift Group AS
Ole Deviksvei 44
0668 OSLO, Norway
Teleph:(+47) 40001004
Fax: (+47) 40001008
Page 2 of 12
www.molift.com
[email protected]
All technical information, data and instructions for operation contained in these operating instructions were
up-to-date at time of print and are compiled on the basis of our experience and to the best of our knowledge.
We reserve the right to incorporate technical modifications within the scope of further development of the
product described in this manual.
BM18101 Molift Stretcher English - rev E 09/2008
Molift Stretcher
• Security straps might be ordered separately. Set of 3
straps for each side.
2150355
Set of safety belts (3 pcs/stretcher)
Molift Stretcher is made of a light plastic composite material and steel locks. It is designed to be used in combination with a lifter to lift from bed or floor. It as also
possible to be used in hospitals in combination with xray, CT-scanning.
Use the straps to secure the patient. The straps will
avoid the patient from sliding out of position.
126
The stretcher can only be used with a 4-point suspension with a fixed connection or with a complete free connection (the suspension swings freely). A suspension with fixed connection
630
Head section
The stretcher is designed for indoor use and
should not be exposed to direct sun over a longer
period
Center of gravity, when loaded.
1588
1980 2
400 2
788
Molift Stretcher
2150103
Molift Stretcher excl. Lifting loops and
safety belts
Lifting loops
• The stretcher is available with standard lifting straps
or lifting straps with reels that automatically retracts
the lifting straps when not in use. See illustration.
P
1188
Technical data
Weight: Total: 14,4 kg
One half: 7,2 kg
Measurements
1980x630x126 mm (LxWxD)
Material Plastic composite body and stainless steel locks
Safe Working Load
300 kg.
400 2
It is possible to use the stretcher without lifter and
straps. Safety straps is recommended.
Foot section
2150357
2150356
Set of lifting loops standard
(4 pcs/stretcher)
Set of straps with auto strap collectors
(4pcs/stretcher)
Page 3 of 12
Using the stretcher
With load on a soft surface
Lifting and moving patients always involves a
certain degree of risk. Read the lift’s user manual
carefully! It is important to understand and be familiar with the equipment, and only trained personnel should use it. Show caution and care when
you use the lift and its accessories. The need of
safety straps should be considered. You, as a carer, are responsible for the safety of the patient.
The stretcher is split in two parts. The locks in the top
and bottom end is opened and closed as described below. Try to open and lock a couple of times before use
the first time to learn how it works.
Do not tamper with the locks when stretcher is
loaded. The locks are easier to operate when the
stretcher is resting on a plane surface, this is also a
safety precaution.
Opening the stretcher locks
Without load
Lock
1
Lock
1
Security lock
• Push the stretcher down on one side (1) to unload
the stretcher lock. Open the lock by pushing in the
security lock and lock handles on both sides and
pull the stretcher apart.
If the lock is hard to open, push the stretcher
parts down on both sides in a way the makes the
stretcher even and unloads the locking mechanism. It may help to turn the patient over on one
side as well.
Closing the stretcher locks
Security lock
• Open the lock by pushing in the security lock and
lock handles and then pull the stretcher apart.
Push the stretcher part together until the lock clicks in
place.
Make sure that the locks are secured in correct position.
If the lock is hard to close, push the stretcher
parts down on both sides in a way the makes the
stretcher even. It may help to turn the patient over
on one side as well.
Check before use
• Check that there is no damage on stretcher or
accessories.
• Check that lifting belt has no damage, torn or
frayed.
• Check that the locks works properly and secure.
Page 4 of 12
BM18101 Molift Stretcher English - rev E 09/2008
Lift and movement with Molift Stretcher
Make sure that the patient always is stable and
don’t slide. Do not push or pull the stretcher when
transferring with a lifter. Use safety straps when
needed.
• Cross the opposite leg and arm of the patient over
the other leg and arm to simplify the tilting of the
patient to the side, as shown on picture.
Use a pillow under the head of the patient during
the handling, for better protection against injury.
Remember the correct working position to protect
your back!
If the stretcher is used in swimming pool, the
stretchers buoyant force will change if water enters inside the stretcher.
• If possible, use the sheet to tilt the patient slightly
to the side. If no sheet could be used, see page 8 for
description of placing the stretcher.
Molift recommends three carers when placing
and operating the stretcher.
The stretcher normally doesn’t have to be removed before x-ray or CT- scanning.
• Place one part of the stretcher underneath the patient.
Placing the stretcher in bed
If possible, adjust the bed to a suitable working
height, and lock the wheels on the bed.
• Change the patients position with crossing the leg
and arm to the opposite side.
• If possible, arrange to have access from both sides
of the bed before you start the procedure.
• Split the stretcher in two parts as described above.
Page 5 of 12
• Then again, if possible, use the sheet to turn the patient to the other side.
• Place the other part of the stretcher under the patient, and push the two stretcher parts together.
• Secure the lock in the foot section first, then secure
the lock in the head section. If the mattress is soft,
it is necessary to push the stretcher parts down on
the sides to make the stretcher horizontally even.
This will simplify the engagement of the security
lock and lock, Keep the patient turned to one side.
• Close the stretcher in the head section in the same
way as in the foot section, by pushing the section
parts down on the sides, and then together.
• Turn the patient on the back, and place the patient
in a stable and comfortable lying position.
• If necessary, the patient shall be strapped to the
stretcher with security straps, to ensure he/she does
not move and slide out of position.
Lifting from bed with patient lifter
Example showing lift with Molift Partner 255
• Place the lifter over the patient as shown on the illustration.
• Attach the 4 lifting straps to the suspension.
Make sure that the two stretcher locks are properly secured and the 4 straps correctly attached on
the suspension before lifting.
Note that a fixed suspension is more stable than a
suspension hanging freely.
Page 6 of 12
BM18101 Molift Stretcher English - rev E 09/2008
• Lift the user carefully so the stretcher is clear of the
bed and move him or her. You do not have to lift
high. Ensure that the patient is stable and do not
slide. Do not push or pull the stretcher!
• Lower the user carefully down to desired surface.
Make sure the user and stretcher are placed steadily. Take the loops off the hooks and remove the lift.
• Unlock the stretcher in head section: push down
the stretcher parts and push the security lock and
loch and the pull the stretcher parts apart.
• Remove carefully the two stretcher parts from the
bed.
Removing the stretcher
• Unlock the stretcher in the foot section. Push the
stretcher parts down (1) to unload the stretcher
lock. The patient might also be turned to one side.
Open the lock by pushing in the security lock and
lock handle and pull the stretcher apart.
1
• Place the patient in a comfortable lying position.
• Pull the two parts carefully from each other, to create a V-shape.
Page 7 of 12
Placing the stretcher with patient on floor
• Place the two stretcher parts in a V-shape around
the patient.
• Secure the stretcher lock in foot section, and slide
the V-shaped stretcher as close to the patient as
possible
• If possible, cross the opposite leg and arm of the patient over the other leg and arm to simplify the tilting the patient to the side, as shown on picture.
Lifting from floor with Molift Partner 205/230/255
• Adjust the legs of the lifter to maximum width.
• Place the lifter in the head section of the stretcher,
as close as possible.
• Attach the straps in the head section of the stretcher in a diagonal pattern on the 4-point suspension.
Alternatively, for lifters with fixed suspensions
(Molift Partner 230/255), the straps can be attached on one side of the 4-point suspension. This
will simplify the following procedure.
• Tilt the patient slightly on the side and push carefully one part of the stretcher underneath the patient.
• Tilt the patient slightly on the opposite side, and
push carefully the other part of the stretcher underneath the patient.
• Secure the lock in the head section.
• Lift up the stretcher enough to turn the lifter 90°
(with the lifter legs underneath the stretcher).
Page 8 of 12
BM18101 Molift Stretcher English - rev E 09/2008
• Adjust the legs to minimum width.
• To balance the stretcher, pull it slightly backwards,
then lower the stretcher carefully down on the legs
of the lifter.
• Lower the user carefully down to desired surface.
Make sure the user and stretcher are placed steadily. Take the loops off the hooks and remove the lift.
• Remove the stretcher as described on page 7.
• Remove the strap on the backmost hook of the suspension and attach it to the foremost hook. Attach
the two lifting straps closest to the foot section on
the backmost hooks, as shown on the illustration
below.
• Lift the patient from the floor. Make sure that the
patient always is stable and don’t slide. Do not push
or pull the stretcher when transferring with a lifter.
Page 9 of 12
X-ray and CT scanning
The stretcher is designed to give as little shadow as
possible when used in x-ray or CT-scanning, and should
normally not have to be removed for this. Consider the
specific situation.
The illustration below shows the areas where the picture can be jammed when CT scanning a standard
stretcher (Part 21500001)
The following pictures is examples from CT-scanning of
a dummy on Molift Stretcher.
Standard Molift Stretcher has areas around the lock in
head- and foot-section where shadows/disturbance
may occur by CT-scanning.
Molift Stretcher with reels (Art 2150010) will in addition
have jamming in the areas where the reels with spring
is placed. This is in the shoulder area and leg area as
shown on next illustration.
Page 10 of 12
Molift Stretcher with a test dummy in a CT-scanner.
One security strap is used
BM18101 Molift Stretcher English - rev E 09/2008
Security
strap
Cross
sect B
Cross
sect A
1
Picture from CT scanning of the dummy on Molift
Stretcher. The stretcher outline is only just visible,
including the reels in leg area. The left reel is mounted
with a spring (1).
Cleaning instructions
• The Molift Stretcher can be washed with normal
household detergents and disinfected with normal
disinfectants on a cloth.
• The stretcher can be washed in hospital washing machines at 80°C in short term washing. The
stretcher must be cooled down to normal room
temperature (max 30°C) before use.
• Careful high pressure cleaning is possible (100 bar).
Remember to remove the straps before washing
inwashingmachineorwithhighpressure.
The stretcher has a hollow structure, and we recommend to check that no water is trapped inside the
stretcher after washing.
Maintenance
Molift recommends annual inspection of the stretcher:
• Check that there is no damage on stretcher or accessories.
• Check that lifting straps has no damage, torn or
frayed. Damaged lifting straps must be replaced,
contact your dealer or Molift.
• Check that the locks works properly and secure,
with no loose parts.
• Check that there is no water trapped inside the
stretcher.
Max user weight (SWL) is 300 kg for Molift Stretcher
Cross section A
Cross section B
The cross-section pictures are from the leg area with
lifting straps and reels. Cross-section B shows how
the spring on the reel affects the scanning by making
stripes on the picture.
ScanningwithX-raymightalsohavedisturbance/
shadows in the same areas because of metal in
thelocksandreels.
Page 11 of 12
Norway
Germany
New Zealand
Molift AS
Ole Deviksvei 44
0668 OSLO
Tlf: (+47) 40001004
Fax: (+47) 40001008
www.molift.com
Thomashilfen für Behinderte
GmbH & Co
Walkmühlenstrasse 1
27432 Bremervörde
Tel.: 0 47 61 / 88 60
Fax: 0 47 61 / 886 19
www.thomashilfen.de
Herrmann & Co GmbH
Oelder str. 20
33378 Rheda-Wiedenbrück
Tel: 05242 / 9671 40
Fax: 05242 / 9671 41
www.herrmann-co.de
Morton & Perry
Homecare Equipment
P.O. Box 34439
Birkenhead
Auckland 0746
www.mortonperry.co.nz
Australia
Patient Handling Australia
8 Chapel Street
Marrickville
NSW 2204 Sydney
www.patienthandling.com.au
Ceiling Hoist Solutions
Melbourne Office
58-62 Star Crescent
AU-3803 Hallam, VIC
www.ceilinghoistsolutions.com.au
Austria
Paul Bständig GesmbH
Strohbogasse 8
1210 Wien
Tel. 01-405 35 43
Fax 01-406 81 02
www.bstaendig.at
Belgium
Pronk ergo NV
Sint-Pietersmolenstraat 204/1
8000 Brugge
T +32 (0)50/32 20 20
F +32 (0)50/32 20 40
www.pronkergo.be
Danmark
Handicare A/S
Jernholmen 41
2650 Hvidovre
Tel. +45 70 22 43 41
www.handicare.dk
Finland
Mediq Suomi Oy
Orionintie 5/ P.O.Box 8
FI-02101 Espoo
Tel.: +358 10 429 99
Fax: +358 10 429 2047
www.mediq.fi
Iceland
Eirberg
Storhofoi 25
IS-110 Reykjavik
www.eirberg.is
Ireland
Meditec Medical Ltd.
Unit 28, Whitestown Drive
Whitestown Industrial Estate
Tallaght, Dublin 24
Tel: 01 4624045
www.meditecmedical.ie
Israel
Mediscan Systems Ltd
P.B Box 2195
6 Hamanov St.
Rehovot 76386
IL-76121 Rehovot
www.mediscan.co.il
Italy
Fumagalli
Piazza Puecher 2
22037 Pontelambro
Tel +39 031 3356811
Fax +39 031 622111
www.fumagalli.org
Japan
Pacific Supply Co. Ltd
1-12-1 Goryo, Daito-shi
JP-5740064
www.p-supply.co.jp
France
Netherlands
Praxis Medical Technologies
Parc 2000
107, rue Dassin
34080 Montpellier FRANCE
Phone +(33) 04 99 77 23 23
Fax +(33) 04 99 77 23 39
[email protected]
Pronk Ergo bv
Cobaltstraat 14
2718 RM Zoetermeer
Tlf: 079-361 13 40
Fax: 079-361 13 41
www.pronkergo.nl
Spain
Karinter S.L
C/Ramón Turró, 5-9 Local 4
08005 Barcelona
Tel. +34 93 221 19 17
Fax. +34 93 221 18 72
www.karinter.com
Sverige
Molift AB
Ekbacksvägen 26
168 69 Bromma
Tel: 08-564 616 50
Fax: 08-564616 59
www.molift.com
Switzerland
Kuhn und Bieri AG
Könizstrasse 227
3097 Bern - Liebefeld
Tel. 0848 10 20 40
Fax 031 970 01 71
www.kuhnbieri.ch
United Kingdom
Meditec Molift Ltd
Hi Trac House
Unit 1 Woodrow Business Centre
Woodrow Way, Irlam
Manchester M44 6NN
Tel. 0844 8004236
Fax 0844 8004237
www.molift.com
USA
Molift Inc.
8406 Benjamin Road
Suite C
Tampa, FL 33634
Tel. 813-969-2213
Fax 813-969-3954
www.moliftinc.com