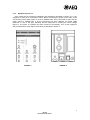
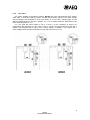
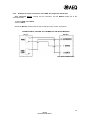
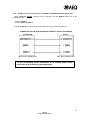
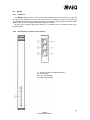
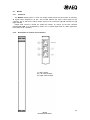
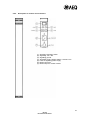
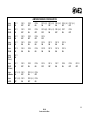
1
AEQ BC-500
Broadcast Audio Mixer
USER’S MANUAL
ED 05/04
A.E.Q., S.A., manufacturer of this equipment, is a Registered Company
in accordance with UNE EN-ISO-9001standard by Aenor with reg. no. ER-080/1/96
INDEX
1.
GENERAL INSTRUCTIONS ........................................................................................4
1.1.
General precautions ..............................................................................................4
1.1.1. Read all instructions .........................................................................................4
1.1.2. Power and ground connections .........................................................................4
1.1.3. Protection against voltage fluctuations ...............................................................4
1.1.4. Water and humidity...........................................................................................4
1.1.5. Ventilation, fire and flammable vapours ..............................................................4
1.1.6. Maintenance ....................................................................................................4
1.1.7. Warranty..........................................................................................................5
2.
POWER SUPPLY .......................................................................................................6
2.1.
General.................................................................................................................6
2.1.1. Before connecting the equipment to mains .........................................................6
2.1.2. Voltage selection..............................................................................................6
2.1.3. Equipment power on .........................................................................................7
2.1.4. 125 / 240 V ......................................................................................................8
3.
AUDIO CONNECTIONS ..............................................................................................9
3.1.
4.
MIXING CONSOLE DESCRIPTION ........................................................................... 10
4.1.
4.2.
4.3.
5.
General.................................................................................................................9
Basic design concepts ......................................................................................... 10
Standard configuration ......................................................................................... 11
Available modules ............................................................................................... 11
MIXING MODULES DESCRIPTION........................................................................... 12
5.1.
BC-511 ............................................................................................................... 12
5.1.1. Functions ....................................................................................................... 12
5.1.2. Description of controls and connectors ............................................................. 13
5.2.
BC-522 ............................................................................................................... 14
5.2.1. Functions ....................................................................................................... 14
5.2.2. Description of controls and connectors ............................................................. 15
5.3.
BC-533 ............................................................................................................... 16
5.3.1. Functions ....................................................................................................... 16
5.3.2. Description of controls and connectors ............................................................. 17
5.3.3. Example of remote connection of the AEQ TH-12 hybrid to the BC-533 ............. 18
5.3.4. Example of remote connection of the AEQ TH-02EXmkII hybrid to the BC-533... 19
5.4.
BC-533H............................................................................................................. 20
5.4.1. Functions ....................................................................................................... 20
5.4.2. Adjusting procedure........................................................................................ 20
5.5.
BC-533H MPX..................................................................................................... 21
5.5.1. Functions ....................................................................................................... 21
5.5.2. Description of controls and connectors ............................................................. 22
5.6.
BC-540 ............................................................................................................... 23
5.6.1. Functions ....................................................................................................... 23
5.6.2. Description of controls and connectors ............................................................. 23
5.7.
BC-550 ............................................................................................................... 24
5.7.1. Functions ....................................................................................................... 24
5.7.2. Description of controls and connectors ............................................................. 24
5.8.
BC-560 ............................................................................................................... 25
5.8.1. Functions ....................................................................................................... 25
5.8.2. Description of controls and connectors ............................................................. 25
5.9.
BC-577 ............................................................................................................... 26
2
BC-500
Broadcast Audio Mixer
5.9.1. Functions ....................................................................................................... 26
5.9.1.1.
Voltage selection.................................................................................. 26
5.9.2. Description of controls and connectors ............................................................. 27
5.10. BC-578 ............................................................................................................... 28
5.10.1. Functions ....................................................................................................... 28
5.10.1.1. Control room monitor and metering block ‘CONTROL MONITOR’............ 28
5.10.1.2. Studio room monitor block ‘STUDIO’...................................................... 28
5.10.1.3. Talkback, PFL and intercom block ‘TALKBACK’ ..................................... 29
5.10.1.4. Power supply ....................................................................................... 29
5.10.1.5. Signalling............................................................................................. 30
5.10.2. Description of controls and connectors ............................................................. 31
6.
FIGURES AND DIAGRAMS ...................................................................................... 32
6.1.
6.2.
Block diagram ..................................................................................................... 32
Rear connection panel ......................................................................................... 34
7.
TECHNICAL SPECIFICATIONS ................................................................................ 35
8.
EXAMPLES OF CONNECTIONS .............................................................................. 36
8.1.
Examples of connections for broadcasting and similar purposes ............................. 36
8.2.
Figures 1A y 1B................................................................................................... 36
8.2.1. The mixer....................................................................................................... 36
8.2.2. The connections ............................................................................................. 37
8.3.
Figures 2 and 3 ................................................................................................... 41
9.
DIMENSIONS ........................................................................................................... 44
10.
DELIVERY PART LIST ............................................................................................. 45
10.1. Jumper programming configuration....................................................................... 45
10.2. Delivery part list................................................................................................... 47
APPENDIX: A.E.Q. WARRANTY........................................................................................ 48
3
BC-500
Broadcast Audio Mixer
1. GENERAL INSTRUCTIONS
1.1.
General precautions
The following precautions should be observed for safety reasons during all operation and
maintenance of this appliance. Failure to comply with all instructions may result in serious
alterations in regard of the functions and performance of the equipment. AEQ will not be
responsible for any damage or loss due to the incorrect handling of the equipment.
1.1.1.
Read all instructions
Before connecting the unit to mains and start operating, it is absolutely necessary to carefully
read all the instructions in this manual, and to do so in the established order. If these basic rules
are respected you will obtain the maximum performance of the equipment from the very start,
and, at the same time, you will avoid incorrect or improper operation that could cause damage
to the equipment or personnel.
1.1.2.
Power and ground connections
To reduce the risk of electrical shock, this equipment should be connected to mains earth.
The equipment is provided with an earthed Euro-plug. If it should be necessary to change the
plug, bear in mind that the green / yellow cable is earth.
1.1.3.
Protection against voltage fluctuations
In some areas, where voltage fluctuations are common, it is highly recommended to connect
the equipment to an external protection in order to guarantee the tension received by the
equipment is the one specified in this manual.
1.1.4.
Water and humidity
The operation of the equipment in humid environments, near water or wet floors should be
avoided at all costs. Nor should it be used in environments where the atmospheric humidity is
so high that it will produce regular condensation inside the equipment.
1.1.5.
Ventilation, fire and flammable vapours
The equipment should never be placed near or over a source of heat. The use of electrical or
electronic equipment in environment close to fire or flammable vapours is a risk that has to be
avoided at all costs. All ventilation grills must be unobstructed to allow hot air out and assure a
proper ventilation of the equipment.
1.1.6.
Maintenance
Any maintenance of this equipment should be carried out by authorized technical service
personnel. AEQ will not be responsible for any damage caused by unauthorized maintenance
operations. Nor will AEQ be responsible for any damage caused to other equipment or persons
due to such unauthorized maintenance.
Always bear in mind that the equipment contains high voltage and that there exists the risk of
an electrical shock. Handle the equipment with due care and precaution.
4
BC-500
Broadcast Audio Mixer
The AEQ BC-500 Broadcast Mixing Console does not need any pre-adjustments. Once
carried out all programming described in this manual, by user or in factory, it is not necessary to
carry out any additional adjustments for optimum performance.
As an advice to the user, it should be mentioned that the input transformers of the different
modules should be demagnetised periodically, since this factor will influence the total distortion
of the equipment. To carry out this operation it is enough to apply a 25 Hz signal at an
appropriate level to achieve that the nucleus of the transformer reaches clip, and then, very
slowly, reduce the level of the signal until it is cancelled. It is recommended to carry out this
operation every year.
Note: In case the user needs to relocate or incorporate new input modules in the equipment,
this should be carried out as follows:
1) Turn off the equipment pressing the power switch located on the rear part of the monitor
module BC-578.
2) Take out the module(s) that you desire to change or relocate, unscrewing the screws that
hold the module to the chassis.
3) Lift the module and unplug the flat cable located in the lower section of the printed circuit, to
free the module form the internal bus connection. If any one is connected, unplug the
connectors at the rear part of the module. Proceed the same way in inverted order, to install
new modules.
1.1.7.
Warranty
A.E.Q. warrants, for a period of one year since the equipment’s date of purchase, the free
replacement at the factory’s Technical Service Department of every faulty part due to defects in
labor and materials. This warranty includes the labor needed for the replacement and the
equipment’s tune up.
This warranty does not include shipping costs, equipment’s installation and start on, neither
cleaning or replacement of parts subject to normal operative wear of the product.
Also, this warranty will not apply in case of damage or defect due to misuse or manipulation
of the equipment by unauthorized personnel.
5
BC-500
Broadcast Audio Mixer
2. POWER SUPPLY
2.1.
General
The description of the panel where the power connectors are located can be found under
Section 5. Extend the sheet including the graphics to obtain a general view and better
comprehension of all connections.
2.1.1.
Before connecting the equipment to mains
Warning: Do not connect the equipment to mains until you have assured yourself that the
voltage selector is correctly set to the requirement in your area, as described in Section 2.1.2. It
is very important to follow carefully all instructions in this section before connecting the
equipment to mains and turning the power on.
2.1.2.
Voltage selection
The AEQ BC-500 is prepared to operate with voltages of 110 or 220 V AC. Select the
required voltage for your area with the voltage selector (figure 1). If you choose 110 V AC, you
should replace the fuse (0.8 A SLOW) that is mounted in the fuse box of the mains connector
(figure 2) with a 1.6 A SLOW fuse that can be found in the plastic bag that contains this manual.
To do so, take out the fuse box located on the lower part of the mains connector (figure 2) and
remove the fuse mounted and replace it with the fuse that comes loose in the plastic bag, as
already mentioned.
Remember:
Voltage 220 V AC = 0.8 A Fuse type T (slow)
Voltage 110 V AC = 1.6 A Fuse type T (slow)
Note: The equipment is delivered from factory with the voltage selector set to 220 V AC and
its corresponding 0.8 A fuse mounted in the fuse box.
220
11
0
Note: The equipment is delivered from factory with a Euro plug mains connector. In some
countries, this connector must be replaced following the local requirements. If your area does
not comply with Euro-plug requirements, please, replace the mains connector before continuing.
FUSE
FIGURE 1
FIGURE 2
6
BC-500
Broadcast Audio Mixer
2.1.3.
Equipment power on
Once carried out the eventual modifications and verifications described in Section 2.1.2., the
equipment is ready to be connected to mains. Before connecting the power cord to mains, make
sure that the power switch (figure 4) is set to POWER OFF. Once connected to mains set the
power switch to POWER ON. If all the instructions has been followed, the power LEDs
ANALOG V+ and V- will light, indicating that the equipment is receiving the correct voltage
(figure 3). The power on operation has been carried out successfully. Turn off the equipment
and proceed with the audio signal connections as described in Section 3.
FIGURE 3
FIGURE 4
7
BC-500
Broadcast Audio Mixer
2.1.4.
125 / 240 V
The power supplies of the Mixing Console BC-500 that were manufactured since October
1993, have a connection inside by means of which the functioning values of the mains voltage
can be changed. The equipment is set up from factory for a 110 / 220 V voltage (figure 5), and
with the voltage selector in the 220 V position. For a 110 V voltage, follow the instructions in this
user's manual (Section 2.1.2.).
If in your area the mains voltage is 125 V or 240 V, do the connection in figure 6 for
programming the equipment for 125 / 240 V. Now, if you turn the voltage selector to the 240 V
position, the equipment will be set for 240 V mains voltage. In addition, if you require 125 V
mains voltage, follow the same instructions in this user manual as for 110 V.
110/220 V
FIGURE 5
125/240 V
FIGURE 6
8
BC-500
Broadcast Audio Mixer
3. AUDIO CONNECTIONS
3.1.
General
Note: It is recommended to extend the graphical description of audio connections (Section 5)
in order to visualize and improve comprehension of the following instructions.
The connectors of the BC-500 have been made in accordance with the
recommendations of AES 14-1992 (ANSIS 4.48 - 1992). This recommendation is based upon
the IEC 268 - 12 of 1987: “Audio Systems Equipment Part 12, Connector application for
Radio Broadcasting and similar use”.
Make sure that the audio cables that you are connecting to the equipment follow these
guidelines. In case the do not, they have to be replaced or modified, since they can cause
problems with regard to the phase of the audio signal.
1
Pin connector
(male)
Socket connector
(female)
2
3
Output
Input
PIN ASSIGNMENT
Appliance
1
2
Mono channel,
balanced
Shield
Positive
polarity
Mono channel,
unbalanced
Shield and return
Positive
polarity
Mono channel,
balanced,
Phantom power
Shield and negative
power
Positive
polarity and power
Mono channel,
balanced,
Power A-B
Shield
Positive
polarity and power
3
Note 1*
Return
If a balanced
microphone is
connected to an
Note 1*
unbalanced
amplifier input,
Positive return and the pin number 3
of the input
power
should be
connected to pin
Negative return and number 1.
power
9
BC-500
Broadcast Audio Mixer
4. MIXING CONSOLE DESCRIPTION
4.1.
Basic design concepts
The AEQ BC-500 Audio Mixing Console has been designed, mainly, to be used in radio
broadcast studios, as well as in OB-vans, local TV and audio installations where the quality and
reliability are basic factors.
The criteria for the development and manufacturing of this mixer has been the result of our
acquired experience on radio broadcasting and the direct contact with professionals in this
sector, this permitting us to compile the request for a mixing console from local radio and TV
broadcasters and meet their demand with this mixing console - AEQ BC-500.
Its design and configuration assures a fast assimilation of the functions by the user. The
logical distribution of the controls and the automatic functions of monitoring mute and signalling,
simplifies the operators labour. Its modular concept allows the replacement of any module in a
few moments. The high standards and quality of the components used in its manufacture,
guarantee a long active life of this equipment.
The AEQ BC-500 audio mixing console, parting from a standard factory configuration, can
be customized following the user’s special requirements. It can easily be expanded and
incorporate new input modules, or simply be redistributed following the users preferences.
Some of the characteristics that make the BC-500 ideal equipment for local radio and TV
stations are:
•
•
•
•
•
•
•
•
•
•
•
•
•
•
•
•
•
Self-operation or studio control push button selection
VCA signal control on fader
Indirect control of the master send
Electronically balanced busses
Transformer balanced inputs and outputs (electronically balanced inputs in BC-522 y BC533)
Electronically balanced external inputs 1 and 2
RF filters on microphone inputs
Latching XLR metal connectors
Auxiliary sends pre/post fader selectable by user
Remote mute and PFL from studio room
Clipping indicators on input modules BC-511
Stereo PFL
External telephone hybrid I/O module, with separate PFL and I/O controls, optional
internal hybrid
Stereo outputs with simultaneous mono sum
Separate control of studio and control room headphones
4-wire intercom for talkback, OB-units, micro line control, etc
Programmable “On-Air” signalling on input modules, 24 V power supply
10
BC-500
Broadcast Audio Mixer
4.2.
Standard configuration
The AEQ BC-500 Audio Mixing Console is delivered with the following standard
configuration:
1
1
4
6
1
1
1
4
BC-501
BC-578
BC-511
BC-522
BC-533
BC-540
BC-560
BC-502
Chassis with capacity for 20 modules, audio metering and PFL monitoring
Monitor and intercom control for self-operation and studio control
Mic / line mono input module
Double stereo input module for two stereo input connections
Input/output module for external telephone hybrid control
Auxiliary stereo + mono sum output module
Master programme stereo + mono sum output module
Blank module
This initial configuration can be equipped with four additional modules, BC-511, BC-522,
BC-533 (maximum two per mixer) and BC-577 (maximum one per mixer).
4.3.
Available modules
The AEQ BC-500 Audio Mixing Console has a variety of modules allowing it to be
configured according to each user’s specific needs. Furthermore, its modular construction
allows the future incorporation of other modules that the market demands.
CODE
732000216
732000217
732000218
732000219
732000220
732000221
732000222
732000223
732000215
732000242
732000243
732000224
MODEL
BC-511
BC-522
BC-533
BC-540
BC-560
BC-578
DESCRIPTION
Mic / line mono input module
Double stereo input module for two stereo input connections
Input / output module for external telephone hybrid control*
Auxiliary stereo + mono sum output module
Master programme stereo + mono sum output module
Monitor and intercom control for self-operation and studio
control
BC-577
Power supply (24 V) for "On Air" signalling
BC-501
Chassis with capacity for 20 modules, audio metering and PFL
monitoring
BC-502
Blank module
BC-533H
Module with internal telephone hybrid *
BC-533H MPX Module with internal digital telephone hybrid *
BC-550
Master programme output module (without fader)
* The BC-500 audio mixer features two telephone busses. If you are using two BC-533/BC533H/BC-533H MPX modules in the same BC-500 mixer, each one should be configured to
work on a different telephone bus. Due to this, it will never be possible to work in conference
(multiplex) between both BC-533/BC-533H channels.
In case you require this function, you can use either two BC-533H MPX modules or a BC533 with an external hybrid with multiplex, like for example the digital telephone hybrid AEQ
TH02-ExmkII, the ISDN audio codec AEQ Eagle or the multiconferencing system Systel 6000.
This kind of equipment delivers only one send and one return audio signal for the conference.
11
BC-500
Broadcast Audio Mixer
5. MIXING MODULES DESCRIPTION
5.1.
5.1.1.
BC-511
Functions
The microphone / line mono input module BC-511 allows to connect two independent inputs,
one at microphone level (14) and one at line level (15); microphone or line is selected with the
MIC/LINE push button (1).
Once the input is selected, its level is adjusted with the GAIN rotary control (2). The module
allows the insertion of an external signal through the connector (13) and its later equalization
with the rotary controls TREBLE (3) and BASS (4), these corresponding respectively to high
frequencies and low frequencies. A signal processor, for example a compressor/limiter can be
connected here.
To avoid clipping at the adjusted level a CLIP LED indicator (5) lights when maximum gain is
reached. This metering point comes after the insertion. If it would be necessary to monitor this
signal, the PFL button (9) has to be pressed, sending this way the signal to the PFL bus. This
mode is indicated by means of the LED (10) being lit.
Equally, the signal can be sent to the following busses:
- Master, adjusting the send level with the fader (12) and pressing the MASTER selector
(8).
- Telephone, adjusting the send level with the PHONE rotary control (7), always with the
CHANNEL ON selector (11) activated (lit).
Whenever the CHANNEL ON (11) selector is pressed, the signalling (ON AIR) is also
activated, and the monitor signal is muted. Likewise, when in the studio room the REMOTE
MUTE button is pressed, send signals are muted and the PFL of this module is activated, and
the signalling and monitor signal mute remains active. It is possible to configure if this works
when the channel is in MIC or LINE position by means of the jumpers PDP5 and PDP6.
The signal can also be sent to the auxiliary bus, adjusting the send level with the rotary
control (6). This send can be programmed with the jumpers PDP1, PDP2, PDP6 and PDP7:
PDP1 and PDP2: Select the type of send to the auxiliary bus. If the configuration jumper is
located in PDP1 it is set to POST-fader send, and if located in PDP2 it is set
to PRE-fader send.
PDP3 and PDP4: Select the send to the telephone buses by means of the rotary control (7),
PDP4 is for Telephone 1 and PDP3 Telephone 2.
PDP5 (1-2):
Signalling and monitor signal muting works only when the channel is in
microphone position.
PDP5 (2-3):
Signalling and monitor signal muting works also when the channel is in line
position, for example, when an external microphone mixer is connected.
PDP6 (1-C):
The send to the auxiliary bus is muted or not according to the position of the
CHANNEL ON selector (11) or if the fader’s (12) is at end of track position.
PDP6 (3-C):
The send to the auxiliary bus is independent of the CHANNEL ON selector’s
(11) position and of the fader’s (12) end of track position.
PDP7 (2-C):
The send to the auxiliary bus is muted or not according to the CHANNEL ON
selector’s (11) position.
12
BC-500
Broadcast Audio Mixer
5.1.2.
Description of controls and connectors
(1) Mic/line input selector.
(2) Input level adjustment rotary control.
(3) High frequencies equalization rotary control.
(4) Low frequencies equalization rotary control.
(5) Clip indicator.
(6) Send to auxiliary bus level adjustment rotary control.
(7) Send to telephone bus level adjustment rotary control.
(8) Send to master bus selector.
(9) PFL push button.
(10)PFL active indicator.
(11)Send activate selector.
(12)Send level adjustment fader.
(13)Insert connector.
(14)Microphone level input connector.
(15)Line level input connector.
13
BC-500
Broadcast Audio Mixer
5.2.
5.2.1.
BC-522
Functions
The double stereo line input module BC-522 allows to connect two stereo inputs, (12) and
(13) are for the left and right channels of line A, and (14) and (15) for the left and right channels
of line B. Line A or line B is selected with the push button (1). If the selector is not pressed, the
input will be line A, and if depressed, line B. In this case, the yellow indicator on the selector will
be activated.
Once selected the input, the level is adjusted with the rotary control (2) GAIN. To avoid
clipping at the adjusted level, a LED indicator (4) CLIP lights up when the maximum gain is
reached.
If it would be necessary to transform this input signal to mono, the button (3) has to be
pressed. If it would be necessary to monitor this signal, the PFL button (8) has to be pressed,
sending this way the signal to the PFL bus. This mode is indicated by means of the LED (9)
being lit.
The signal can be send to the following busses:
- Master, adjusting the send level with the fader (11) and pressing the selector (7).
- Telephone, adjusting the send level with the rotary control (6), always with the selector
(10) activated (lit).
The signal can also be sent to the auxiliary bus, adjusting the send level with the rotary
control (5). This send can be programmed with the jumpers PDP1, PDP2, PDP3, PDP4, PDP5
and PDP6:
PDP1, PDP2,
PDP3 + PDP4: Select the type of send to the auxiliary bus. If the configuration jumper is
located in PDP1 and PDP3, it is set to POST-fader send, and if located in PDP2
and PDP4 it is set to PRE-fader send.
PDP5 (2-C):
The CHANNEL ON selector (10) mutes or not the send to the auxiliary bus.
PDP6 (1-C):
The CHANNEL ON selector (10) and the fader (11) mute or not the send to the
auxiliary bus.
PDP6 (3-C):
The send to the auxiliary bus is never muted by the CHANNEL ON selector (10)
nor the fader’s (11) end of track position.
PDP7 + PDP8: Allows assigning the send signal from this module to the telephone busses. Put
the configuration jumper in PDP7 to assign to telephone bus 1, or in PDP8 to
assign to telephone bus 2, or on both to assign to both busses.
The remote control is activated (closing contacts) when the CHANNEL ON selector (10) is
pressed. According to the position of the INPUT A/B button (1) the output A (16) or B (17) are
activated:
14
BC-500
Broadcast Audio Mixer
5.2.2.
Description of controls and connectors
(1) Line A/B selector.
(2) Input level adjustment rotary control.
(3) Stereo / mono selector.
(4) Clipping indicator.
(5) Send to auxiliary bus level adjustment rotary control.
(6) Send to telephone bus level adjustment rotary control.
(7) Send to master bus selector.
(8) PFL push button.
(9) PFL active indicator.
(10)Send active selector.
(11)Send level adjustment fader.
(12)Line A left channel input connector.
(13)Line A right channel input connector.
(14)Line B left channel input connector.
(15)Line B right channel input connector.
(16)Remote control line A.
(17)Remote control line B.
15
BC-500
Broadcast Audio Mixer
5.3.
5.3.1.
BC-533
Functions
The telephone input/output module BC-533 allows adapting of an external telephone hybrid,
digital or analogue, to the rest of the modules in the system.
It has one audio input (14) that is fed by an external telephone hybrid at line level. This input
can be monitored on the PFL bus if the PFL IN push button (8) is pressed and the LED (9) is lit.
The module’s input signal can be sent to the master bus, adjusting the send level with the
fader (11) and pressing the MASTER selector (7), and also to the auxiliary bus, adjusting the
send level with the AUX ST rotary control (6), provided that the CHANNEL ON selector is
activated (pressed) to allow the signal to be sent.
If the fader is put at the minimum position, it will have the same effect as if the CHANNEL
ON selector (10) was pressed deactivating all the return sends (gone out).
The output signal (13) of this module is obtained by summing all signals sent to the
telephone busses (PHONE 1 or PHONE 2) from the BC-511, BC-522 and BC-578 channels.
The monitoring of the signal is carried out on the PFL bus, activating the PFL OUT selector (4),
and when the LED is lit (5). This output signal is the signal that is being sent to the external
telephone hybrid, adjusting its level on the GAIN rotary control (3).
This module also features an interface for remote control (12) of external hybrids, if this
would be necessary, as for example when using the AEQ TH-02ExmkII. In this case, an
incoming call is indicated by the RING LED (2) being lit, and the connection of the hybrid to the
telephone line (hook on / hook off) can be remote controlled by means of the CONNECT push
button (1). The remote control connector is a DB-9 male. This module features special functions
that can be programmed through the configuration jumpers described below:
PDP1 + PDP2: Select the type of send to the auxiliary bus of the signal received from the
hybrid. If the configuration jumper is located in PDP1 it is set to POST-fader
send, and if located in PDP2 it is set to PRE-fader set.
PDP3, PDP4: Select the remote modes. PDP3 sends + Vcc through the AIR contact (pin nr.
PDP5:
5 of the connector (13)). PDP4 sends ground through the AIR contact. PDP5
connects contacts GND and AIR (pins nr. 9 and 5 of the connector (13)).
PDP6:
Telephone bus 1
PDP7:
Telephone bus 2
The BC-533 can be connected to the telephone bus 1 or telephone bus 2. You should
always bear in mind that you must not connect two BC-533 modules to the same telephone
bus.
16
BC-500
Broadcast Audio Mixer
5.3.2.
Description of controls and connectors
(1) Switch for remote control of incoming call on external
hybrid.
(2) Call indicator.
(3) Send to external hybrid level adjustment rotary control.
(4) External hybrid send PFL selector.
(5) External hybrid send PFL indicator.
(6) Send to auxiliary bus level adjustment rotary control.
(7) Send to master bus selector.
(8) External hybrid PFL / input program return selector.
(9) External hybrid PFL / input program return indicator.
(10)Program return sending activate selector.
(11)Send level adjustment fader.
(12)Remote control connector.
(13)Output to telephone hybrid.
(14)Input from telephone hybrid.
17
BC-500
Broadcast Audio Mixer
5.3.3.
Example of remote connection of the AEQ TH-12 hybrid to the BC-533
Very important: Before carrying out the connection, pull the BC-533 module out of the
console and then:
1) Remove PDP-4 and PDP-5.
2) Place PDP-3.
Return the BC-533 module back into the console and carry out the connections.
CONNECTION OF THE AEQ TH-12 HYBRID TO THE BC-533 MODULE
TH-12
BC-533
(MULTIPIN CONNECTOR)
18
BC-500
Broadcast Audio Mixer
5.3.4.
Example of remote connection of the AEQ TH-02EXmkII hybrid to the BC-533
Very important: Before carrying out the connection, pull the BC-533 module out of the
console and then:
1) Remove PDP-3.
2) Place PDP-4 and PDP-5.
Return the BC-533 module back into the console and carry out the connections.
CONNECTION OF THE AEQ TH-02EXmkII HYBRID TO THE BC-533 MODULE
TH-02EXmkII
BC-533
(MULTIPIN CONNECTOR)
(MULTIPIN CONNECTOR)
To see an example of the connection to an EAGLE audio codec,
consult the user’s manual of this equipment.
19
BC-500
Broadcast Audio Mixer
5.4.
5.4.1.
BC-533H
Functions
The BC533H channel has the same functions than the BC-533, and externally looks like it,
but it includes a basic telephone hybrid. Thus, the telephone line will be connected directly to
the module by way of the XLR connector with no need to use additional equipment.
Telephone line connection is made on the female XLR connector, pins 2 and 3, and the
auxiliary telephone is connected on the male XLR connector, pins 2 and 3. Both connectors are
located in the rear panel, and the connection is made like shown on the label on this panel:
TELEPHONE LINE
PIN 2-3
TELEPHONE SET
PIN 2-3
5.4.2.
Adjusting procedure
This module includes an automatic line impedance adaptation system, but an adjusting
procedure is necessary during the installation.
Steps:
1.- Switch the mixer off.
2.- Remove the two screws, which hold the BC-533H module to the chassis, take the module
carefully out without disconnecting the ribbon cable by putting the module in a horizontal
position.
3.- Turn the power on.
4.- Connect the telephone line and auxiliary telephone set to their right connectors on the
module’s rear panel. Make a call. Once established, push the CONNECT switch.
5.- Send a 1 kHz tone (you must measure 0dB at PFL OUT).
6.- Press the PFL IN (reception) button to activate it and adjust VR1 on the hybrid board (PBA
472-001-209) until you get a minimum level in the PFL VU-meter.
7.- Switch the mixer off again, insert the module in the original position and tighten the screws.
20
BC-500
Broadcast Audio Mixer
5.5.
BC-533H MPX
5.5.1.
Functions
The BC533H MPX channel has the same functions than the BC533 module, but features a
digital telephone hybrid. Thus, the telephone line will be connected directly to the module by
way of the RJ-11 connectors with no need to use additional equipment. Due to the hybrid’s
digital processing, no adjustment is needed on installation.
The telephone line and telephone set are connected by means of RJ-11 type connectors,
which are located at the rear of the module.
There are two functions that distinguish the BC533H MPX module from the BC533 module,
which are multiplex and frequency extender:
MULTIPLEX: When this function is activated in both BC-533H MPX modules (if the
console features two modules), both telephone lines intercommunicate.
FREQ. EXTENDER: When this key is enabled, the frequency extender function is
activated, and all transmitted frequencies are shifted 250 Hz upwards, and all received
frequencies are shifted 250 Hz downwards. For a correct operation of this function, at
the remote end has to be done the reverse procedure, by means of a AEQ TH-02
EXMkII or TLE-02D hybrid.
This module has special features, which are programmed by means of the jumpers described
below:
PDP1:
PDP2/PDP3:
Selects how the signal received at the hybrid is sent to the auxiliary bus. Put the
jumper in position 1 to send the signal post-fader, and in the opposite position
to send it pre-fader.
If you want to connect the module to the telephone bus 1, both jumpers have to
be put in position 1, and to connect it to telephone bus 2, both jumpers have to
be put in the opposite position.
21
BC-500
Broadcast Audio Mixer
5.5.2.
Description of controls and connectors
RING
1
2
14
SET
15
LINE
CONNECT
3
0
10
GAIN
4
5
PFL OUT
6
FREQ.
EXTENDER
7
MULTIPLEX
8
0
10
AUX ST
9
MASTER
10
11
PFL IN
12
CHANNEL ON
+12
(1) Switch for remote control of incoming call on internal
hybrid.
(2) Call LED.
(3) Send to hybrid level adjustment rotary control.
(4) Hybrid PFL send selector.
(5) Hybrid PFL send LED.
(6) Frequency extender activation key.
(7) Multiplex function activation key.
(8) Send to auxiliary bus level adjustment rotary control.
(9) Send to master bus selector.
(10) Hybrid PFL / input program return selector.
(11) Hybrid PFL / input program return LED.
(12) Program return send activation selector.
(13) Send level adjustment fader.
(14) Telephone set connector.
(15)Telephone line connector.
0
13
-∞
22
BC-500
Broadcast Audio Mixer
5.6.
5.6.1.
BC-540
Functions
The BC-540 auxiliary stereo + mono sum output module carries out the function of summing
all signal inputs assigned to its bus. The output level is controlled by means of the fader (1).
This module delivers the mono output signal on the connector (2), as well as the stereo output
signal on the connectors (3) (left channel) and (4) (right channel).
By way of the internal programming jumpers, it is possible to turn a BC-540 module into a
BC-560 module.
5.6.2.
Description of controls and connectors
(1)
(2)
(3)
(4)
Auxiliary output level adjustment fader.
Mono output.
Left channel output.
Right channel output.
23
BC-500
Broadcast Audio Mixer
5.7.
5.7.1.
BC-550
Functions
The BC-550 auxiliary stereo + mono sum output module carries out the function of summing
all signal inputs assigned to its bus. This module delivers the mono output signal on the
connector (1), as well as the stereo output signal on the connectors (2) (left channel) and (3)
(right channel).
Output level control is carried out inside the module, by means og the blue coloured
potentiometer CN2. It is pre-adjusted in factory for a nominal output level of 4 dBm (equivalent
to the fader set at 0 position).
5.7.2.
Description of controls and connectors
(1) Mono output.
(2) Left channel output.
(3) Right channel output.
BC-550
24
BC-500
Broadcast Audio Mixer
5.8.
5.8.1.
BC-560
Functions
The BC-560 auxiliary stereo + mono sum output module carries out the function of summing
all signal inputs assigned to its bus. The output level is controlled by means of the fader (1).
This module delivers the mono output signal on the connector (2), as well as the stereo output
signal on the connectors (3) (left channel) and (4) (right channel).
By way of the internal programming jumpers, it is possible to turn a BC-560 module into a
BC-540 module.
5.8.2.
Description of controls and connectors
(1)
(2)
(3)
(4)
Master output level adjustment fader.
Mono output.
Left channel output.
Right channel output.
25
BC-500
Broadcast Audio Mixer
5.9.
5.9.1.
BC-577
Functions
The BC-577 carries out the function of delivering the right voltage to the signalling lamps in
the studio and control room in a completely stand-alone way.
It is equipped with a DC MAINS mains connector (6), a protective FUSE (5) and a SELECT
voltage selector (4). The module is activated by means of the ON/OFF switch (1) and the direct
tension of 24 V is delivered between the +24 V (2) and 0 V DC (3) contacts. This power supply
can deliver up to 20 W.
In order to simplify the wiring, and to increment the flexibility, the module is equipped with an
(7) AC LINK, a mains output to be connected to the mains connector of the monitoring and
power supply BC-578 module.
5.9.1.1. Voltage selection
The BC-577 is prepared to operate with voltages of 110 or 220 V AC. Select the required
voltage for your area with the voltage selector (figure below). If you choose 110 V AC, you
should replace the mounted fuse with the one that can be found in the plastic bag that contains
this manual.
Remember: Voltage 220 V AC = 1 A fuse type T
Voltage 110 V AC = 2 A fuse type T
0
22
11
0
Note: The equipment is delivered from factory with the voltage selector set to 220 V AC, and
its corresponding fuse mounted.
The diagram for signalling wiring can be seen in section 5.9.1.5. Signalling.
26
BC-500
Broadcast Audio Mixer
5.9.2.
Description of controls and connectors
(1)
(2)
(3)
(4)
(5)
(6)
(7)
Signalling activation switch.
Signalling +24 V DC.
Signalling ground.
Signalling supply voltage selector 110/220 V AC.
Fuse for signalling power supply.
Mains connector.
Mains output to monitor module.
27
BC-500
Broadcast Audio Mixer
5.10. BC-578
5.10.1. Functions
The monitoring and power supply module, BC-578, carries out the functions of:
• Studio and control room monitoring
• Talkback management
• System general power supply
• Master and PFL Vu-meters control, located up-front on the chassis
• Feeds the PFL speakers located beside the Vu-meters
Due to this, this
•
•
•
•
5.10.1.1.
module can be divided in the following sub-blocks:
Control room monitor and metering module ‘CONTROL MONITOR’
Studio room monitor module ‘STUDIO’
Talkback, PFL and intercom module ‘TALKBACK’
Power supply
Control room monitor and metering block ‘CONTROL MONITOR’
This block manages the signal sends to the control room monitors.
The master output signal is sent pressing the MASTER selector (4), the auxiliary output
signal is sent by means of the AUX selector (3), the PFL by means of the PFL selector (6), and
the external signals that are coming in through the I/O CONNECTOR (36) are sent by means of
their respective EXT1 (7) and EXT2 (8) selectors.
The level of the signal or signals selected for control room monitoring is adjusted by means
of the MONITOR LEVEL rotary control (9), for the control room speakers, and by means of the
H/PHONES LEVEL rotary control (10) if the H/PHONES headphones outputs (12 and 13)
(located on the lower part of the module) are used. This level can be metered on the PFL/SEL
VU-Meter if the switch (3) PFL/SEL is pressed selecting SEL.
In this block two function modes can be selected, studio control or self-operation, by means
of the NORMAL/AUTOCONTROL selector (11). The NORMAL mode allows the muting of the
studio room speakers and the connection of signalling on opening any microphone module. If
AUTOCONTROL (self-operation) mode is selected by means of the selector (11), the control
room speakers are also muted when any microphone channel is opened.
This block also delivers the signal to the PFL speakers and the metering instruments. The
mixer is fitted with two VU-meters. One of them is assigned permanently to master (L and R),
and the other one to PFL/SEL.
Nonetheless, the function of both VU-meters can be modified by means of the configuration
jumpers located on the rear part of the VU-meter board:
PDP3 (1-C), PDP1 (1-C): Master assignment
PDP3 (3-C), PDP1 (3-C): PFL/SEL assignment
PDP4 (2-C), PDP2 (2-C): Auxiliary assignment
The 0 Vu adjustment is carried out by means of the potentiometers P1 and P2 on the same
board. To access this board, remove the mixer’s rear panel.
5.10.1.2.
Studio room monitor block ‘STUDIO’
The ‘STUDIO’ block manages the signal sends to the studio room monitors.
The master output signal is sent pressing the MASTER selector (14), the auxiliary output
signal is sent by means of the AUX selector (15), the PFL by means of the PFL selector (16),
and the external signals that are coming in through the I/O CONNECTOR (36) are sent by
means of their respective EXT1 (17) and EXT2 (18) selectors.
The level of the signal or signals selected for monitoring in the control room is adjusted by
means of the MONITOR LEVEL rotary control (19), for the studio room speakers, and by means
28
BC-500
Broadcast Audio Mixer
of the H/PHONES LEVEL rotary control (20) for the studio room headphone outputs, located on
the I/O CONNECTOR (36). There are two outputs for headphone connection, named PRIMARY
HEADPHONES and SECONDARY HEADPHONES. The signal is the same on both outputs.
This block also cancels all PFL assignments on the various channels, when the PFL RESET
button (21) is pressed.
5.10.1.3.
Talkback, PFL and intercom block ‘TALKBACK’
This module manages a series of functions that complete the AEQ BC-500 functionality and
performance. Below, each one of them is explained in detail.
This block allows talkback by means of the included MIC T'BACK microphone (28) to:
• Master outputs (to BC560), pressing the MASTER selector (23). If you want to
deactivate this function, remove the jumpers from PDP3 and PDP4 and place them
on PDP5 and PDP6.
• Auxiliary outputs (to BC540), pressing the AUX selector (24). If you want to deactivate
this function, remove the jumpers from PDP7 and PDP8 and place them on PDP9
and PDP10.
• Telephone outputs (to BC533), pressing the PHONE selector (25). The jumpers
PDP1 and PDP2 allow (when they are placed) the talkback to be sent to the
telephone bus 1 and/or 2 respectively.
• Studio room monitors and headphones (on I/O CONNECTOR (36)), pressing the
STUDIO selector (26).
• 4-wire intercom mode communication (on I/O CONNECTOR (36)), pressing the
INTERCOM selector (27).
It also allows the PFL speaker level adjustment by means of the SPEAKER LEVEL rotary
control (22). This rotary control also controls the level of the input signal of the intercom I/O
CONNECTOR (36) when this input is activated by means of the INTERCOM switch (29). The
intercom input and output is only active when the INTERCOM INPUT ON switch (29) is pressed.
5.10.1.4.
Power supply
This module contains the power supply that delivers the correct voltage to all the other
modules in the system. This power supply is fitted with the mains AC MAINS connector with an
EMI filter and a fuse (35), the voltage input SELECT selector (34), POWER switch (33), as well
as two status indicators, + V ANALOG (1) and - V ANALOG (2), located in the front of the
module. Their task is to indicate the internal system voltages. To allow optimum heat
dissipation, the power supply‘s heat sink is located externally (37). The toroidal transformer is
located inside the chassis.
In the control room monitor module, when jumper PDP1 is short-circuited, it connects the
appliance’s analogue ground with the mains earth.
29
BC-500
Broadcast Audio Mixer
5.10.1.5.
Signalling
Below is shown the connection and wiring diagram of the signalling system.
30
BC-500
Broadcast Audio Mixer
5.10.2. Description of controls and connectors
(1)
(2)
(3)
(4)
(5)
(6)
(7)
(8)
(9)
(10)
(11)
(12)
(13)
(14)
(15)
(16)
(17)
(18)
(19)
(20)
(21)
(22)
(23)
(24)
(25)
(26)
(27)
(28)
(29)
(30)
(31)
(32)
(33)
(34)
(35)
(36)
Power indicator +V ANALOG.
Power indicator -V ANALOG.
PFL/SEL monitoring VU-meter selector.
Control room master monitoring selector.
Control room auxiliary monitoring selector.
Control room PFL monitoring selector.
Control room external input 1 monitoring selector.
Control room external input 2 monitoring selector.
Control room monitor level adjustment rotary control.
Control room headphone level adjustment rotary control.
Normal / self-operation selector.
Control room headphones 1 output.
Control room headphones 2 output.
Studio room master monitoring selector.
Studio room auxiliary monitoring selector.
Studio room PFL monitoring selector.
Studio room external input 1 monitoring selector.
Studio room external input 2 monitoring selector.
Studio room monitor level adjustment rotary control.
Studio room headphone level adjustment rotary control.
PFL reset push button.
PFL speaker level adjustment rotary control.
Talkback to master selector.
Talkback to auxiliary selector.
Talkback to telephones selector.
Talkback to studio room selector.
Talkback to intercom selector.
Talkback microphone.
Intercom input PFL speaker monitoring selector.
Signalling connector (common).
Signalling connector (break).
Signalling connector (make).
Power switch ON / OFF.
Voltage input selector 110/220 V.
Mains connector with fuse.
I/O connector.
31
BC-500
Broadcast Audio Mixer
6. FIGURES AND DIAGRAMS
6.1.
Block diagram
32
BC-500
Broadcast Audio Mixer
BC-500
Broadcast Audio MIxer
1
2
3
2
1
FEMALE
3
1
MALE
REMOTE
INSERT
0
11
POWER SUPPLY & MONITORING
1 - GROUND
2 - V(+)
3 - V(-)
1 - GROUND
2 - V(+)
3 - V(-)
1 - RING
2 - NC
3 - NC
4 - NC
5 - CONNECT
6 - NC
7 - NC
8 - NC
9 - GND
T - RETURN
R - SEND
G - GND
SIGNALING
MASTER
F
U
S
E
MAINS
I/O CONNECTOR
AUX
LINE A/B
LINE A/B
AC IN
AC GROUND
AC IN
1 A -PRIMARY H/PHONES (L)
2 A -PRIMARY H/PHONES (R)
3 A -SECONDARY H/PHONES (L)
4 A -SECONDARY H/PHONES (R)
5 A -H/PHONES GROUND
6 A -INTERCOM IN (+)
7 A -INTERCOM IN (-)
8 A -INTERCOM OUT (+)
9 A -INTERCOM OUT (-)
0 A -INTERCOM GROUND
LINE A/B
LINE A/B
LINE A/B
BREAK
MAKE
COMMON
1 B -STUDIO MONITOR (L+)
2 B -STUDIO MONITOR (L-)
3 B -STUDIO MONITOR (R+)
4 B -STUDIO MONITOR (R-)
5 B -MONITOR GROUND
6 B -CONTROL MONITOR (L+)
7 B -CONTROL MONITOR (L-)
8 B -CONTROL MONITOR (R+)
9 B -CONTROL MONITOR (R-)
0 B -REMOTE MUTE
LINE A/B
MIC / LINE
MIC / LINE
1 C -EXT 1 (L+)
2 C -EXT 1 (L-)
3 C -EXT 1 (R+)
4 C -EXT 1 (R-)
5 C -EXT 1 GROUND
6 C -EXT 2 (L+)
7 C -EXT 2 (L-)
8 C -EXT 2 (R+)
9 C -EXT 2 (R-)
0 C -EXT 2 GROUND
MIC / LINE
MIC / LINE
6.2.
Rear connection panel
220
34
7. TECHNICAL SPECIFICATIONS
Microphone inputs
Input impedance:
Input range:
Equivalent noise:
Fader attenuation:
Line input
Input impedance:
Input range:
Fader attenuation:
Insert input / output on BC -511
Output impedance:
Nominal output level:
Transformer balanced.
> 3 kΩ
- 94 dBv Fader max. Master 0. / - 17 dBv
< -123 dBv, 200 Ω, 20 Hz-20 kHz
- 00 / +12 dB.
Transformer balanced. Electronic symmetry on BC-522.
> 6,5 kΩ
-32 dBv Fader max. Master 0. / + 25 dBv
- 00 / +12 dB.
< 1,8 kΩ
- 6 dBv Input 0 dBv Fader 0. Master 0.
Output master + 4 dBv
Input impedance:
> 50 Ω
Input range:
-12 dBv Fader max. Master 0. / +25 dBv
Input / output telephone hybrid interface BC -533
Output impedance:
< 100 Ω
Output level:
+2 dBv Output master + 4 dBv
Master fader 0. Channel fader 0.
Phone channel send max. gain 533 max.
Input impedance:
> 8 kΩ
Input range:
-18 dBv Fader channel max. Master 0. / +25 dBv
External Inputs 1 and 2
Electronic symmetry.
Input impedance:
> 5 kΩ
Input level:
-2 dBv For 0 dBv at monitor output.
Send and equalization
Auxiliary send:
- 00 / +12 dBv
- 00 / 0 dBv on pre-fader.
Phone send:
- 00 / +12 dBv
Master send:
- 00 / +12 dBv
Equalization BC-511:
Low frequencies: +/- 16 dBv
High frequencies: +/- 16 dBv
Master and Auxiliary stereo outputs
Output impedance:
< 75 Ω
Nominal output level:
+4 dBv
Maximum output level:
+18 dBv: D < 0.2%, 30 Hz-20 kHz
+25 dBv: D < 0.2%, 60 Hz-20 kHz
+27 dBv: D < 0.2%, 72 Hz-20 kHz
3 dB Bandwidth:
20 Hz-20 kHz
Absolute output noise:
< - 70 dBv / 20 Hz / 20 kHz Fader master Max. All sends muted.
< - 80 dBv / 20 Hz/ 20 kHz Fader master 0. All sends muted.
< - 85 dBv / 20 Hz/ 20 kHz Fader master - 70. All sends muted.
Control room / studio room monitor outputs
Control room mon. output impedance:
< 75 Ω
Output level:
+4 dBv Max. monitor level. Master output +4 dBv
Absolute noise:
< -72 dBv
Headphones output impedance:
< 70 Ω
Output level:
+20 dBv H/Phones level max. Master output + 4 dBv
Intercom
Input impedance:
> 4 kΩ
Input sensitivity:
10 dBv
Output impedance:
< 75 Ω
Output level:
+25 dBv max.
Signalling BC-577
Power requirements:
110/220 V AC, +6% - 10%, 50 - 60 Hz.
Signalling voltage:
+24 V DC, 20 VA.
Power supply
Power requirements:
110/220 V AC, +6% - 10%, 50 - 60 Hz, 160 VA.
Dimensions
Height:
310 mm (12.20").
Width:
830 mm. (32.67").
Depth:
590 mm. (23.22").
Weight
Weight:
30 kg
35
BC-500
Broadcast Audio MIxer
8. EXAMPLES OF CONNECTIONS
8.1.
Examples of connections for broadcasting and similar purposes
In this section, we are going to give you a series of application examples for the AEQ BC500 audio mixing console. These can also be seen graphically as the figures are enclosed at
the end of this section.
The main application of this mixing console is in radio broadcast studios. Due to this fact,
and although it has possible application in other environments as mobile units, radio and TV
broadcasting, sound reinforcement, auxiliary microphone mixer, stereo line mixer, small
production, etc., we will describe the different wiring of progressive complexity, that connects
the console with the circuits and equipment that normally accompany the mixing console.
8.2.
Figures 1A y 1B
The figures 1A and 1B are describing the same connections of the mixing console.
In figure 1A the rear part of the console has been reproduced in its real proportions. Every
connector is accompanied by a number and an arrow that indicates the direction of the signal, in
or out. In this figure, we have also reproduced peripheral equipment that receives or sends
signals to the console. If we connect the numbers on the console and the peripherals, we obtain
the way the cable should be connected. This cable should be balanced and screened, and
connected to the console following the terminal numbering, serigraphed on its rear part for each
type of connector (see Section 6.2.), and to the peripheral as indicated by the manufacturer.
Figure 1B represents the same system as figure 1A, but with different and more schematic
symbols, and console and peripherals are physically connected with a line. As you can see, the
numbers and the arrows are identical to the ones in figure 1A.
The positioning of the devices that are described in figure 1B will introduce us to the later
comprehension of figure 2 and figure 3, these describing somewhat more complex situations.
Now we proceed with the description of the studio represented in figures 1A and 1B.
8.2.1.
The mixer
The BC-500 audio mixing console, in its standard configuration, for which the examples of
connections has been elaborated, is assembled on a chassis with capacity to house 20
modules, one of them, the monitor module, in a special width (3 times the other modules).
The first 4 modules are mono mic/line modules ( BC-511).
The fifth module is a blank module (BC-502) to give space for future expansion of additional
input modules.
The sixth to the eleventh are double stereo line input modules (BC-522).
The twelfth module is a blank module (BC-502) to give space for future expansion of
additional input modules.
The thirteenth module is a telephone line I/O module (BC-533).
The fourteenth module is an auxiliary stereo + mono sum output module (BC-540).
The fifteenth module is a master program stereo + mono sum output module (BC-560).
The sixteenth and seventeenth module included are blank modules (BC-502).
The eighteenth module is the power supply and monitoring module (BC-578).
36
BC-500
Broadcast Audio MIxer
8.2.2.
The connections
Bear in mind that the symbol (E) represents an incoming signal, (S) an outgoing signal and
(E/S) and incoming / outgoing signal.
In examples 1A and 1B we have made the following connections:
FIRST CHANNEL (BC-511).
Cable M1(E) connects the self-operation microphone used in the control room to the MIC input.
Cable 01(E) connects, for example, a microphone line, dedicated line or point to point line to the LINE input.
Cables 41(S) and 42(E) connect, for example, a personal multi-effect for the announcers voice to the insertion point
of the channel to insert a loop.
SECOND CHANNEL (BC-511).
Cable M2(E) connects the main studio microphone for use in studio room to the MIC input.
Cable 02(E) connects, for example, a microphone line, dedicated line or point to point line input to the LINE input.
Cables 43(S) and 44(E) connect, for example, a personal multi-effect for the announcers voice to the insertion point
of the channel to insert a loop.
THIRD CHANNEL (BC-511).
Cable M3(E) connects a guest studio microphone for use in studio to the MIC input, without selecting self-operation
mode when it is used, thus muting studio monitors when this microphone is opened.
Cable 03(E) connects, for example, a microphone line, dedicated line or point to point line input to the LINE input.
No connection to the insertion point has been made.
FOURTH CHANNEL (BC-511).
Cable M4(E) connects a guest studio microphone for use in studio room to the MIC input.
Cable 04(E) connects, for example, a microphone line, dedicated line or point to point line input to the LINE input.
No connection to the insertion point has been made.
SIXTH CHANNEL (BC-522).
Cables 05(E) and 06(E) connect a stereo line (in this case a tape recorder output) to line input A.
Cables 07(E) and 08(E) connect a stereo line (in this case an external stereo line) to line input B.
SEVENTH CHANNEL (BC-522).
Cables 09(E) and 10(E) connect a stereo line (in this case a DAT player output) to line input A.
Cables 11(E) and 12(E) connect a stereo line (in this case a satellite receiver output) to line input B.
EIGHTH CHANNEL (BC-522).
Cables 13(E) and 14(E) connect a stereo line (in this case compact disc player 1 output) to line input A.
Cables 15(E) and 16(E) connect a stereo line (in this case the RIIA output of turntable 1) to line input B.
NINTH CHANNEL (BC-522).
Cables 17(E) and 18(E) connect a stereo line (in this case compact disc player 2 output) to line input A.
Cables 19(E) and 20(E) connect a stereo line (in this case the RIIA output of turntable 2) to line input B.
TENTH CHANNEL (BC-522).
Cables 21(E) and 22(E) connect a stereo line (in this case a cartridge recorder output) to line input A.
Cables 23(E) and 24(E) connect a stereo line (in this case a cassette deck output) to line input B.
ELEVENTH CHANNEL (BC-522).
Cables 25(E) and 26(E) connect a stereo line (in this case a cartridge player output) to line input A.
Cables 27(E) and 28(E) connect a stereo line (in this case a video recorder or TV set stereo audio output) to line
input B.
THIRTEENTH CHANNEL (BC-533).
Cable H1(S) connects the audio input of a telephone hybrid to the channel output.
Cable H2(E) connects the audio output of a telephone hybrid to the channel input.
Cable RI(E/S) connects the remote control of the telephone hybrid.
FOURTEENTH CHANNEL (BC-560).
Cable 29(S): in this specific case, this output is not being used. However, it can be used to send a mono program
signal to a spare link, for example.
Cable 30(S) connects the left input of a compressor-limiter to the left program output.
Cable 31(S) connects the right input of a compressor-limiter to the right program output.
FIFTEENTH CHANNEL (BC-540)
Cable 32(S) connects the auxiliary mono output to an outgoing mono line, for example, dedicated or point to point
line.
Cable 33(S) connects the left auxiliary programme output to the left input of recording devices (tape recorders, DAT,
cartridge recorders, cassette decks, etc.).
Cable 34(S) connects the right auxiliary programme output to the right input of recording devices (tape recorders,
DAT, cartridge recorders, cassette decks, etc.).
Signals 33 and 34 are distributed to all recording devices.
37
BC-500
Broadcast Audio MIxer
SIXTEENTH CHANNEL (BC-578) (occupies the space of three modules)
Cables 35(E) and 36(E) are connected to the stereo output of the tuner for program monitoring.
Cables 37(E) and 38(E) are connected to the stereo output of a second tuner for program monitoring.
Cable 39(E) is connected to the output of an intercom control.
Cable 40(S) is connected to the input of an intercom control.
Cable AS(S) is connected to the headphone level control for the guests in the studio room.
Cable RM(S) is connected to the remote mute switch.
Cable AC1(S) is connected to the left input of the control room monitor amplifier.
Cable AC2(S) is connected to the right input of the control room monitor amplifier.
Cable AL1(S) is connected to the left input of the studio room monitor amplifier.
Cable AL2(S) is connected to the right input of the studio room monitor amplifier.
Cable C(S) is connected to one of the 24 V connectors on the BC-577.
Cable M(S) is connected to the “on air” signalling lamps.
Cable B(S) is connected to the “off air” signalling lamps.
The physical connections are described in Section 6.2.
NINETEENTH CHANNEL (BC-577)
Cable 24V(S) connects to ground of the signalling lamps to the free 24 V connector.
OTHER CONNECTIONS NOT IN RELATION WITH THE MIXING CONSOLE
Cable T(E/S) connects the telephone line output of the telephone hybrid with the telephone set.
Cable LT(E/S) connects the telephone line input of the telephone hybrid with the telephone line.
38
BC-500
Broadcast Audio MIxer
8.3.
Figures 2 and 3
Figure 2, with similar symbols as figure 1B, shows a main studio corresponding to a small
station consisting in two studios. A 2x24 connector patch panel receives all signals from the
studios and interconnects them and the outside.
Figure 3, with equal symbols, shows a single studio with its equipment. A 2x48 connector
patch panel connects all equipment for internal studio use.
41
BC-500
Broadcast Audio Mixer
9. DIMENSIONS
NOTE: All dimensions are in millimetres.
44
BC-500
Broadcast Audio Mixer
10. DELIVERY PART LIST
10.1. Jumper programming configuration
45
BC-500
Broadcast Audio Mixer
JUMPER STANDARD CONFIGURATION
Module
BC-511
PDP 1
ON
PDP 2
OFF
PDP 3
OFF
PDP 4
ON
PDP 5 (1-2)
ON
PDP 5 (2-3)
OFF
PDP 6 (1-C)
ON
PDP 6 (3-C)
OFF
PDP 7 (2-C)
OFF
Module
BC-522
PDP 1
ON
PDP 2
OFF
PDP 3
ON
PDP 4
OFF
PDP 5 (2-C)
OFF
PDP 6 (1-C)
ON
PDP 6 (3-C)
OFF
PDP 7
ON
PDP 8
OFF
Module
BC-533
PDP 1
ON
PDP 2
OFF
PDP 3
OFF
PDP 4
OFF
PDP 5
OFF
Module
BC-560
PDP 1
ON
PDP 3
ON
PDP 5
ON
PDP 7
ON
PDP 9
ON
PDP 11
ON
PDP 13
ON
PDP 15
ON
Module
BC-540
PDP 2
ON
PDP 4
ON
PDP 6
ON
PDP 8
ON
PDP 10
ON
PDP 12
ON
PDP 14
ON
PDP 16
ON
Module
BC-578
(Control)
PDP 1
ON
Module
BC-578
(Talkback)
PDP 1
ON
PDP 2
OFF
PDP 3
ON
PDP 4
ON
PDP 5
OFF
PDP 6
OFF
PDP 7
ON
PDP 8
ON
Module
Vu-Master
PDP 1 (1-C)
ON
PDP 2
OFF
PDP 3 (1-C)
ON
PDP 4
OFF
Module
Vu-PFL
PDP 1 (3-C)
OFF
PDP 2
ON
PDP 3 (3-C)
OFF
PDP 4
ON
BC-500
Broadcast Audio Mixer
PDP 9
OFF
PDP 10
OFF
46
10.2. Delivery part list
The BC-500 audio mixing console is delivered in a standard configuration as described in
section 4.2, but can also be delivered with the configuration the customer requests.
Together with the mixing console is delivered a user's manual and spare fuses for both 110
and 220 V AC.
47
BC-500
Broadcast Audio Mixer
APPENDIX: A.E.Q. WARRANTY
AEQ guarantees that this product has been designed and manufactured under a certified Quality
Assurance System and according to the ISO 9001/2002 Standard. AEQ therefore Guarantees that
the necessary test protocols to assure the proper operation and the specified technical
characteristics of the product have been followed and accomplished. This includes that the general
protocols for design and production and the particular ones for this product are conveniently
documented.
1. - The present guarantee does not exclude or limit in any way any legally recognized right of the
client.
2. - The period of guarantee is defined to be twelve natural months starting from the date of
purchase of the product by the first client. To be able to apply to the established in this guarantee, it
is compulsory condition to inform the authorized distributor or –to its effect- an AEQ Sales office or
the Technical Service of AEQ within thirty days of the appearance of the defect and within the period
of guarantee, as well as to facilitate a copy of the purchase invoice and serial number of the product.
It will be equally necessary the previous and expressed conformity from the AEQ Technical Service
for the shipment to AEQ of products for their repair or substitution in application of the present
guarantee. In consequence, return of equipment that does not comply with these conditions will not
be accepted.
3. -AEQ will at its own cost repair the faulty product once returned, including the necessary labour to
carry out such repair, whenever the failure is caused by defects of the materials, design or
workmanship. The repair will be carried out in any of the AEQ authorized Technical Service Center.
This guarantee does not include the freight charges of the product to or from such Authorized
Technical Service Center.
4. – No Extension of the Guarantee Period for repaired product shall be applied. Nor shall a
Substituted Products in application of this Guarantee be subject to Guarantee Period Extension.
5. - The present guarantee will not be applicable in the following situations:
Improper use or Contrary use of the product as per the User or Instruction Manual; violent
manipulation; exhibition to humidity or extreme thermal or environmental conditions or sudden
changes of such conditions; electrical discharges or lightning; oxidation; modifications or not
authorized connections; repairs or non-authorized disassembly of the product; spill of liquids or
chemical products.
6. - Under no circumstances, whether based upon this Limited Guarantee or otherwise, shall AEQ,
S.A. be liable for incidental, special, or consequential damages derived from the use or from the
impossibility of using the product.
AEQ shall not be liable for loss of information in the disks or data support that have been altered or
found to be inexact, neither for any accidental damage caused by the user or other persons
manipulating the product.
48
BC-500
Broadcast Audio Mixer