1
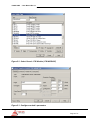
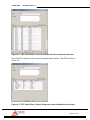
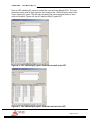
1756HP-CNV
USER MANUAL
Rev 1.1 – December 2007
1756HP-CNV - User Manual Rev 1.1
Table of Contents
Chapter 1
Chapter 2
Chapter 3
Chapter 4
Chapter 5
Chapter 6
Introduction.......................................................................................................3
Module Accessories .........................................................................................4
Module Operation.............................................................................................5
Installing the Module ........................................................................................6
Configuring the Module ....................................................................................7
I/O Address Map ............................................................................................10
Appendix A UDT Example.................................................................................................13
Appendix B Specifications .................................................................................................17
.
Page 2 of 17
1756HP-CNV - User Manual Rev 1.1
CHAPTER 1
INTRODUCTION
The 1756HP-KeyID is the KeyID Master module for the Allen-Bradley ControlLogix PLC
system that communicates with up to 30 KeyID slave modules. This enables the detection
of the KeyID status at each slave.
This document serves to describe the functionality, installation, configuration and use of
the module.
.
Page 3 of 17
1756HP-CNV - User Manual Rev 1.1
CHAPTER 2
MODULE ACCESSORIES
The module interfaces to the network via the RJ45 port located on the front of the module.
The required cable is supplied with the module.
Each 1756HP-KeyID package includes the following components:
•
•
•
1756HP-KeyID module
3m Cable
1756HP-KeyID user manual
Alphanumeric Display
Status LED’s
RJ45 Port
.
Page 4 of 17
1756HP-CNV - User Manual Rev 1.1
CHAPTER 3
MODULE OPERATION
The 1756HP-KeyID module is designed to operate within the Allen-Bradley ControlLogix
PLC system. All power required for the module’s operation is derived from the 1756
backplane.
The 1756HP-KeyID master module will communicate by broadcasting a packet to all of the
slaves. The slaves will then reply in turn, according to address, with all the necessary
information. Should a slave not reply, a flag will be set indicating that it is offline. Should
the slave reply in future transmissions, it will be marked as online again.
The current status of the module is conveyed to the user by means of the 3 bi-color Status
LED’s and the alphanumeric LED display.
.
Page 5 of 17
1756HP-CNV - User Manual Rev 1.1
CHAPTER 4
INSTALLING THE MODULE
The module is equipped with a RIUP (Removal and Insertion Under Power) circuitry
enabling the module to be installed or removed from the chassis while power is applied.
Attach the cable to the module via the RJ45 connector. Connect the communication wires
Blue (A), White/Blue (B), Brown (Ground) to the correct bus terminals of the 4-wire
communications bus that runs to the slaves.
Once the module powers up, it will immediately look at the parameters defined and start
searching for the KeyID slaves as set out in the parameters.
.
Page 6 of 17
1756HP-CNV - User Manual Rev 1.1
CHAPTER 5
5.1.
CONFIGURING THE MODULE
Establishing the Direct Connection
This section describes the procedures necessary to configure the 1756HP-KeyID module
within the ControlLogix system. Each 1756HP-KeyID module must be owned by a single
ControlLogix controller.
The 1756 Generic Module is used in RSLogix5000 to configure the module. The
configuration of the module is detailed in the table below.
CommFormat
Description
Input
Output
Configuration
Min
Data Format
Data – INT
Connection parameters
Instance
1
2
4
RPI
5 msec
Max
Size
192
38
0
750.0 msec
Table 5.1 : 1756HP-KeyID connection parameters.
The steps required to add a new 1756HP-KeyID module are detailed below.
Figure 5.1 : Right-click on I/O Configuration and select New Module
.
Page 7 of 17
1756HP-CNV - User Manual Rev 1.1
Figure 5.2 : Select Generic 1756 Module (1756-MODULE)
Figure 5.3 : Configure module’s parameters
.
Page 8 of 17
1756HP-CNV - User Manual Rev 1.1
Figure 5.4 : Configure module’s RPI (Requested Packet Interval)
Once a modules configuration data has been downloaded to the controller, it will attempt
to establish a connection with the module. A connection will fail if there is inappropriate
configuration data.
.
Page 9 of 17
1756HP-CNV - User Manual Rev 1.1
I/O ADDRESS MAP
CHAPTER 6
The input and output image of the 1756HP-KeyID module is defined in the following
sections. Appendix A provides an example UDT that can be used to extract and view the
data.
6.1.
Bit
Int
0
1
2
3
4
5
6
7
8
9
10
11
12
13
14
15
16
17
12
.
.
.
.
174
175
176
177
178
179
180
.
.
.
.
191
Input Image
15
14
13
12
11
10
9
8
7
6
5
4
3
2
1
0
Reserved
Reserved
Online (Int 1)
Online (Int 2)
Reserved
Reserved
Slave 1 Status
Slave 1 Voltage
Slave 1 Temperature
Slave 1 KeyID Status
Slave 1 Analogue Input 1
Slave 1 Analogue Input 2
Slave 2 Status
Slave 2 Voltage
Slave 2 Temperature
Slave 2 KeyID Status
Slave 2 Analogue Input 1
Slave 2 Analogue Input 2
Slave 3 Status
.
.
.
.
Slave 30 Status
Slave 30 Voltage
Slave 30 Temperature
Slave 30 KeyID Status
Slave 30 Analogue Input 1
Slave 30 Analogue Input 2
Reserved
.
.
.
.
Reserved
Table 6.1 : Input image.
.
Page 10 of 17
1756HP-CNV - User Manual Rev 1.1
Int 0: Reserved
Int 1: Reserved
Int 2: Online – Bit 0 indicates if the slave with address 1 is online (1 – online, 0 – offline);
Bit 1 indicates if the slave with address 2 is online; this continues to Bit 15,
which holds the online status of the slave with address 16.
Int 3: Online – Same as above, with Bit 0 providing the online status of the slave with
address 17 and ends with Bit 13 for slave address 30.
Int 4: Reserved
Int 5: Reserved
Int 6: Slave 1 Status bits.
Int 7: Slave 1 Voltage – Indicates the supply voltage on the bus.
Int 8: Slave 1 Temperature – Indicates the temperature of the slaves enclosure.
Int 9: Slave 1 KeyID Status – Bit 0 to 7 indicates the KeyID input status in their respective
order. Bit 8 indicates the output 1 and Bit 9 the output 2 status.
Int 10: Slave 1 Analogue Input 1 – Gives the analogue 1 input voltage (0-10V) as a 10bit
number (10V = 1023).
Int 11: Slave 1 Analogue Input 2 – Gives the analogue 2 input voltage (0-10V) as a 10bit
number (10V = 1023).
Int 12 – 179: Repetition of Int 6 to 11 for each slave as shown in table 6.1.
Int 180 - 191: Reserved
.
Page 11 of 17
1756HP-CNV - User Manual Rev 1.1
6.2.
Bit
Int
0
1
2
3
4
5
6
7
8
9
.
.
.
.
35
36
37
Output Image
15
14
13
12
11
10
9
8
7
6
5
4
3
2
1
0
Reserved
Reserved
Reserved
Maximum Slaves
Control (Int 1)
Control (Int 2)
Slave 1
Slave 2
Slave 3
Slave 4
.
.
.
.
Slave 30
Reserved
Reserved
Table 6.2 : Output image.
Int 0: Reserved
Int 1: Reserved
Int 2: Reserved
Int 3: Maximum Slaves – Used to enter the address of the last slave on the line. Slaves
with an address higher than this address will not be scanned.
Int 4: Control – Bit 0 indicates if the slave with address 1 must be polled again if removed
from the scan list as indicated in Int 2 and 3 of the input image (1 – scan
again, 0 – ignore); Bit 1 indicates the scan status for slave 2 and this
continues to Bit 15, which holds the scan status for slave 16.
Int 5: Control – Same as above, with Bit 0 providing the scan status of the slave with
address 17 and this ends with Bit 13 for slave address 30.
Int 6: Slave 1 - Used to send the output status that slave 1 should have. Bit 0 will change
the output status of Output 1 and Bit 1 will change the output status of
Output 2.
Int 7: Slave 2 - Used to send the output status that slave 2 should have. Bit 0 will change
the output status of Output 1 and Bit 1 will change the output status of
Output 2.
Int 8 - 35: Repetition of Int 6 and 7 for all the slaves (to address 30) as shown in table 6.2
above.
Int 36: Reserved
Int 37: Reserved
.
Page 12 of 17
1756HP-CNV - User Manual Rev 1.1
APPENDIX A
UDT EXAMPLE
See Figure A.1 below on how to create a new User Defined Type.
Figure A.1 : Creating a new User Defined Data Type
Create the first UDT called Slaves. This UDT consists of 32 bits with each Slave being
represented by a bit. This will be used to indicate the online status of the slaves. This is
detailed in Figure A.2 below. The last 2 bits will not have slave address and can be named
not used.
.
Page 13 of 17
1756HP-CNV - User Manual Rev 1.1
Figure A.2 : UDT called Slaves. Used to indicate the online status of each slave.
The next UDT is created to set out each individual slave’s values. The UDT is shown in
Figure A.3.
Figure A.3 : UDT called Slave_Values. Shows the values obtained from the slave.
.
Page 14 of 17
1756HP-CNV - User Manual Rev 1.1
Next an UDT called KeyID_Inputs is created that uses all of the defined UDT’s. The copy
instruction will be used to copy the entire Input Image of the 1756HP-KeyID module into a
Tag of type KeyID_Inputs. This will make accessing the values and information of each
slave much easier. Figures A.4 and A.5 detail the KeyID_Inputs UDT.
Figure A.4 : UDT called KeyID_Inputs. Shows the first half of the UDT.
Figure A.5 : UDT called KeyID_Inputs. Shows the last half of the UDT.
.
Page 15 of 17
1756HP-CNV - User Manual Rev 1.1
Next an UDT called KeyID_Outputs is created. The copy instruction will be used to copy
the entire Output Image of the 1756HP-KeyID module into a Tag of type KeyID_Outputs.
This will make accessing the values and information of each slave much easier. Figures
A.6 and A.7 detail the KeyID_Outputs UDT.
Figure A.6 : UDT called KeyID_Outputs. Shows the first half of the UDT.
Figure A.7 : UDT called KeyID_Outputs. Shows the last half of the UDT.
.
Page 16 of 17
1756HP-CNV - User Manual Rev 1.1
APPENDIX B
SPECIFICATIONS
Parameter
Specification
General
Module Location
Backplane Current
RPI
Any Slot
Electrical
515mA @ 5.1V
3mA @ 24V
Schedules Connection Parameters
5ms to 750ms
(………………./// end of document )
.
Page 17 of 17