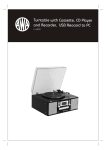
1
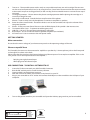
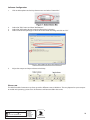
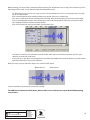
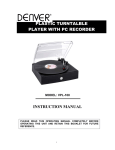
User Manual
USB Turntable Converter
AFTER SALES SUPPORT
GB
0333 200 5846
IRE
1890 917 060
[email protected]
MODEL: 1393 PC: 67421 11/2015
• USB Turntable
• USB cable
• Software CD
• RCA cable
• 45 rpm adaptor
• Extra stylus
• User Manual
YEAR WARRANTY
CONTENTS
INTRODUCTION...........................................................................................................................................................................4
Welcome.....................................................................................................................................................................................4
GENERAL INFORMATION AND SAFETY INSTRUCTIONS..............................................................................................4
TURNTABLE PARTS......................................................................................................................................................................5
GETTING STARTED .....................................................................................................................................................................6
Mains connection....................................................................................................................................................................6
Phones output/RCA out........................................................................................................................................................6
USB connection - to install software to PC.....................................................................................................................6
Playing a record.......................................................................................................................................................................7
MAINTENANCE ........................................................................................................................................................................7
Replacing the tone arm head.............................................................................................................................................7
AUDACITY QUICK GUIDE..........................................................................................................................................................9
Please note................................................................................................................................................................................9
Installing Software..................................................................................................................................................................9
Software Configuration..................................................................................................................................................... 10
Please note............................................................................................................................................................................. 10
Setting recording sound levels....................................................................................................................................... 11
Windows XP............................................................................................................................................................................ 11
Windows Vista........................................................................................................................................................................ 11
Windows 7.............................................................................................................................................................................. 11
Making a recording............................................................................................................................................................. 11
Audio Levels........................................................................................................................................................................... 12
Toolbars.................................................................................................................................................................................... 14
Audio Control Buttons........................................................................................................................................................ 15
Edit Toolbar............................................................................................................................................................................. 15
Saving a project.................................................................................................................................................................... 17
Save project............................................................................................................................................................................ 17
Save project as ..................................................................................................................................................................... 17
Export as WAV........................................................................................................................................................................ 17
Export as MP3 ....................................................................................................................................................................... 17
Export as Ogg Vobis............................................................................................................................................................ 17
AFTER SALES SUPPORT
GB
0333 200 5846
IRE
1890 917 060
[email protected]
MODEL: 1393 PC: 67421 11/2015
• USB Turntable
• USB cable
• Software CD
• RCA cable
• 45 rpm adaptor
• Extra stylus
• User Manual
2
YEAR WARRANTY
TIPS FOR BETTER TURNTABLE PERFORMANCE............................................................................................................ 18
FAQ................................................................................................................................................................................................. 18
DISPOSAL.................................................................................................................................................................................... 19
WARRANTY CARD.................................................................................................................................................................... 20
AFTER SALES SUPPORT
GB
0333 200 5846
IRE
1890 917 060
[email protected]
MODEL: 1393 PC: 67421 11/2015
• USB Turntable
• USB cable
• Software CD
• RCA cable
• 45 rpm adaptor
• Extra stylus
• User Manual
3
YEAR WARRANTY
INTRODUCTION
This USB Turntable Converter makes digitising vinyl records a breeze. Transfer vinyl records to digital format in a
few minutes to your PC.
Welcome
You have made an excellent choice with the purchase of this quality EnVivo brand product.
By doing so you now have the assurance and peace of mind which comes from purchasing a product that has
been manufactured to the highest standards of performance and safety, supported by the high quality standards of Aldi.
We want you to be completely satisfied with your purchase so this EnVivo product is backed by a comprehensive
manufacturer’s 3 year warranty and an outstanding after sales service through our dedicated Helpline.
We hope you will enjoy using your purchase for many years to come.
If you require technical support or in the unlikely event that the purchase you have made is faulty, please telephone our Helpline for immediate assistance. Faulty product claims made within the 3 year warranty period
will be repaired or replaced free of charge provided that you have satisfactory proof of purchase (keep your till
receipt safe!) This does not affect your statutory rights.
However, be aware that the warranty will become null and void if the product is found to have been deliberately
damaged, misused or disassembled.
GENERAL INFORMATION AND SAFETY INSTRUCTIONS
Read all safety information below and operating instruction before using this USB Turntable Converter to avoid
any damages to your device.
1.
Do not drop, disassemble, open, crush, bend, deform, puncture, shred, microwave, incinerate, paint, or insert foreign objects into this device.
2.
Do not expose the Turntable to moisture or submerge it in liquid. Keep it dry at all times.
3.
Always keep the product out of reach of babies and children, in order to avoid any dangerous situation.
AFTER SALES SUPPORT
GB
0333 200 5846
IRE
1890 917 060
[email protected]
MODEL: 1393 PC: 67421 11/2015
• USB Turntable
• USB cable
• Software CD
• RCA cable
• 45 rpm adaptor
• Extra stylus
• User Manual
4
YEAR WARRANTY
TURNTABLE PARTS
1.
2.
3.
4.
5.
45 RPM Adapter Holder – Holds the included 45 RPM adapter. When not using the adapter, please place it
in this holder.
Lift lever – Use this lever to raise or lower the tone arm.
33.3 / 45/ 78 Switch – This switch controls the RPM of the turntable platter.
Speakers – These are the speakers for the turntable. Adjust the volume using the Power and Volume Control Knob(10)
Arm Clip – This specially designed arm clip secures the tone arm while at rest or when not in use. The arm
clip has been designed to remain in the up position while unlocked.
AFTER SALES SUPPORT
GB
0333 200 5846
IRE
1890 917 060
[email protected]
MODEL: 1393 PC: 67421 11/2015
• USB Turntable
• USB cable
• Software CD
• RCA cable
• 45 rpm adaptor
• Extra stylus
• User Manual
5
YEAR WARRANTY
6.
7.
8.
9.
10.
11.
12.
13.
14.
15.
Tone arm – The turntable comes with a ready to use pre-balanced tone arm and cartridge. The tone arm
can be raised and lowered by hand, or by using the raise / lower lever. Please note that the tone arm needs
to be moved away from resting position (on the arm clip) for the turntable motor to activate if auto stop is
activated.
Cartridge & protector – Please remove the plastic cartridge protector before placing the cartridge on a
record by sliding it forward.
Auto Stop on/off control- Control the Auto stop function of the platter.
Phones - Listen to vinyl music by headphone or connect to amplifier or speakers
Power & volume control knob – Rotate the knob to turn on the turntable and adjust the volume of the
integrated speakers.
Platter – Place your record here. Please use the 45 RPM adapter, if the spindle is the incorrect size.
Transparent Dust Cover – To protect turntable against dust.
USB jack – Link to PC for recording and editing by USB cable.
RCA Output – Use to connect to external speakers/amplifier (not included).
AC Power cord –Use to connect to the wall power outlet.
GETTING STARTED
Mains connection
Ensure that the mains voltage of your home corresponds to the operating voltage of the unit.
Phones output/RCA out
The Turntable Converter can be connected to amplifier or speakers by 3.5mm earphone jack on the front panel
or through RCA sockets at the back.
Please note that the sound may be distorted when using Phone input on for example an amplifier. If this is the
case, please use an AUX input instead on the amplifier.
•
•
Red plug into right channel input
White plug into left channel input
USB CONNECTION - TO INSTALL SOFTWARE TO PC
1.
2.
3.
4.
5.
Insert the CD that came with your USB Turntable Converter.
Run the file “audacity.exe” to install Audacity software.
Once installed, run the Audacity program.
With the software installed, you can record vinyl records to your PC.
Plug in your turntable to an AC outlet and connect the USB port on the turntable to the USB port of your
computer.
6.
Turn on the power switch on your turntable and open the Audacity program that you have installed.
AFTER SALES SUPPORT
GB
0333 200 5846
IRE
1890 917 060
[email protected]
MODEL: 1393 PC: 67421 11/2015
• USB Turntable
• USB cable
• Software CD
• RCA cable
• 45 rpm adaptor
• Extra stylus
• User Manual
6
YEAR WARRANTY
Playing a record
1.
2.
3.
4.
5.
6.
7.
8.
9.
10.
11.
12.
13.
Open the lid of your turntable.
Place the record of your choice on the turntable. If it is a 45 rpm, do not forget to place the adapter on the
record spindle.
Select the speed of record: 33.3, 45 and 78rpm according to vinyl to be played.
Activate the turntable by rotating the POWER/VOL knob.
Rotate the AUTO STOP knop to the desired function ON or OFF. When the switch is at the ON position the
turntable will automatically stop when the song on the record is finished. When it is at OFF position it will
NOT stop automatically, this may help to play some long recorded vinyl which cannot be played to the
end when AUTO STOP is set to ON.
Remove the stylus protection.
Release the tone arm lock and lift the tone arm using the lift lever.
Lightly push in the arm with your hand.
Place the cartridge vertically over the first track of the record, and the turntable will start turning automatically.
Put down the cartridge slowly to the record then the turntable will play.
Rotate the POWER/VOL know to get desired sound level.
When records comes to the end, record will stop automatically if the AUTO STOP knob is set to ON.
If the Auto Stop knob is set to OFF, the record will rotate all the way when finished.
After playing a record please do the following
- Lift up the tone arm and put it on the rest position.
- Place the protective cap on the stylus and close the tone arm lock.
- Turn off the power.
MAINTENANCE
Replacing the cartridge
-
Refer to the figures 1-8
Push the
arm lock
to
release the tone-arm.
Remove the plastic cap
to access the stylus.
Separate the cartridge
from the socket lightly.
Take off the audio-line
from the cartridge.
To fit a new cartridge, carry out the actions in reverse: Insert the audio line accordingly and gently install the cartridge.
AFTER SALES SUPPORT
GB
0333 200 5846
IRE
1890 917 060
[email protected]
MODEL: 1393 PC: 67421 11/2015
• USB Turntable
• USB cable
• Software CD
• RCA cable
• 45 rpm adaptor
• Extra stylus
• User Manual
7
YEAR WARRANTY
Replacing the stylus
-
Refer to the figures 1-7
Push the arm lock to
release the tone-arm.
Remove the plastic cap
to access the stylus.
Separate the cartridge
from the socket lightly.
Take off the audio-line
from the cartridge.
To fit a new stylus, carry out the actions in reverse: Mount the new stylus on the cartridge and gently install the cartridge.
Notes
•
•
•
•
We advise you to clean your records with an anti-static cloth to gain maximum enjoyment from them and
to ensure they last.
We would also point out that for the same reason your stylus should be replaced periodically (approximately every 250 hours)
Dust the stylus from time to time using a very soft brush dipped in alcohol (brushing the tone arm head
from back to front)
If the sound is bad or the music jumps, then try and carefully bend the stylus head down to make sure it
has full contact with the LP.
Press down for
maximum contact
When transporting your record player do not forget to:
•
•
Replace the protective cap on the stylus.
Lock the tone arm using the tone arm lock.
AFTER SALES SUPPORT
GB
0333 200 5846
IRE
1890 917 060
[email protected]
MODEL: 1393 PC: 67421 11/2015
• USB Turntable
• USB cable
• Software CD
• RCA cable
• 45 rpm adaptor
• Extra stylus
• User Manual
8
YEAR WARRANTY
AUDACITY QUICK GUIDE
For the complete and latest manual, as well as the latest version of software, please go to the following website:
www.audacityteam.org
Please click on help and documentation to obtain the manual.
Before recording and editing the music, please install the supplied Software or the latest version from the website.
Please note
The appearance and functionality of the software may be altered through the various versions available from
the website. This manual was correct as of Audacity version 1.2.6.
Installing Software
1.
2.
3.
Insert the enclosed software CD.
Your computer will auto-run the program. Follow the instructions to complete the installation.
If your computer does not auto run, click on the “Start” menu, select “Run” and choose the CD located on
your computer and run “Setup.exe”.
Run the Audacity program.
Double-click on the Audacity program and the Audacity interface window will be displayed on your computer screen.
AFTER SALES SUPPORT
GB
0333 200 5846
IRE
1890 917 060
[email protected]
MODEL: 1393 PC: 67421 11/2015
• USB Turntable
• USB cable
• Software CD
• RCA cable
• 45 rpm adaptor
• Extra stylus
• User Manual
9
YEAR WARRANTY
Software Configuration
1.
Click on Microphone in the drop down menu and select “Stereo Mix”.
2.
3.
4.
Select the “Edit” menu and then “Preferences”.
Select the “USB audio device” under the “Recording” selection.
Select “Software Playthrough” to hear the audio while recording and click on “OK”
5.
Adjust the output and input volume in Audacity.
Please note
The USB Turntable Converter may show up with a different name in Windows. This may depend on your computer model and operating system. 99% of the time it will contain USB in the name.
AFTER SALES SUPPORT
GB
0333 200 5846
IRE
1890 917 060
[email protected]
MODEL: 1393 PC: 67421 11/2015
• USB Turntable
• USB cable
• Software CD
• RCA cable
• 45 rpm adaptor
• Extra stylus
• User Manual
10
YEAR WARRANTY
Setting recording sound levels
It is VERY important that the sound levels are set correctly in Windows, otherwise the sound recorded through
Audacity will be distorted.
Windows XP
Click the start menu, go to control panel, select sounds and sound levels, select sound units. Under Sound recording, click volume.
Set the volume very low, e.g 2 or 3 to begin with, start playback of a record and adjust the sound level so that
the sound is not distorted.
Windows Vista
Click the start bubble, go to control panel, select hardware and sound, select sound, select recording, select the
turntable input, normally USB PnP Audio Device and click on properties Click on levels
Set the volume very low, e.g. 2 or 3 to begin with, start playback of a record and adjust the sound level so that
the sound is not distorted.
Windows 7
Click the start bubble, go to control panel, select hardware and sound, select Sound, select recording, select the
turntable input, normally Microphone, 2 USB PnP Audio Device and click on properties. Click on levels. Set the
volume very low, e.g. 2 or 3 to begin with, start playback of a record and adjust the sound level so that the sound
is not distorted. If no sound is heard when the playback is started, please click on listen and select listen to this
unit, select apply and try again.
After you complete the above settings, you are ready to start recording.
Making a recording
1.
2.
3.
4.
5.
6.
With the software installed, you can record vinyl records to your PC.
Plug in your turntable to an AC outlet and connect the USB port on the turntable to an USB port of your
computer.
Power on your turntable and open the Audacity program.
Press the record button
on the toolbar to start recording while your record is playing.
You will see the waveform of the audio on the screen as it is recording. You will hear the audio coming
from the output of your computers soundcard. (Make sure Software Playthrough is selected in the settings. Please see chapter Software Configuration)
Press the stop button on the toolbar to stop recording.
AFTER SALES SUPPORT
GB
0333 200 5846
IRE
1890 917 060
[email protected]
MODEL: 1393 PC: 67421 11/2015
• USB Turntable
• USB cable
• Software CD
• RCA cable
• 45 rpm adaptor
• Extra stylus
• User Manual
11
YEAR WARRANTY
Editing your recording
Audio Levels
Select your entire recording by selecting “Edit,” then “Select…” then click “All.”
Select the “Effect” menu and choose the desired effect. There are various types of effects which are described
further on Audacity’s website.
Selecting “Normalize” should be used to have Audacity auto-correct volume on the recording.
AFTER SALES SUPPORT
GB
0333 200 5846
IRE
1890 917 060
[email protected]
MODEL: 1393 PC: 67421 11/2015
• USB Turntable
• USB cable
• Software CD
• RCA cable
• 45 rpm adaptor
• Extra stylus
• User Manual
12
YEAR WARRANTY
Noise Reduction
Drag your cursor over a portion of the audio track which contains unwanted noise. We recommend using the
beginning or end of a track where there is no music and only noise.
-
Select “Effect” and then “Noise Removal” from the drop down menu to bring up the “Noise Removal Window”.
-
-
-
Click “Get Noise Profile” and the window will close automatically.
Select the entire track of audio you wish to remove noise from.
Adjust the amount of audio that you would like to filter by moving the slider in the “Noise Removal” window. We recommend using the minimum noise removal for optimum sound.
Note: You can preview the audio before removing the noise by clicking on ‘Preview’.
AFTER SALES SUPPORT
GB
0333 200 5846
IRE
1890 917 060
[email protected]
MODEL: 1393 PC: 67421 11/2015
• USB Turntable
• USB cable
• Software CD
• RCA cable
• 45 rpm adaptor
• Extra stylus
• User Manual
13
YEAR WARRANTY
-
Click on ‘Remove Noise’.
Toolbars
Selection tool – used for selecting a range of audio you want to edit or listen to.
Envelope tool – used for charging the volume over time.
Draw tool – used for modifying individual samples
Zoom tool – used for zooming in and out
Timeshift tool – used for sliding tracks left and right.
Multi tool – please see the manual for further instructions.
AFTER SALES SUPPORT
GB
0333 200 5846
IRE
1890 917 060
[email protected]
MODEL: 1393 PC: 67421 11/2015
• USB Turntable
• USB cable
• Software CD
• RCA cable
• 45 rpm adaptor
• Extra stylus
• User Manual
14
YEAR WARRANTY
Audio Control Buttons
Skip to Start – moves the cursor to the start of the project. If you press Play, your project will play from
the beginning.
Play – starts playing audio at the cursor position. If a part of the project is selected, only the selection is
played.
Loop – if you hold down the Shift key, the Play button changes to a Loop button, which lets you keep
playing the selection.
Record – starts recording.
Pause – temporarily stops recording or playback until you press pause again.
Stop – stops recording or playback. You must do this before applying any effects, saving exporting.
Skip to End – moves the cursor to the end of the last track.
Edit Toolbar
Cut – removes selected audio data and places it on the clipboard.
Copy – copies the selected audio data to the clipboard without removing it from the track.
Paste – pastes whatever is in the clipboard into the track at the position of the selection cursor.
Trim - the audio outside the selection will be deleted.
Silence – replaces the current selection with silence instead of removing it completely.
Undo – undo the last editing operation performed.
Redo – redo any editing operations that were just undone.
Zoom in – zooms in on displayed tracks displaying less time and giving a more detailed view of the track.
Zoom out – zooms out displaying more time and a less detailed view of tracks.
Fit selection – fits selected audio into the width of the screen to show the selection in more detail.
Fit project – shows entire project on one screen.
AFTER SALES SUPPORT
GB
0333 200 5846
IRE
1890 917 060
[email protected]
MODEL: 1393 PC: 67421 11/2015
• USB Turntable
• USB cable
• Software CD
• RCA cable
• 45 rpm adaptor
• Extra stylus
• User Manual
15
YEAR WARRANTY
Before editing, you must make a selection of the recording you would like to cut or copy. This will trim any music
from the previous track, or any silence on the record between tracks.
-
-
-
-
-
-
To select the part you wish to cut, copy or paste, use the selection tool. If it is not activated, do so by clicking on it in the toolbar.
Press and hold the left mouse button while you drag the mouse to a marked area.
This area is darker than the surrounding area of the clip. Note, even though you can mark an area larger
than or extending beyond the actual audio clip in the track, the operations will only work on the actual
clip. Playback however will work outside the clip.
Press the space bar to listen to the audio in the marked area.
To extend or contract your selection, hold down the SHIFT button and click on the area you wish your
selection to extend or contract to.
If you click on a spot that is on the right hand side from the middle of the current selection, you will set the
right hand boundary of your new selection.
Now you must cut your selection. Select “Cut” from the “Edit” menu.
Before the Cut
After the Cut
Create a new file and paste your cut into the new file.
For additional software information, please refer www.audacityteam.org for detailed operating
instructions.
AFTER SALES SUPPORT
GB
0333 200 5846
IRE
1890 917 060
[email protected]
MODEL: 1393 PC: 67421 11/2015
• USB Turntable
• USB cable
• Software CD
• RCA cable
• 45 rpm adaptor
• Extra stylus
• User Manual
16
YEAR WARRANTY
Saving a project
There are 5 ways of saving a project.
Save project
This saves the project to hard drive in a format (AUP) recognized only by Audacity. This can be done for a work in
progress.
Save project as
This saves the project to hard drive in a format (AUP) recognized only by Audacity. This can be done for a work in
progress.
Export as WAV
This saves the project to hard drive as a WAV file that is playable by most players. Please note that WAV files are
big files that take up a lot of space on the hard drive
Export as MP3
This saves the project to hard drive as an Mp3 file that is playable by most players. Please note that Mp3 conversion requires the LAME codec. To install the LAME codec, please see the Help section of the Audacity website
listed in the start of the Audacity quick guide.
Export as Ogg Vobis
This saves the project to hard drive as an ogg file.
AFTER SALES SUPPORT
GB
0333 200 5846
IRE
1890 917 060
[email protected]
MODEL: 1393 PC: 67421 11/2015
• USB Turntable
• USB cable
• Software CD
• RCA cable
• 45 rpm adaptor
• Extra stylus
• User Manual
17
YEAR WARRANTY
TIPS FOR BETTER TURNTABLE PERFORMANCE
1.
When opening or closing the turntable cover, handle it gently, gripping it either at the centre or at each
side.
Do not touch the needle tip with your fingers; avoid bumping the needle against the turntable platter or
record edge.
Frequently clean the needle tip-use a soft brush in a “back-to-front’ motion only.
If you must use a stylus cleaning fluid, use it very sparingly.
Gently wipe the dust cover and turntable housing with a soft cloth. Use only a small amount of mild detergent to clean the turntable and dust cover.
Never apply harsh chemicals or solvents to any part of the turntable system.
2.
3.
4.
5.
6.
FAQ
Q: A: A: A: A: Why does the sound jump, or why is the sound bad?
Try to carefully bend down the stylus head to make sure it has full contact with the LP.
Try replacing the stylus with the included extra stylus.
Check that the tonearm head is securely mounted onto the tonearm.
Check that the stylus is securely mounted onto the tonearm head.
Q: A: Q: A: The turntable stops spinning before the turntable has reached the end of the LP.
Set the Auto Stop knob to the “Off” position, and it will be able to play the whole LP.
Q: A: A: in Audacity it only register audio from one channel (L or R).
Go to the settings in Audacity, and make sure the audio source is set to “2 (Stereo)”. Edit -> Preferences,
Click on the “Audio I/O” tab, and choose “2(Stereo)” at Recording -> Channels.
My computer does not register the Turntable.
Make sure the turntable is turned on.
Try connecting the USB cable to another USB port on your PC.
Note: If you need an extra stylus, then please contact After Sales Support
AFTER SALES SUPPORT
GB
0333 200 5846
IRE
1890 917 060
[email protected]
MODEL: 1393 PC: 67421 11/2015
• USB Turntable
• USB cable
• Software CD
• RCA cable
• 45 rpm adaptor
• Extra stylus
• User Manual
18
YEAR WARRANTY
DISPOSAL
Batteries, electrical and electronic equipment (EEE) contain materials, parts and substances, which can be dangerous to the environment and harmful to human health
if waste of electrical and electronic equipment (WEEE) are not disposed of correctly.
Batteries, electrical and electronic equipment, which are marked with the WEEE logo
(as shown on the left), should not be thrown away with your household waste. Contact your Local Authority Waste Disposal Department, as they will be able to provide
details of the recycling options available in your area.
AFTER SALES SUPPORT
GB
0333 200 5846
IRE
1890 917 060
[email protected]
MODEL: 1393 PC: 67421 11/2015
• USB Turntable
• USB cable
• Software CD
• RCA cable
• 45 rpm adaptor
• Extra stylus
• User Manual
19
YEAR WARRANTY
WARRANTY CARD
USB Turntable Converter - 67421
Please keep your purchase receipt together with your card.
NAME
ADDRESS
DATE OF PURCHASE
LOCATION OF PURCHASE
Detailed description of malfunction
Accession ApS - Vandmanden 34 - DK - 9200 Aalborg SV
www.accessionx.com
[email protected]
AFTER SALES SUPPORT
GB
0333 200 5846
IRE
1890 917 060
[email protected]
MODEL: 1393 PC: 67421 11/2015
• USB Turntable
• USB cable
• Software CD
• RCA cable
• 45 rpm adaptor
• Extra stylus
• User Manual
20
YEAR WARRANTY