1
Professional Edition
Installation Guide
& User Manual
Version 2.1
KomBea Corporation
796 East Pacific Drive, Suite C
American Fork, UT 84003
Phone: 801-756-2525
Fax: 801-756-6781
www.kombea.com
Installation Guide & User Manual
1
Contents
Welcome to KomBea ReCall – your call-recording and screen-capture solution.
This
Installation Guide and User Manual has the following Sections:
Section 1: Install & Test ReCall
This covers the five steps to successfully install and test KomBea ReCall.
1)
2)
3)
4)
5)
Review System Requirements and Licensing
Install ReCall Server
Install ReCall Admin, Viewer, and Client
Create Test Recordings
View Test Recordings
Section 2: ReCall Triggers
This covers the ways to trigger ReCall Client to start / stop recording and to add
searchable data to recordings.
1) Manual Triggers
2) Command-line Triggers
3) API Triggers
Section 3: Using ReCall Admin
This covers how to use the features of ReCall Admin.
1)
2)
3)
4)
5)
Log In
Change Password
Change Recording Settings
Manage User Accounts
Archive & Delete Recordings
Section 4: Using ReCall Viewer
This covers how to use the features of ReCall Viewer.
1)
2)
3)
4)
5)
6)
7)
8)
Log In
Change Password
Find Recordings
Filter Recordings
Save Recordings
Email Recordings
Annotate Recordings
Play Recordings
Section 5: Troubleshooting, Customer Service & FAQs
This covers troubleshooting steps for common issues, information on contacting
customer service (technical support), and answers to frequently asked questions.
1) Troubleshooting
2) Contacting Customer Service
3) FAQs
This User Manual is written for Windows XP, but ReCall also supports Windows 2000 and later
(Vista is still in development).
Installation Guide & User Manual
2
Section 1: Install & Test ReCall
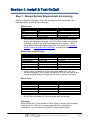
Step 1: Review System Requirements & Licensing
Before you begin the installation, review the following functions, requirements, and
licensing impacts for each ReCall component:
ReCall Server
Component
Processor
RAM
Operating System
Network Connection
Video
Minimum
1.5Ghz
1GB
Windows 2000
10Mbps
SVGA (800x600)
Recommended
2.0Ghz, Dual Core
2GB +
Windows 2000 Server (or later)
100Mbps
SVGA (1024x768)
ReCall Server is installed on the PC where call recordings and searchable
data for call recordings are stored. This PC must be turned on and network
accessible in order for the other ReCall applications to function. This PC
should also have enough storage capacity for your needs (see “Recording
Settings” and “Archive & Delete Recordings” to determine capacity needs).
ReCall Viewer & ReCall Admin
Hardware/Software
Processor
RAM
Available Disk Space
Operating System
Network Connection
L
Video
Sound
R Card
Windows
Media Player
e
Minimum
1.0 GHz
512 MB
5 GB
Windows 2000
10Mbps
16-bit SVGA (1024x768)
16-bit
Version 7.1
Recommended
1.5 GHz
1 GB
10 GB
Windows XP
100Mbps
16-bit SVGA (1024x768)
16-bit
Version 9 or later
ReCall Viewer is installed on PCs for users who need to find, view, and
annotate recordings. ReCall Admin is installed on PCs for users who need to
change recording settings, manage user accounts, or archive recordings.
ReCall Client
Hardware/Software
Processor
RAM
Operating System
Network Connection
Video
Sound Card
PC-Phone Interface
Minimum
1.5Ghz
512 MB
Windows 2000
10Mbps
16-bit SVGA (1024x768)
16-bit
KomBea Multiplexer
Recommended
2.0 Ghz
1 GB
Windows XP
100Mbps
16-bit SVGA (1024x768)
16-bit
KomBea Multiplexer
ReCall Client is installed on PCs where agent calls are recorded.
Licensing
ReCall utilizes one (1) license when a ReCall Client PC sends its first recording
to ReCall Server. There are no license requirements for other ReCall
components. You can remove a licensed PC using KomBea Admin.
Installation Guide & User Manual
3
Step 2 – Install ReCall Server
You must install ReCall Server before installing any other ReCall components. You may
optionally install the other ReCall components on the ReCall Server PC, but this is not
recommended.
1) Download KomBea ReCall Installer from www.kombea.com/download.
2) Double-click the KomBea ReCall Installer icon.
3) When the Welcome screen
appears, click “Next >”.
4)
When the Choose Components
screen appears, make sure only
ReCall Server is selected and
click “Next >”.
ReCall Server is selected
by default.
5) When the Choose Install
Location screen appears, click
“Next >”.
You may accept the
default “Destination
Folder” or choose
another.
Installation Guide & User Manual
4
6) When the Locate License File
screen appears, click “Locate
License File”, browse to the
license file and click “Next >”.
If a license file is
already in the
“Destination Folder”,
this screen will not
appear.
If you don’t have a
license file, click “No
License >”. This will
generate an email to KomBea Corp. requesting a license file, but
allow you to install a one-user license now.
The license file will arrive via email within one (1) business day. Copy
this file into the “Destination Folder” and then reboot the ReCall
Server PC.
7) When the Installing screen
appears, wait for this to change
to Installation Complete and
then click “Next >”.
If you receive an error
and KomBea ReCall
Installer aborts, reboot
your PC and go to Step
2. If you receive the
error on the second
attempt, contact
Customer Service.
8) During Step 7 above, a Notepad file will open with information you will need
when installing ReCall Admin and ReCall Client on other PC’s.
Print this document or write down the information.
9) When the Completing screen appears, click “Next >” and then “Finish” to
close the Installer. Immediately reboot the PC, which will complete the install
process and automatically start the ReCall Server service. ReCall Server will
NOT work until you reboot the PC.
10) You may optionally encrypt all recordings, making it impossible for ReCall
Admin users to save or share recordings with others. To encrypt recordings:
Go to the “Destination Folder” and open “KomBeaReCall.ini” with any
text editor program.
Change “EncryptRecordedCalls = 0” to “EncryptRecordedCalls = 1”.
Save the changes and reboot the PC.
Installation Guide & User Manual
5
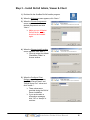
Step 3 – Install ReCall Admin, Viewer & Client
1) Double-click the KomBea ReCall Installer program.
2) When the Welcome screen appears, click “Next >”.
3) When the Choose Components
screen appears, select the
desired components and click
“Next >”.
Make sure you UNselect
ReCall Server, as this
should not be installed
again.
4) When the Choose Install Location
screen appears, click “Next >”.
You may accept the default
“Destination Folder” or
choose another.
5) When the Configure Client
Settings screen appears, enter
the “ReCall Server Name” and
“ReCall Server Port” values and
click “Install >”.
These values were
provided during the ReCall
Server installation.
If you receive alert or
information messages,
click “OK” or “Accept” to
continue.
Installation Guide & User Manual
6
6) When the Installing screen
appears, wait for this to change
to Installation Complete and click
“Next >”.
If you receive an error or
the Installer aborts,
reboot and go back to
Step 1. If you receive the
same error on the second
attempt, contact
Customer Service.
7) When the Completing screen appears, click “Next >” and then “Finish” to
close the Installer.
8) Immediately reboot the PC, which will complete the install process and
automatically start the ReCall services. The ReCall component will NOT
work until you reboot the PC.
9) ReCall Client installations only
The multiplexer is a small device that connects the PC to a physical phone.
This device is NOT needed for PCs using a soft phone with USB headset, but
is needed on every ReCall Client PC that uses a physical phone. Note: Your
multiplexer may differ slightly from the one shown in the pictures below.
• Plug the phone wire
coming out of the headset
into the phone jack on the
multiplexer.
• Plug the phone wire
coming out of the
multiplexer into the jack on
the phone base (the jack where the
headset normally goes).
• Plug the PINK connector coming
out of the multiplexer into the
microphone jack of the PC.
IMPORTANT: If your multiplexer
has a GREEN connector, DO NOT
plug this into the headset jack of
the PC unless you are also using
KomBea ProtoCall. This connector
will allow customers to hear sounds
from the PC.
Installation Guide & User Manual
7
Step 4 – Create Test Recording(s)
Create a test recording so that you can test PC performance while recording and verify
that audio and screen-capture settings are correct.
1) On the PC where the ReCall Client is installed, go to Start | Programs |
KomBea, and click on the ReCall Agent application.
2) A small application will open that is only used for
manually creating recordings.
3) Using the phone that is connected to this PC, call someone who can speak
with you for 20-30 seconds.
4) Start recording by clicking the “Start” button on the
ReCall Agent application. Within a few seconds, the
button will change to “Stop”, indicating that recording
has successfully started.
5) Speak with the person on the phone and have him/her speak to you. While
speaking, perform typical agent activities on the PC (starting applications,
entering data, etc). This should take about 20 seconds.
6) Stop recording by clicking the “Stop” button on the
ReCall Agent application. The button will change to
“Start”, indicating that recording has successfully
stopped.
7) Resolve any errors or performance issues you may encounter (see
Troubleshooting).
Installation Guide & User Manual
8
Step 5 – View Test Recording(s)
View test recordings so that you can verify that recordings are being sent to the ReCall
Server and that recording settings are correct.
1) On the PC where ReCall Viewer is installed, go to Start | Programs |
KomBea, and click on the ReCall Admin program.
2)
When the Viewer Login
window appears, enter “admin”
(without the quotes) for both
“User Name” and “Password”
and click “OK”.
This is the default
Administrator account.
Creating user accounts
is covered in Manage
User Accounts.
3) When ReCall Viewer opens, recordings will appear in the list with the most
recent listed first. Double-click the test recording, which will launch ReCall
Player and automatically start playing the recorded call.
4) Make sure that audio and video quality is at expected levels. Resolve any
errors or performance issues you may encounter (see Troubleshooting).
Installation Guide & User Manual
9
Section 2: ReCall Triggers
Since ReCall does not interface with the PBX, there are other ways to “trigger” a ReCall
Client to a) start and stop a recording and b) attach searchable data to a recording.
Manual Triggers
If you don’t need automated triggers, use the agent-initiated trigger application
called ReCall Agent. This is installed in the “Destination Folder” folder you
selected during installation.
When agents double-click the ReCall Agent shortcut, the application opens as a
small (always on top) window.
When the agent clicks “Start”, the recording begins and “Start” changes to “Stop”.
When the agent clicks “Stop”, the recording ends and “Stop” changes to “Start”.
When the agent clicks the “…” button WHILE the recording is in progress, the
agent can enter searchable data (up to four fields) to the recording.
While this trigger takes no time to implement, it has several disadvantages:
•
•
•
Agents may purposefully exclude recordings.
Agents may forget to start and/or stop a recording –missing
recordings completely or blending two or more recordings together.
This option does not include all of the features available in the other
trigger options.
Installation Guide & User Manual
10
Command-Line Triggers
This is the simplest automated trigger to implement and includes the following
capabilities:
•
•
•
Start & Stop Recording
Pause & Resume Recording (audio only)
Attach searchable data
The ReCall CLI application is installed in the Destination Folder selected during
the installation process.
From any desktop application (soft phone, CRM, etc), you can send commands
to the ReCall Client service that trigger recording events as follows:
/start
/stop
/pause
/resume
/username <value>
/systemfield1 <value>
/systemfield2 <value>
/systemfield3 <value>
/systemfield4 <value>
/systemfield5 <value>
/systemfield6 <value>
/customfield1 <value>
/customfield2 <value>
/customfield3 <value>
/customfield4 <value>
Start recording
Stop recording
Pause recording (audio only)
Resume recording (audio only)
The user’s name to store in the database
The SystemField1 to store in the database
The SystemField2 to store in the database
The SystemField3 to store in the database
The SystemField4 to store in the database
The SystemField5 to store in the database
The SystemField6 to store in the database
The CustomField1 to store in the database
The CustomField2 to store in the database
The CustomField3 to store in the database
The CustomField4 to store in the database
For example, you would start a new recording by sending the following
command:
> C:\KomBea\KomBea ReCall CLI /start
Installation Guide & User Manual
11
API Triggers
The API Trigger contains one object, which exposes one interface. The object
(RecorderService) is controlled by setting properties and invoking methods on
the exposed interface (IRecorderService).
NOTE: To view sample source code for VB Script, Java Script on an HTML
page, C++ MFC project, and others, download “ReCall Sample API Applications”
from the KomBea Download Center at www.kombea.com/download.
RecorderService Object
•
•
GUID: 4FF7EAF2-CF61-422A-BB5C-A7EFBBFC8F53
The file containing the RecorderService object is named “KomBea ReCall
Recorder Service.exe”
IRecorderService Interface
•
•
GUID is: A7F1F38F-17DE-4DB8-8B32-F30FAFF689AA
Type name: KomBeaReCall.RecorderService
IRecorderService Properties
Property Name
Value Type
Description
UserName*
BSTR
AudioRecordingDevice
BSTR
IsRecording
IsRecordingPaused
RecordingID
VARIANT_BOOL
VARIANT_BOOL
ULONG
The user name to be stored in the database for
the recorded calls.
The device to record audio from. The default is
the system’s default playback device.
True if a recording is in progress, False otherwise.
SystemField1
BSTR
SystemField2
BSTR
SystemField3
BSTR
SystemField4
BSTR
SystemField5
BSTR
SystemField6
BSTR
CustomField1
BSTR
CustomField2
BSTR
CustomField3
BSTR
CustomField4
BSTR
True if a recording is paused, False otherwise
The ID of the recording from the last call
recorded. The ID can be used to look up the
record in the ReCall database.
A system defined field to be stored in the
database – this value is not used by ReCall.
A system defined field to be stored in the
database – this value is not used by ReCall.
A system defined field to be stored in the
database – this value is not used by ReCall.
A system defined field to be stored in the
database – this value is not used by ReCall.
A system defined field to be stored in the
database – this value is not used by ReCall.
A system defined field to be stored in the
database – this value is not used by ReCall.
A custom database field to be stored in the
database – this value is not used by ReCall.
An administrator may update this field via ReCall
Admin.
A custom database field to be stored in the
database – this value is not used by ReCall.
An administrator may update this field via ReCall
Admin.
A custom database field to be stored in the
database – this value is not used by ReCall.
An administrator may update this field via ReCall
Admin.
A custom database field to be stored in the
database – this value is not used by ReCall.
An administrator may update this field via ReCall
Admin.
* We recommend setting the UserName property with the triggering application
Installation Guide & User Manual
12
IRecorderService Methods
Method Name
Return Type
Description
HRESULT
S_OK (or 0) is
returned on
success
Start recording - this method blocks until the
recorder is started. Depending on the machine’s
resources, this may take several seconds to start.
Pause recording - this method blocks until the
recorder is paused. A recording with video cannot
be paused or resumed.
Resume recording - this method blocks until the
recorder is resumed. A recording with video
cannot be paused or resumed.
Stop recording - this method blocks until the
recorder is stopped. Depending on the machine’s
resources, this may take several seconds to start.
StartRecording
PauseRecording
ResumeRecording
StopRecording
Instantiating a RecorderService Object Using JavaScript
// Instantiate the RecorderService object.
// The default interface is IRecorderService.
var recorder;
recorder = new ActiveXObject("KomBeaReCall.RecorderService");
Initializing the IRecorderService Interface
// Set the user’s name field - not required, but recommended
recorder.UserName = "Jane Doe";
Start Recording
// Start recording
recorder.StartRecording();
Stop Recording
// Stop recording
recorder.StopRecording();
Setting System and Custom Properties
At any point before calling StopRecording, the system and custom field
properties may be set. The data pertaining to a call will be sent to the database
as soon as the recording is stopped, so they must be set by then or they will be
used for the next call.
// Set the values
recorder.SystemField1 = "This is system field 1";
recorder.SystemField2 = "This is system field 2";
recorder.SystemField3 = "This is system field 3";
recorder.SystemField4 = "This is system field 4";
recorder.SystemField5 = "This is system field 5";
recorder.SystemField6 = "This is system field 6";
recorder.CustomField1 = "This is custom field 1";
recorder.CustomField2 = "This is custom field 2";
recorder.CustomField3 = "This is custom field 3";
recorder.CustomField4 = "This is custom field 4";
Installation Guide & User Manual
13
Section 3: Using ReCall Admin
Log In
1.
Start ReCall Admin by going to Start
| Programs | KomBea, and clicking
on the ReCall Admin program.
2. Enter your “User Name” and
“Password” and click “OK”.
The default “User Name” and
“Password” are “admin”
(without the quotes).
Change Password
1. On the Admin Login window, click
“Change Password…”
2. When the Change Password dialog
appears, enter your “User Name” and
current password (in the “Old
Password” field).
3. Enter a new password into the “New Password” and “Confirm New Password”
fields and click “OK”.
Installation Guide & User Manual
14
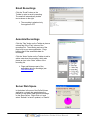
Change Recording Settings
To change turn recording on/off and to change recording settings:
1. Go to the [Settings] tab and select any one of the computers from the
“LICENSED COMPUTERS:” list.
2. Turn audio-only recording ON by selecting the “Audio” radio button. Turn
audio + screen capture ON by selecting the “Audio + Video” radio button.
3. Adjust “Audio” and/or “Screen Capture” settings by moving the sliders.
Audio Properties
(Recommendation: Medium)
This adjusts sound quality and volume. Increasing this improves audio quality
and increases file size (high = 150KB/min, medium = 90KB/min, low =
50KB/min). No impact on PC performance.
Size
(Recommendation: High)
This scales captured resolution of the screen that is recorded. Increasing this
improves video quality (High = full screen, medium = 80%, low = 65%); increases
file size (high = 3X the low setting, 2X the medium setting), and may degrade PC
performance.
Frames per Second
(Recommendation: Low)
This changes the frequency of screen captures. Increasing this improves
smoothness in screen movement and may degrade PC performance. It has no
impact on file size.
Quality
(Recommendation: High)
This adjusts the amount of information stored. Increasing this improves video
quality (fewer smudges in static parts of the screen); moderately increases file
size, but may improve PC performance.
4. Click “Apply” to apply these settings to the selected PC. New settings are
applied once the client PC completes its next recording. Caution! “Apply to
All” will apply these settings to every licensed computer.
Installation Guide & User Manual
15
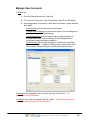
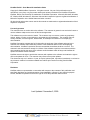
Manage User Accounts
To Add a User:
1. Go to the [Users] tab and click “Add User”.
2. Fill out the user information (First & Last Name, Login ID, and Password).
3. Set the appropriate “Permissions” check boxes and select a profile and then
click “Apply”
Administrator gives the user access to all features.
Change Client Settings gives the user the ability to turn recordings on or
off and to change audio/video settings.
Archive Recordings gives the user the ability to flag recordings as
archived (which also moves recordings to a folder designated for
movement to external storage or deletion).
View Recordings gives users the ability to Find and Play recordings.
“Restricted Search…” enables the Administrator to apply filters to the
user’s search, thereby limiting the recordings that can be viewed.
To Delete a User, highlight the user on the list and click “Delete User”. The
Administrator cannot be deleted.
To modify a User, enter the changes and click “Apply”. The Administrator account
cannot be modified, except Login and Password.
Installation Guide & User Manual
16
Permission Profiles
Create a “Permission Profile” to define which recordings are accessible for those users
given this profile. Permissions can be allowed for viewing recordings from a particular
Slave Server, from particular machines, or specific user logins. When multiple “Available
Objects” are added, they are OR’d together to determine if the recording satisfies the
restrictions of the profile.
1. Go to the [Permissions] tab, and click on “Add Profile”.
2. Give it a name in the “Profile Name:” field.
3. Select either the “Slaves”, “Machines”, or “Logins” and then choose the
desired entries and click on the “ Add” button.
4. When done identifying the servers, machines, or logins for recordings that
this profile will allow access to, then click on the “Apply” button.
Installation Guide & User Manual
17
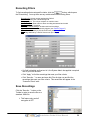
Archive & Delete Recordings
To archive or delete recordings automatically:
1. Go to the [Archive] tab.
2. Check the “Automatic” checkbox.
3. Select the “Archive” or “Delete” radio button.
4. Enter the number of days old a recording must be to perform this action.
5. Give the Archive Profile a name in the “Profile Name” field.
6. Select the “Slave” Servers. “Machines”, “Logins”, or “Data” Fields that will
identify the recordings to be automatically archived or deleted, and then click
on the “ Add” button.
7. When the desired recording types for this profile have been selected, then
click on the “Apply” button.
To archive or delete recordings manually, simply fill in the date in the “all recordings on
or before” area and click the “Archive” or “Delete” button.
Archived recordings are moved to a sub-folder named “Archived Files” in
the Destination Folder. These files may be moved to another location.
To retrieve an archived recording, move the file (identified by the
Recording ID) into the “Recorded Calls” sub-folder in the Destination
Folder. If recordings are not encrypted, you can simply give the file to the
person who needs to view it.
Installation Guide & User Manual
18
Section 4: Using ReCall Viewer
Log In
1. Start ReCall Viewer by going to Start |
Programs | KomBea, and clicking on
the ReCall Viewer program.
2. Enter your “User Name” and
“Password” and click “OK”.
The “User Name” and
“Password” are created by
ReCall Admin.
Change Password
1. On the Admin Login window, click
“Change Password…”
2. When the Change Password dialog
appears, enter your “User Name” and
current password (in the “Old
Password” field).
3. Enter a new password into the “New Password” and “Confirm New Password”
fields and click “OK”.
Installation Guide & User Manual
19
Find Recordings
When ReCall Viewer opens, the most recent recordings will automatically be listed (200
maximum) recordings.
Click a column title to sort by that column. Click the column title again to
toggle between ascending and descending order.
Refresh the list of recordings by clicking the “Most Recent” filter under the
“Standard Filters”.
Recording Filters are covered on the next page.
The first column indicates whether the recording is audio-only or audio
plus video. The ID column shows the unique ID given to each recording.
Add or remove columns by right-clicking the column header area and
checking or un-checking the column options.
Toolbar options are covered later in this section.
Installation Guide & User Manual
20
Recording Filters
To find recordings that meet specific criteria, click the
button, which opens
the Filters dialog. You may then use any combination of the following filters:
Recording ID: Unique number assigned by ReCall
User Name: Client user’s Windows login ID
Computer Name: The unique computer or machine name
Start & End Time: Date and time when recording was started and ended
Duration: Length of recording
Show Archived Recordings: Includes archived recordings
System Fields 1-6: Data attached by triggers (see “ReCall Triggers”)
Notes: Data attached by a ReCall Viewer user (see “Notes”)
Flag: Flag attached by a ReCall Viewer user (see “Flags”)
> If a field is disabled and has text in it, the System Admin has applied a required
filter to your user account.
> Click “Apply” to find the recordings that meet your filter criteria.
> Click “Save As…” to name and save this Filter for later use and find the
recordings that meet your filter criteria. This saved filter will appear in the
“Customer Filters” area.
Save Recordings
Click the “Save As…” button on the
Toolbar in order to save the file as a
standard .WMV file.
This feature only works if
encryption is OFF
Installation Guide & User Manual
21
Email Recordings
Click the “E-mail” button on the
Toolbar in order to email a recording.
The email will automatically include
text as shown to the right.
The recording is attached only
if encryption is OFF
Annotate Recordings
Click the “Flag” button on the Toolbar to place a
colored flag in the “Flag” column of the
recordings list. The meaning and use of the
flags is up to your own organization. Flags
become part of the searchable data for
recordings.
Click the “Notes” button on the Toolbar to add a
written note about the recording, which also
places an icon in the “Note” column of the
recording list.
Flags and Notes are part of the
searchable data for recordings (see
Filter Recordings).
Server Disk Space
In the bottom left corner of the ReCall Viewer
application, a simple bar graph shows the
percent of disk space used to store recordings
on the Slave Server. Right-Click on it and
select “Refresh” to have it updated, or “Details”.
Installation Guide & User Manual
22
Play Recordings
Click the “Play” button on the Toolbar to play a recording (or simply double-click on the
recording). The recording will transfer from ReCall Server and open the ReCall Player
window will start playing the recording.
Simply use the ReCall Player controls to pause, play, fast forward, and adjust volume.
End the playback by closing ReCall Player (click [x] in the upper-right corner).
You may resize the ReCall Player window, but take note the following:
The window will attempt to size to the same resolution as the recording, which
provides the best viewing quality.
If your display has the same or lower resolution, the recording may appear blurry
or distorted.
If the window sizes to full screen, optimize viewing clarity by right-clicking in the
window, selecting “Zoom” and then “Full Screen”.
Exit “Full Screen” mode by pressing ESC on your keyboard.
Installation Guide & User Manual
23
Section 5: Troubleshooting, Customer
Service, & FAQs
Troubleshooting
Before contacting Customer Service, look for a solution among these common issues:
ERROR 0x80010105: This error is generally caused by a communication error
between the ReCall Client and ReCall Server processes:
1. Verify that the ReCall “Server Name” and “Server Port” are
correct.
• Run RegEdit
• Go to HKEY_LOCAL_MACHINE | SOFTWARE | KomBea |
KomBea ReCall.
• “Server Name” should be the name of the PC where
ReCall Server is installed.
• “Server Port” should be the one selected during the
installation process.
2. You may optionally uninstall and then reinstall the ReCall
components, making sure to enter the correct “Server Name” and
“Server Port” values.
3. Verify that the ReCall Client PC can communicate with the ReCall
Server PC (turned on and network accessible).
4. Verify that the KomBea Server service is running on the ReCall
Server PC.
5. Verify that you have not exceeded the license count. If you have,
you should receive an error message that reads,” The ReCall
Server's client license count has been exceeded. Recording is not
enabled on this machine.”
6. If none of the above items fix the problem, contact Customer
Service.
FILE NOT FOUND – UNEXPECTED ERROR HAS OCCORRED: If you get this
error message when trying to play a recording in ReCall Admin, check the
following:
1. Wait at least 2 minutes from the time the ReCall Client stops
recording until you attempt to play the recording. It may take this
long before the file has completely transferred to ReCall Server.
2. Check the steps listed above for ERROR 0x80010105.
3. If none of the above items fix the problem, contact Customer
Service.
Installation Guide & User Manual
24
VIDEO QUALITY IS POOR WHEN PLAYING RECORDINGS: If the video
quality is poor when playing recordings, check the following:
1. Try to view the recording in Full Screen mode by right-clicking in
the ReCall Player window, clicking “Zoom”, and then clicking “Full
Screen”.
2. Check that Display Properties on the ReCall Client PC are at the
recommended settings.
o Go to Start | Settings | Control Panel | Display
o Move “Screen resolution” to 1024x768 or less.
o Change “Color quality” to “Medium (16 bit)”.
o Change “Hardware acceleration” to “None” (click
“Advanced” and go to the [Troubleshoot] tab).
o Click “OK” twice.
3. Implement all recommended Recording Settings (see “Recording
Settings”).
4. If none of the above items fix the problem, contact Customer
Service.
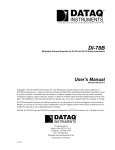
AUDIO QUALITY IS POOR WHEN PLAYING RECORDINGS: If the audio
quality is poor when playing recordings, check the following:
1. Go to “Sounds and Audio Devices
Properties”: Start | Settings | Control
Panel | Sounds and Audio Devices
2. Click “Advanced…” from the [Volume]
tab.
3. Go to “Recording Control”: Options |
Properties | Select “Recordings” | [OK]
4. Check the checkbox for the port
where the multiplexer is plugged in
(usually “Microphone”). Move the
“Volume” and the “Balance” sliders to
the center.
5. Click “Advanced…” , place a
check in the “Microphone
Boost” checkbox, and click
“Close”
6. Close the “Recording Control”
and “Control Panel” windows.
7. Try a new recording.
8. If none of the above items fix
the problem, contact
Customer Service.
Installation Guide & User Manual
25
PERFORMANCE IS DEGRADED WHEN RECALL CLIENT IS RECORDING: If
the ReCall Client PC is sluggish when recording is on, check the following:
1. Check that all hardware and software meet the recommended
levels (see “System Requirements”). If the PC is running
resource-intensive applications, it may be necessary to increase
the memory or upgrade to a faster PC.
2. Check that the recording settings are set to levels that reduce the
impact on PC performance (see “Recording Settings”).
3. Check that the Display Properties are at the recommended
settings.
o Go to Start | Settings | Control Panel | Display
o Move “Screen resolution” to 1024x768 or less.
o Change “Color quality” to “Medium (16 bit)”.
o Change “Hardware acceleration” to “None” (click
“Advanced” and go to the [Troubleshoot] tab).
o Click “OK” twice.
4. If none of the above items fix the problem, contact Customer
Service.
Contacting Customer Service
We are committed to your success in implementing and maintaining KomBea
ReCall. When you contact us, your support issue is routed to the best qualified
person to address your needs:
Tier 1: These are general how-to inquiries regarding installation and use of the
software and hardware. If we have encountered your question before, it is likely
handled at the Tier 1 level within a couple of hours.
Tier 2: These are questions that require research and testing, often involving the
software engineers that designed KomBea ReCall. If your issue is escalated to
our Tier 2 team, we will keep you updated on the progress while we work to
provide a solution as quickly as possible.
Customer Service is available Monday – Friday, 8:00am–5:00pm U.S. Mountain
Time. To initiate a support incident, simply send an email to
[email protected]. Provide as much detail as possible. We respond to Tier
1 issues via email, while Tier 2 issues generally transition to phone
communication.
Technical support and software upgrades are free and unlimited for those who
have a current Annual Maintenance & Support Agreement.
To remain current, you are required to be paid in full on all KomBea ReCall
licenses. If your agreement has lapsed or you didn’t purchase one, you may
become current by purchasing an Annual Maintenance & Support Agreement at
the non-discounted rate (35% of license). The expiration date will be one year
from the time the KomBea ReCall licenses were purchased, not from the time the
Agreement was purchased. Alternatively, support can be purchased as
Professional Services ($200 per hour billed in half-hour increments).
Installation Guide & User Manual
26
FAQs
POLICIES
1. Can I get an evaluation copy?
We offer a 60-day money-back guarantee. You simply return the multiplexers
in their original packaging for a full refund.
2. What is your return policy?
Same as #1 above.
3. What are your support hours?
Monday – Friday, 8:00am–5:00pm U.S. Mountain Time.
4. What is your support policy?
See “Customer Service”.
5. What is your upgrade policy?
See “Customer Service”.
6. How do I increase my number of licenses once I purchase the initial lot?
Simply place another order. As soon as payment is received, we will ship out
additional multiplexers and provide an updated license file. You’ll be up and
running right away.
TECHNICAL QUESTIONS
1. What is the file format?
WMV format, but can be optionally encrypted.
2. What type of encryption is used?
The encryption algorithm is proprietary.
3. What is the size of an audio file? Screen capture file?
Using the default recording settings (see “Recording Settings”), a typical
audio file is under 90KB per minute and a screen capture file is under 1MB
per minute. File size is influenced by recording settings and the length of a
recording.
4. What is the size of the application on the client PC?
The ReCall Client installation needs less than 1MB of disk space (more if
dependencies are not already installed). However, we recommend at least
100MB of free space to temporarily hold recordings before they are
transferred to the ReCall Server.
5. What kind of PC do I need?
A PC with Windows 2000 or later (see “Systems Requirements”).
6. What can I expect in network (LAN / WAN) traffic as a result?
Other than the recordings being transferred from the client PCs to the server,
the network traffic is very minimal.
Installation Guide & User Manual
27
CAN YOU...?
1. Can you record audio for VoIP / Analog / Digital?
Any type of phone can be used where the audio is sent through the
computer. This can be done directly with a soft phone or indirectly with a
piece of hardware that is included with a license of ReCall.
2. Can you screen capture any screen type or resolution? Dual monitors?
Yes, but dual monitors may increase CPU and Memory requirements.
3. Can you do voice only, screen only, and voice + screen recordings?
Yes, any of these.
4. Can you do live monitoring?
This is not supported at this time.
5. Can you record my at-home agents?
Yes.
WHAT IF…?
1. What if the recording volume is missing, too soft, or too loud?
Make sure the multiplexer is installed correctly and adjust the recording
settings (see “Recording Settings”).
2. What if the video quality is missing or poor quality?
See Troubleshooting.
3. What if the server runs out of disk space?
No new recordings will be sent from the client PCs to the server. They will be
stored on the client PC until they can be sent to the server.
4. What if the client PC disconnects from the server?
Recording will continue. They will be stored on the client PC until they can be
sent to the server.
5. What if I run out of licenses… or go over my license count?
Once the license limit is reached, no recordings will be made on any new
PCs where ReCall Client is installed. If a license needs to be freed up, it can
be done via the ReCall Admin program.
6. What if the agent unplugs your recorder device?
Screen capture will continue, but no audio will be recorded until it is plugged
back in.
7. What if the agent messes with the audio or screen resolution settings?
ReCall does not enforce any audio or video settings on the ReCall Client PC.
If an agent alters their settings, then those settings will be used for the
recordings. You may want to consider restricting access to these settings.
8. What if the PC hangs during the call?
The current recording will not be saved and will be lost.
9. What if the Server hangs… what happens to call recordings in progress?
All data and recordings will continue uninterrupted. They will be stored on the
ReCall Client PC’s until they can be sent to the server.
10. What if my recordings are cut off at 30 minutes?
ReCall sets the maximum length of a recording at 30 minutes. A future
release will allow you to change this to a longer time.
Installation Guide & User Manual
28
KomBea ReCall – User Manual & Installation Guide
Copyright © 2008 KomBea Corporation. All rights reserved. No part of this publication may be
reproduced, in any form or by any means without prior written permission from KomBea Corporation.
KomBea, ReCall, and ProtoCall are trademarks of KomBea Corporation. Microsoft, Windows, Windows
NT, Widows 2000, Windows XP, Windows Vista and their respective logos are registered trademarks of
Microsoft Corporation in the United States and other countries.
All other brand and product names used in this manual are trademarks or registered trademarks of their
respective companies.
License Agreement
The customer does not receive title to the software. The customer is granted a non-exclusive license to
use the software subject to the terms of this license agreement.
This software may not be rented or leased. The customer may not remove or alter any proprietary
notices, labels, or marks on the software or accompanying documentation. The customer may not
modify, translate, reverse engineer, disassemble, or decompile the software or accompanying
documentation.
KomBea Corporation warrants that for 90 days after the purchase of the software package by the
customer, the software shall reasonably conform to the standards defined in the accompanying
documentation. KomBea Corporation does not warrant that the software shall be error-free. The
customer’s sole and exclusive remedy for a failure of the software to perform in accordance with the
documentation shall be the return of the software and/or hardware within 60 days and KomBea will
replace the software and/or hardware.
KomBea reserves the right to provide the customer with updates to the software and retains the right to
offer such updates for a fee. The customer may refuse to accept the updates.
This document may not, in whole or in part, be copied, photocopied, reproduced, translated, or reduced to
any electronic medium or machine-readable form without prior consent in writing from KomBea
Corporation.
Disclaimer
KomBea makes no representation or warranties with respect to the contents of this publication and
specifically disclaims any implied warranties of merchantability or fitness for any particular purpose.
Further, KomBea Corporation reserves the right to revise this publication without notice.
Last Updated: November 2, 2009
Installation Guide & User Manual
29