1
O’Reilly Media, Inc.
9/10/06
1
The Tools
This book is a cookbook of sorts, and this chapter covers the staple ingredients. The
concepts and tools you’ll use in every chapter are introduced here. There’s enough
information on each tool to get you to the point where you can make the tool say “Hello
World!” Chances are you’ve used some of the tools in this chapter before, or other tools
just like them. Skip past the things you know and jump into learning the tools that are
new to you. You may want to explore some of the less familiar tools on your own to get
a sense of what they can do. The projects in the following chapters only scratch the
surface of what’s possible for most of these tools. References for further investigation
are provided.
It Starts With The Stuff You Touch
All of the objects you’ll encounter in this book, tangible or intangible, will have certain
behaviors. Software objects will send and receive messages, store data, or both. Physical
objects will move, light up, or make noise. The first question to ask about any object in
this book is: what does it do? The second is: how do I make it do what it’s supposed to
do? Or more simply, what is its interface?
An object’s interface is made up of three elements. First there’s the physical interface.
This is the stuff you touch. The knobs, switches, keys, and other sensors that make up
the physical interface react to your actions. The connectors that join objects are also part
of the physical interface. Many of the projects in this book will show you how to build
physical interfaces. Every network of objects begins and ends with a physical interface.
Even though some objects in a network (software objects) have no physical interface,
people build their mental models of how a system works based on the physical interface.
A computer is much more than the keyboard, mouse, and screen, but that’s what we think
of it as, because that’s what we see and touch. You can build all kinds of wonderful
functions into your system, but if those functions aren’t apparent in the things people get
to see, hear, and touch, your wonderful functions will never get used. Remember the
lesson of the VCR clock that constantly blinks 12:00 because no one can be bothered to
learn how to set it: if the physical interface isn’t good, the rest of the system suffers.
1
O’Reilly Media, Inc.
9/10/06
Second there’s the software interface, the commands that you send to the object to make
it respond. In some projects, you’ll invent your own software interface, and in others,
you’ll rely on existing interfaces to do the work for you. The best software interfaces
have simple, consistent functions that result in predictable outputs. Unfortunately, not all
software interfaces are as simple as you’d like them to be, so be prepared to have to
experiment a little to get some software objects to do what you think they should do.
When you’re learning a new software interface, it helps to approach it mentally in the
same way you do with a physical interface. Don’t try to use all the functions at once.
Learn what each function does on its own before you try to use them all together. You
don’t learn to play the piano by starting with a Bach fugue, you start one note at a time.
Likewise, you don’t learn a software interface by writing a full application with it, you
learn it one function at a time. There are many projects in this book; if you find any of
their software functions confusing, write a simple program that demonstrates just that
function, then return to the project.
Finally there’s the electrical interface, the pulses of electrical energy sent from one
device to another to be interpreted as information. Unless you’re designing new objects
or the connections between them, you never have to deal with this interface. When you’re
designing new objects or the networks that connect them, however, you have to know and
understand a few things about the electrical interface, so that you know how to match up
objects that might have slight differences in their electrical interfaces.
It’s About Pulses
In order to communicate with each other, objects use communications protocols. A
protocol is a series of mutually agreed-upon standards for communication between two or
more objects. Serial protocols like RS-232, USB, and IEEE 1394 (also known as
FireWire and i.Link) connect computers to the printers, hard drives, keyboards, mice, and
other peripheral devices. Network protocols like Ethernet and TCP/IP connect multiple
computers to each other through network hubs, routers, and switches. A communications
protocol usually defines the rate at which messages are exchanged, the arrangement of
data in the messages, and the grammar of the exchange. If it’s a protocol for physical
objects, it will also define the electrical characteristics, and sometimes even the physical
shape of the connectors. Protocols don’t define what happens between objects, however.
The commands to make an object do something rely on protocols in the same way that
clear instructions rely on good grammar. You can’t give good instructions if you can’t
form a good sentence.
One thing that all communications protocols share, from the simplest chip-to-chip
message to the most complex network architecture, is this: it’s all about pulses of energy.
Digital devices exchange information by sending timed pulses of energy across a shared
connection. The USB connection from your mouse to your computer uses two wires for
transmission and reception, sending timed pulses of electrical energy across those wires.
Likewise, wired network connections are made up of timed pulses of electrical energy
sent down the wires. For longer distances and higher bandwidth, the electrical wires may
be replaced with fiber optic cables carrying timed pulses of light. In cases where a
physical connection is inconvenient or impossible, the transmission can be sent using
pulses of radio energy between radio transceivers (a transceiver is two-way radio,
capable of transmitting and receiving). The meaning of data pulses is independent of the
medium that’s carrying them. You can use the same sequence of pulses whether you’re
sending them across wires, fiber optic cables, or radios. If you keep in mind that all of
2
O’Reilly Media, Inc.
9/10/06
the communication you’re dealing with starts with a series of pulses, and that somewhere
there’s a guide explaining the sequence of those pulses, you can work with any
communication system you come across.
Computers Of All Shapes and Sizes
You’ll encounter at least four different types of computers in this book, grouped
according to their physical interfaces. The most familiar of these is the personal
computer. Whether it’s a desktop or a laptop machine, it’s got a keyboard, a screen, and a
mouse, and you probably use it just about every working day. These three elements: the
keyboard, the screen, and the mouse—make up its physical interface.
The second type of computer you’ll encounter in this book, the microcontroller, has no
physical interface that humans can interact with directly. It’s just an electronic chip with
input and output pins that can send or receive electrical pulses. Using a microcontroller
is a three-stage process:
1.
You connect sensors to the inputs to convert physical energy like motion, heat, and
sound into electrical energy.
2.
You attach motors, speakers, and other devices to the outputs to convert electrical
energy into physical action.
3.
Finally, you write a program to determine how the input changes affect the outputs.
In other words, the microcontroller’s physical interface is whatever you make of it.
The third type of computer in this book, the network server, is basically the same as a
desktop computer, and may even have a keyboard, screen, and mouse. Even though it can
do all the things you expect of a personal computer, its primary function is to send and
receive data over a network. Most people using servers don’t think of them as physical
things because they only interact with them over a network, using their local computers
as physical interfaces to the server. A server’s most important interface for most users’
purposes is its software interface.
The fourth group of computers is a mixed bag: mobile phones, music synthesizers, and
motor controllers, to name a few. Some of them will have fully developed physical
interfaces, some of them will have minimal physical interfaces but detailed software
interfaces, and most will have a little of both. Even though you don’t normally think of
these devices as computers, they are. When you think of them as programmable objects,
with interfaces that you can manipulate, it’s easier to figure out how they can all
communicate with each other, regardless of their end function.
The full list of hardware devices used in the book is in Appendix 1.
Good Habits
Networking objects is a bit like love. The fundamental problem in both is that when
you’re sending a message, you never really know if the receiver understands what you’re
saying, and there are a thousand ways for your message to get lost or garbled in
transmission. You may know why you feel the way you do, but your partner doesn’t. All
he or she’s got to go on are the words you say and the actions you take. Likewise, you
may know exactly what message your local computer is sending, how it’s sending it, and
3
O’Reilly Media, Inc.
9/10/06
what all the bits mean, but the remote computer has no idea what they mean unless you
program it to understand them.. All it’s got to go on are the bits it receives. If you want
reliable, clear communications (in love or networking), there are a few simple things you
have to do:
•
Listen more than you speak.
•
Never assume that what you said is what they heard.
•
Agree on how you’re going to say things in advance.
•
Ask politely for clarification when messages aren’t clear.
Listen More Than You Speak
The best way to make a good first impression, and to maintain a good relationship, is to
be a good listener. Listening is more difficult than speaking. You can speak anytime you
want to, but you never know when the other person is going to say something, so you
have
to
listen
all
the
time.
In networking terms, this means that you should write your programs such that they’re
listening for new messages most of the time, and sending messages only when necessary.
It’s often easier to send out messages all the time rather than figure out when it’s
appropriate, but it can lead to all kinds of problems. It usually doesn’t take a lot of work
to limit your sending, and the benefits far outweigh the costs.
Never Assume
What you say is not always what the other person hears. Sometimes it’s a matter of
misinterpretation, and other times, you may not have been heard clearly. If you assume
the message got through and continue on obliviously, you’re in for a world of hurt.
Likewise, you may be tempted to work out all the logic of your system, and all the steps
of your messages before you start to connect things together, then build it, then test it all
at once. Avoid that temptation. It’s good to plan the whole system out in advance, but
build it and test it in baby steps. Most of the errors that occur in building these projects
occur in the communication between objects. Always send a quick “Hello World!”
message from one object to the others and make sure the message got there intact before
you proceed to the more complex details. Keep the “Hello World!” example on hand for
testing when communication fails.
Getting the message wrong isn’t the only wrong assumption you can make. Most of the
projects in this book involve building the physical, software, and electrical elements of
the interface. One of the most common mistakes people make when developing hybrid
projects like these is to assume that the problems are all in one place. Quite often, I’ve
sweated over a bug in the software transmission of a message, only to find out later that
the receiving device wasn’t even connected, or wasn’t ready to receive messages. Don’t
assume that communication errors are in the element of the system with which you’re
most familiar. They’re most often in the element with which you’re least familiar, and
therefore avoiding. When you can’t get a message through, think about every link in the
chain from sender to receiver, and check every one. Then check the links you overlooked.
4
O’Reilly Media, Inc.
9/10/06
Agree on How You Say Things
In good relationships you develop a shared language based on shared experience. You
learn the best ways to say things so that your partner will be most receptive, and you
develop shorthand for expressing things that you repeat all the time. Good data
communications also rely on shared ways of saying things, or protocols. Sometimes you
make up a protocol yourself for all the objects in your system, and other times you have
to rely on existing protocols. If you’re working with a previously established protocol,
make sure you understand what all the parts are before you start trying to interpret it. If
you have the luxury of making up your own protocol, make sure you’ve considered the
needs of both the sender and receiver when you define it. For example, you may decide to
use a protocol that’s easy to program on your web server, but that’s impossible to handle
on your microcontroller. A little thought to the strengths and weaknesses on both sides of
the transmission and a little compromise before you start to build will make things flow
much more smoothly.
Ask Politely for Clarification
Messages get garbled in countless ways. Sometimes you hear one thing, it may not make
much sense, but you act on it, only to find out that your partner said something entirely
different. It’s always best to ask nicely for clarification to avoid making a stupid mistake.
Likewise, in network communications, it’s wise to check that any messages you receive
make sense. When they don’t, ask for a repeat transmission. It’s also wise to check that a
message was sent, rather than assume. Saying nothing can be worse than saying
something wrong. Minor problems can become major when no one speaks up to
acknowledge that there’s a problem. The same thing can occur in network
communications. One device may wait forever for a message from the other side, not
knowing that the remote device is unplugged, or didn’t get the initial message. When no
response is forthcoming, send another message. Don’t re-send it too often, and give the
other party time to reply before re-sending. Acknowledging messages may seem like a
luxury, but it can save a whole lot of time and energy when you’re building a complex
system.
Tools
Since you’ll be working with the physical, software, and electrical interfaces of objects,
the tools you’ll need are physical tools, software, and (computer) hardware.
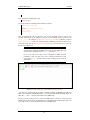
Physical Tools
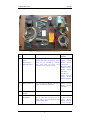
If you’ve worked with microcontrollers before, chances are you have your own hand
tools already. Figure 1-1 shows the ones used most frequently in this book. They’re
common tools, and can be obtained from many vendors. A few are listed below.
5
O’Reilly Media, Inc.
9/10/06
Figure 1-1. Handy hand tools for networking objects
Item
No.
Tool
Notes
Supplier
part no.
1
Needle-nosed
pliers,
Wire strippers,
Diagonal cutters.
Avoid the 3-in-1 version of these tools.
They’ll only make you grumpy. These
three tools are essential for working
with wire, and you don’t need
expensive ones to have good ones.
Wire Stripper:
Jameco: 159290;
Radio Shack:
640-2129A
Diagonal Cutter:
Jameco: 161411;
Radio Shack:
640-2043
Needle-nose
Pliers: Jameco:
35473; Radio
Shack: 640-2033
2.
Mini-screwdriver.
Get one with both Philips and slotted
heads. You’ll use it all the time.
Jameco: 127271;
Radio Shack:
640-1963
3
Microcontroller
module
4.
Solderless
Breadboard
Having a few around can be handy. I
like the ones with two long rows on
either side, so you can run power and
ground on both sides.
Jameco: 20722
(2 bus rows per
side); Radio
Shack 276-174
(1 bus row per
side)
6
and
O’Reilly Media, Inc.
9/10/06
Item
No.
Tool
Notes
Supplier
part no.
side)
5
Multimeter
You don't need an expensive one. As
long as it measures voltage, resistance,
amperage, and continuity, it’ll do the
job.
Jameco: 220812;
Radio Shack:
22-810
6
Alligator clip test
leads
It’s often hard to juggle the five or six
things you have to hold when metering
a circuit. Clip leads make this much
easier.
Jameco: 10444;
Radio Shack:
278-016
7
Soldering iron
Middle-of-the-line is best here. Cheap
soldering irons die fast, but a mid-range
iron like the Weller WLC-100 work
great for small electronic work. Avoid
the Cold Solder irons. They solder by
creating a spark, and that spark can
damage static-sensitive parts like
microcontrollers.
Jameco: 146595
Radio Shack:
640-2802 and
640-2078
8
Solder
21 – 23AWG solder is best. Get leadfree solder if you can, it’s healthier for
you.
Jameco: 668271;
Radio Shack:
640-0013
9
Helping hands
These make soldering much easier.
10
9-12V DC power
supply
You’ll use this all the time, and you’ve
probably got one spare from some dead
electronic device. Make sure you know
the polarity of the plug so you don’t
reverse polarity on some component
and blow it up! Most of the devices
shown in this book have a DC power
jack that accepts a 2.1mm inner
diameter, 5.5mm outer diameter plug,
so look for an adaptor with the same
dimensions.
Jameco: 170245
(12V, 1000mA)
Radio
Shack: 273-1667
(3-12V, 800mA)
11
Ethernet cables
A couple of these will come in handy
Jameco: 522781
12
Serial cable
Even though serial ports are less
common, you’ll need a 9-pin RS-232
serial cable. Don’t get a null modem
cable. The receive and transmit wires in
that type of cable are crossed. Make
sure your cable has one male and one
female end, and it’s probably the right
kind.
Jameco: 162915;
Radio Shack:
260-0117
13
Serial breadboard
plug
Make your own one of these by
soldering some header pins to pins 2, 3,
4, and 5 of a female 9-pin connector.
Jameco: 15780
7
and
O’Reilly Media, Inc.
Item
No.
Tool
9/10/06
Notes
4, and 5 of a female 9-pin connector.
Supplier and
part no.
Radio Shack:
276-1538
Plus header pins,
below
14
Serial-to-USB
converter
This lets you speak RS-232 from a USB
port. I like the Keyspan models, but the
IOGear models have proven to be
reliable as well. You’ll also learn how
to build your own [BJ8]in chapter three.
Keyspan: USA19HS; Iogear:
GUC232A
15
Spare LEDs for
tracing signals
LEDs are to the hardware developer
what print statements are to the
software developer. They let you see
quickly if there’s voltage between two
points, or if a signal’s going through.
Keep spares on hand.
Jameco: 34761
Radio Shack:
276-0069
16
Black, red, blue,
yellow wire
22AWG solid core hook-up wire is best
for making solderless breadboard
connections. Get at least three colors,
and always use red for voltage and
black for ground. A little organization
of your wires can go a long way.
Black: Jameco:
36791
Blue: Jameco:
36767
Green: Jameco:
36821
Red:
Jameco:
36855; Radio
Shack: 278-1215
Yellow: Jameco:
36919
Mixed: Radio
Shack: 276-173
17
Header pins
You’ll use these all the time. It’s handy
to have female ones around as well.
Jameco: 103376
You’ll find a number of suppliers in this book. I buy from different
vendors depending on who’s got the best and the least expensive
version of each part. Sometimes it’s easier to buy from a vendor that
you know carries what you need rather than search through the massive
catalog of a vendor who might carry it cheaper, though. Feel free to
substitute your favorite vendors. A list of vendors can be found in the
index.
Software Tools
Processing
The multimedia programming environment used in this book is called Processing. It’s
based on Java, and made for designers, artists, and others who don’t need to know all the
gory details of programming, but want to get something done. It’s a useful tool for
8
O’Reilly Media, Inc.
9/10/06
explaining programming ideas because it takes relatively little Processing code to make
big things happen, such as opening a network connection, connecting to an external
device through a serial port, or controlling a camera through FireWire. It’s a free, open
source tool available from http://www.processing.org. Because it’s based on Java, you
can include Java classes and methods in your Processing programs[BCJ10]. It runs on
Mac OS X, Windows, and Linux, so almost anyone can run Processing on their favorite
operating system[BCJ11]. If you don’t like working in Processing, you should be able to
use the code samples here and their comments as pseudocode for whatever multimedia
environment you prefer.
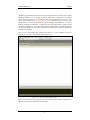
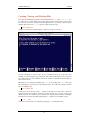
Once you’ve downloaded and installed Processing on your computer, open the
application. You’ll get a screen that looks like Figure 1-2.
Figure 1-2. The Processing editor window
Here’s your first Processing program. Type this into the editor window, and press the
Run button on the top left-hand side of the toolbar:
9
O’Reilly Media, Inc.
9/10/06
println("Hello World!\n");
It’s not too flashy a program, but it’s a classic. It should print
Hello World!
in the message box at the bottom of the editor window. It’s that easy.
Programs in Processing are called sketches, and all the data for a sketch is saved in a
folder with the sketch’s name. The editor is very basic, without a lot of clutter to get in
your way. The toolbar has buttons to run and stop a sketch, create a new file, open an
existing sketch, save the current sketch, or export to a Java applet. You can also export
your sketch as a standalone application from the File menu. Files are normally stored in a
subdirectory of your Documents folder called Processing, but you can save them
wherever you prefer if you don’t like them there.
Here’s a second program that’s a bit more exciting. It illustrates some of the main
programming structures in Processing:
/*
Triangle drawing program
Language: Processing
Draws a triangle whenever the mouse button is not pressed.
Erases when the mouse button is pressed.
*/
// declare your variables:
float redValue = 0;
// variable to hold the red color
float greenValue = 0; // variable to hold the green color
float blueValue = 0;
// variable to hold the blue color
// the setup() method runs once at the beginning of the program:
void setup() {
size(320, 240);
background(0);
fill(0);
smooth();
}
//sets the size of the applet window
// sets the background of the window to black
// sets the color to fill shapes with (0 = black)
// draw with antialiased edges
// the draw() method runs repeatedly, as long as the applet window
// is open. It refreshes the window, and anything else you program
// it to do:
void draw() {
// Pick random colors for red, green, and blue:
redValue = random(255);
greenValue = random(255);
blueValue = random(255);
// set the line color:
stroke(redValue, greenValue, blueValue);
// draw when the mouse is up (to hell with conventions):
if (mousePressed == false) {
10
O’Reilly Media, Inc.
9/10/06
// draw a triangle:
triangle(mouseX, mouseY, width/2, height/2,pmouseX, pmouseY);
}
// erase when the mouse is down:
else {
background(0);
fill(0);
}
}
Every Processing program has two main routines, setup() and draw(). setup()
happens once at the beginning of the program. It’s where you set all your initial
conditions, like the size of the applet window, initial states for variables, and so forth.
draw() is the main loop of the program. It repeats continuously until you close the
applet window.
In order to use variables in Processing, you have to declare the variable’s data type. In the
preceding program, the variables redValue, greenValue, and blueValue are all
float types, meaning that they’re floating decimal-point numbers. Other common
variable types you’ll use are ints (integers), booleans (true or false values),
Strings of text, and bytes.
Like C, Java and many other languages, Processing uses C-style syntax. All functions
have a data type just like variables (and many of them are the void type, meaning that
they don’t return any values). All lines end with a semicolon, and all blocks of code are
wrapped in curly brackets. Conditional statements (if-then statements), for-next loops,
and comments all use the C syntax as well. The preceding code illustrates all of these
except the for-next loop. Here’s a typical for-next loop. Try this in a sketch of its own (to
start a new sketch, select New from Processing’s File menu):
for (int myCounter = 0; myCounter <=10; myCounter++) {
println(myCounter);
}
BASIC users: If you’ve never used a C-style for-next loop, it can seem
a bit forbidding. What this bit of code does is to establish a variable
called myCounter. As long as number is less than or equal to ten, it
executes the instructions in the curly brackets. myCounter++ tells the
program to add one to number each time through the loop. The
equivalent BASIC code is:
for myCounter = 0 to 10
Print myCounter
next
Processing is a fun language to play with, because you can make interactive graphics
very quickly. It’s also a simple introduction to Java for beginning programmers. If
you’re a Java programmer already, you can include Java directly in your Processing
programs. Processing is expandable through code libraries. You’ll be using two of the
Processing code libraries frequently in this book, the serial library and the networking
library.
For more on the syntax of Processing, see the language reference guide at
http://www.processing.org. To learn more about programming in Processing, check out
11
O’Reilly Media, Inc.
9/10/06
CASEY’S BOOK TITLE by Casey Reas and Ben Fry, the creators of Processing, or
SHIFFMAN’S BOOK TITLE, by Daniel Shiffman.
Mac OS X Users:
Once you’ve downloaded and installed Processing, there’s an extra step
you’ll need to take that will make the projects in this book that use
Processing possible. Go to the Processing application directory, then to
the libraries/serial/ subdirectory. There’s a file there called
macosx_setup.command. Double-click this. It will run a script that
enables Processing to use serial communication to USB, Bluetooth, and
other devices. A terminal window will open and run a script that will
ask you a few questions. It will also ask for your administrator
password, so don’t run it unless you have administrator access to your
machine. Say “yes” to anything it asks, and provide your password
when needed. When it’s done, you’ll be able to use the serial ports of
your computer through Processing. You’ll be making heavy use of this
capability later on in this book.
Remote Access Applications
One of the most effective debugging tools you’ll use in making the projects in this book
is a command-line remote access program, which allows you access to the command line
interface of a remote computer. If you’ve never used a command line interface before,
you’ll find it a bit awkward at first, but you get used to it pretty quickly. This is
especially important if you need to log into a web server, since you’ll need the command
line to create HTML pages and PHP scripts that will be used in this book.
Most web hosting providers are based on Linux, BSD, Solaris or some other Unix-like
operating system. So, when you need to do some work on your web server, you may need
to make a command-line connection to your web server.
If you already know how to create PHP and HTML documents and
upload them to your web server, you can skip ahead to the “PHP”
section.
In a command line interface, everything is done by typing commands at the cursor. The
programs you’ll be running and the files you’ll be writing and reading aren’t on your
machine. When you’re using the PHP programming language described shortly, for
example, you’ll be using programs and reading files directly on the web host’s computer.
Although this is the most direct way to work with PHP, some people prefer to work more
indirectly, by writing text files on their local computers and uploading them to the remote
computer. Depending on how restrictive your web hosting service is, this may be your
only option. Even if you prefer to work this way, there are times in this book when the
command line is your only option, so it’s worth getting to know a little bit about it now.
[BCJ12]
On Windows computers, there are a few remote access programs available, but the one
that you’ll use here is called PuTTY.
You can download it from
http://www.snapfiles.com/get/putt.html. Download the Windows-style installer and run it.
On Mac OS X and Linux, you can use OpenSSH, which is included with either operating
system, and can be run with the command ssh.
12
O’Reilly Media, Inc.
9/10/06
ssh is a more modern cousin of a longtime Unix remote access
program called telnet. ssh is more secure, in that it scrambles all
data sent from one computer to another before sending it, so it can’t be
snooped on en route. telnet sends all data from one computer to
another with no encryption. You should use ssh to connect from one
machine to another whenever you can. Where telnet is used in this
book, it’s because it’s the only tool that will do what’s needed for the
examples in question. Think of telnet as an old friend, maybe not
the coolest guy on the block, maybe he’s a bit of a gossip, but he’s
stood by you forever, and you know you can trust him to do the job
when everyone else lets you down.
Before you can run OpenSSH, you’ll need to launch a terminal emulation program,
which gives you access to your Linux or Mac OS X command-line. On Mac OS X, the
program is called Terminal, and you can find it in the Utilities subdirectory of the
Applications directory. On Linux, look for a program called xterm, rxvt, Terminal, or
Konsole.
The instructions to connect to a remote host are slightly different depending on whether
you use Mac OS X, Linux, or Windows:
Mac OS X and Linux
To get started, open your terminal program. The Linux and Mac OS X Terminal
applications give you a plain text window with a greeting like this (commands you
type will appear right after the $ prompt):
Last login: Wed Feb 22 07:20:34 on ttyp1
Welcome to Darwin!
ComputerName:~ username$
Type the following at the command line to connect to your web host:
ssh [email protected]
Replace username and myhost.com with your username and host address.
Windows
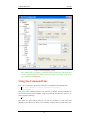
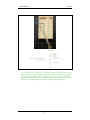
On Windows, you’ll need to start up PuTTY. Its opening interface is shown in
Figure 1-3. To get started using it, type myhost.com (your web host’s name) in the
Host Name field, choose port 22, and choose the SSH protocol. Then click Open.
13
O’Reilly Media, Inc.
9/10/06
Figure 1-3. The main putty window
The computer will try to initiate a connection with the remote host, and will prompt
you for your password when it makes a connection. Type it (you won’t see what you
type), followed by the Enter key.
Using the Command Line
Once you’ve connected to the remote web server, you should see something like this:
Last login: Wed Feb 22 08:50:04 2006 from 216.157.45.215
[userid@myhost ~]$
Now you’re at the command prompt of your web host’s computer, and any command you
give will be executed on that computer. Start off by learning what directory you’re in. To
do this, Type the following:
pwd
This stands for “print working directory.” It asks the computer to list the name and
pathname of the directory in which you’re currently working. You’ll see that many Unix
14
O’Reilly Media, Inc.
9/10/06
commands are very terse, so you have to type less. The downside of this is that it makes
them harder to remember. The server will respond with a directory path, such as:
/home/igoe
This is the home directory for your account. On many web servers, this directory
contains a subdirectory called public_html or www, which is where your web files
belong. Files that you place in your home directory (that is, outside or www or
public_html) can’t be seen by web visitors.
You can check with your service provider to learn how the files and
directories in your home directory are set up.
To find out what files are in a given directory, use the list (ls) command, like so:
ls –l .
The dot is shorthand for “the current working directory.” Similarly, a
double dot is shorthand for the directory (the parent directory) that
contains the current directory.
The –l means “list long.” You’ll get a response like this:
total 44
drwxr-xr-x 13 igoe users 4096 Apr 14 11:42 public_html
drwxr-xr-x
3 igoe users 4096 Nov 25 2005 share
6[BCJ13]This is a list of all the files and subdirectories of the current working directories, and their
attributes. The first column lists who’s got permissions to do what (read, modify, or
execute/run a file). The second lists how many aliases elsewhere on the system; it’s notn
something you’ll have much need for, most of the time. The third column tells you who
created it, and the fourth tells you who has access to change it. The fifth lists its size, and
the sixth lists the date it was last modified. The final column lists the filename.
In a Unix environment, all files whose names begin with a dot are invisible. Some files,
like access-control files that you’ll see later in the book, need to be invisible. You can
get a list of all the files, including the invisible ones, using the –a modifier for ls, this
way:
ls -la
To move around from one directory to another there’s a “change directory” command,
cd. To get into the public_html directory, for example, type
cd public_html
To go back up one level in the directory structure, type
cd ..
To return to your home directory, use the ~ symbol, which is shorthand for your home
directory:
cd ~
If you type cd on a line by itself, it takes you to your home directory.
If you wanted to go into a subdirectory of a directory, for example the cgi-bin directory
inside the public_html directory, you’d type cd public_html/cgi-bin. You can
type the absolute path from the main directory of the server (called the root) by placing a
15
O’Reilly Media, Inc.
9/10/06
/ at the beginning of the file’s pathname. Any other file pathname is called a relative
path.
To make a new directory, type
mkdir directoryname
This will make a new directory in the current working directory. If you then ls -l to
see a list of files in the working directory, you’ll see a new line with the new directory. If
you then cd directoryname to switch to the new directory and ls –la to see all
of its contents, you’ll see only two listings:
drwxr-xr-x
drwxr-xr-x
2 tqi6023 users 4096 Feb 17 10:19 .
4 tqi6023 users 4096 Feb 17 10:19 ..
The first file, . is a reference to this directory itself. The second, .. , is a reference to the
directory that contains it. Those two references will exist as long as the directory exists.
You can’t change them.
To remove a directory, type
rmdir directoryname
You can only remove empty directories, so make sure you’ve deleted all the files in a
directory before you remove it. rmdir won’t ask you if you’re sure before it deletes
your directory, though, so be careful. Don’t remove any directories or files you didn’t
make yourself until you know your way around.
Controlling Access to Files
Type ls –l . to get a list of files in your current directory, and take a closer look at the
permissions on the files. For example, a file marked drwx------ means that it’s a
directory, and that it’s readable, writable, and executable by the system user that created
[BCJ14]the directory (also known as the owner of the file). Or take the file marked -rwrw-rw. The – at the beginning means it’s a regular file, not a directory, that the owner,
the group of users that the owner belongs to, and everyone else who accesses the system
can read and write to this file. The first rw- refers to the owner, the second refers to the
group, and the third refers to the rest of the world. You can change these permissions if
the owner of a file using a command called chmod like so:
chmod go –w filename
The options following chmod refer to which users you want to affect. In the example
above, you’re removing write permission (-w) for the group that the file’s owner belongs
to, and for all others (go) besides the owner of the file. To restore write permissions for
the group and others, and to give them execute permission, you’d type:
chmod go +wx filename
A combination of u for user, g for group and o for others, and a combination of + and –
and r for read, w for write, and x for execute gives you the capability to change
permissions on your files for anyone on the system. Be careful not to accidentally remove
permissions from yourself (the user), and get in the habit of not leaving files accessible to
the group and others unless you need to: on large hosting providers, it’s not unusual for
you to be sharing a server with hundreds of other users!
16
O’Reilly Media, Inc.
9/10/06
Creating, Viewing, and Deleting Files
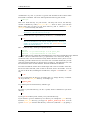
Two other command-line programs you’ll find useful are nano and less. nano is a
text editor. It’s very bare-bones, and you may prefer to edit your files using your favorite
text editor on your own computer and then upload them to your server. But for quick
changes right on the server, nano is great. To make a new file, type
nano filename.txt
You’ll get a screen that looks like Figure 1-4 (after you type in some text):
Figure 1-4. The nano text editor.
All the commands to work in nano are key commands using the control key. For
example, to exit the program, type Control-X. The editor will then ask you if you want to
save, and prompt you for a filename. The most common commands are listed along the
bottom of the screen.
While nano is for creating and editing files, less is for reading them. less takes any
file and displays it to the screen one screenful at a time. To see the file you just created in
nano, for example, type
less filename.txt
You’ll get a list of the file, with a : prompt at the bottom of the screen. Press the
spacebar for the next screenful. When you’ve read enough, type q to quit. There’s not
much to less, but it’s a handy way to read long files. You can even send other commands
through less (or any unix program) using the pipe (|) operator. For example, try this:
ls –la .| less
Once you’ve created a file, you can delete it using the rm command, like this:
17
O’Reilly Media, Inc.
9/10/06
rm filename
Like rmdir, rm won’t ask you if you’re sure before it deletes your file, so use it
carefully.
There are many other commands available in the Unix command shell, but these will
suffice to get you started for now. For more information, type help at the command
prompt to get a list of commonly used commands. For any command, you can get its
user manual by typing man commandname. For more on getting around Unix and
Linux systems using the command line, see Learning the Unix Operating System by Jerry
Peek, John Strang, and Grace Todino-Gonguet. When you’re ready to close the
connection to your server, type
logout
PHP
The server programs in this book are mostly in PHP. PHP is one of the most common
scripting languages for applications that run on the web server (server-side scripts).
Server-side scripts[BCJ15] are programs that allow you to do more with a web server than
just serve fixed pages of text or HTML. They allow you to access databases through a
browser, save data from a web session to a text file, send mail from a browser, and more.
You’ll need a web hosting account with an Internet service provider for most of the
projects in this book, and it’s likely that your host already provides access to PHP. If not,
talk to your system administrator to see if it can be installed.
To get started with PHP, you’ll need to make a terminal connection to your web hosting
account using ssh as you did in the last section. Some of the more basic web hosts don’t
allow terminal connections, so check with yours to see if they do. Once you’re connected,
type:
php -v
you should get a reply like this:
PHP 4.3.9 (cgi[BCJ16]) (built: Nov 4 2005 11:49:43)
Copyright (c) 1997-2004 The PHP Group
Zend Engine v1.3.0, Copyright (c) 1998-2004 Zend Technologies
This tells what version of PHP is installed on your server. The code in this book was
written using PHP4, so as long as you’re running that version or later, you’ll be fine.
PHP makes it easy to write web pages that can display results from databases, send
messages to other servers, send email, and more. Most of the time you won’t be
executing your PHP scripts directly from the command line. Instead, you’ll be calling the
web server application on your server, most likely a program called Apache, and asking it
for a file (this is all accomplished simply by opening a web browser, typing in the address
of a document on your web server, and pressing Enter—just like visiting any other web
page). If the file you ask for is a PHP script, the web server application will look for your
file and execute it. It’ll then send a message back to you with the results. For more on
this, see Chapter 3. For now, let’s get a simple PHP program or two working. Here’s your
first PHP program. Open your favorite text editor, type this in, and save it on the server
with the name hello.php in your public_html directory.
<?php
echo "<html><head></head><body>\n";
echo "hello world!\n";
echo "</body></html>\n";
18
O’Reilly Media, Inc.
9/10/06
?>
Now, back at the command line, type
php hello.php
To see the results. You should get the following response:
Content-type: text/html
[BCJ17]<html><head></head><body>
hello world!
</body></html>
Now try opening this file in a browser. To see this program in action, open a web
browser and navigate to the address of this file on your website. Since you saved it in
p u b l i c _ h t m l , the address is http://www.example.com/hello.php[BCJ18] (replace
www.example.com with your web site and any additional path info needed to access
your home files, such as http://tigoe.net/~tigoe/hello.php). You should get a web page
like the one in Figure 1-5.
If you see the PHP source code instead of what’s shown in Figure 1-5,
you may have opened up the PHP script as a local file (make sure your
web browser’s location bar says http:// instead of file://).
If not, your web server may not be configured for PHP. Another
possibility is that your web server uses a different extension for php
scripts, such as .php4. Consult with your web hosting provider for more
information.
Figure 1-5. The results of your first PHP script, in a browser.
You may have noticed that the program is actually printing out HTML text. PHP was
made to be combined with HTML. In fact, you can even embed PHP in HTML pages, by
using the <? and ?> tags that start and end every PHP script.
If you get an error when you try to open your PHP script in a browser, ask your system
administrator if there are any requirements as to which directories PHP scripts need to be
in on your server, or on the file permissions for your PHP scripts.
19
O’Reilly Media, Inc.
9/10/06
Here’s a slightly more complex PHP script. Save it to your server in the public_html
directory as time.php:
<?php
/*
Date printer
Language: PHP
Prints the date and time in an HTML page.
*/
//
Get the date, and format it:
$date = date("Y-m-d h:i:s\t");
// print the beginning of an HTML page:
echo "<html><head></head><body>\n";
echo "hello world!<br>\n";
// Include the date:
echo "Today's date: $date<br>\n";
// finish the HTML:
echo "</body></html>\n";
?>
To see it in action, type http://www.example.com/time.php into your browser. You
should get the date and time. You can see this program uses a variable, $date, and calls
a built-in PHP function, date(), to fill the variable. You don’t have to declare the
types of your variables in PHP. Any simple, or scalar, variable begins with a $ and can
contain an integer, a floating point number, or a string. PHP uses the same C-style syntax
as Processing, so you’ll see that if-then statements, repeat loops, and comments all look
familiar.
For more on PHP, check out http://www.php.net, the source for PHP, where you’ll find
some good tutorials on how to use it. You can also check out Learning PHP 5 by David
Sklar for a more in-depth treatment.
Serial Communication Tools
The remote access programs in the earlier section were terminal emulation programs that
gave you access to remote computers through the Internet, but that’s not all a terminal
emulation program can do. Before TCP/IP was ubiquitous as a way for computers to
connect to networks, connectivity was handled through modems attached to the serial
ports of computers. Back then, many users connected to bulletin boards (BBSes) and
used menu-based systems to post messages on discussion boards, download files, and
send mail to other users of the same BBS.
Nowadays, serial ports are used mainly to connect to some of peripheral devices of your
computer. In microcontroller programming, they’re used to exchange data between the
computer and the microcontroller. For the projects in this book, you’ll find that using a
terminal program to connect to your serial ports is indispensable. There are several
freeware and shareware terminal programs available, but to keep it simple, stick with one
that’s already on your computer: HyperTerminal for Windows users, and the GNU screen
program for Mac OS X and Linux users. [BCJ19]
HyperTerminal can also make telnet connections, but not SSH
connections. Putty can make telnet and SSH connections, but can’t
make connections to the serial port. So Windows users are going to
20
O’Reilly Media, Inc.
9/10/06
have to use to two terminal programs in this book. Linux and Mac OS
X users can use GNU screen and SSH from within a terminal program
such as Terminal, xterm, rxvt, or Konsole.
On Windows, HyperTerminal [BCJ20]can be found in the Start Menu, under All
Programs→Accessories→Communications→H y p e r T e r m i n a l .
To
configure
HyperTerminal for serial communication in Windows, open the program and click on the
File→Properties menu item. Choose the serial port you want to open from the popup
menu in the Configuration tab. Click on Configure to bring up the Port Settings tab. Set
the properties as needed for the device you’re talking to. For many of the projects that
follow, you’ll set the port settings to:
•
9600 bits per second
•
8 data bits
•
No parity
•
One stop bit
•
No hardware flow control
Once you’ve applied those settings, click the Call button on the toolbar to open the serial
port. Any characters you type in the window will be sent byte-by-byte out the serial port
you opened. They won't show up on the screen, however. Any bytes received in the
serial port will be displayed as characters in the window. Click the Disconnect button to
close the serial port.
To get started with serial communication in Mac OS X or Linux, open a terminal window
and type:
ls /dev/tty*
This will give you a list of available serial ports. The names of the serial ports in Mac OS
X and Linux are more unique, but more cryptic than the COM1, COM2, etc. that
Windows uses. Pick your serial port and type screen portname datarate.
For example, to open the serial port on an Arduino board (discussed shortly) at 9600 bits
per second, you might type screen /dev/tty.usbserial-1B1 9600 on Mac OS
X. On Linux, the command might be screen /dev/ttyUSB0 9600. The screen will
be cleared, and any characters you type will be sent out the serial port you opened. They
won't show up on the screen, however. Any bytes received in the serial port will be
displayed in the window as characters. To close the serial port, type control-A
followed by control-\.
Who's Got the Port?
21
O’Reilly Media, Inc.
9/10/06
Serial ports aren't easily shared between applications. In fact, only one
application can have control of a serial port at a time. If HyperTerminal or the
screen program has the serial port open to an Arduino module, for example, the
Arduino programming application can't download new code to the module.
When an application tries to open a serial port, it requests exclusive control of it
either by writing to a special file called a lock file or by asking the operating
system to lock the file on its behalf.[BCJ22] When it closes the serial port, it
releases the lock on the serial port. Sometimes when an application crashes
while it's got a serial port open, it can forget to close the serial port, with the
result that no other application can open the port. When this happens, the only
thing you can do to fix it is to restart the operating system, which clears all the
locks (alternatively, you could wait for the operating system to figure out that
the lock should be released). To avoid this problem, make sure you close the
serial port whenever you switch from one application to another. Linux and Mac
OS X users should get in the habit of closing down screen with Ctrl-A Ctrl-\
every time, and Windows users should disconnect the connection in
HyperTerminal. Otherwise, you may find yourself restarting your machine a lot.
In the next section, you’ll use a serial communications program to communicate with a
microcontroller.
Hardware
Arduino and Wiring
There are a number of microcontrollers used in this book. The main one is the Arduino
module. Arduino is based on a similar module called Wiring. You should be able to use
Arduino or Wiring interchangeably for the examples in this book. Wiring has a few more
input and output connections, but Arduino is a bit less expensive. Both modules are the
children of the Processing programming environment and the Atmel family of
microcontrollers. In fact, you’ll find that the editors for Processing, Wiring, and Arduino
look almost identical. Both programming environments are free and open source,
available through http://hardware.processing.org. You can buy the actual modules from
the original developers or from Sparkfun at http://www.sparkfun.comor if you’re a
hardcore hardware geek and like to make your own printed circuit boards, you can
download the plans and make your own. I recommend the former, as it’s much quicker
(and more reliable, for most people). You can also build an Arduino module on a
solderless breadboard.
One of the best things about Wiring and Arduino is that they are cross-platform. This is a
rarity in microcontroller development environments. They work well on Mac OS X,
Windows, and (with some effort) Linux.
Another good thing about these environments is that, like Processing, they can be
extended. Just as you can include Java classes and methods in your Processing programs,
you can include C/C++ code, written in AVR-C, in your Wiring and Arduino programs.
For more on how to do this, see the Wiring and Arduino websites.
At the time of this writing, there was no Linux installer for Arduino,
but there was one for Wiring. For information on installing the Arduino
software on Linux, see the FAQ: http://www.arduino.cc/en/Main/FAQ .
22
O’Reilly Media, Inc.
9/10/06
The projects in this book can be built with other microcontrollers as well. In the
appendix, you’ll find example code for building the projects on other microcontroller
platforms.
Like all microcontrollers, the Arduino and Wiring modules are just small computers. Like
every computer, they have inputs, outputs, a power supply, and a communications port to
connect to other devices. You can power these modules either through a separate power
supply or through the USB connection to your computer. The jumper shown in Figure 16 switches power from the external supply to the USB supply. For this introduction,
you’ll power the module from the USB connection.
Figure 1-6. Arduino and Wiring modules. Note the jumper to switch
power from the USB connection to an external power supply.
Getting Started
Since the installation process for Wiring and Arduino is almost identical, I’ll only detail
the Arduino process here. Wiring users will find things similar enough that you can
follow along and do the same steps, substituting “Wiring” for “Arduino” in the
instructions that follow.
Once you’ve downloaded the Arduino software, you’ll need to do a bit of configuring to
get things ready for use. Expand the downloaded file and you’ll get a directory called
arduino-0004 (if there is a newer version of the software available, the number will be
different). Move this somewhere convenient: on a Mac, you might put it in your
Applications directory; on Windows, maybe in C:\Program Files; on Linux, you might
want to keep it in your home directory or drop it into /usr/local. Now navigate to the
directory arduino-0004/drivers subdirectory. In that directory you’ll find an installer for
the FTDI USB serial driver. [BCJ23] This is the USB device on the module that allows
your computer to communicate with the module via USB. Install it. Macintosh users
will also find a file in the arduino-0004 directory called macosx_setup.command. This
is the same as the macosx_setup.command for Processing that was described earlier, so if
23
O’Reilly Media, Inc.
9/10/06
you already ran it to configure Processing, you won’t need to do it again. If you haven’t,,
double-click the file and follow the instructions that follow.
Arduino, and Wiring,are new to the market, and changes to their
software happen frequently. The notes in this book refer to Arduino
version <ARDUINO VERSION NUMBER> and Wiring version
<WIRING VERSION NUMBER>. By the time you read this, the
specifics may be slightly different, so check the Arduino, Wiring,
websites for the latest details.
Now you’re ready to launch Arduino. Connect the module to your USB port, and doubleclick the Arduino icon to launch the software. The editor looks like Figure 1-7.
24
O’Reilly Media, Inc.
9/10/06
Figure 1-7. The Arduino programming environment, The Wiring
environment looks identical to this, except for the color.
The environment is based on Processing, and has the same New, Open, Save, and Export
buttons on the main toolbar. In Arduino and Wiring, the Run function is called Verify. It
compiles your program to check for any errors, and the Export function is called Upload
to Module instead. It uploads your code to the microcontroller module. There’s an
additional button, the Serial Monitor, that you can use to receive serial data from the
module while you’re debugging.
Here’s your first program:
/*
Blink
Language: Arduino/Wiring
25
O’Reilly Media, Inc.
9/10/06
Blinks an LED attached to pin 13 every half second.
Connections:
Pin 13: + leg of an LED (- leg goes to ground)
*/
int LEDPin = 13;
void setup() {
pinMode(LEDPin, OUTPUT);
}
// set pin 13 to be an output
void loop() {
digitalWrite(LEDPin, HIGH);
delay(500);
digitalWrite(LEDPin, LOW);
delay(500);
}
//
//
//
//
turn
wait
turn
wait
the LED on pin 13 on
half a second
the LED off
half a second
In order to see this run, you’ll need to connect an LED from pin 13 of the board to ground
as shown in Figure 1-8.
Figure 1-8. LED connected to pin 13 of an Arduino board
Then type the code into the editor. Click on Tools→Serial Port to choose the serial port
of the Arduino module. Set Click on Tools→Serial Monitor Baud Rate to set the serial
monitor baud rate to 9600 bits per second as well (in Wiring, the serial monitor baud rate
is fixed at 9600 bits per second). On the Mac or Linux, the serial port will have a name
like /dev/tty.usbserial-1B1 (the letters and numbers after the dash will be
slightly different each time you connect it). On Windows, it should be COMx, where x
is some number (for example, COM5).
On Windows, COM1-COM4 are generally reserved for built-in serial
ports, whether you computer has them or not.
Once you’ve selected the port, click Verify to compile your code. When it’s compiled,
you’ll get a message at the bottom of the window saying Done compiling. Then
press the reset button on the module to reset the it and prepare it to accept a new program.
26
O’Reilly Media, Inc.
9/10/06
Then click Upload. This will take several seconds. Once it’s done, you’ll get a message
saying Done uploading, and a confirmation message in the serial monitor window
that says:
Atmel AVR ATmega8 is found.
Uploading: flash
Intel-based Mac users: if you have a problem getting the module to
accept your program, click Upload, then wait five seconds before
hitting the reset button on the module. The Intel-based Macs weren’t
on the market when Arduino and Wiring were first made, and this is a
problem that still plagues early versions of these modules. It may be
gone by the time you read this, especially if you have a later version of
the Arduino or Wiring module.
Press the reset button on the module again, and after about five seconds, the LED you
wired to pin the output pin will begin to blink. That’s the microcontroller equivalent of
“Hello World!”
Where’s My Serial Port?
The USB serial port that’s associated with the Arduino or Wiring module is
actually a software driver that loads every time you plug in the module. When
you unplug, the serial driver deactivates and the serial port will disappear from
the list of available ports. You might also notice that the port name changes
when you re-plug the module. On Windows machines, you may get a new
COM number. On Macintoshes, you’ll get a different alphanumeric code at the
end of the port name.
Never unplug a USB serial device when you’ve got its serial port open; this
means you need to exit the Wiring or Arduino software environment before you
unplug anything. Otherwise, you’re sure to crash the application, and possibly
the whole operating system, depending on how well-behaved the application is.
Serial Communication
One of the most frequent tasks you’ll use a microcontroller for in this book is to
communicate serially with another device, either to send sensor readings over a network,
or to receive commands to control motors, lights, or other outputs from the
microcontroller. Regardless of what device you’re communicating with, the commands
you’ll use in your microcontroller program will be the same. First you’ll configure the
serial connection for the right data rate. Then you’ll either read bytes in or write bytes
out or both, depending on what device you’re talking to, and how the conversation is
structured.
If you’ve got experience with the Basic Stamp or PicBasic Pro, you
will find Arduino serial commications a bit different than what you are
used to. In PBasic and PicBasic Pro, the serial pins and the data rate are
defined each time you send a message. In Wiring and Arduino, the
serial pins are unchangeable, and the data rate is set at the beginning of
the program. This way is a bit less flexible than the PBasic way, but
there are some advantages that you’ll see shortly.
27
O’Reilly Media, Inc.
9/10/06
This next program listens for incoming serial data. It adds one to whatever serial value it
receives, and sends the result back out. It also blinks an LED on pin regularly, on the
same pin as the last example, to let you know it’s still working:/*
Simple Serial
Language: Arduino/Wiring
Listens for an incoming serial byte, adds one to the byte
And sends the result back out serially.
Also blinks an LED on pin 13 every half second.
*/
int LEDPin = 13;
int inByte = 0;
long blinkTimer = 0;
tutned off
int blinkInterval = 1000;
void setup() {
pinMode(LEDPin, OUTPUT);
Serial.begin(9600);
}
// you can use any digital I/O pin you want
// variable to hold incoming serial data
// keeps track of how long since the LED was last
// a full second from on to off to on again
// set pin 13 to be an output
// configure the serial port for 9600 bps data rate.
void loop() {
// if there are any incoming serial bytes available to read:
if (Serial.available() > 0) {
// then read the first available byte:
inByte = Serial.read();
// and add one to it, then send the result out:
Serial.print(inByte+1, BYTE);
}
// Meanwhile, keep blinking the LED.
// after a quarter of a second, turn the LED on:
if (millis() - blinkTimer >= blinkInterval / 2) {
digitalWrite(LEDPin, HIGH);
// turn the LED on pin 13 on
}
// after a half a second, turn the LED off and reset the timer:
if (millis() - blinkTimer >= blinkInterval) {
digitalWrite(LEDPin, LOW);
// turn the LED off
blinkTimer = millis();
// reset the timer
}
}
[BCJ25]To send bytes from the computer to the microcontroller module, first compile and
upload this program, then quit the Arduino or Wiring program so that your serial
communication program can open the port.
Next, open your serial communications program (such as HyperTerminal or screen), then
open the serial port for the module at 9600 bits per second (8 data bits, no parity, one stop
bit, and no flow control). Once it’s open, type any letter. The module will respond with
the next letter in sequence. For every character you type, the module adds one to that
character’s ASCII value, and sends back the result. Terminal applications represent all
bytes they receive as ASCII. [BCJ26]
28
O’Reilly Media, Inc.
9/10/06
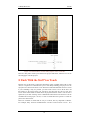
Wiring Components to the Module
The Arduino and Wiring modules don’t have many sockets for connections other than the
I/O pins, so you’ll need to keep a solderless breadboard handy to build sub-circuits for
your sensors and actuators (output devices). Figure 1-9 shows a standard setup for
connections between the two.
Figure 1-9. Arduino connected to a breadboard. +5V and ground run
from the module to the long rows of the board. This way, all sensors
and actuators can share the +5V and ground connections of the board.
A 10µF capacitor is connected between +5V and ground to decouple
any voltage dips and spikes on the breadboard from the module.
Control or signal connections from each sensor or actuator run to the
appropriate I/O pins. In this example, a force-sensing resistor is
connected to analog pin 0 using a voltage divider circuit.
Specialty Devices
You’ll encounter some specialty devices as well, such as the Lantronix Xport, WiPort,
and Cobox Micro. The Lantronix modules are serial-to-Ethernet modules. Their main
function is to connect devices with a serial communications interface (such as all
microcontrollers) to Ethernet networks. It’s possible to program your own serial-toEthernet module directly on a microcontroller with a few spare parts, but it’s a lot of
work. The Lantronix modules cost more, but they’re much more convenient. You’ll also
encounter serial-to-Bluetooth modules, RFID modules, and other microcontrollers whose
main job is to connect other devices. The details on connecting these will be explained
one by one as you encounter them in the projects that follow.
Basic Circuits
There are two basic circuits that you’ll use a lot in this book. If you’re familiar with
microcontroller development, you’re already familiar with them. Any time you need to
read a sensor value you can start with one of these two. Even if you’re using a custom
sensor in your final object, you can use these circuits as placeholders, just to see any
changing sensor values.
29
O’Reilly Media, Inc.
9/10/06
Digital input
A digital input to a microcontroller is nothing more than a switch. The switch is
connected to voltage, and to a digital input pin of the microcontroller. A high-value
resistor (10 kilohms is good) connects from the input pin to ground. This is called a
pull-down resistor. Other electronics tutorials sometimes connect the switch to
ground, and the resistor to voltage. In that case, you’d call the resistor a pull-up
resistor. Pull-up and pull-down resistors provide a reference to power (pull-up) and
ground (pull-down) for digital input pins. When a switch is wired like the one shown
in Figure 1-10, closing the switch sets the input pin high. Wired the other way:
closing the switch sets the input pin low.
Figure 1-10. Digital Input to a microcontroller
Analog Input
The circuit in Figure 1-11 circuit is called a voltage divider. The variable resistor and
the fixed resistor divide the voltage between them. The ratio of the resistors’ values
determines the voltage at the connection between them. If you connect the analogto-digital converter of a microcontroller to this point, you’ll see a changing voltage
as the variable resistor changes. You can use any kind of variable resistor:
photocells, thermistors, force-sensing resistors, flex sensing resistors, and more.
30
O’Reilly Media, Inc.
9/10/06
Figure 1-11. Voltage divider used as analog input to a microcontroller.
The potentiometer is a special type of variable resistor. It’s a fixed resistor with a
wiper that slides along the conductive surface of the resistor. The resistance changes
between the wiper and both ends of the resistor as you move the wiper. Basically, a
potentiometer (pot for short) is two variable resistors in one package. If you connect
the ends to voltage and ground, you can read a changing voltage at the wiper.
31
O’Reilly Media, Inc.
9/10/06
Figure 1-12. Potentiometer used as analog input to a microcontroller.
There are many other circuits you’ll learn in the projects that follow, but these two are the
salt and pepper of all the projects.
It Ends With the Stuff You Touch
Though most of this book is about the fascinating world of making things talk to each
other, it’s important to remember that you’re most likely building your project for the
enjoyment of someone who doesn’t care about the technical details under the hood. Even
if you’re building it only for yourself, you don’t want to have to fix it all the time. All
that matters to the person using your system are the parts that she can see, hear, and
touch. All the inner details are irrelevant if the physical interface doesn’t work. So don’t
spend all of your time focusing on the communication between devices and leave out the
communication with people. In fact, it’s best to think about the specifics of what the
person does and sees first.
There are a number of details that are easy to overlook, but very important to humans.
For example, many network communications can take several seconds or more. In a
32
O’Reilly Media, Inc.
9/10/06
screen-based operating system, progress bars acknowledge a person’s input and keep her
informed as to the progress of the task. Physical objects don’t have progress bars, but
they should incorporate some indicator as to what they’re doing. Perhaps it’s as simple
as an LED that gently pulses while the network transfer’s happening, or a tune that plays.
Find your own solution, but make sure you give some physical indication as to the
invisible activities of your objects.
Don’t forget the basic elements either. Build in a power switch or a reset button. Don’t
forget a power indicator. Design the shape of the object so that it’s clear which end is up.
Make your physical controls clearly visible and easy to operate. Plan the sequence of
actions you expect a person to take, and lay out the physical affordances for those actions
in a sensible sequence. You can’t tell people what to think about your object—you can
only show them how to interact with it through its physical form. There may be times
when you violate convention in the way you design your controls, perhaps in order to
create a challenging game, or to make the object seem more “magical,” but make sure
you’re doing it intentionally. Always think about the participant’s expectations first.
By including the person’s behavior in your system planning, you solve some problems
that are computationally difficult, but easy for human intelligence to solve. Ultimately,
the best reason to make things talk to each other is to give people more reasons to talk to
each other.
33