1
OMNI Application Note
Title:
Date:
Revision:
DTD-DTD Key Transfer Using OMNIs
February 10, 2004
1
1. Overview
This application note describes key transfer between two DTDs using OMNIs connected
in a secure data mode. Keys may also been transferred between an OMNI and STE
combination, in both PSTN and ISDN modes. This note will be concerned with the
OMNI – OMNI configuration, although the other configurations are similar. Users are
assumed to be familiar with an OMNI configured for PSTN or DNI Asynchronous
operation in secure data mode.
2. Prerequisites
The equipment needed for the secure DTD-DTD key transfer are:
• AN/CYZ-10 Data Transfer Device (DTD) with key(s) to be transferred and/or
memory available to accept keys. For DTD-encrypted transfer, the DTDs must have
the same TrKEK.
• OMNIs with compatible key
• Keys may be transferred either in PSTN Asynch or DNI RT Async modes.
For PSTN links, the following equipment is needed:
Telephones
Standard PSTN telephone cords and access to PSTN wall jacks
For DNI links, the following equipment is needed:
DNI cabling and adaptors
Access to digital network
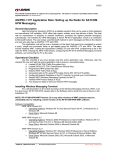
• Special DTD-to-OMNI LDI Data Cable. See cable pin-out diagram below (Figure 1).
An alternative is to use the STU-III Data Cable (part number 24384-36021523-1,
purchased from Sypris Electronics, Tampa, Florida, telephone 813-972-6234 in
conjunction with the OMNI kit-supplied cable K10048260-1.
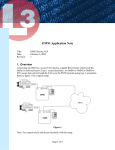
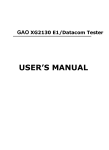
• Connect equipment as in Figure 2.
Page 1 of 8
Figure 1 :LDI Cable Pinout Diagram
Figure 2: Equipment Connection
Page 2 of 8
3. Quick Start Guide
PSTN
Setup the equipment as illustrated in Figure 2 and configure both OMNIs for PSTN
Asynchronous operation in secure data mode. Next, establish a secure voice call to the other side,
if the material to be discussed is classified. Verify that the equipments have the proper key
classification to transfer the desired key. It is the user’s responsibility to ensure key material is
transferred over a secure call of equal or higher classification level. Verify the OMNI’s Max and
Min classifications and ACL setting in the Secure Data menu. Turn on the DTD and verify the
key material to be transferred is present and space is available in the far end DTD to receive the
key. If a DTD has more than 5 SDNS keys, it may be best to either delete a key no longer needed
or to use a DTD with more space. The sending DTD should be running in a suitable application,
e.g. FILL or F4_09, in XMIT and Issue configuration. The receiving DTD should also be in a
suitable application and in RCV mode. When ready to transfer, go to non-secure voice and then
establish a secure data call. When in secure data mode, select the SEND mode in the transmitting
DTD. The DTDs should reflect the transmit or load state as appropriate. ‘Transfer complete’ or
‘key received’ messages should be displayed when the key is successfully sent and received by
the respective DTDs. Go to non-secure voice, and then to Secure Voice, if needed, to verify
successful key transfer. Complete any security-related documentation/procedures as needed.
DNI
The procedure is to agree on the keys to be transferred, classifications, etc., similar to the PSTN
mode, but using the OMNI in a DNI Voice mode. Once this is done the steps are the same as
above except that a secure DNI data session is used.
4. Detailed Instructions
The following steps assume the users at both locations are familiar with OMNI operation.
Detailed instructions for PIN entry, User/PIN creation, data port rate selection, etc. can be
found in the OMNI User’s Manual.
The steps below detail the configuration of OMNI #1 and OMNI #2, classification level
verification, the configuration of DTD #1 and DTD #2, starting the transfer, and
completing the transfer.
1. Configure OMNI #1 and OMNI #2
a. Connect the equipment for both locations as shown in the Equipment Connection
Diagram (Figure 2), using the cables identified above.
b. Enter the OMNI #1 PIN and OMNI #2 PIN to enter Authentic User mode.
Page 3 of 8
c. Setup OMNI #1 and OMNI #2 so that they are in PSTN-ASYNC mode and their
data port rates are set to EIA-232 and 2400 BPS. The OMNI data port type and rate
menu is located in the OMNI Configuration Menu, accessible by pressing menu
and then 2 (OMNI CONFIGURATION):
Set Network (menu, 2, 2, n)
To set the network depress 2 (SET NETWORK), in the OMNI CONFIG menu,
and then enter.
The OMNI™ displays:
NET: PSTN-ASYNC
1-PSTN-ASYNC
2-PSTN-SYNC
3-DNI-ASYNC
4-DNI-SYNC
The first line of the display represents the current network configuration. Select
PSTN-ASYNC (1) for PSTN usage and DNI-ASYNC (3) for DNI usage
followed by enter.
Set Local Port (menu, 2, 4,1)
To set the Local Data port, depress 4 (SET LCL PORT), in the OMNI CONFIG
menu, and then enter .
The OMNI™ displays
LOCAL: EIA232
1-EIA 232 ** factory default setting
2-EIA 530A
To make a change, depress the corresponding numeric key (1) and then depress
enter .
Set Rate (menu, 2, 6,1)
To set the Data Rate, depress 6 (SET RATE), in the OMNI CONFIG menu, and
then enter. OMNI™ displays Async 2400 bps
1-ASYNC, 2.4
2-ASYNC, 4.8
If not at 2400, depress the corresponding numeric key (1) and then depress enter .
Page 4 of 8
2. Classification Level Verification
The security settings of OMNI #1 and OMNI #2 must be as high as or higher than the
classification of the encryption keys to be transmitted. After a clear call is established, if
classified information is to be discussed, either OMNI user can press the “sec voice”
button to transfer to secure voice operation. When in secure voice, the two users
authenticate proper classification levels. Once the proper classification levels have been
verified, the OMNI users must then press the “non sec” button and verify the SACS
settings for secure data are correct. The users may stay online or hang up and restart the
call, before initiating the secure data transfer.
3. Configure DTD #1 and DTD #2
Both users must configure their DTDs prior to placing the secure data call.
•
Press ON/OFF (The user may abort out of the initial key test on the DTD).
•
In the Main Menu, set both DTDs to RS-232 mode (Main Menu/Setup/Comm
Mode/RS-232).
•
As the DTD application is booting up, verify the display indicates Fill ver 4.09 or a
higher number. In some DTDs the application does not automatically launch and it
must be selected and then loaded by pressing ENTR. (Main Menu > Appl > (select
application (i.e. 04.09)) > ENTR)
** NOTE: If the Fill ver is not 4.09 or higher, the following DTD transfer steps may
not work.
•
When the DTDs are in the Xmit Recv Utility menu, the DTD display should indicate
{LMD} in the upper right hand corner. If {LMD} is not in the upper right hand
corner, then perform the following sub-steps to select the LMD protocol.
1) Select the Utility menu and press ENTR.
2) Select the Setup menu and press ENTR.
3) Select Protocol and press ENTR.
4) Select LMD and press ENTR.
5) Press ABORT to return to the Xmit Recv Utility menu.
Page 5 of 8
•
Set the BUS Timeout to Slow by performing the following sub-steps. This option
must be setup anytime the DTD has been powered off. If the BUS Timeout is set to
Fast, the power on default, the Receiving DTD will display a RCV Error.
1) Select the Utilities menu and press ENTR.
2) Select the Setup menu and press ENTR.
3) Select the Protocol menu and press ENTR.
4) Select the Timeout menu and press ENTR.
5) Select the Slow timeout and press ENTR.
6) Press ABORT to return to the Xmit Recv Utility menu.
•
Perform the following sub-steps to Continue Configuring DTD #1, the transmitting
DTD; or, go to the next bullet to configure DTD #2, the receiving DTD.
1) From the Xmit Recv Utility menu select Xmit and press ENTR.
2) Select Issue and press ENTR.
3) Find the key you wish to transfer by pressing the P UP or P DN (Page Up
or Page Down) keys. Use the arrow keys to select the desired field, e.g. short
title.
4) When the correct key has been located, press ENTR. Notice the XMT in
the lower right corner of the DTD display.
5) Press SEND. The DTD display will indicate Send To.
6) When the DTD displays Direct highlighted, press ENTR.
7) When the DTD displays Send highlighted, wait for the secure data call.
•
Perform the following sub-steps to Continue Configuring DTD #2, the
receiving DTD.
1) From the Xmit Recv Utility menu select Recv and press ENTR.
2) When the DTD displays RCV highlighted, wait for the secure data call.
4. The DTD to DTD Transfer Process is Started
With the OMNIs and DTDs ready, either user may initiate a secure data transfer. This
is done by initiating a new call (if the users had hung up previously) or pressing the
Page 6 of 8
secure data button, and waiting for the OMNIs to establish a secure data connection.
When a secure call has been established, both users press ENTR on their DTDs and
the DTDs will display “Attempting to Connect”. After a successful connection, when
the DTD transfer is taking place, the display on DTD #1 indicates Transferring Msg
1 and the display on DTD #2 indicates Load in progress.
5. Completing the DTD to DTD Transfer Process
When the DTD Key Transfer Completes, the display of DTD #1 indicates 1 MSGS
transferred for a few seconds followed by Retransmit Abort New or Retransmit
Modify New. The display of DTD #2 returns to the [Rcv]/[Abort] menu. It is
suggested that the receiving DTD is checked to verify the new key is in inventory
before terminating the session or transferring additional keys. To check keys, press
ABORT to return to the Xmit Recv Utility menu, select Utility and then Check.
When the transfer process is completed, press the “non sec” button on both OMNIs to
end the secure call and go into non-secure mode, or simply hang up.
Hints:
•
•
•
•
•
The DTD has limited battery life and may Auto-Shutoff depending on the setting. Establish a
voice call (Secure as needed), then turn on the DTDs and verify the key material to be
transferred.
Before beginning a key transfer, make sure the DTD doesn’t indicate LO BAT in the bottom
of the display. If so, replace the battery or your session may not complete and/or the keys in
the DTD may be lost. Also, if the Audit Full message appears, return the DTD to the
appropriate person/supervisor for resetting/uploading of Audit information, before attempting
to continue.
The DTD Arrow keys can be used to select menu options or one may prefer to press the
corresponding capital letter for the option. In some cases, the buttons have second functions.
Verify the OMNIs are set for PSTN-Asynchronous (Menu, 2, 1), the Local Data Interface
(LDI) to RS-232 (Menu, 2, 4, 1) and the Data Port Rate to 2400 bps (Menu, 2, 6, 1).
Preset the DTDs to RS-232 in the Main Menu (Main Menu/Setup/More../Change Comm
Mode/(select RS-232). In the Application Mode (e.g. Fill, F4_09, etc.) select
Utility/Setup/Protocol/LMD and also select Utility/Setup/Timeout/Slow.
Page 7 of 8
•
•
•
•
•
•
•
The DTD has a capacity of about six or seven SDNS keys (more of the traditional type),
therefore check the inventory before receiving any more keys. A receiving DTD with
insufficient storage will go through the transfer routine as normal, but will then give an error
message after key transfer is complete and trying to process and store the key. The transfer
will need to be logged in accordance with security procedures, but the key may need to be
“issued” a second time. Avoid this complication by checking before hand that there is
sufficient room in the receiving DTD. If an SDNS key must be transferred, check if there is
an unused SDNS key in the receiving DTD that can be deleted to provide storage for the new
key. Using another receiving DTD with more available memory is another option. Be careful
to properly report key material transfers, destructions, etc as required.
If an encrypted DTD transfer (TrKEK) is used, be sure that the DTDs have the same DTD
TrKEK before beginning the procedure.
The only port rate available for this procedure is 2400 bps. Be sure to check this before
beginning.
The DTD Key Loading cable supplied with the OMNI (part number K1004886-1) will NOT
work with this application. The DTD-STU-III cable from Sypris, referred to above, is
required for the procedure to work.
The PgUp and PgDn buttons on the DTD will illustrate a tag associated with the key, the key
short title, the edition and segment, or CIK information. The arrow buttons can be used to
change between these fields. To show the tag field, press the Up arrow until it doesn’t change
the display. To display the short title, press the down arrow once. The PgUp and PgDn
buttons will show the same field for each of the keys in the DTD, e.g. short title.
The time to transfer an SDNS key is about 2 minutes, and about another minute for the
receiving DTD to process and store the key. A traditional key requires about 10-15 seconds to
transfer, process and store.
If the DTDs fail to establish a transfer, reinitiate the secure call, but press ENTR on the
receiving DTD first, followed promptly by pressing ENTR on the transmitting DTD.
5. Reference
The L-3 OMNI User Manual provides detailed information on OMNI operation,
menu selection and setup, as well as basic information on DTD setup. If unsuccessful
at completing a DTD-DTD key transfer using OMNIs, contact L-3 Communications
Systems East Tech Support at 1-800-339-6197 (toll free) or 1-856-338-6207 (outside
the US).
Page 8 of 8