1
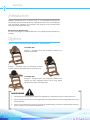
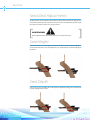
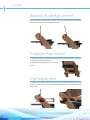
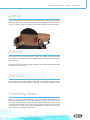
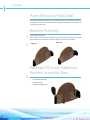
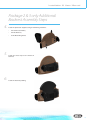
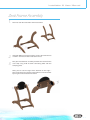
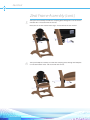
Neat Zeat
Installation &
User manual
IMPORTANT CONSUMER INFORMATION NOTICE: This manual
contains important instructions that must be passed on to the
user of this product. Please do not remove this manual before
delivery to the end user.
SUPPLIER: This manual must be given to the user of this product.
USER: Before using this product, read entire manual and save for
future reference.
User Name:
Serial Number:
User Manual for all Neat Zeats (product code begins with “3320-”)
Manual: NeatZeat20140603
www.medifab.com
Neat Zeat
Introduction
Medifab recommends that a clinician such as an Occupational Therapist be
consulted to determine if the Neat Zeat is appropriate for the user. To avoid injury,
read, understand and follow all instructions and warnings in this manual before
installing and using the Neat Zeat.
Maximum User Weight: 75 kg.
For users over 50 kg, it is recommended that a carer support the Neat Zeat during
transfers.
Options
There are three standard packages of Neat Zeat as indicated below:
3320-0001-000
Package 1 Complete with seat, footplate, padded seat
cushion and hip belt.
3320-0002-000
Package 2 Complete with seat, footplate, padded seat
cushion, hip belt, adjustable laterals and chest strap.
3320-0003-000
Package 3 Complete with seat, footplate, padded seat
cushion, hip belt, adjustable laterals, chest strap, depth
adjustable tray table and mobile base.
WARNING
2
1.
The Neat Zeat must only be assembled and adjusted by a qualified therapist or seating technician.
2.
Ensure all bolts and nuts are securely tightened once adjustments have been completed to the set-up
of the Neat Zeat.
3.
Never use your Neat Zeat if any parts are missing, malfunctioning, or broken. Seek qualified assistance
with any repairs, replacements or adjustments.
www.medifab.com
Installation & User Manual
Warnings
Remember, your child’s safety is your responsibility. Please read this instruction
manual completely before using this product. Failure to follow these instructions
and warnings could result in serious injury or death. Keep these instructions for
future reference.
•
•
•
•
•
•
•
•
•
•
•
•
•
•
•
•
•
•
•
•
Prevent serious injury or death from falls or sliding out.
Always secure user with the appropriate restraints. Snugly adjust the
restraint belts to fit your child.
Never leave the user unattended.
Never adjust seating when user is sitting in seat.
Do not allow user to climb into the Neat Zeat unassisted.
The tray is not designed to hold the child in the Neat Zeat.
Maximum weight is 75 kgs (165 lb).
Avoid injuries to adults and older children from falls.
Do not use Neat Zeat as a step stool or ladder to climb up or reach
elevated surfaces.
Do not allow adults to sit in Neat Zeat.
Never use Neat Zeat without seat back attached.
Do not over-tighten screws. Check and tighten the screws frequently.
Check Neat Zeat for damaged hardware, loose joints, missing parts
or sharp edges before and after assembly and frequently during use.
Do not use Neat Zeat unless all components are correctly fitted and
adjusted. Do not use Neat Zeat if any parts are missing, damaged or
broken.
Do not place your Neat Zeat anywhere near hazards such as open fires
or other significant sources of heat such as radiators, barbecues, stoves,
etc.
Do not place your child near hazards such as medication, small items
that may pose a choking risk, trailing chords or electrical leads, etc.
Only use on a flat, stable surface.
Never use near stairs.
Do not force the tray into child when adjusting the tray; always allow
sufficient breathing space for your child’s comfort.
Do not allow user to stand up in the Neat Zeat.
Do not move the Neat Zeat with user seated unless the mobile base is
installed.
Contact Medifab
Email: [email protected]
New Zealand Head Office: Australian Head Office:
7-9 Allens Road
26 Pardoe Street
Ashburton 7700
East Devonport, TAS 7310
Phone +64 3 307 9790
Phone +61 3 6427 0105
Fax +64 3 307 2820
Fax +61 3 6427 0107
3
Neat Zeat
Neat Zeat Adjustments
All adjustments are made with a 4mm Allen key. We recommend that all adjustments
are made by starting at the top of the chair to ensure the optimum positioning of
the child in relation to the user’s activity surface.
WARNING
Never adjust the Neat Zeat when the user is seated in the chair.
Seat Height
To raise or lower the seat height, remove the 4 t-nuts and the clamping plate on
each side. Remove the seat and reposition it as required then install and retighten
the bolts.
Seat Depth
Loosen the 2 t-nuts on both sides and adjust the depth by sliding the seat forwards
or back. Retighten the t-nuts.
4
www.medifab.com
Installation & User Manual
10° Seat Angle Adjustment
Remove the 4 t-nuts and the two clamping plate from each side. Replace the two
clamping plate with four M6 coach bolts. Postion the seat at anagle, slide the M6
coach bolts through the seat rail into the wood sides. Refit the 4 t-nuts onto the
m6 coach bolts and tighten.
5
Neat Zeat
Backrest Angle Adjustment
Loosen the lower backrest bolt on both sides with the 4mm Allen Key, tilt the
backrest to desired angle and retighten securely.
Footplate Adjustment
To adjust the footplate, simply follow the instruction procedure for Seat Height &
Seat Depth and Angle adjustment.
To adjust the heel bar depth, loosen the two
m6 nut.
Tray Adjustment
To adjuste the height of the tray, remove the 4 t-nuts and reposition the tray
bracket and secure. Slide the tray into the tray brackets and secure with the black
wing knobs.
6
www.medifab.com
Installation & User Manual
Laterals
These can be adjusted in width. Loosen the two black wing knobs at the rear of the
backrest slide in or out to the required position and retighten the knobs. To raise
or lower, remove the knobs and adjust to the required height and refit the knobs.
Pommel
The pommel can be moved forward or back by simply loosening the bolt
underneath with a 4mm Allen key and retightening once the desired position has
been achieved.
If a quick-release version is being used, the depth can be adjusted by the adjustable
collar on the pommel stem.
Footshoes
These attach to the footplate from the top and are adjustable forward or back.
Loosen the bolts with a 4mm Allen key, reposition and retighten the bolts securely.
Positioning Straps
There are a variety of straps available for use with the Zeat chair including hip belts,
chest straps and harnesses from our SPEX wheelchair seating range. They are used
for security and to improve the child’s position whilst seated. Straps and harnesses
are factory fitted and will only need the final adjustments. Once the child is seated
in the chair, secure them with the straps before you do anything else. The chest
strap is fastened and adjusted with Velcro.
7
Neat Zeat
Assembling your Neat Zeat
Your flat packed Neat Zeat will be packaged according to your ordered specifications.
Some parts may be preassembled. Please follow the following instructions to
assemble your Neat Zeat.
Backrest Assembly
1.
Unpackage the backrest
Note; Figure 2a shows these brackets being attached to get maximum seat depth,
Figure 2b shows the brackets inverted to meet the minimum seat depth.
2.
3.
8
www.medifab.com
Figure 2a
Figure 2b
Package 2 & 3 only Additional
Backrest Assembly Steps
Install the lateral supports using the following hardware:
•
4 X 25mm Coach bolts,
•
4 X M6 Washers,
•
4 M6 Black Wing Knobs
Installation & User Manual
Package 2 & 3 only Additional
Backrest Assembly Steps
4.
5.
6.
Install the protractor supports using the following hardware:
•
4 X 25mm Coach bolts,
•
4 X M6 Washers,
•
4 M6 Black Wing knobs
Install the chest strap to the Velcro on
backrest
Install the backrest padding
9
Neat Zeat
Seat and Footplate Assembly
1.
Unpack the Seat plate
Note: to achieve the minimum seat depth, bolt the seat to the rails
using the first hole on each side. To achieve the maximum seat
depth, use the second hole.
2.
Fit the upholstery unit onto the seat (Note, you may need
to loosen the seat rail bolts to do this)
3.
Fit the Hip belt, fold the upholstery attachment tab underneath and
bolt the hip belt through the tab to the seat using the following
hardware:
4.
10
www.medifab.com
•
2 X M6 X 25 Button Head
•
2 X M6 Nyloc Nut
Install the heel bar using the following hardware:
•
2 X 25mm Coach bolts,
•
2 X M6 Washers,
•
2 X M6 nyloc nut
Installation & User Manual
Zeat Frame Assembly
1.
Push into each brace the M6 X 12mm Cross Nuts
2.
Using M6 X50 mm connecting bolts, screw a side to the braces
as shown Connect the other side to the braces
3.
Take your Zeat backrest assembly and bolt this into the frame
at the top using 4 M6 X 35mm connecting bolts and two
clamping plate.
Note, you can set the angle of the backrest at this stage –
Please refer to the user manual. The backrest can also be lower
by using the holes located lower down.
11
Neat Zeat
Zeat Frame Assembly (cont.)
12
www.medifab.com
5.
Take your seat assembly and slide the clamping plate through the seat rail into the
wooden sides and secure with the 4 t nuts.
6.
Take your footplate assembly and slide the clamping plate through the footplate
rail into the wooden sides and secure with the 4 t nuts.
Note; You can set the seat tilt at this stage – Please refer to the user manual
Installation & User Manual
Tray Assembly
1.
Secure the tray mounting brackets to the wood sides using the
two clamping plate and the 4 t-nuts.
The tray heght can be adjusted by securing the tray mounting
bracket to the lower holes.
2.
Secure the tray by tightening the black wing knobs on the tray.
13
Neat Zeat
Mobile Base Assembly
1.
2.
3.
Unpack the Mobile base
•
Insert a M6X20 Cross Nut into each hole in each foot of the Zeat sides
Mount the chair onto the base and bolt the base to the chair using the following
hardware:
•
14
4 X M6X50 MM Bolts
www.medifab.com
Installation & User Manual
Maintenance and Cleaning
Cleaning Upholstery
All the upholstery is a water-proof fabric and therefore any food and mess can
be wiped down with a damp cloth. Should there be any need to use detergents,
please use a mild detergent and water, and dry with a soft cloth.
Cleaning Woodwork
Woodwork requires no ongoing maintenance and can also be wiped clean with a
mild detergent and water. Do not immerse components in water.
Maintenance
Medifab recommends that all fasteners be checked for wear, such as loose bolts
or broken components every 6 months. Loose fasteners should be retightened
according to the installation instructions. Contact Medifab or your local Medifab
distributor immediately to replace any broken components. Do not continue to
use the system after identifying loose or broken components. If you have any
additional questions regarding cleaning procedures, please contact Medifab.
WARNING
For continued safety and stability of the chair, the bolts on the seat’s side
must be retightened every time an adjustment is made. We also recommend
that this function is checked and tightened weekly.
Customisations
The Neat Zeat is very versatile and has been developed to meet the needs of a wide range
of children with special needs. There are many special adaptions available - speak with your
Medifab product consultant or local distributor regarding any customisations for your client.
Warranty
Your Neat Zeat is carefully inspected to provide peak performance and is guaranteed
to be free from defects in materials and workmanship for a period of 24 months
from the date of purchase, provided normal use. Should a defect in materials or
workmanship occur within 24 months from the original date of purchase, Medifab
will, at its option, repair or replace it without charge. This warranty does not apply
to general wear and use.
Claims and repairs should be processed through the nearest authorized Medifab
distributor. Except for express warranties made herein, all other warranties,
including implied warranties of merchantability and warranties of fitness for a
particular purpose are excluded. There are not warranties which extend beyond
the description on the face hereof. Remedies for breach of express warranties
herein are limited to repair or replacement of the goods. In no event shall damages
for breach of any warranty include any consequential damages or exceed the cost
of non-conforming goods sold.
15
Your enthusiastic distributor is
Medifab Ltd
Phone +64 3 307 9790
Fax +64 3 307 2820
[email protected]
ABN # 49 828 922 466
www.medifab.com