1
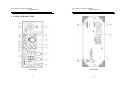
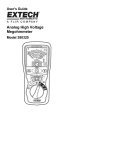
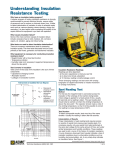
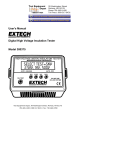
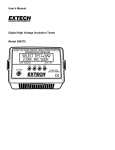
ELECTRICAL SAFETY TESTER
USER MANUAL
ELECTRICAL SAFETY TESTER
USER MANUAL
EC Declaration of Conformity
We
GOOD WILL INSTRUMENT CO., LTD.
WARNING
MANUFACTURER ASSUMES NO LIABILITY
IF UNIT OPERATED IN AN UNSAFE
MANNER.
No.7-1, Jhongsing Road, Tucheng City, Taipei County 236, Taiwan
GOOD WILL INSTRUMENT (SUZHOU) CO., LTD.
No. 69 Lushan Road, Suzhou New District Jiangsu, China.
declares that the below mentioned product
GPT-805/815, GPI-825/826
are herewith confirmed to comply with the requirements set out in the Council
Directive on the Approximation of the Law of Member States relating to
Electromagnetic Compatibility (89/336/EEC,92/31/EEC) and Low Voltage
Equipment Directive (73/23/EEC, 93/68/EEC).
For the evaluation regarding the Electromagnetic Compatibility and Low Voltage
Equipment Directive, the following standards were applied:
EN 61326-1: Electrical equipment for measurement, control and laboratory use ––
WARNING
THIS INSTRUMENT GENERATES AND
DELIVERS
A
HAZARDOUSLY
HIGH
VOLTAGE
(5kV).
BE
EXTREMELY
CAREFUL
WHEN
USING
THIS
INSTRUMENT. BE SURE TO READ
MANUAL SECTION 3 PRECAUTIONS
EMC requirements (1997+A1: 1998+A2:2001)
Conducted and Radiated Emissions
Electrostatic Discharge
EN 55011 Group I class A: 1998
EN 61000-4-2: 1995+A1 :1998
Current Harmonic
Radiated Immunity
EN 61000-3-2: 2000
EN 61000-4-3: 1996+A1 :1998
Voltage Fluctuation
Electrical Fast Transients
EN 61000-3-3: 1995
EN 61000-4-4: 1995
Surge Immunity
---------------------------------------------EN 61000-4-5: 1995
Conducted Susceptibility
---------------------------------------------EN 61000-4-6: 1996
Power Frequency Magnetic Field
---------------------------------------------IEC 61000-4-8: 1993
Voltage Dips/ Interrupts
---------------------------------------------EN 61000-4-11: 1994
Low Voltage Equipment Directive 73/23/EEC & amended by 93/68/EEC
Safety Requirements
IEC/EN 61010-1: 2001
Remark: Also complied with Continuity of Protective Bonding Tester, Insulation
Resistance Test, Voltage Test, and Residual Voltage Test in accordance with
the Sub-Clauses 19.2, 19.3, 19.4 and 19.5 of EN 60204-1: 1997
i
ii
ELECTRICAL SAFETY TESTER
USER MANUAL
ELECTRICAL SAFETY TESTER
USER MANUAL
CONTENTS
PAGE
1. PRODUCT INTRODUCTION............................................ 1
1-1.Description…………………………..…………………. 1
1-2.Feature……………………………..…………………… 2
2. SPECIFICATION………………………………………….. 3
3. PRECAUTIONS BEFORE OPERATION……...………...
3-1.Unpacking the instrument……..…………….………...
3-2.Checking the Line Voltage..…………………..………..
3-3.Environment……………………………………..……..
6
6
6
8
4. PANEL INTRODUCTION……………………..…………. 9
4-1.Front Panel……………………………………………... 11
4-2.Rear Panel……………………………………….……... 12
5. OPERATION METHOD……..……………………………
5-1.AC Withstanding Test………………………………….
5-2.DC Withstanding Test…….……………………………
5-3.Insulation Test…………...…..………………………….
SAFETY TERMS AND SYMBOLS
These terms may appear in this manual or on the product:
WARNING. Warning statements identify condition or
practices that could result in injury or loss of life.
CAUTION. Caution statements identify conditions
or practices that could result in damage to this
product or other property.
The equipment shall not be used for measurements
within category II, III and IV.
13
13
14
16
6. MAINTENANCE………..…………………………………. 17
6-1.Fuse rating and type.…………………………………... 17
6-2.Cleaning………………..……………………………….. 17
The following symbols may appear in this manual or on
the product:
DANGER
ATTENTION
Protective
High Voltage refer to Manual Conductor
Terminal
iii
iv
Earth (ground) Frame or
Terminal
Chassis
Terminal
ELECTRICAL SAFETY TESTER
USER MANUAL
FOR UNITED KINGDOM ONLY
NOTE: This lead/appliance must only be wired by competent
persons
WARNING: THIS APPLIANCE MUST BE EARTHED
IMPORTANT: The wires in this lead are coloured in accordance
with the following code:
Green/ Yellow:
Blue:
Brown:
Earth
Neutral
Live (Phase)
As the colours of the wires in main leads may not correspond
with the colours marking identified in your plug/appliance,
proceed as follows:
ELECTRICAL SAFETY TESTER
USER MANUAL
The wire which is coloured Brown must be connected to the
terminal marked with the letter L or P or coloured Brown or
Red.
If in doubt, consult the instructions provided with the equipment
or contact the supplier.
This cable/appliance should be protected by a suitably rated and
approved HBC mains fuse: refer to the rating information on
the equipment and/or user instructions for details. As a guide,
cable of 0.75mm2 should be protected by a 3A or 5A fuse. Larger
conductors would normally require 13A types, depending on the
connection method used.
Any moulded mains connector that requires removal
/replacement must be destroyed by removal of any fuse & fuse
carrier and disposed of immediately, as a plug with bared wires
is hazardous if a engaged in live socket. Any re-wiring must be
carried out in accordance with the information detailed on this
label.
The wire which is coloured Green & Yellow must be connected
to the Earth terminal marked with the letter E or by the earth
symbol
or coloured Green or Green & Yellow.
The wire which is coloured Blue must be connected to the
terminal which is marked with the letter N or coloured Blue or
Black.
v
vi
ELECTRICAL SAFETY TESTER
USER MANUAL
ELECTRICAL SAFETY TESTER
USER MANUAL
1. PRODUCT INTRODUCTION
1-2. Features
The GPT/GPI-800 series offer several other features:
1) Current and output voltage setting
A safe way to set the current and output voltage without high
voltage activated.
2) Easily and quickly setting with front panel control
A user-friendly interface provides user an easy and quick way to
set all parameters.
3) Testing time
Use micro processor to control testing time.
4) Adjustable ARC detect level
The ARC detect level can be adjusted with front panel control.
5) Adjustable output voltage during test
The output voltage can be adjusted during testing that add an
operation flexibility.
6) An alert indicator for high voltage
A flashing red LED indicates dangerous situation during high
voltage output is activated.
7) Remote I/O controller
In addition to the 9 pin remote I/O controller to control
START/RESET, it also provides PASS/FAIL/TEST signal for
professional use.
1-1. Description
The GPT/GPI-800 Electrical Safety Testers (EST) are designed for
AD/DC Withstanding Voltage test and Insulation Resistance test (IR) in
order to provide a safe and accurate test environment for the operator.
With thoughtful design described in 1-2. Feature insures a safe operation
environment of high voltage test to protect user from hazardous impact.
The Electrical Safety Testers comply with the requirement of the
electrical equipment & appliance control ordinances and JIS, CSA, UL,
BS and other overseas standards as well. The testers can be used for
withstanding voltage test of the various types of electrical and equipment
and components.
The GPT/GPI-800 series are based on the family of GW
withstanding voltage tester including AC Withstanding Voltage test, DC
Withstanding Voltage test and Insulation Resistance test. Please refer to
the table as follows:
Function
Model
GPT-805 (500VA)
GPT-815 (500VA)
GPI-825 (500VA)
GPI-826 (100VA)
AC
ˇ
ˇ
ˇ
ˇ
1
DC
IR
ˇ
ˇ
ˇ
2
ELECTRICAL SAFETY TESTER
USER MANUAL
ELECTRICAL SAFETY TESTER
USER MANUAL
2. SPECIFICATION (15℃~35℃ RH≦75%)
500VA
1) AC Hi-Pot Specifications (only for GPT-805/815, GPI-825)
Voltage Regulation
15%
Voltage Range
0.200~5.00kV
Voltage Accuracy
±3% of reading ±3 counts
Current cut-off range
0.3mA~100mA
Current Accuracy
≤1mA ±(5% of reading +40µA)
>1 mA ±(5% of reading +20µA)
Warning: The test time by using 5000V 100mA is within
180s, it needs 15 minutes interval after 180s of continuous
testing. If proceed continuity test, the test voltage and
current must be at 5000V 50mA.
2) DC Hi-Pot Specifications (only for GPT-815)
Voltage Regulation
20%
Voltage Range
0.200~5.00kV
Voltage Accuracy
±3% of reading ±3 counts
Current cut-off range
0.3mA~10mA
Current Accuracy
≤1mA ±(5% of reading +40µA)
>1 mA ±(5% of reading +20µA)
Warning: The test time by using 5000V 10mA is within 180s,
it needs 15 minutes interval after 180s of continuous testing.
If proceed continuity test, the test voltage and current must
be at 5000V 5mA.
3
100VA
3) AC Hi-Pot Specifications (only for GPI-826)
Voltage Regulation
15%
Voltage Range
0.200~5.00kV
Voltage Accuracy
±3% of reading ±3 counts
Current cut-off range
0.3mA~20mA
Current Accuracy
≤1mA ±(5% of reading +40µA)
>1 mA ±(5% of reading +20µA)
Warning: The test time by using 5000V 20mA is within
180s and it needs 15 minutes interval after 180s of
continuous testing. If proceed continuity test, the test
voltage and current must be at 5000V 10mA.
4) Insulation Resistance Specifications (only for GPI-825/826)
500V/1000V
DC Voltage
Resistance Range
1~2000MΩ
1~500MΩ: ±5% of reading ± 2counts
Resistance Accuracy
501~2000MΩ: ±10% of reading
Warning: The main purpose provided by the series of the
instruments is for Puncture Testing.
4
ELECTRICAL SAFETY TESTER
USER MANUAL
ELECTRICAL SAFETY TESTER
USER MANUAL
Warning: Unlike power supply which can be used on the
extreme low load range, when the series are used on the AC
voltage, the suggestive load should be more than 500VA at
50kΩ and 100VA at 250kΩ, while used on the DC voltage,
more than 500kΩ load is suggested.
5) ARC Detect
Detect Current
6) Interface
Terminal type
7) General Specification
500VA : 0.3~100mA
100VA : 0.3~20mA
Terminal seat
Power Source
AC115V/ 230V±10%, 50/60Hz
Indoor use, altitude up to 2000m.
Operation
Environment
Relative Humidity 80% (Maximum).
Operation Temperature &
Humidity
Storage temperature &
Humidity
Accessories
Dimension
Installation category
Pollution Degree
3. PRECAUTIONS BEFORE OPERATION
3-1. Unpacking the instrument
The product has been fully inspected and tested before shipping
from the factory. Upon receiving the instrument, please unpack and
inspect it to check if there is any damage caused during
transportation. If any sign of damage is found, notify the bearer
and/or the dealer immediately.
3-2. Checking the Line Voltage
The instruments can be applied with any kind of line voltage shown
in the table below. Before connecting the power plug to an AC line
outlet, make sure the voltage selector of the rear panel is set to the
correct position corresponding to the line voltage. It might be
damaged the instrument if connected to the wrong AC line voltage.
II
2
WARNING: To avoid electrical shock the power
cord protective grounding conductor must be
connected to ground.
0℃ ~ 40℃, <70%
-10℃ ~ 70℃, <70%
Power cord
× 1,
Test lead (GHT-105A) × 1,
Instruction manual
×1
446(L) × 330(W) × 149(H) (m/m)
GPT/GPI-8X5: 20kgs, GPI-826: 13kgs approx.
* All specifications are guaranteed under the distortion of AC power
source less than 3%.
The equipment shall not be used
measurements within category II, III and IV.
When line voltages are changed, replace the required fuses shown as
below:
Line voltage
115V
5
for
Range
Fuse Line voltage Range
Fuse
T 3.15A
T 6.3A
230V
207-250V
105-125V
250V
250V
6
ELECTRICAL SAFETY TESTER
USER MANUAL
WARNING: To avoid personal injury, disconnect the
power cord before removing the fuse holder.
Operator’s Precaution
(1) With immense high output voltage and current of the puncture
tester, only qualified person can operate the tester in order to
avoid fatal electric shock.
(2) On-job training is required for operator to better use the tester
smoothly and safely.
(3) The operator is prohibited to dress with metal ornaments or wear
metal decoration in order to avoid electric shock.
(4) The person with cardiac or wear a pacemaker must not to operate
the tester.
(5) Be sure to wear electric protective gloves whenever operating
this instrument, in order to guard against electric shock hazards.
(6) Before turning on the power switch, make sure that the TEST
VOLTAGE dial is in the counterclockwise extreme position(Min.
voltage).
(7) Be sure to turn off the power switch each time the instrument is not
used even for a short period of time or when the operator leaves
the instrument.
(8) Before touching the leads or output terminals, be sure to turn off
the instrument
7
ELECTRICAL SAFETY TESTER
USER MANUAL
Secure Testing
Never operate the tester in the place with electric circuit device
around.
The earth lead should be well connected in accordance with
instruction. The Return Lead has to be connected to the tested object
first before linking up test probe. Do not plug the high voltage test
probe to the high voltage output terminal before doing the testing.
Also, do not touch the electric conductor of test probe and the
operator has to fully control the power on/off by using switch or
remote control, which should not be lay aside carelessly.
WARNING: During the testing, do not touch the
tested object or any other connected objects.
3-3. Environment
The normal ambient temperature range of this instrument is from 0°
to 40°C (32° to 104°F). To operate the instrument over this specific
temperature range may cause damage to the circuits.
Do not use the instrument in a place where strong magnetic or
electric field exists as it may disturb the measurement.
WARNING: This is a Class A product. In a domestic
environment this product may cause radio
interference in which case the user may be required
to take adequate measures.
8
ELECTRICAL SAFETY TESTER
USER MANUAL
ELECTRICAL SAFETY TESTER
USER MANUAL
4. PANEL INTRODUCTION
Front Panel
9
Rear Panel
10
ELECTRICAL SAFETY TESTER
USER MANUAL
ELECTRICAL SAFETY TESTER
USER MANUAL
4-1. Front Panel
4-2. Rear Panel
1 Model Number
2. Display
3. CAUTION
Indicator LED
4. START Button
5. RESET Button
6. ARC VR
7. Current VR
8. I Set/ARC Set
9. ARC Con./Stop
10.
11.
12.
13.
14.
15.
16.
17.
18.
19.
Model number and description
Indicate all messages about test procedure.
During test the red LED will flash to indicate
dangerous.
Press the green button to start a test procedure.
Press the red button to reset/stop a test procedure.
Control ARC range.
Control the range of Cut-off current.
: I Set,
: ARC Set
: A signal for stop test. when the ARC is in use,
the test will be stopped.
: A signal for continuous test.
Range
Switch over the range.
Time VR
Control test time.
TIMER ON/OFF
: Power on and the test time can be adjusted.
: Power off and the test time can not be adjusted.
Test Voltage
Test voltage adjustment.
Setting
(Current,
: Can adjust Current/ARC VR to set current and
ARC, & Test)
ARC.
: Stand by status for testing.
AC/DC or AC/IR
: AC withstand voltage test.
: DC withstand voltage test (only for GPT-815)
or Insulation Test (only for GPI-825/826).
500V/1000V
: 500V, : 1000V(for GPI-825/826 only)
High Voltage Output High voltage output terminal
Seat
RETURN terminal The test return terminal.
Power switch
Power on to start test.
11
20. Fuse Holder with To change AC source voltage, pull the fuse holder and
Voltage Selector
replace with an adequate fuse to connect with AC
power cord.
Connect Ground terminal to the earth ground.
21. Ground Terminal
22. Remote I/O Control Remote I/O output joint point:
Test signal: Two test holes has to be shorted when
getting into test mode by pressing Start
key, and it won’t return to open status
until the test result of PASS or FAIL
comes available, or the RESET key is
pressed.
PASS signal: At the time when the test result comes
out to be PASS, two PASS holes has to
be shorted, and return to open until the
RESET key is pressed.
FAIL signal: At the time when the test result comes
out to be FAIL, two FAIL holes has to
be shorted, and return to open until the
RESET key is pressed.
RESET: The function is same as the RESET key on
the front panel.
START: The function is same as the START key on
the front panel.
23. Current Monitor
The cutoff current can be directly monitored by
disconnecting the shorting bar from these terminals
and connecting a milliammeter (DC/AC) between
them. The milliammeter should be capable of
measuring the cutoff current. Be sure to connect the
shorting bar when no milliammeter is connected
between these terminals.
12
ELECTRICAL SAFETY TESTER
USER MANUAL
5. OPERATION
5-1. AC Withstanding Test
Take GPT-805 as example, if want to output 5000VAC, set the cutoff current to 100mA and ARC to 50mA. During the 60s test time,
the instrument will keep on testing even when the ARC appears.
1) Connect the Withstanding/Insulation Tester to the ground.
2) Adjust the “Voltage Knob” counter-clockwise to the lowest
voltage position.
3) Set power switch to ON position.
4) Set CURRENT/ARC to
position.
5) Set Range to 100mA range.
6) Set to I Set
position by pressing (8) key, then adjust the
Current VR until the value of 100.0 is displayed on the panel.
7) Set to ARC Set
by pressing (8) key, then adjust ARC VR
until the value of 50.0 is displayed on the panel.
8) Set to Test
by pressing (14) key.
9) Set Timer to ON position, adjust the knob until the timer
value is at 60s.
10) Connect a test lead from the Return terminal (18) to the EUT
(equipment under test).
11) Connect a red high pot probe from “High voltage output
terminal” (17) to the EUT (equipment under test).
12) Press START key once to appear STBY(Stand by) on the
display, then adjust (13) the voltage knob until the value of 5.00
is display on the panel.
13) Then, press START key to proceed testing, during testing, the
warning indicator(3) will be flashing continuously.
14) If the value displayed on the panel drops because of the load
13
ELECTRICAL SAFETY TESTER
USER MANUAL
adding test, adjust “Voltage knob” to maintain the value at 5.00.
15) If the test on the EUT is approval, the PASS indicator on the
panel will be lighted up.
16) If the test on the EUT is disapproval, the FAIL indicator on the
panel will be lighted up and the buzzer will blare out a warning.
Now remove the high pot probe from the EUT, and press
RESET to turn off the buzzer and FAIL light, then the
instrument will be back to the initial status.
5-2. DC Withstanding Test
Take GPT-815 as example, if want to output 5000VDC, set the cutoff current to 10mA and ARC to 10mA. During the 180s test time,
the instrument will stop testing when the ARC appears.
1) Connect the Withstanding/Insulation Tester to the ground.
2) Adjust the “Voltage Knob” counter-clockwise to the lowest
voltage position.
3) Set power switch to ON position.
4) Set the key (15) to DC
position.
5) Set CURRENT/ARC of SETTING to position.
6) Set Range to 10mA range.
7) Set to I Set
position by pressing (8) key, then adjust the
Current VR until the value of 10.0 is displayed on the panel.
8) Set to ARC Set
by pressing (8) key, then adjust ARC VR
until the value of 10.0 is displayed on the panel.
9) Set to Test
by pressing (14) key.
10) Set Timer to ON position, adjust the knob until the timer
value is at 180s.
11) Connect a test lead from the Return terminal (18) to the EUT
14
ELECTRICAL SAFETY TESTER
USER MANUAL
(equipment under test).
12) Connect a red high pot probe from “High voltage output
terminal (17)” to the EUT (equipment under test).
13) Press START key once to appear STBY (Stand by) on the
display, then adjust (13) the voltage knob until the value of 5.00
is display on the panel.
14) Then, press START key to proceed testing, during testing, the
warning indicator (3) will be flashing continuously.
15) If the value displayed on the panel drops because of the load
adding test, adjust “Voltage knob (13)” to maintain the value at
5.00.
16) If the test on the EUT is approval, the PASS indicator on the
panel will be lighted up.
17) During testing, if the ARC is occurred, both the lights of ARC
and FAIL will be on, and the buzzer will blare out a warning,
now remove the high pot probe from the EUT, and press RESET
to turn off the buzzer, ARC and FAIL lights, then the instrument
will be back to the initial status.
18) If the test is over the jump-out current, the FAIL indicator on the
panel will be lighted up and the buzzer will blare out a warning.
Now remove the high pot probe from the EUT, and press
RESET to turn off the buzzer and FAIL light, then the
instrument will be back to the initial status.
15
ELECTRICAL SAFETY TESTER
USER MANUAL
5-3. Insulation Test
Take GPT-825 as example, set output to 1000V, but without
specifying the test time.
1) Connect the Withstanding/Insulation Tester to the ground.
2) Adjust the “Voltage Knob” counter-clockwise to the lowest
voltage position.
3) Set power switch to ON position.
4) Set the key (15) to IR
position.
5) Set the Timer to OFF position.
6) Connect a test lead from the Return terminal (18) to the EUT
(equipment under test).
7) Connect a red high pot probe from “High voltage output
terminal (17)” to the EUT (equipment under test).
8) Press START key once to appear STBY (Stand by) on the
display, then, press START key to proceed testing. During
testing, the warning indicator (3) will be flashing continuously.
9) If the insulation resistance of the EUT is within 2000MΩ, thus
the panel will display the insulation resistance value of the EUT,
and the testing is kept going until the RESET key is pressed.
10) If the test on the EUT is disapproval, the FAIL indicator on the
panel will be lighted up and the buzzer will blare out a warning.
Now remove the high pot probe from the EUT, and press
RESET to turn off the buzzer and FAIL light, then the
instrument will be back to the initial status.
16
ELECTRICAL SAFETY TESTER
USER MANUAL
6. MAINTENANCE
The following instructions are used by qualified person only to avoid
electrical shock, do not perform any service other than contained in the
operation instructions unless you are qualified to do so.
6-1. Fuse Rating and type
If the fuse blows, the product will not operate. Try to determine and
correct the cause of the blown fuse, then replace the fuse with
correct rating and type shown as below:
WARNING: For continued fire protection, replace only
with 250V fuse of the specified type and rating, and
disconnect the power cord before proceeding fuse
replacement.
6-2. Cleaning
To keep the instrument clean, wipe the case with a damp cloth and
detergent. Do not use abrasives or solvents.
17