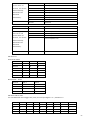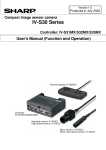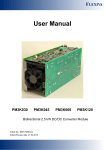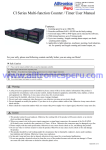
1
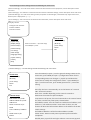
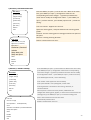
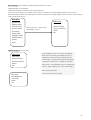
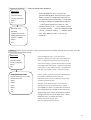
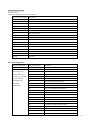
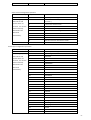
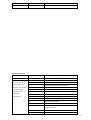
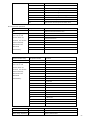
IR PTZ DOME CAMERA User Manual ※ Read this manual before using the camera safety announcements 1.Careful transportation Transport, storage and installation process, we need to prevent stress, severe vibration and damage to the product immersion. 2. Be careful installation of dome camera modules To be especially careful, light up-light down, do not force squeezing movement and the structural components, so as to avoid the dome camera trouble. For security reason, do not cover the housing is not installed electricity. 3. Power, video cables and control cables Power cables, video cables and control cables preferable to use shielded cable and is independent of routing, can not blend together with other cables. 4. Electrical Safety In use must comply with all electrical safety standards, the PTZ Dome Camera or signal transmission line should work with high-voltage equipment or cables to maintain a sufficient distance (at least 50 meters), if necessary, do a good job against lightning, surge and other safeguard procedures. 5. Cleaning When cleaning the camera housing, please use the dry soft cloth. such as severe dirt, please use neutral cleaner gently wipe. Do not use strong or with abrasive cleaner, so as not to scratch jacket, affecting image quality. 6. Please strictly sealed to prevent liquid splashing into the PTZ Dome Camera, otherwise it will result in permanent damage to the device. 7. Do not use the camera when exceed the limits of temperature, humidity. Dome camera use temperature of -10 ℃ to 50 ℃, humidity less than 90%. 8. Do not install the camera near the air-conditioned outlet. Under such conditions, the lens would be fogging following the state of hydrometer. By the opening and closing air-conditioner frequently caused the high and low temperature changed. By the opening and closing door frequently caused the high and low temperature changed. Make the glasses fogging environment. In a room filled with smoke or dust . 9. Do not use the camera toward strong light for long time, such as the sun.. Spotlight and other light will cause screen aging. Use the camera toward to strong light for a long time, may be raised CCD of the color filter damage and loss the true color images. Specification Model Number XYSD723IR Image sensor 1/3"SONY CCD Signal mode PAL/NTSC Horizontal resolution 700TVLine Effective pixel PAL:976(H) x 582(V) Minimum illumination Color to B/W,Color 0.05LUX,B/W 0.001LUX S/N ratio >50dB(Enhanced) Backligh compensation ON/OFF White balance Auto Electronic shutter 1/50~1/12000s Focus length 3.2~83mm Focal Auto match Distance/Speed NTSC:976(H) x 494(V) Match control Automatic cruise 9group, dwell time Adjustable Auto Scan 16group, dwell time Adjustable Optical focus 26X/27X Focus manual/Auto,take high-performance DSP to realize complete digital and ulta-high speed focus function IR distance IR 100M Zone Shown Adjustable 8 zone Presets 256 Guard Tours 4groups,each can record 500 actions Rotation Range Horizontal 360°unlimted rotation,Vertical 180°,auto reversal Rotation speed PAN/tilt Speed: 0.1 ~ 200°/Sec Communications PELCO-D and PELCO-P Communication mode: RS485 OSD Full screen menu Lightning protection Three level surge protection Power protection Automatically run memory function Power supply DC12V--4A Compass function Show position Power Consumption Max 50W Dimension 7 inch Material Aluminum shell, waterproof IP66 Wrok -10℃~+50℃(select temperature control accessories) ,﹤95%RH Environment -2- Function Description IR 7-inch brief intelligent high speed dome camera integration, the main function 1. Set address ID, baud rate, control protocol Any operation commands the camera has its own Dome ID, baud rate, communication protocol, a single camera only to respond with its own Dome ID, baud rate, communication protocol, under the operation of the command. Camera address ID, baud rate, communication protocol specific settings please refer to the dial-setting methods. 2. Tracking Users can use the controls on the keyboard joystick control of the upper and lower turning left and right cameras can be used to track moving targets or moving horizon, while the focal length can be adjusted to change the perspective of the size or the target image size. In the auto-focus of the state, with the lens rotation, the camera will automatically adjust according to a rapid scene changes, instantly get a clear picture. 3. Focal length / speed automatic matching technique Manual adjustment, the longer the focal length of the case, a reflection of high-speed PTZ Dome Camera makes a slight touch screen joystick may move back, resulting in data loss. Based on user-friendly design, intelligent ball according to the proximity of the focal length of the camera automatically adjusts the horizontal and vertical speed, so that manual operation is more simple and easy to track targets. 4. Settings and call preset position Preset function is the current state of the ball under the PTZ function of the horizontal angle, tilt angle and camera lens focal length, etc. position parameters stored in memory, you need to call these parameters can be quickly and PTZ cameras will be adjusted to that location. The operator can quickly and easily by controlling the keyboard, infrared controller, control equipment such as storage and call the preset point, the PTZ Dome Camera to support 256 preset points. 5. Lens Control (1) Zoom control Users can control the keyboard or through the PTZ DOME to adjust the focus of the distance matrix of the host, receive the necessary panoramic images, or is a fine view. (2) Focus Control System default auto-focus, zoom, the camera lens will be the center of the screen features auto-focus, to maintain a clear picture; in exceptional circumstances, the user can manually focus, achieve the desired image effect. When in manual focus state, to restore the auto-focus, as long as the sway bar can be restored remotely auto-focus. There is also a dedicated control commands can be issued or to call an arbitrary way of restoring a preset bit auto-focus. The camera lens in the following situations will not autofocus on the camera objectives: a. Target is not to screen center; b. Targets the same time in the far and near the place; c. Target light objects, such as neon lighting, spotlights and other luminous objects; d. Target with droplets or dust behind the glass; e. Targets moving too fast; f. Large area targets, such as walls; g. Objectives are too dark or inherently ambiguous. 6. Night vision function (color / monochrome conversion) Cameras with night vision function, automatic color / monochrome conversion mode, in accordance with changes in ambient light automatic conversion CCD illumination. Such as: adequate lighting during the day due to the use of general -3- illumination to ensure colorful images. In the night illumination can be automatically changed to black and white images show a clear interest. 7. Cruise Can be pre-set cruise preset point, certain preset points, organized in the order required to auto-cruise in the queue, only an external command can be in an indoor speed ball set automatically according to preset points in order to provide the time interval constant movement back and forth. 8. Pattern scanning Pattern scanning machines to run the ball through the menu, the trajectory is stored down by power-on action, free movement, alarm linkage, etc. to call the stored scan line. 9. Continuous scan Just an external command or through a power-on action, free movement, alarm linkage, etc. to call, can make the PTZ Dome Camera horizontal direction to a certain speed the cycle of continuous scanning. 10. Batch Scanning Just an external command or through a power-on action, free movement, alarm linkage, etc. to call, can make the horizontal direction the PTZ Dome Camera cycle of a certain speed intermittent scan. 11. Area scan Just an external command or through a power-on action, free movement, alarm linkage, etc. to call, can make the PTZ Dome Camera horizontal direction to a certain speed, within the limits set by the community and from scanning. Equipment installation Operation Communication Baud Rate Setup Baud Rate based on DIP witch(see Appendix 1), When DIP did not Switch ,Automatic identification Baud rate. Data bits: 8 . Parity: None. Stop bit: 1 . communication protocol PECOL-D, PECOL-P,etc, Setup communication protocol (see Appendix 2), PTZ Control: Up Down Left Right Zoom Camera Control : TELE WIDE NEAR FAR OPEN CLOSE Camera's focus near (NEAR), focus far (FAR) function must focus feature of the camera is configured for "Manual " Focus mode is being used. Preset Point Control : Set , call , delete. Running function operation Preset function PTZ Dome supports 220 preset points, including 65 to 99 preset for special presets, these presets to complete predefined functions. Detailed reference to specific preset " ( 6 ) special preset list of features ." Preset operation process: Setup Preset Shake the joystick or other device that enables pan tilt to reach a certain area . On the keyboard , or other device input preset number , press "Settings " or "SET" button. Set the current preset , then head sets the current position of the camera becomes a multiple saved to a specific preset number . -4- Call presets On the keyboard , or other device input preset number , press that button , " call " or "CALL". PTZ preset point will jump to change the previously set position. If the preset number has not been previously set . Then the screen will display " do not set ." Delete preset On the keyboard or other input control software preset number , press the button "Delete ." Change the preset point is removed . Preset cruise function Dome supports 9 preset cruise , cruise track of each preset can be edited 16 preset points . Complete cruise cruise function which corresponds to the preset cycle in order to jump one by one . 16 preset preset function must be set individually . If you find the cruise preset number is not set , it will jump to the next set of preset point . Preset cruise function on the configuration menu to configure detailed scan settings inside the cruise . Line scan function PTZ Dome supports 16 line scan . PTZ finish line scan function to scan between two points in the action . Line scan starting position, need to terminate the pre-set position , starting with the line scan direction . Line scan function of the camera zoom based on the starting point set by multiple camera zoom , camera zoom end position is invalid. See the menu configuration line scan function configuration. Full- scan function (360 ° scan ) PTZ Dome supports 8 full scan . Full scan is complete 360 ° rotation scans. Full scan need to pre- set the scan start position of the scanning direction ( clockwise or counterclockwise reverse ) see the detailed menu setting. Pattern scan function Dome supports 4 pattern scan, pattern scan can not record 450 commands 10 minutes . Pattern scan is divided into two phases, the first phase of the recording phase, which will record all incoming ball machine control commands . The second stage is the playback phase, which will execute the loop the PTZ recorded commands. Detailed reference pattern scan configuration menu . Timing function PTZ Dome supports 4- timing functions. Timing function can be specified to reach a ptz cam is scheduled to perform the specified action. Timing function must be configured start time , end time, and the timing cycle ( which specifies one week , one day this feature is enabled ) . When the dome system clock reaches the start time , when the ptz camera will perform the specified action . When the dome system clock reaches the end time , the ball machine will end the specified action . Detailed configuration reference timing function timer function menu configuration. Note: When the system time end time is reached , the system first determines whether the current implementation of the action initiated by a timer , if the current implementation of the action non- timer starts , then the implementation of actions will not be canceled . Power-on action When PTZ Camera restarts, perform a certain action specified by the user . You can specify actions include : ( 1 ) call preset points . ( 2 ) perform line scan . ( 3 ) perform pattern scan . ( 4 ) perform full scans. ( 5 ) perform preset cruise . ( 6 ) implementation of mobile tracking . dwell operation and dwell time dwell definition: no dome control. PTZ Camera does not perform some kind of continuous motion operation. dwell Action: When the ptz is in dwell, in case reached the dwell time, then the ptz camera perform user-specified dwell action . You can specify actions include : ( 1 ) preset adjustments. ( 2 ) perform line scan . ( 3 ) perform pattern scan . ( 4 ) perform full scans. ( 5 ) perform preset cruise .. Menu configuration operations Enter the menu Recall or set preset 95 ( system-specific preset points ) to enter the menu . The basic format of the menu The menu includes four basic formats : -5- " [ ****** ] " This type of menu item indicates that the menu item has a submenu . " < ****** > " The types of menu items that " < > " the value of which is changed number . Can be down about modifying "<>" value inside . "****** > " This type of menu item indicates press OPEN ( iris open + ) to enter configuration. "****** : ******" This type of menu item consists of two parts , the configuration of the items before the colon , the colon is the current configuration values. Press the OPEN ( iris open + ) can be changed : "****** : < ****** > " format. Where " < ****** > " Reference (ii). Basic operation of the menu Menu Basic Operations as follows: up and down , OPEN ( iris open +), CLOSE ( aperture Off - ) . Down about : used to traverse a menu item , or menu item value changes. OPEN ( iris open + ) : Enter the sub-menu , start menu, or to determine the value to modify and save the menu values. CLOSE ( aperture off - ) : Returns to the previous menu or cancel the menu values changes. -6- Main Menu Main Menu [system info] [display setup] [control setup] [camera setup] [run setup] [other setup] [language setup] [system restart] [resest] [Exit] System info Run setup Serial no.xxxxxxx [preset setup] Address:003 [area instruct] Protocol:Pecolo-D [cruise set] Temperature:27 [pttern Set] Version:V1.0 [line scan] Title:xxxxx [full scan] Return Return Exit Exit Display setup Title display:<03sec> Date display:<On> Other setup Preset [date setup] notice:<03sec> [password setup] Focus [Privacy protection] display:<03sec> Return Area instruct<off> Exit Temp display<off> Title Display setup Camera setup Control setup Camera OSD<off> [Common setup] Auto zoom:<on> [IR Setup] Digital focus:<off> [Timer setup] BLC:<off> Return Vertical mirror:<off> Exit Image freeze:<off> Zoom speed:<high> Day/night switch:<auto> Return Exit configuration menu System Information : Users can view system information dome menu . Menu system information including : ball machine serial number, ball machine address , baud rate , communication protocol , the ball machine temperature , software version number, the ptz camera heading. -7- Main Menu [system info] [display setup] [control setup] [camera setup] [run setup] [other setup] [language setup] [system restart] [resest] [Exit] System info Serial no.xxxxxxx Move current menu to[system info] Press OPEN(iris +) enter Address:003 Protocol:Pecolo-D Temperature:27 Version:V1.0 Title:xxxxx Return Exit Menu Display settings : Users can define various headings are displayed on the monitor . The following are displayable title : Dome title, date display , preset point tips , angle zoom display , zone indication , temperature display . Main Menu [system info] [display setup] [control setup] [camera setup] [run setup] [other setup] [language setup] [system restart] [resest] [Exit] Display setup Title Move current menu to[Display setup] Press OPEN(iris +) enter display:<03sec> Date display:<On> Preset notice:<03sec> Focus display:<03sec> Area instruct<off> Temp display<off> Title Display setup (A) various configurations descriptio Continue: When the display settings for that type, it will always show. ON: When the display settings for that type, it will always show. OFF: Do not display the type of screen. <N Second>: After activating the display, N seconds, the display automatically clears the project, N: 1 ~ 60 seconds. <N Minutes>: After activating the display, N points automatically remove the items are displayed, N: 1 ~ 60 minutes. (2) Show time setting procedure Move the current menu item to "[Display Settings]" press OPEN (iris open +) into the display settings submenu. Move to display the menu item that will be modified, press OPEN to enter the value of the current menu item to modify, joystick up and down the value of the menu item selected, press OPEN (iris open +) confirm the settings and exit, press CLOSE (Iris Off -) unset and return. (3) set the title of the ptz camera during operation -8- Display setup Title display:<03sec> Date display:<On> Preset notice:<03sec> Focus display:<03sec> Area instruct<off> Temp display<off> Title Display setup Return Exit Enter [title setting] sub menu -> moved to the "Dome Title" column -> joystick left and right to select the set the first few characters -> moved to the "input type" select the current type->ove the character to the character list line press the OPEN (iris open +) to enter the character selectionlect the character (the currently selected character will continue to blink) press OPEN (iris open +) select the character. When all the characters entered, move the cursor to "Confirm input>" items "OPEN (iris open +)" Save ball machine and return to the previous menu title, or move to the "Cancel back>" item and press "OPEN (iris open +) "Exit dome Title setting and return to the previous menu. Title setup Title: Input type:<digit> /<Uppercase letters> /<Lower case letters ABCDEFGHIJKLMN OPQRSTUVWXYZ -- Confirm Return exit Display position during operation Display setup Title display:<03sec> Date display:<On> Preset notice:<03sec> Focus display:<03sec> Area instruct<off> Temp display<off> Title Display setup Go to "[display position setup]" submenu moved to the "Display Position Type" menu bar press OPEN (iris open +) -> joystick left and right selection will set the display position of the type, press OPEN (iris open +) OK move to "Start settings>" menu bar press OPEN (iris open +) to begin setting -> joystick up and down, the configuration item location will move the control to the appropriate location -> press OPEN (iris open +) OK to save the position and returns, according CLOSE (iris off -) will cancel the settings and return. Return Exit Display position setup Display position type: <date> <title/address> <preset title> <zone title> Setup Return exit -9- Control Settings: Control settings include the following sub-menu items: "[General Settings]": This sub-menu contains some basic ball machine control properties, see the description of the sub-menu. "[Alarm Settings]": This submenu contains dome alarm function attribute settings, see the description of the sub-menu. "[Infrared Settings]": This sub-menu setting control properties of infrared light, infrared ball only support this menu, Ordinary ball is displayed as "[------]." "[Timer Settings]": This sub-menu to set timer function attributes, see the description of the sub-menu. Display all item Configure item movable Confirm<OPEN> Cancell<CLOSE> Main Menu [system info] [display setup] [control setup] [camera setup] [run setup] [other setup] [language setup] [system restart] [resest] [Exit] Control setup [Common setup] Move current menu to[control setup] Press OPEN(iris +) enter [IR Setup] [Timer setup] Return Exit " [ General Settings ] " : Control settings include the following sub- menu items: Control setup [Common setup] [IR Setup] [Timer setup] Return Exit Common setup Auto rotate:<on>/<off> Address switch<on>/<off> Address<n> Power on action:<n/a> Dwell time:<1-60sec>/<1-60min > Dwell action:<n/a> Return Press the OPEN (iris open +) into the general settings. Move to the menu item, press OPEN (iris open +) configuration values for the corresponding menu item changes -> joystick up and down the menu item to modify the configuration values -> press OPEN (iris open +) confirm and save, press CLOSE (aperture off -) cancel the setting. Auto flip: the lens is automatically run to the bottom of a vertical 180 ° horizontal rotation. Gear ratio: variable depending on the camera's manual to determine the maximum speed multiples. Jump Freeze: call preset, first send commands to the camera freezes the video, reaches the preset point, thawed video. Soft address switch: Turn the switch to enable the soft address, soft address is "soft address number" menu item of value, turn the feature off when the ball machine address is the address of the DIP switch settings. Soft Address Number: soft ball machine address number. Power Action: Dome normal power operation performed after - 10 completion. Standby time: joystick left and right selection <N ec<N min,joystick " [ IR Infrared Settings ] Control setup [Common setup] [IR Setup] [Timer setup] Return Exit Press the OPEN ( iris open + ) into the infrared setting. Move to the menu item, press OPEN ( iris open + ) configuration values for the corresponding menu item changes - > joystick up and down the menu item to modify the configuration values - > press OPEN ( iris open + ) confirm and save , press CLOSE ( aperture off - ) cancel the setting . \ On mode : Define the infrared lamp on mode . Auto - infrared light in accordance with the "Scan Time " time to read the value set state of the environment , if it reaches a " turn-on threshold " level set , the ball will automatically turn on or off infrared light . Manual open - IR control setup Turn on mode<auto>/<manual on>/<manual off>/<time>/<camera> Light: 010 Turn on:00:00 Turn off:00:00 Near light compensation:mid Scan time:<1-60sec>/<1-60min> Turn on data:<n level> Return Exit infrared light will remain in the open state . Manual Off - Infrared light has been turned off. Camera - When the camera automatically switches infrared , infrared will automatically switch to the appropriate mode. Time - in the "open time " , " off time " the time period between automatically open infrared light . BRIGHTNESS: Specify the brightness level of infrared light , if it is < Auto > mode , then the infrared lamp brightness will be based on the current zoom camera automatically adjusts . Opening time: When the " Open Mode" to < time > , the menu value defines the infrared light turn-on time . Closed: When the " Open Mode" to < time > , the menu value defines the infrared light off time. Near light compensation: compensation levels. - 11 - [ Timer Settings ] Control setup [Common setup] [IR Setup] Press the OPEN (iris open +) into the timer settings. Move to the menu item, press OPEN (iris open +) configuration values for the corresponding menu item changes -> joystick up and down the menu item to modify the configuration values -> press OPEN (iris open +) confirm and save, press CLOSE (aperture off -) cancel the setting. [Timer setup] Return Exit Timer setup Timer function no.<n> Timer action:<off> Turn on time:00:00 Turn off time:00:00 [timer cycle] Return exit Timer Function Number: Total Support 4 timing functions. Timing Action: When the system clock reaches timer function "start time" is the implementation of the action. Start Time: Perform "timed action" point in time. Close Time: End "time movement" point in time. The system will determine whether the action currently being executed by the timer function is activated, it is then end the execution specify the action, whether it will do nothing. [Timing cycle]: This sub-menu configuration current timer, day in a week which is enabled. Timer cycle Mon:<on>/<off> Tue:<on>/<off> Wed:<on>/<off> Thu:<on>/<off> Fri:<on>/<off> Sat:<on>/<off> Sun:<on>/<off> Return exit Camera settings: Camera settings include the following sub-menu items: Note: When the camera itself supports OSD menu, it will enter the camera comes with menus. Main Menu [system info] [display setup] [control setup] [camera setup] [run setup] [other setup] [language setup] [system restart] [resest] [Exit] Camera setup Camera OSD<off> Auto zoom:<on> Move current menu to[camera setup] Press OPEN(iris +) enter Digital focus:<off> BLC:<off> Vertical mirror:<off> Image freeze:<off> Zoom speed:<high> Day/night switch:<auto> Return Exit - 12 - Setup: Run setup includes the following sub-menu items: "[Preset Settings]": Set the preset point. "[Regional Settings]": to set the regional indicative. "[Cruise Settings]": Set the preset cruise scanning. "[Pattern]": Mode Path recording starts. "[Line Scan]": Set between two scans. "[Full Scan]": Set 360 ° scanning. Main Menu [system info] [display setup] [control setup] [camera setup] [run setup] [other setup] [language setup] [system restart] [resest] [Exit] Run setup [preset setup] Move current menu to[Run setup] Press OPEN(iris +) enter [area instruct] [cruise set] [pttern Set] [line scan] [full scan] Return Exit " [ Preset Settings ] " Run setup [preset setup] [area instruct] [cruise set] [pttern Set] [line scan] [full scan] Return Exit Press the OPEN (iris open +) to enter the preset point setting. Move to the menu item, press OPEN (iris open +) configuration values for the corresponding menu item changes -> joystick up and down the menu item to modify the configuration values -> press OPEN (iris open +) confirm and save, press CLOSE (aperture off -) cancel the setting. Preset Number: preset number. [Preset Title]: enter the sub-menu to edit the title of preset point. Title only supports preset number from 1 to 48 preset points. Other non-title of the preset Preset setup Preset:<n>(255) [preset title](48) Setup Call Delect Delect all preset Return Exit settings. Setting method refer Dome Title setup process. Settings>: Set the preset point. Call>: call preset points. Delete>: delete the current preset number saved preset point information. Delete all presets>: delete all saved dome presets. " [ Regional Settings ] " : to set the regional directions to set the ball machine in a range of titles. Being installed , the lens by Clockwise direction according to the "right" direction . Flip , the lens counterclockwise as the "right" direction. - 13 - Press the OPEN (iris open +) into the regional settings. Move Run setup to the menu item, press OPEN (iris open +) configuration [preset setup] values for the corresponding menu item changes -> joystick up [region setup] and down the menu item to modify the configuration values -> [cruise set] press OPEN (iris open +) confirm and save, press CLOSE [pttern Set] (aperture off -) cancel the setting. [line scan] [full scan] Area No.: A total of eight areas can be set. Return [Section title]: enter the sub-menu to edit the title of the Exit region. Setting method to set the reference Dome Title Set the left margin>: Set the left margin area. Set the right margin>: Set the right border area. Delete>: delete the current area of the region title. Region setup Region no.<n>/(8) Region title Setup left side Setup right side Delete Return exit " [ Cruise Settings ] ": Set the preset cruise scanning Run setup [preset setup] [region setup] [cruise set] [pttern Set] [line scan] [full scan] Return Exit Press the OPEN (iris open +) into the regional settings. Move to the menu item, press OPEN (iris open +) configuration values for the corresponding menu item changes -> joystick up and down the menu item to modify the configuration values -> press OPEN (iris open +) confirm and save, press CLOSE (aperture off -) cancel the setting. Area No.: A total of eight areas can be set. [Section title]: enter the sub-menu to edit the title of the Cruise setup Cruise no.<n> Edit no. Reset default Return exit region. Setting method to set the reference Dome Title Set the left margin>: Set the left margin area. Set the right margin>: Set the right border area. Delete>: delete the current area of the region title. - 14 - Press the OPEN ( iris open + ) into the sequence editor . Move to the menu item, press OPEN ( iris open + ) configuration values for the Edit no. Item/preset/dwelltime/speed 01 / 001<1-255>sec/64level 02 / 002<1-255>sec/64level 03 / 003<1-255>sec/64level 04 / 004<1-255>sec/64level Last page Next page Return exit corresponding menu item changes - > joystick left and right , respectively, select " Preset ", " duration ", " speed" , joystick up or down selection value - > press oPEN ( iris open + ) confirm and save , press CLOSE ( iris off - ) cancel the setting . Preset : cruise preset point number. Duration: ball machine after the jump to the preset dwell time . Speed: jump to the preset speed. " [ Pattern ] " : recording user actions , executed playback the user's actions . Run setup [preset setup] [region setup] [cruise set] [pttern Set] [line scan] [full scan] Return Exit Pattern setup Scan no.<n>(4 pattern) Record Start Delete Return exit Press the OPEN ( iris open + ) into the pattern scan settings. Move to the menu item, press OPEN ( iris open + ) configuration values for the corresponding menu item changes - > joystick up and down the menu item to modify the configuration values - > press OPEN ( iris open + ) confirm and save , press CLOSE ( aperture off - ) cancel the setting . Scan number: pattern scan number. Recording > : Enter the pattern scan recording process , the user shakes the joystick , the system will record the incoming commands. Press the CLOSE ( Iris Off - ) will stop recording, press the CLOSE ( Aperture Off - ) will exit the Recording menu . Start > : Start implementation of this Article pattern scan . Starts automatically exit the menu. Delete> : delete the clause pattern scan . Rest space [IIIIIIIIIIIIIIIIIIIIIIIIIII]100% Confirm--<OPEN> Exit--<CLOSE> - 15 - " [ Line Scan ] ": Set between two scans. Run setup [preset setup] [region setup] [cruise set] [pttern Set] [line scan] [full scan] Return Exit Line scan Line scan no.<n>(16) Speed:<n>(1-6level) Direction:< Press the OPEN ( iris open + ) into the line scan . Move to the menu item, press OPEN ( iris open + ) configuration values for the corresponding menu item changes - > joystick up and down the menu item to modify the configuration values - > press OPEN ( iris open + ) confirm and save , press CLOSE ( aperture off - ) cancel the setting . Line scan number : Supports 16 -line scan . Speed: the starting point , end point between two scanning speed grades. Duration: Turn the starting point or ending point after time spent on this point . Direction : Starting scanning direction . Delete> : Delete section line scan . Clockwise>/Countercl ockwise Setup start point Setup end point Start Delete Return exit " [ Full Scan ] ": Set 360 ° scanning. Press the OPEN (iris open +) into the full scan. Move to the menu item, press OPEN (iris open +) configuration values for the corresponding Run setup menu item changes -> joystick up and down the menu item to modify [preset setup] the configuration values -> press OPEN (iris open +) confirm and save, [region setup] press CLOSE (aperture off -) cancel the setting. [cruise set] [pttern Set] Scan number: total support for 8-round sweep. [line scan] Scan speed: Set 360 ° scan speed grade, a total of 64. [full scan] Scanning direction: the direction of scanning, clockwise, or Return counterclockwise. Exit Set start point>: Set full scan start position, OPEN enter the configuration starting point, joystick, so that camera movement to the starting point, press OPEN (iris open +) to save the starting point. Start>: Start section full scan will start from Full scan Automatically exit the menu. Scan no.<n>(8) Scan speed:<n level>(64 level) Delete>: Delete section line scan. Scan direction:<clockwise>/<cunterclockwise> Setup start point Start Delete Return exit - 16 - " [ Mobile Tracking ] " : moving object tracking property setting. Run setup [preset setup] Press the OPEN (iris open +) into mobile tracking [region setup] submenu item. Move to the menu item, press OPEN [cruise set] (iris open +) configuration values for the corresponding [pttern Set] menu item changes -> joystick up and down the menu [line scan] item to modify the configuration values -> press OPEN [full scan] (iris open +) confirm and save, press CLOSE (aperture Return off -) cancel the setting. Exit Trace switch: whether to start mobile tracking feature. Tracking Sensitivity: Set the trigger tracking sensitivity. Target size: Set the trigger tracking moving objects size. Target speed: Set the speed of a moving target. Return time: When moving target is lost, time to Mobile tracking setup Tracking switch:<on>/<off> Sensitivity:<high>/<mid>/<low > Target:<big>/<mid>/<small> Speed: <high>/<mid>/<low> Return time:<off>/<n sec>/<n min>(n:1-60) Zoom tracking:<off>/<on> Setup scene Delete scene Return exit return to the default scene. Zoom follow: Set the lens zoom tracking. Setting the Scene>: Set lost object, return to the scene. Deleted scenes>: delete return to the scene. - 17 - Other settings: Control settings include the following sub-menu items: "[Date Settings]": to set the date. "[Password Protection]": enter the dome menu password. "[Privacy]": Set the privacy zone. (Need camera support, currently only supports SONY, NEWLG cameras privacy protection features. SONY camcorder supports inside the dome menu settings, NEWLG cameras need to set up inside the camera comes with menus.) Main Menu [system info] [display setup] [control setup] [camera setup] [run setup] [other setup] [language setup] [system restart] [resest] [Exit] Other setup [date setup] Move current menu to[Run setup] Press OPEN(iris +) enter [password setup] [Privacy protection] Return Exit "[Date Settings]": to set the date. Other setup [date setup] [password setup] [Privacy protection] Return Exit Press the OPEN (iris open +) to enter date setting. Move to the menu item, press OPEN (iris open +) configuration values for the corresponding menu item changes -> joystick left and right to modify the configuration menu items -> joystick up and down select values -> press OPEN (iris open +) to determine and save, press CLOSE (iris off -) cancel the setting. Date: dome system date. Date setup Time: dome system current time. Date:2009-01-01 Time:11:06 Return exit - 18 - " [ Password Protection ] " : enter the dome menu password. Other setup [date setup] [password setup] [Privacy protection] Return Exit Password setup Password protection<on><off> Modify password:xxxx Confirm:--<OPEN> Return exit Press the OPEN ( iris open + ) to enter the password setting. Move to the menu item, press OPEN ( iris open + ) configuration values for the corresponding menu item changes - > joystick left and right to modify the configuration menu item - > select values joystick up or down "X" ( the password value is 0 ~ 9 ) - > press oPEN ( iris open + ) confirm and save , moves to "OKpress CLOSE ( iris off - ) cancel the setting . > - <OPEN>" menu item , point OPEN ( iris open + ) to save the password. " [ Privacy ] ": Set the privacy mask area , privacy protection requires camcorder supports privacy function. Currently supported with NEW LG SONY privacy . Other setup [date setup] [password setup] [Privacy protection] Return Exit Press the OPEN (iris open +) into the privacy protection. Move to the menu item, press OPEN (iris open +) configuration values for the corresponding menu item changes -> joystick left and right to modify the configuration menu items -> joystick up and down select values -> press OPEN (iris open +) to determine and save, press CLOSE (iris off -) cancel the setting. Privacy protection setup Privacy protection no.<n>(24) Switch:<on><off> Setup Delete Clear Return exit exit Privacy number: 24 Privacy Protection (depending on the number of different cameras privacy). Protection switch: turn on or off the corresponding numbers to protect privacy. Settings>: Press OPEN (iris open +) to enter the setting joystick Privacy move the lens a region -> press OPEN (iris open +) to enter the area size of the configuration (the middle of the screen will appear black area) down about Move joystick configuration the size of the black area. Press OPEN (iris open +) confirm the entry. Delete>: delete the privacy zone. Clear>: delete all 24 privacy zones. - 19 - Special preset feature list Summary Table System 65 ~ 99 special preset for the system . Preset number (calling Description 65 system configuration 66 camera type configuration 67 infrared control configuration 68 Start full scan 69 start line scan 70 start preset cruise 71 start pattern scan 72~73 Reserved 74 soft address set 75 set camera parameters 76 Reserved 77 cancel the mirror image 78 Mirror image 79 reset 80~94 Reserved 95 enter the menu 96~99 Reserved PTZ system configuration Preset number entry Sub preset number 65 Function Enter system configuration After calling 65 preset , 1 Open depth of field scale deceleration function then call the sub 2 Close depth ratio deceleration function presets within 15 3 Turn on automatic rotate seconds , can achieve 4 Turn off automatic rotate the functionality 5 Turn on language configuration described in the 6 Turn off language configuration described 9 Reserved functionality . 10 Reserved 11 Turn on soft address enable switch 12 Turn off soft address enable switch 13 Turn on PECOL-P preset offset enable switch 14 Turn off PECOL-P preset offset enable switch 15 Turn On the level of control reverse 16 Turn Off the level of control reverse 17 Turn On the vertical control reverse 18 Turn Off the vertical control reverse 19 Open the OSD menu function 20 Close the OSD menu function 21 Reset 22 Restore the system clock settings - 20 - 23~255 Reserved Zoom Camera Configuration Operation Preset number entry Sub preset number 75 After calling 75 preset , Function Enter 1 then call the sub system configuration Into the camera menu (camera need with OSD Function ) presets within 15 2 Turn on the camera screen seconds , can achieve 3 Turn Off the camera screen the functionality 4 Turn on the camera digital zoom described in the 5 Turn off described 6 Turn on Camera BLC functionality . 7 Turn off Camera BLC 8 Set the camera to Auto Focus mode 9 Set the camera to manual focus mode 10~255 Reserved the camera digital zoom Camera type configuration operations Preset number entry Sub preset number 66 Function Enter system configuration After calling 66 preset , 1 Auto recognize camera then call the sub 2 SONY18X presets within 15 3 CNB22X seconds , can achieve 4 SAMSUNG231 the functionality 5 HITACHI454 described in the 6 SANYO400 described 7 SAMSUNG330 functionality . 8 CHITACHI 9 LGX 10 SANYO600 11 SANYO800 12 SONY26X 13 SONY36X 14 HITACHI654 15 NEWLG23X 16 NEWCHITACHI 17 HAITUO 18 HITACHI214 19 CNB2260X 20 Reserved 24 SCM_2251 28 CNBZCN_21Z22F 29 CNB_SS_803LD 33 LG22X 34 Reserved 35 Reserved - 21 - 36 Reserved 37~255 Reserved Sub preset number Function IR(Infrared operation Preset number entry 67 Enter IR Infraredconfiguration After calling 67 preset , 1 Infrared detection sensitivity set to 1 then call the sub 2 Infrared detection sensitivity set to 2 presets within 15 3 Infrared detection sensitivity set to 3 seconds , can achieve 4 Infrared detection sensitivity set to 4 the functionality 5 Infrared detection sensitivity set to 5 described in the 6 Infrared detection sensitivity set to 6 described 7 set to automatic mode IR functionality . 8 Turn on manual mode IR 9 Turn off manual mode IR 10 Set the timer mode IR 11 Set the camera mode IR 12 Set up an infrared lamp brightness to automatic adjustment mode 13 Reserved 14 Reserved - 22 - 15 Reserved 16 Reserved 17 Initialization infrared light 18 Set up an infrared brightness is low 19 Set up an infrared brightness is mid 20 Set up an infrared brightness is high 21 Turn on infrared synchronization 22 Turn off infrared synchronization 23 Set into the infrared synchronization time Sub preset number Function Running function operation Preset number entry 68 Entrance into the start full scan After calling 68preset , 1 Turn on 1 full scan then call the sub 2 Turn on 2 full scan presets within 15 3 Turn on 3 full scan seconds , can achieve 4 Turn on 4 full scan the functionality 5 Turn on 5 full scan described in the 6 Turn on 6 full scan described 7 Turn on 7 full scan functionality . 8 Turn on 8 full scan Preset number entry Sub preset number Function 69 Entrance into the line scan After calling 69 preset , 1 1 line scan then call the sub 2 2 line scan presets within 15 3 3 line scan seconds , can achieve 4 4 line scan described 5 5 line scan functionality . 6 6 line scan 7 7 line scan 8 8 line scan 9 9 line scan 10 10 line scan 11 11 line scan 12 12 line scan 13 13line scan 14 1 4line scan 15 1 5line scan 16 1 6line scan 17~255 Reserved the functionality described in the Preset number entry Sub preset number 70 After calling 70 preset , Function Entrance into the start preset cruise 1 Start 1 preset cruise - 23 - then call the sub 2 Start 2 preset cruise presets within 15 3 Start 3 preset cruise seconds , can achieve 4 Start 4 preset cruise the functionality 5 Start 5 preset cruise described in the 6 Start 6 preset cruise described 7 Start 7 preset cruise functionality . 8 Start 8 preset cruise 9 Start 9 preset cruise 10~255 Reserved Sub preset number Function Preset number entry 71 Entrance into the start pattern scan After calling 71 preset , 1 Turn on 1 pattern scan then call the sub 2 Turn on 2pattern scan presets within 15 3 Turn on 3pattern scan seconds , can achieve 4 Turn on 4pattern scan 5~255 Reserved the functionality described in the described functionality . DIP switch list Protocol DIP Switch Protocol SW1-1 SW1-2 SW1-3 PECOL-D 0 0 0 PECOL-P 1 0 0 B01 0 1 1 HKV 1 1 0 DAIWA 1 0 1 SAMSUNG 1 1 1 Baud rate DIP Switch Protocol SW1-4 SW1-5 1200B 0 0 2400B 1 0 4800B 0 1 9600B 1 1 DIP switch address code The encoded bit DIP switch toggle "ON" place, the corresponding bit is "1" , otherwise "0 ." Add SW2-1 SW2-2 SW2-3 SW2-4 SW25 SW2-6 SW2-7 SW2-8 1 1 0 0 0 0 0 0 0 2 0 1 0 0 0 0 0 0 3 1 1 0 0 0 0 0 0 4 0 0 1 0 0 0 0 0 - 24 - 5 1 0 1 0 0 0 0 0 6 0 1 1 0 0 0 0 0 7 1 1 1 0 0 0 0 0 8 0 0 0 1 0 0 0 0 9 1 0 0 1 0 0 0 0 10 0 1 0 1 0 0 0 0 11 1 1 0 1 0 0 0 0 12 0 0 1 1 0 0 0 0 13 1 0 1 1 0 0 0 0 14 0 1 1 1 0 0 0 0 15 1 1 1 1 0 0 0 0 16 0 0 0 0 1 0 0 0 17 1 0 0 0 1 0 0 0 18 0 1 0 0 1 0 0 0 19 1 1 0 0 1 0 0 0 20 0 0 1 0 1 0 0 0 21 1 0 1 0 1 0 0 0 22 0 1 1 0 1 0 0 0 23 1 1 1 0 1 0 0 0 24 0 0 0 1 1 0 0 0 25 1 0 0 1 1 0 0 0 26 0 1 0 1 1 0 0 0 27 1 1 0 1 1 0 0 0 28 0 0 1 1 1 0 0 0 29 1 0 1 1 1 0 0 0 30 0 1 1 1 1 0 0 0 31 1 1 1 1 1 0 0 0 32 0 0 0 0 0 1 0 0 … … … … … … … … … 254 0 1 1 1 1 1 1 1 255 1 1 1 1 1 1 1 1 - 25 -