1
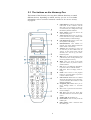
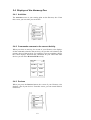
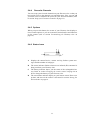
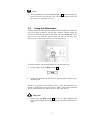
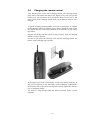
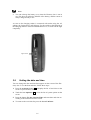
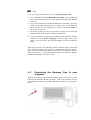
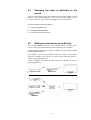
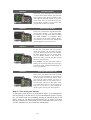
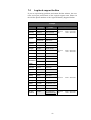
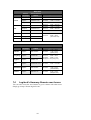
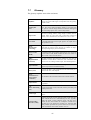
System Remote Control
User's Manual
1
2
Contents
1
Preface.................................................................................. 6
1.1
Included ........................................................................................... 7
1.2
Transport .......................................................................................... 7
2
Getting to know your Harmony One .................................. 8
2.1
How the Harmony One works ......................................................... 8
2.2
Activities, Devices and Inputs ......................................................... 8
2.3
The buttons on the Harmony One.................................................... 9
2.4
Displays of the Harmony One ....................................................... 10
2.4.1
Activities ........................................................................... 10
2.4.2
Commands common to the current Activity ...................... 10
2.4.3
Devices .............................................................................. 10
2.4.4
Favourite Channels .......................................................... 11
2.4.5
Options .............................................................................. 11
2.4.6
Status icons ....................................................................... 11
3
Using the Harmony One ................................................... 12
3.1
Menus on the touch screen ............................................................ 12
3.2
Selecting an Activity...................................................................... 12
3.3
Switching between Activities ........................................................ 12
3.4
Turning off your devices ............................................................... 12
3.5
Using the Help button .................................................................... 13
3.6
Using your Favourite Channels ..................................................... 14
3.7
Controlling devices individually.................................................... 14
3.8
Charging the remote control .......................................................... 15
3.9
Setting the date and time................................................................ 16
4
Setting up the Harmony One ............................................ 17
4.1
Installing the Harmony Remote Software ..................................... 17
4.2
Login for returning user ................................................................. 18
4.3
Connecting the Harmony One to your computer........................... 19
4.4
Update your login information ...................................................... 20
3
4.5
Logout ............................................................................................ 20
5
Changing your setup ........................................................ 20
5.1
Adding and changing Activities .................................................... 20
5.2
Renaming an Activity .................................................................... 21
5.3
Changing how buttons work in an Activity ................................... 21
5.4
Adding custom buttons to an Activity ........................................... 22
5.5
Changing the order of Activities on the screen ............................. 23
5.6
Adding an extra device to an Activity ........................................... 23
5.7
Adding a new Device..................................................................... 24
5.8
Changing the setup of a Device ..................................................... 24
5.9
Delete a Device .............................................................................. 25
5.10 Identifying the inputs of your system ............................................ 25
5.11 Programming new commands ....................................................... 27
5.11.1 Naming conventions for new commands .......................... 28
5.12 Teaching already existing commands ............................................ 28
5.13 Speed settings ................................................................................ 29
5.13.1 Delay settings .................................................................... 30
5.13.2 Repeat settings .................................................................. 30
5.14 Setup your Favourite Channels ...................................................... 31
5.15 Update remote ................................................................................ 31
5.16 Testing the remote setup ................................................................ 32
6
Personalizing the Harmony One ...................................... 34
6.1
Upgrading to a new Harmony remote ........................................... 34
6.2
Setting up the Remote Assistant .................................................... 34
6.3
Setting up the on-remote help system ............................................ 35
6.4
Adjusting the glow timing ............................................................. 36
6.5
Setting up the time display format ................................................. 36
6.6
Show 'Starting Activity' screen ...................................................... 37
6.7
Setting up the tilt sensor ................................................................ 37
6.8
Set a background............................................................................ 37
6.9
Adding a slide show....................................................................... 38
6.9.1
Displaying a slide show .................................................... 39
4
6.10 Selecting and changing a theme .................................................... 39
6.11 Updating the firmware ................................................................... 40
6.12 Registering a new user account ..................................................... 40
7
Getting help with your Harmony One .............................. 41
7.1
Tip Center ...................................................................................... 41
7.2
Tutorial .......................................................................................... 41
7.3
The on-remote help system ............................................................. 41
7.4
Frequently asked questions (FAQ) ................................................ 41
7.5
Logitech support hotline ................................................................ 43
7.6
Logitech's Harmony Remote user forums ..................................... 44
7.7
Glossary ......................................................................................... 45
8
Device Worksheet.............................................................. 47
9
System requirements ........................................................ 48
10
Technical Data ................................................................... 48
5
1
Preface
The Audionet Team congratulates you on your purchase of this unit.
The Audionet System Remote Control Harmony One is your answer to
effortless home entertainment. The Activities button puts control for all
your devices in one convenient location. You can go from watching TV
to watching a DVD to listening to music with the touch of a button. You
no longer need to type codes to get your remote working with your entertainment system. The guided online setup walks you through the step-bystep configuration of your Harmony One with your entertainment system
and then you'll be ready to sit back and enjoy!
Whether you're new to the Harmony One or you consider yourself an
expert, this user's manual provides you with useful information to get you
going. Therefore, please read this manual carefully so you are able to use
and enjoy all functions of this unit without any drawback.
6
1.1
Included
Included you will find the following items:
·
Audionet System Remote Control Logitech Harmony One
·
User's manual (that you are currently reading)
·
USB cable
·
Rechargeable Li-ion battery
·
Recharging station
·
AC adapter for recharging station
1.2
Transport
Important
·
Please transport the Audionet System Remote Control Harmony One
only inside the included package.
·
Always use the plastic sheet to prevent scratches on the housing.
·
For safety reasons please remove the rechargeable battery from the
Harmony One during transport and place it, protected by its plastic
sheet, into the package.
7
2
2.1
Getting to know your Harmony One
How the Harmony One works
The Harmony One is an Activity-based infrared (IR) universal remote
control. Using the Harmony Remote Software, you can configure the
Harmony One to control up to 15 devices.
Using an intelligent and powerful Activity-based technology, the Harmony One is able to keep track of the devices it controls, so it always
knows which of your devices are on. Hence, the Harmony One switches
effortlessly e.g. from watching a DVD to listening music on the stereo
with the touch of a button.
2.2
Activities, Devices and Inputs
Activities are the basis for how the Harmony One works. Things like
watching a DVD, listening to radio, playing a game are all examples of
Activities you can set up for your remote using the Harmony Remote
Software.
When you select an Activity, the Harmony One sends a series of commands to your entertainment system to turn on the necessary devices and
configure them for the selected Activity. After you select an Activity, the
Harmony One assigns the buttons on the remote so they control the
proper devices and the screen displays other commands for that Activity.
For information on how to select an Activity, or how to switch between
Activities, refer to section 'Selecting an Activity' on page 12 and section
'Switching between Activities' on page 12.
Devices are the components of your entertainment system. They are
things like your TV, cable box, DVD player, or game system.
Inputs are how your devices are connected. For example, if your DVD
player is connected to your TV using the Component 1 input, then the TV
needs to be set to Component 1 to display the DVD picture properly.
8
2.3 The buttons on the Harmony One
The buttons of the Harmony One may have different functions or control
different devices depending on which Activity you are in. For further
information, refer to section 'Commands common to the current Activity'
on page 10.
A
B
C
D
E
F
G
H
I
J
K
L
M
N
O
P
Q
R
9
USB connector: Connect one end of the
USB cable to this connector and the
other end to your computer so that you
can download your configuration using
the Harmony Remote Software.
Power button: Turns all devices off
with one button press.
Touch screen: Shows lists of your Activities and Devices, help, infrared (IR)
commands and any available listings.
Left / Right arrow: Allows you to view
more options on the display.
Function buttons: This buttons are
dynamic and select different functions
on the remote or the Activity.
Activites: Press Activities to view a list
of Activities you have added. Press an
Activity on the touch screen and the
Harmony One will set up your entertainment system.
Help: Asks you simple questions so that
your Harmony One can fix problems you
are having within an Activity.
Menu: Gives you access to the menu
system on a device, if you have a device
with this feature.
Info: Gives you additional information,
if you have a device with this feature.
Exit: Exits from an display menu or
listing.
Guide: Gives access to view program
listings or on-screen menus, if you have
a device with this feature.
Smart buttons: While there is a default
setting for the buttons in most Activities,
you can customize these buttons to send
different commands.
Navigation pad arrows: allow you to
move through menus or on-screen
guides.
Prev: Goes to previous television channel (for example).
Play area: puts your play, pause, skip
and other buttons in one area for quick
access.
Number pad: has the digits 0-9.
Clear button: clears an entry from the
number pad.
Enter button: enters a selection from
the number pad.
2.4 Displays of the Harmony One
2.4.1 Activities
The Activities screen is your starting point on the Harmony One. From
this screen, you can select your Activities.
My Activities:
1/2 pages
Mi 14:51
Listen to CDs
Watch a DVD
CD with VIPG3
Options
Devices
2.4.2 Commands common to the current Activity
When you select an Activity, the screen of your Harmony One displays
all the commands related to that Activity, not just the ones related to the
primary device of that Activity. For example, if you are watching a DVD,
the screen displays functions and commands for your DVD and other
devices you use in the Watch a DVD Activity.
Watch a DVD
Mi 14:51
1/4 pages
Home Menu
Angle
Top Menu
Subtitle
Menu
Audio
Devices
2.4.3 Devices
When you press the Devices button, the screen of your Harmony One
displays a list of your devices. From this screen, you can control individual devices.
Devices:
1/4 pages
Mi 14:51
SAM G2
MAP V2
SAM
Current
Activity
10
2.4.4
Favourite Channels
You can set up your favourite channels on your Harmony One so that you
have quick access to the channels you watch the most. Also, you can add
your own icons to customize the screen for your favourite channels (refer
to section 'Setup your Favourite Channels' on page 31).
2.4.5 Options
When you press this button, the screen of your Harmony One displays a
list of remote options so you can customize certain features and functions
on the remote (refer to section 'Personalizing the Harmony One' on
page 34).
2.4.6 Status icons
B C
A
My Activities:
1/2 pages
Mi 14:51
D
A
Displays the current Device, current Activity, further system messages and the number of sub pages..
B
The status indicator flashes whenever an infrared (IR) command is
being sent from your Harmony One.
C
The battery indicator shows you the status of the rechargeable battery. Refer to section 'Charging the remote control' on page 24 on
how to charge the battery of your Harmony One.
D
The current date and time display on your remote screen. How to set
up date and time on the remote is discussed in section 'Setting the
date and time' on page 16.
11
3
3.1
Using the Harmony One
Menus on the touch screen
If a menu or listing stretches over more than one screen page, use the
corresponding arrow buttons D * to go to the next or previous page of the
menu or listing.
Listen to CDs
Watch DVD
3.2 Selecting an Activity
Press button Activities F to get a list of all Activities currently programmed into the Harmony One.
The screen displays all available Activities. To select and start an activity,
touch the item on the screen.
3.3 Switching between Activities
To select a new Activity, press the Activities button F , and select the
Activity you want. The Harmony One will take care of powering on the
needed devices, and powering off the ones not needed. Please read section 'Adding and changing Activities' on page 20 on how to add new Activities and to customize existing ones.
3.4 Turning off your devices
Press the Power button B to power off all devices used in the current
Activity.
*
see numbers in section "The buttons on the Harmony One" on page 9.
12
Note
·
You do not need to press the Power button B when switching between Activities. The Harmony One ensures the proper devices for
the Activity are switched on or off.
3.5
Using the Help button
Because obstacles or distance can interfere with the signals the Harmony
One sends when it starts an Activity (for example, someone walks between your Harmony One and the TV when you press Watch TV, or you
are very far away from the system when you start an Activity), your
Harmony One can become 'out of sync' with your devices.
To fix the problem, use the help feature on your Harmony One.
1. On the remote, press the Help button G .
2. Answer the questions on the screen of your Harmony One by selecting Yes or No.
Based on your answers, the Harmony One re-sends the necessary commands to synchronize with your devices. When you are done with this
process, the Harmony One will be 'in sync' with your devices.
Important
·
Before using the Help button G , be sure you have addressed the
cause of the problem, such as removing any obstacles from the line of
sight.
13
3.6
Using your Favourite Channels
When you set up your Favourite Channels on the Harmony One, the item
Favourite Channels is added to the list of commands for the Activities
Watch TV and Record Video.
To use your Favourite Channels:
1. Select the Activity Watch TV or Record Video.
2. Use the arrow buttons D to get to the last page of the command list.
3. Press button Favourite Channels. The list of favourite channels you
have added appears on the screen.
4. To select a channel, simply press the corresponding button.
Use button Exit at the end of the list of favourite channels to return to the
command list.
Note
·
Refer to section 'Setup your Favourite Channels' on page 31 on how
to setup Favourite Channels.
3.7
Controlling devices individually
In some cases, you may need to control a device individually (for example, to access a function rarely used). You can use the Devices feature of
the Harmony One to control devices one-by-one.
When you press the Devices button E , the screen of your Harmony One
displays a list of your devices.
Options
Devices
Select the device you wish to control. After you selected a device, the
Harmony One controls only that device. You have access to all the commands for the device included in your Harmony One configuration.
Tip
·
Once you have finished, return to the current Activity for the optimal
control of your entertainment system. For this, press the item current
Activity.
14
3.8
Charging the remote control
Your Harmony One comes with a charging station. The charging station
plugs into a wall outlet and charges the battery every time you put the
remote on it. All you need to do is pick up the Harmony One, use it, and
place it back on the charging station when you are done to ensure it stays
charged.
To get the charging station operable, you have to connect the AC adapter
to the charging station as shown in step 1 below. Install the cable of the
AC adapter into one of the cable channels on the backside of your charging station.
Plug the AC adapter into the outlet (see step 2 below). Now the charging
station is ready to operate.
As soon as you place the Harmony One onto the charging station, the
battery will be charged (step 3 below).
In the upper right corner of the display screen is the battery indicator. If
only one red segment is left, the battery needs recharging. Additionally,
the Harmony One will issue a warning on the screen right before the battery is completely empty.
The battery is fully charged when the battery indicator shows 3 green
segments.
15
Note
·
You can recharge the battery every time the Harmony One is not in
use. This does not affect the lifetime of the battery, and the remote is
always charged ready to use.
As soon as the charging station is connected with mains using the AC
adapter, the Logitech logo will light up. Use the switch on the backside of
the charging station to select the illumination level, or switch off the light
completely.
light switch
3.9
Setting the date and time
You can change the date and time that appears on the screen of the Harmony One. To set the date and time, follow these steps:
1. Press the Activities button F to display the list of Activities on the
screen of your Harmony One.
2. Touch the item Optiones E to view the list of system options on the
screen.
3. Press the button Use the Current Time and enter date and time according to the instructions on the screen.
4. To return to the Activities list press the button I'm Done.
16
4
Setting up the Harmony One
Important
·
Audionet programmed your Harmony One by default for control of
Audionet devices so that you can use the remote without the need of
initial configuration. In order to use the full potential of your Harmony One, you should define your own Activities or customize the
pre-defined Activities to your entertainment system. For this you
have to use the included Harmony Remote Software.
Tip
·
In case you should experience any problems installing the Harmony
Remote Software or connecting the remote to your computer using
the USB port, please refer to the toll-free Harmony support hotline
(refer to section 'Logitech support hotline' on page 43).
4.1
Installing the Harmony Remote Software
After downloading and executing the installer file the guided online installation starts. Follow the instructions on the computer screen during the
installation of the Harmony Remote Software.
Important
·
While downloading, installing and operating the Harmony Remote Software you need an active internet connection.
·
Also refer to section 'System requirements' on page 48.
1. Download the Harmony Remote Software installer for Windows®
systems: LogitechHarmonyRemote7.7.0-WIN-x86.exe
or for Macintosh® / OSX systems:
LogitechHarmonyRemoteSoftware7.7.0-OSX.dmg
using this internet link:
ftp://ftp.logitech.com/pub/techsupport/harmony/
2. After the download please execute the file:
LogitechHarmonyRemote7.7.0-WIN-x86.exe (Windows®) or
LogitechHarmonyRemoteSoftware7.7.0-OSX.dmg (Macintosh®).
3. Follow the instructions on the computer screen until the end of the
installation process.
4. After installing the software, the application starts.
17
As soon as the Harmony Remote Software has connected to the Logitech
server, it checks for updates automatically and downloads them if necessary. Then you see the login screen. The following section discusses the
login procedure in detail.
4.2
Login for returning user
Note
·
Audionet set up an user account for all customers. In case you
did not get any account information (i.e. LoginID and password),
please contact the Audionet customer service. For any inquiry
please have the exact model name and serial number ready.
Important
·
If you create a new user account at this point and transfer the
new configuration to your Harmony One, all configurations for
Audionet devices will be irretrievably deleted and overwritten!
In this case, please login with the LoginID and password provided by
Audionet and update your Harmony One configuration by clicking
the button Update Remote.
To login to an existing account, enter LoginID and password into the
corresponding fields of the Returning User mask of the Harmony Remote Software. To start the login procedure click button Login.
Important
·
Passwords are case-sensitive!.
18
Tip
·
If you forgot your password, click on I forgot my password.
·
If you mark the box beside Remember my Login, your LoginID will
be inserted automatically every time you start the Harmony Remote
Software.
·
If you also mark the box beside Remember my Password, your password will inserted automatically, too, when you start the Harmony
Remote Software. You simply have to click on the button Login to
log onto your account.
·
In section 'Update your login information' on page 20 you will find
detailed information on how to change the password.
·
If you would like to change the language of the Harmony Remote
Software, click on Select Language in the top right corner of the
login screen and select the desired language from the pull-down
menu.
Each time you login, the Harmony Remote Software opens your home
page. Your home page is where you can manage your Activities and Devices, as well as change the settings on your remote. Whether you want to
add a new Activity, or customize remote buttons, the Harmony Remote
Software home page is the place to start.
4.3
Connecting the Harmony One to your
computer
Remove the Harmony One from the charging station. As soon as you are
asked by the Harmony Remote Software, connect the Harmony One to
your computer using the provided USB cables as shown in the pictures
below:
19
1. Connect the smaller end of the cable to the USB port on your remote.
2. Connect the wider end of the cable to a free USB port on your computer.
Any changes you made in the Harmony Remote Software will only be
transmitted to the Harmony One over the USB connection when you click
the button Update Remote on your home page screen (refer to section
'Update remote' on page 31).
4.4
Update your login information
When logged in to an existing account, you can view and update your
personal user data. Click on Preferences on the top right of your home
page. Now follow the instructions on the screen. If necessary update your
user data. You also may enter a new password.
4.5
Logout
After finishing your work with the Harmony Remote Software or if you
like to login with a different LoginID, click on Logout top right. You
logout from the current account and return to the login screen.
5
Changing your setup
Whether you get a new device, want to change the behaviour of some
buttons or customize some settings, you need to make changes to the
configuration of your Harmony One. The following sections provide you
with information to help you with these tasks.
Tip
·
If any questions or problems turn up during the setup of your Harmony One, please refer to section 'Getting help with your Harmony
One' on page 41. All possible help options are addressed there.
5.1
Adding and changing Activities
To set up Activities, you need to enter the information related to the Activities you will be using on your Harmony One. The Harmony Remote
Software shows you a selection of recommended Activities based on the
device information you provided.
20
When you set up Activities, the software asks you questions about the
function of each device. For example, if you set up the Watch TV Activity, you are asked which device changes the channels (TV or satellite/cable box).
If you only have one device that is capable of doing something, then the
software skips the question. For example, if you only have one TV, the
software does not ask you which device displays video.
If a device has more than one input, the software asks you which input
the device needs to be set. If you are not sure which input a device uses,
see section 'Identifying the inputs of your system' on page 25.
Tip
·
Activities are the basis for how the Harmony One works. With Activities, the Harmony One eliminates the need to use multiple remotes
for simple tasks. Just select the Activity and the Harmony One does
the rest.
·
The Audionet standard configuration comprises some common Activities. You can customize them very easily for optimal control of
your entertainment system.
In the Harmony Remote Software, select the Activities tab.
§
To add an Activity, click Add Activity.
§
To remove an Activity, click the
to remove.
§
To modify the settings for an Activity, click the Settings button
for the Activity you want to modify.
5.2
icon for the Activity you want
Renaming an Activity
In some cases, you may want to rename an Activity. You can rename any
Activity using the Harmony Remote Software.
To rename an Activity, go to the Harmony Remote Software:
§
Select the Activities tab.
§
In the Activity you want to rename, click Settings.
§
Select the option Rename <current Activity name>, click on
Next and follow the instructions on the screen.
5.3
Changing how buttons work in an Activity
When you select an Activity, your Harmony One turns on all the required
entertainment devices, sets up the device inputs correctly, and sets up the
remote's buttons to control the devices in the Activity. For example, when
you select the Watch a DVD Activity, the volume buttons on the Harmony One changes the volume.
21
However, there may be some commands you want to add to buttons or
display on the remote's screen. Using the Harmony Remote Software you
can add or customize how buttons work in any Activity quickly and easy.
From the Harmony Remote Software:
1. Select the Activities tab.
2. In the Activity in which you want to change a button, click Customize Buttons.
3. Follow the online instructions.
5.4
Adding custom buttons to an Activity
If you want a button to do something specific, or there's a function on
your device's original remote that's not on the Harmony One, you can
create your own buttons that appear on the screen of the Harmony One.
You can also change the name of a button on your remote's screen to help
make them easier to find.
Tip
·
When you create a custom name for a button, remember to think
about how the name will look on the remote's screen. We recommend
keeping button names to 10 characters or less.
When you use your Harmony One to control devices one-by-one, you can
customize the commands that appear on the remote's screen to make the
function you use easiest to find. You can even add the commands you are
missing to your Activities so they will always be easily accessible. If
there is a button you do not use, you can remove buttons that appear on
the remote's screen using the Harmony Remote Software.
To customize the buttons that appear on the screen of your Harmony One,
from the Harmony Remote Software:
1. In the Activity for which you want to customize a button, click Customize Buttons.
2. Follow the online instructions.
22
5.5
Changing the order of Activities on the
screen
You can easily change the order in which your Activities appear on your
remote's screen. Rearranging the order of the Activities allows you to
have the Activities you use most often appear at the top of the list.
From the Harmony Remote Software:
1. Click the Activities tab.
2. Click Re-order Activities.
3. Follow the online instructions.
5.6
Adding an extra device to an Activity
You can add additional devices to any existing Activity, if this is necessary to control your entertainment system. Here now two examples:
A passthrough device is a device that you add to your system that a signal
passes through unaltered.
For example, if you use your DVD recorder (or VCR) to record shows
from your satellite or set top box, you may need to add your DVD recorder as a passthrough device.
In these examples, the DVD recorder and the A/V Switch are used as
passthrough devices.
Digital Set Top Box
DVD Recorder
VCR
Digital Set Top Box
A/V Switch
DVD Player
23
To add an extra device to an Activity, go to your homepage:
1. Select the Activities tab.
2. Click Settings next to the appropriate Activity.
3. Select Review the setting for this Activity.
4. Select Yes, but I want to add more control of options and devices
for this Activity.
5. Click Next.
6. Follow the online instructions to complete the setup.
5.7
Adding a new Device
To add or change a device in the setup of your Harmony One, use the
Harmony Remote Software as follows:
1. Select the Devices tab.
2. To add a device, click Add Device.
The guided online setup asks you to enter your device information. Enter
The information for all entertainment components you want to control
with your Harmony One. You should use Device Worksheet to gather all
your device information before starting the setup process:
1. Select the Device Type for each of your devices.
2. Select the Manufacturer for each device.
3. Enter the Model numbers for each device.
4. Follow the online instructions.
Tip
·
You will find a worksheet that helps you gathering all device information in section 'Device Worksheet' on page 47 or use the hyperlink
Device Worksheet in the Tip Center on the right side of the Harmony Remote Software's screen while entering the device information.
5.8
Changing the setup of a Device
To make any changes to a device already existing in the configuration of
your Harmony One, do the following in the Harmony Remote Software:
1. Select the Devices tab.
2. To modify the settings for a device, click the Settings button for the
device you want to modify.
24
3. Select the item you would like to change for the current device from
the Device Options list and click Next.
4. Follow the online instructions.
5.9
Delete a Device
If you want to remove an existing device from your Harmony One, proceed in the Harmony Remote Software as follows:
1. Select the Devices tab.
2. Click on the
icon for the device you would like to remove.
3. Follow the online instructions.
Important
·
If you delete a device, be sure to update your Activities!
5.10
Identifying the inputs of your system
One of the most important parts to creating your Activities for your Harmony One is determining which inputs your system uses for each device.
This chapter gives you some suggestions on how to figure out which
inputs your entertainment system uses if you are not sure.
Inputs are how the devices in your entertainment system are connected.
For example, your DVD player or cable box is connected to your TV
through an input. If you use an AV Receiver to control the sound on your
devices, for example if you have a home theater system, this chapter will
also help you figure out the inputs for your audio connections.
After you know how your devices are connected, you can use the information to create your Activities using the Harmony Remote Software.
Step 1 – Identifying the type of input control
The first step in determining which inputs you have is to figure out how
you use your device's original remote to change inputs. In general, there
are four possibilities and each one is described in this section. To figure
out which option your TV or AV Receiver uses, look at your device's
original remote and see which option fits.
25
One source button
Option 1
In this case, your remote has only one source
or input select button. When you press the
source button, your device switches to the
next input and the label appears on your TV
screen. Each time you press the source button, the device switches to a new source until
you get back to where you started.
Several source buttons
Option 2
In this case, your device's original remote has
several source buttons – one for each input.
For example, you may have buttons labelled
TV, DVD, VIDEO 1, or S-VIDEO. When
you press one of the source buttons, the device switches to the source you selected and
the label appears on your TV screen.
Option 3
Select the input from an on-screen menu
In this case, your device uses an on-screen
menu from which you can select the input
you want. When you press the source button,
the menu appears on your TV screen. Then,
you use another button on the remote to
choose the input you want, and then a third
button to select the input.
For example, you press the source button to
display the on-screen menu, the arrow keys
to select an input, and then the OK button to
enter your selection.
Select the source form a list
Option 4
In this case, your device has a list of inputs
and you can use the button on the remote to
select the input you want from the list. After
you press the source button, you have to
press another button on the remote that selects the input you want. In this option, there
is no menu from which to choose (option 3)
and you do not have to cycle through all
inputs to get to the one you want (option 1).
Step 2 – Turn on all your devices
To determine which devices are using which inputs, we recommend you
start by turning on all the devices in your entertainment system. If possible, you should even start something playing on your DVD player, CD
player, VCR, etc. By having all your devices on, it's easier to see how
they are connected. It is also handy to have some paper and a pen so you
can note which devices are connected to which inputs.
26
Step 3 – Video
In this step, you must use the original remote control of your viewing
device (TV, plasma, projector etc.) to switch between inputs:
1. Using your viewing device's original remote, select each input one-ata-time.
2. For each input, note which device appears to be connected to that
input. For example, if you switch to VIDEO 1 and see your DVD
playing, you know your DVD player is connected to input VIDEO 1.
3. Repeat the previous step for each input.
Step 3 – Audio
In this step, you will determine which device manages the sound for your
entertainment system (e.g. an AV Receiver).
For example, you have a home theater system or connect your TV to
your stereo so the sound comes out of your stereo speakers.
You must use the original remote of your device managing the sound in
your entertainment system (e.g. your AV Receiver) to switch between
inputs:
1. Using the original remote of your device managing the sound, select
each input one-at-a-time.
2. For each input, note which device appears to be connected to that
input. For example, if you switch to OPTICAL 1 and hear the sound
from your DVD playing, you know your DVD player is connected to
OPTICAL 1.
3. Repeat the previous step for each input.
5.11
Programming new commands
It is possible that a device's commands are not recognized, because
maybe you have a very rare or very new device. Although Logitech updates their device list regularly, there are always new devices on the market. To remedy this, you can teach your Harmony One how to control this
device by using the device's original remote. Also, you can add that way
commands to devices already existing on your Harmony One, if necessary.
With the Learn IR feature of your Harmony One and the Harmony Remote Software, you can use your device's original remote to 'teach' your
Harmony One new commands. You should only need to use this feature
when Logitech's device list does not have your device listed, or there is a
button you want to use that is missing from the device configuration.
To use the learning feature of your Harmony One, go to the Harmony
Remote Software:
27
1. Select the Devices tab.
2. Click Learn IR located next to the device you want to control.
3. At the bottom of the following page you will find the input mask
'Learn a New Command'. Now enter a name for the new command to
be learned and click on the button Learn New Command.
4. Follow the online instructions.
5.11.1 Naming conventions for new commands
When you teach your Harmony One a new command, you need to give
the command a name. This way, you can refer to the command by name
in various locations in the Harmony Remote Software.
Logitech recommends you use the default names listed on the Learn IR
page. By using the default names, you minimize the chance of a button
being assigned incorrectly on the Harmony One.
When naming a command for which there is no default name on the
Learn IR page, use the following naming conventions to make button
assignment easier:
§
Do not use spaces or special characters such as /, & or * in the
name.
§
Capitalize the start of words (e.g. NextDisc, ModeDigital).
§
Start the command name with its main function (e. g. VolumeRearUp, VolumeRearDown or VolumeFrontUp). This helps
grouping related commands in lists.
§
Start infrared commands that select inputs (e.g. on a stereo receiver) with the prefix 'Input'.
§
Do not name the input based on what you've connected to your
device, rather name it based on what it is called on the input
panel of the device, or on the remote control (e. g. InputAux, InputVideo1, InputTape or InputDVD).
5.12
Teaching already existing commands
It may be possible that a command for a device exists in the configuration
of your Harmony One, but the IR code the remote sends out does not
work with your device you want to control. In this case, use the original
remote to teach the Harmony One the correct IR code to solve the problem.
To use the learning feature of your Harmony One, go to the Harmony
Remote Software:
28
1. Select the Devices tab.
2. Click Learn IR located next to the device you want to control.
3. Mark every command from the list you would like to teach the Harmony One by checking the box left to its name.
4. To start the learning procedure click on one of the Learn Selected
Commands buttons in the list.
5. Follow the online instructions.
5.13
Speed settings
If your device does not react to a command from the Harmony One, it
may be because the delay setting needs to be adjusted. By default, different devices take different amounts of time to react to a command from a
remote control. To accommodate these differences in your devices, the
Harmony One uses several types of delay, or speed settings, to control
your devices.
Power On Delay
Example:
Every time I turn on my system with an
Activity, my TV powers on but does not
go to the correct input. However, it does
go to the correct input when switching
between Activities when the TV is already on. The Help button fixes it each
time, but I do not want to use the Help
button every time.
The Power On Delay is the amount of
time that a device needs to 'warm up'
before receiving another command. For
instance, when you turned on a device,
you may notice that the device needs a
certain amount of time before it can
receive another command from the
remote.
Inter-key Delay
Example:
Any time I press volume up multiple
times in a row, for my AV Receiver it
takes a long time to increase the volume.
I would like my devices to respond
quicker to these presses.
The Inter-Key Delay is the amount of
time allotted for commands to be sent
between button presses.
Input Delay
Example:
My TV does not always go to the correct
input when switching between Activities
and I have already verified that the input
list is correct.
The Input Delay is the amount of time
that the remote takes when switching
between inputs. Many devices need a
certain amount of time before changing
to the next input in the input list.
29
Inter-Device Delay
Example:
My DVD player does not always turn on
when I start the Activity. I can get the
DVD player to turn on by using the Help
button however I do not want to use Help
every time.
The Inter-Device Delay is the amount
of time between commands for different devices when you start an Activity.
The Inter-Device Delay is also the time
between the next sequence of commands that are sent to other devices
within an Activity.
Repeats
Example:
Any time I press channel up, my Digital
Set Top Box skips two channels at a
time.
The Repeats are the number of times
the remote repeats a command for a
device to properly respond to the
command. For instance, many devices
need longer or shorter command repetitions to respond properly.
5.13.1 Delay settings
To adjust the delay between IR commands, go to the Harmony Remote
Software:
1. Select the Devices tab.
2. Select the device for which you want to apply the change and click
Settings.
3. Select Adjust the delays (speed settings) and click Next.
4. Enter the desired values for Power On, Inter-Key, Input and InterDevice Delays.
5. Click Next.
6. Follow the online instructions.
Note
·
The Input Delay setting is only available for devices equipped with
more than one input.
5.13.2 Repeat settings
To adjust the number of repetitions of IR commands, go to the Harmony
Remote Software:
1. Select the Devices tab.
2. Select the device for which you want to apply the change and click
Settings.
3. Select Troubleshoot.
30
4. Click Next.
5. Select <Device name> responds to some commands either too
many times or only occasionally.
6. Click Next.
7. Follow the online instructions.
5.14
Setup your Favourite Channels
To set up your favourite channels, and to add your own icons, go to the
Harmony Remote Software:
1. Select the Activities tab.
2. Under Watch TV or Record Video, click Settings.
3. Select Set Up Favourite Channels and follow the online instructions.
Note
·
You can program Favourite Channels only for Activities Watch TV
and Record Video.
·
Mind the information about picture specifications in the Tip Center
(top right).
·
Due to copy right reasons, there are no icons provided. But you can
find them easily on the internet.
5.15
Update remote
After you enter your Device and Activity information, the software saves
all data. For the changes to take effect, the new data has to be transferred
to your Harmony One. For this, go to the Harmony Remote Software and
click on the Update Remote button (top right) and follow the online
instructions.
31
Note
·
The Update Remote button is available while you are on your home
page or on one of the Activities, Devices or Remote Settings screen.
·
To transfer the data from the Harmony Remote Software to the remote, your Harmony One has to be connected to your computer via
the USB cable (refer to section 'Connecting the Harmony One to your
computer' on page 19). Otherwise the Harmony Remote Software
will ask you to plug in the cable.
·
In case of problems occurring during the update procedure, please
use the Tip Center of each screen at first to find a solution.
After the software updated your remote, you are ready to test your setup.
For specific details on testing your setup, refer to section 'Testing the
remote setup' on page 32.
5.16
Testing the remote setup
Every time you update your Harmony One, you should test your remote
to ensure it is working the way you expect. This section gives you information you need to test your remote. It also has some suggestions on
what to check while you are testing your setup. If you run into specific
issues while testing your remote, refer to section 'Getting help with your
Harmony One' on page 41 of this manual for suggestions and possible
fixes for your problems.
The process of testing your Harmony One is straightforward. It involves
simply trying the Activities you use most often and then using the onremote help to correct any issues.
In some cases, you may need to return to the Harmony Remote Software
to make changes to your remote's setup to ensure the remote is working
the way you want.
To begin testing your remote:
1. Ensure all the devices in your entertainment system are turned off.
2. Disconnect the USB from your remote.
3. Got to your entertainment system and try each of your Activities.
4. For tips on what to look for when starting an Activity, or switching
between Activities, see the following tips.
Important
·
In an Activity does not start correctly, press the Help button on the
remote and the on-remote help will get you back 'in sync'. After you
finished testing your Activities, be sure to re-test any Activity for
which you had to use the Help feature.
32
Tip
·
Testing your setup – Starting an Activity
Look for these things in particular:
▪ Did all of your devices for that Activity turn on?
▪ Do you hear the correct sound?
▪ If the Activity includes you video display device, do you see the
correct picture?
·
Testing your setup – Switching between Activities
Look for these things in particular:
▪ Are all devices needed for this new Activity on?
▪ Did devices not needed for this Activity turn off?
▪ Do you hear the correct sound?
▪ If the Activity includes you video display device, do you see the
correct picture?
33
6
Personalizing the Harmony One
You can personalize your Harmony One to make the screen look and act
the way you want.
Important
·
For any new setting to take effect you have to update your remote
(refer to section 'Update remote' on page 31).
6.1
Upgrading to a new Harmony remote
When you upgrade to a newer or different Harmony model, you can
transfer the configuration from your old remote to your new remote.
From the Harmony Remote Software:
1. Click Remote Settings.
2. Click Manage Remotes.
3. Click Replace.
4. Follow the online instructions.
6.2
Setting up the Remote Assistant
The Remote Assistant of your Harmony One guides you through starting
Activities. It also gives you more information about the status of your
remote and the Activity you selected.
For example, when you select the Watch TV Activity, the Remote Assistant asks you if the TV is on and if the other devices in the Activity are
configured properly.
You can turn this feature on or off from the Harmony Remote Software
or from the remote. The Remote Assistant can be turned off permanently
only using the Harmony Remote Software.
To activate the Remote Assistant, from the Harmony Remote Software:
1. Select the Remote Settings tab.
2. Click Display Settings.
3. Select setting On for the option Remote Assistant.
4. When you are finished configuring the remote options, click the Save
button down right to save the changes.
5. To transfer the new configuration to your remote, click the Update
Remote button and follow the online instructions.
34
To permanently turn off the Remote Assistant, from your Harmony Remote Software:
1. Select the Remote Settings tab.
2. Click Display Settings.
3. Select setting Off for the option Remote Assistant.
4. When you are finished configuring the remote options, click the Save
button down right to save the changes.
5. To transfer the new configuration to your remote, click the Update
Remote button and follow the online instructions.
To temporarily turn the Remote Assistant off, from your Harmony One:
1. If necessary, press the Activities button to get the list of all Activities
on your Harmony One.
2. If the list of Activities comprises more than one screen page, press
the left arrow button beneath the screen to get to navigate to the last
page of the list.
3. The last entry of the list always is System Options. Now, press the
corresponding button to list all system options onto the screen.
4. Press button Turn Remote Assistant off.
To re-activate the Remote Assistant:
1. If necessary, press the Activities button to get the list of all Activities
on your Harmony One.
2. If the list of Activities comprises more than one screen page, press
the left arrow button beneath the screen to get to navigate to the last
page of the list.
3. The last entry of the list always is System Options. Now, press the
corresponding button to list all system options onto the screen.
4. Press button Turn Remote Assistant on.
Important
·
In order to turn on and off the Remote Assistant directly on your
Harmony One, the option Remote Assistant of your Harmony Remote Software has to be set to On (see above).
6.3
Setting up the on-remote help system
Using the Harmony Remote Software, you can customize the on-remote
help of your Harmony One by selecting between two types of help:
35
Smart Help
asks questions about the devices that are on during a
specific Activity.
Full Help
asks questions about all the devices in your account.
From the Harmony Remote Software:
1. Select the Remote Settings tabs.
2. Click Display Settings.
3. Select the desired setting for option On-remote Help system.
4. When you are finished configuring the remote options, click the Save
button down right to save the changes.
5. To transfer the new configuration to your remote, click the Update
Remote button and follow the online instructions.
6.4
Adjusting the glow timing
The Harmony One senses when you pick it up, and lights up the display
and buttons. To set the length of time the backlight stays on, follow these
steps:
1. Start the Harmony Remote Software on your computer and login to
your account.
2. Select the Remote Settings tabs.
3. Click Display Settings.
4. Select the desired Glow Timing between 5 and 30 seconds.
5. When you are finished configuring the remote options, click the Save
button down right to save the changes.
6. To transfer the new configuration to your remote, click the Update
Remote button and follow the online instructions.
6.5
Setting up the time display format
To set up the time display, follow these steps:
1. Start the Harmony Remote Software on your computer and login to
your account.
2. Select the Remote Settings tabs.
3. Click Display Settings.
4. Select the desired Time Display Format.
5. When you are finished configuring the remote options, click the Save
button down right to save the changes.
36
6. To transfer the new configuration to your remote, click the Update
Remote button and follow the online instructions.
6.6
Show 'Starting Activity' screen
This screen is a reminder to keep the Harmony One pointed at your entertainment system while each Activity starts. This ensures that all the IR
signals are sent properly.
To switch on/off this reminder, follow these steps:
1. Start the Harmony Remote Software on your computer and login to
your account.
2. Select the Remote Settings tabs.
3. Click Display Settings.
4. Select the desired setting for option Show 'Starting Activity' screen.
5. When you are finished configuring the remote options, click the Save
button down right to save the changes.
6. To transfer the new configuration to your remote, click the Update
Remote button and follow the online instructions.
6.7
Setting up the tilt sensor
The Harmony One has a built-in Tilt Sensor that automatically turns on
the backlight (Glow) when you pick up the remote.
To switch on/off the Tilt Sensor, follow these steps:
1. Start the Harmony Remote Software on your computer and login to
your account.
2. Select the Remote Settings tabs.
3. Click Display Settings.
4. Select the desired setting for option Enable Tilt Sensor.
5. When you are finished configuring the remote options, click the Save
button down right to save the changes.
6. To transfer the new configuration to your remote, click the Update
Remote button and follow the online instructions.
6.8
Set a background
A background is an image displayed on the remote. You can choose to
use the default background or add your own background image. The remote will automatically resize the image to fit the screen.
37
Note
·
For best results, your image should be 128 pixels in width and 160
pixels in height. If your image is smaller than this, then it will be
stretched to fit these settings. If your image is larger than this, then it
will be shrunk to fit these settings. The maximum file size is 160 KB
for each image you wish to upload. If your image size if greater then
160 KB you will need to use image editing software to reduce the
size. Only JPG, GIF, PNG, and BMP image formats are supported.
To set up the background, follow these steps:
1. Start the Harmony Remote Software on your computer and login to
your account.
2. Select the Remote Settings tabs.
3. Click Set a Background.
4. Click Use Custom button to load a picture of your choice. Follow the
online instructions.
Alternatively, click Use Default button to set the default background.
5. When you are finished selecting the background, click the Save button down right to save the changes.
6. To transfer the new configuration to your remote, click the Update
Remote button and follow the online instructions.
6.9
Adding a slide show
You can use your own pictures or images to create a slideshow on your
Harmony One. To add a slideshow to your Harmony One, follow these
steps:
1. Start the Harmony Remote Software on your computer and login to
your account.
2. Select the Remote Settings tabs.
3. Click Set Up a Slideshow.
4. Follow the online instructions.
5. Finish editing your slideshow by clicking on Save.
6. To transfer the new configuration to your remote, click the Update
Remote button and follow the online instructions.
Tip
·
For optimal results, use images in JPG format with a width of 128
pixels and a height of 160 pixels. Your image will automatically be
adjusted to meet these requirements.
38
·
The maximum file size is 160 KB. Only JPG, GIF, PNG, and BMP
image formats are supported.
·
Animated GIF images will not display correctly on the remote.
·
A GIF image with a transparent background does not display correctly on the remote.
6.9.1
Displaying a slide show
The slideshow automatically displays on the remote's screen while the
remote is in the charging station.
You can also start the slideshow manually using the Harmony One:
1. If necessary, press the Activities button to list all Activities on the
screen of your Harmony One.
2. If the Activities list has more than one page, press the left Arrow
button beneath the screen to get to the last page of the list.
3. The last list entry is always System Options. Press the corresponding
button to list all system options on the screen.
4. Press the Start the Slide Show
5. To return to the current Activity or to the Activities list press any
button.
6.10
Selecting and changing a theme
You can change the theme on your Harmony One to any of the themes
included with the Harmony Remote Software. When you select a new
theme, you change the look of your remote's screen.
To change the theme of your Harmony One:
1. Start the Harmony Remote Software on your computer and login to
your account.
2. Select the Remote Settings tabs.
3. Click Select a Theme.
4. Follow the online instructions.
5. Confirm your selection by clicking on Save.
6. To transfer the new configuration to your remote, click the Update
Remote button and follow the online instructions.
39
6.11
Updating the firmware
The Harmony One contains internal software, called firmware. The remote's firmware is similar to your computer's operating system. Logitech
updates the firmware for your remote to ensure you are always getting the
most from your Harmony One. Generally, when you connect your remote
to your computer the Harmony Remote Software updates your remote
automatically if new firmware is available.
To manually update the firmware, follow these steps:
1. Start the Harmony Remote Software on your computer and login to
your account.
2. Click the Downloads button.
3. Click the Firmware button.
4. Follow the online instructions.
6.12
Registering a new user account
In case you would like to register a new user account, follow these steps:
1. Start the Harmony Remote Software or, if already logged in, click the
Logout button on the top right.
2. Click Create New Account.
3. If necessary, view the tutorial. Otherwise click Skip Tutorial.
4. Fill in the required information for your new account.
5. If you gathered the device information for all devices of your entertaining system using the Device Worksheet, the setup wizard guides
you through four steps in which you answer a series of questions
about how your entertainment system is set up:
Check connection: The software ensures your computer and Harmony One communicating with each other.
Set up Devices: The software walks you through entering the manufacturer and model numbers of your entertainment system that you
collected using the Device Worksheet.
Setup Activities: The software asks you questions about how your
entertainment system is set up, and then saves the settings.
Update Remote: The software transfers the information from your
computer to the remote.
Tip
·
To simplify the setup process, we recommend you fill out the Device
Worksheet, so that all the device information is at hand when you
need it (refer to section 'Device Worksheet' on page 47). Manufacturer names and model numbers are typically found at the front of the
device, on a label on the back of the device, or in the user manual for
that device.
40
7
Getting help with your Harmony One
The Harmony Remote Software will guide you step-by-step through the
set up of your Harmony One. You answer simple questions or select options from a list to optimally adjust the Harmony One to your entertainment system. You simply follow the online instructions on your computer
screen.
Additionally, during set up and using the Harmony One further help is
available, which is discussed in the following.
7.1
Tip Center
While configuring the Harmony One using the Harmony Remote Software, the Tip Center on the right of the screen is always available. There
you will find a brief summary of information relevant to the current task.
If you click the More Help button in the Tip Center, the Harmony
Online Help window will pop up. There you will find further information on your current task, but also information on further topics as well as
a list of frequently asked questions (FAQ).
7.2
Tutorial
While you are on the login screen of the Harmony Remote Software,
click Create New Account. Select the desired tutorial (depending on the
bandwidth of your internet connection) on the next screen. At the end of
the tutorial do not enter any information to a new account, but click Cancel to return to the login screen.
7.3
The on-remote help system
When one or more of your devices do not power on or off, or when they
do not switch inputs correctly, you can use the Help button on the remote
for simple troubleshooting. Answer the questions on your Harmony One
to re-synchronize it with your entertainment system. Please also read
section 'Using the Help button' on page 13.
7.4
Frequently asked questions (FAQ)
In this section, you will find some commonly reported issues and the
suggested solutions. These solutions may help you fix problems you are
experiencing. If you still cannot fix the problem, refer to the online help
of the Harmony Remote Software.
41
The TV does not turn on when starting an Activity, but using
the Help button on the remote fixes the issue.
Try increasing the Inter-Device Delay for your television. Sometimes
commands are sent too close together for different devices and need to
be spaced out more.
The TV does not go to the right input when starting Activities.
Using the Harmony Remote Software, check your Activity to ensure
the Activity is set up to use the correct input your TV needs to be set
on to get a picture. Next, check that the inputs are in the correct order
for the Harmony One to know how to cycle through each input. If you
are still experiencing trouble, try raising the Inter-Device and Input
Delays for your TV.
When pressing buttons in an Activity, the remote sends the
command twice.
Try lowering the repeats for the device that is receiving the command.
You can do this by using the troubleshoot option in the Harmony Remote Software as discussed in section 'Speed settings' on page 29.
When you try to add a new TV to your account, you get a
message informing you that you have not entered the correct
model number.
The model number for most devices can be found on the front of the
device. If it is not there, it can be found on a label on the back or bottom of the device. The model number should not be confused with the
serial number or the model number of the device's remote control, as
many different devices by a manufacturer can share the same remote.
The command <XXX> for Activity <YYY> is not on the Harmony One.
You can map the command to any unused button on the Harmony One
or on the remote's screen. The command is likely in the database, but
was not mapped to the Activity. If a command is actually missing, the
Harmony One can learn it from the original remote, see section
'Programming new commands' on page 27.
The Harmony Remote Software is unable to communicate
with the Harmony One.
Try disabling any Internet security software you might have including
firewalls and anti-virus software.
42
7.5
Logitech support hotline
If you are experiencing problems and cannot find the solution, the courteous and expert professionals of the Logitech support team. Please use
the toll-free phone numbers of the Logitech Harmony Support Hotline:
Europe
Support
Languages
Toll Free Support
Number
Austria
Deutsch
0800 296 615
Germany
Deutsch
0800 000 6726
Switzerland
Deutsch
0800 558 677
Français
0800 80309
Country
Support Hours
Mon to Fri
Sat
09:00 – 21:00 CET
10:00 – 18:00 CET
Mon to Fri
Sat
09:00 – 20:00 CET
10:00 – 18:00 CET
Mon to Fri
09:00 – 18:00 CET
Mon to Fri
Sat
09:00 – 20:00 CET
10:00 – 18:00 CET
Belgium
Nederlands
0800 80310
Czech
Republic
English
0800 142957
France
Français
0805 540 357
Hungary
English
06 800 16 539
Ireland
English
1800 882928
Luxemburg
Français
800 26129
Netherlands
Nederlands
0800 0226903
Français
0800 561767
Italiano
0800 561814
United
Kingdom
English
0800 032 64 33
Denmark
Dansk
808 87905
Finland
Suomi
0800 913192
Italy
Italiano
800 979229
Norway
Norsk
800 11673
Poland
Polska
0-0 800 441 18 33
Portugal
Portuguese
800 844573
Russia
русский
81 0800 202 71044
Spain
Español
900 811863
Sweden
Svenska
020 1701520
All other
countries
English
+41 21863 5470
International Rates Apply
Switzerland
43
Americas
Support
Languages
Toll Free Support
Number
Español
1-800-499-3508
Mon to Fri
09:00 – 19:00 ET
English
1-866-291-1505
Mon to Fri
Sat & Sun
09:00 – 22:00 ET
10:00 – 17:30 ET
Français
1-800-392-0431
Mon to Fri
09:00 – 22:00 ET
English
1-866-291-1505
Mon to Fri
Sat & Sun
09:00 – 22:00 ET
10:00 – 17:30 ET
Français
1-800-392-0431
Mon to Fri
09:00 – 22:00 ET
Español
1-800-499-3508
Mon to Fri
09:00 – 19:00 ET
Argentina
Español
0800-555-3284
Brazil
Portuguese
0800-891-4173
Mon to Fri
09:00 – 20:00
(Sao Paulo time)
Mexico
Español
001-800-578-9619
Country
Canada
USA
Support Hours
Asia / Pacific
Support
Languages
Toll Free Support
Number
Australia
English
1800 726 063
Hong Kong
English
800 966 969
Singapore
English
800 6011 371
India
English
000 800 600 1133
New Zealand
English
Thailand
English
Country
7.6
Support Hours
Mon to Fri
Sat & Sun
11:00 – 22:00
11:00 – 20:00
(Sydney time)
Mon to Fri
08:00 – 20:00
Sat & Sun
08:00 – 17:00
(Singapore / Hong Kong time)
Mon to Fri
Sat & Sun
09:00 – 21:00 IST
09:00 – 18:00 IST
0800 303 855
Mon to Fri
Sat & Sun
1800 060 119
Mon to Fri
Sat & Sun
13:00 – 01:00
13:00 – 22:00
(Auckland time)
07:00 – 19:00
07:00 – 16:00
(Bangkok time)
Logitech's Harmony Remote user forums
You can also access the user forums to get in contact with other users.
Simply go to http://forums.logitech.com/.
44
7.7
Glossary
The glossary explains some often used terms.
Amplifier
A stereo component that outputs to speakers, and increases the
gain or level of an audio signal. An amplifier does not typically
include a radio.
Anamorphic
views
Also referred to as Enhanced for Widescreen, or Enhanced for
16:9. The process that horizontally shrinks a 16:9 image into
4:3 space to convert images between widescreen and typical
television image aspect ratio. Used on many DVDs.
Aspect ratio
The ratio of image width to image height. Common motionpicture ratios are 1.85:1 and 2.35:1. Television screens are
usually 1.33:1 (also known as 4:3). HDTV is 1.78:1, or 16:9.
A/V switch
A device with several audio and video source inputs that sends
a selected audio/video source input signal to an output device
like speakers or a TV.
DLP®
(Digital Light
Processing)
Projector screen technology that relies on using individually
controlled tiny mirrors (micro mirrors) to produce an image.
Developed originally by Texas Instruments.
DVD recorder
(DVR)
A standalone unit that resembles and functions very much like
a VCR. Like a VCR, DVD recorders all have AV source inputs, as well it can record TV shows.
HDTV
(High Definition
Television)
The high-resolution form television. HDTV has 1125 lines of
resolution, or more than five times the video information than
that of a TV set, creating a much crisper, more detailed picture.
Light controller
A device that is connected to a set of lights and allows the
lights to be powered or dimmed remotely.
Mini-system
A single unit that is some combination of the functionality of a
DVD, VCR, radio, and amplifier.
NTSC
(National Television System(s)
Committee)
The standard video broadcast format used in North America..
Output Device
A device that produces the sound or picture, for example, a TV
or speakers
PAL
(Phase Alternating
Line)
A video format that is used in the UK, Germany and other parts
of Europe and Asia
Passthrough
A device that routes video or audio from one device to another
device.
Personal Video
Recorder (PVR))
Contains an internal recorder and player that records and plays
video without the use of a removable tape or disc. Typically,
PVRs can pause, rewind, instantly replay, and play slowmotion for live and recorded TV. Examples of PVR service
providers are TiVo, ReplayTV, Ultimate TV, and Keen PM.
Many satellite providers also provide PVR services and have
PVRs included in some of their satellite receivers.
45
Pre-amplifier
A control and switching component that may include equalization functions.
Pre-amp Sound
Processing
Takes a small signal and amplifies it sufficiently to be fed into
the power amplifier for further amplification. A pre-amp includes all of the controls for regulating tone, volume, and
channel balance. This task is known as sound processing..
Receiver
Also referred to as a tuner or a stereo receiver. A receiver can
be any component that receives or tunes broadcast signals, or
AM/FM radio. Typically refers to the single component that
includes a pre-amplifier, surround processor, multi-channel
amplifier, and AM/FM tuner.
RF
(Radio Frequency)
Used by some remote controls, to control devices because it
does not have the same line-of-sight restrictions as IR (infrared)
signals.
SACD
(Super Audio CD)
A read-only optical disc aimed at providing much higher quality of digital audio reproduction than the compact disc.
Satellite Radio
A service that provides digital programming directly from
satellites. Currently the two main providers for that service in
the United States are XM and Sirrus.
SDTV
(Standard Definition Television)
One mode of operation of digital television where the broadcaster transmits pictures with detail similar to, or slightly better
than, today's analog television. Since the picture contains less
information, there is 'room' in the digital signal for multicast
broadcasting.
Stereo receiver
see Receiver
Tuner
see Receiver
Power strip
A common device that acts like an extension cord, providing
additional cord length, as well as a mechanism that offers
several electrical outlets.
Z-Wave
A radio frequency-based technology used in some home automation products that allows a single remote to control devices
anywhere in the house by sending the signal from device to
device around the house until it reaches the correct device.
46
8
Device Worksheet
Use this worksheet to gather all necessary information on all the devices
of your entertainment system before configuring your Harmony One.
Tip
·
You can also download this worksheet using the Device Worksheet
hyperlink in the Tip Center on the right side of the Harmony Remote
Software screen when you start entering the device information.
47
9
System requirements
System requirements
Pentium® or compatible processor
PC
Windows®, 2000/XP/Vista/7
USB port, CD-ROM drive, Internet access
MAC
10
MAC OS® X (10.3 or later)
USB port, CD-ROM drive, Internet access
Technical Data
Function
Audionet Systemfernbedienung
LCD-Display
5.5cm Diagonal, 200x176 Pixel, 64000 Colors
Touch screen technology
Capacitive
Power source
Rechargeable, Lithium Ion
Maximum number of
devices per account
15
Backlight
White or Amber (depending on mode)
IR transmission range
Up to 20 m
Dimensions
22,2 x 5,8 x 3,3 cm
Weight
170 g (with battery installed)
Errors and omissions excepted. Specifications and design are subject to changes without prior notice.
All rights reserved. Logitech logo and Logitech's trademarks are either registered trademarks or trademarks of
Logitech in the US and other countries. All other trademarks are the property of their respective owners.
audionet is a trademark of Idektron GmbH & Co KG
Idektron GmbH & Co. KG, Herner Str. 299, Gebäude 6, 44809 Bochum, Germany
www.audionet.de
[email protected]
48