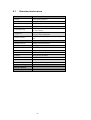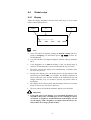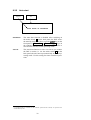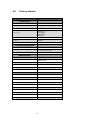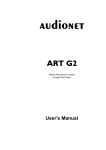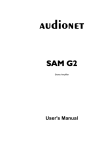
1
Digital Network Client
User's Manual
Contents
1
Preface ............................................................................... 7
1.1
Included........................................................................................ 8
1.2
Transport ..................................................................................... 8
2
Overview front panel......................................................... 9
3
Overview back panel....................................................... 10
4
Installation and power supply........................................ 11
4.1
Placement ................................................................................... 11
4.2
Mains connection....................................................................... 11
4.3
Orientation of mains plug......................................................... 12
5
Inputs and outputs .......................................................... 13
5.1
Audio inputs............................................................................... 13
5.1.1
Digital input ................................................................................ 13
5.1.1.1 Audionet HighBit input .............................................................. 13
5.2
Audio output .............................................................................. 14
5.3
Other connections ..................................................................... 14
5.3.1
Network, USB, WLAN ............................................................... 14
5.3.2
USB Audio .................................................................................. 14
5.3.3
FM Antenna Connection ............................................................. 15
5.3.4
Audionet Link ............................................................................. 15
5.3.5
External power supply EPS G2 ................................................... 16
5.3.6
Additional earth connection ........................................................ 17
5.3.7
Control connections .................................................................... 17
6
Usage ............................................................................... 18
6.1
Basic operations......................................................................... 18
6.1.1
Powering up ................................................................................ 18
6.1.2
Switching on and off ................................................................... 19
6.1.3
Mains phase detection ................................................................. 20
6.1.4
Using Audionet Link ................................................................... 21
6.1.5
Control elements on the front panel ............................................ 21
6.2
Detail operations ....................................................................... 22
6.2.1
Display ........................................................................................ 22
6.2.1.1 Digital input channel ................................................................... 22
6.2.1.2 FM tuner ..................................................................................... 22
6.2.1.3 NET input.................................................................................... 23
6.2.2
Input selection ............................................................................. 25
6.2.3
FM tuner ...................................................................................... 26
6.2.4
NET input .................................................................................... 26
6.2.4.1
6.2.4.2
6.2.4.3
6.2.4.4
Internet radio ............................................................................... 26
USB ............................................................................................. 27
iPod ............................................................................................. 27
UPnP server ................................................................................ 28
6.2.5
USB Audio .................................................................................. 28
7
Audionet system remote control .................................. 29
7.1
Key assignment DNC ................................................................ 31
7.2
Screen 1 ...................................................................................... 32
7.3
Screen 2 ...................................................................................... 33
7.4
Screen 3 ...................................................................................... 33
7.5
Screen 4 ...................................................................................... 34
8
Device setup.................................................................... 35
8.1
Overview device menu .............................................................. 36
8.2
Global setup ............................................................................... 37
8.2.1
Display ........................................................................................ 37
8.2.2
Auto start ..................................................................................... 38
8.2.3
Power-off mode ........................................................................... 39
8.2.4
Channel name .............................................................................. 39
8.2.5
Digital equalizer setup................................................................. 40
8.2.6
Trigger out ................................................................................... 41
8.2.7
Speaker distance .......................................................................... 42
8.3
Network setup ............................................................................ 43
8.3.1
Manage Network ......................................................................... 44
8.3.1.1 Restart Network Driver ............................................................... 44
8.3.1.2 Save & Apply Settings ................................................................ 44
8.3.1.3 Load Factory Defaults................................................................. 45
8.3.2
Connection Type ......................................................................... 46
8.3.3
DHCP .......................................................................................... 46
8.3.4
IP Address ................................................................................... 47
8.3.5
IP Mask ....................................................................................... 47
8.3.6
Gateway....................................................................................... 48
8.3.7
DNS ............................................................................................. 48
8.3.8
RCP port ...................................................................................... 49
8.3.9
Wireless setup ............................................................................. 50
8.3.9.1 SSID ............................................................................................ 50
4
8.3.9.2
8.3.9.3
8.3.9.4
8.3.9.5
8.3.9.6
Wireless security ......................................................................... 51
WPA pass phrase ........................................................................ 52
WEP authentication .................................................................... 52
WEP key index ........................................................................... 53
WEP key 0-3 ............................................................................... 54
8.3.10 Example for Network setup ........................................................ 55
8.4
User settings ............................................................................... 59
8.4.1
Save user setting.......................................................................... 59
8.4.2
Load user setting ......................................................................... 59
8.5
Device info .................................................................................. 60
9
Additional information .................................................... 61
9.1
Glossary...................................................................................... 61
9.2
Link collection ........................................................................... 63
9.2.1
Wireless security ......................................................................... 63
9.3
Equalizer filter type .................................................................. 64
9.3.1
Peak-Filter ................................................................................... 64
9.3.2
High shelf filter ........................................................................... 64
9.3.3
Low shelf filter ............................................................................ 64
9.3.4
High-pass filter 2nd order ............................................................. 65
9.3.5
Low-pass filter 2nd order ............................................................. 65
9.3.6
High-pass filter 1st order.............................................................. 65
9.3.7
Low-pass filter 1st order .............................................................. 65
9.4
Error handling (FAQ) .............................................................. 66
9.5
Security advice........................................................................... 67
9.6
Factory defaults ......................................................................... 68
9.7
Specifications ............................................................................. 69
5
1
Preface
The Audionet Team congratulates you on your purchase of this unit.
Audionet components are no marketing products, they are authentic.
Conceived and developed with scientific inspiration, professional engineering expertise and a passion for achieving the perfect sound. They are
unique creations designed to inspire musical enjoyment and have an excellent reputation amongst all connoisseurs throughout the world. Each
and every one of our precision-manufactured devices is individually
crafted at our Bochum works by our experienced and passionate workforce.
But before you start listening to your new Audionet DNC, please read
this manual carefully so you are able to use and enjoy all functions of this
unit without drawback on music quality.
1.1
Included
Included you will find the following items:
·
The network client DNC
·
The user's manual
·
one standard mains cord
·
F-adaptor for FM connection
·
WLAN antenna
·
Audionet System Remote Control Harmony One
1.2
Transport
Important
·
Please transport the DNC only in the included package.
·
Always use the provided cloth bag to prevent scratches on the casing
·
Please allow the DNC to adapt to the climatic conditions in your listening room before you switch on the unit for the first time after
transport.
8
9
A
USB-
power
key
set
key
IR remote
control receiver
Display
down
key
up
key
2
Overview front panel
10
16 Balanced output (XLR), right
17 Unbalanced output (Cinch), right
18 Balanced output (XLR), left
Serial control port RS232
Trigger output (5 or 12 Volt)
Audionet Link input IN
Audionet Link output OUT
7
8
9
15
20
15 Digital input no. 1, no. 2, electrical
14 Digital input no. 3, AES/EBU (XLR)
13 FM antenna input
12 USB input
11 USB Audio Input
10 Ethernet connector LAN
6
14
5-pin connector for external power supply EPS
13
5
12
additional earth connector
11
4
10
Marking mains phase
9
3
8
Mains input
7
2
6
Mains switch
5
1
4
2
1
3
21
17
18
19
21 Connector WLAN antenna
20 Digital input no. 4, no. 5, optical
19 Unbalanced output (Cinch), left
16
3
Overview back panel
4
Installation and power supply
Important
·
During connecting and removing of sources or amplifiers to the
DNC all units of your audio system have to be switched off to prevent damage of the DNC or any of the other connected units.
·
Please make sure that all cables are in absolute best conditions!
Broken shields or short-cut cables could damage the DNC and/or
any other connected unit.
4.1
Placement
Important
·
It is recommended to place the DNC into a high quality rack or onto a
stable table.
·
Do not expose the unit to direct sunlight.
·
Do not cover the ventilation slots.
·
Do not place the DNC in close range to heat sources like radiators.
·
Do not place the DNC on top of other units, especially not on top of
power amplifiers, preamplifiers or similar devices that produce heat.
Both units could suffer damage from thermal overload.
·
Do not place other units on top of the DNC. Both units could suffer
damage from thermal overload.
·
Do not use the unit in places where it is exposed to vibrations.
·
Do not place the unit close to loudspeakers or into the corner of a
room where it is exposed to high levels of sonic energy, which might
reduce the sound quality of the unit.
4.2
Mains connection
The mains input 2 * is on the back panel of the DNC. To connect the device
to mains use the included mains cord. If you prefer to use a different power
cord make sure that it meets the specifications for your home country.
*
see numbers in section "3 - Overview back panel" on page 10.
11
Important
·
The electrical specifications of your home country must meet the
electrical specifications printed onto the back panel.
·
The DNC is a Class I unit and must be earthed. Please ensure a stable
earth connection. Phase (hot pin) is marked on the back panel phase
3.
·
If you connect the mains cord please make sure that the mains switch
1 on the back panel is switched off.
·
Never pull the mains plug while the DNC is switched on! Before you
pull the mains cord off its socket 2 on the back panel, power down
the unit to stand-by mode using power key, and switch off the unit
using mains switch 1 .
Only in cases of extended absence – like vacations – or if massive trouble
on the mains power grid is to be expected you should switch off the DNC
from the mains using mains switch 1 . Then, to disconnect the unit completely from mains power grid, pull the mains plug.
Tip
·
The use of high quality mains cords can improve sound quality. Ask
your local dealer for more information.
4.3
Orientation of mains plug
The correct polarization of mains is important for reasons of audio clarity
and stability. Please connect the mains cord so that the hot pin of the wall
outlet is connected to the pin of the mains input 2 marked phase 3 .
Your Audionet DNC is able to detect a wrong polarization of the mains
plug during start-up. If the message
►
►
Attention:
Mains phase incorrect
◄
◄
appears in the display, switch off the unit and flip the mains plug in the
wall outlet (see section "6.1.3 - Mains phase detection" on page 20).
12
5
Inputs and outputs
Important
·
During connecting and removing sources or amplifiers to the
DNC all units of your audio system have to be switched off to
prevent damage of the DNC or any of the other connected units.
·
Please make sure that all cables are in absolute best conditions!
Broken shields or short-cut cables could damage the DNC and/or
any other connected unit.
5.1
Audio inputs
5.1.1
Digital input
Connect your digital sources to the electrical (coaxial) digital input IN 1
and IN 2 15 * or to the optical (TosLink) digital input IN 4 and IN 5 20 .
In addition, there is a XLR socket IN 3 AES/EBU 14 for connecting
AES/EBU input signals.
5.1.1.1 Audionet HighBit input
In order to send audio data across the Audionet HighBit interface to your
DNC, connect your source device (e.g. ART G3 or VIP G3) with two
digital cords to the digital inputs IN 1 and IN 2.
The following table shows how to connect Audionet HighBit-capable
devices to the DNC:
Audionet HighBit
Devices
VIP G3
ART G3
Output
DNC Input
Digital OUT 1
’
Digital IN1
Digital OUT 2
’
Digital IN2
Digital OUT 1
’
Digital IN1
Digital OUT 2
’
Digital IN2
Important
·
Only if both connections are established and Audionet HighBit mode
is activated on your source device, you can transmit audio data with
all sampling rates and full resolution.
*
see number in section "3 - Overview back panel" on page 10.
13
Note
·
Check the corresponding section in user's manual for Audionet ART
or VIP. User's manuals are available for download on our website
www.audionet.de.
5.2
Audio output
The DNC is equipped with two pairs of analog outputs: BALANCED
OUT 16 and LINE OUT 17 for the right channel, and BALANCED
OUT 18 and LINE OUT 19 for the left channel.
5.3
Other connections
5.3.1
Network, USB, WLAN
The Ethernet port LAN 10 is a standard RJ45 socket for network cables
(Cat-cable, 10/100 Mbit BASE-T).
The WLAN port WLAN 21 uses a SMA connection to attach the provided WLAN antenna. With the articulated joint the antenna can be
turned into two directions.
The USB port USB 12 is a TYPE-A socket (USB 2.0) for external hard
drive, USB sticks, iPod, iPad etc.
Note
·
We recommend using a wired network connection for best data transfer rate and to provide high stability in control with our software.
5.3.2
USB Audio
The USB Audio port USB AUDIO 11 is a USB TYPE-B-socket. With
the USB Audio connection you are able to connect your DNC with a
USB cable directly to a PC. Thus you can use your DNC as the sound
device / playback device for your PC. Playback operates in asynchronous
mode, that means the DNC uses its own clock and you are able to enjoy
your music without diminishing sound quality.
For using USB Audio the required driver needs to be installed on your
PC. For Apple devices using Mac OS X 10.6.4 and higher a suitable driver is included within the operating system. To receive the driver for Windows based systems please contact us via [email protected].
Note
·
The driver is packed into a zip-file. To install the driver unpack the
zip-file into a folder of your choice. Then open the chosen folder and
start the installation process executing the file setup.exe.
14
·
During the installation process all occurring security warnings can be
confirmed with 'OK'.
·
During the installation process your Audionet device has to be connected with your PC via an USB cable.
·
After successful installation you can choose your DNC as the sound
device / playback device of your PC. For configuration open the system preferences of your PC.
·
Pay attention to the length of the USB cable. If the cable is too long
you might diminish sound quality and / or experience dropouts during
playback.
5.3.3
FM Antenna Connection
Your device has an F-series connector 13 for antenna connection. An
adaptor to coaxial socket is delivered separately. This port is specified for
75 Ohm FM antenna or analog cable TV connection.
5.3.4
Audionet Link
For your convenience, the DNC can be switched on/off by other
Audionet units (e.g. power amplifiers) connected via Audionet Link by a
simple touch on the remote control or the power key on the front panel.
You only need a simple optical TosLink cable. Connect the Audionet
Link input Link IN 8 of your DNC to the Audionet Link output of the
controlling unit.
The DNC is equipped with an Audionet Link input Link IN 8 and an
Audionet Link output Link OUT 9 . The DNC is a slave device. Connect
the Audionet master device to Link IN 8 , other Audionet slave devices
can be connected to Link OUT 9 . Thus the switching signal will be
passed along.
Tip
·
Audionet source units and power amplifiers are usually equipped not
only with an Audionet Link input, but additionally with an Audionet
Link output to connect further Audionet devices to be controlled via
Audionet Link in a daisy chain. Connect this Audionet Link output to
the Audionet Link input of the next Audionet unit using a simple optical TosLink cable allowing you to switch on/off your complete
Audionet system by your Audionet master unit.
Important
·
For the DNC to be controlled via Audionet Link, menu item Poweroff mode within the Global Setup menu has to be set to Quick
Start (see section 8.2.3 - Power-off mode on page 39).
15
5.3.5
External power supply EPS G2
In order to use the optional external power supply Audionet EPS G2 (External Power Supply) connect it with delivered cable to equal socket EPS
5 on the back panel of your DNC. Connect both (!!) units (DNC and
EPS G2) to mains. First, switch on the EPS on its back panel. Then
switch on the DNC with the mains switch 1 . Now the DNC is ready to
use (stand by mode).
Switch on the DNC with the power key on the front panel or keys
Power On or Power Toggle of the Audionet System Remote Control Harmony One. The Audionet EPS G2 will then be automatically
switched on time-delayed.
To disconnect the DNC and EPS G2 from mains, switch the DNC into
stand-by mode. Use the power key on the front panel or the keys Power Off or Power Toggle on the system remote control. First, switch
off the DNC with the mains switch 8 on the back panel, and then switch
off the EPS G2. Now you can disconnect the mains and EPS G2 connection cables.
Important
·
Never switch on or off the EPS G2 on its back panel while the
DNC is operating!
·
The DNC is only to be used with EPS G2 from serial number
12.23.10 on up. For EPS or EPS G2 with older serial numbers
there is no guarantee for proper functionality!
·
Before using the DNC in combination with the external power
supply EPS G2 please read the user's manual of the EPS G2 carefully!
16
5.3.6
Additional earth connection
An optional green-yellow cord for the additional earth connection is
available from Audionet. Attach this cord to the earth connector 4 on
the back panel of the DNC and put the plug into the mains socket right
beside the mains cord of your DNC. This ensures an additional and stable
earth connection resulting in a better sound.
5.3.7
Control connections
Use trigger output TRIGGER 7 to control (e.g. switch on/off) non
Audionet devices. If you switch on the DNC from stand-by mode, the
trigger output 7 provides a signal of 12 Volts DC (see section "8.2.6 Trigger out" on page 41), which can be re-configured to 5 Volts DC.
The serial connection RS232 6 is an additional control port to your DNC
e.g. for house automation systems (Crestron or the like).
Tip
·
Use a 3.5 mm telephone mono plug to connect a device to the trigger
output 15 of your DNC. The pinning is as follows:
Ground
17
Switching Voltage
12V or 5V DC
6
Usage
All functions of the DNC are microprocessor controlled. This guarantees
highest precision, exclusive functions, easy handling and protection
against operating errors.
6.1
Basic operations
6.1.1
Powering up
First of all, please make sure your DNC is connected correctly to your
signal sources, preamplifier(s) and mains (see section "4 - Installation
and power supply" on page 11 and "5 - Inputs and outputs" on page
13).
The DNC is a stand-by unit. Please operate the mains switch 1 on the
back panel. The display shows a welcome message for a brief moment.
After that the DNC is in stand-by mode.
Only in cases of extended absence (like vacations) or if massive trouble
on the mains power is to be expected (e.g. thunder storms) it is recommended to disconnect the DNC from the mains. While the DNC is in
stand-by mode, operate mains switch 1 on the back panel. The display
will go dark. To disconnect the DNC from mains completely, you have to
pull the mains cord off the mains jack 2 .
Important
·
Before you switch off the DNC from mains, power down and discharge completely all units connected to the outputs of the DNC.
18
6.1.2
Switching on and off
To power up the DNC from stand-by mode, press the power key on the
front panel. The DNC issues the message:
Waking up ...
In case the mains plug has the incorrect polarization a warning will appear in the display (see section "4.3 Orientation of mains plug" on page
12). After that the unit is in normal operating mode and ready to use.
If you would like to switch off the unit, please press the power key on the
front panel. The display shows the message
Going to sleep ...
and the unit enters stand-by mode.
Note
·
Of course, you may switch on/off the DNC with the Audionet System
Remote Control Harmony One. For detailed information please refer
to section "7.5 - Screen 4" on page 34.
19
6.1.3
Mains phase detection
The correct polarization of mains is important for reasons of audio clarity
and stability. Please connect the mains cord with the hot pin of the wall
outlet to the pin marked phase 3 of the mains input 2 on the back panel. The DNC recognizes the incorrect polarization of the mains plug automatically. Right after switching on the unit from stand-by mode by
pressing the power key on the front panel the following message will
appear in the display in case the mains polarization is incorrect:
►
►
Attention:
Mains phase incorrect
◄
◄
If you are alerted by the above message, switch off the unit by pressing
the power key. Please wait until the display no longer reads:
Going to sleep ...
Disconnect the DNC from mains by operating the mains switch 1 . Now
pull the mains plug and re-insert it into the mains socket rotated by 180°.
If you switch on the unit again, the warning should not appear now.
Important
·
If the DNC issues the mains polarization warning or no warning at all
for both positions of the mains plug, check the connection to earth of
your mains socket and mains cord. You have to ensure a stable
connection to earth for the mains phase detection of the DNC to
work correctly!
20
6.1.4
Using Audionet Link
The DNC is equipped with an Audionet Link input Link IN 8 and an
Audionet Link output Link OUT 9 allowing you to connect further
Audionet units (e.g. preamplifiers, power amplifiers or CD player) via
Audionet Link (also see section "5.3.4 - Audionet Link" on page 15).
If the rest of your Audionet system is connected to your DNC via
Audionet Link, all forth following linked units will be automatically
switched on/off as soon as the DNC itself is switched on/off via Link IN
8.
Note
·
Please read section "5.3.4 - Audionet Link" on page 15. Also, consult the user's manual of your Audionet components connected via
Audionet Link for further information.
·
If you use Audionet Link to switch off other devices, please wait
until everything is in stand-by mode before you switch on again.
Important
·
For the DNC to be controlled via Audionet Link, menu item Poweroff mode within the Global Setup menu has to be set to Quick
Start (see section 8.2.3 - Power-off mode on page 39).
6.1.5
Control elements on the front panel
The front panel has four keys to control the DNC (see section "2 Overview front panel" on page 9). With these keys you can control all
functions as well as all setup options to adjust the unit to your preferences
(see section "8 - Device setup" on page 35).
power
Use key to switch on/off the unit (see section "6.1.2 Switching on and off" on page 19).
set
Push key shortly to change input channel (see section
"6.2.2 - Input selection" on page 25). Within a menu
press shortly to open a subfolder or to confirm and save
an adjustment.
Push the key for longer than two seconds to get into
system menu (see section "8 - Device setup" on page
35). Within a menu press long to step back and open the
superior folder or to dismiss an adjustment without saving.
down
Push key to select previous input channel (see section
"6.2.2 - Input selection" on page 25) or change an option of the setup menu (see section "8 - Device setup"
on page 35).
up
Push key to select next input channel (see section
"6.2.2 - Input selection" on page 25) or change an option of the setup menu (see section "8 - Device setup"
on page 35).
21
6.2
Detail operations
6.2.1
Display
The display provides the following information in the normal operating
mode.
Depending on which channel you chose, you get different information. If
there is more information to show you can switch display pages with the
Info key on system remote control Harmony One (see section "7.1 Key assignment DNC" on page 31). You will need it especially for the
NET input channel (see section "6.2.1.3 - NET input" on page 23). The
following illustrations will show you the differences between the input
channels. Your display could be different, because of your selected system adjustments.
6.2.1.1 Digital input channel
Digital In 1
D1
Input
PCM
44 kHz
Channel name
Signal handling
6.2.1.2 FM tuner
FM Radio
MHz
FM
Input
99.2
Channel name
22
Frequency
6.2.1.3 NET input
·
View 1:
Channel name
PCM
Streaming In
EQ
NET 44 kHz
Equalizer
·
Input
Signal handling
View 2:
Marker
Media devices
and internet radio
Marker position
► Internetradio
USB
UPnP Server
1 of 4
23
◄
Folder icon
·
View 3a (Play from UPnP or USB):
Title
Interpreter
Ludwig van Beethoven
Für Elise
WoO 59
►
00:00:01
Play state
Play/Stop/Pause
Album
·
mp3
Media type
View 3b (Play from internet radio station):
Title/Interpreter
Station text
Station name
WDR Event
Track name
►
Play state
Play/Stop/Pause
mp3
128 kbps
Data type
Data rate
24
Play time
6.2.2
Input selection
Push the set key on the front panel once for less than two seconds to enter
the input selection menu. Then select the desired input channel with the
keys up and down. In the display you see the selected input channel,
channel number and your chosen channel name. Press set to apply the
channel switching. Overview of DNC input channels:
Signal
see 3 - Overview back
No.
Inputs
1
D1
Digital (electrical)
Digital Inputs IN 1 15
2
D2
Digital (electrical)
Digital Inputs IN 2 15
3
D3
Digital (AES/EBU)
Digital Inputs IN 3 14
4
D4
Digital (optical)
Digital Inputs IN 5 20
5
D5
Digital (optical)
Digital Inputs IN 6 20
6
NET
Stream, USB, Internet radio
Network 10 12 21
7
USB
USB Audio In
USB Audio 11
8
FM
FM Tuner
FM Antenna 13
panel on page 10
While switching of inputs, the outputs are switched off at first. Once an
input is selected, the outputs are switched on again.
Note
·
Leave the input selection function by holding down the set key longer than 2 seconds or wait a few seconds.
·
Using the Audionet System Remote Control Harmony One, select an
input channel by simply pressing the corresponding key, or use the
keys Ch+ and Ch- to switch to the next or previous input channel
without using the Select Input function.
25
6.2.3
FM tuner
For setting and saving radio stations to your DNC, please use the
software Audionet RCP (see chapter "7 - FM-Tuner" on page 23 in
RCP user's manual). You can also setup your radio station frequency
manually with your remote control. Use the keys of the Audionet System
Remote Control Harmony One (see section "7.1 - Key assignment DNC"
on page 31). Use keys Page Up / Page Down to change frequency
manually. Use keys up / down of the directional pad to change presets,
press keys left / right to start an automatic station scan.
6.2.4
NET input
Marker
Media devices
and internet radio
Marker position
► Internetradio
USB
UPnP Server
Folder icon
◄
1 of 4
6.2.4.1 Internet radio
With the internet radio service vTuner it is possible to select your
favourite radio stations from a steadily growing number of worldwide
stations. You have to register with an account at vTuner to save your
favourite stations and to receive personalized recommendations.
Beforehand a stable network environment should be set up for your
Audionet device (see section "8.3 - Network setup" on page 43).
To register an account, open the website http://audionet.vtuner.com. You
will be going to visit this address every time you wish to edit your
favourite radio stations. As long as you do not have registered an account
with your Audionet device, you have to click on Register Here right
below the login. Additionally you will be requested to enter your E-Mail
address, to choose a personal passphrase and to enter an access code.
There a two possibilities to spot your access code. With the system
remote control Harmony One select the NET input. Select the first menu
item Internet Radio (1 of 5) using OK key. Navigate to menu
entry Get Access Code (13 of 14). Confirm with OK . Your
access code consists of eight digits and is now shown in line 3 (3 of 3).
Note down this code and enter it in the registration window within your
browser.
26
6.2.4.4 UPnP server
The easiest way to play music from an UPnP server is to use the software
Audionet RCP or Android App aMM.
Note
·
Look out for separately available user's manual to our software
Audionet RCP. You can find it on our website www.audionet.de.
If you want to use your System Remote Control Harmony One, it is the
same way to navigate through as shown above in section internet radio
and USB.
6.2.5
USB Audio
The USB Audio connection allows a direct connection of your DNC to
your PC. Audio files can then be played with your favorite software. The
DNC serves as sound device / playback device.
For further information see section "5.3.2 - USB Audio" on page 14.
28
7
Audionet system remote control
Every function of the DNC is accessible via the Audionet system remote
control Harmony One. Additionally, up to 14 other devices can be controlled by the Harmony One.
Press Devices key to enter Device Mode. The display now lists all
devices included in the current configuration of the Harmony One. Select
DNC from the list to set the Harmony One to controlling the DNC. The
Device Mode gives you access to all the possible commands to control
your DNC. The following explains all these commands in detail.
Important
·
During everyday use, you should never need to use the Device Mode
of your Harmony One, but control the DNC (and other devices of
your audio setup) by customizing your Activities. For detailed information on how to customize and use Activities on your Harmony
One please consult the separate user's manual for Harmony One. It is
available for download on our website www.audionet.de.
1
2
My Activities:
Mi 14:51
1/2 pages
Listen to CDs
Watch a DVD
3
3
CD with VIPG3
Options
Devices
4
5
1.
Power key for use with Activities, turns all devices off that are included into the current Activity. See separate user's manual for
Harmony One.
2.
Depending on the operational mode, the touch screen of the Harmony One shows a list of Activities or Devices, help or infrared commands and any available listings.
3.
If a menu or listing stretches over more than one screen page, use the
corresponding arrow buttons to go to the next or previous page of
the menu or listing (see also separate user's manual for Harmony
One).
4.
Devices key, lists all the devices on the display, and allows you to
select and directly control any device included in the configuration
of the remote control (see separate user's manual for Harmony One).
Select DNC to enter Device Mode for controlling the DNC.
29
5.
Activities key: Press this key to view a list of Activities you have
added. Press the button next to the Activity you want to select, and
the Harmony One will control your entertainment system (see separate user's manual of Harmony One).
Important
·
The Power key
is only available for Activities. In Device
Mode the Power key has no function.
·
Even without using an Activity, the user is able to control all
functions of the DNC using the Harmony One in Device Mode.
·
The keys described below to control the DNC refer to the factory
default programming of the Audionet System Remote Control
Harmony One. Understandably, any changes done to this setup
by the user cannot be discussed here.
Tip
·
In order to switch the DNC on/off, without using an Activity, please
use the keys Power On , Power Off or Power Toggle on
screen 4 (see section "7.5 - Screen 4" on page 34). Of course, it is
possible to control the DNC without any Activity, but to tap the full
potential of the Harmony One you need to configure Activities customized to your needs (please refer to separate manual of the remote
control Harmony One).
Note
·
Please read the separate user's manual to your Audionet System Remote Control Harmony One. Activities, Devices and Device Mode
as well as customizing the remote control are discussed there. It is
available for download on our website www.audionet.de.
30
7.1
Key assignment DNC
DNC
Mi 14:51
1/5 pages
Digital
Input 1
Digital
Input 2
Digital
Input 3
Optical
Input 4
Optical
Input 5
Streaming
Input
Current
Activity
Devices
1
3
2
4
5
6
7
8
1
Use Menu key to navigate through the setup menus. This key has
the same function as set key on the front panel (see section "8.2 Global setup" on page 37).
2
Exit leaves every menu to go back to main screen. If you are in a
submenu of the NET input you will get to the top level.
3
Page up/down. With this key you can switch three files or folders
forward/backward. The key is activated only if you select NET input
(Internet radio, UPnP play, USB and iPod).
4
Ch+ switches to the next input channel (see section "6.2.2 - Input
selection " on page 25).
31
5
Ch- switches to the previous input channel (see section "6.2.2 Input selection " on page 25).
6
Cancel to step back in menu, without saving any changes
7
Player keys for controlling media content if you chose NET input.
8
Numeric keys are used for input of numbers or letters (SMS principle) if the menu item supports direct letter input.
Note
·
To navigate backwards in menu use Cancel 6 , or leave the setup
menu using Exit 2 .
7.2
Screen 1
DNC
Mi 14:51
1/4 pages
1
Digital
Input 1
Optical
Input 1
4
2
Digital
Input 2
Optical
Input 2
5
3
AES/EBU
Input
Current
Activity
Devices
1
Directly selects input channel D1 (coaxial).
2
Directly selects input channel D2 (coaxial).
3
Directly selects input channel D3 (AES/EBU).
4
Directly selects input channel D4 (optical).
5
Directly selects input channel D5 (optical).
32
7.3
Screen 2
DNC
Mi 14:51
2/4 pages
2
Streaming
Input
1
FM Radio
3
USB Audio
Input
Current
Activity
Devices
1
Directly selects input channel NET (streaming input). This input
channel allows you to access internet radio stations, USB devices,
iPod and UPnP server (if they are connected).
2
Directly selects input channel USB (USB Audio In).
3
Directly selects input channel FM radio.
7.4
Screen 3
DNC
Mi 14:51
3/4 pages
2
Random
1
Repeat
3
Equalizer
on/off
Current
Activity
Devices
1
Random
activates random play from selected folder (activated
only with NET input).
2
Equalizer on/off switches on/off the equalizer for the selected
channel.
3
Repeat activates repeat for titles of a folder ALL
or for the
currently playing title ONE
(activated only with NET input).
33
7.5
Screen 4
DNC
Mi 14:51
4/4 pages
2
Power On
1
Power Off
3
Power
Toggle
Current
Activity
Devices
1
If the DNC is in stand-by mode, press key Power On to switch the
unit on.
2
Use Power Toggle to switch on/off the DNC. This key has the
same function as the power key on the front panel. If the DNC is in
stand-by mode, Power Toggle switches on the unit. If the DNC is
already switched on, Power Toggle switches off the unit to standby mode.
3
If the DNC is switched on, use key Power Off to switch the unit
off to stand-by mode.
34
8
Device setup
To adjust the DNC to your preferences, please use the setup menu. You
can control the menu with the keys on the front panel of your DNC or
with your remote control. For more comfortable adjustment use our software Audionet RCP. You only need to integrate your DNC to your network (see section: "8.3.10 - Example for Network setup" on page 55).
To control your DNC with front panel keys, use set, up and down.
set
holding the key pressed for more than 2 seconds opens
the system menu. If you hold again you leave the menu
without saving, you cancel. Short push saves/applies a
menu item or switches into marked menu item.
up, down
are used to select setup menu items and change.
For easier control you can use the directional pad on your System Remote
Control Harmony One (see section "7 - Audionet system remote control" on page 29).
To setup your DNC very comfortable, please use our software Audionet
RCP. You can control everything with mouse and keyboard. You can see
everything on your computer display. Especially with equalizer setup it is
very useful, because you have a good overview (see also Audionet RCP
user's manual).
Note
·
Changes will only take effect if you push OK on your remote control or short push of set key on DNC front panel.
·
Within menus with more than one page the fastest way to reach the
last entries is to press up. To reach, for example, entry 9 of 9, open
the main menu (marker 1 of 9) and press up once instead of pressing down several times. Use the same procedure with keys
Up / Down on the directional pad of the Audionet System Remote
Control Harmony One.
35
8.1
Overview device menu
Global Setup
Function
Display
Setup display brightness
Auto start
Setup auto start mode
Power-Off Mode
Setup stand-by mode
Channel Name
Name the input channel (12-digits)
Digital EQ Setup
Setup the parametric 5-band-equalizers (separately
for each channel)
Trigger Out
Setup Trigger Out for control of non Audionet devices (e.g. active subwoofer)
Speaker Distance
Setup distance between speakers and hearing position
Network Setup
Manage Network
Manage main network setup
Connection Type
Select type of connection
DHCP
Switch on/off DHCP
IP Address
Setup IP address for your DNC
IP Mask
Setup subnet mask
Gateway
Setup gateway IP address
DNS
Setup DNS IP address
RCP Port
Setup network port for software Audionet RCP
Wireless Setup
Setup Wi-Fi (SSID, crypt,…)
Save User Setting
Load User Setting
Device Info
36
8.2
Global setup
8.2.1
Display
Adjust the display brightness with the front panel keys or your system
remote control Harmony One.
Brightness
adjustment
Title
►
Scale
SET DISPLAY BRIGHTNESS
--------------+
Off
25%
50%
75%
◄
100%
Note
·
Get to this option at anytime opening the Global Setup and navigating to Display. Use directional pad or up / down to select desired brightness.
·
It is also possible to set display brightness with the software Audionet
RCP.
·
Is the brightness set to Off the display is only on during setup. It
switches off automatically several seconds after the last user entry.
·
The DNC activates the display saver automatically 12 minutes after
last user entry/activity.
·
During active display saver, the display shows only the number of the
selected input channel NET, for example. The display brightness is
always reduced to 25%, and the location of the information text will
change randomly every 12 seconds to prevent any burn-in effect of
the display.
·
The display saver is deactivated, and the display returns to its normal
mode as soon as any user entry is detected
·
The user cannot switch off the automatic display saver function!
Important
·
Long-term usage of the display set to maximum brightness (setting 100%) may cause extended signs of wear resulting in a decay
of contrast or brightness of individual dots in the display. Do not
use the display with a brightness set higher than the factory default of 50% for a longer period of time!
37
8.2.2
Auto start
Auto start
adjustment
Title
►
SET AUTO START
◄
Auto Start is disabled
disabled
The Auto Start function is disabled. After switching on
the mains switch 1 on the back panel, the DNC enters
the stand-by mode. You have to use the power key on the
front panel or Power On or Power Toggle keys on
the Audionet System Remote Control Harmony One to
switch on the unit into normal operating mode*.
active
The Auto Start function is active. As soon as you connect
the DNC to mains (i.e. use the mains switch 1 on the
back panel) the unit starts up automatically to normal operating mode. Use this setting for timer controlled operations.
*
or switched on/off by Activities on the Audionet System Remote Control; see separate user's
manual Harmony One
38
8.2.3
Power-off mode
Power-off
adjustment
Title
►
SET POWER-OFF MODE
◄
normal
The DNC differentiates between two power-off modes. Firstly the normal power-off mode and secondly the Quick Start mode.
The factory default setup is the normal mode, because of low power
consumption in stand-by (less than 1W). If you use normal power mode,
you cannot switch on the DNC with the software Audionet RCP or with
Audionet Link.
With the Quick Start mode activated, the network interface remains
activated, and the DNC start up process is accelerated, because the network interface must not boot up. Furthermore you can use software
Audionet RCP or Audionet Link to switch on the DNC. If you select
Quick Start mode the power consumption is increased. Check out
"9.7 - Specifications" on page 69.
8.2.4
Channel name
Assigned channel
name
Title
►
Input number
EDIT CHANNEL NAME
®
Analog In 1
◄
AN 1
You can assign a fully user-definable name up to 12 characters in length
to each of the eight input channels. The display shows the number of the
currently selected input channel and the assigned channel name. The cursor marks the character you now may alter.
39
Note
·
For easier adjustment of the channel name use the software Audionet
RCP (see user's manual RCP).
·
All settings apply to the currently selected input channel.
8.2.5
Digital equalizer setup
The digital EQ is a parametric 5 band equalizer with separated adjustment
for left and right channel.
Channel
L/R, Sub 1, 2
Marker
►
SET DIGITAL EQUALIZER
► Left ◄
Freq: 120 HZ
Gain: 3.0 dB
Frequency
Band selection
EQ 1-5
Title
◄
EQ 1
Q: 8.00
Peak EQ
Gain
Filter type
Quality factor
You can navigate through the menu of the digital EQ with the directional
pad on your system remote control. With up/down keys you choose the
parameter for adjustment, left/right changes the selected parameter. If you
enter the digital equalizer menu item, the first selected parameter is Left.
Here you select the speaker channel you want to adjust [Left, Right].
►
SET DIGITAL EQUALIZER
Left
Freq: 120 HZ
Gain: 3.0 dB
◄
► EQ 1 ◄
Q: 1.00
Hi Shelf
Secondly you select the band [EQ 1 – EQ 5]. For each band you can
adjust the following parameter:
Freq
center- respectively cutoff frequency (depends on filter)
Q
filter quality (depends on filter)
Gain
gain (from -12 dB to +6 dB)
Filter type
you can choose between seven different filter types
40
Filter type
Short description
Peak EQ
band-pass filter
Hi Shelf
treble control
Lo Shelf
bass control
LP 2nd
low pass filter 2nd order
HP 2nd
high pass filter 2nd order
LP 1st
low pass filter 1st order
HP 1st
high pass filter 1st order
Note
·
For easier adjustment of equalizer parameters use the software
Audionet RCP (see user's manual RCP).
·
All settings apply to the currently selected input channel.
8.2.6
Trigger out
Adjustment
Title
►
SET TRIGGER OUT
◄
Trigger Out: disabled
The trigger out connection could be used to remotely switch on/off non
Audionet devices. By factory default the voltage is adjusted to 12V DC.
If necessary the output voltage can be re-configured to 5V DC. Changing
the voltage must be done by authorized personnel only. Ask your local
dealer for support.
Note
·
All settings apply to the currently selected input channel.
41
8.2.7
Speaker distance
Speaker distance
left
Speaker distance
right
Title
►
SET SPEAKER DISTANCES
► Left
Right
:
:
0 cm
0 cm
◄
◄
1 of 2
Use this menu to enter the distances from your speakers to your listening
position. The distance ranges from 0 to 700 cm in steps of 5 cm. According to the entered distances, the DNC calculates the necessary delays of
each channel to ensure that all signals from all speakers arrive at the same
time at the listening position.
42
8.3
Network setup
Marker
Network adjustment
Marker
position
► Network Profile
DHCP
IP Address
Key icon
◄
1 of 8
Your DNC is set to receive DHCP* information from your network. If
you connect your device to a wired network, it should be ready to use.
For use of fixed IP address you may contact your network administrator
to get the information you need to adjust. Use your system remote control
Harmony One to adjust your IP and Wi-Fi information. An adjustment
with the front panel keys is possible. To set numbers for an IP address
you can use the numeric key pad. For letters you can use the numeric key
pad as well (SMS principle) or you navigate with the directional key pad.
With up/down you change the letter and with left/right you move the
cursor. Confirm your input with OK key. An example for network configuration can be found at the end of the section (see section: "8.3.10 Example for Network setup" on page 55). Most network terms are defined in glossary (see section: "9.1 - Glossary" on page 61).
Note
·
Wireless setup can also be done with the software Audionet RCP. For
the time of configuration you need to connect your DNC to the wired
network. Later you may disconnect the cable for using a Wi-Fi connection.
·
Every block of an address consists of three numbers. Sometimes the
triplets are not written down in full length. If that is the case with an
address you need for your network setup, then the leading zeros have
been left out. You need to complete these addresses for use with your
DNC referring to the following example: e.g. 0.1.10.100 has to be
completed to 000.001.010.100.
*
see section: "9.1 - Glossary" on page 76
43
8.3.1
Manage Network
Save and Apply
Settings
Driver
Restart
Title
►
Manage Network
Restart Network Driver
Save & Apply Settings
Load Factory Defaults
►
◄
◄
Factory
Defaults
In this menu you find the basic setup for managing the network preferences of your DNC. The following explains the menu in detail.
8.3.1.1 Restart Network Driver
Sometimes it might be necessary to restart the network driver of the
DNC. With this function you can restart the driver without having to
switch the device off completely. The driver restarts with its current settings.
Select this menu entry and confirm your selection with OK . The DNC
issues the following message:
►
re-starting network…
◄
It takes about 30 seconds for the driver to be restarted. Then your
Audionet device will be available in the network again.
8.3.1.2 Save & Apply Settings
This entry has to be selected every time you finished network configuration and want to save and apply the new values. Made changes to your
network setup will be dismissed without saving and applying them unless
you select this particular entry.
Select this menu entry and confirm your selection with OK . It takes
about 30 seconds for the driver to be restarted. Then your Audionet device will be available in the network again.
Note
·
You have to execute this entry if you want to save and apply your
made changes. Otherwise your configuration will be dismissed!
44
8.3.1.3 Load Factory Defaults
With this function you can restore the factory settings of your DNC's
network driver. The DNC is factory-set to wired ethernet connection with
DHCP activated. This way, if you connect your device to a wired network, it should be ready to use.
Select this menu entry and confirm your selection with OK . The factory
default settings are now loaded.
After successfully loading the factory defaults the cursor automatically
marks the menu entry Save & Apply Settings. This entry has to be executed as described in section "8.3.1.2 - Save & Apply Settings" on page
44 to apply the factory defaults.
Note
·
You have to execute menu entry Save and Apply Settings if
you want to save and apply the factory default settings. Otherwise
this configuration will be dismissed!
·
If you accidentally selected this entry and the factory default settings
are loaded, you are able to exit the menu with the key Exit of your
Audionet System Remote Control Harmony One or by pressing set
longer than 2 seconds. This way the settings accidentally loaded will
not be activated and your former settings will remain.
45
8.3.2
Connection Type
Connection Type
Title
►
SET CONNECTION TYPE
◄
Wireless (WiFi) 802.11
Wired Ethernet
Factory setting. Your DNC connects to a network
via a connected network cable.
Wireless (WiFi)
Your DNC establishes a wireless connection via
the included WLAN Antenna.
Only if Wireless (WiFi) 802.11 is selected, the menu "8.3.9 Wireless setup" on page 50 is available.
8.3.3
DHCP
DHCP adjustment
Title
►
SET DHCP MODE
DHCP
:
◄
active
disabled
DHCP client mode is disabled
active
Your DNC will try to get information via DHCP.
If the IP address is received from DHCP server, the following menu items
must not be setup. Menu item IP address, IP mask, gateway and DNS are
without effect and they are overwritten by DHCP information.
Tip
·
Use directional pad on your System Remote Control Harmony One.
Confirm everything with OK key.
46
8.3.4
IP Address
IP Address
Title
►
SET IP ADDRESS
◄
192.168.178.222
Setup your chosen IP address.
The used address type is IPv4 (e.g. 192.168.178.222).
Tip
·
Use numeric key pad on your System Remote Control Harmony One.
Confirm everything with OK key.
8.3.5
IP Mask
Subnet mask
Title
►
SET IP MASK
◄
255.255.255.000
Setup your used subnet mask (e.g. 255.255.255.000).
Tip
·
Use numeric key pad on your System Remote Control Harmony One.
Confirm everything with OK key.
47
8.3.6
Gateway
Gateway-IPAddress
Title
►
SET GATEWAY ADDRESS
◄
192.168.178.001
Setup your gateway IP address (e.g. 192.168.178.001).
Tip
·
Use numeric key pad on your System Remote Control Harmony One.
Confirm everything with OK key.
·
The gateway address is mostly the same as the router IP address.
8.3.7
DNS
DNS IP address
Title
►
SET DNS ADDRESS
◄
192.168.178.001
Setup your DNS IP address (e.g. 192.168.178.001).
Tip
·
Use numeric key pad on your System Remote Control Harmony One.
Confirm everything with OK key.
·
The DNS IP address is mostly the same as the router IP address.
48
8.3.8
RCP port
RCP port adjustment
Title
►
SET RCP PORT
◄
RCP PORT: 54321
The communication port for software Audionet RCP and Android App
aMM is set up here. This adjustment should only be done by professional
users. Setup a value between 50000 to 59999. The default value has to be
changed only if you have network communication problems. Ask your
network administrator for support.
Tip
·
Use directional pad left/right on your System Remote Control Harmony One. Confirm everything with OK key.
49
8.3.9
Wireless setup
Wi-Fi
adjustment
Marker
Marker
position
► SSID
Wireless Security
WPA Cipher Type
Key icon
◄
1 of 10
All Wi-Fi adjustment has to be done manually.
You can find all your Wi-Fi adjustments in your router or access point. If
you have no access to this information ask your network administrator.
Note
·
You can use software Audionet RCP to adjust Wi-Fi settings. A
wired network connection is necessary. This connection can be removed after setup (see user's manual Audionet RCP).
8.3.9.1 SSID
Enter your Wi-Fi name. Attention on case sensitive input.
SSIDname
Title
►
SET WIRELESS SSID
◄
WLANNAME
-
Note
·
Use numeric key pad on your System Remote Control Harmony One
for letter input (SMS principle). You have to switch the cursor position forward manually. Use the left/right keys on directional key pad.
Confirm the adjustment with the OK key.
·
Use key Cancel 9 to delete the selected character. In this case the
key Cancel 9 does not execute a step backward. Press Exit to
leave the menu without saving.
50
8.3.9.2 Wireless security
Select your Wi-Fi crypt type. Take this information from your router.
Crypt
adjustment
Title
►
SET SECURITY MODE
◄
WPA2PSK
None
no crypt type selected (not recommended).
WEP
Wired Equivalent Privacy, out-dated and unsecure security standard (not recommended).
WPAPSK
Wi-Fi Protected Access Pre-shared key was an transitional standard to replace WEP until the new WPA2 was defined (not recommended).
WPA2PSK
Wi-Fi Protected Access 2 Pre-shared key is the regular
standard for Wi-Fi security (recommended).
Note
·
Use directional pad left/right on your System Remote Control Harmony One. Confirm everything with OK key.
·
Wikipedia links to all security terms can be found in section "9.2.1 Wireless security" on page 63.
Tip
·
In the preferences of some new routers / access points the used
WPA2PSK crypt type might be called "WPA2PSK – Personal" or
"WPA2 – Personal".
51
8.3.9.3 WPA pass phrase
Enter your WPA network key. Attention on case sensitive input. This
phrase is only active with WPAPSK or WPA2PSK.
Wi-Fi security key
Title
►
SET WPA PASSPHARSE
◄
security_key
-
Note
·
Use numeric key pad on your System Remote Control Harmony One
for letter input (SMS principle). You have to switch the cursor position forward manually. Use left/right keys on directional key pad.
Confirm the adjustment with the OK key.
·
Use key Cancel 9 to delete the selected character. In this case the
key Cancel 9 does not execute a step backward. Press Exit to
leave the menu without saving.
·
The passphrase has to consist of at least 8 characters. Maximum
length is 63 characters. The longer the passphrase the more secure the
connection. For further information see the documentation of your
router / access point.
8.3.9.4 WEP authentication
Select the WEP setup to your network.
WEP mode
Title
►
SET WEP AUTHENTICATION
open
open
Open Authentication
shared
Shared-Key-Authentication
52
◄
Note
·
Chose authentication mode with directional pad. Left for open and
right for shared. Confirm the adjustment with the OK key.
·
We strongly recommend to use WPA2PSK standard to secure your
Wi-Fi connection. WEP is not secure.
8.3.9.5 WEP key index
Select the Index Key 0-3
WEP index
Title
►
SET WEP INDEX KEY
◄
WEP Key Index: 0
Note
·
Select the WEP key index with your directional pad left / right.
Confirm the adjustment with the OK key.
53
8.3.9.6 WEP key 0-3
Enter the WEP key phrase for key 0 - 3.
WEP key
Title
►
SET WEP KEY 0
◄
80ff72ab32
-
Note
·
Use numeric key pad on your system remote control Harmony One
for letter input (SMS principle). You have to switch the cursor position forward manually. Use left/right on directional key pad. Confirm
the adjustment with OK key.
·
Use key Cancel 9 to delete the selected character. In this case the
key Cancel 9 does not execute a step backward. Press Exit to
leave the menu without saving.
·
A WEP key contains only numbers 0-9 and letters a-f.
·
A WEP key consists of 10 or 26 digits.
54
8.3.10 Example for Network setup
In this sample all adjustments are made with the System Remote Control
Harmony One. Compare the keys in this section "7.1 - Key assignment
DNC" on page 30.
Choose the Device DNC (see section: "7 - Audionet system remote
control " on page 29).
Open the system menu with the Menu key and mark the menu item
Network Setup with the directional pad keys up/down. Confirm with
OK key.
Channel Setup
Delay Manager
► Network Setup
◄
4 of 7
Switch to menu item Connection Type.
Manage Network
► Connection Type
DHCP
◄
1 of 8
With the keys left / right of the directional pad choose your preferred
connection type. Connection types Wired Ethernet and Wireless
(WiFi) 802.11 are available. Confirm with OK .
►
SET CONNECTION TYPE
◄
Wired Ethernet
In this sample we suppose that you do not use DHCP in your network.
Therefore we disable the DHCP function and set a fixed IP address. Open
the menu item DHCP, press the left directional pad to select disabled
and confirm with OK key. The DNC saves the adjustment and switches
to the Network Setup menu.
►
SET DHCP MODE
DHCP:
disabled
55
◄
Now you have to enter the IP address you selected for your DNC. (e.g.
192.168.178.222 or 192.168.000.222 or 192.168.001.222).
►
SET IP ADDRESS
◄
000.000.000.000
Insert the IP address directly with the numeric key pad in the lower section on your System Remote Control. Confirm with OK key. The DNC
applies the adjustment and switches to the Network Setup menu.
►
SET IP ADDRESS
◄
192.168.178.222
Select the menu item IP Mask and compare the adjustment with your
data. The default value 255.255.255.000 should be the same with your
network and could be confirmed with OK . Otherwise, enter your settings via numeric keypad.
►
SET IP MASK
◄
255.255.255.000
The gateway in your network is probably the router, so you have to set
the routers IP address as gateway address. Enter the address which is
correct within your network and confirm.
►
SET GATEYWAY ADDRESS
192.168.178.001
-
56
◄
Mostly the DNS address is the same like the routers IP address. If you use
another DNS, enter the DNS IP address which is correct within your network configuration. You can find a DNS address through the internet.
Use a search engine to find DNS server addresses for your location.
►
SET DNS ADDRESS
◄
192.168.178.001
With this menu item the section fixed IP address is completed.
When you use your DNC in a wired network, the network setup is completed. You can now save and apply your adjustments. If you want to use
a Wi-Fi connection skip to paragraph "Wi-Fi adjustment".
Save network profile
Within the menu item Manage Network select Save & Apply
Settings and confirm with OK . The new created network profile
with all its settings is now saved and will immediately be applied.
Wi-Fi adjustment
Within the menu Manage Network select entry Connection Type.
Now change to Wireless (WiFi) 802.11 and confirm with OK .
Back in Network Settings the menu item Wireless Setup is now
available. Now you have to enter the network name and network security
key. Maybe you have to ask your network administrator or check out
your router configuration.
► SSID
Wireless Security
◄
1 of 2
Note
·
In menu Connection Type the adjustment Wireless (WiFi)
802.11 has to be made. Otherwise menu entry Wireless Setup is
not visible.
57
Select SSID and set the network name.
►
SET WIRELESS SSID
◄
Audionet_WLAN
You have to be attentive to case sensitive input. Use the numeric key pad
(SMS principle) for numbers and letters. With the left/right keys of the
directional pad you switch to the next input position. The cursor does not
step forward automatically. Confirm your input with OK .
Now select your security mode.
►
SET SECURITY MODE
◄
WPA2PSK
You can choose between WEP, WPAPSK and WPA2PSK. All settings
have to be confirmed with OK key. Because the WEP mode is not secure, we only describe the setup of WPA security mode.
At last insert your Wi-Fi security key into menu item WPA Pass
Phrase. Sample: 1x2y3z4a5b
►
SET WPA PASSPHRASE
◄
1x2y3z4a5b
Confirm your input with OK .If all your network adjustments are correct
now your settings can be saved.
Save network profile
Within
the
menu
item
Manage
Network
select
Save & Apply Settings and confirm with OK . The new created
network profile with all its settings is now saved and will immediately be
applied.
58
8.4
User settings
You can store 20 separate user settings to your DNC.
This function can be selected with the keys on the front panel and with
the System Remote Control Harmony One. Furthermore you can use the
software Audionet RCP (see Audionet RCP user's manual).
A user setting contains all information which is currently set, i.e. all EQ
adjustments for all channels, also speaker setup (e.g. subwoofer active).
Example for usage: Store a user setting with less bass; you may call it
"night mode".
8.4.1
Save user setting
►
SAVE USER SETTING
◄
Set No. 1
Open the system menu with Menu or with a long press on set. Navigate
to menu entry Save User Setting with up / down.
Select the slot number with left/right where you would like to save the
current setup.
Confirm your input with OK key.
Note
·
If you save to a user setting all existing data will be overwritten.
·
If you do not want to set all adjustments again, you can copy the desired user setting. For that purpose load the user setting and store it to
another memory slot.
8.4.2
Load user setting
►
LOAD USER SETTING
◄
Set No. 1
Open the system menu with Menu or with a long press on set. Navigate
with up / down to menu entry Load User Setting.
Select the setting you want to load from with left / right.
Confirm your input with OK key.
59
8.5
Device info
►
Device Info
◄
Device: DNC
MAC: 1F:2E:3D:4C:5B:6A
FW: 01.02.0012 BL: 00.08
Here you will find information about your hardware and software.
·
MAC address
·
Firmware version
·
Boot loader version
With key left/right or OK you can proceed to the second page. The second page contains the following information:
►
NETWORK STATUS
◄
Wired Ethernet (DHCP)
IP: 192.168.178.222
Connection Type
DHCP adjustment
IP Address of the device
Note
·
Also take a look in the software Audionet RCP user's manual.
60
9
Additional information
9.1
Glossary
· Switch:
A switch is the central connection unit in a computer network. Every
device is directly or indirectly connected to the switch.
· Router:
A router is sharing out data through the network. Mostly the router device
takes over other several features, such as Gateway-Server, DHCP-Server,
DNS-Server, Switch, WLAN-Access Point, Modem, UPNP-AV and NAS
via USB.
· Access Point:
An access point is an extension of a router. If a router is incapable of
providing WLAN or its WLAN range is to be extended, an access point
can be connected to one of the LAN ports of the router and extend its
functions.
· Gateway:
A gateway connects computer or router to other networks (internet) and
controls these connections.
· Modem:
A modem establishes a connection between LAN and WAN.
Nowadays all devices mentioned above are built in one device, which is
called router.
· IP-Address:
The IP-Address identifies a device in the network. It is comparable to a
postal address. An IP address can only be used once within a network!
IPv4 (192.168.0.1) common standard
IPv6 (2001:db8::1428:57ab) future standard
· DNS-Server:
A DNS-Server translates textual request to IP addresses and provides
simple communication to the internet.
(e.g. www.audionet.de is translated to "194.000.201.201")
· Proxy:
Proxy-Server is mostly used in lager network facilities to guarantee more
control and security to the network. Data transfer could be more efficient
and speeded up. Home networks do not need a proxy.
· LAN (Local Area Network):
Localized network (home or company network)
·
Ethernet (cable):
Ethernet is a technology that specifies hardware and software for wired
data networks. An Ethernet connection offers a very good transmission
rate and should be preferred.
61
·
Power LAN (mains supply):
With power LAN technology you can connect Ethernet device through
your mains supply. Transfer rate could be faster and more stable as a WiFi connection. A disadvantage could be the harmonics, which are produced by such devices and pollute your mains supply.
· WLAN (Wi-Fi):
A Wi-Fi connection can be established very quickly, because you need no
wire. The mayor disadvantages are the lower data transfer rate and the
technical reliability. Physical structures or a large distance to the access
point could harm the signal. We recommend wired connection.
· WAN (Wide Area Network):
Wide area network connections are used to connect to the internet.
· Client:
A client is a device which has no administrative or special jobs in a network (e.g. PC, Notebook, DNC, iPad, etc.).
· Server:
Servers provide services to clients or other servers. A server could have
multiple services running on it.
·
NAS (Network Attached Storage):
A NAS is a network storage device, which makes data (e.g. music, pictures, video and documents) easily accessible to all network devices.
· UPnP-MS (Universal Plug and Play – Media Server):
UPnP is a defined network standard to connect clients and servers. It is
very easy to use, because you do not have to set up a lot. Only connect
and play. UPnP media servers are the most common way to provide data
through a home network. A media server could also be part of a NAS or
router or it could run as program on a Computer.
· SSID:
The term SSID is the short form of service set identifier and describes
what is generally known as the name of the network. A wireless network
must have a name, so that client devices are able to find, identify and
connect to the network.
· Passphrase:
Every wireless network should be protected by a passphrase. Client devices are only able to access a protected wireless network if they pass the
passphrase check. The passphrase is used for authentication and identification and is thus an important element of network security.
62
9.2
Link collection
Note
·
We are not responsible for Wikipedia links. If you are looking for
scientifically proven information, have a look at referenced science
books in wiki article.
9.2.1
Wireless security
WPA: http://en.wikipedia.org/wiki/Wi-Fi_Protected_Access
WPA2: http://en.wikipedia.org/wiki/Wi-Fi_Protected_Access#WPA2
PSK:
http://en.wikipedia.org/wiki/Pre-shared_key
EAP (Radius): http://en.wikipedia.org/wiki/RADIUS
http://en.wikipedia.org/wiki/Extensible_Authentication_Protocol
WEP: http://en.wikipedia.org/wiki/Wired_Equivalent_Privacy
63
9.3
Equalizer filter type
The different EQ filters are shown below. Listed are all adjustments for
each filter, and the Wikipedia link for detailed information.
Note
·
We are not responsible for Wikipedia links. If you are looking for
scientifically proven information, have a look at referenced science
books in wiki article.
9.3.1
Peak-Filter
Gain range: -12 dB to +6 dB
Frequency range: 20 to 20000 Hz
Filter quality (Q):
0.3 – 8.0
Wikipedia: en.wikipedia.org/wiki/Band-pass_filter
9.3.2
High shelf filter
Gain range: -12 dB to +6 dB
Frequency range: 20 to 20000 Hz
Wikipedia: en.wikipedia.org/wiki/Equalization_(audio)#Shelving_filter
9.3.3
Low shelf filter
Gain range: -12 dB to +6 dB
Frequency range: 20 to 20000 Hz
Wikipedia: en.wikipedia.org/wiki/Equalization_(audio)#Shelving_filter
64
9.3.4
High-pass filter 2nd order
Attenuation at set Frequency: 3 dB
Filter quality (Q): 0.3 to 2.0
Attenuation below the set frequency is 40 dB per decade.*
Wikipedia: en.wikipedia.org/wiki/High-pass_filter
9.3.5
Low-pass filter 2nd order
Attenuation at set Frequency: 3 dB
Filter quality (Q): 0.3 to 2.0
Attenuation above the set frequency is 40 dB per decade.
Wikipedia: en.wikipedia.org/wiki/High-pass_filter
9.3.6
High-pass filter 1st order
Attenuation at set Frequency: 3 dB
Attenuation below the set frequency is 20 dB per decade.
Wikipedia: en.wikipedia.org/wiki/High-pass_filter
9.3.7
Low-pass filter 1st order
Attenuation at set Frequency: 3 dB
Attenuation above the set frequency is 20 dB per decade.
Wikipedia: en.wikipedia.org/wiki/High-pass_filter
*
Note: Technical considerations describe order-n filters with attenuation of n•20dB/Decade, the
corresponding description often used in music related topics is n•6dB/Octave.
65
9.4
Error handling (FAQ)
Problem with internet radio streams:
A good, stable and fast connection to the internet, network is the most
significant item. If your local conditions are fine, dropouts may be the
problem of the radio stations broadcast. Switch to another station. If there
is no problem it is perhaps a problem of the radio stations broadcast.
Maybe it is overloaded.
Local problems could be an overload of your network, by downloads
from the internet or data which is moved through your network as well as
other streaming (e.g. video). Reduce or quit connections to receive internet radio without dropouts. A bad Wi-Fi connection could also cause
dropouts.
No control:
Switch off your device through the power button on the front panel. Then
switch off the mains circuit breaker on the back panel. If there is no action while you press the power button on the front, directly take the mains
circuit breaker on the back panel. Wait 20 to 30 seconds until you switch
on again. If there is still a problem, contact your local dealer for support.
Which control has no function: If the remote control does not react try the
front panel keys, maybe it is only a problem of the remote control.
Remote control has no function:
Is the rechargeable battery charged?
Is the control light shining?
No – the battery is not charged!
Have you plugged in the power supply? Is your wall socket switchable?
Yes – Maybe the rechargeable battery is defect!
Ask your local dealer for support.
The software Audionet RCP does not establish a connection to DNC:
Restart your software and research for DNC again.
If this is without success, switch off the DNC (first stand-by, then mains
circuit breaker) and wait 30 seconds. Startup your DNC again and switch
to NET input. Wait until Booting is no longer shown in the display.
Now start your software Audionet RCP and search for DNC.
If there is still a problem, check out your network and network adjustment or ask your network administrator for support.
66
9.5
Security advice
Important
·
Avoid packaging material, especially plastic bags, to come into children’s hands.
·
Store and operate the unit in a dry room at a reasonable room temperature.
·
Avoid moisture or any liquid to get into the unit.
·
Place the device with enough circulation of air.
·
Do not cover, e.g. with a blanket.
·
Do not open the case. Unauthorized opening will cause loss of guarantee.
·
Prevent short circuit to the outputs.
·
Switch off all devices if you plug any cable.
·
Use a dry cloth for cleaning.
·
If massive trouble on the mains power grid is to be expected. Disconnect all devices from mains to prevent electrical overload. Disconnect
antenna and network connections as well.
We would like to wish you many exciting listening experiences with your
new Audionet product!
If you still have any questions, don't hesitate to ask your competent
Audionet dealer.
67
9.6
Factory defaults
Option
Adjustment
Global Setup
Display
50%
Auto start
disabled
Power-Off Mode
normal
Channel Name
Digital In 1, 2
Optical In 1, 2
Streaming In
USB Audio In
FM-Tuner
Digital EQ
disabled
Trigger Out
disabled
Speaker Distance
Left / Right: 0 cm
Parametrical digital EQ
for all input channel
Gain
All channel, all MPEs: + 0 dB
Q
All channel, all MPEs: 1.00
Freq.
50,207,725,3147 & 10413 Hz
Network Setup
DHCP
active
IP Address
192.168.178.222
IP Mask
255.255.255.000
Gateway
192.168.178.001
DNS
192.168.178.001
RCP Port
54321
Wireless Setup
SSID
blank
Wireless Security
WPA2PSK
WPA Cipher Type
AES
WPA Pass Phrase
blank
WEP Authentication
open
WEP Key Index
0
WEP Key 0
blank
WEP Key 1
blank
WEP Key 2
blank
WEP Key 3
blank
68
9.7
Specifications
Function
network - compatible streaming client
Frequency response
0 – 1.000.000 Hz (-3 dB)
attenuation coefficient
typ. 1000 at 100 Hz
THD+N
< -104 dB @1 kHz
capacitance
> 44.000 µF
Input digital
2 SPDIF RCA jack, gold plated, Teflon isolated
(WBT)
2 SPDIF TosLink
1 XLR AES/EBU, 110 Ohm, gold plated, Teflon isolated (Neutrik)
1 USB (A) (for ext. hard drive, USB stick, iPod etc)
1 USB (B), USB Audio 2.0 (asynchronous)
1 RJ45 Ethernet 10/100 BASE-T
1 SMA Connector WLAN
1 Audionet Link, optical
Output
1 pair RCA jack, gold plated, Teflon isolated (WBT)
1 pair XLR symmetric, gold plated (Neutrik)
1 Audionet Link, optical
1 3,5mm TSR connector mono Trigger Out (50mA)
1 Sub D9 Serial interface RS232
Mains
220 V…240 V, 50…60 Hz
Power consumption
< 1 W Stand-by
max. 85 W
Dimensions
width
height
depth
Weight
8 kg
Design
Front: brushed aluminum, 10 mm, black anodized,
white printing or aluminum natural, 10 mm, anodized,
black printing
430 mm
70 mm
310 mm
Display: red or blue
Cover plate: aluminum, black anodized
Side plate: aluminum, black anodized
Chassis: sheet steel, black varnished
69
Specials
Options
-
System remote control Harmony One
-
Remote control with software
-
automatic mains phase detection
-
separated power supply for digital and analog section
-
fully DC coupled, no condenser in signal path
-
Audionet Link in-/output to remote control
Audionet devices
-
Audionet EPS G2
70
Errors and omissions excepted. Specifications and design are subject to changes without prior notice.
audionet is a trademark of Idektron GmbH & Co KG
Engineered and produced by:
Idektron GmbH & Co. KG, Herner Str. 299, Gebäude 6, 44809 Bochum, Germany
www.audionet.de
[email protected]