1
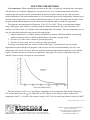
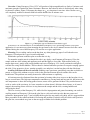
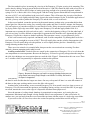
USER’S MANUAL
Instructions for using Petropoxy 154
CONTENTS
Introduction.....................................
Health Cautions..............................
Mixing Petropoxy 154....................
Preparing the Microslides...............
Mounting the Specimen..................
Applying the Cover Glass...............
1
1
2
2
3
6
Impregnation and Specimen Repair............. 7
Sectioning of Loose Grains.......................... 8
Repairing Broken Thin Sections.................. 9
Curing Agent Notes..................................... 9
The Refractive Index of Epoxides............... 10
Petropoxy 154 Warranty.............................. 10
INTRODUCTION
Petropoxy 154 is an epoxide-based mounting medium especially developed for use in the preparation of
petrographic thin sections. The highest levels of research, development and technology have been combined to
help you achieve maximum quality in your thin sections, as well as the maximum in speed, efficiency and
convenience in section preparation. To achieve these objectives, please follow the instructions carefully.
Boron Warning: Mixed Petropoxy 154 has a relatively high boron content and should not be used to
prepare samples which will be analyzed for boron isotopes.
Coccolith Warning: Reports have been received from two laboratories that Petropoxy 154 will slowly attack
coccoliths. Therefore, it is recommended that this product not be used to mount coccoliths that you wish to save
for more than a few months.
HEALTH CAUTIONS
Petropoxy 154 has a very low volatility and toxicity, and comprises epoxide compounds that are virtually
identical with ones that have been used in industry for many years with no deleterious effects. However, some
persons have skin that is sensitive to epoxide compounds, and most persons will become sensitized with
sufficient exposure. Also, it is becoming increasingly recognized that biochemistry and synthetic organic
chemistry are inseparable and therefore you should always remain cognizant that there is a possibility for
bodily harm whenever you handle any organic chemicals. Please read the Material Safety Data Sheets
(available at our website) and follow the general guidelines for good lab hygiene in the next 3 paragraphs.
No special solvents are needed to clean up uncured Petropoxy 154. Ethanol and isopropanol are
inexpensive, low toxicity solvents that perform well for general cleanup.
Avoid contact with your skin. When handling Petropoxy 154, use vinyl or latex gloves. For Petropoxy 154
in contact with skin, use soap and water, or mechanics’ “waterless” hand cleaners. Using alcohol to clean skin
is not recommended as the ethanol dries the skin and may act as a vehicle for absorption of Petropoxy 154.
As with any organic chemical, use ventilation sufficient to avoid prolonged breathing of vapors.
Page 1
Petropoxy 154 Instructions - Rev. 01/15
Preparation of thin sections for all methods of analysis.
Petropoxy 154 Thin Section Epoxy • Petrographic Slide Boxes
5029 W. Lodestar Ave. • Rathdrum, ID 83858 USA
Toll Free (800) 772-3975
Phone (208) 687-5951 • Fax (208) 687-0232
[email protected]
www.burnhampetrographics.com
MIXING PETROPOXY 154
Petropoxy 154 needs mixing only once about every 5 days. This will save you a lot of time and effort but
you must make the effort to mix it correctly.
Cut off the tip of the Yorker spout at a point about halfway between the tip and the rib for holding the red
cap. This will give the spout an exit i.d. of about 3mm.
Dispensing. Place one of the disposable beakers on a level surface. With the beaker at eye level, fill to the
5ml or 10ml level with Petropoxy 154 Resin.
Add the curing agent to the resin at the concentration of 10phr*. For example, to 5.0ml of Resin, add 0.5ml
of Curing Agent. Fill one of the 1cc syringes by drawing the curing agent into the syringe. The initial bubble
can be eliminated by repeating this procedure. If the syringe has two scales, be sure to use the cc scale, not the
M scale. After use, wipe off the syringe, put the cap back on, and save it. It will last for months.
With careful use of the equipment provided, it is a simple matter to keep the curing agent concentration
(CAC) to within an accuracy of ±0.5phr. The CAC can range from between 8phr and 12phr without adversely
affecting mechanical properties. However, the refractive index coefficient, dnD/dCAC, is -0.0002/1phr over this
range.
Mix thoroughly. Using one of the stirring rods provided, mix thoroughly for at least one minute, taking
particular care to frequently scrape the sides and bottom of the beaker with the stirring rod.
Remember - Petropoxy 154 that is not mixed thoroughly will not cure thoroughly. The use of paper cups or
wooden stirring rods will normally work, but is not recommended because fibers from these materials will
contaminate your thin sections.
Pot life. Mixed Petropoxy 154 has a useful pot life of about 5 days at 20°C (68°F). Covered with foil in the
freezer section of a refrigerator, the pot life is extended indefinitely. For more than two weeks in a refrigerator,
the beaker should be placed in an airtight jar with a desiccant.
PREPARING THE MICROSLIDES
It is neither necessary or desirable to frost slides. For almost all rocks and minerals, the Petropoxy 154 bond
to unfrosted slides is stronger than either the specimen or the slide. On a microscopic scale, frosting produces a
myriad of tiny, randomly oriented surfaces which refract transmitted light. This refraction is especially
noticeable at high contrast, as, for example, when observing the Becke line. Thin sections made on unfrosted
slides are a joy to use, as the quality of the transmitted light is not deteriorated by refraction due to frosting.
Slides must be clean and free of any film. As they come from the box, slides are usually sufficiently clean.
Keep them covered.
If the slides are dirty, an effective way to clean them is to build a wire rack that will hold many slides. Clean
with hot, soapy water in an ultrasonic cleaner followed by a rinse with tap water and a brief rinse with
deionized or distilled water. Dry in an oven.
_____________________________________________
*
As used here, phr stands for parts per hundred parts of resin, by volume.
Page 2
Petropoxy 154 Instructions - Rev. 01/15
MOUNTING THE SPECIMEN
Cure temperature. When mounting the specimen on the slide, it is generally considered more convenient
and efficient to use a hotplate, although an oven may be used. Use of a surface thermometer will ensure
consistent gel and cure times and is recommended; in general, hot plate controls are too crude to provide
reliable information. The surface thermometer we sell is moderately priced and of high quality. Another way to
measure surface temperature is to cement a suitable thermocouple to a glass slide and put the assembly on the
hot plate with the thermocouple on top, the other end of the thermocouple is attached to a pyrometer.
The optimum cure temperature for Petropoxy 154 is 135°C to 140°C. This is on an aluminum hotplate,
using a white paper work surface, as measured with our surface thermometer. This cure temperature will
produce a gel time of from 1 to 2 minutes and a full strength bond in 10 minutes. The cure temperature you use
may fall somewhat outside this range for the following reasons:
1. Surface temperature is a complex quantity and difficult to measure. Different methods of measuring
surface temperature and even different thermometers will produce varying results.
2. Gel time is, to some extent, a matter of personal preference.
3. Gel time, to some extent, varies according to curing agent batch.
Too high a cure temperature may result in cracked slides (page 5), production of excessive vapors,
degradation of optical and physical properties, and too fast a cure for convenient handling. Too low a cure
temperature will result in cure times which are impractical and the highest bond strength may not be realized.
Figure 1 illustrates gel time as a function of temperature. The graph is for relative comparisons only and
probably will not exactly correspond to your experience.
The final refractive index is, to a small degree, dependent on cure temperature. Each batch of Petropoxy
154 is formulated to have an nD of 1.540±0.001 at 140°C. However, the refractive index coefficient for
temperature, dnD/C°, is -0.00014. For example, curing at 145°C will lower the final refractive index by 0.0007.
Page 3
Petropoxy 154 Instructions - Rev. 01/15
Preparation of thin sections for all methods of analysis.
Petropoxy 154 Thin Section Epoxy • Petrographic Slide Boxes
5029 W. Lodestar Ave. • Rathdrum, ID 83858 USA
Toll Free (800) 772-3975
Phone (208) 687-5951 • Fax (208) 687-0232
[email protected]
www.burnhampetrographics.com
Cure time. Curing Petropoxy 154 at 135°C will produce a high strength bond in as little as 5 minutes, and
maximum strength is attained in about 10 minutes. However, the refractive index is finalized only after curing
for about 45 minutes. Figure 2 illustrates the change in nD as a function of cure time. After 3 hours cure, nD
will completely stabilize at about 0.0004 below that obtained for 45 minutes cure.
If an nD of 1.54 is desired and if, as recommended, Petropoxy 154 is also being used for cover glass
application, it is not necessary when mounting the specimen to cure for 45 minutes because final cure can be
obtained during the cure of the Petropoxy 154 used for cover glass application.
Mounting. For a working surface on the hot plate, try white photocopy paper. It will absorb excess
Petropoxy 154 and provides a good visual background.
Preheat the specimen on the hot plate to assure that it is dry.
To mount the sample, turn it so that the flat side is up. Apply a small amount of Petropoxy 154 to the
sample with one of the stirring and applicator rods and then apply a clean slide. With wooden sticks (e.g.
tongue depressors), gently work out any bubbles and excess Petropoxy 154. A well positioned work light is
essential for seeing smaller bubbles. The best bond is obtained when the specimen is not quite scraping against
the slide. Using protective gloves, turn the assembly over and place it on the hot plate with the slide down.
Avoiding voids between the rock and slide. Bonding some specimens, particularly ones that are friable or
porous, to a glass slide without excessive voids in the glue-line between the rock and the slide can be
troublesome. The problem can usually be traced to either moisture or capillarity.
All moisture must be eliminated from the specimen by heating either in an oven or on the hot plate, for as
long as several hours. The high cure temperature contributes to a strong bond and long pot life, but because this
cure temperature is above the boiling point of water, steam will be generated if there is any residual water in
voids or cracks of the specimen. At 1 atm, steam has a volume about 1,800 times that of water; so if water is
trapped, the resulting steam will force its way between the sample and the slide, creating bubbles and
destroying the bond.
The low viscosity of hot Petropoxy 154, while ideal for impregnation and general mounting, can result in
capillary transfer of Petropoxy 154 from the glue-line to voids and cracks in rocks that are porous and
permeable. Impregnation (page 7) and a slightly thicker glue-line are usually a big help, and it is suggested that
these procedures be the routine method for correcting this problem. For those rocks for which voids persist in
the glue-line, two methods are given on the next page to further deal with this problem.
Page 4
Petropoxy 154 Instructions - Rev. 01//09
The first method involves increasing the viscosity of the Petropoxy 154 prior to using it for mounting. This
can be done by adding Curing Agent to the Resin in the ratio of 1 phr. This should be done with at least 10cc of
Resin in order to be able to add a volume of curing agent large enough to be accurately dispensed with the
syringe. For 10 cc Resin, add 0.10cc Curing Agent. Add the Curing Agent to Resin that has been preheated in
an oven at 110°C; mix well and heat in the oven for 45 minutes. This will increase the viscosity of the Resin
substantially. Now cool slightly and add Curing Agent in the normal amount, 10 phr. To facilitate application of
the slide, you may wish to preheat the Petropoxy 154 and the slide, as well as the rock.
In the second method, mount the specimen in the normal manner, perhaps using a somewhat thicker than
normal glue-line. Observe the curing very carefully with a probe and when, in about 2 minutes, the Petropoxy
154 just begins to gel, turn the assembly over and check for voids. If they are present, quickly remove the slide
by prying with a single edge razor blade. Apply more Petropoxy 154 and then apply another slide. It is
important not to separate the slide and rock too early -- wait for the beginning of the gel. On the other hand, if
you wait too long, it will be difficult or impossible to separate the slide from the rock. Apparently the gelled
Petropoxy 154 provides a barrier to further capillarity. The operation is messy, so wear protective gloves.
A few rocks contain easily vaporized constituents, such as sulfur compounds. Try heating these rocks for a
few hours or even overnight in an oven at 100°C. This will usually drive out the volatiles. Impregnation with
Petropoxy 154 will usually help solve the problem, as will a slightly thicker glue line. Alternatively, a cold
setting mounting medium may be used.
There are a few minerals, for example halite, that prevent the cure reaction from occurring. For these
minerals, alternate mounting media must be used.
Avoiding cracked slides. Cracked slides are caused by the contraction of Petropoxy 154 as it cools from the
cure temperature to room temperature. Because the Petropoxy 154 bond is typically stronger than the sample or
the slide, this shrinkage can create strains that can crack the slide. Figure 3 illustrates how this can occur. There
are 3 variables which can potentially be adjusted to minimize this problem.
One remedy is to limit the initial cure to 10 minutes. This cure time will produce a full strength bond, but
the bond is more flexible than for longer cure times. One way to keep track of time is to write the minutes of
the hour on the paper working surface next to the slide with a pencil.
Another factor is the tendency to use too much Petropoxy 154. If too much is used, too large an excess of
Petropoxy 154 will form around the specimen, and shrinkage during cooling can crack the slide. If you apply
too much, transfer the excess to the edge of a disposable absorbent tissue/paper towel.
Since the amount of cooling related shrinkage is proportional to temperature, try lowering the cure
temperature. Maximum bond strength is being attained at this lower temperature if, when cooled after 10
minutes cure, you can barely dent the excess around the specimen with the corner of a single edge razor blade.
If you crack a slide, all is not lost; refer to the section on repairing cracked thin sections on Page 9.
Page 5
Petropoxy 154 Instructions - Rev. 01/15
Preparation of thin sections for all methods of analysis.
Petropoxy 154 Thin Section Epoxy • Petrographic Slide Boxes
5029 W. Lodestar Ave. • Rathdrum, ID 83858 USA
Toll Free (800) 772-3975
Phone (208) 687-5951 • Fax (208) 687-0232
[email protected]
www.burnhampetrographics.com
APPLYING THE COVER GLASS
Advantages of Petropoxy 154. Because of its low viscosity and long pot life, applying cover glasses with
Petropoxy 154 is faster, easier and simpler than with any other medium. There are no solvents to vaporize; and
there are no by-products of the cure reaction. Therefore, no bubbles will form under the cover glass during
cure, provided the sections are dry.
In addition, Petropoxy 154 will give substantially better images at higher powers. Most objectives with a
numerical aperture greater than 0.3 are optically compensated for a particular thickness of cover glass,
commonly 170µ. At an N.A. of 0.85, a variance of as little as 10µ can noticeably decrease image quality. The
cover glass thickness is effectively increased by an amount equal to the thickness of the glue-line, that is, the
thickness of any medium between the specimen and the cover glass. The high viscosity of most cover glass
mounting mediums make it difficult or impossible to consistently obtain a sufficiently thin and constant glueline. The low viscosity of hot Petropoxy 154 permits the quick and routine formation of a maximum glue-line
thickness of only 2.5µ. For an optimum image with an objective of high N.A., use #1-1/2 cover glasses.
Petropoxy 154 will dissolve alizarine and so should not be used with this stain; a god alternative is Norland
Optical Adhesive 611, an adhesive cured with UV light. Petropoxy 154 works fine with sodium cobaltinitrite
(K-feldspar stain) except that the stain may produce a few tiny bubbles under the cover glass; however, this is
uncommon and the bubbles are generally so small that they are not very objectionable. Petropoxy 154 is also
compatible with amaranth and the dipotassium derivative of rhodizonic acid (plagioclase stains).
Dispensing Petropoxy 154. If only a few sections are being covered at one time, the stirring rod can be used
to apply Petropoxy 154. For several sections, Petropoxy 154 is conserved and less clean up is required if
Petropoxy 154 is dispensed using one of the syringes provided.
Fill the syringe and dispense about 0.03 to 0.04ml onto the hot, dry thin section while the section is on the
hot plate. Apply the cover glass and gently work out all bubbles and excess Petropoxy 154. Ideal for this
purpose are disposable wooden applicator sticks, 6” long x 0.08” diameter2. They are inexpensive, so throw
them away as them come into contact with Petropoxy 154. This will avoid smearing the next cover glass with
Petropoxy 154.
Final cleaning. Remove excess Petropoxy 154 with a single edge razor blade. This is most easily done
while the thin section is on the hot plate and about 4 to 10 minutes after application.
After cure and cooling, clean off any smears or thin films by rubbing vigorously with a rag and alcohol.
Stopping the cure. If a problem arises after Petropoxy 154 has been applied to the hot thin section, and it
appears that the Petropoxy 154 will gel before cover glass application an be completed, stop the cure reaction
by immediately removing the slide from the hot plate and placing it on a piece of room temperature metal. If
necessary, the section can be cleaned with alcohol and the cover glass application process repeated.
Oversize cover glass. If the thin section is larger than the largest available cover glass for the slide, the use
of Petropoxy 154 allows the use of a cover glass larger than the slide. For example; 24 x 40mm is the largest
standard cover glass available for 26 x 46mm slides. Using Petropoxy 154, a 24 x 50mm cover glass can be
applied. After cure, the cover glass can be ground to size on a bonded diamond lap. During this grinding, the
cover glass will not come off or crack in the bonded area.
Removing the cover glass. With practice, cover glasses can be removed by grinding, on laps, and glass
plates, using a slurry of about 12.5µ grit in the final stages. Three layers are involved: the cover glass, the layer
of Petropoxy 154, and the thin section. As grinding proceeds, all three layers may be observed by drying the
slide and holding it at a low angle between your eye and a light source. The layer of Petropoxy 154 will appear
smoother and more polished than either the cover glass or the thin section. For reapplication of a cover glass, it
is not necessary to remove the layer of Petropoxy 154, only the cover glass.
_____________________________________________
1
2
Norland Optical Adhesive 61 (Norland Products, P.O. Box 145, North Brunswick, NJ 08902)
Available from VWR Scientific (cat #10805-018) and other distributors.
Page 6
Petropoxy 154 Instructions - Rev. 01/15
IMPREGNATION AND SPECIMEN REPAIR
Routine impregnation of blanks. Impregnation with Petropoxy 154 is so simple, quick and effective that
many thin section makers prefer to routinely impregnate nearly all their thin section blocks.
Dry the block in an oven or on a hot plate. Place aluminum foil on a piece of paper on the hot plate. Apply a
generous amount of Petropoxy 154 to the surface to be sectioned and then put this surface face down on the foil
to cure. Depending on porosity and permeability, the specimen may accept additional Petropoxy 154; apply
around the edge of the block as needed.
The foil can easily be removed immediately after gelation or after the cure is complete and the block has
cooled. Removal is more difficult after cure completion and while the block is still hot.
Treatment of slabs and broken blanks. If the specimen is coherent enough to withstand slabbing, but not
trimming to blank size, dry the slab on the hot plate on aluminum foil over paper. Coat one or both sides, as
needed, with Petropoxy 154 until no more is absorbed and leave to cure.
To repair blanks that have broken during preparatory sawing, dry the pieces and then fit them together on
the aluminum foil. Let Petropoxy 154 flow from the applicator rod into the cracks until the cracks remain full.
Impregnation of entire hand samples. If the rock is so friable that impregnation is needed before slabbing
or cutting the thin section block, dry the specimen in an oven for up to several hours at 100°C. With the rock
out of the oven, support it on two or three layers of aluminum foil and coat with Petropoxy 154 until no more is
absorbed, or until enough is absorbed to permit slabbing. Place the rock, with foil, in the oven and cure.
Vacuum impregnation. Hot Petropoxy 154 is an excellent impregnating medium due to its low viscosity
and excellent wetting. Although in some cases vacuum impregnation may be of significant value, for most
cases of routine billet treatment and sectioning there is little to be gained from it. The vapor pressure of
Petropoxy 154 is about the same as other epoxies, boiling at about 65cm of Hg.
Preventing the specimen from warping. Almost all blocks and slabs treated as above can now be sectioned
in the normal manner. You will find that blanks so treated are almost indestructible and that there will be no
plucking during section preparation. However, if the rock has absorbed so much Petropoxy 154 during
impregnation that a large proportion of the specimen is now polymerized Petropoxy 154, then the rock may
warp during sectioning, especially if the slab is thin. This is because polymerized Petropoxy 154 expands when
heated from room temperature to the cure temperature, and thus a flat surface at room temperature will become
convex at the cure temperature. This will be manifest as a section with thin edges, lost corners and a thick
center.
To work around this problem, prepare a block of coherent rock, such as a basalt or granite, 1 to 2cm thick.
Grind a flat side on this, and on the friable, impregnated specimen you wish to section. Dry both on the hot
plate and adhere the two together using Petropoxy 154 (do this on aluminum foil). After cure, cut the friable
rock within 1 to 2mm of the coherent rock. Impregnate this surface as needed, and section in the usual manner.
The coherent rock will keep the friable rock from warping.
If the specimen contains abundant clays or other water-reactive minerals, grind in a slurry of low-viscosity
oil and clean with alcohol.
Page 7
Petropoxy 154 Instructions - Rev. 01/15
Preparation of thin sections for all methods of analysis.
Petropoxy 154 Thin Section Epoxy • Petrographic Slide Boxes
5029 W. Lodestar Ave. • Rathdrum, ID 83858 USA
Toll Free (800) 772-3975
Phone (208) 687-5951 • Fax (208) 687-0232
[email protected]
www.burnhampetrographics.com
SECTIONING OF LOOSE GRAINS AND CHIPS
Two methods are given below for sectioning loose grains, well cutting chips, etc. The first method is
somewhat faster and simpler, and it is particularly preferred if only a few grains are available for sectioning, or
if the grains are more than 1cm in size. The second method provides a denser packing in the thin section for
smaller grains, and is better if the grains in the sample vary widely in size. Both methods require a block of
coherent rock, such as a basalt or granite, about 1 to 2cm thick, and ground flat on one side.
First method. Place the coherent rock block with flat side up on aluminum foil over paper on the hot plate
and allow to dry. Spread a generous amount of Petropoxy 154 on the block. Spread the grains on the block and
distribute them evenly with a toothpick or other disposable applicator. Let cure on the hot plate with grains
facing up.
If several large grains are to be sectioned, grind a flat side on each grain and then arrange a close packing of
these on the block. Then apply Petropoxy 154.
Next, grind to the middle of the layer of grains. If the grains are small and the layer is only one grain thick,
use caution and commence grinding on a fine lap. Dry on the hot plate and apply a slide, being careful not to
apply an excess of Petropoxy 154.
Second method. This method involves first encapsulating the grains or rock chips3. Place about 5 to 10cc of
the grains or rock chips in one of the polypropylene mixing beakers supplied with the Petropoxy 154 kit, and
dry in an oven at 110°C. Strive to obtain a close packing of material. While the grains are hot, cover them with
Petropoxy 154 by slightly tilting the beaker and letting the Petropoxy 154 run down the inside wall of the
beaker. This procedure will entrap a minimum of air. No vacuum treatment is normally necessary. Cure in the
oven for 30 minutes or until hard.
Pop the encapsulation from the beaker, grind flat through the grains or chips, and adhere to a block of
coherent rock. This step is performed for two reasons. First, the encapsulation contains enough Petropoxy 154
that a surface ground flat at room temperature will bulge and warp at cure temperature, precluding the
production of a thin section of even thickness. Second, the slide may crack upon cooling due to the shrinkage of
such a large mass of Petropoxy 154.
Next, cut the encapsulation within 1 to 2mm of the block. The rigidity of the coherent rock block will
prevent the encapsulation from warping during sectioning. Impregnate again if needed, then grind, mount and
section as per usual.
Leu and Druckman4 have developed an alternate procedure not using a block of coherent rock. After
grinding the encapsulation to expose a suitable cross section, mount the encapsulation on the glass slide. Cure
for 10 minutes or less, and then very rapidly transfer this hot assembly to the chuck of the cutoff saw. The idea
is to cut the encapsulation while hot, thereby working around the problem of potentially cracking slides while
sawing, due to shrinkage of Petropoxy 154 upon cooling.
Grain mounts of small grains. Grain mounts of grains less than about 50µ can be made by placing a small
amount of Petropoxy 154 on a slide, sprinkling the grains onto the Petropoxy 154, and distributing the grains
with a disposable applicator. Apply a cover glass and cure.
For grains of more than about 100 microns which will not be ground, the thickness of Petropoxy 154 is
great enough that the slide may crack upon cooling, so use a short cure time.
Alternatively, after the grains are distributed, let the mount cure. Grind to thickness and apply a cover glass.
_____________________________________________
Thanks to Mark Druckman and Ron Leu of Sonoma State University for developing this method of encapsulation using Petropoxy
154. The method is similar to that described by Middleton, L.T., and Kraus, M.J., 1980, Simple technique for thin-section preparation
of unconsolidated materials: Jour. Sed. Petrology, v. 50, p. 622-623.
4
Leu, R.F., and Druckman, M.M., 1982, Preparation of grain mounts: Jour. Sed. Petrology, v. 52, p. 667.
3
Page 8
Petropoxy 154 Instructions - Rev. 01/15
REPAIRING BROKEN OR CRACKED THIN SECTIONS
Glass to glass bonds with Petropoxy 154 are so strong that many cracked or broken thin sections repaired
with Petropoxy 154 will virtually have their original strength. The procedures below apply only to sections
which have been mounted with Petropoxy 154, although in some cases the procedures may be modified for
sections mounted with other epoxides or thermoplastic materials (e.g. Lakeside 70C).
Cracked sections. For a section that is merely cracked and not broken, place the section on aluminum foil
over paper on the hot plate and allow to dry. Apply a bead of Petropoxy 154 along the crack. After 10 minutes
cure, and while the section remains on the hot plate, scrape off the bead of Petropoxy 154 with a single edge
razor blade.
If a slide cracks during the cut off process, it can usually be salvaged. Most thin section machines will not
crack the slide any further if you use the cutoff saw and coarse lap with care. After using the thin section
machine, but before hand lapping, treat as in the above paragraph.
If the crack developed as a result of excess Petropoxy 154 around the perimeter of the specimen, remove
some of that excess after the crack repair is cured but while the section remains on the hot plate.
Broken sections. For a broken section, place the pieces, section side up, on very smooth aluminum foil on a
2” x 3” glass slide; place this assembly on the hot plate and allow to become hot and dry. Apply a bead of
Petropoxy 154 along the crack between the pieces. With a wooden stick (e.g. tongue depressor) on each piece,
push the pieces together and flat against the foil. Hold the pieces in position until the Petropoxy 154 has set
(about 3 or 4 minutes). After about 10 minutes cure, and while the section is on the hot plate, carefully scrape
off the excess Petropoxy 154 with a single edge razor blade.
If the section is badly broken, or if extra strength is desired, the above procedure can be modified. Place
either another slide, or a cover glass which is larger than the slide upon which the section is mounted, between
the bottom of the section slide and the foil. This creates a sandwich which will add additional strength. After
cure, the slide or cover glass can be ground to size on a bonded diamond lap.
CURING AGENT NOTES
Both Petropoxy 154 Curing Agent and Resin have shelf lives of several years. Keep containers tightly
closed. The Curing Agent is hygroscopic and will be destroyed if exposed to air for a long period of time.
It is a normal tendency of Petropoxy 154 Curing Agent to crystallize or solidify, especially when stored at
temperatures below 22 °C (72°F). Crystallization is actually an indication of product purity, and it is a harmless
and reversible physical change, not a chemical one. This phenomenon doesn’t happen all the time, and doesn’t
happen with any degree of predictability. It is not uncommon for random containers of Curing Agent -- from
the same batch, subjected to identical conditions during manufacture -- to become semi-solid while others
remain liquid.
Storing the Curing Agent between 24°C and 32°C (75°F - 90°F) may help prevent it from solidifying, but if
you find your Curing Agent has thickened or there is what appears to be a sludge in the bottom of the container,
simply heat and stir to return it to a clear, homogeneous liquid. This heating and re-homogenization will not
affect the quality of the Curing Agent whatsoever.
The quickest way to heat Curing Agent is in a microwave oven with the lid on. However, Curing Agent is
very absorptive of microwaves, so be very conservative. Start by heating for only a few seconds. Remove from
the oven and stir in a well-ventilated area. If it is not warm or does not completely re-dissolve, heat a few more
seconds. Repeat as necessary. The Curing Agent can get very hot without harm; the temperature is really
limited by the possible melting of the polypropylene container. Allow heated Curing Agent to cool before use.
If a microwave is not available, heat in an oven for a few minutes at up to 100°C, stirring intermittently.
If properly performing the above procedure fails to restore the Curing Agent, we will gladly replace it at our
expense.
Page 9
Petropoxy 154 Instructions - Rev. 01/15
Preparation of thin sections for all methods of analysis.
Petropoxy 154 Thin Section Epoxy • Petrographic Slide Boxes
5029 W. Lodestar Ave. • Rathdrum, ID 83858 USA
Toll Free (800) 772-3975
Phone (208) 687-5951 • Fax (208) 687-0232
[email protected]
www.burnhampetrographics.com
ON DETERMINING THE REFRACTIVE INDEX OF CURED EPOXIDES
Unlike minerals, the refractive index of most cured epoxides cannot be determined by crushing or grinding
the epoxide into small particles and observing the particles in oils under the microscope. This is because most
epoxides undergo considerable inelastic strain before fracture; and in any polymer, the refractive index is a
function of strain.
Nor can the refractive index be measured by observing a flat polished slab of epoxide in a refractometer.
This is because shrinkage during cure, and thermal shrinkage due to cooling from the cure temperature,
introduce strain near the contact with the specimen. This strain can be observed as a faint birefringence. For
light vibrating in this strained area in the plane orthogonal to the specimen boundary, nD=1.540, which is
slightly lower than for the unstrained Petropoxy 154 farther away from the specimen.
It should be noted that this birefringence does not affect Becke line observations because two conditions are
satisfied: 1) the principal stress axes of the epoxide are everywhere essentially orthogonal and tangential to the
specimen, and 2) within the nD limits specified for Petropoxy 154 (±0.001), the intensities of the principal
stresses can be assumed to be constant, regardless of specimen size and shape. The first condition can be
verified by observing the isoclinic lines.
One method of precisely determining nD of an epoxide is to obtain an unzoned uniaxial mineral for which
nD of the epoxide falls between ε and ω. For an nD of 1.54, some nephelines are suitable. The mineral is
crushed and sieved to obtain an appropriate size fraction for microscopic examination. ε and ω are then
precisely determined using oils and sodium light. To prepare a sample of epoxide for nD determination, place a
drop of the epoxide on a slide, then mix several tens of the mineral grains into the epoxide, apply a cover glass
and cure.
By observing flash figures, find a grain in which the c axis is parallel to the stage of the microscope. In this
case the indicatrix is an ellipse whose semiaxes are ε and ω. Using Na light with the lower polarizer in,
determine the angle of rotation (θ) during which the grain has a higher refractive index than the surrounding
epoxide. nD is then calculated by using the relation
The equation to the right holds for optically negative minerals; for
optically positive minerals, the positions of ω and ε are exchanged. For
a complete revolution of 360°, ω will be measured twice; it can then be averaged before the calculation.
THE PETROPOXY 154 IRONCLAD GUARANTEE
No ifs, ands, buts, or quibbles: if you don’t like Petropoxy 154, just give us a call and we’ll refund the
purchase price, plus the return postage, within 10 days. Of course, we’d like an explanation, but this is not
required.
This is the only warranty applicable to Petropoxy 154. Palouse Petro Products assumes no other obligation
or liability in connection with this product.
Page 10
Petropoxy 154 Instructions - Rev. 01/15