1
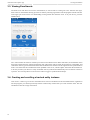
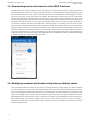
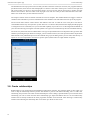
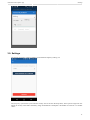
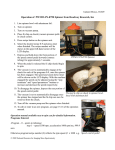
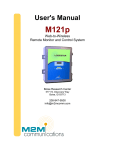
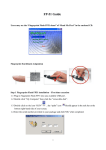
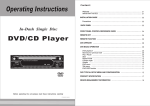
DHIS 2 Android User Manual
2.21
© 2006-2015
DHIS2 Documentation Team
Revision 1696
Version 2.21 2015-11-27 11:23:04
Warranty: THIS DOCUMENT IS PROVIDED BY THE AUTHORS ''AS IS'' AND ANY EXPRESS
OR IMPLIED WARRANTIES, INCLUDING, BUT NOT LIMITED TO, THE IMPLIED
WARRANTIES OF MERCHANTABILITY AND FITNESS FOR A PARTICULAR PURPOSE ARE
DISCLAIMED. IN NO EVENT SHALL THE AUTHORS OR CONTRIBUTORS BE LIABLE FOR
ANY DIRECT, INDIRECT, INCIDENTAL, SPECIAL, EXEMPLARY, OR CONSEQUENTIAL
DAMAGES (INCLUDING, BUT NOT LIMITED TO, PROCUREMENT OF SUBSTITUTE
GOODS OR SERVICES; LOSS OF USE, DATA, OR PROFITS; OR BUSINESS INTERRUPTION)
HOWEVER CAUSED AND ON ANY THEORY OF LIABILITY, WHETHER IN CONTRACT,
STRICT LIABILITY, OR TORT (INCLUDING NEGLIGENCE OR OTHERWISE) ARISING IN
ANY WAY OUT OF THE USE OF THIS MANUAL AND PRODUCTS MENTIONED HEREIN,
EVEN IF ADVISED OF THE POSSIBILITY OF SUCH DAMAGE.
License: Permission is granted to copy, distribute and/or modify this document under the terms of the
GNU Free Documentation License, Version 1.3 or any later version published by the Free Software
Foundation; with no Invariant Sections, no Front-Cover Texts, and no Back-Cover Texts. A copy
of the license is included in the source of this documentation, and is available here online: http://
www.gnu.org/licenses/fdl.html.
ii
DHIS 2 Android User Manual
Contents
1. Android Event Capture App .............................................................................................................. 1
1.1. Overview ............................................................................................................................. 1
1.2. Installing and logging in ......................................................................................................... 1
1.3. Viewing events ..................................................................................................................... 2
1.4. Creating events ..................................................................................................................... 2
1.5. Modifying events .................................................................................................................. 4
1.6. Settings ................................................................................................................................ 5
2. Android aggregate data capture app .................................................................................................... 7
2.1. Overview ............................................................................................................................. 7
2.2. Installation ........................................................................................................................... 7
2.3. Logging in ........................................................................................................................... 7
2.4. Entering and saving data ........................................................................................................ 7
3. Android Tracker Capture App ............................................................................................................ 9
3.1. Overview ............................................................................................................................. 9
3.2. Installing and logging in ......................................................................................................... 9
3.3. Viewing Enrollments ............................................................................................................ 10
3.4. Creating and enrolling a tracked entity instance ........................................................................ 10
3.5. Downloading tracker data from the online DHIS 2 instance ......................................................... 12
3.6. Modifying enrollment and tracked entity instance attribute values ................................................. 12
3.7. Creating new events for Enrollment ........................................................................................ 13
3.8. Create relationships .............................................................................................................. 14
3.9. Settings .............................................................................................................................. 15
iii
Android Event Capture App
Overview
Chapter 1. Android Event Capture App
1.1. Overview
The event capture Android app allows you capture, modify and list events. The event capture app works with eventbased programs in DHIS 2, which handles anonymous events not linked to registered entities. These programs are
suitable for handling scenarios such as facility surveys, hospital registry summaries and training events. However the
app is not tied to any specific domain and can potentially be utilized for any scenario of event-based information.
The event capture app allows you to capture events offline, i.e. without Internet connectivity. The app will automatically
synchronize events with the online DHIS 2 server automatically when connectivity is present. This makes the app
suitable for environments where Internet connectivity is scarce or unstable.
1.2. Installing and logging in
The event capture add can be found on Google Play under the name "Event Capture for DHIS 2".
Event Capture on Google Play
You can download the APK file directly from the GitHub release page.
Event Capture GitHub releases
Click on the app to open it after the installation is done. This will bring up the login screen.
In the URL field, enter the full URL to the DHIS 2 instance (server) for which you want to capture and manage events
for. Be careful to enter the http:// or https:// part of the URL as well. In the username and password field, enter the
username and password for your account at the given DHIS 2 instance. Note that you can use this login on the online
DHIS 2 server as well, i.e. you will be using the same account as you will use when logging into DHIS 2 using a Web
browser. After logging in the first time, the app will download meta-data from the online instance. This could take a
few minutes so please be patient.
1
Android Event Capture App
Viewing events
1.3. Viewing events
The main screen will show an overview of events, as well as links to creating new ones. Start by selecting organisation
unit and program from the selectors at the upper part of the screen.
The + button below the selectors will take you to the new event screen. Below this button, all events which have been
registered for the selected organisation unit and program will be listed. Each column is configurable, and could show
various types of information from each event. The column to the far right shows the synchronization status. Sent means
that the event has been uploaded to the server, whereas Offline means that the event is so far only stored at your device.
Events will be synchronized automatically once an Internet connection is present. You can swipe down on the screen
in order to trigger a synchronization attempt.
1.4. Creating events
Click on the + button to go to the new event form. The new event will be associated with the organisation unit and
program you selected previously. The new event screen has a range of functions:
2
Android Event Capture App
Creating events
The back button in the top top-left corner will take you back to the main screen (list of events). For programs that have
specified sections, these sections will be displayed as a selector at the centre of the top bar. There are also right and
left arrows which you can use to move between sections. You can use this selector and arrows to quickly navigate
between form sections. The save button in the top-right corner will save what you have entered for the event so far.
Data is also saved when you switch between sections.
The Complete button on the second bar will mark the event as complete. The Validate button will trigger a check for
validness of the information you have entered based on the validation rules which have been set up for the program.
The first form field contains a date selector and indicators the time of when the event took place. The label is
customizable and will vary from system to system. The Enter coordinates field, which will be displayed if the program
is configured to store coordinates, lets you use the GPS capability of your device to set the longitude and latitude of
your current location by pressing the circle-like symbol to its right. You can alternatively enter the coordinates directly.
The event entry form itself will be rendered below. The type of input field selector will depend on the type of the data
element representing the input field. For example, you will see date selectors, free text input and numeric input fields.
Data elements with predefined options will be rendered using a special dialog where you can either click directly on
options or use a text input field to search for a specific option (useful if there is a high number of options).
3
Android Event Capture App
Modifying events
1.5. Modifying events
After an event has been created you can go back to or modify the event by simply clicking on it in the event list. This
will open the event form pre-populated with information that has been captured so far.
4
Android Event Capture App
Settings
1.6. Settings
The settings screen lets you do configure synchronization frequency and log out.
The frequency of automatic synchronization attemps can be set form the drop-down, where options range from one
minute to one day. This affects the battery usage and bandwith consumption. The default of one hour is a sensible
choice.
The log out button will log you out of the app, and request you to enter the login information again. You are not
intended to log out of the application between each session. This is mostly useful when you want to log into another
DHIS 2 online instance.
5
Android aggregate data capture app
Overview
Chapter 2. Android aggregate data
capture app
2.1. Overview
The Data Capture for DHIS 2 app allows you to enter data into a DHIS2 server with an Android device. The app
downloads instances of forms which are required to enter data from the server, and stores them on the device. This
means that you can enter data offline and then upload it to the DHIS2 server when you have network coverage.
2.2. Installation
You can easily install the Data Capture for DHIS2 app by logging into the Google play store and searching for "Data
Capture for DHIS2"
2.3. Logging in
After you install and launch the Data Capture app on your device, when you launch it for the first time, you will be
required to enter the server URL address of the DHIS2 server and your user name and password. Be sure to specify
the full address of the server and protocol (either https or http). Once you have specified all details, press "Log in"
to authenticate with the server.
2.4. Entering and saving data
Once you login, you will need to select the organisation unit, dataset and time period for which you wish to enter data.
Once you have selected all of this, press the highlighted area to proceed to the data entry screen.
7
Android aggregate data capture app
Entering and saving data
Data entry in the android app is very straight-forward. Data elements are listed along with their category combination
option. Just select the field for which you want to enter data by clicking it and entering the correct data value. Values
will be saved locally to your device. When you finish entering data, press "Save" and data will be saved to the server.
8
Android Tracker Capture App
Overview
Chapter 3. Android Tracker Capture App
3.1. Overview
The Tracker Capture Android app allows you capture, modify and list tracked entity instances with its enrollments and
events. The Tracker Capture app works with multiple event-based programs in DHIS 2, which handles events linked
to registered entities. These programs are suitable for handling disease programmes where multiple visits is required.
The Tracker Capture app can be used for disease programmes such as tubercolosis and malaria. However the app is
not tied to any specific domain and can potentially be utilized for any scenario of multiple event-based information.
The Tracker Capture app allows you to capture events offline, i.e. without Internet connectivity. The app will
automatically synchronize events with the online DHIS 2 server automatically when connectivity is present. This makes
the app suitable for environments where Internet connectivity is scarce or unstable.
3.2. Installing and logging in
The Tracker Capture app can be found on Google Play under the name "DHIS 2 Tracker Capture".
Tracker Capture on Google Play
You can download the APK file directly from the GitHub release page.
Tracker Capture GitHub releases
Click on the app to open it after the installation is done. This will bring up the login screen.
In the URL field, enter the full URL to the DHIS 2 instance (server) for which you want to capture and manage data
for. Be careful to enter the http:// or https:// part of the URL as well. In the username and password field, enter the
username and password for your account at the given DHIS 2 instance. Note that you can use this login on the online
DHIS 2 server as well, i.e. you will be using the same account as you will use when logging into DHIS 2 using a Web
browser. After logging in the first time, the app will download meta-data from the online instance.
9
Android Tracker Capture App
Viewing Enrollments
3.3. Viewing Enrollments
The main screen will show an overview of enrollments, as well as links to creating new ones. After the first login,
there will be no enrollments showing up in the list. Start by selecting organisation unit and program from the selectors
at the upper part of the screen. For downloading existing tracker data from the server on to your device, press the
middle button.
The + button below the selectors will take you to the new enrollment screen. Below this button, all enrollments which
have been registered for the selected organisation unit and program will be listed. Each column is configurable, and
could show various types of information from each enrollment. The column to the far right shows the synchronization
status. Sent means that the enrollment has been uploaded to the server, whereas Offline means that the enrollment is
so far only stored at your device. Locally stored data will be synchronized automatically once an Internet connection
is present. You can swipe down on the screen in order to trigger a synchronization attempt.
3.4. Creating and enrolling a tracked entity instance
Click on the + button to go to the new enrollment form. The new enrollment will be associated with the organisation
unit and program you selected previously and the tracked entity instance that you create with this form. The new
enrollment screen has a range of functions:
10
Android Tracker Capture App
Creating and enrolling a tracked entity
instance
The back button in the top top-left corner will take you back to the main screen (list of enrollments). The save button
in the top-right corner will automatically save what you have entered for the enrollment so far.
The first form field contains a date selector and indicators the time of when the enrollment took place. If your program
is selected to accept incident date, this will also be displayed. The labels is customizable and will vary from system
to system.
The enrollment data entry form itself will be rendered below. The type of input field selector will depend on the type
of the data element representing the input field. For example, you will see date selectors, free text input and numeric
input fields. Data elements with predefined options will be rendered using a special dialog where you can either click
directly on options or use a text input field to search for a specific option (useful if there is a high number of options).
11
Android Tracker Capture App
Downloading tracker data from the online
DHIS 2 instance
3.5. Downloading tracker data from the online DHIS 2 instance
From the main screen press the middle button for querying the server. Since this task requires an Internet connection,
please make sure that you have one. This task will query the server with the organisation unit and programme that you
have selected from the main screen. After you have pressed this button a dialog appears. In this dialog you can either
specify your search by pressing the detailed search button. The detailed search queries the server for tracked entity
instances that contains the values that you have specified in your query. When you are finished with your query, press
the globe for displaying the results from the server. If you want to display all tracked entity instances from the selected
organisation unit and programme, you can simply press the globe button without entering any details. Depending on
your Internet connection, this task can take some time so please be patient. A new dialog will present a list of results
from your query containing tracked entity instances. Select the tracked entity instances that you want to download by
tapping on them (A green tick on the right side will indicate that you have selected the tracked entity instance). After
you have selected all your tracked entity instances that you want to download, press the download button, that has an
icon with a downwards arrow, at the top of the dialog screen. The tracked entity instances will be downloaded in the
background and the synchronization wheel will be displayed. When a tracked entity instance is finished downloading
it will appear in the list at the bottom of the main screen.
3.6. Modifying enrollment and tracked entity instance attribute values
After an enrollment has been created you can go back to or modify the event by simply clicking on it in the enrollment
list. This will open an overview screen of the enrolled tracked entity instance with information that has been captured
so far. To change the tracked entity instance attribute values that has been captured, simply press the profile box and a
new screen will apppear. By default the data entry rows will be disabled. To enable the data entry rows press the edit
button in the top-right corner. This form will save whenever you do any changes. To change enrollment details, press
the Enrollment box from the overview screen. To make the rows editable, press the edit button in the top-right corner.
Data is automatically saved whenever changes is done. In the Overview screen you can also choose to complete or
terminate the enrollment for the tracked entity instance. When an enrollment is completed or terminated, you will not
be able to modify the data
12
Android Tracker Capture App
Creating new events for Enrollment
3.7. Creating new events for Enrollment
In the main screen click on any enrollment in the list to go into the Overview screen. This screen displays the information
of the enrollment and the tracked entity instance with its relationships and active events. Some events is auto generated
with the enrollment and therefore is already displayed in the list. This is customizable from the server side. Click on
the new button to generate a new event and go to the event form. The new event will be associated with the enrollment
that you selected previously. The new event screen has a range of functions:
13
Android Tracker Capture App
Create relationships
The back button in the top top-left corner will take you back to the main screen (list of events). For programs that have
specified sections, these sections will be displayed as a selector at the centre of the top bar. There are also right and
left arrows which you can use to move between sections. You can use this selector and arrows to quickly navigate
between form sections. The save button in the top-right corner will save what you have entered for the event so far.
Data is also saved when you switch between sections.
The Complete button on the second bar will mark the event as complete. The Validate button will trigger a check for
validness of the information you have entered based on the validation rules which have been set up for the program.
The first form field contains a date selector and indicators the time of when the event took place. The label is
customizable and will vary from system to system. The Enter coordinates field, which will be displayed if the program
is configured to store coordinates, lets you use the GPS capability of your device to set the longitude and latitude of
your current location by pressing the circle-like symbol to its right. You can alternatively enter the coordinates directly.
The event entry form itself will be rendered below. The type of input field selector will depend on the type of the data
element representing the input field. For example, you will see date selectors, free text input and numeric input fields.
Data elements with predefined options will be rendered using a special dialog where you can either click directly on
options or use a text input field to search for a specific option (useful if there is a high number of options).
3.8. Create relationships
Relationships let you create links between different tracked entity instances. This could be useful in cases where you
want to map the relationships between parents and children or persons with malaria breeding sites. To add a new
relationship, first press the 'new' button on the relationship box. Now a dialog is presented where you can choose which
relationship you want to create from the 'Select relationship type' input field. Below there is a list of tracked entity
instances that is already enrolled in the same programme and thus can be choosed. After choosing a tracked entity
instance and confirming the relationship then it will show up in the Overview screen.
14
Android Tracker Capture App
Settings
3.9. Settings
The settings screen lets you do configure synchronization frequency and log out.
The frequency of automatic synchronization attemps can be set form the drop-down, where options range from one
minute to one day. This affects the battery usage and bandwith consumption. The default of one hour is a sensible
choice.
15
Android Tracker Capture App
Settings
The log out button will log you out of the app, and request you to enter the login information again. You are not
intended to log out of the application between each session. This is mostly useful when you want to log into another
DHIS 2 online instance.
16