1
CASSESE FRANCE
Automation & Development Department
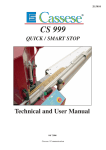
BARCOD EDITOR 4.00
Cassese Driving Numeric Underpinners:
CS 486 Ultra/XL - CS 3099 - CS 3099 Ultra/XL - CS 4095 - CS 4095 Ultra
&
Numeric Stop for Saws: CS 939 - CS 996 - CS 999 - CS 2095
- Barcode Management (code 39) -
PRESENTATION
BARCOD EDITOR is software that has been developed to manage a simple moulding assembly database and to print the
corresponding barcode or execute assembly on the machine. The purpose of the software is not to manage stocks, suppliers,
customers, invoices etc... but rather to transfer management of the machine's assembly criteria to the computer. Many more
possibilities are then opened up, because of the presence of the computer, particularly for the CS486ultra, which had no article
management.
A short history...
BCeditor 1.00 a 1.02 :
Has been successfully tested on WINDOWS 95/98 and NT4.
BCeditor 1.03 :
Is identical to 1.02 with WIN2000 update.
BCeditor 1.04 (Fr ou En) :
Is identical to 1.03 + manufacturer file access function.
BCeditor 2.00 (Fr ou En) :
Also manages a moulding pattern per manufacturer.
BCeditor 3.00ml :
Is identical to 2.00. with the addition of multi-language management (4) together with an external resources file.
BCeditor 3.01ml :
1. Copies the machine type when creating new record;
2. Allows reference text printing without barcode printing.
BCeditor 3.02ml :
BCeditor 3.03ml :
Printing problemes solved.
Update for WIN XP.
BCeditor 3.10ml :
1. Accepts JPG format for image moulding.
2. Barcode printing only in code 39 with advanced properties.
3. Validation and save confirmations if any changes made in files.
4. Autodetects Windows XP
BCeditor 4.00ml :
( Base articles V3.00 )
1. Shortcuts by icons menu.
2. Adds numeric stop machines QUICK/SMART STOP.
3. Adds ".sav" file import function from 3099 and 4095.
4. Shows machine image type.
5. Adds creation date and sort by date.
6. Adds picture print function.
7. Adds picture editor selection preferences.
8. Adds vendor and model automatically to vendor file.
9. Adds machine type on articles list.
10. Allows multiple selection on articles list.
11. Demo mode no longer locks OPEN/SAVE.
Note: Running under WINDOWS MILLENIUM has not been tested in the workshop,
but it seems to operate correctly at the customer's site.
CAUTION!!!
This software is only dedicated to the following Cassese machines:
- Numeric Underpinners: CS 486 ULTRA/XL - CS 3099 - CS 3099 ULTRA/XL - CS 4095 ULTRA - NUMERIC STOPS Quick Smart Stop fitted on saws: CS 939 - CS 996 - CS 999 - CS 2095 -
SYSTEM REQUIREMENTS
The software was developed on a Pentium 166 mmx/32 Mb RAM. The system requirements for this application have been
reduced to the very minimum:
- P166
- 32 Mb RAM
- 5 Mb available HDD
- Video 1 Mb/256 colour
- WIN 95 and higher
However, the performance depends on the hardware and the operating system installed on your computer.
The most important parameters are:
- The processor frequency
- The available RAM
- The programs running simultaneously (Word, Excel, etc.)
- The size of the database being processed
- The operating system (with equivalent clock frequency, WIN95 is faster than WIN98 which is in turn faster than
WINNT4 which is in turn faster than WIN2000)
- A good quality laser, ink-jet or thermal printer - if you want to print the barcode. An available serial port, if you want to
work with direct connection to the machine.
CAUTION: BarCod Editor can only produce barcode in Code 39 (3-in-9). Please check the user's manual of your scanner for
further information.
INSTALLATION AND START-UP
DEMO MODE
- Insert the BARCOD EDITOR CD in your CD drive.
- Installation starts up automatically.
- If this is not the case, use the START / RUN / BROWSE menus and start up the file Installbarcode.exe on the CD.
- Follow the instructions that appear on the screen.
If you have downloaded the file Installbarcod.exe from our Internet site, double click on this file and follow the instructions that
appear on the screen.
FULL VERSION
Printer Connection:
- With your computer switched OFF: install the dongle provided between the LPT(x) port and the printer.
- Once the connection is made, start up your computer.
- Install BarCod EDITOR as shown for the DEMO version above.
- Double-click on the Cassese BarCod Editor icon. Once the program has started up, the dongle driver is installed automatically (with
WINNT, WIN2000, WINXP you have to be Administrator of the workstation). After it is installed, your software can print barcode.
Machine Connection:
A COM port (COM1, COM2, COM3, COM4) must be available for the connection with the machine.
This port must physically exist, must not be in use already (for the mouse, a printer, a modem, etc.) when BarCod Editor is run and
must be recognised in WINDOWS.
To check, go to:
"CONTROL PANEL -> SYSTEM -> DEVICE MANAGER -> PORTS". COM1 is generally the standard port for all PCs, but on
older machines it may be used for the mouse. On more recent systems, the mouse has moved to the PS2 connector.
On laptops there is generally only one COM port.
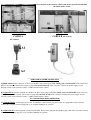
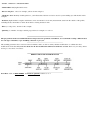
PC / Barcode reader connection to CS underpinner / Numeric stops
Open the door of the machine cabinet with the key provided and identify
the model of PLC inside:
CQM1H-CPU51
CQM1-CPU43
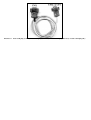
CABLE A
CABLE B (B1 on PLC)
A1 (on PLC)
BARCODE SCANNER CONNECTION
CQM1H-CPU51 Connect plug A1 of cable A to the PLC. Next connect plug CM1 (black patch + marked API) of the extension to
plug A2 of cable A. Connect your scanner to plug CM2 (marked SCAN) of the extension. Connect the power supply of your
barcode scanner to the connector (220 V + GND) installed in the cabinet.
B) CQM1-CPU43: Connect plug B1 of cable B to the PLC. Next connect plug CM1 (black patch + marked API) of the extension
to plug B2 of cable B. Connect your scanner to plug CM2 (marked SCAN) of the extension. Connect the power supply of your
barcode scanner to the connector (220 V + GND) installed in the cabinet.
PC CONNECTION (BARCOD EDITOR)
C) CQM1H-CPU51: Connect plug A1 of cable A to the PLC. Then connect plug A2 of cable A to plug CM1 of the extension.
Connect the available extension plug CF1 to an available COM port on your PC.
B) CQM1-CPU43: Connect plug B1 of cable B to the PLC. Then connect plug B2 of cable B to plug CM1 of the extension. Connect
the available extension plug CF1 to an available COM port on your PC.
Extension = male COM plug (scanner) / male COM plug (Interface) or male COM plug (Interface) / female COM plug (PC)
USING THE "BARCOD" EDITOR
Double-click on the "Cassese" icon of BarCod, from the Desktop or Programs menu.
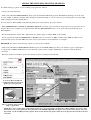
VENDOR FILE
Looking at the VENDOR list (your moulding suppliers) you will see that "UNKNOWN" is shown and that the MODEL list
is empty:
To update the VENDOR list: enter each vendor's name and validate each one
using the "ENTRY" key on the keyboard. A NEW VENDOR window opens
asking you if you want to integrate the vendor file. Click on OK: the VENDOR
list is updated. Repeat for the MODEL list, taking each vendor in your list.
To delete one or more vendors or models from the list:
Click on the menu TOOLS/VENDORS FILE. The "vendors.ini - Notepad"
window opens containing the list of your VENDORS and MODELS.
Delete Vendor / Model from your selection, but keep the file structure, as shown
below:
1.
2.
3.
4.
Always use the same font.
Each vendor or model between inverted commas.
A single vendor or model per line.
Each model is preceded by a *.
Save the file once complete. BarCod Editor then prompts you to validate the
changes. Click on OK. Your lists are updated.
CREATING A DATA BASE
The data base is a text file containing the sheets created when it was produced using
BarCod Editor. To create a data base, go into the FILE menu and choose NEW. The
fields containing the assembly parameters must be set to 0. Next select FILE / SAVE
AS: A window opens prompting you to save the base. Choose a name for it then click
on OK. The new base is created. Remark: By default BarCod Editor proposes saving
the base in its program file ("C:\Program Files\bc4.00ml\sans nom.txt), but you can
save it to a different location (floppy disc, CD, network, etc.). Simply open the base
again and enter the access path in BarCod Editor.
Note: If the base contains pictures, BarCod Editor will not export them during the copy. In such cases you should make a copy of the file
containing the base and pictures by copy-paste from Windows Explorer.
EXAMPLE OF CREATING FILES IN THE BASE
- Position/quantity (number of files recorded in the base): you currently have 1/1.
- Date: Double-click on the field = current date, or enter the date of your choice on the keyboard.
- Choice of machine, for example, click on CS3099
- Reference: first delete the 0 then type your reference, for example 220402
- Label: moulding1
- Description : for the description of moulding1 and other information if necessary
- Vendor : VENDOR 1 / Model: MODEL 2
- Mould width: 100 (implied unit is mm)
- Pressor end-piece : select, for example, yellow 45-mm end-piece.
- Check the "bars" box. By checking this box, you indicate that side bars need to be used for your moulding (we will check it in this
example).
- Positions (implied units for staples and distance: mm): 10-20-30-55-75-95 mm (measurement starts from the outside of the profile,
excluding rebate). Remember to delete the 0s before entering the data in mm.
- Sizes (i.e. wedge size): 10 mm for the example.
- Quantity (i.e. number of wedges stacked per position) for example: 1-2-3-6-4-3
The program has been tested with 1000 sheets and produced no problems. Nonetheless, we recommend creating a different base
for each type of machine, or per moulding collection or per year.
All assembly parameters have now been entered. All that is left is to click on VAL (validate modifications) to validate the sheet
modifications in the base. If you do not click on VAL the modifications will not be taken into account. Then save (for safety) before
moving to a new sheet or new base.
EXPLANATION OF TOOLBAR ICONS
New Sheet: click on NEW SHEET : the Position / quantity switches to 2 / 2
- Choice of machine : CS4095 - Reference: 2204022
- Label: moulding2 - Description: description of moulding 2
- Vendor : VENDOR2 - Model: MODEL3
- Mould width: 50 - Pressor end-piece : black triangle
- Bars: this time we will not check the box
- Positions : 15-25-45 -Sizes : 5BD-10BD-7BD - Quantity: 2-1-1
Once the assembly parameters are entered, validate with the key VAL.
Now save the base using the menu FILE / SAVE.
To create a copy of this base or rename it, use: FILE / SAVE AS.
Bases should be created in a methodical manner: for example, create one base per supplier or one base per type of machine. You
can always merge them later if necessary.
ADDING THE MOULDING DRAWING OR PHOTO.
To add the drawing or photo of your moulding to the parameter window:
- Create your sheet in the base.
- Click on the tab TOOLS/EDIT DESIGN, which opens by default the MS Paint program. The MS Paint drawing tool can be used
to create simple or elaborate drawings. These drawings, in black and white or colour, can be saved as a bitmap file. You can use MS
Paint to display and modify digital photos.
If you want to use BarCod Editor with different picture processing software, proceed as follows:
- Menu PREFERENCES / CHOICE OF GRAPHICS EDITOR: A window opens and asks for the program access path (often in C://
Program files/). Once complete, press OK. From the TOOLS / EDIT DESIGN menu, you can open your program directly from
BarCod Editor.
- Recommended picture format: 100 x 100 pixel in grey shades (approx. 10 kb in BMP - 1 kb in JPG)).
- Save the picture file under the REFERENCE or MODEL name of your sheet, in .BMP or .JPG format (.BMP and .JPG are file
extensions that can be used with MS Paint, in the same way that .DOC is used with Word, for example).
EXAMPLE: You want to add a drawing or photo to reference sheet 220402:
- Click on the tab TOOLS / EDIT DESIGN. MS Paint opens. Select FILE / NEW to produce your drawing or open a digital photo
of your profile via FILE / OPEN. Then save the drawing or photo (in the example 220402.bmp) in the file containing the base
concerned.
- When sheet reference 220402 is opened, the drawing or photo is displayed automatically.
TOOLS menu or
You can use BarCod Editor in
conjunction with your preferred
picture processing program.
Photo or drawing of the profile in
.bmp or .jpg format.
NOTE: For releases earlier than version 2.00, the pictures have to be placed in the execution file of BarCod Editor. For releases later
than 2.00 you can save the picture file under the name of the MODEL-VENDOR. The display of the model-vendor picture, if it exists,
has priority over the moulding reference picture. From V 3.00 onwards, the pictures must always be placed in the same file as the base
concerned.
DESCRIPTION OF FUNCTIONS
EDITING
- New file / Delete file / Copy file
These functions are also available on the toolbar. Sheet modifications are only validated after clicking on the VAL key. Any new sheet or
copied sheet will be added to the end of the base. If a picture (.bmp saved in the directory containing the sheet data base) has the same
name as the reference or model (e.g. "123.bmp") it is displayed on the screen.
- Search for reference / label / part of label
Used to search for the 1st sheet with a reference, label or part of label corresponding to your search criteria. The search begins from the
current position.
- Print
Displays the print window. You can print from several places on the sheet and "sheet by sheet".
You can also print 5 barcodes per sheet (but you will no longer be able to choose the position of the barcodes on the sheet).
DESCRIPTION OF FUNCTIONS
DATA BASE MERGER
- Merge - delete by reference
Used to merge the current base with another base by deleting identical references from the current base if they exist in the base
to be imported. The sheets will be added to the end of the base.
- Merge - delete by reference and vendor
Used to merge the current base with another base by deleting identical references from the current base if the exist in the base
to be imported, but only if the vendor is identical. If the vendor is different, the sheet will be added to the end of the base.
- Merge - delete by label
Used to merge the current base with another base by deleting identical labels from the current base if they exist in the base to
be imported. The sheets will be added to the end of the base.
- Merge - delete by label and vendor
Used to merge the current base with another base by deleting identical labels from the current base if they exist in the base to
be imported, but only if the vendor is identical. If the vendor is different, the sheet will be added to the end of the base.
- Merge without delete by reference or label
Same as merge - delete, but there is a risk of creating doubles. Use the tool: "Preference/search/alarms/search for all
doubles" to check the result.
- Merge - add
Used to merge the current data base with another base by adding the files to the end of the base. No sheet is deleted and
doubles may be produced.
TOOLS
- Display sheet list
Used to display the base as a list of sheets. This provides a very good overview of the base at a given position. By pressing the right
mouse button, a handy pop-up menu is available for basic functions. You can also select a sheet and return to the management screen by
double-clicking on it and then clicking OK.
Sort by: reference / label / machine / moulding width / vendor
Used to reorganise the sheets in the base. You can then display them as a list and check their consistency (doubles for example).
- Execute on the machine the reference number
(With a PC connected directly by cable to the machine, no need to scan).
With the cable connection you can execute the current sheet reference on the machine. The machine will behave exactly as if it has just
received the barcode of the reference and will execute the corresponding item, if it exists (only 3099, 4095 and Quick Smart Stop). The
sheet must exist in the machine memory for this to operate.
- Execute on the machine the parameters
(With a PC connected directly by cable to the machine, no need to scan).
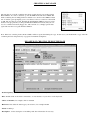
Advanced settings can be used to resolve certain
problems concerning print quality and/or scanner
resolution. Only modify these parameters if it is
difficult to recognise the barcode.
BC Reference
BC Parameters
Label
barcode print-out with photo
Vendor
(example sheet - Ref 2204022)
Profile picture
With the cable connection you can execute the current sheet parameters on the machine. The machine will behave exactly as if it has just
received the barcode of the parameters and will execute them. The machine memory is not used as the barcode contains the execution
parameters.
- Generate export file
Used to compile a base which can then be loaded on a machine (only 3099, 4095 and Quick Smart Stop). Once compiled the export file
will be stored on the hard disc. This file has the same format as the file used in Trans_XX or Unistrans_XX (.sav).
- Download export file: Used to download the export file (.sav) to the PLC.
- Upload export file: Used to retrieve an export file (.sav) from the PLC.
- IMPORT BASE V1, V2 : Used to import data bases created with older versions of BarCod Editor.
- IMPORT BASE .sav of 3099 / 4095: Used to convert the export files (.sav) retrieved by the function above.
- Vendor file
Opens the text editor on the vendor file. Make the necessary changes then save your vendor file. Click on "OK" to activate your changes.
- Edit design
Opens MS Paint* on a moulding picture file (.bmp or .jpg). Make the necessary changes, save your moulding picture, then close MS
Paint*. A moulding picture appears when the picture name corresponds to the reference or model name (e.g. "123.bmp"). The MS Paint*
program must be installed in Windows for this to operate!
(* MS Paint or other picture processing program used with BarCod Editor).
HELP
- Help: Displays this help file
- Calculator: Runs the Windows calculator
- About... : Summary of software version and date
- System Info: Summary of computer memory capability
- User level: Used to protect the software for the final user. By entering the user password, the file can be protected against any changes.
The user can only OPEN, PRINT, EXECUTE. To reactivate the save and edit functions, enter the administrator password.
- Dongle (on printer port): Dongle management utilities. In Demo mode (without dongle), the machine and printer accesses are
deactivated.
PROBLEMES POSSIBLES.
POSSIBLE PROBLEMS
1) The colours used by BARCOD EDITOR are the standard WINDOWS colours.
If you have changed the colours of WINDOWS Office, the program window may be rather unpleasant to look at.
2) Performance depends to some extent on the size of the database to be processed.
This is why we recommend that you CREATE A DIFFERENT DATABASE for a different type of machine - or a different database
per moulding series or per year. The program has been tested with 1000 articles without problems. It has merely been found that the
system slows down during sorting operations if the database becomes very big.
3) The communication port (COM1,COM2,COM3,COM4) for connection to the machine must be available.
This port must physically exist and not already be in use (for the mouse, a printer or a modem, for example) when BARCOD is
running and it must have been recognised by WINDOWS. To check, consult:
"CONTROL PANEL -> SYSTEM -> DEVICE MANAGER -> PORTS"
COM1 is usually standard on all PCs but on old computers it may be used for the mouse. On more recent systems, the mouse has
moved to socket PS2. Laptops usually have only one COM port.
4) The software declared in PREFERENCES / GRAPHICS EDITOR CHOICE must be installed before the .bmp or .jpg picture
display functions can be used.
5) The Windows NOTEPAD software must be installed to be able to use the Edit functions of the vendor file.
6) The protection key is only recognised if the driver (HASP) is installed. For installation you must have Administrator rights.
(WINNT, WIN2000, WINXP)
SUPPORT
DEMO version : http://www.cassese.com .....BarCod Editor (form)
Full version : As above (form) + Telephone + Fax


![どじょっこネット設定マニュアル パソコンの設定方法 [PDF: 2.7MB]](http://vs1.manualzilla.com/store/data/006638233_3-d78194dd865a777efbfe22d6780c555f-150x150.png)