1
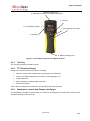
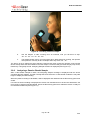
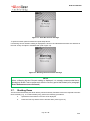
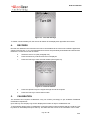
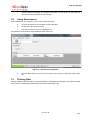
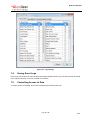
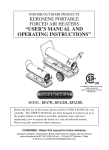
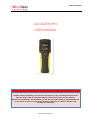
HH3 User Manual ALCOLIZER HH3 USER MANUAL Disclaimer – External documents Note to Reader The BAC reading obtained by correct use of this device is only considered accurate at the time of testing. Great care has been taken to ensure the accuracy of each reading. Neither the manufacturer, the distributor, nor the owner accepts liability or responsibility due to any action or claim arising from the reading produced by this device, whether used correctly or incorrectly. © Alcolizer Technology 2015 HH3 User Manual TABLE OF CONTENTS 1. INTRODUCTION ............................................................................................................. 4 2. DESCRIPTION OF HH3 .................................................................................................. 4 2.1. Equipment Overview .............................................................................................. 4 2.2. Device Overview..................................................................................................... 4 3. OPERATING INSTRUCTIONS ........................................................................................ 6 3.1. General Information ................................................................................................ 6 3.2. Testing Types ......................................................................................................... 7 3.3. Mouthpieces ........................................................................................................... 7 3.4. Charging the Battery............................................................................................... 7 3.5. Turning On Device.................................................................................................. 8 3.6. Testing ................................................................................................................... 9 3.7. Shutting Down ...................................................................................................... 15 4. RECORDS .................................................................................................................... 16 5. CALIBRATION .............................................................................................................. 16 6. SPECIFICATIONS......................................................................................................... 17 7. ALCOCONNECT ........................................................................................................... 17 7.1. Installing Alcoconnect Software ............................................................................ 17 7.2. Using Alcoconnect ................................................................................................ 18 7.3. Filtering Data ........................................................................................................ 18 7.4. Saving Event Logs................................................................................................ 19 7.5. Controlling Access to Data ................................................................................... 19 LIST OF FIGURES Figure 1 - User Display, Buttons and Adapter Sockets .............................................................5 Figure 2 - Mouthpiece locator and Sample inlet spigot .............................................................6 Figure 3 - Mouthpiece Types....................................................................................................7 Figure 4 - Battery Condition Indicator .......................................................................................8 Figure 5 - Start Display Information ..........................................................................................8 Figure 6 - Start Mouthpiece Test message...............................................................................8 Figure 7 - Locating the Mouthpiece ..........................................................................................9 Figure 8 - Mouthpiece correctly positioned ...............................................................................9 Figure 9 - Blow is displayed when device is ready ................................................................. 10 Figure 10 - Providing a Mouthpiece sample ........................................................................... 11 Figure 11 - Sample Progress Bar ........................................................................................... 11 Figure 12 - Invalid Sample Try Again message ...................................................................... 12 Figure 13 - Analysing Sample message ................................................................................. 12 Figure 14 - BAC Displayed: Zero and 0.065 g/210L ............................................................... 12 Figure 15 - Start Passive Test message................................................................................. 13 Figure 16 - Providing a Passive sample ................................................................................. 14 Page 2 of 20 V2.2 HH3 User Manual Figure 17 - Pass No Alcohol message ................................................................................... 15 Figure 18 - Warning Alcohol Present message ...................................................................... 15 Figure 19 - Turn Off message ................................................................................................ 16 Figure 20 - Records module ................................................................................................... 16 Figure 21 - Read Event Log Window...................................................................................... 18 Figure 22 - Log settings ......................................................................................................... 19 Figure 23 - Event log .............................................................................................................. 20 LIST OF TABLES Table 1 - Alcolizer Technology HH3 Specifications ................................................................ 17 REFERENCE DOCUMENTS Doc Number Document Title CHANGE STATUS Issue Number Reason for Issue Date Authority 1.0 Initial Issue 1 Jun 2014 General Manager 1.1 New Template Nov 2015 General Manager 2.1 Updated front matter and minor corrections 17 Dec 14 General Manager 2.2 Revised Template 2 Mar 2015 General Manager Page 3 of 20 V2.2 HH3 User Manual 1. INTRODUCTION This User Manual details the operation of the Alcolizer HH3 alcohol breath testing device and Alcoconnect software for managing and analysing breath test results. This User Manual is divided into various Sections and Sub-sections to enable the user to access the required information with ease. It includes Cautions and Notes applicable to the HH3 device and a Specifications table. 2. DESCRIPTION OF HH3 2.1. Equipment Overview The HH3 Equipment List includes the following items: HH3 handheld device, USB cable, Battery Charger, User Manual and Alcoconnect CD, Carry bag or metal case (optional), and Neoprene cover (optional). 2.2. Device Overview The HH3 is a handheld device consisting of a hard plastic outer case, rubberised hand grip, wrist strap and the following user displays, buttons and adaptor sockets (refer Figure 1): a. Test Key, b. TFT Graphics Display, c. Mouthpiece Locator and Sample Inlet Spigot, d. Up and Down Arrow Keys, e. USB Port, and f. Battery Charging Port. Page 4 of 20 V2.2 HH3 User Manual Battery Port Spigot 3. Mouthpiece Locator andCharging Sample Inlet Test Key ( 1. Test Key 2. TFT Graphics Display 4. Up and Down Arrow Keys 5. USB Port 6. Battery Charging Port Figure 1 - User Display, Buttons and Adapter Sockets 2.2.1. Test Key The Test Key activates selected functions. 2.2.2. TFT Graphics Display Displays the various functions of the device including: Welcome screen which includes days remaining till next calibration; Various Test modes (Mouthpiece or Passive, refer paragraph 3.2); Ready notification; Blow notification including progress bar; and Records information. These and other displays are explained in the Operating Instructions Section. 2.2.3. Mouthpiece Locator and Sample Inlet Spigot The disposable mouthpiece (sample tube) is located on the Mouthpiece Locator which surrounds the Sample Inlet Spigot (refer Figure 2). Page 5 of 20 V2.2 HH3 User Manual Mouthpiece Locator Sample Inlet Spigot Figure 2 - Mouthpiece locator and Sample inlet spigot 2.2.4. Up and Down Arrow Keys The Up and Down Arrow keys allow access to various sub menus. Operation of the Down arrow also facilitates access to the off function (refer to the Operating Instructions Section). 2.2.5. USB Port The USB Port facilitates the connection of the device to a USB equipped computer using the USB cable included with the device. Refer to Section 7 for instructions on using the Alcoconnect toolbox. 2.2.6. Battery Charger Port The Battery Charging Port is located beneath a moisture proof cap under the wrist strap bracket and facilitates connection to the battery charger included with the device. 3. OPERATING INSTRUCTIONS CAUTION While the HH3 is a robust device, it does contain sensitive instrumentation and should not be subject to rough handling or become submerged in water. Do not store device in direct sunlight or places where extreme temperature conditions can occur. 3.1. General Information The following information should be observed when conducting breath test analysis using this device: To obtain an accurate reading, alcohol should not be consumed, or mouthwash containing alcohol used for at least 15 minutes prior to using this device. Blood Alcohol Concentration (BAC) readings can continue to rise or fluctuate for up to two hours after alcohol was last consumed. Should the BAC readings be near or over the local threshold, drinking should cease, then a re-test conducted after 15 minutes. Driving or operating machinery should not occur until a new test shows a decline in BAC reading and the BAC reading is below the local legislation legal limit. It can take up to one hour for the average person’s system to absorb a 0.01ml BAC before the level returns to zero. In such circumstances further testing later in the day or the following morning is strongly recommended. Page 6 of 20 V2.2 HH3 User Manual 3.2. Testing Types The HH3 can perform both Mouthpiece and Passive BAC testing. Mouthpiece testing provides a BAC reading in g/100ml and Passive testing will display the presence of alcohol in breath. Following a Passive test that indicates the presence of alcohol, a Mouthpiece test should then be performed if an accurate BAC is required. 3.3. Mouthpieces There are two types of Mouthpieces available for use on the HH3 (refer Figure 3). These are the: • Spit Trap Non Return Valve Mouthpiece, and • Standard Spigot Locator Mouthpiece. Ribbed end Spit Trap Non Return Valve Mouthpiece Mouthpiece Sample Inlet Port Standard Spigot Locator Mouthpiece Non ribbed end Figure 3 - Mouthpiece Types 3.4. Charging the Battery Prior to initial use, the HH3 battery should be fully charged. The battery charge cycle may take up to two hours. CAUTION The battery in the HH3 device is a Li-ION battery. As such it should not be tampered with in anyway. Should any problems occur that are related to the battery, contact your local Alcolizer representative for advice (1300 789 908). Only use the battery charger supplied with the Alcolizer supplied kit. Use of non Alcolizer battery charges could damage the device and render it inoperative. Charge the battery as follows: a. Connect the charger DC socket to the HH3 battery charger port (refer Figure 1). b. Connect the AC plug to a suitable power supply and switch on power. The device will automatically start and Charging will be displayed. Testing is not available during charging. When the battery is fully charged, the battery condition indicator on the TFT Graphics Display will display five bars (refer Figure 4). Page 7 of 20 V2.2 HH3 User Manual Figure 4 - Battery Condition Indicator Recharge the battery when the battery condition indicator shows one bar to ensure testing will not be interrupted by a flat battery. The device cannot be used for testing during charging but can be used for accessing Records (refer Section 4). 3.5. Turning On Device Turn the device on by depressing either the Test key or Up/down buttons. A company logo screen will appear for a period of five seconds prior to the test screen displaying. The logo screen can be terminated sooner by pressing either the Test key or Up/down buttons a second time. The device serial number, date, time and days remaining till next calibration will be displayed (refer Figure 5). Figure 5 - Start Display Information NOTE To view the start screen for longer, hold the Test key down continuously. After about six seconds, the Display will show Start Mouthpiece Test and a down arrow (refer Figure 6). Figure 6 - Start Mouthpiece Test message Page 8 of 20 V2.2 HH3 User Manual 3.6. Testing 3.6.1. Mouthpiece Testing CAUTION To maintain a healthy sampling environment, the following procedures must be strictly adhered to. Attach the mouthpiece to the device as follows: a. Grasp the mouthpiece at the non-ribbed end and tear the plastic wrapping from the ribbed end, downwards to expose the sample inlet hole. b. Locate the mouthpiece sample inlet port over the mouthpiece locator in line with the recesses that surround the spigot (refer Figure 7). c. Press the mouthpiece sample inlet port onto the locator until it is attached securely (refer Figure 8). The orientation of the mouthpiece will not affect the sampling. d. Remove the remaining portion of the plastic wrap just prior to testing to ensure hygienic use. Figure 7 - Locating the Mouthpiece Figure 8 - Mouthpiece correctly positioned Page 9 of 20 V2.2 HH3 User Manual 3.6.2. Taking a Mouthpiece Breath Sample NOTE Before taking a breath sample, ensure the subject has not consumed alcohol for at least 15 minutes. If any step in a breath test sequence is not completed or the device is left idle for a prolonged period of time, then the device will terminate the breath test and display Test timed out. The device will return to the Start Mouthpiece Test display The standard breath test time out period is 60 seconds. If a test time out does occur during a breath test, a new breath test must be performed. Perform a Mouthpiece Test as follows: a. Press the Test key. The device will perform a self-test and Please wait... and a progress bar will be displayed. NOTE If the self-check is unsuccessful an error code will be displayed and the device will not accept a breath sample. b. Blow will be displayed when the device is ready (refer Figure 9). Figure 9 - Blow is displayed when device is ready c. Take a deep breath; place mouth over mouthpiece inlet (ribbed end) and blow a gentle to medium breath sample into the mouth piece (refer Figure 10). Page 10 of 20 V2.2 HH3 User Manual Figure 10 - Providing a Mouthpiece sample The exhaled breath volume is indicated via a bar graph, scrolling left to right at the bottom of the screen. A beeping sound is also heard during the breath sample delivery phase, indicating a satisfactory breath sample is being delivered (refer Figure 11). Figure 11 - Sample Progress Bar d. Continue blowing until the device takes a sample of the exhaled breath volume, indicated by a click and long beep sound. The frequency of the sound beeps increases with the intensity of the blow pressure. Blowing too hard or too soft will result in Invalid Sample Try Again being displayed (refer Figure 12). Page 11 of 20 V2.2 HH3 User Manual Invalid Sample Try Again Figure 12 - Invalid Sample Try Again message 3.6.3. Analysing a Mouthpiece Breath Sample After a valid breath sample is taken, the Analysing Sample message is displayed until the device calculates the BAC reading. This will normally take a few seconds. In cold climate conditions it may take longer to display the BAC reading (refer Figure 13). Analysing Sample... Figure 13 - Analysing Sample message When the BAC reading is calculated, it will be displayed on the screen together with unit of measurement (eg: g/100mL, g/210L) and be retained until the Recovering period has ended. This is indicated by Recovering shown on the display (refer Figure 14). .065 g/210L Recovering... Figure 14 - BAC Displayed: Zero and 0.065 g/210L Page 12 of 20 V2.2 HH3 User Manual The Recovering period is the time the fuel cell sensor requires to recover from the previous breath test. This period will vary according to BAC readings displayed. To perform another breath test repeat steps above. 3.6.4. Passive Testing Passive testing is a test that is performed in a non-invasive manner and without using mouthpieces. The test is performed by holding the device approximately 80mm to 100mm in front of the test subject’s mouth and asking them to count or talk so that exhaled breath may be picked up by the device and analysed for the presence of any alcohol. 3.6.5. Taking a Passive Breath Sample NOTE If any step in a breath test sequence is not completed or the device is left idle for a prolonged period of time, then the device will terminate the breath test and display Test timed out. The device will return to the Start, passive Test display. The standard breath test time out period is 60 seconds. If a test time out does occur during a breath test, a new breath test must be performed. Press the Test key to perform a new passive breath test as per steps above Perform a Passive Test as follows: a. On the Start Mouthpiece Test page, press the down arrow key to access the Passive Test function and Start Passive Test is displayed (refer Figure 15). Figure 15 - Start Passive Test message b. Press the Test button. c. Hold the device no further than 100mm in front of the test subject’s mouth; so that the subject is breathing or talking directly into the device’s sample inlet port (refer Figure 16). Page 13 of 20 V2.2 HH3 User Manual Figure 16 - Providing a Passive sample d. Ask the Subject to start counting from 20 onwards, until you tell them to stop. “20…21…22…23…24…25…etc.” e. The subject should count in a one second rhythm. While subject is counting, the operator must press the Test key to take a sample when they reach “24…25.” The device is set to take three pump samples. During these three pumps the operator must hold the device steady and at the same distance from the subject. The device will give three sample pump clicks, followed by a long beep sound. Analysing Sample will then be displayed (refer Figure 13). 3.6.6. Analysing a Passive Breath Sample After a valid breath sample is taken, the Analysing Sample message is displayed until the device calculates the BAC reading. This will normally take a few seconds. In cold climate conditions it may take longer to display the BAC reading. When the passive reading is calculated, it will be displayed and retained until the Recovering period has ended. If a Pass No alcohol reading is displayed the device has indicated that no alcohol was detected in the near vicinity of subject’s exhaled breath. When the Recovering period has ended the device is ready for next Passive breath test (refer Figure 17). Page 14 of 20 V2.2 HH3 User Manual Figure 17 - Pass No Alcohol message To perform another passive breath test repeat steps above. If a Warning Alcohol Present reading is displayed the device has indicated that alcohol was detected in the near vicinity of subject’s exhaled breath (refer Figure 18). Figure 18 - Warning Alcohol Present message NOTE When a Warning Alcohol Present reading is displayed, it is strongly recommended that a Mouthpiece Breath Test be performed, after the recovery period has ended (refer paragraph Error! Reference source not found.). 3.7. Shutting Down The HH3 will automatically shut down after a period of inactivity. Should the device be required to be shut down manually (e.g., to conserve battery life), perform the following procedures: a. Operate the Down button until Turn Off is displayed b. Press the Test key and the device will shut down (refer Figure 19). Page 15 of 20 V2.2 HH3 User Manual Figure 19 - Turn Off message To further conserve battery life, the device will switch off the display back light after two minutes. 4. RECORDS Records are retained in the instrument and can be downloaded via the Alcoconnect software application support (refer Section 7). It is recommended that records are periodically downloaded and erased from the device. Access the records as follows: a. Switch the device on (refer paragraph 3.5). b. Press the Down key until Records menu is displayed. c. Press the Test key to enter records module (refer Figure 20). Figure 20 - Records module 5. d. Press the Up/down keys to navigate through records as required. e. Press the Test key to exit records module. CALIBRATION The Alcolizer HH3 requires re-calibration every six months (190 days) as per Australian Standards Certification requirement. Upon start up, the company logo screen displays the number of days to recalibration due. To permanently display days to recalibration, instrument serial number and date and time, hold the Test key down for extended period upon start up. This will freeze the screen so the information can be read. Page 16 of 20 V2.2 HH3 User Manual When re-calibration warning message period has expired, the Recalibration Due Now is displayed and the device is locked, preventing any further breath tests until the device is recalibrated. It is recommended that the device be returned to Alcolizer Technology for calibration prior to the number of days to recalibration warning message expiring. This will avoid the inability and inconvenience of not being able to perform further breath testing when required. Contact Alcolizer Technology by any of the following means: Phone: 1300 789 908; Email: [email protected]; or Web: www.alcolizer.com 6. SPECIFICATIONS The technical specifications of the HH3 are detailed in Table 1. Table 1 - Alcolizer Technology HH3 Specifications Industry – Mouthpiece and Passive Instrument Application BAC Range 0.000 - 0.500 g/100ml Accuracy Better than 0.005 at 0.100 BAC g/100ml Test Time Within 3-5 seconds at 0.100% BAC Recovery Time Instantaneous for 0.0000 BAC readings (reading remains on screen for 5 seconds) Mouthpiece Type Standard spigot locator or non-return mouthpiece. (Mouthpieces are not required for Passive testing) Sensor Type Electro-chemical fuel cell (premium grade platinum) Power Supply Rechargeable Li-ION battery Weight 272 grams (basic) Dimensions 202mm H x 63mm W x 39mm D Calibration Six monthly recalibration at Alcolizer’s service facility 7. ALCOCONNECT Alcoconnect assist in the analysis of data downloaded from the HH3 device. The Alcoconnect software can be loaded from the supplied CD onto a compatible computer running MS Windows® XP, Vista, Win 7 or Win 8. 7.1. Installing Alcoconnect Software To install the Alcoconnect software, proceed as follows: a. Load the Alcoconnect CD into the DVD drive of the computer. The Auto play window will be displayed. b. Go to Alcoconnect folder 1.01 and run setup.exe and follow the on screen prompts. Page 17 of 20 V2.2 HH3 User Manual c. 7.2. Unless otherwise specified, the software will reside on the device ‘C’ drive and an Alcoconnect icon will appear on the Desktop. Using Alcoconnect Once installed onto the computer, access Alcoconnect as follows: a. Connect the device to the computer via the USB cable. b. Double click the Alcoconnect icon. c. Turn the HH3 device on (refer paragraph 3.5). The Read Event Log window will be displayed (refer Figure 21). Figure 21 - Read Event Log Window d. 7.3. Click the Read Event Log icon and The Event Log will then be displayed (refer Figure 23). Filtering Data Filtering of data can be achieved by clicking File/Options. Log Settings are displayed. The required criteria can be made by enabling/dis-enabling the record types (refer Figure 22). Page 18 of 20 V2.2 HH3 User Manual Figure 22 - Log settings 7.4. Saving Event Logs Event Logs can be saved for future analysis by clicking File/Save Event Log. The data can then be saved to the required location on the PC or tablet as a CSV file. 7.5. Controlling Access to Data To control access to the data, files must be saved and protected by the user. Page 19 of 20 V2.2 HH3 User Manual Figure 23 - Event log Page 20 of 20 V2.2