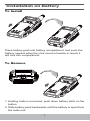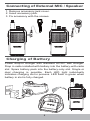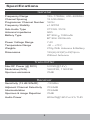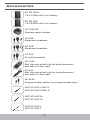
1
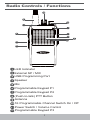
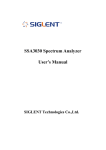
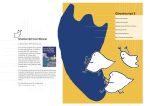
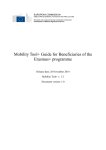
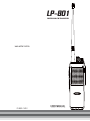
LP-801
PROFESSIONAL FM TRANSCEIVER
www.wintec.com.tw
USER MANUAL
PK EQ05-1 VER.1
Thank you for purchasing LP-801 two-way radio
manufactured by Wintec Co., Ltd. Based on the
ever-changing innovative technology, we have been able to
develop many different wireless products that have gained
widely consumers' affection. We even wish you to be
attentive to new product information. Please read through
the manual carefully to understand the features of this
model.
Features
‧ High quality sound
‧ Wide frequency coverage
‧ 16 programmable channels
‧ 3 programmable function keys
‧ Independent settings on TX/RX frequencies CTCSS / DCS
‧ Power settings (5W/1W)
‧ Low battery alert
‧ Muti scan mode
‧ VOX 9 levels set
‧ TOT/APO/BCLO
‧ 2-tone, 5-tone
‧ Scrambler
‧ PC programming
Recycle Marking
Safety Warning
Consumers need to have clear understanding of safety use
of this product.
Turn off power before fueling or parking at the gas station.
Safety Information
1. Self-replacing or re-structuring of any parts by is legally
not permitted or will lose license.
2. Use is prohibited at restricted environment declared by
authority, during flight, highly-explosive area like near
mining areas.
3. Avoid storing in high temperature or humid place for long
time.
4. Turn to lowest volume if external Mic/Speaker is used,
then adjust appropriately.
5. If strange smell or smoke comes off from radio, dispatch
to service center immediately.
6. Never use other power sources for charging other than
the standard charger set designed for this radio model.
7. Take off battery pack if out of use for long Time.
Low Battery Notice
1. When battery is low, you will hear a beep sound for
every transmission to remind user battery is low. At main
time, power output will automatically change to L level
automatically.
2. When battery is extremely low, you will hear twice beep
sounds for every transmission. At main time, power
output will automatically change to Level automatically.
3. When battery is used up, radio will automatically turn
OFF.
Contents
Radio Controls / Functions..................................................1
Operation Guide..................................................................2
Programmable Functions................................................... 4
Installation of Battery...........................................................7
Connecting of External MIC / Speaker................................8
Charging of Battery.............................................................8
Specifications......................................................................9
Accessories.......................................................................10
Radio Controls / Functions
10
9
11
12
1
8
2
3
4
5
7
6
LED Indicator
External SP / MIC
USB Programming Port
Speaker
Mic
Programmable Keypad P1
Programmable Keypad P2
(Push-to-talk) PTT Button
Antenna
16 Programmable Channel Switch On / Off
12
Power Switch / Volume Control
Programmable Keypad P3
1
Operation Guide
Power On / Off
1. Rotate the Power switch / volume control knob clockwise
to switch power ON. When the click sound of switch and
the melody is heard, the transceiver is powered.
2. Rotate the Power switch / Volume control knob
counterclockwise to switch power OFF. When the click
sound of switch is heard, transceiver's power is turned
off.
Receiving / Transmitting
1. Rotate the channel control knob to the desired channel,
press and hold PTT button. The LED lamp turns red
during transmission. Talk to the speaker microphone
from a distance of 5 cm and speak in general volume.
2. Release PTT button for the transceiver for receiving.
During receiving, LED light turns on green. And you can
hear the sound from the transmission unit.
Adjusting Volume
1. For the adjustment of volume, rotate the Power /Volume
control knob in clockwise direction to increase volume.
Rotate Power/Volume knob counterwise to decreases
volume.
2. Rotate the Power switch/Volume knob slowly to avoid
outburst of sound harmful to ears. Too low volume might
miss users' attention. Adjust volume to an appropriate
level.
Attention: adjust volume in low before connecting to the
earphone headset.
Assignment of Channels
This function can only be programmed by the dealers.
There are channels 1 ~ 16 selectable by channel control
knob. All such 16 channels are dealer-programmable for
authorized use by consumers. In other words, if consumer
tries to adjust to any unauthorized channel, speaker sounds
beeps and LED lamp turn on orange.
2
Priority Channel Scanning
This dealer-programmable function can be activated
by the dealers by selecting PRI CH.
During programming, assign a channel as "PRI.CH".
Transceiver will scan this channel in priority with others
interchangeably.
Ex: If channel 3 is assigned to be "PRI.CH", scan sequence
will be CH1, CH3(P), CH2, CH3(P), CH3, CH3(P), CH4,
CH3(P), …….. The scanning will continue until channel knob
is rotated (or) scan button is hold on. During scanning, if
busy channel is found, transceiver stops scanning to allow
radio-communication. It will continue scanning after 3
seconds from the end of reception or transmission.
If scanned-out channel is not priority channel, the transceiver
will leave it to priority channel for 3 seconds to channel the
signal and will stay standby on priority channel to check if
there is signal coming in. It will change to back to receiving
channel after 3 seconds from the end of reception or
radio-communication on priority channel. While there is no
signal and if PTT is pushed, transmission is done from
priority channel.
Low Battery Warning
1. There are speech sounds to remind you when battery is
low in English (Battery Low) or Chinese (請充電). The
battery needs to be charged immediately.
2. When battery is near to exhausted, it will remind you
every one second and the power output will lower. By the
time battery is exhausted, radio will turn off it selves.
Please change new battery or battery needs to be
charged.
3
Programmable Functions
Introduction to programmable functions
(Use WPS-800 software for programming)
Please advice the official dealers to receive an
authorized file to perform the programming
software.
Channel Setting
Programmable
Functions on
16 Channels
Alias
Tx Frequency
Rx Frequency
Tx Tone Type
Rx Tone Type
W/N band
Tx Power
TOT
BCLO
VOX
Scrambler
Compandor
Explanation
It can be programmed and named the
Channel by defining the Name in English or
by numbers.
When General setting to be selected as
Channel Name, you can see the Name
defined on Channels.
The TX step-up freq at 5Khz within frequency
range.
The RX step-up freq at 5Khz within frequency
range.
CTS/DCS ENC is programmable to "OFF"
CTS(1~51+1User )
DCS Normal(83+1User)
DCS Invert(83+1User)
CTS/DCS ENC is programmable to "OFF"
CTS(1~51+1User )
DCS Normal(83+1User)
DCS Invert(83+1User)
RX/TX is selectable to Narrow Band (2.5KHz)
Or Wide Band (5KHz).
TX power is selectable to LOW or HI.
TIME OUT TIMER is selectable to 30, 60, 90,
180, 360 sec.
BCLO is selectable to be OFF / BCL / BTL.
VOX TX is selectable OFF or ENSITIVITY
L0~L9.
Selectable from 0~9, the "0" means to turn off
this function.
Setting compandor "ON" can enhance the
quality of voice in communication.
4
General Setting
General
Programmable
Functions
User Name
SQL
APO
Noise Cancel
Roger Tone
Power Save
Explanation
If the radio is connected to the PC by
WPS-800 (PC software), the user name will
appear on the software.
The setting ranges from L0~L9
(Default at L3)
AUTO POWER OFF (APO) is selectable to be
30, 60, and 120 mins (Default at OFF)
selectable to be
0:Disable / 1: Normal / 2:Strong
selectable to be ON or OFF. If it is ON, it will
send out beep sound when finish the
transmitting. (Default at OFF)
Selectable to be OFF / 1:1 / 1:2 / 1:3 /
1:4(Default at )
Scan Setting
Scanning
Functions
PriCh
Response
Time
Group
Explanation
1. Priority cannel number must be selected
before this function is activated for Priority
Scan and Dual Watch function.
2. When PRI Channel is activated, priority
channel will automatically be scanned on the
channel and transmission is done from it.
There are three kinds of scanning modes BR /
TR / HOLD
BR: The scanning process will pause when
signal comes in and perform scanning again
when signal discontinued.
TR: The scanning process will pause by 3, 5,
10 secs once signal comes in and continue to
perform scanning after time out again even
during the signal is receiving.
HOLD: The scanning process will stop
immediately and skip out when signal comes
in. It needs to be started again for continuing
the scanning.
TR time can be set by 3, 5, and 10 secs.
There are totally 16 groups that can be set by
channels.
5
Programmable Key Setting
Programmable Key P1~P3 functions are operable only by
dealers. It is not intended for use by general consumers.
The the functions for P1~P3 can be defined separately in
long or short press on the buttons.
The Factory Default on programmable keys:
P1 in long press: No use, short press: Noise Cancel
P2 in long press: Monitor, short press: Backlight
P3 in long press: No use, short press: Low and High Power
Switch
The radio will send out "Do Re Mi" melody to remind you that
Noise Cancel is on and send out " Do" melody when the
Noise Cancel is off.
Function button
P1~P3
0. None
1. TA
(Talk Around)
2. Scan
3. Power Switch
4. Noise Cancel
5. Key Lock
6. SendCall
7. Monitor
Explanation
Assign the buttons to be no use.
The setting on transmission channel will
change to the same as the receiving
channel, including the frequency.
Channel Scanning will perform to scan the
Pri channel if it is set in advance. If not, the
radio will perform the general scanning on
channels.
It can temporarily switch to High or Low
power when press this button. The change
on the channel will restore to the factory
setting.
NC function can elevate the quality of voice
in communication.
Press the button once to enable or disable
the keylock. When keylock is enabled, you
are not able to change the channels and
functions.
Long Programmable Keys can set Send
Call tone function.
Press the button longer to send out the call
tone. Release it to stop the transmission.
Long Programmable Keys can set Monitor
function.
Press the button longer to enable the
monitor function, release the button to stop
in monitoring.
6
Installation on Battery
To Install
Place battery pack into battery compartment, and push the
battery upward when the click sound of switch is heard, it
will lock into compartment.
To Remove
1. Holding radio in one hand, push down battery latch on the
button.
2. Slide battery pack backwards until the battery is apart from
the radio unit.
7
Connecting of External MIC / Speaker
1. Remove accessory jack cover.
2. Insert accessory jack.
3. Fix accessory with the screws.
Charging of Battery
Power drop-in charger with standard AC/DC wall charger.
Drop in radio installed with battery into the battery-with-radio
slot. Spare battery pack into the battery-only slot. Single or
dual charging is possible. Each LED light individually
indicates charging slot in process. LED flash in grean when
battery in slot is fully charged.
8
Specifications
General
Frequency Range
Channel Spacing
Programmer Channel Number
Frequency Stability
Sub-Audio Type
Antenna Impedance
Battery Type
Power Voltage Range
Temperature Range
Weights
Dimensions
135~175MHz, 400~480MHz
12.5/25.0KHz
16CH
±1.5PPM
CTCSS / DCS
50Ω
BT 90LI 1350mAh
BT 90LI 2200mAh
7.4V
-30 ~ +70℃
270g With Antenna & Battery
125(H)×53(W)×43(D)mm
Without Antenna
Transmitter
Max RF Power (@ DCV)
Modulation(W/N)
Spurious emissions
5.00W(@7.4V)
16K0F3E, 11K0F3E
70dB
Receiver
-120dBm
70/65dB
70/65dB
70dB
600mW@16Ω For 5% THD
Sensitivity (12 dB SINAD)
Adjacent Channel Selectivity
Intermodulation
Spurious & image Rejection
Audio Power
9
Accessories
BT FR 90LIs
7.4V/1350m AhLi-ion battery
BT FR 90LI
7.4V/2200m AhLi-ion battery
LP-CHG 90
Desktop rapid charger
LP-20A
Earphone headsets
LP-20B
Earphone headsets
LP-20C
Air-tube headsets
LP-10M
Belt clip swivel belt clip for best placement
and take-out the radio
LP-84L
Belt clip swivel belt clip for best placement
and take-out the radio
WI AL20
Programmable cables for programmable type
ANT 80 UHF-LOW S
ANT 80 UHF-HIGH S
ANT 80 UHF M
ANT 80 VHF M
ANT 80 UHF L
ANT 80 VHF L
10