1
mCWEB, an Extension of CWEB for Teams
Markus Öllinger
October 4, 1998
Abstract
This book describes mCWEB—a descendant of the CWEB system of structured documentation by Donald E. Knuth and Silvio Levy—that adds some features that are
indispensable when working in a team. mCWEB regards a project as a book consisting
of several chapter files. By means of import and export commands, it automatically
manages all relationships between the chapters of a book and to other books.
Interface Documentation is now part of the mCWEB file and can be extracted into
a second TEX file. This allows to define well known interfaces between the individual
parts of a project that will be implemented by different persons.
In the first part, this paper also gives a general overview about literate programming and tries to give hints how to write ‘good literate programs’.
Contents
I
Literate Programming
5
1 Overview
1.1 Literate Programming Tools . . . . . . . . . . .
1.2 The CWEB System . . . . . . . . . . . . . . . . .
1.2.1 Introduction . . . . . . . . . . . . . . .
1.2.2 Titles for Sections . . . . . . . . . . . .
1.2.3 Translating a CWEB File . . . . . . . . .
1.2.4 Formatting Issues . . . . . . . . . . . .
1.2.5 Other Commands . . . . . . . . . . . .
1.2.6 The Change File . . . . . . . . . . . . .
1.3 Pros and Cons . . . . . . . . . . . . . . . . . .
1.3.1 What does it cost? . . . . . . . . . . . .
1.3.2 Why it is worth the Trouble . . . . . . .
1.4 A Guide to Literate Programming . . . . . . .
1.4.1 Literate Programming and Design . . .
1.4.2 Determining Section Order . . . . . . .
1.4.3 The Contents of each Section . . . . . .
1.4.4 Naming Conventions . . . . . . . . . . .
1.5 Literate Programming and Reverse Engineering
1.6 Inadequacy of the CWEB System for Teams . . .
2 The
2.1
2.2
2.3
2.4
2.5
2.6
2.7
2.8
.
.
.
.
.
.
.
.
.
.
.
.
.
.
.
.
.
.
.
.
.
.
.
.
.
.
.
.
.
.
.
.
.
.
.
.
.
.
.
.
.
.
.
.
.
.
.
.
.
.
.
.
.
.
.
.
.
.
.
.
.
.
.
.
.
.
.
.
.
.
.
.
.
.
.
.
.
.
.
.
.
.
.
.
.
.
.
.
.
.
.
.
.
.
.
.
.
.
.
.
.
.
.
.
.
.
.
.
.
.
.
.
.
.
.
.
.
.
.
.
.
.
.
.
.
.
.
.
.
.
.
.
.
.
.
.
.
.
.
.
.
.
.
.
.
.
.
.
.
.
.
.
.
.
.
.
.
.
.
.
.
.
.
.
.
.
.
.
.
.
.
.
.
.
.
.
.
.
.
.
.
.
.
.
.
.
.
.
.
.
.
.
.
.
.
.
.
.
7
8
8
9
9
10
10
11
12
13
13
14
16
17
18
18
20
21
21
mCWEB System
The Book Concept . . . . . . . . . . . . . . . . . .
The Chapter Files . . . . . . . . . . . . . . . . . .
Translating a Book . . . . . . . . . . . . . . . . . .
Import and Export . . . . . . . . . . . . . . . . . .
2.4.1 Export Commands . . . . . . . . . . . . . .
2.4.2 Import Commands . . . . . . . . . . . . . .
2.4.3 The Environment Variable DEPDIR . . . . .
2.4.4 The Improved Index . . . . . . . . . . . . .
Dependencies and Makefile . . . . . . . . . . . . .
2.5.1 Using two Makefiles . . . . . . . . . . . . .
Inserting Example Code . . . . . . . . . . . . . . .
Interface Documentation . . . . . . . . . . . . . . .
2.7.1 The Autodoc Command @a . . . . . . . . .
2.7.2 TEX Macros for Autodocs . . . . . . . . . .
2.7.3 Autodoc Style Guide . . . . . . . . . . . . .
2.7.4 Literate Programming and the User Manual
Copy & Paste . . . . . . . . . . . . . . . . . . . . .
.
.
.
.
.
.
.
.
.
.
.
.
.
.
.
.
.
.
.
.
.
.
.
.
.
.
.
.
.
.
.
.
.
.
.
.
.
.
.
.
.
.
.
.
.
.
.
.
.
.
.
.
.
.
.
.
.
.
.
.
.
.
.
.
.
.
.
.
.
.
.
.
.
.
.
.
.
.
.
.
.
.
.
.
.
.
.
.
.
.
.
.
.
.
.
.
.
.
.
.
.
.
.
.
.
.
.
.
.
.
.
.
.
.
.
.
.
.
.
.
.
.
.
.
.
.
.
.
.
.
.
.
.
.
.
.
.
.
.
.
.
.
.
.
.
.
.
.
.
.
.
.
.
.
.
.
.
.
.
.
.
.
.
.
.
.
.
.
.
.
23
23
24
25
25
26
27
28
28
29
30
31
31
32
32
34
35
36
3
.
.
.
.
.
.
.
.
.
.
.
.
.
.
.
.
.
.
4
II
CONTENTS
Implementation
37
3 Common code for mCTANGLE and mCWEAVE
39
4 The mCTANGLE processor
77
5 The mCWEAVE processor
189
III
Appendices
A File Survey
A.1 Input files . . . . . . . . . . . . . . .
A.2 Output Files . . . . . . . . . . . . .
A.2.1 Output files of mCTANGLE . .
A.2.2 mCTANGLE’s Information Files
A.2.3 Output files of mCWEAVE . . .
A.2.4 mCWEAVE’s Intermediate Files
B Summary of all New Commands
380
.
.
.
.
.
.
.
.
.
.
.
.
.
.
.
.
.
.
.
.
.
.
.
.
.
.
.
.
.
.
.
.
.
.
.
.
.
.
.
.
.
.
.
.
.
.
.
.
.
.
.
.
.
.
.
.
.
.
.
.
.
.
.
.
.
.
.
.
.
.
.
.
.
.
.
.
.
.
.
.
.
.
.
.
.
.
.
.
.
.
.
.
.
.
.
.
.
.
.
.
.
.
.
.
.
.
.
.
382
382
382
382
383
383
384
386
Part I
Literate Programming
5
Chapter 1
Overview
The term ‘literate programming’ has been introduced by Donald E. Knuth in [8].
Knuth thought programs should best be seen as works of literature that are meant
to be read by human beings. The main difference to conventional methods is that
a programmer is supposed to write the program as if he or she wants to present it
to another programmer, which means that one should present the program in any
order which is suitable to understand it easily.
Knuth has created two preprocessor tools which make it possible to combine documentation and code in one document, the WEB system of structured documentation
[7]. It has been used to write programs of any size, from rather small examples [2, 3]
to rather large ones like TEX [9] and METAFONT [10].
In a WEB program, code is divided into manageable sections which can be
arranged in any order. This makes it possible to present a program so that it
is easier to understand for human beings and not in the order the compiler expects
to see it, since there is no reason to explain programs to compilers: they simply
do not care anyway. Some sections may have a name which means that they can
be inserted in completely different places of the source program thus making code
rearrangement possible.
4.
h Set initial values 4 i=
x := 1;
y := 2;
means that the given chunk of code can be used in the program under the name
h Set initial values i and that it is first defined in section 4. If one defines another
section with the same name, the code is accumulated. So, if one writes (maybe
much later in the program):
15. h Set initial values 4 i+=
z := 1;
it will simply be appended to the code defined above. In this particular case, this
means that one can insert our named section in a place where all initialisation
should be done and then define the different parts of initialisation wherever one
wants. This makes it easy to define and initialize a variable where it is first used
and not at the very beginning of the program where the compiler requires it to be.
The general outline of a section is
1. Description as an ordinary TEX text.
2. Macro definitions and formatting hints.
3. Code part of the section.
7
8
CHAPTER 1. OVERVIEW
where each of these parts may be missing. Sections get numbers starting with one,
so that they can be referenced.
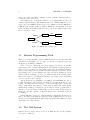
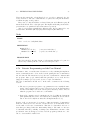
The translation process from the combined code/document WEB source file to an
ordinary computer language (like PASCAL in the case of Knuth’s WEB) is done by a
preprocessor called TANGLE. Another preprocessor, WEAVE converts the WEB file into
a TEX file that can subsequently be printed. WEAVE also automatically creates an
index containing all identifiers with references to the section numbers where they
have been defined or used.
CWEAVE
foo.tex
TEX
foo.dvi
foo.w
CTANGLE
foo.c
cc
foo
Figure 1.1: WEB file as a common source
1.1
Literate Programming Tools
Many people found that WEB could not fulfill all their needs and they built their
own literate programming tools. A couple of tools have been largely accepted by
the literate programming community.
These tools can be divided into two parts: language dependent tools and language independent tools with each having their own advantages. Language independent tools are not restricted to any formatter and can be used with any language,
but they cannot support the programmer as much as language dependent tools can.
They usually don’t do pretty-printing since they don’t know anything about the
syntax of their host language. Some people think that this is an advantage rather
than an inconvenience, especially if the language dependent tool’s pretty-printing
does not conform to their own style.
Among the literate programming tools, FWEB [1] and FunnelWEB [18], and especially the language independent tools noweb [15] and nuweb [4] have become
popular. The latter have the advantage of being very simple (where noweb uses
awk (or icon) scripts and is therefore a little bit more UNIX related than nuweb).
nuweb has the advantage of having its options embedded in the program itself, so
that there are not that many command line options necessary. noweb passes the
input source through a pipeline of filters allowing for user customisation without
recompiling.
Knuth’s WEB has been ported to different languages and further extensions were
made to the syntax of the language. Only the C version CWEB [13] has become more
widespread and is still maintained. Marc van Leeuwen has build a CWEB clone called
cwebx with some enhancements.
1.2
The CWEB System
In this section, we want to take a closer look at CWEB. For more detailed explanations, please consult [13].
1.2. THE CWEB SYSTEM
1.2.1
9
Introduction
We have already seen, that web programs consist of small sections that contain
a TEX part describing what’s going on in this section, a macro part with macro
definitions and a C part containing one piece of code of the whole program. Each
of these parts may be empty, but if present, they must appear in that order.
@ÃWe will define a data structure called |pair| that can
contain two integer values |x| and |y|. We will store our
coordinates in |pair| variables.
@d dist(x,y) sqrt(x*x+y*y)
@c
struct pair {
int x,y;
};
As one can see, sections are introduced by @Ã or an @ sign immediately followed by a
newline. @d defines constants and macros just like #define does except that these
constants are also known in the preceding sections and not only in the following
ones. The command @c introduces the C part of the section. In the above example,
we define a data structure.
As already mentioned, the C part of a section can be given a name, thus making
it possible to insert it somewhere else in the program. If one wants to name the C
section, one must use @<...@>= instead of @c.
@
@c
@<Types@>;
@<Global Variables@>;
...
@*Transformations.
We will define a global transformation matrix
|transformation_matrix| that is applied to all points
to map them on the screen.
@<Global Variables>=
struct matrix transformation_matrix;
@ We have to keep track where the pen currently is, so we store
its current position in |pen|.
@<Glob...@>+=
struct pair pen;
The first section defined here is a @c section, which means it will be written to
the resulting C file. This section contains two named sections, ‘Types’ and ‘Global
Variables’ that are defined elsewhere in the program.
The following section defines the ‘Global Variables’ section. In the last section,
we have the section name Glob... which is simply an abbreviation for Global
Variables. CTANGLE merges all named sections with the same name together, so
the code defined there will be appended to the named section Global Variables.
1.2.2
Titles for Sections
In the above example, we have seen another kind of section, a starred section @*.
Starred sections are like ordinary @Ã sections but the * is followed by an optional
level number and a name terminated by a period.
One can see the web sections like paragraphs in a book. Like each paragraph
explains something to the reader and one starts a new paragraph each time one
10
CHAPTER 1. OVERVIEW
introduces something new, each section has one clear topic. In traditional books,
paragraphs are grouped into chapters. In CWEB, a section can be starred. Starred
sections have a name that represents a kind of title for all following sections.
This makes it possible to say: everything that follows now is dealing with transformations.
@*Transformations.
Let’s have a look at the routines that perform transformations.
There are three different kinds of transformations:
Translation, Rotation and Scaling.
@*1Translation.
h sections dealing with translation i
...
@*1Rotation.
...
@*1Scaling.
Like a book has a table of contents with all its chapters, CWEAVE makes a table of
contents containing all starred sections. As indicated above, starred sections may
have a level. This is like having chapters that contain sections which in turn consist
of subsections and so on.
The lower the level, the bigger is the title. The default level is zero. The highest
level is @** which corresponds to level −1.
1.2.3
Translating a CWEB File
The CTANGLE preprocessor converts a CWEB file into an ordinary C file that can
be passed on to the compiler. The C file will contain #line instructions so that
debugging can be performed on CWEB level.
CTANGLE rearranges the sections by collecting all named sections and then inserting them at the right places into the program. In addition, CTANGLE moves all
macro definitions to the very beginning of the program or to the place where the
@h command was given.
CWEAVE, on the other hand, takes the CWEB file and converts it into a TEX file
ready to be typeset by TEX. CWEAVE does not only pretty-print the code, it also
automatically creates an index containing all identifiers defined in the source file
with references to the various section numbers, as well as a list of all named sections
and a table of contents containing all starred sections.
1.2.4
Formatting Issues
First of all, one has to understand that C code is different from TEX text. TEX
text follows TEX rules, which means that some special symbols like ’_’ have to be
protected by a backslash. C text is pretty-printed by CWEAVE and converted into
TEX text, so here, this conversion is done automatically.
If one wants to refer to variable and function names in TEX text, one has to
enclose them in |...| to inform CWEAVE that everything in between has to be
formatted in C code style. The opening ’|’ and the closing ’|’ have to be on the
same line.
On the other hand, ordinary C comments in the code part of the section will be
regarded as TEX text. Likewise, the name of a named section is also TEX text.
Every CWEB program includes a macro package called cwebmac.tex, that contains a bunch of TEX macros to typeset the code. Most of these macros are of no
use to the programmer, they are simply used by CWEAVE.
1.2. THE CWEB SYSTEM
11
There is one possibility of changing the appearance of special identifiers. This
has to be done in the macro part of a section by @f identifier like-identifier. This
causes CWEAVE to treat the given identifier like like-identifier, thereby making it
possible to introduce new keywords. If there is a keyword far on the system and
one wants it to be a qualifier like extern, one simply writes: @f __far extern. If
one doesn’t want this definition to appear in the output file, @s is used instead of
@f.
These formatting commands also provide a more powerful way to change how
CWEAVE typesets the identifier. If, for example, one has an identifier alpha and one
wants TEX to print it like α in the output, one simply states: @f alpha TeX. In
general words, TEX will then use a TEX macro with the same name as the identifier
to typeset the identifier.
This means, that one can define a macro in the limbo part of the CWEB file (that
is the part before the first section starts)
\def\ax{a_x}
and then give a formatting command in the middle part of a section
@f ax TeX
telling CWEAVE to use the TEX macro ax to typeset the variable ax like ax .
1.2.5
Other Commands
We have already seen that @Ã and @*title. introduce a section. Please try to keep
TEX commands in title simple since it will also be used in the header line of each
page.
Next comes the TEX part of the section. This is eventually followed by a middle
part, defined by @d (macro definition), @f or @s (formatting commands). Last but
not least we can have a unnamed @c code part or a named @<name@>= C code.
There is another way of introducing the C part of a section. If one says
@(file name@>=, CTANGLE treats this named section like all others except that it
will be output to the given file name and not to the default output file. This can
be used to generate header files.
@h determines where all the @d macro definitions go. If no @h is encountered, the
macros are inserted at the very beginning of the output file. One should normally
put a @h after having included the system header files.
There are also three commands to insert text into the index. @^text@> inserts
the given text using roman font type. Likewise, @.text@> inserts something in
typewriter type. The third command, @:text@> can be used to enter text into the
index which is under the control of TEX macro ‘9’, which has to be defined by the
user.
Now let’s take a look at the rest of CWEB’s commands:
@tTEX text@> will put the given TEX text into a \hbox and insert it at the current
position in the output file.
@=text@> will pass text verbatim to the C program.
@qtext@> will cause text to be totally ignored. It’s only a comment for the reader
of the source.
@! This will cause the section entry in the index for the identifier or control text
following the @! to be underlined thus indicating that it is defined here rather
than only used.
12
CHAPTER 1. OVERVIEW
@& Causes the left and right side of @& to appear adjacent to each other with no
blank in between, in the C output.
@l hex-code char-replacement In CWEB programs, one can use all 8-bit characters
in identifiers. This makes it possible to use german umlauts in a program.
By default, CTANGLE translates them into their hex code, which means that a
variable Menü will be changed into MenXFC, since the hex code for ‘ü’ is 0xfc.
If one says @l fc ue, Menü will become Menue in the resulting C program.
The @l may only appear in limbo, i.e. before the first section starts.
Note, that the ‘ü’ will be passed on to TEX by CWEAVE, so TeX must be able
to handle high bit characters to print them properly. One should have a
macro package coming with the TEX distribution to do this. In case it is not
provided, here is a template for ‘ü’:
\lccode’ü=’ü
\uccode’ü=’Ü
\lccode’Ü=’ü
\uccode’Ü=’Ü
\catcode’ü=\active \def ü{\"{u}}
@, inserts a thin space into CWEAVE’s TEX output.
@/ tells CWEAVE to break the line at this place.
@| This is an optional line break one might insert into long formulae to give TEX
a hint where to break the expression.
@# Like @/, this forces a line break. In addition, it causes a little vertical skip to
appear before the next line comes.
@+ Has the opposite effect of @/ since it prevents CWEAVE from breaking the line at
this point. This can be used to put more than one instruction on a single line.
@; is treated like an ordinary semicolon except that it does not appear in the
output. One can set a @; after each inserted named section to make it look
like an ordinary statement.
...
if(x) @<do this@>@;
else @<do that@>@;
@[...@] tells CWEAVE that everything that is enclosed in the bracket should be
formatted like an expression. In particular, one should use @[@] when using
a pointer to a function,
int @[@] (*f)();
otherwise CWEAVE will believe it’s a C ++ cast expression int(∗f ).
@i file name inserts the given file at this point in the web file.
1.2.6
The Change File
Change files are used to make minor changes to a web source file to reflect local
conditions. They simply replace individual lines of the web source by others. The
format of a change file is as follows:
@x
original lines in web source
@y
1.3. PROS AND CONS
13
lines that should replace the above ones
@z
...
The original lines must exactly match the lines to replace in the web source. After
the @z comes the next line chunk to override. All replacement texts must appear
in the same order they appear in the web source.
The change file may be passed in addition to the web file to the preprocessors.
So, to invoke CTANGLE one can pass the following arguments:
ctangle [options] webfile[.w] [–changefile[.ch]|−˝ [outfile]]
To start CWEAVE simply replace the name ctangle by cweave. For a list of options,
see Table 2.1.
1.3
Pros and Cons
We have now seen how CWEB programs look like and what commands the system
offers. If one wants to see how a final CWEB program looks like take a look at
part two, the implementation of mCWEB. It should not be denied that writing CWEB
programs requires an additional intellectual effort.
Writing a literate program is harder than writing a program in a
traditional language!
One should not underestimate the effort required to present a program so that it
is easily comprehensible. Computer programs are inherently complex and making
them easier to understand is quite a challenging task.
Programming in the ‘literate style’ does not only mean documenting programs
for the poor soul who comes after and will have to maintain it, it also makes sense
during the implementation phase. Large programs are said to grow until they exceed
the intellectual faculty of their creators. This means that from a certain point on,
even the creator of a program will lose control over it.
For this reason, the easier a program is to understand, the longer its creators
will be able to understand what has been done so far. However, everything has its
price.
1.3.1
What does it cost?
Literate programming is not the same as ‘writing programs with many comments’.
It is a completely new style of writing software products which—if used properly—
can lead to better quality, but one can also produce a totally illiterate program with
a literate programming tool. It takes time to learn how to program in a literate
way and software metrics must be found to mesure the ‘literateness’ of a program.
In [15], Ramsey wrote:
WEB is a complex tool. In addition to enabling programmers to present
pieces of a program in any order, it expands three kinds of macros,
pretty-prints code, evaluates some constant expressions, provides an integer representation for string literals, and implements a simple form
of version control. The manual for the original version documents 27
“control sequences” [7].
Ramsey then created his own tool noweb with focus on simplicity and extensibility.
As far as the implementation details of CWEB are concerned, it is true: CWEB is
14
CHAPTER 1. OVERVIEW
complex. However, I disagree with Norman Ramsey that using CWEB is too complex.
WEB’s 27 control sequences contain some commands which are rarely needed. It is
easy to keep those in mind which are used frequently, and to simply forget about
the others (or look them up if one really should need them one day). According
to examinations of five WEB programs in [16], only @Ã, @<...@> and @! were used
frequently, @*, @p, @d, @;, @/ and the index entry commands @^ and @. were rarely
used, and most other commands did never appear at all.
At first glance, the biggest hurdle is TEX. If one doesn’t know plainTEX at all, he
or she will have a hard time formatting the programs. This is the reason why literate
programming is not very widespread on Microsoft operating systems, where Word
is the favorite documentation system (although some optimists are attempting to
make WYSIWYG literate programming tools using Winword). However, examining
some of my own CWEB programs, I found out, that one can get by using very few
TEX commands, most of them were \item commands, various math typesetting
commands or font switching commands like \it or (the CWEB specific) \..
What is even harder to learn is how to write a good literate program. Similar to
some C ++ programs which have nothing to do with object oriented programming,
some people use literate programming tools to insert a TEX comment every now
and then. They have not changed their way of thinking or writing and don’t use
the new features at all. Learning how to write a real ‘literate’ program requires
probably the most effort. I think one can do that with any literate programming
tool since all of them are extremly simple compared to the computer language itself.
1.3.2
Why it is worth the Trouble
Despite all the difficulties, one should give it a try. Like authors of novels tend
to fail with their first book because of their lack of experience, one cannot expect
one’s first works of computer literature to be a masterpiece. Nevertheless, the more
literate programs one writes, the better they will be and everyone will evolve his
own ‘literate programming style’.
In this section, we want to present a few arguments in favor of literate programming. Maybe they will convince you to give it a chance.
It can be Fun
Literate programming is fun. Knuth once said in an interview:
Jill [his wife] will tell you, I come out of my office serveral times a week
saying, “CWEB programming is such fun!” It’s true, I just can’t do enough
of it.
This is mainly due to the aesthetic aspect. Literate programs are ‘literary works of
art’ (see Chapter one in [11]: Computer Programming as an Art). People who like
to explain what they are doing and to present their work will enjoy writing literate
programs. Since a motivated worker will do a better job, this should also be in the
company’s interest.
Better Documentation
What is a little bit more obvious is the excellent documentation a literate program
can contain. Literate programs are better documented. This is not only because
of automatic index generation—which makes it easy to find the places where an
identifier is defined and used—and division into small pieces that can be described
more easily than large blocks could be, there is also a psychological reason. In a
CWEB program, there is a language defined place where the preprocessor expects the
1.3. PROS AND CONS
15
comments. If one omits the explanations of a section, the lonesome @Ã looks a little
bit like an accusation: what, you have nothing to say about this section? If there
are supposed to be some explanatory sentences after a @Ã, people will put them
there.
Better documentation is essential if one doesn’t intend to throw away one’s
software product after one has finished it (and I hope nobody does). The largest part
of software costs is in the maintenance phase, when the product is already shipped
and error corrections as well as enhancements are necessary. These modifications
can only be done efficiently, if the programmers in charge have a thorough knowledge
about the internals of the program. However, most programs are not maintained by
their original authors, because either they are already working on another project
or they have left the company. Even if exactly the same group is maintaining the
program for its whole lifetime, they will not be able to keep the details in mind.
Time is wasted on code analysis of things that once have been known, but of which
all the knowledge is gone since it was not written down.
Less Errors
CWEB does not only help mastering the maintenance phase, the test phase will usually
be shorter too. It seems that writing a verbose documentation does not only lead
to better documented code, it also has better quality, and: for free!
Knuth [8] found out
The costs of WEB are more difficult to estimate at higher levels, but I have
found to my surprise that the total time of writing and debugging a WEB
program is no greater than the total time of writing and debugging an
ALGOL or PASCAL program, even though my WEB programs are much
better, and even though I am putting substantially more documentation
into the programs. [. . . ] The extra time I spend in preparing additional
commentary is regained because the debugging time is reduced.
This does not mean that one doesn’t have to test anymore, but one simply will
find many errors before they appear in testing and therefore one doesn’t have to
correct them during the test phase. This conforms with my own experience: literate
programming does not shorten the process of software creation, but neither does it
lengthen it, so the only thing one gets is a better documented code of better quality
in about the same time one would have spent writing an ordinary C program.
Better Quality
The effect that programmers suddenly impose higher quality standards on themselves when they start writing literate programs is due to the fact that literate
programs are meant to be published. Even if the final document never finds its
way out of the company, surly no programmer wants to create a nice looking final
document that contains code of bad quality, since everybody ‘could’ read it and
find out. In addition, if one explains what he or she is doing in a section, one is in
‘expository mode’ which means that one has to clarify his or her thoughts in order
to explain them in an understandable way.
Code Reviews
The style of literate programming encourages a team to make code reviews and
walkthroughs, since CWEB programs are easy to read and therefore also easy to
present. During such code reviews, implementation details and design decisions
are discussed and all members of the group are encouraged to give their opinions.
Individual criticism should be avoided in the review process.
16
CHAPTER 1. OVERVIEW
Code Reviews
• are a way to statically verify programs, thus ensuring quality,
• help to find errors and design flaws at an early stage in the software process,
• make sure one doesn’t lose the overview about the different parts of a project,
• lead to commonly accepted, consistent ‘company standards’, without imposing
them by means of ‘company laws’.
Freedom
Literate programming offers no methodology. It does not say that one has to use topdown or bottom-up design. It does not require the use of object oriented analysis.
One can simply use it as one likes. No restrictions, no limitations.
The reason why C has become so popular is not because it is such a great language that offers features no other language offers, but because it does not restrict
the programmer. Everybody has seen examples showing C programs with lots of ?:
operators and other tricky things nobody but the author himself can understand,
but nobody writes such programs. C programs tend to be as structured or unstructured as Modula-2 or ADA code. But if one wanted to do something in a tricky
way, he or she would be able to do so, and sometimes a tricky, well documented
implementation really makes a programmer’s job easier. You could, if you wanted.
That’s why people are using C. That’s why people should use literate programming.
Note that CWEB makes it easy to write programs nobody will ever be able to
understand. As far as that is concerned, it is even worse than pure C. As a matter
of fact, it is easy to confuse the reader if, for example, the closing brace is not in
the same section as the opening brace of a compound statement. Sections should
always contain full blocks.
@ @c
int func(
@<function@>
return x+1;
}
@ @<function@>=
int x)
{
is not really a good example of a good literate programming style. However, since
most programmers are old enough to know what they are doing, nobody will be
crazy enough to do write such code.
1.4
A Guide to Literate Programming
The purpose of this chapter is to provide a set of rules of thumb which should
help to write literate programs that really merit this label. When writing a literate
program, we have to answer the following questions:
• Which starred section shall we define (at which level of hierarchy)?
• In which order shall we arrange our sections?
• What is each section supposed to contain?
1.4. A GUIDE TO LITERATE PROGRAMMING
1.4.1
17
Literate Programming and Design
In [8], Knuth writes
I think that a complex piece of software is best regarded as a web that has
been delicately pieced together from simple materials. We understand
a complicated system by understanding its simple parts, and by understanding the simple relations between those parts and their immediate
neighbors.
...
I have come to realize that there is no need to choose once and for all
between top-down and bottom-up [design], because a program is best
thought of as a web instead of a tree.
I think that programs are best seen as a web and as a tree. CWEB provides a
hierarchical way of presenting the program using starred sections which allows us
to give a collection of sections a name which can itself be part of another starred
section, like we group several paragraphs of an article in sections which can be
subsections of another one. Sho-Huan Tung has presented a literate programming
method called HSD (hierarchical structured document) [17].
The Table of Contents usually provides valuable information about the design
of a program as the following excerpt shows:
4
Actions
Actions of the Scrollbar . . . . . . . . . . . . . . . . . . . . . . . . . . . . . . . . .
Shift-Click on the Scrollbar . . . . . . . . . . . . . . . . . . . . . . . . . .
Click on Scrollbar without Shift . . . . . . . . . . . . . . . . . . . . . .
Actions of the Drawing Area . . . . . . . . . . . . . . . . . . . . . . . . . . . . .
New Window Size . . . . . . . . . . . . . . . . . . . . . . . . . . . . . . . . . .
Draw Icons . . . . . . . . . . . . . . . . . . . . . . . . . . . . . . . . . . . . . . . .
Mouse Button 1 or 2 pressed . . . . . . . . . . . . . . . . . . . . . . . . .
Mouse moved while Button pressed . . . . . . . . . . . . . . . . . . .
Mouse Button 1 or 2 released . . . . . . . . . . . . . . . . . . . . . . . .
Mouse Button 3 pressed . . . . . . . . . . . . . . . . . . . . . . . . . . . . .
Actions of the Shell . . . . . . . . . . . . . . . . . . . . . . . . . . . . . . . . . . . . .
Focus assigned . . . . . . . . . . . . . . . . . . . . . . . . . . . . . . . . . . . . .
Focus lost . . . . . . . . . . . . . . . . . . . . . . . . . . . . . . . . . . . . . . . . .
Reparent . . . . . . . . . . . . . . . . . . . . . . . . . . . . . . . . . . . . . . . . . .
Index . . . . . . . . . . . . . . . . . . . . . . . . . . . . . . . . . . . . . . . . . . . . . . . . . . . . .
11
12
13
14
15
16
26
38
43
62
64
65
70
71
72
61
64
64
64
64
65
65
72
78
82
95
95
96
98
98
99
Looking at this table, we can immediatly distinguish the various parts the translation unit consists of. This reflects the architectural design, only stating the different
parts in a single line.
When one is about to start a literate program, he has to take a look at the
design to identify the various parts and break it up into units of the same purpose.
In [5] one can see examples how three convention design methods, top-down design,
data-flow design and JSD (Jackson System Design), can be converted into a literate
program that still captures the original design. It is generally a good idea to include
the whole design into the literate program, otherwise everybody who wants to read
and understand the program will have to recover the design from the code.
In TEX it is not only possible to typeset mathematical formulas that can describe
the behaviour of the program, one can also include graphics to describe the design.
As indicated in [14], diagrams are also very useful for depicting the organization of
data structures and their interrelations. John Hobby’s Metapost [6] is a great tool
18
CHAPTER 1. OVERVIEW
that allows to draw data structures (among other things) using a script language
to define them.
1.4.2
Determining Section Order
The individual sections of a program can be arranged in any order, which can
be regarded as a big advantage, but not every order is equally good. The task of
deciding in which order to present the sections is nontrivial and strongly determines
how ‘literate’ a program really is.
I found out that, when I am writing a CWEB program, I always try to present
the code in that order, that it can be read sequentially without jumping around in
the source code. If moving around should be necessary, the index greatly helps in
finding the right place, but nevertheless, this should be avoided.
This order implies that, when I refer to parts of the program that will be defined
later in the program, I only do it using a named section (or a function call, if
necessary). This means that every time I add a new function or named section to
the CWEB source, I don’t add it ‘where the cursor is’, but I have to decide where it
fits best so that all parts that should be known to understand it are defined earlier
in the program (or at least in one of the following sections) and everything that
depends or uses the new code comes later in the source.
This is very similar to a PASCAL programmer writing a program in the order
the compiler needs it except that one writes it in the order the human reader needs
it. Note that this order will be completely different. A program might start with
the main( ) section without really depending on things defined later, just containing
a number of named sections outlining the general functionality of the function on an
abstract level without going into detail. In particular, I describe all data structures
prior to their first use. If a function uses a data structure not yet introduced, one
will not define the function prior to the definition of this datatype.
It is generally a good idea for most typical applications to start defining a couple
of suitable data structures. C ++ programmers will think of them as classes. Then
a couple of (member) functions are added dealing with that data structure. Basic
functions appear before the more sophisticated ones. Last but not least we must
bring the datatype definitions in the right order, which means that we will start
with those datatypes that have the least dependencies.
1.4.3
The Contents of each Section
We have seen how to determine which starred sections we should have and in which
order they should be presented. Now, we want to consider what to put into the
sections themselves.
The TEX Part of the Section
As already mentioned, each section will usually consist of TEX text followed by C
code, thus we have a (more or less) informal description in natural language and
an unambiguous, formal C equivalent immediately following. Most people know
what to put in the code part since they have been writing C programs for years,
the problem is rather: what shall the TEX text contain?
When writing the TEX text of a section, one always has to keep the intended
reader and his supposed background in mind. Of course, he must at least be familiar
with C and we should also assume that he knows about the basic data structures
like lists, stacks, binary trees or hash tables. In addition, the user is supposed to
have read the specification and user documentation of the program he wants to
analyze and in most cases he should have seen the program running. Since the new
1.4. A GUIDE TO LITERATE PROGRAMMING
19
mCWEB system now supports interface documentation, we will also be able to refer
to it.
People who are used to insert documentation with C comments only, tend to
use rather scarce formulations like
/*
* Draw an icon in its window.
*/
void draw_icon(struct Icon *icon)
{
...
}
Literate programs usually should be more verbose. Note, that writing a whole
phrase does not take much longer, but makes the documentation more readable.
The program is read much more often than it is written (by its own author, every
time he looks at it). The comment used above is more or less an optical separator
and contains no additional information to the function name at all.
Each TEX text can (and usually should) contain the following parts:
1. How is the following code part related to the previous ones and why is it here
(interrelationship and raison d’être).
2. What is it supposed to do (relation to the program specification).
3. How does it achieve that (implementation). Describe algorithmic details that
are not obvious.
4. In case of a function: Meaning of parameters and return values; in case of a
datatype structure: Description of the individual fields of the structure. This
will be covered by so called autodoc sections in the new mCWEB system (see
Chapter 2.7).
While most people find it natural to describe how the following code works (first
we do this then we do that)—something that could be recovered from the C code
with some additional effort if the explanation is missing—many forget to say what
the function is supposed to accomplish.
While the why and what part must have been written before one tackles the C
code following, the how part can also be added after the code is written, in case the
algorithm decision was not too complicated and was made while implementing the
code.
Not all section will require a why part, but sometimes, one should give a short
explanation about the general purpose of the following definitions. Why parts are
generally recommended in the first TEX texts after a starred section. If there are no
why parts at all, readers not familiar with the program will ask themselves why the
programmer defines a function or data structure they don’t know what it is good
for. This is especially the case if a bottom-up approach was used where many code
parts are defined and nobody can estimate what they will be good for (sometimes,
when the program is under development, not even the authors). Don’t confuse the
reader by defining things that seem to be superfluous.
As for the what part, one will have to search for good excuses if one want to
omit it. Although often neglected, it is the essential part of the documentation, even
more important than the how part. One should be able to read the TEX description
of the section and know what it should do. The reader should always know what
part of the program specification we are going to implement. In addition, this often
helps finding errors before they even occur in testing. This is an interesting fact,
because it automatically leads to less error-prone programs. How comes?
20
CHAPTER 1. OVERVIEW
If the program specification and the implementation are at the same place, it
is much easier to realize that there is a difference between what one intends to do
and what one is actually doing. It is more likely to find these differences if it has
been written down because writing down the thoughts often helps to clarify your
thoughts.
This is like explaining a problem to a colleague (who might not know anything
about the problem at all and therefore is absolutely unable to find the bug) often
helps to find the error because one had to explain his intentions in detail and had to
speak out what he wanted to do, realizing in the same moment that there is a discrepancy between the specification and the implementation or that the specification
is wrong or incomplete.
The C Part of the Section
Each section in a CWEB program should have a reasonable size, which means that
they should fit on a single page. If they don’t fit, there can be two reasons: either
the TEX text that describes the section is too long (in which case you have given
an exhaustive explanation, good!) or probably the code part of the section is too
long and one should investigate the function searching for possibilities to further
partition the section.
Good candidates are:
• Error handling lines and code treating special cases: These parts tend to
distract the reader (and the writer) from the ‘real problem’, although they
are absolutely necessary. The function itself should concentrate on the general
outline of its algorithm, don’t overload it with details.
Another reason why they should always be placed in named sections is, that
otherwise programmers intuitively tend to neglect them, because they don’t
like to see that there are more lines treating special cases than there are
code lines for the ‘usual’ case. If the former are put in a named section of
their own, the purpose of this named section is, say, h Check if r is a valid
argument, return if not 45 i and that’s what the whole section will be about.
The programmer will automatically focus on the new purpose of this section.
• Multi-way instructions like switch-case or multiple if-else constructs: Here,
each case usually requires special treatment that should be described separately. A named section allows to put extra TEX text for each case, thus
documenting it in more detail.
• Independent subjobs: Some functions do a couple of jobs one after the other.
If they are relatively independent from each other and can be described by an
expressive named section, why not putting them into one? Sometimes, these
subjobs can be easily recognized because most C programmers separate them
with empty lines. Of course, not every empty line justifies a named section of
its own.
1.4.4
Naming Conventions
Literate programming does not only mean shifting code sections around and using
TEX to get a nice looking printable document, but also carefully choosing variable
names and section names. Knuth suggests that one has a thesaurus at hand, choosing names that express the meaning of a variable best. Chapter 9 of [11] and [8]
give some stylistic suggestions. Not everybody will write literate programs in the
same way, but if you are new to the topic, some hints might be helpful.
1.5. LITERATE PROGRAMMING AND REVERSE ENGINEERING
21
It is always a good idea to use verbs for functions and nouns for variables. For
functions and named sections which really perform an action, use imperative style,
for named sections that collect various parts one can use descriptors. For example,
one should write h Draw icon image 63 i rather than h Draws the icon image 63 i,
but one still would write h Drawing Functions 56 i for a collection of functions. If
sections can have an effect on the control flow, this should be stated in the section
name. Typical examples would be h Check if inside range, return if not 23 i or
h Store s in the hash table, goto done if already there 46 i.
1.5
Literate Programming and Reverse Engineering
The fact the literate programming leads to well documented software might imply
that it would be a good method for reverse engineering, i.e. trying to document an
existing C program of which usually no or at least not very much documentation
exists. Usually, even the requirements are poorly understood and nobody really
knows what the program really does and what not.
Everyone who has tried to squeeze an existing ordinary C program into the style
of a literate program will agree, that this is really a hard job. C programs tend
to have a completely different structure and one has to do a lot of copying and
restructuring, even if one perfectly knows what the program does.
If one tries to do that with a program not really understood, he will find himself
unable to give meaningful explanations because he simply doesn’t know what’s
going on. One will only put in comments here and there, every time one found out
something new, but one will avoid restructuring the program. One could also do
this in ordinary C. For this reason, I cannot recommend literate programming as a
method for reverse engineering. If the author does not explain all the decisions he
made while writing the program, this information is probably lost forever.
Even literate programs under development need restructuring from time to time.
Sometimes, I spend half of a day only on rearranging the code because I realize some
parts of the program aren’t where they best should be. However, I found out that
such a restructuring always paid off. Afterwards, the code was much clearer and
seemed to have a ‘logical’ order and I felt more comfortable when I added new parts
to it, knowing that the existing code was ‘clean’.
1.6
Inadequacy of the CWEB System for Teams
Although the CWEB system also makes sense for smaller programs, its strong points
lie in the support of large scale software projects, where accurate documentation
and careful design are basic requirements for success. But nowadays, most large
projects are developed by software teams rather than one single programmer. This
means, that the program will necessarily consist of more than one WEB source file,
since one file can only be edited by one person at a time.
Unfortunately, CWEB does not support multiple source files at the moment. It
requires one single source document, which makes it difficult to use for projects
where more than one person is involved. Even for projects which are developed by
a single person it may be desirable to split the source file up into more files.
There is a historical reason for this inconvenience. CWEB is a descendant of
Knuth’s WEB which was intended for PASCAL. PASCAL, unlike C, does not support linking of multiple files and did indeed expect one single input file. However,
adapting WEB to a new language like C does not only mean changing the grammar
for pretty-printing, but one also has to consider the language specific properties.
22
CHAPTER 1. OVERVIEW
One of the features of C are header files, which are used to insert shared data into
different translation units. In release 3 of the CWEB system of structured documentation, the new @( command was introduced, which allows writing some sections
into a file other than the C output file. With this option, it is possible to create C
header files.
@ @(foo.h@>=
void bar(int);
13. h foo.h 13 i=
void bar (int);
outputs the code of this section to the file foo.h.
This header file can then be included with #include "foo.h", but if we are
using make, the header file is rewritten every time we call CTANGLE thus causing a
retranslation of the whole project and making make useless. Knuth’s demonstrates
how he uses @( in [12]. Still, the index covers one single CWEB file only and is
unaware of all identifiers in other files.
Anyway, since we want to define our data structures and functions where they
best fit and not where the compiler wants them to be, the mCWEB system described
below has a couple of export and import commands which make the manual creation
of header files for information interchange between translation units obsolete.
Furthermore, software teams usually break their projects into smaller, independent units to be assigned to individual programmers. To coordinate the work
between the individual members of the team, an interface specification which only
covers how the different units interact with each other is made. This means that
each unit is regarded as a black box with a well-defined interface. mCWEB is able to
combine the interface documentation in the web code.
Chapter 2
The mCWEB System
During many years of experience with the CWEB system, I found that everything was
fine as long as one didn’t want to cut his programs into different translation units.
Several programmers complained about CWEB’s inability to handle multiple input
files and still maintaining a complete index about all identifiers known in each part
of the project.
In addition, I found it annoying to put a prototype for every function in a single
h Predeclaration of procedures 3 i section right before the function only to make the
compiler happy. I realized that there should be some kind of export and import
commands that make prototypes and forward declarations of variables obsolete.
Since it seems that large projects nowadays consist of a couple of (dynamic) link
libraries and sometimes even more than one executable, the interrelations of the
individual files that make up a project can be complex and should be covered fully
by the tool. This should include managing dependencies between the various files.
2.1
The Book Concept
Conforming to the idea of creating works of literature, I decided to regard each
executable or library as a book consisting of several chapters. Each chapter is a
single file that can be edited independently from all other files. Thus, an old-style
CWEB source file would only be a chapter of a mCWEB book. Chapters are meant
to contain functions that have a high cohesion (e.g. they work on the same data
structure).
Book files usually have the file extension .prg. For instance, an example book
foobar.prg could look like the following:
\def\title{The FooBar Program}
\def\author{A. U. Thor}
\showtitle
\noindent
This is an example book that does not really exist.
\vfill
@c foo
@c bar
@m
#
# Here is the makefile
#
foobar : $(CHAPTERS)
$(CC) -o foobar $(CHAPTERS)
23
24
CHAPTER 2. THE MCWEB SYSTEM
foo.o :
bar.o :
$(FOO)
$(BAR)
As we can see, the book imports two chapters foo.w and bar.w. This is done by
@c h chapter name i h change file name i h output file name i
which is quite similar to a call of CTANGLE.
Everything following the
@m [h makefile name i]
command goes to the makefile. We will talk about makefiles in more detail in
Chapter 2.5.
mCWEAVE processes all chapters given by the @c commands and copies all other
lines of the book file up to the @m command or the end of file to the output file
foobar.tex. This means that one can define TEX macros in the limbo part of the
book that will be available in all chapters of the book.
In particular, one can write an introduction to the book after the \showtitle
command like it is indicated in the above example. This introduction should contain
information about what the program the book contains does. In addition, if it is
necessary to have read other books in order to understand this one, please say so
in the introduction so that reader can find out which book to start reading with if
a project consists of multiple books.
2.2
The Chapter Files
Chapter files are ordinary CWEB files and therefore end in .w. Each chapter file
usually starts with the TEX macro
\chapter name-of-chapter.
giving the name of the chapter (terminated by a ‘.’) which will also be used in
the header. Unlike in former CWEB files, the first section should not be a starred
section because the \chapter macro already puts a chapter title line and adjusts
the header. Use an ordinary @Ã instead to introduce the first section.
In addition to some new commands, there are other differences between how
mCWEB processes the input file and how CWEB did. If, in CWEB, one wrote something
like this:
@ Let us now introduce a new type called |Node| ...
@c
typedef struct {
...
} Node;
The first reference to Node will be printed in italics because CWEAVE only knows
that Node is a type from the point on where it was defined. However, in mCWEB,
this will be printed in boldface, like all type names.
An even more important improvement is that mCWEB now parses all header files
that are included into the program by means of the preprocessor instruction #include. This means that all types defined in these files are known and typeset
correctly. This is especially important if one is writing X window programs where
there will be a lot of predefined data types.
In order to make this possible, one has to define the environment variable
INCLUDE to contain all directories that have to be searched for include files, each
path separated by colons.
2.3. TRANSLATING A BOOK
25
Unlike CWEB, mCWEB now explicitly distinguishes between C and C ++ programs.
Although C ++ is said to be a superset of C, there is still a difference: C ++ treats
structure labels as data types while C does not. For this reason, mCWEAVE now has
the ‘++’ command line switch for C ++ programs. If ++ is not given, structure labels
are printed in italics and are no type keywords. This makes it possible to write
things like struct List List; which is absolutely legal in C but not in C ++ . A file
extension of .wpp or .wxx automatically switches on C ++ mode too.
2.3
Translating a Book
To translate a book to a TEX file, just call mCWEAVE as one did call CWEAVE in order to
translate old-style CWEB files. Files with the recommended book file extension .prg
are automatically treated as book files. If one has chosen another file extension,
one must explicitly set the ‘+m’ flag or mCWEB will be in CWEB compatibility mode.
mCTANGLE and mCWEAVE take the following arguments
£
¤
mctangle [h options i] h webfile i (h changefile i|−) [h outfile i]
£
¤
mcweave [h options i] h webfile i (h changefile i|−) [h outfile i]
where webfile is either a book or an old-style CWEB source file, change file is the
change file to use, and output file is the name of the output file which defaults to
webfile. If one wants to give an output file but omit the change file, use ‘−’ for the
change file name. Table 2.1 lists all command line options for mCWEB.
mCTANGLE will only translate those chapters that have changed. This means
that chapters that have not been modified will not create new C files, so that the
compiler won’t have to retranslate them.
mCWEAVE always weaves all chapters of the book. Weaving now takes a little bit
longer than with CWEAVE, depending on how many include files have to be parsed.
For an input file foobar.prg, mCWEAVE outputs a file foobar.tex containing the
implementation (as CWEB did) and—if there is an interface documentation in the
book—a file autodoc.tex. Both files are plainTEX files and can be passed on to
TEX to get printable DVI files.
Important Note: Since mCWEAVE reads some of mCTANGLE’s output files (that is
the shared and export files, see below) to make the index, one must make sure
that all books a particular book is related to have been tangled before one
calls weave. In particular, each book must be tangled before it may be woven.
2.4
Import and Export
As mentioned above, mCWEB now supports export and import commands which
greatly simplify the maintenance of the relationship between the individual source
files that make up a project. What we want to do is to automatically generate
declarations for all parts of a chapter we want to make visible to others. For
example, if one has a function func in chapter A one wants to be accessible from
other chapters of the same book, one simply writes:
shared int func(int x)
{
...
}
In chapter B of the same book, one can write
26
CHAPTER 2. THE MCWEB SYSTEM
Flag
+
b
For
mCWEAVE
CWEB
f
h
CWEAVE
CWEB
i
mCWEAVE
k
l
mCTANGLE
mCWEAVE
m
p
mCWEB
CWEB
s
CWEB
x
CWEAVE
† On,
‡ On,
Description
Switch C ++ mode on.
Print a banner line at the beginning of
execution.
Force line breaks after each C statement.
Print a happy message at the conclusion
of a successful run.
Show names of all #included header
files.
Make Kernighan & Richtie C prototypes.
The +lprefix causes TEX to use
prefix mcwebmac.tex instead of
mcwebmac.tex which makes it easy to
use localized versions. Use +ld to
include the german macro file, or +lf for
the french one.
Input file is a book (mCWEB mode).
Give progress reports as the program
runs.
Show statistics about memory usage
after the program runs to completion.
Make indexes and a table of contents in
the TEX output of CWEAVE.
Default
Off†
On
On
On
Off
Off
N/A
Off‡
On
Off
On
if (chapter) file extension is .wpp or .wxx
if file extension is .prg
Table 2.1: Options for mCWEB
#import chapter "A"
and chapter B will automatically have a prototype of chapter A’s function func
thus making it able to call it (as well as all other shared functions defined in
chapter A). This does not only work for functions but for all C definitions like
datatypes or variables.
2.4.1
Export Commands
Let’s have a look in more detail what export commands are available. For the sake
of simplicity, we will only demonstrate the use of the export commands with C
functions although they work fine for other C constructs as well.
There are three export levels. There first level is to make a function visible in
the whole chapter where it is defined, which means that—unlike in ordinary C—the
function can be called before it is defined. This makes it easy to rearrange sections
without caring about their interrelationships.
In order to make a function visible in its own chapter, precede its definition by
@_global as demonstrated in the following example:
@ global void func(s)
char *s;
{
...
}
it is generally a good idea to precede every C function by @_global which saves the
work of creating all function prototypes by hand and putting them into annoying
h Predeclaration of procedures i sections.
2.4. IMPORT AND EXPORT
27
mCWEB now creates a prototype for func and puts it at the place in the C code
where @h was given. If no @h was found, it is inserted at the beginning of the C
code. One usually will set @h right after including the required system header files.
The next export level makes the function callable by another chapter of the same
book. The name of this export command is @_shared, where @_shared implies
@_global (i.e. all shared functions are automatically global).
Last but not least, one can export functions to another book. This can be done
using @_export in front of the C definition. Exported functions are not automatically global nor shared so one might want to combine two export commands to
make a function, say, ‘exported and shared’.
Exporting to other books is often necessary if a project is made of more than
one book. This is the case in Client-/Server Applications and projects that make
use of libraries. Since libraries are books too, they are supposed to @_export all
their interface functions to make them visible for users of the library.
Export commands make it possible to define global variables inside a function
body:
void func()
{
...
@_global int this_is_global;
...
}
The mCWEB system automatically creates the required header files (called shared
and export files) for each chapter which consist of declarations for the exported
stuff. See Appendix A if you are interested what files really are created and what
they are good for.
Exporting Definitions
If one wants to export macros defined with @d, one can do it like that:
@d @_export Number(x) sizeof((x)/sizeof(*(x)))
which means that the export commands must immediately follow the @d. Note that
@_global does not make much sense since all @d are per definitionem global.
2.4.2
Import Commands
Since we now know how to export data, we will take a look at the import commands.
Again, we can choose among different import commands.
First of all, we will want to import all @_shared functions of another chapter of
the same book. This is done using
@_import chapter "h chaptername i"
In order to import @_exported functions from various chapters of another book,
we use the command:
@_from (program|library) "h bookname i"
import [transitively] "h chaptername i" {,"h chaptername i"}
Here we distinguish between books that make up programs (or other types of books
that don’t get linked) and link libraries. Link libraries should be imported using
the library keyword while other books are imported with @_from program....
28
CHAPTER 2. THE MCWEB SYSTEM
If one wants to import all chapters of another book, one can use:
@_import [transitively] (program|library) "h bookname i"
The optional keyword transitively determines if these imported chapters are
passed on transitively to whatever imports this chapter. If, for example, chapter B
transitively imports chapter A and chapter C in turn imports chapter B, then
chapter C automatically imports chapter A, too. However, if transitively was
omitted, chapter A would not automatically be imported into chapter C.
The dependencies of all books are stored in so called dependency files which lie
in the same directory as export files.
2.4.3
The Environment Variable DEPDIR
In order to have a common base point from which references to other books are
searched, the environment variable DEPDIR must be set to a directory in which a subdirectory for each book will automatically be created at the first call of mCTANGLE.
For this reason, books must have a unique name.
This subdirectory in DEPDIR will contain all export files so that they can be
found again by other books. If one decides to import chapter foo of book foobar,
mCTANGLE will create a #include "foobar/foo.exp" statement. For this reason,
the DEPDIR directory must be part of the compiler’s default include search path. For
UNIX compilers this is usually done with the −I$(DEPDIR) command line option.
If the book is a link library that must be found by the linker, one can put the
final .a file in the DEPDIR variable and add it to the default library search path
using the −L$(DEPDIR) command line option.
In addition, mCWEAVE also needs this environment variable because it reads the
export files in order to find out all references to foreign books and to learn about the
new datatypes they define. So, if one forgets to define this environment variable,
both—mCTANGLE and mCWEAVE—will abort with a fatal error.
2.4.4
The Improved Index
Since a mCWEB book consists of several chapters and can be even related to other
books, we have to print a more complete index than CWEB did. mCWEB outputs an
index at the end of each chapter and a final index at the end of the book. Note,
that one must have run mCTANGLE on all books that are in the index or one will
have an incomplete or wrong index. The reason for this is that mCWEAVE reads the
export and shared files mCTANGLE creates to find out what is defined in the other
books/chapters.
The Chapter Index
At the end of each chapter one gets an index containing all identifiers defined in
this chapter or imported from other chapters. Let’s take a look at an excerpt of a
chapter index:
AddHead : 12 , 19.
AddIcon: 19† , 24, 30, 39.
...
compare icons: 20, 21.
In this index, compare icons is a function that is defined in the current chapter and
not exported. AddIcon is also defined in this chapter, but the † sign indicates, that
this identifier is shared between chapters within the book. Identifiers exported to
other books are marked with a ‡ sign.
2.5. DEPENDENCIES AND MAKEFILE
29
Each imported identifier has a superscript number telling where it comes from.
In our example, AddHead was defined in section 1 of another part of the project
and is used in section 19 of the chapter the index belongs to.
At the end of the index we have a description of the superscript indices like:
†
shared within book
Referenced books:
1
2
lists, Chapter 1
lists, Chapter 2
...
Thus, AddHead is defined in book lists, Chapter 2.
The Final Index
The final index consists of three parts. First come the shared identifiers, which
means everything that is exchanged between the chapters of the book, followed by
the exported identifiers (all names exported to other books). Last but not least
comes the list of all identifiers imported from other books into the current one.
Like in the chapter index, the entries in the final index have superscripts to indicate
where they really come from.
2.5
Dependencies and Makefile
I presume that every software team uses make or a similar tool which helps to
automatically keep a project up-to-date by only retranslating the files that have
changed. This requires a makefile to give all the dependencies of the files.
These dependencies are not trivial if one has a large program consisting of several
libraries where individual parts of the program #include many header files, some
of them resulting from transitive dependencies.
Due to import and export commands, mCTANGLE knows about that interrelationship of its chapter files and can help the programmer creating the dependencies
for the makefile. As we have seen in Chapter 2.1, the book file can contain a @m
command followed by an optional name of the makefile. All the lines following this
command until EOF are copied to this makefile without change.
When mCTANGLE writes the makefile, it puts some useful constants at the very
beginning of the file. For each chapter, there is a makefile constant with the name
of the chapter which contains all files this chapter depends on.
For a chapter foo.w that contains an import command #import chapter
"bar" and a #from library "mylib" import "libchapter", this could look like
the following:
FOO=foo.c bar.shr h DEPDIR i/mylib/libchapter.exp
if there are no transitive dependencies. One can then use
foo.o :
$(FOO)
to inform make about the dependencies for chapter foo.w without caring about the
individual files.
Linking is simplified by the CHAPTERS constant which contains all object files
that emerge from the book.
foobar :
$(CHAPTERS)
30
CHAPTER 2. THE MCWEB SYSTEM
can be used to give the dependencies for the final executable, adding libraries after
the CHAPTERS constant as needed.
For a book foobar.prg consisting of two chapters named foo.w and bar.w,
mCTANGLE defines CHAPTERS= foo.o bar.o.
The last makefile constant defined by mCTANGLE is LIBRARIES which contains all
associated link libraries the book depends on. If a book imports, say, the libraries
xwblib.prg and lists.prg, there will be the following constant in the makefile:
LIBRARIES= $(LIBPREFIX)lists $(LIBPREFIX)xwblib
where $LIBPREFIX is a user defined constant that gets appended in front of each
library name. This makes it possible to write:
# use -l in front of each library name in $(LIBRARIES)
LIBPREFIX=-l
# system libraries
LIBS=-lXm -lXt -lX11
foobar : $(CHAPTERS) $(DEPDIR)/libxwb.a $(DEPDIR)/liblists.a
cc -o foobar -L$(DEPDIR) $(CHAPTERS) $(LIBRARIES) $(LIBS)
assuming that both libraries lie in the DEPDIR directory.
2.5.1
Using two Makefiles
Since the makefile is created by mCTANGLE and one might want to use a makefile
for the tangling process too, one will probably create two makefiles. Here is a
recommended way to do this.
Give the makefile that gets created by mCTANGLE another name by stating it
after the @m command (e.g. @m makefile.unix). The standard Makefile will then
look like this:
all : tangle translate
tangle :
mctangle book
translate :
make -f makefile.unix
weave : tangle
mcweave book
tex book
[tex autodoc]
which makes it possible to say make if one wants to translate the book and it will
automatically tangle first and translate afterwards using the makefile created by
the tangling process. On the other hand, one can say make weave to run mCWEAVE
and TEX on the book. This will also cause mCTANGLE to translate the program if
needed which ensures that one always gets the right references.
If one has a project consisting of several books, create an overall makefile looking
like this:
all : tangle translate
tangle :
make -C firstbook tangle
make -C secondbook tangle
...
translate :
make -C firstbook translate
make -C secondbook translate
2.6. INSERTING EXAMPLE CODE
31
...
thus ensuring that all books get tangled before the first one gets compiled.
2.6
Inserting Example Code
Sometimes, one might want to give an example to illustrate the use of a function
or datatype. CWEB provides the |...| instruction in TEX text to set identifiers like
C text, but it didn’t work for C text that contains multiple lines. For this reason,
mCWEB now knows the @e command which switches example mode on and off. One
can use @e in the TEX text part of a section. Example code may only contain
ordinary C code, no named sections.
In ordinary books, the opening @e is usually preceded by \bex (begin example)
which makes a small horizontal indentation and vertical skip and switches to a
smaller font so that the user can see that the following code is not part of the
program but only an example code. The closing @e should then be followed by
\eex (end example) to switch back to the previous settings.
@ÃHere is an example that demonstrates how to access all
nodes of a list:
\bex@e
struct List l;
struct Node *n;
NewList(&l);
@t\dots@>@;
for(n=FirstNode(&l);NextNode(n);n=NextNode(n))
@t\dots@>
@e\eex
results in
6.
Here is an example that demonstrates how to access all nodes of a list:
struct List l;
struct Node ∗n;
NewList (&l);
...
for (n = FirstNode (&l); NextNode (n); n = NextNode (n)) . . .
If one doesn’t want to have the example printed differently from ordinary code
(e.g. in autodocs, see below), one can simply use \smallskip instead of \bex and
\eex.
2.7
Interface Documentation
In software teams, the individual members are not interested in the implementation
details of those parts, which have been written by other members of the group.
They rather would like to see each part reduced to an interface documentation, so
they can see another user’s chapter from outside without having to read the whole
document.
Unfortunately, the CWEB system did not support interface documentation. Therefore, a so called autodoc section has been added to mCWEB. Autodoc sections may
only appear in the TEX text of a section and are exported to a separate book called
autodoc.tex.
Each autodoc entry has a name and belongs to an autodoc class. For each class
classname, mCWEAVE creates a file classname.adc with all autodocs sorted by their
32
CHAPTER 2. THE MCWEB SYSTEM
name. Autodoc classes can be used to group the same kind of things. For example,
for simple books, one may create a class Functions and a class Datatypes, thus
having a chapter in the reference manual which describes all functions and one for
the various datatypes. In a more complex project one might refine this classification.
The idea of putting the interface documentation in the same file as the source
file is obvious. If the interface is documented at the same place where the code is,
it is easy to keep both up-to-date if changes are necessary. One doesn’t have to
search the corresponding places in two separate files.
2.7.1
The Autodoc Command @a
Interface documentation in mCWEB is done using the @a command. It may only be
used in the TEX text description of a section and has the following syntax:
@a{h class i} {h name i} {h description i}
where all { } denote real braces, not optional arguments.
The name of the class is also the name of the TEX file that will be created. All
autodocs are grouped by their class and within their class sorted by their names.
Note, that h name i is a TEX text and no C code, and must please follow TEX
conventions (i.e. all underscores and other special characters must be protected by
a backslash).
The final document is called autodoc.tex and contains all autodoc classes in
the order in which they appeared in the mCWEB source. Unlike named sections which
can only be used in the chapter where they have been defined, the scope of autodocs
is the whole book, so that one can put autodocs of different chapters in the same
class.
There is one special name each autodoc class can have. If one uses * as the
autodoc name, the description is not a real autodoc, but TEX text that is inserted
at the very beginning of the autodoc class file. This can be used to define the title
of the autodoc class (which defaults to the class name):
@a{func} {*} {\def\chapname{Functions}}
If one uses an empty name, one can write an introduction that gets inserted
right after the title. All other names are treated as ordinary autodoc entries that
are sorted and printed in a special way.
Similarly, if one omits the autodoc name as well as the class name, one is
defining the autodoc book header, i.e. the TEX text gets inserted right after the
\input mcwebmac at the beginning of autodoc.tex, the book containing all autodoc classes. A typical autodoc header could look like the following:
@a { } { } {
\input epsf
% for including postscript graphics
\def\title{h title of autodoc book i}
\def\author{h your name i}
\def\topofcontents{\showtitle} % title on same page as toc
}
If one doesn’t define \title, one gets the default title, but the autodoc header
should at least contain the command \showtitle or the autodoc book will have no
title.
2.7.2
TEX Macros for Autodocs
Inside an autodoc description, one should use the macros provided for setting
autodocs. An autodoc usually consists of different parts, like its name, synopsis
or function. Let’s take a look at a typical autodoc describing a function.
2.7. INTERFACE DOCUMENTATION
33
StealMoney
NAME
StealMoney – Steal money from the Federal Reserve Bank. (V77)
SYNOPSIS
err = StealMoney (userName , amount , destAccount , falseTrail );
int StealMoney (char ∗, int, struct AccountSpec ∗, struct Trail ∗);
FUNCTION
Transfer money from the Federal Reserve Bank into the specified interest-earning
checking account. No records of the transaction will be retained.
INPUTS
userName – name to make the transaction under.
amount – number of dollars to transfer (in thousands).
destAccount – A filled-in AccountSpec structure detailing the destination account
(see datatype AccountSpec ).
falseTrail – If the DA_FALSETRAIL bit is set in flags field of destAccount , a
falseTrail structure must be provided.
RESULT
err – zero for success, else an error code is returned (see Financial Error Codes).
EXAMPLE
Federal regulations prohibit a demonstration of this function.
NOTES
Do not run on Tuesdays!
BUGS
Before V66, this function would occasionally print the address and home phone
number of the caller on local police 976 terminals. We are confident that this
problem has been resolved.
SEE ALSO
CreateAccountSpec ( ), Security functions/DestroyEvidence ( )
There are two different macros for autodocs:
\< h part i >
introduces one of the parts that can be seen above. For example, the first part was
created using \<NAME>.
The second macro is used every time we start with an identifier that we describe
afterwards. This was the case with the Name, Inputs and Result parts above. A
\*{h description i}
makes sure that the first line is less intended than the following which can be seen
by looking at destAccount in the Inputs part.
This was written using \*{|destAccount| −− A filled−in...}.
34
CHAPTER 2. THE MCWEB SYSTEM
2.7.3
Autodoc Style Guide
We already have seen a typical autodoc for a function, let’s describe the various
parts in more detail. The autodoc style conforms to the autodoc guide of AT.
NAME: Here, one puts the name of the function followed by a one line description
what it does. Don’t forget to enclose the name in |...| since it is a C text
rather than a TEX text.
SYNOPSIS: The Synopsis has two parts, the C calling convention and the ANSI
function prototype. The Synopsis part is C text that spans over more than
one line, so use the @e command (example code).
\<SYNOPSIS>
@e
h C calling convention i
h ANSI C prototype i
@e
FUNCTION: Describe what the function does in generally accepted English, keep
jargon to a minimum, but don’t sacrifice clarity and accuracy.
INPUTS: Describe the range and domain of each input parameter. Use the same
name token used in the first Synopsis line (so the user can match inputs to
the descriptions). The preferred follower is −− (see example). Don’t forget to
note the actions taken for Λ pointers!
Please use the \* TEX macro described in the previous section.
\<INPUTS>
\*{|name| -- h description i}
RESULT: Describe the range and domain of the output. Describe which abnormal
conditions produce each error output. In case of a void function, this part
will be missing.
EXAMPLE: In the autodoc shown above, there is no real example, but if one
wants to include an example demonstrating how to use the function, use the
@e command to switch example mode on and off (see Synopsis).
Not all functions will need an example how they are called. The example
should be short and must be tested. Write, test, then remove lines if needed
to shorten the example. Use @t\dots@>@; to indicate removed sections.
NOTES: Notes usually contain helpful hints, warnings, tricks, traps and are optional.
BUGS: If there are any, describe the bug, and how it can be avoided. This is
especially useful for libraries where older versions may still be around. List
versions, workarounds, etc.
SEE ALSO: If there are other autodocs which help describe the data structures,
or are otherwise related to this function, place their names here.
Functions in this class are simply listed, with ( ) to indicate they are a function.
Functions from other classes are preceded by the module name. (See the
StealMoney ( ) autodoc for examples).
2.7. INTERFACE DOCUMENTATION
35
Please use the parts in the order indicated above to provide a consistent look to the
reader. Feel free to introduce additional autodoc parts, but each part should have
a well known purpose and position.
Every autodoc entry should have at least a Name part and a Function part, all
functions should also have a Synopsis part. The Inputs and Result part should be
present if there are parameters and return values, respectively.
Autodocs for datatypes usually have different parts. It is recommended to use
at least Name, Definition (like Synopsis) and Description (like Function).
Node
NAME
Node – a node for doubly-linked lists
DEFINITION
struct Node {
struct Node ∗ln Succ ;
struct Node ∗ln Pred ;
};
/∗ successor in the list ∗/
/∗ predecessor in the list ∗/
DESCRIPTION
The Node should be the first element of each structure that has to be part of a
list. It only contains pointers to the successor and predecessor.
2.7.4
Literate Programming and the User Manual
From time to time, one and the same idea arises: not only combining the implementation documentation and code in one file, but also putting the user documentation
into the same file. The intention is to keep the user documentation consistent with
the program. After people realized that this generally does not work, the idea
disappeared until proposed by somebody else a couple of months later.
The user documentation should not be in the same document for the following
reasons:
• The way one presents a program to a programmer is not necessarily the same
way he or she would present it to a user. Users don’t care about data structures
and the relationship between the various parts, what they want to know is
what the program can do and how to work with it.
• In most big companies, user documentation is done by a different department
(this explains why it is often so inconsistent, those writing the user documentation often don’t really know what the real implementation does).
In spite of all, one can use autodoc sections to define user interface documentation
that is not intended for the end user, but should serve as an information base
for the author of the user documentation. This autodoc class will be the base of
facts that gets changed when the functionality changes. The author of the user
documentation has the possibility of writing a user manual that conforms to that
specification. Since he is supposed to have read the program specification too, the
autodoc sections will be rather brief.
36
CHAPTER 2. THE MCWEB SYSTEM
2.8
Copy & Paste
Sometimes, one wants to have a part of the code in two different places. Copying and
inserting by means of an editor is not only a nuisance but also dangerous because
in case one of the copies gets changed, one will have to change all of them (which
are sometimes hard to remember). So, every time one needs consistent copies of
parts of the code, one can use mCWEAVE’s mark/copy/paste commands.
Suppose, one has a C structure and also wants to have it in an autodoc section, something that really happens very often. Then one encloses the part of
the code to copy in @_mark "h name i" and @_copy, thus assigning it the name
h name i. This code chunk can be inserted anywhere in the mCWEB source code using
@_paste "h name i".
@ ...
@a{datatypes} {Node} {
\<NAME>
\*{|Node| -- a node for doubly-linked lists}
\<DEFINITION>
@e
@_paste "Node"
@e
\<DESCRIPTION>
The |Node| should be the first element of each structure that
has to be part of a list. It only contains pointers to the
successor and predecessor.
}
@c
@_export @_mark "Node"
struct Node {
struct Node *ln_Succ,*ln_Pred;
};
@_copy
The scope of the copy buffer commands is a chapter. Note that one can paste a
copy buffer even before defining it.
Part II
Implementation
37
Chapter 3
Common code for mCTANGLE
and mCWEAVE
39
Chapter 4
The mCTANGLE processor
77
Chapter 5
The mCWEAVE processor
189
Part III
Appendices
380
Appendix A
File Survey
When tangling and weaving a book, mCWEB takes a couple of input files, creates
some intermediate files and finally outputs the desired output files. Usually, one
doesn’t have to care about the meanings of the individual file extensions, but if
one is curious, here is a complete description of the purpose of the *.scn, *.dep,
*.shr, . . . files.
A.1
Input files
Input files are files the programmer creates or which are already available on the
system, anyway, mCWEB only reads them.
.prg are book files, which means that they contain the names of all the chapter
files. In addition, they contain the makefile.
.w are the chapter files, which can be compared to CWEB’s web files. They contain
the code and documentation in one book. None of the chapter files of a book
may have the same name as the book itself.
.ch denote change files. They simply replace lines in a book or chapter file by
modified ones. Change files are usually used to port an application to a
slightly different operating system.
.h are include files which usually are system header files. Only mCWEAVE parses
them to find out which types are defined in there. They are always searched
relative to the environment variable INCLUDE. Please don’t forget to define
this environment variable properly. Several paths can be separated by a colon
(as for the UNIX version; on operating system where colons can be part of the
file path commas are used).
A.2
Output Files
All files that are generated by mCWEB and are subsequently processed either by the
compiler or by TEX are called output files. One will not have to care about all of
them.
A.2.1
Output files of mCTANGLE
Here is the list of all files that are created by tangle and will be translated by the
compiler afterwards.
382
A.2. OUTPUT FILES
383
Makefile can take any name specified in the book file and is used to inform the
make utility about the dependencies between all the files of a program and
how to translate the individual files.
.c files are ordinary C files that can be compiled with a C compiler. This is usually
done by make.
.shr files contain code shared between different chapters of the same book. They lie
in the same directory as the associated C files and are automatically included
into those files where needed.
Note that mCWEAVE reads the shared file mCTANGLE outputs (in order to know
what the chapter exports to other chapters). Thus, in order to have proper
indexes, one must have run mCTANGLE before mCWEAVE.
.exp are export files that contain all data exported from a chapter or a book. There
is exactly one export file for the book and for each chapter. The export file
of the book simply includes (#include) the chapters’ export files.
Unlike shared files, export files (like mCTANGLE’s .dep files) are always created
in the directory $(DEPDIR)/bookname where $(DEPDIR) is the environment
variable DEPDIR and bookname is the name of the book file (without .prg).
This is necessary so that export files of other books can be found via the book
name.
Like shared files, export files are read by mCWEAVE, so please take care that all
associated books are tangled.
A.2.2
mCTANGLE’s Information Files
In addition to the files describe above, mCTANGLE creates a couple of information
files it needs to keep information about dependencies. Please never delete one of
these files after tangling, even if they seem to be useless because they are never
passed to the compiler. Usually, one doesn’t have to worry about any of those files,
they are only listed for completeness.
.dep files are so called dependency files that are used to keep track of which chapter
depends on which other chapter of which book. They lie in the same directory
as export files.
The dependency file of a book simply states the chapters the book consists of.
The chapters’ .dep files give a list of other chapters and books they directly
depend on.
.rep files are used to determine if a chapter has to be retranslated. They contain
the name of the change file last used, the names of all files included into the
chapter using @i and if the chapter has an export file.
A.2.3
Output files of mCWEAVE
mCWEAVE’s job is to create the TEX file for the implementation and for the autodoc
of the book. Both of these files can then be passed on to TEX.
.tex files are TEX files. There is a TEX file for the book, one for each chapter and
a file called autodoc.tex which includes all the .adc files. Usually, one only
has to translate tex bookname and tex autodoc to get the final DVI files.
.adc files are autodoc files and in TEX format. There is one autodoc file for each
autodoc class of the book. These files are \input into the file autodoc.tex,
so the user is not supposed to call TEX on them directly.
384
APPENDIX A. FILE SURVEY
.scn files are section files. They are in TEX format and contain all the named
sections of a chapter. There is one section file per chapter. Section files are
read by TEX when it translates the chapter.
.idx files contain the index and—like section files—are read by TEX. There is one
index file for the book (containing the final index) and one for each chapter.
A.2.4
mCWEAVE’s Intermediate Files
mCWEAVE’s intermediate files are true intermediate files, which means that one can
eventually delete all .xid, .sid and iid files after weaving. In any case, one won’t
need to fiddle around with them.
.xid stands for exported identifiers. This files lists all identifiers that are exported
from a chapter together with the section names where they have been defined.
.sid lists all shared identifiers.
.iid states all identifiers imported into a chapter together with the book, chapter
and section number they came from.
A.2. OUTPUT FILES
*.h‡
*.exp†
385
*.xid
*.sid
*.iid
*.idx
*.scn
autodoc.tex
TEX
autodoc.dvi
functions.adc
datatypes.adc
mCWEAVE
foobar.tex
TEX
foobar.dvi
foo.tex
bar.tex
foobar.prg
foo.w
foo.ch
foobar.exp†
bar.w
foo.exp†
foo.ch
bar.exp†
foo.c
mCTANGLE
foo.shr
bar.c
bar.shr
† . . . relative to DEPDIR
‡ . . . relative to INCLUDE
Makefile
†
*.dep
*.rep
Figure A.1: Data-flow of mCWEB
cc
Executable
Appendix B
Summary of all New
Commands
Here is a brief summary of all commands that are new in mCWEB in alphabetical
order:
@_copy
Is used to copy parts of the code into a copy buffer, from which it can then
be pasted to another place in the file. See chapter 2.8.
@_export h C code i
Converts the following C definition into a declaration and puts it into a an
export file which can be included by other books. This is used in order to
make parts of the chapter visible to other books. See Chapter 2.4.1.
@_from (program|library) h book i import [transitively] h chapters i
Imports only some specified chapters of another book. The name of the book
as well as the list of chapters must be enclosed in quotes. See Chapter 2.4.2.
@_global h C code i
Converts the following C definition into a declaration and moves it to the
top of the program (or where @h is given), thus making it known in the whole
chapter. This is especially useful for generating prototypes. See Chapter 2.4.1.
@_import [transitively] (chapter|program|library) h name i
Imports declarations previously exported by means of @_shared or @_export.
See Chapter 2.4.2 for details.
@_mark h copy-buffer i
Sets the beginning of the copy buffer copy-buffer to the pointer where the
statement is. This is used in conjunction with @_copy. The name of the copy
buffer must be enclosed in quotes. See Chapter 2.8
@_paste h copy-buffer i
Pastes the content of a copy buffer defined with @_mark and @_copy.
@_shared h C code i
Converts the following C definition into a declaration and puts it into a shared
file which is included before the global stuff and can also be included by other
chapters of the same book. This is used in order to make parts of the chapter
visible to other chapters. See Chapter 2.4.1.
386
387
@a {h class i} {h name i} {h description i}
Is used to create an autodoc description (i.e. an interface documentation)
which is sorted by its name within its class. See Chapter 2.7 for details.
£
¤
@c h chapter i h change i [h output i]
Only valid in book files. Includes the given chapter. See 2.1. In chapter files,
this starts the C part of a section like it did in CWEB.
@e
Switches ‘example mode’ on and off. This is used to typeset example code that
never gets its way through mCTANGLE. See Chapter 2.6 for further information.
@m [h makefile i]
Only valid in book files. Starts the makefile. For any details, see Chapter 2.5.
Bibliography
[1] Adrian Avenarius and Siegfried Oppermann. FWEB: A literate programming
system for Fortran 8X. ACM SIGPLAN Notices, 25(1):52–58, January 1990.
[2] Jon Bentley. Programming pearls—literate programming. Communications of
the Association for Computing Machinery, 29(5):364–369, May 1986.
[3] Jon Bentley, Donald E. Knuth, and Doug McIlroy. Programming pearls—a literate program. Communications of the Association for Computing Machinery,
29(6):471–483, June 1986.
[4] Preston Briggs. Nuweb, A simple literate programming tool. cs.rice.edu:/
public/preston, Rice University, Houston, TX, 1993.
[5] Marcus E. Brown and David Cordes. Literate programming applied to conventional software design. Journal of Structured Programming, 11(2):85–98,
1990.
[6] John D. Hobby. A METAFONT-like System with PostScript Output. TUGBoat,
10(4):505–512, December 1989.
[7] Donald E. Knuth. The WEB system of structured documentation. Stanford
Computer Science Report CS980, Stanford University, Stanford, CA, September 1983.
[8] Donald E. Knuth. Literate programming. The Computer Journal, 27(2):97–
111, May 1984.
[9] Donald E. Knuth. TEX: The Program, volume B of Computers & Typesetting.
Addison-Wesley, Reading, MA, USA, 1986.
[10] Donald E. Knuth. METAFONT: The Program, volume D of Computers &
Typesetting. Addison-Wesley, Reading, MA, USA, 1986.
[11] Donald E. Knuth. Literate Programming. CSLI Lecture Notes Number 27.
Stanford University Center for the Study of Language and Information, Stanford, CA, USA, 1992.
[12] Donald E. Knuth. The Stanford GraphBase: A Platform for Combinatorial Computing. ACM Press, New York, NY 10036, USA, 1994. [From the
publisher]: . . . represents Knuth’s final preparation for Volume 4 of The Art
of Computer Programming. Through the use of about 30 examples, the book
demonstrates the art of literate programming. Each example is a programmatic
essay, a short story that can be read by human beings, as well as read and interpreted by machines. In these essays/programs, Knuth makes new contributions
to the exposition of several important algorithms and data structures.
388
BIBLIOGRAPHY
389
[13] Donald E. Knuth and Silvio Levy. The CWEB System of Structured Documentation, Version 3.0. Addison-Wesley, Reading, MA, USA, 1993.
[14] Charles Lins. A first look at literate programming. Journal of Structured
Programming, 10(1):60–62, 1989.
[15] Norman Ramsey. Literate-programming tools need not be complex. Report
at ftp.cs.princeton.edu in /reports/1991/351.ps.Z. Software at ftp.cs.
princeton.edu in /pub/noweb.shar.Z and at bellcore.com in /pub/norman/
noweb.shar.Z. CS-TR-351-91, Department of Computer Science, Princeton
University, August 1992. Submitted to IEEE Software.
[16] Lisa M. Smith and Mansur H. Samadzadeh. Measuring complexity and stability
of WEB programs. Journal of Structured Programming, 13(1):35–50, 1992.
[17] Sho-Huan Tung. A structured method for literate programming. Journal of
Structured Programming, 10(2):113–120, 1989.
[18] Ross Williams. Funnelweb user’s manual. ftp.adelaide.edu.au in /pub/
compression and /pub/funnelweb, University of Adelaide, Adelaide, South
Australia, Australia, 1992.