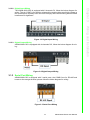
1
User Manual ADAM-3600-C2G iRTU User’s Manual Copyright The documentation and the software included with this product are copyrighted 2015 by Advantech Co., Ltd. All rights are reserved. Advantech Co., Ltd. reserves the right to make improvements in the products described in this manual at any time without notice. No part of this manual may be reproduced, copied, translated or transmitted in any form or by any means without the prior written permission of Advantech Co., Ltd. Information provided in this manual is intended to be accurate and reliable. However, Advantech Co., Ltd. assumes no responsibility for its use, nor for any infringements of the rights of third parties, which may result from its use. Acknowledgements ADAM is a trademark of Advantech Co., Ltd. IBM and PC are trademarks of International Business Machines Corporation. All other product names or trademarks are properties of their respective owners. Product Warranty (2 years) Advantech warrants to you, the original purchaser, that each of its products will be free from defects in materials and workmanship for two years from the date of purchase. This warranty does not apply to any products which have been repaired or altered by persons other than repair personnel authorized by Advantech, or which have been subject to misuse, abuse, accident or improper installation. Advantech assumes no liability under the terms of this warranty as a consequence of such events. Because of Advantech’s high quality-control standards and rigorous testing, most of our customers never need to use our repair service. If an Advantech product is defective, it will be repaired or replaced at no charge during the warranty period. For outof-warranty repairs, you will be billed according to the cost of replacement materials, service time and freight. Please consult your dealer for more details. If you think you have a defective product, follow these steps: 1. Collect all the information about the problem encountered. (For example, CPU speed, Advantech products used, other hardware and software used, etc.) Note anything abnormal and list any onscreen messages you get when the problem occurs. 2. Call your dealer and describe the problem. Please have your manual, product, and any helpful information readily available. 3. If your product is diagnosed as defective, obtain an RMA (return merchandize authorization) number from your dealer. This allows us to process your return more quickly. 4. Carefully pack the defective product, a fully-completed Repair and Replacement Order Card and a photocopy proof of purchase date (such as your sales receipt) in a shippable container. A product returned without proof of the purchase date is not eligible for warranty service. 5. Write the RMA number visibly on the outside of the package and ship it prepaid to your dealer. Part No. XXXXXXXXXX Edition 1 Printed in Taiwan April 2015 ADAM-3600 Series User Manual ii Declaration of Conformity CE The ADAM-4000 series developed by Advantech Co., Ltd. has passed the CE test for environmental specifications when operated within an industrial enclosure (ADAM4950-ENC). Therefore, in order to protect the ADAM modules from being damaged by ESD (Electric Static Discharge), we strongly recommend that the use of CE-compliant industrial enclosure products when using any ADAM module. Technical Support and Assistance 1. 2. Visit the Advantech web site at www.advantech.com/support where you can find the latest information about the product. Contact your distributor, sales representative, or Advantech's customer service center for technical support if you need additional assistance. Please have the following information ready before you call: – Product name and serial number – Description of your peripheral attachments – Description of your software (operating system, version, application software, etc.) – A complete description of the problem – The exact wording of any error messages iii ADAM-3600 Series User Manual ADAM-3600 Series User Manual iv Contents Chapter Chapter 1 Introduction..........................................1 1.1 Product Concept &Target Market.............................................................. 2 Figure 1.1 iRTU Application Architecture..................................... 2 2 Specifications ......................................3 2.1 2.2 Product Key Features ............................................................................... 4 ADAM-3600-C2G Specification................................................................. 5 2.2.1 ADAM-3600-C2G Specification of Main Unit ................................ 5 2.2.2 Expansion Module Specifications ................................................. 7 LED Indicators........................................................................................... 8 Figure 2.1 LED Indicator.............................................................. 8 2.3.1 System LED .................................................................................. 9 2.3.2 Digital Input/Output Indicator LED ................................................ 9 2.3.3 Serial Communication LED........................................................... 9 2.3.4 Ethernet LED ................................................................................ 9 iRTU Dimensions .................................................................................... 10 Figure 2.2 ADAM-3600 Dimensions .......................................... 10 2.3 2.4 Chapter 3 Wiring and Installation ......................11 3.1 Wiring ...................................................................................................... 12 3.1.1 Power Supply Wiring................................................................... 12 Figure 3.1 Power Supply Wiring ................................................ 12 3.1.2 3-1-2........................................................... Input / Output Wiring12 Figure 3.2 Analog Input Wiring .................................................. 12 Figure 3.3 Digital Input Wiring ................................................... 13 Figure 3.4 Digital Output Wiring................................................. 13 3.1.3 Serial Port Wiring ........................................................................ 13 Figure 3.5 Serial Port Wiring...................................................... 13 Installation ............................................................................................... 14 3.2.1 Wall-mounted and DIN-Rail Installation ...................................... 14 Figure 3.6 Wall-mounted Installation ......................................... 14 Figure 3.7 DIN-Rail Installation.................................................. 14 3.2.2 Wireless Module Installation ....................................................... 15 Figure 3.8 Wireless Module Installation..................................... 15 3.2.3 Expansion Input/Output Module Installation ............................... 15 Figure 3.9 Expansion Input/Output Module Installation ............. 15 Figure 3.10Expansion Input/Output Module Installation ............. 15 3.2.4 Writeable Label ........................................................................... 16 Figure 3.11Writeable Label......................................................... 16 3.2.5 SD Card Installation .................................................................... 16 Figure 3.12Card Installation........................................................ 16 3.2.6 SIM Card Installation................................................................... 17 Figure 3.13SIM Card Installation ................................................ 17 Jumper/Switch Settings........................................................................... 18 3.3.1 DIP Switch Settings .................................................................... 18 Figure 3.14DIP Switch Setting.................................................... 18 3.3.2 Jumper Settings .......................................................................... 19 Figure 3.15Jumper Settings........................................................ 19 3.2 3.3 v ADAM-3600 Series User Manual Chapter 4 Advantech iRTU Studio .................... 21 4.1 4.2 iRTU Studio Introduction......................................................................... 22 Using iRTU Studio for Configuration and Management.......................... 22 4.2.1 Project Initialization..................................................................... 22 Figure 4.1 Creating a new project ............................................. 22 Figure 4.2 Adding Devices and Editing ..................................... 23 Figure 4.3 Copying Devices ...................................................... 23 Figure 4.4 Deleting Devices ...................................................... 24 4.2.2 Configuring the Data Center and Link Tag with I/O .................... 24 Figure 4.5 Configuring Onboard I/O .......................................... 24 Figure 4.6 Adding COM port...................................................... 25 Figure 4.7 Adding a COM meter................................................ 26 Figure 4.8 Editing TCP Information ........................................... 26 Figure 4.9 Adding and Deleting a TCP Meter............................ 27 Figure 4.10Configuring a TCP Meters I/O .................................. 27 Figure 4.11Adding and Editing TCP Ports.................................. 28 Figure 4.12Adding a New ZigBee Port ....................................... 29 Figure 4.13Adding a ZigBee Meter............................................. 29 Figure 4.14ZigBee Meter I/O Configuration................................ 30 Figure 4.15User Tag Configuration ............................................ 30 4.2.3 Protocol Service Configuration ................................................... 31 Figure 4.16Adding I/O Tags to the Modbus Address List........... 31 Figure 4.17Adding I/O Tag Information ...................................... 32 Figure 4.18WebAccess whereIAM ............................................. 32 4.2.4 System Settings.......................................................................... 33 Figure 4.19On-board I/O Settings .............................................. 33 Figure 4.20Expansion I/O Settings............................................. 34 Figure 4.21Wired Network Settings............................................ 35 Figure 4.22Wireless Network Settings ....................................... 35 Figure 4.23GPRS Settings ......................................................... 36 Figure 4.24GPRS Script Setting................................................. 36 Project Deployment................................................................................. 36 4.3.1 Device Identification.................................................................... 37 Figure 4.25Identification for Connected RTU Devices ............... 37 4.3.2 Project Download........................................................................ 37 Figure 4.26Project Download ..................................................... 37 4.3.3 Password Settings ...................................................................... 38 Figure 4.27Password Information............................................... 38 Figure 4.28Password Settings.................................................... 38 4.3 Appendix A ADAM-3600 Naming Rules ............... 39 A.1 ADAM-3600 Naming Rules..................................................................... 40 Figure A.1 ADAM-3600 Naming Rules ...................................... 40 Appendix B Interface Definition ........................... 41 B.1 Interface Definitions ................................................................................ 42 B.1.1 Communication Ports ................................................................. 42 B.1.2 I/O Interface Definition ................................................................ 44 ADAM-3600 Series User Manual vi Chapter 1 Introduction 1 1.1 Product Concept &Target Market The ADAM-3600-C2G is an Intelligent Remote Terminal Unit / iRTU, mainly for the oil & gas and water industries. Intelligent network nodes in loT can control the downstream field devices to complete delivery tasks, transfer data to upstream devices wired or wirelessly. It is a key to connecting devices to the Internet of things architecture. In the remote and wide ranging oil, gas and water application site maintenance and updating equipment is extremely costly. Intelligent RTU can perform remote monitoring, operation, maintenance and updates via the Internet. iRTU can perform up-date, complete delivery tasks at the site, and update data to the cloud. iRTU can also communicate with each other, quickly handle I/O correlation on emergencies to reduce the loss The ADAM-3600 has a high performance and low power processor, adopts 20 local I/ O points and wired and wireless communication modes, users can collect, process and distribute the local information. It has a built-in real-time operating system and a real-time database, providing customers with an open interface and supports diverse programming languages. Figure 1.1 iRTU Application Architecture ADAM-3600 Series User Manual 2 Chapter 2 Specifications 2 2.1 Product Key Features Wireless communication for high-efficient transmission An RTU is usually applied to a wide range of monitoring, such as oil field or oil pipelines. In wide area environments, wired communication often has cost and maintenance problems. The ADAM-3600-C2G series two built-in Mini-PCle cards slots and can support two types of different wireless communication interfaces. The supported wireless communication functions include: GPRS, 3G, Wi-Fi and Zigbee, users have many choices in the application of wireless communication, and are not restricted by field conditions. High performance low-power CPU/RAM The ADAM-3600-C2G comes with a 32-bit Cortex A8 600MHz CPU and DDR3 memory chips, which greatly improves the processing speed and efficiency. Based on these advantages and its unique low-power design, customers could take their time to tackle complex logic programs. Wide range of operating temperature with durability in harsh environment and reducing maintenance costs It can be used for outdoor control cabinets and therefore must be able to withstand the heat of summer and the cold of winter. The ADAM-3600 supports an operating temperature range of - 40oC ~ 70oC. The selected components are industrial grade, and have been tested with the strictest environmental control, to ensure that the products have a long life and, stable working in harsh environments. Convenient remote project configuration software iRTU Studio Provides project configuration software with remote operation. Users can configure all the devices in an offline and group mode, and can automatically conduct remote downloading based on its own code. Users can use this software for remote monitoring, updating the programmable logic and firmware, to save the cost of manpower and materials. Supports open communication protocols In addition to the standard Modbus communication protocol, it also supports the object DNP3 protocol. DNP3 is an international standard for RTU applications, and can also realize data identification, breakpoint transmission, initiative report and other functions under this protocol user can quickly integrate most of the SCADA system. Multiple programming interfaces Adopts an open real-time Linux system architecture, and run the real-time database. Transmission gives priority to the customizable tag. Data with a simple configuration can be converted instantly within the different communication protocols. And provides the IEC - 61131-3 standard & C/C + + library for the customer to develop programs. This lets users develop programmable logic control in the most convenient way. ADAM-3600 Series User Manual 4 2.2 ADAM-3600-C2G Specification 2.2.1 ADAM-3600-C2G Specification of Main Unit 2.2.1.1 System Specifications CPU A8 AM3352BZCZD60 RAM DDR3 256MB Battery Backup RAM 32KB Power Requirement 9-36VDC Digital Input/ Pulse In 8-ch Digital Output/ Pulse Output 4-ch Analogue Input 8-ch Extension I/O Slot 4-Slot Serial Port 2 x RS-485 1 x RS-232/485(DB9) Wireless Interface 2 x Mini-PCIe (1x Half-Size/ 1 x Full-Size) Zigbee Serial Signal GPRS/3G/ Wi-Fi USB Signal USB 1 x USB2.0 Ethernet 2 x RJ-45 Display 1 x VGA LEDs DI/DO/System/Serial Port/LAN SD Card Standard SD (For Data Storage) Micro SD(1GB For OS Storage) Operating Temperature -40~70°C Storage Temperature -40~85°C 5 ADAM-3600 Series User Manual Specifications Intelligent communication condition monitoring software iCDManager Communication is the key function of RTU applications. RTU hardware can monitor the health status of the hardware communication. Users can use the intelligent algorithm to identify the health status of communications lines, remotely monitor the communication quality through the network in group mode, conduct the maintenance in advance, so as to avoid emergency repair caused by temporary failure. Chapter 2 NodeID as identification facilitate remote batch configuration ADAM-3600 has a six bit DIP-switch on board which can be identification for 64 devices on the field. Through an ordinary cable, it could download configuration documents into RTU devices (with a maximum of 64), and customers could find out the sources of faults through ID codes when variations encountered in the performance of RTU. 2.2.1.2 Input / Output Specification Analog Input Channel 8, differential Input Type Voltage, Current Voltage/Current Range ±10V, ±2.5V, 0~20mA, 4~20 mA Resolution 16-bit Sampling rate 10 samples/second (total) Input Impedance 10M Accuracy ±0.1% or better (Full Scale) CMR @ 50/60 Hz 120 dB NMR @ 50/60 Hz 100 dB Span Drift ± 25 ppm/? Zero Drift ± 3 μV/?, ± 3 μA/? Isolation Voltage 2,000VDC Burn-out detection Yes (Current-only) Digital Input/Pulse Input Channel 8 Input Type Sink (Wet Contact)/ Counter Wet Contact Input Logic0: 0 ~ 5 VDC Logic 1: 11~30VDC Rated Voltage 12/24VDC Rated Input Current >5mA@12VDC >10mA@24VDC Input Filter Programmable, Default: 3ms Pulse Input Frequency 150HZ Over Voltage Protection +40VDC Isolation Voltage 2000VDC Digital Output/Pulse Output Channel 4 Output Type Open Collector (Sink) OC Output Rated Voltage 8~30 VDC Rated Current 200mA(max.load) Over Voltage Protection +40VDC Pulse Output Frequency 1KHz Isolation Voltage 2000VDC 2.2.1.3 Environmental Specifications Operating Temperature: -40~70°C Storage Temperature: -40~85°C Operating Humidity: 20~95% (non-condensing) Storage Humidity: 0 ~ 95% (non-condensing) ADAM-3600 Series User Manual 6 ADAM-3600-C2G support four slots expansion can support different type I/O modules in one integrated unit. 2.2.2.1 ADAM-3617 (4-ch AI) 4, differential Input Type Voltage, Current Voltage/Current Range ±10V, ±2.5V, 0~20mA, 4~20 mA Resolution 16-bit Sampling rate 10 samples/second (total) Input Impedance 10M Accuracy ±0.1% or better (Full Scale) CMR @ 50/60 Hz 120 dB NMR @ 50/60 Hz 100 dB Span Drift ± 25 ppm/? Zero Drift ± 3 μV/?, ± 3 μA/? Isolation Voltage 2000VDC Burn-out detection Yes (Current-only) Specifications Channel 2.2.2.2 ADAM-3618 (3-ch Thermocouple ) Channel 3 , differential Input Type J,K,T,E,R,S,B Type Thermocouple Resolution 16-bit Sampling rate 10 samples/second (total) Input Impedance 2M Accuracy ±0.1% or better (Full Scale) CMR @ 50/60 Hz 90dBs NMR @ 50/60 Hz 60dBs Span Drift ± 25 ppm/? Zero Drift ± 3 μV/? Isolation Voltage 2000 VDC Burn-out detection Yes (Current-only) 2.2.2.3 ADAM-3622 (2-ch AO ) Channel 2 Output Type Voltage, Current Output Range 0 ~ 10 VDC, 0~20 mA, 4~20 mA Resolution 12-bit Accuary ±0.1% or better (Full Scale) Current Load Resistor 0 ~ 500 Span Drift ± 25 ppm/? Zero Drift ± 3 μV/? Isolation Voltage 2000 VDC Burn-out detection Yes (Current-only) 7 Chapter 2 2.2.2 Expansion Module Specifications ADAM-3600 Series User Manual 2.2.2.4 ADAM-3651 (8-ch DI/ PI ) Channel 8 Input Type Sink (Wet Contact)/ Counter Wet Contact Input Logic0: 0 ~ 5 VDC Logic 1: 11~30VDC Rated Voltage 12/24 VDC Rated Input Current >5mA@12VDC >10mA@24VDC Input Filter Programmable, Default: 3ms Pulse Input Frequency 150HZ Over Voltage Protection +40 VDC 2.2.2.5 ADAM-3656 (8-ch DO/ PO ) Channel 8 Output Type Open Collector (Sink) OC Output Rated Voltage 8~30 VDC Rated Current 200 mA(max.load) Over Voltage Protection +40 VDC Pulse Output Frequency 1KHz Isolation Voltage 2000 VDC 2.2.2.6 ADAM-3664 (4-ch RO) Channel 4 Output Type Open Collector (Sink) OC Output Rated Voltage 8~30 VDC Rated Current 200mA(max.load) Over Voltage Protection +40 VDC Pulse Output Frequency 1KHz Isolation Voltage 2000 VDC 2.3 LED Indicators Figure 2.1 LED Indicator ADAM-3600 Series User Manual 8 LED Color Function Description PWR Green Light on, Device powered RUN Green Blinking, Normal Operation (control by user’s program or Softlogic) ERR Red Light on, System failure (control by user’s program or Softlogic) BAT Red Light on, battery lower than 5V PROG Green Control by user’s program LED Color Function Description DI0 Green DI1 Green Light on, the channel is activated by input signal DI2 Green DI3 Green DI4 Green DI5 Green DI6 Green DI7 Green DO0 Green DO1 Green DO2 Green DO3 Green Light on, the channel output is activated 2.3.3 Serial Communication LED LED Color Function Description TX1 Orange Blinking, COM1 is sending data RX1 Green Blinking, COM1 is receiving data TX2 Orange Blinking, COM2i s sending data RX2 Green Blinking, COM2 is receiving data TX3 Orange Blinking, COM3 is sending data RX3 Green Blinking, COM3 is receiving data 2.3.4 Ethernet LED LED Color Function Description Link1 Orange Light on, LAN1 is unconnected with Ethernet Act1 Green Blinking, LAN1 is sending data to Ethernet Link2 Orange Light on, LAN2 is unconnected with Ethernet Act2 Green Blinking, LAN2 is sending data to Ethernet 9 ADAM-3600 Series User Manual Specifications 2.3.2 Digital Input/Output Indicator LED Chapter 2 2.3.1 System LED 2.4 iRTU Dimensions Figure 2.2 ADAM-3600 Dimensions ADAM-3600 Series User Manual 10 Chapter 3 3 Wiring and Installation 3.1 Wiring 3.1.1 Power Supply Wiring ADAM-3600-C2G supports mains input ranging from 10 VDC to 30 VDC. Users can choose standard 12 VDC or 24 VDCC power supply. Figure 3.1 Power Supply Wiring 3.1.2 3-1-2Input / Output Wiring 3.1.2.1 Analog Input Wiring ADAM-3600-C2G equips with 8 channels AI with differential wiring type, wire as shown below: Figure 3.2 Analog Input Wiring ADAM-3600 Series User Manual 12 3.1.2.3 Digital Output Wiring ADAM-3600-C2G is equipped with 4 channels DO, follow the below diagram for wiring Figure 3.4 Digital Output Wiring 3.1.3 Serial Port Wiring ADAM-3600-C2G is equipped with 3 serial ports, the COM2/3 are for RS-485 and locate on the orange terminal, please follow the below diagram for wiring: Figure 3.5 Serial Port Wiring 13 ADAM-3600 Series User Manual Wiring and Installation Figure 3.3 Digital Input Wiring Chapter 3 3.1.2.2 Digital Input Wiring The ADAM-3600-C2G is equipped with 8 channels DI, follow the below diagram for wiring. The pin “COM” is for positive voltage wiring and provides a pull high voltage to the unwired pins. Normally user can leave it empty, and consider wiring while the field interference is significant. 3.2 Installation 3.2.1 Wall-mounted and DIN-Rail Installation The ADAM-3600-C2G supports two types of installation: Wall-mounted and DIN-Rail Installation. For wall-mounted installation, users can fix the device on the wall with 4 screws as shown below. Figure 3.6 Wall-mounted Installation For DIN-Rail installation, follow the below diagram to put the device on the DIN-Rail, and lock the 3 lock to fix the device on the DIN-Rail Figure 3.7 DIN-Rail Installation ADAM-3600 Series User Manual 14 There are two wireless expansion interfaces under the gray cover, which supports two Mini-PCle ports, and can insert wireless LAN card. Two overlapping network cards can be installed. The below supports half-sized card while the upper supports full-size card. Two screws are needed to install each card, and then the antenna could be installed. More details as follows: 3.2.3 Expansion Input/Output Module Installation The ADAM-3600-C2G has four expansion slots named A, B, C and D with a black cover. The following is the installation methods when customers need to plug expansion modules. Figure 3.9 Expansion Input/Output Module Installation Figure 3.10 Expansion Input/Output Module Installation 15 ADAM-3600 Series User Manual Wiring and Installation Figure 3.8 Wireless Module Installation Chapter 3 3.2.2 Wireless Module Installation 3.2.4 Writeable Label To make it more convenient for users to record RTU device information, we especially design a writeable label on the cover. User can write any information to help to keep some important project information. Figure 3.11 Writeable Label 3.2.5 SD Card Installation The ADAM-3600-C2G supports two types of SD cards used as storage. One is Micro-SD, which carries the OS. The other is a Standard SD for storing data. It is available for users to choose and configure. The installation location of Standard SD is at the bottom of the antenna, poke the black blade upward, and you will find the slot, insert the SD card, push the black cover downward as follows: Figure 3.12 Card Installation ADAM-3600 Series User Manual 16 When customers install a 3G/GPRS module, they need to insert a SIM card, follow below diagram to install the SIM card. The SIM card is micro-SIM (3FF) type. Chapter 3 3.2.6 SIM Card Installation Wiring and Installation Figure 3.13 SIM Card Installation 17 ADAM-3600 Series User Manual 3.3 Jumper/Switch Settings 3.3.1 DIP Switch Settings ADAM-3600-C2G IO has two DIP switches as follows: Figure 3.14 DIP Switch Setting No. Name Meaning Description 1 SW6 Node ID 6-bit: supports 0~63 devices ON-1/ OFF-0 1 is for high bit, 6 is for last bit, ex: [0 0 0 0 0 1] = 1 [1 0 0 0 0 0] = 32 2 SW5 8-ch AI Current or voltage range select ON- Current OFF- Voltage ADAM-3600 Series User Manual 18 Chapter 3 3.3.2 Jumper Settings The ADAM-3600 CPU has two Jumpers as follows: Wiring and Installation Figure 3.15 Jumper Settings No. Name Meaning Descriptions 1 CN14 COM1 DB9 Port select RS-232 or RS-485 RS-485 RS-232 2 CN15 Watchdog Enable Jumper 19 ON- Enable OFF- Disable ADAM-3600 Series User Manual ADAM-3600 Series User Manual 20 Chapter 4 Advantech iRTU Studio 4 4.1 iRTU Studio Introduction If there’s one or more RTU devices in the field site it’s more convenient for users if there is a tool to complete the integrated configuration and remote management. For this, Advantech developed a utility software to facilitate these tasks. Advantech iRTU Studio can be operated in Windows XP/ Windows 7 system and has the following functions: Provide interface for off-line project configuration, and remote deploy the configuration base on the adjustable NodeID. Easy to configure the project tags with actual engineering meaning, and easy to map these tags to the Modbus and DNP3 services. Users could set each input and output range and support AI calibration for on onboard IO and Expansion IO. With regard to network communications, user can complete the settings for Ethernet, Wi-Fi, 3G and GPRS via iRTU Studio. ADAM-3600 provides Modbus/RTU, Modbus/TCP and DNP3.0 servers, and customers can flexibly choose protocol services according to their own needs. Advantech iRTU Studio Support remote monitoring of communication status of serial ports and Ethernet ports Advantech iRTU Studio can be downloaded from Advantech support website: http://support.advantech.com/ 4.2 Using iRTU Studio for Configuration and Management 4.2.1 Project Initialization Project Initialization can be achieved while users start iRTU software, and step by step complete 'Create Project' -> Right click to 'Add Device' -> Right click to 'Copy' (for large number ADAM-3600 configuration) 4.2.1.1 Creating a new project Start iRTU Studio software, click “create project” button under the taskbar “Project”, and you will find the dialog box as follows, what you need to do is to input the project name, description and select the storage directory, then click “OK” button. Figure 4.1 Creating a new project ADAM-3600 Series User Manual 22 After completing the creation of the new project, users can right-click on the project name to check the project information and add new devices. To add devices, user need to input the name, device type Node ID and description. The field of password contains the default setting; user can change it in “Deploy” taskbar “Password Setting”. See more details in Article 13-3 After finish the device adding, user's can modify the device information by double-click the device name on the left-hand-side tree view, or right-click on the device name, and choose “edit”. 4.2.1.3 Copying Devices To reduce the complexity of configure a lot of ADAM-3600 on the field, iRTU Studio supports the ability to copy device information within a project. Users can right-click on the device name and choose “copy”. The copied device will have the same configuration as the original device, but user still need to be modify the name, NodeID or IP as well as the description according to the project planning. Figure 4.3 Copying Devices 23 ADAM-3600 Series User Manual Advantech iRTU Studio Figure 4.2 Adding Devices and Editing Chapter 4 4.2.1.2 Adding Devices and Editing a Project 4.2.1.4 Deleting Devices Users can right-click on the device name and choose “delete” to delete a device in the project. Figure 4.4 Deleting Devices 4.2.2 Configuring the Data Center and Link Tag with I/O After adding a device, there will be an item "Data Center" under the added device. It is a place for user to manage data acquisition, which is an important functionality for a RTU. Through this interface, user can manage all the ADAM-3600 resources which are able to fetch data from the field site. The ADAM-3600 can support many interfaces for data acquisition, include on-board I/O, expansion I/O, serial device I/O, Ethernet device IO, and Wireless Zigbee device I/O. All these above I/Os can be configured as a tag by using the iRTU Studio. Beside the real I/O tags, user can also build some user tags which is with specific engineering purpose for management under the iRTU Studio 4.2.2.1 OnBoard I/O Configuration ADAM-3600 is equipped with 8-ch AI, 8-ch DI, and 4-ch DO on the device, user can map the real input signals to the IO tag through following instructions: Figure 4.5 Configuring Onboard I/O ADAM-3600 Series User Manual 24 4.2.2.2 Serial I/O Device Configuration The ADAM-3600 has three serial ports including 1x RS232/RS485, 2 x RS485. iRTU Studio can edit, delete and add device on these three ports. 1. 2. Figure 4.6 Adding COM port 25 ADAM-3600 Series User Manual Advantech iRTU Studio 3. Right click the “Data Center” on the left-side tree view, and select “Add Port” In the “Type” field of “New Port” page, select "Serial", and input the related parameters for the serial port. Click button “Apply”, the port will be created on the left-hand side tree view under the “Data Center” item Chapter 4 For the analogue I/O tags, RTU Studio provides the “Advanced” function for user to do the scaling. In the dialog window, many kinds of formulas are provided for user to scale the measured signal to the corresponding real physical signal. 4. 5. 6. 7. Right click the “COMx” item created on the previous step and select “Add Meter” to add meter. In the “New Meter” page, type in the name and related parameters, and click “Apply” to add meter. While the meter added, there is a new item “I/O Tag” below the meter, click the “+” in front of the COM port and meter to unfold it. Figure 4.7 Adding a COM meter Double click the “IO Tag” item to edit the tag to map with the data from serial meter. To delete a COM port or a meter, right click to the select the target item and select “Delete”. 4.2.2.3 Ethernet I/O Device Configuration ADAM-3600 is equipped two Ethernet ports; user can edit, delete and add devices through iRTU Studio. 1. 2. 3. Double click or right click the “TCP” item under the “Data Center” in the left side tree view and choose “edit” as shown in the following figure to edit the port. Figure 4.8 Editing TCP Information Right click “TCP” item, choose “Delete”, the port will be deleted after your confirmation. Right click “TCP” item, choose “Add Meter” to add a meter. ADAM-3600 Series User Manual 26 In the “New Meter” page, type in the name and related parameters, and click “Apply” to add meter. While the meter added, there is a new item “I/O Tag” below the meter, click the “+” in front of the port and meter to unfold it. 6. Figure 4.10 Configuring a TCP Meters I/O iRTU Studio default provide 1 TCP port for Ethernet IO configuration, if user need another TCP port, please right click on the “Data Center” and select “Add Port”. 27 ADAM-3600 Series User Manual Advantech iRTU Studio 5. Figure 4.9 Adding and Deleting a TCP Meter Double click the “I/O Tag” item to edit the tag to map with the data from Ethernet meter. Chapter 4 4. 7. In the “Type” field of "New Port" page, select “TCPIP”, and input the related parameters for the serial port. Then click button “Apply”, a new TCP port will be created. Figure 4.11 Adding and Editing TCP Ports 4.2.2.4 Zigbee Wireless I/O Device Configuration A Zigbee wireless communication module can be added to the ADAM-3600 from COM port or USB port on PCIe-mini card socket. To get data from the Zigbee Wireless Meter, use the following steps: 1. 2. 3. Right click the “Data Center” on the left-side tree view, and select “Add Port” In the “Type” field of “New Port” page, select “XBee/XBee-PRO” which is the supported Zigbee driver for ADAM-3600. In the section of “Serial Port Setting”, please select the port where the Zigbee communication module connects to and adjust related parameter to communicate with the module. Please note if the resource is shown on the tree view, it is occupied by other meter, the resource will not be shown on the drop-down menu of the “Port” field. ADAM-3600 Series User Manual 28 6. Figure 4.12 Adding a New ZigBee Port Right click the port created on the previous step and select “Add Meter” to add meter. In the “New Meter” page, type in the name and related parameters, and click “Apply” to add meter. While the meter added, there is a new item “I/O Tag” below the meter, click the “+” in front of the port and meter to unfold it. Figure 4.13 Adding a ZigBee Meter 29 ADAM-3600 Series User Manual Advantech iRTU Studio 5. Click button “Apply”, the port will be created on the left-hand side tree view under the “Data Center” item. Chapter 4 4. 7. 8. Double click the “I/O Tag” item to edit the tag to map with the data from Zigbee wireless meter. Figure 4.14 ZigBee Meter I/O Configuration To delete a Zigbee port or a meter, right click to the select the target item and select “Delete”. 4.2.2.5 User Tag Configuration We mainly introduced I/O tag configuration in the former articles, while there are some nonactual I/O tags in the project configuration, which allow users to choose and configure. This is called as user tag. These user tags could be used for C language and KW language programming as a control signal as well as a presentation of computation results. In a word, all of these user tags will fulfill user's demands for data. iRTU Studio supports user tag configuration. Users can configure step by step into RTU as shown in the following: Figure 4.15 User Tag Configuration ADAM-3600 Series User Manual 30 The ADAM-3600-C2G is an open basis intelligent RTU which is able to integrate many kinds of communication protocol to communicate with the center station. And it is default with two standard protocol services: Modbus and DNP3. 4.2.3.1 Modbus Service ADAM-3600-C2G Modbus address mapping: Modbus Client request data of Server by Modbus addressing. Thus, in the lower table is an interface to map the tags with Modbus address. To add tag into Modbus address list, please double click the field of column “Tag Name” and select the tag from the tree-view as shown on below figure. And select the “Tag Type” from the draw down list. If the tag is an analogue type (AI/AO), please also select the related “Data Type” from the draw down list. The “Modbus Address” is the address for client to access the tag data. Figure 4.16 Adding I/O Tags to the Modbus Address List 31 ADAM-3600 Series User Manual Advantech iRTU Studio The ADAM-3600-C2G can be used as Modbus Server for Modbus Client accessing. There are two types of services supported: Modbus TCP Server and Modbus RTU Server Users can check the Checkbox to enable the services, fill all the required parameters for these services and click “Apply”. Note if all the serial ports are occupied there will pop-up and error message while you enable the Modbus RTU Server. Go back to “Data Center” tree-view to release COM port resource. To release the COM port, right click on the resource and select “Delete”, the resource will be remove from the “Data Center” configuration. Chapter 4 4.2.3 Protocol Service Configuration Figure 4.17 Adding I/O Tag Information To connect with WebAccess, users should click WebAccess WhereIAm. Make sure that the physical IP address with WebAccess is right. The parameter definition as below: IP Address: physical IP address with WebAccess; Port: default TCP port for WebAccess; Period (s): for connecting with WebAccess Center; Duration (s): communication time; it should be shorter than Periods. the default value (0) means there is no interruption during communication with WebAccess. Figure 4.18 WebAccess whereIAM ADAM-3600 Series User Manual 32 The system setting of iRTU Studio includes two parts: I/O setting and network setting. 4.2.4.1 I/0 Settings The ADAM-3600-C2G is equipped with 8 AI channels, 8 DI channels, and 4 DO channels. Besides, there are four I/O expansion slots which can integrate various I/O modules into the main unit. In the Studio, for both on-board I/O and expansion I/O, user can set mode, I/O range, integration time as well as calibration. Figure 4.19 On-board I/O Settings 33 ADAM-3600 Series User Manual Advantech iRTU Studio Configure the I/O setting as below figures to provide an initiated setting to the on-board I/O and expansion I/O (1) AI supports 4 IO ranges: ±10V,±2.5V?0~20mA,4~20 mA (2) DI supports 2 modes: Normal & Counter (3) DO supports 2 modes: Normal & PWM The figure below shows the configuration page the ADAM-3600-C2G on-board IO; AI,DI,DO in the same page: Chapter 4 4.2.4 System Settings While configuring the expansion module, please click to select the target expansion slot first and select the module from the draw down list. Then configure the related setting by click and select from the related column, please refer to the figure below: Figure 4.20 Expansion I/O Settings Click the button “Calibration” to execute the calibration function for the analogue input channel on board. User has to provide the precious source for the zero and span calibration. User only need to calibrate the channel 0, the related parameter will apply to all other channels automatically. Please follow the instruction to finish the calibration. Note! The analogue I/O is default well calibrated and we do not recommend user do the calibration by one-self. Once the calibration is needed, we suggest sending back to RMA for calibration service. ADAM-3600 Series User Manual 34 The ADAM-3600-C2G supports wired and wireless network connections to communicate with other devices. User has to configure the network environment in this section. Cable Network Settings The ADAM-3600-C2G has two Ethernet ports and users can configure them respectively. Under the concomitances that Ethernet ports supports IPv4 and IPv6, users can set RTU as DHCP or fixed IP. Wireless Network Settings In the Wi-Fi setting section, users have to input an SSID to join the network. For the network security, there are three mechanisms available: Open: No password needed, the RTU will auto connect to the Wi-Fi network. WEP: A kind of network encryption. Need password, check the password of connected Wi-Fi Access Point. WPA/ WPA2 PSK: A kind of advanced network encryption. Need password, check the password of connected Wi-Fi Access Point. Figure 4.22 Wireless Network Settings 35 ADAM-3600 Series User Manual Advantech iRTU Studio Figure 4.21 Wired Network Settings Chapter 4 4.2.4.2 Network Function Setting GPRS Settings In the GPRS setting section, user has to choose the GPRS connection to join the network. and make sure the Connect has been clicked: Figure 4.23 GPRS Settings If there are different communicated modes applied. Users should make scripts. Figure 4.24 GPRS Script Setting 4.3 Project Deployment This section will introduce the steps to download the configured project to the related RTU devices. Users can one click to download the project to many RTU devices through the NodeID identification. ADAM-3600 Series User Manual 36 Before we start to download the configuration to the RTU device, users have to adjust the connected RTUs to be with the correct NodeID as project required. The “Device Search” will help user to explore all the RTU devices which the NodeID is mentioned in the configured project. After the search, utility will feedback the IP address of the RTUs and show the status as “on-line”. If the NodeID setting is incorrect or the device is actually not in the network, the status will show “off-line” 4.3.2 Project Download While all the RTU devices are no-line, click “Project Download” to download the project into the RTU devices. If users click and active the project node on the left-hand-side tree view and click the “Project Download”, user can download the whole project to all the devices on line by one click. If users only click and activate one target device on the tree view, the “Project Download” will only download the project to the selected device. Figure 4.26 Project Download 37 ADAM-3600 Series User Manual Advantech iRTU Studio Figure 4.25 Identification for Connected RTU Devices Chapter 4 4.3.1 Device Identification 4.3.3 Password Settings For security, the ADAM-3600-C2G has a default password "00000000", and iRTU Studio also sets it as the default password for RTU devices. Figure 4.27 Password Information To change the password, follow the steps below: 1. 2. 3. iRTU Studio connects with the RTU device, and it has been identified. Click 'password setting', select the device, input the old and new password respectively and then confirm the new password. Back to the General Information of the RTU device, edit 'password' to ensure it fit the new password. Please note the “Project download” will not work if the password does not match. Figure 4.28 Password Settings ADAM-3600 Series User Manual 38 Appendix A A ADAM-3600 Naming Rules A.1 ADAM-3600 Naming Rules The ADAM-3600 includes two types of products that are ADAM-3600-A1F and ADAM-3600-C2G, which shows a difference as far as their design and features. In this Manual, we focus on the introductions of ADAM-3600-C2G. Figure A.1 ADAM-3600 Naming Rules Examples: ADAM-3600-C2GL1AE: Cortex A8 iRTU for Oil & Gas (C Series) ADAM-3600-A1FN0AE: Cortex M4 Remote IO for Facility Monitoring (A Series) ADAM-3600 Series User Manual 40 Appendix B B Interface Definition B.1 Interface Definitions B.1.1 Communication Ports B.1.1.1 COM 1: RS-232/RS-485 Connection: DB-9 Baud rate: 1200~115.2k bps RS232 signals: RxD, TxD, GND, RTS, CTS RS485 signals: DATA+, DATA- PIN RS-232 Signal 1 N/C 2 RXD 3 TXD 4 N/C 5 GND 6 N/C 7 RTS 8 CTS 9 N/C PIN RS-485 Signal 1 DATA- 2 DATA+ 3 N/C 4 N/C B.1.1.2 COM 2 & COM3: RS-485 Connection: Terminal Block Baud rate: 1200~921.6k bps RS-485 signals: DATA+, DATA Communication Isolation: 2000VDC PIN RS-485 Signal 1 DATA2+ 2 DATA2- 3 DATA3+ 4 DATA3- ADAM-3600 Series User Manual 42 PIN USB Signal 1 VCC 2 Data- 3 Data+ 4 GND Appendix B Interface Definition B.1.1.3 USB Port Connection: USB 2.0 1800 connect USB signals: Vcc, Data-, Data+, GND B.1.1.4 LAN1 and LAN2: Ethernet Port Connection: RJ-45 Base-T 1800 connect Transfer rate: 10/100Mbps LAN signals: TD+, TD-, RD+, RDPIN Signal 1 2 3 4 5 6 7 8 TD+ TD‐ RD+ N/C N/C RD‐ N/C N/C 43 ADAM-3600 Series User Manual B.1.2 I/O Interface Definition ADAM-3600 Series User Manual 44 Appendix B Interface Definition ADAM-3600 Series User Manual 45 www.advantech.com Please verify specifications before quoting. This guide is intended for reference purposes only. All product specifications are subject to change without notice. No part of this publication may be reproduced in any form or by any means, electronic, photocopying, recording or otherwise, without prior written permission of the publisher. All brand and product names are trademarks or registered trademarks of their respective companies. © Advantech Co., Ltd. 2015