1
Database Design 1
Reference
Database Design 1
Reference
1. Background to Databases ............................................................................................................3
1.1 What is a Database?.................................................................................................................3
1.2 Database Facts ..........................................................................................................................3
1.4 Database Terminology.............................................................................................................4
2. Database Design Process.............................................................................................................6
2.1 The Importance of Database Design....................................................................................6
2.2 The Database Design Process...............................................................................................7
3. Access Overview.............................................................................................................................8
3.1 Microsoft Access Database Objects ....................................................................................8
3.2 Microsoft Access Overview....................................................................................................8
4. Creating Databases ........................................................................................................................9
4.1 Microsoft Access Naming Conventions..............................................................................9
4.2 Database Window .....................................................................................................................9
5. Record Structures Revision .......................................................................................................11
5.1 Tables.........................................................................................................................................11
5.2 Records and Fields.................................................................................................................11
6. Tables...............................................................................................................................................13
6.1 Database Components ..........................................................................................................13
6.2 Table Design.............................................................................................................................13
6.3 Working with Access Tables................................................................................................13
6.4 Tables - Design View..............................................................................................................14
6.5 Tables - Datasheet View ........................................................................................................15
6.6 Access Field Data Types.......................................................................................................16
6.7 Indexes ......................................................................................................................................17
6.8 Primary Key ..............................................................................................................................17
6.10 Field Properties .....................................................................................................................17
6.11 Field Formatting ....................................................................................................................18
6.12Adding Records .....................................................................................................................18
6.13 Saving Records .....................................................................................................................19
6.14 Selecting Fields and Records............................................................................................19
6.15 Editing Field Data..................................................................................................................20
6.16 Finding and Filtering Data ..................................................................................................20
6.17 Browsing Records ................................................................................................................21
6.18 Deleting Records and Data.................................................................................................21
7. Importing External Data...............................................................................................................22
7.1 Importing External Data .......................................................................................................22
learnresource.doc
1of 53
19/09/02
Database Design 1
Reference
8. Relationships .................................................................................................................................23
8.1 Types of relationships ...........................................................................................................24
8.2 Referential Integrity Rules ....................................................................................................25
9. Documenting a Database Design..............................................................................................26
10. Queries ..........................................................................................................................................27
10.1 Access Query Overview......................................................................................................27
10.2 Using Queries to Ask Questions ......................................................................................27
10.3 Creating and Running Queries..........................................................................................29
10.4 Viewing a Query's Results as a Datasheet.....................................................................31
10.5 Totals Queries .......................................................................................................................31
10.6 Multiple Tables and Query Joins ......................................................................................31
10.7 Criteria .....................................................................................................................................32
10.8 Expressions ...........................................................................................................................32
10.9 Expression Examples ..........................................................................................................34
10.10 Calculated Expressions ....................................................................................................34
10.11 Wildcard Characters ..........................................................................................................35
10.12 Sorting Records ..................................................................................................................36
11. Forms .............................................................................................................................................37
11.1 Forms overview.....................................................................................................................37
11.2 Form Design View.................................................................................................................38
11.3 Control .....................................................................................................................................40
11.4 Form Design Tools ...............................................................................................................40
11.5 Toolbox....................................................................................................................................41
11.6 Field List..................................................................................................................................41
11.7 Property Sheet.......................................................................................................................41
11.8 Formatting a form in Design View ....................................................................................42
11.9 Combo Lists and List Boxes..............................................................................................42
11.10 Working with Form Filters ................................................................................................43
11.11 Subforms ..............................................................................................................................45
12. Macros ...........................................................................................................................................47
12.1 Macro Overview.....................................................................................................................47
12.2 The AutoExec Macro............................................................................................................47
12.3 Group Macros ........................................................................................................................47
12.4 Conditional Actions..............................................................................................................48
12.5 Command Buttons................................................................................................................49
13. Reports ..........................................................................................................................................50
13.1 Overview .................................................................................................................................50
13.2 The Report Window..............................................................................................................51
14. Printed Output .............................................................................................................................53
14.1 Previewing Access Objects ...............................................................................................53
learnresource.doc
2of 53
19/09/02
Database Design 1
Reference
1. Background to Databases
1.1 What is a Database?
"A database is a collection of related information"
An efficient database holds data independently of the programs, which process the data. A
Database Management System (DBMS) manipulates the data and avoids the need for each
program to manage its own data.
Ideally, all the data possessed by an organisation is considered as a whole and is structured
in such a manner so that data is entered once and stored in one place. Database interfaces
then make this data available to all programs. In essence, a database is any collection of data
which has been organised so that it is retrievable.
Typically databases are highly structured although, in general terms, hypertext systems and
text retrieval may be considered as free format databases. In this course only fixed format
record type databases will be considered. Students should be aware that there are systems
such as PICK which are databases but do not have fixed format records.
Data should not be duplicated. It must be stored in one place so that it is easy to
access and update. In the real world, data is also stored on backup media to
guard against accidental erasure.
Modern client-server systems may distribute the data over a number of file servers but,
to the user, all the data appears to be located in one place.
1.2 Database Facts
Why do we need databases?
·
To store large volumes of information efficiently.
·
To retrieve information quickly.
·
To enable computerised processing of information.
·
To maintain data easily.
·
To maintain data consistency by eliminating redundancy.
·
To achieve device independence.
·
To obtain consistent documentation.
Types of Databases
There are two main types of database:
·
the simple flat file model such as a card index
·
relational database - a database comprising a number of linked tables.
learnresource.doc
3of 53
19/09/02
Database Design 1
Reference
1.3 Extra Information - Databases
·
Text retrieval systems apply database techniques of indexing and should probably be
considered as a third type of database.
·
Virtually all the modern PC based databases such as Paradox, Dbase IV, Access (the
database tool set use in this course) are relational.
·
SQL databases (such as Oracle, SQL Server, Informix etc) are all relational. SQL is the
language used to program queries and reports from the database information.
·
Xbase language products (such as Dbase IV, Recital etc) all use a common language
that is very different from the SQL language.
·
The Pick language is also used in a small but significant market segment and
appears in such products as Pick, Universe and others.
·
Client / Server - this refers to the implementation of the database system and not its
functionality. However Client / Server implementation will normally be highly complex
systems which will be relational and currently mainly SQL based.
1.4 Database Terminology
field the smallest complete unit of data in the database.
record a collection of fields with data in them.
form defines the layout of some or all the fields that make up a record as presented on
screen. Note there can be a number of forms displaying record information from one
database. Forms are used both for the entry and display of data. Users with lower security
access to a given database may be presented with forms having a limited number of fields
displayed.
file or table collection of records defined with the same structure - may appear as a DOS file
in Database engines such as Dbase IV and Paradox. Note that in Access, the individual
tables and forms are not visible from the Windows level.
database a collection of tables which may be related via reference codes or merely related as
they hold data concerning different aspects of the business. In Access, a database consists of
one Windows file only which has a very complex internal structure.
DBMS software which makes it easier to use a database.
learnresource.doc
4of 53
19/09/02
Database Design 1
Reference
query a query is used to interrogate, sort, search and select records from a database.
entity An entity is something that your computer system will store information about (such as
a person, product or place). Facts about an entity are normally stored in a table.
normalisation The process of splitting complex tables into small stable units of data that are
related by common fields. This cuts down on data repetition and ensures data integrity and
security.
learnresource.doc
5of 53
19/09/02
Database Design 1
Reference
2. Database Design Process
2.1 The Importance of Database Design
In relational databases (RDBMS), such as those created using Microsoft Access, you store
information about different subjects in separate tables. To bring the information together in a
meaningful way, you then tell Microsoft Access how the different subjects relate to each other.
A successful database relies totally on its design and, although designing and planning a
database can be time-consuming and difficult, in the long-term the initial hard work pays off.
Each database application should be built by following a clear and comprehensive design
specification. Although this may change slightly as the database develops, any changes
should be minor. The final specification blueprint should be uncomplicated and easy-to-follow
so that others involved in using or developing the database can pick up on any element from
start to finish.
Collaborative team work is an essential part of the database design process - from the
operator inputting the data to the manager querying the information and producing database
reports.
In a nutshell, the key to good design lies in the planning and information-gathering stage,
basically the design process can be broken down into 6 steps:
1. Determine the purpose of the database so you can decide what facts need to be
stored.
2. Sketch out any reports you'd like to produce and gather any forms that might
currently be used to record data.
3. Determine the tables. Divide the information into separate subjects, such as staff or
projects. Each subject will be a table in the database.
4. Determine the fields. Decide what information is needed for tables in your database.
5. Determine the relationships. Look at each table and work out how the data in it is
related to the other tables. Create new tables where necessary to clarify
relationships.
6. Refine the design. Create the tables and add sample data to test your design
learnresource.doc
6of 53
19/09/02
Database Design 1
Reference
2.2 The Database Design Process
learnresource.doc
7of 53
19/09/02
Database Design 1
Reference
3. Access Overview
3.1 Microsoft Access Database Objects
Microsoft Access can contain 6 types of database objects:
1. Tables - To store data.
2. Queries - To gather data you request from table/s and then view, edit or print the
results.
3. Forms - To display the data from tables or queries so you can view, edit or enter
data.
4. Reports - Summarise and present data from tables and queries so you can print it or
analyse it.
5. Macros - Automate your database by performing actions you specify without the
need of programming.
6. Modules - To store Visual Basic code you can write to customise, enhance and
extend your database.
The illustration that follows offers a visual overview of Microsoft Access and the diagram gives
a 3-dimensional view of the database. For example, a Table or Query can be manipulated as
a Datasheet or worked with in Design mode - the more you work with Access, the clearer
this concept will become.
3.2 Microsoft Access Overview
learnresource.doc
8of 53
19/09/02
Database Design 1
Reference
4. Creating Databases
4.1 Microsoft Access Naming Conventions
The Database (.mdb) file: Use a name that is unique, short and descriptive. Microsoft Access
will automatically add a .mdb extention.
Names of fields, controls, and objects:
·
Can be up to 64 characters long.
·
Can include any combination of letters, numbers, spaces, and special characters except
a period (.), an exclamation point (!), an accent grave (`), and brackets ([ ]).
·
Can't begin with leading spaces.
·
Can't include control characters (ASCII values 0 through 31).
Although you can include spaces in field, control, and object names, most examples in the
Microsoft Access documentation show field and control names without spaces because
spaces in names can produce naming conflicts in some circumstances.
When you name a field, control, or object, it's a good idea to make sure the name doesn't
duplicate the name of a property or other element used by Microsoft Access; otherwise, your
database can produce unexpected behaviour in some circumstances.
When naming Microsoft Access objects, try to give them meaningful names and include a
prefix code letter for that object. For example:
tblSuppliers - the Suppliers Table
qrysuppliersMainForm - a query used as a base for the Suppliers Main Form
frmSuppliersAndProducts - a form displaying Suppliers and product details
rptSalesOrdersByWineType - a report displaying wine details grouped under wine type.
4.2 Database Window
Every time you create or open a database you will see the Database Window. Think of this
window as your command centre as it is from here that you will create, modify and open the
objects (tables, forms, etc.) in your database.
learnresource.doc
9of 53
19/09/02
Database Design 1
Reference
Database Window:
The parts of the database window are labelled in the figure above.
1. Title Bar Shows the name of the open database.
2. Objects bar You use the Objects bar on the left-hand side of the window to choose
the type of object you want to display. For example, click Forms to display a list of the
forms in the open database.
3. Object List Select the object (table, query, etc) you want from the displayed list. The
figure above shows the Tables list for the Bacchus database.
The New Object shortcuts above the list provide a quick way to create a new object of
the selected type.
4. Database Window ToolbarUse the buttons on the toolbar to open the selected
object in a particular view, to create a new object of the current type or delete a
selected object. For example, click the Design button to open an object in Design
view.
The four buttons at the right hand end of the toolbar can be used to change the
appearance of the object list.
learnresource.doc
10of 53
19/09/02
Database Design 1
Reference
5. Record Structures Revision
5.1 Tables
A table is a collection of data about a specific topic, such as products or suppliers. Using a
separate table for each topic means you store that data only once. This makes your database
more efficient and it also reduces the risk of data entry errors.
Tables organise data into columns (called fields) and rows (called records).
Tables consist of a large number of records. Each record describes the attributes of one
instance of the entity. A Customer table, for example, contains one record for each customer.
Products and Suppliers Tables:
5.2 Records and Fields
Records contain a number of fields which hold the values of the attributes of the entity
represented in each record. The record for Toulouse Co-operative, for example, contains
fields for the supplier ID, name, phone number, address, etc.
Fields are the smallest unit of the database and these fields are selected by the database
designer to have the relevant DATA type and length. Fields that hold addresses or names will
be character or string fields. Other common data types used are numeric, date/time, and
memo.
Each field in a table contains the same type of information for every product. Using the
Bacchus Product table as an example, the Description holds textual description, the Product
ID a unique number, etc.
learnresource.doc
11of 53
19/09/02
Database Design 1
Reference
5.3 Extra Information - Field Types
alphanumeric strings specified by length of string, used for names, address, etc.
numeric fields - integer (Short numbers). Used for quantities of items order where
absolute accuracy is required and the range of the numbers stored will be small i.e. 0
to 32000.
real number formats, length must include sign (if negative and decimal point). Therefore a
field size of 8 with two decimals for pence can only contain a positive value up to one
penny less than £100,000 or a negative value of 1 penny greater that £1000.
BCD (binary coded decimal) fields. These are used where large values must be stored
with absolute accuracy - normal in financial transactions.
Currency field - only available in some databases. This maintains accuracy without the
computational overhead of the BCD data type defined above.
logical fields - true / false or yes/no. Cannot be indexed in a number of databases.
dates - a special data field is needed so that if a number of days is added to given data
field, the result will be meaningful. For example 31 days from 1 January is 1 February
whereas 31 days from 1 February is not 1 March. The actual day will depend on
whether the year is a leap year.
Memo fields - are used when a field will contain usage and restrictions. Formatted and
non formatted memo fields. Formatted fields normally available in Windows based
databases as they contain formatting information such as font, size, colour etc.
BLOB - binary large objects. These objects are sometimes further categorised as noted
below:
BINARY - (special BLOB) use for sound.
GRAPHIC - (special BLOB) used for images. See the last field in Categories in
the Northwind Traders database in Access sample databases.
OLE - (special BLOB) Object linked embedded object - Only applies for
Windows based databases.
learnresource.doc
12of 53
19/09/02
Database Design 1
Reference
6. Tables
6.1 Database Components
A database comprises:
1. Tables holding the information
2. Screens on which information is entered or displayed
3. Reports that may be printed or displayed showing information produced from the
database.
6.2 Table Design
The tables are the prime responsibility of the database designer and should be designed to
accommodate all the required information and the necessary links. These links are needed so
that the various tables can be related together in order to provide the information in the format
required by the organisation.
The following diagram is a simple Customer table designed in Access.
Each text field in a table can be given a maximum length. These lengths must be specified
carefully so that the space used by each record is minimised whilst catering for the maximum
size of information to be stored. If fields are too big, not only is disk space wasted but the
system is made slower because more information must be processed even though it is only
blank spaces.
6.3 Working with Access Tables
A table is the fundamental structure of a relational database system. It consists of a collection
of records about a particular category of information. For example, a table could be a list of
staff, customers or a record of resources.
Fields are the building blocks of tables. Each field contains information about one aspect of
the category, such as a last name, a part number, or a job title.
You will use the Table object to create and view tables of data. You can open a Table in
either of two views:
1. In Design view, you can create and modify the structure of a table.
2. In Datasheet view, you can view, add, and edit data in a table.
While you work with Access objects (tables, queries, etc.) you can switch views at any time by
clicking the relevant view icons on the object's toolbar:
learnresource.doc
13of 53
19/09/02
Database Design 1
Reference
Switching between Access Windows
You can use the WINDOW menu to switch between open object windows or to move to
the database window.
Use the Database Window toolbar button
window.
or press F11 to switch to the database
6.4 Tables - Design View
When you are working with a table and switch to Design View your screen will resemble the
screen below. You can switch to Design View by clicking the Design View toolbar button
.
In the grid in the upper part of the window, you type the field name, select the field data
type, and type a description of each field. (The description is optional.)
Under Field Properties, you can set properties for individual fields. The available options
depend on the data type you define for the field.
At the lower right, Microsoft Access displays a description of the current column or field
property.
(If you want more information about a particular property you can press the F1 key to display
the Help topic associated with the current property.)
learnresource.doc
14of 53
19/09/02
Database Design 1
Reference
6.5 Tables - Datasheet View
A datasheet displays data in a row-and-column format similar to a spreadsheet. You can
display a datasheet in a Table, Query, or Form window.
To display a datasheet you click the Datasheet View button
.
You can use a datasheet to add and edit data, although a form usually provides more
flexibility for these operations. Field names appear as column headings in the datasheet.
To display records out of view you can use the vertical scroll bar, the Page Up and Page
Down keys, or the navigation buttons. To display fields out of view, use the horizontal scroll
bar.
learnresource.doc
15of 53
19/09/02
Database Design 1
Reference
6.6 Access Field Data Types
Every field must have a defined data type. The data type determines the kind and range of
values that can be entered in a field and the amount of storage space available in the field.
For example, you will probably define most fields in a table of names and addresses as Text
fields. Even a phone number field that contains only digits should be defined as a Text field.
Data type
Text
Use for...
Text and numbers, such
as names and addresses,
phone numbers and
postal codes.
Data type
Currency
Currency values. Don't use
the Number data type for
currency values because
numbers to the right of the
decimal may be rounded off
during calculations. The
Currency data type maintains
a fixed number of digits to
the right of the decimal.
Autonumber
Sequential numbers
automatically inserted by
Microsoft Access. Numbering
begins with one. Makes a
good primary key field.
A Text field can contain
up to 255 characters.
Memo
Lengthy text and
numbers, such as
comments or
explanations. A Memo
field can contain up to
32,000 characters.
learnresource.doc
Use for...
16of 53
19/09/02
Database Design 1
Reference
Number
Numerical data on which
you intend to perform
mathematical
calculations, except
calculations involving
money. Set the FieldSize
property to define the
specific Number data
type.
Yes/No
Yes/No, True/False, On/Off,
or fields that will contain only
one of two values.
Date/Time
Dates and times. A
variety of display formats
are available, or you can
create your own.
OLE Object
Objects created in other
programs using the OLE
protocol that can be linked to
or embedded in a Microsoft
Access database through a
control in a form or report.
6.7 Indexes
An index helps Microsoft Access find and sort records faster. Microsoft Access uses indexes
in a table as you use an index in a book: to find data, it looks up the location of the data in the
index. You can create indexes based on a single field or on multiple fields.
Multiple-field indexes enable you to distinguish between records in which the first field may
have the same value.
You'll probably want to index fields you search frequently, fields you sort, or fields that you
join to fields in other tables in queries. However, indexes can slow down some action queries
such as append queries, when the indexes for many fields need to be updated while
performing these operations.
6.8 Primary Key
The Primary Key
is a field or combination of fields that uniquely identifies each record in
a table. As the main index for the table, it is used to associate data between tables.
If a table doesn't include an obvious primary key field, you can have Access create a field
(using the Autonumber data type) that assigns a unique number to each record.
6.9 Fields
·
You can't index fields with the data types Memo, Yes/No, and OLE Object.
·
The Autonumber data type is compatible with the Number data type with the
FieldSize property set to Long Integer.
·
Sorting. With Microsoft Access, you can perform simple or complex sorts. Simple
sorts allow you to sort all records in ascending or descending order. Complex sorts
allow you to sort specified records in ascending order by some fields and in
descending order by others.
6.10 Field Properties
Each field has a set of properties you use to specify how you want data stored, handled, and
displayed. You set the properties in the bottom part of the Table's Design view. The
properties you can set for each field are determined by the data type you select for the field.
You can display the Help topic related to a particular property by clicking the property and
then pressing the F1 key.
learnresource.doc
17of 53
19/09/02
Database Design 1
Reference
Property
Description
FieldSize
Maximum length of a text field or type of Number
Format
How data is displayed; use predefined formats or customise
your own
DecimalPlaces
Number of places to the right of the decimal
InputMask
Formatting characters for data entry; use predefined masks or
customise your own
Caption
Default field label in a form or report
DefaultValue
Value entered in a field when records are created
ValidationRule
Expression that defines data entry rules
ValidationText
Text that appears when invalid data is entered in the field
Required
Setting that defines whether data must be entered
AllowZeroLength
Setting that defines whether zero-length strings are permitted
Indexed
Single-field indexes to speed searches and sorting
6.11 Field Formatting
You can specify how data is displayed in a form or datasheet by defining formats for individual
fields. You can select from predefined formats, such as Medium Date (displayed as 27-Jun99) or create your own custom formats, such as June 99. By specifying formats, you can
display data consistently throughout the database, regardless of how the data is entered.
Predefined formats are available for fields of the following data types: Number, Currency,
Autonumber, Date/Time, and Yes/No. You can create custom formats for any field data type
other than OLE Object.
Field format example:
6.12Adding Records
You can add a record to any table (including an attached table) using a form or datasheet.
Microsoft Access automatically saves a new record when you move to another record or
close the form or datasheet.
learnresource.doc
18of 53
19/09/02
Database Design 1
Reference
Records are added by doing one of the following:
·
Select RECORDS / Data Entry
·
Select EDIT Go To/New
·
Press CTRL+PLUS SIGN
·
Press the New Record button
The data is then typed in the record.
To move to a field you can click with the mouse or pressing the TAB, ENTER or ARROW
keys moves you on to the next field (pressing these keys after the last field will move you on
to the next record).
Adding Records
·
If you used RECORD Data Entry, you can display ALL records again by selecting
RECORDS Remove Filter/Sort command.
·
To add a few existing records to a table you can use EDIT Copy or EDIT Paste.
·
To add many existing records to a table you can create an append query or use
EDIT Paste Append.
6.13 Saving Records
Microsoft Access automatically saves data in a record when the focus leaves it. For example,
Microsoft Access saves a record when you move the focus to a different record; close the
active form, datasheet, or database; or exit Microsoft Access. However, if you want to save
the current record's data while the record has the focus, you can save record changes as you
work using one of the methods shown below:
·
Move to the next record or change the focus
·
Choose Save from the FILE menu
·
Press SHIFT+ENTER
·
Close the form or datasheet
6.14 Selecting Fields and Records
As a rule, you always select the fields (columns) and records (rows) you want to work with
first, and then you choose the operation you want to perform.
For example, to delete a record, select the record, and then choose Delete from the EDIT
menu, or click the Delete button on the Toolbar (or press the DEL key).
To select:
A single record
learnresource.doc
Do this:
Click the record selector (marked with the green cross):
19of 53
19/09/02
Database Design 1
Reference
Several records
Drag down the record selectors:
All records
Choose Select EDIT All Records or click in the top left of this
window (shown by the green cross):
A single field
Click the field label:
6.15 Editing Field Data
You can update records in an underlying table by editing the data in fields on a form or in a
datasheet. Microsoft Access protects data from unwanted changes in:
·
Counter, locked, and disabled fields
·
Calculated controls
·
Fields in locked records
·
Fields in certain types of queries
·
Fields in the underlying table that aren't included in the query or form you're editing.
To edit text and numeric data in a field you just click the field you want to edit, or move to it
using the TAB or ARROW keys and edit the field contents.
6.16 Finding and Filtering Data
You can move to specific records in a table or dynaset by searching for specific text. To
conduct a search you choose the EDIT Find command or press the Find Tool
.
You can search for any text string, including a phrase, a word, or part of a word and you can
use wildcards to make the search more general. (NB: Wildcard characters are used to
replace characters in a string).
For the fastest searches you should search for the first characters within a single indexed
field. If you are searching a non-indexed field repeatedly, index the field.
Because the Find dialog box remains on the screen during searches, you can find as many
records as you want without having to choose the Find command repeatedly. If necessary,
drag the box out of the way to see your records.
You should use a filter rather than the Find command if you want to isolate or sort specific
records within the table. As with a query, a filter creates a subset of your records.
There are four methods you can use to filter records: Filter By Selection, Filter For Input,
Filter By Form, and Advanced Filter/Sort.
The use of wildcards is covered later in the section covered Queries.
learnresource.doc
20of 53
19/09/02
Database Design 1
Reference
Filters are covered in greater detail in the section covering Forms
6.17 Browsing Records
You can use the RECORDS / Go To command, the UP and DOWN arrow keys, PAGE UP
and PAGE DOWN, or the VERTICAL SCROLL BAR to move between records in a datasheet
or form. However, the most efficient way to move between records in large databases is with
the navigation buttons in the lower-left corner of the window:
Navigation Buttons
6.18 Deleting Records and Data
You can delete a record from a table using a form or a datasheet. Records are deleted by first
selecting the record(s) and then pressing DEL key (or EDIT Delete) to delete the selection.
Microsoft Access always prompts you to confirm the deletion.
To delete records that meet specific criteria you can create a delete query or create a filter
that includes only those records and then delete them.
When you delete records, you may want to delete related data in other tables, otherwise,
your database will contain obsolete data that could be misleading.
Using EDIT CUT
Removes the selected item and places it on the Clipboard so you can paste or insert it
elsewhere. You can cut:
·
A database object
·
An action
·
An OLE object
·
Field or record data
·
A control in Design view
·
Text, including expressions/property of a form or report settings.
learnresource.doc
21of 53
19/09/02
Database Design 1
Reference
7. Importing External Data
From the Database Window you can use the FILE Get External Data command to transfer
data from a text file, spreadsheet, or database table into a Microsoft Access table; or you can
copy objects from another Microsoft Access database into the open database.
This Microsoft Access feature will prove invaluable to you if you have existing data in various
formats which you want to use with Microsoft Access.
In order to show you how this feature works, we have chosen to use Excel spreadsheets. If
you need to carry out such a process in the future and your data source is not Excel, you can
refer to the HELP screens or user manual for guidance.
7.1 Importing External Data
If you import a table from another application or database, you may need to supply the
password set in the other application.
If you're importing a text file or spreadsheet, and errors occur, Microsoft Access gives
you the option to cancel. If you continue, it imports as many records as it can and
creates a table called Paste Errors containing a description of each error that occurs.
After you import a table, it's a good idea to set field properties in the table's Design
view. You'll also want to set a primary key for the table.
learnresource.doc
22of 53
19/09/02
Database Design 1
Reference
8. Relationships
" A database is a collection of related information "
" A relational database is one where an association has been established between
common fields in two tables. "
"" A multi-file, relational database application (or RDBMS) is one in which the user's
requirement for data entry retrieval, and reporting, cannot be satisfied by a single
datafile structure. "
Once you have created the tables that make up a database, it's a good idea to define
relationships between the tables. By defining relationships, you tell Microsoft Access how
data is related between tables. This makes it easier to create queries, forms, and reports that
include multiple tables. Defining a default relationship between two tables can save you time
later when you create forms or reports that tie the information together.
To combine facts in a meaningful manner into information, you must define the relationships
between facts: e.g. connect Nancy Jones with the sales that she makes, connect a customer
Mr Smith with the invoices for his purchases and the payments he has made. A simple
relationship diagram produced by Access is shown below. In the diagram a customer table
(Customers) is related to an order table (Orders) which is itself related to an order detail table
(Order Details).
Relationships:
A multi-file, relational database is an application in which the user's requirement for data
entry, retrieval, and reporting, cannot be satisfied by a single datafile structure. A file of book
references, for example, can be listed and grouped in many different ways (publisher, author,
title etc.). Although a single datafile might be appropriate, it is inefficient to waste disk space
and retrieval time by storing this repetitive information with every book. Instead you would
create another datafile which would contain the extra information and you would link the two
files together.
This illustrates the rule that a record should not contain repeating fields. If your database
has a table that contains duplicate information in one or more fields, you should split the data
into related tables so that you can store data more efficiently. This process is called
normalisation.
learnresource.doc
23of 53
19/09/02
Database Design 1
Reference
8.1 Types of relationships
One to One
In a one-to-one relationship, a record in Table A can have no more than one matching record
in Table B.
This type of relationship is not common, because most information related in this way would
be in one table. You might use a one-to-one relationship to divide a table with many fields, to
isolate part of a table for security reasons, or to store information that applies only to a subset
of the main table. For example, you might want to create a table to track employees
participating in a sponsored walk.
One to Many
In a one-to-many relationship, a record in Table A may have many matching records in Table
B.
In this one to many example: One wine supplier can supply many wines. One wine is supplied
by only one supplier.
Table A. tblSuppliers
Supplier ID
Company Name
Contact Name
WI001
Williams & Co
Fred Belling
WI002
Wilton & Sons
Jane Horrocks
WI003
Wilson Racket & Co
Jacque Lenain
Product ID
Product Name
Units in
Stock
Units on
Order
Supplier ID
0010
Haut Issy Beajolais Nouveau
39
12
W1001
0020
Vin Super Beajolais Villages
23
0
W1001
0030
Hamaeux Beajolais Nouveau
124
0
W1002
0040
Sud Ouest Beajolais Nouveau
24
64
W1002
0050
Ole Beajolais Nouveau
37
12
W1002
Many to Many
In a many-to-many relationship between two tables, one record in either table can relate to
many records in the other table. To establish a many-to-many relationship, you need to create
a third (junction) table and add the primary key fields from each of the other two tables to this
table. For example, the Order Details table in the relationships diagram at the start of this
section is an example of a junction table used to establish a many-to-many relationship
between the Orders table and the Products table.
learnresource.doc
24of 53
19/09/02
Database Design 1
Reference
Many to many relationships are a problem for database design and must be broken down into
two one to many relationships using link entities.Enforcing
8.2 Referential Integrity Rules
You can also tell Microsoft Access to enforce referential integrity rules while defining
relationships. These rules allow you to preserve the defined relationship when you enter or
delete records.
8.3 Extra Information - Relationships
To define relationships in Microsoft Access, it is common practice to match the primary key
fields in one table with matching fields in the second table. See key words and phrases below:
Phrase/Word
Definition
Primary Table
Or Parent
The table on the one side of the relationship which contains the unique
primary key field (e.g. ID Number, Order Code etc.).
Related Table
Or Child
The table related to the primary table containing a field which can be
matched to the primary key field in the primary table.
For example in Microsoft Access it is common to choose a counter field
as the primary key field. For the relationship to work this would mean
that the related table's matching field would need to be set up as a long
integer in order to associate the two fields.
In all cases it is essential that the field to be associated in the related
table is defined with field format and properties which match the primary
key field in the primary table.
Working Example:
Primary Key
A field value which uniquely identifies each record in a table. This field
information must never change and, if the record is deleted, should not
be repeated for another field.
Foreign Key
A field that refers to a field (or fields) in another table. Usually this field is
used within relationships to associate the field information to the primary
key field of a primary table.
Referential
Integrity
Rules that are followed to preserve the defined relationships between
tables when records are entered or deleted.
learnresource.doc
25of 53
19/09/02
Database Design 1
Reference
9. Documenting a Database Design
In order to build up a reliable database specification, it is necessary to document the contents
of a database and the definitions of any objects that exist within that database. Using
Microsoft Access, this can be done in a number of ways:
1. Use TOOLS ® Analyze ® Documenter to view, print, output, or save the design
characteristics of database objects.
2. Use your keyboard's PrintScrn facility or any screen capture application to output
the relationships screen as a graphic and then print it using a Windows application
such as Paintbrush or Word.
3. When you have the relationships window open, use FILE ® Print Relationships to
produce a dated report showing the current layout of the relationships in your
database.
4. Microsoft Access includes two tools that can help you to refine your database design:
·
The Table Analyzer Wizard can analyse the design of one table at a time,
can propose new table structures and relationships if appropriate, and can
restructure a table into new related tables if that makes sense.
·
The Performance Analyzer can analyze your entire database and make
recommendations and suggestions for improving it. The wizard can also
implement these recommendations and suggestions.
For additional ideas on designing and documenting a database, you may want to look at the
Northwind sample database and the database schemas for one or more of the databases
that you can create with the Database Wizard.
learnresource.doc
26of 53
19/09/02
Database Design 1
Reference
10. Queries
10.1 Access Query Overview
With queries, you can:
·
Delete batch records
·
Ask questions about data in several tables of data
·
Perform calculations
·
Create forms, reports, graphs based on the queries
·
Create queries based on queries
·
Ask questions about remote data.
The 6 types of query you will work with are:
·
Select (the most frequently used)
·
Crosstab (to display summarised values)
·
Make Table (Action Query)
·
Update (Action Query)
·
Append (Action Query)
·
Delete (Action Query)
10.2 Using Queries to Ask Questions
Access Queries give you real power over your database as they allow you to interrogate and
extract the data you want, in any order you want to see it. With queries you can ask questions
about the data in your tables.
Using Bacchus as an example, you might need to ask:
·
What are the names of our French suppliers?
·
How many red wines do we currently stock?
·
Which suppliers do we use for white wines, and in which countries are they located?
·
What is the highest price received for a bottle of wine?
Below are shown the queries you would use to answer these four questions:
Q1: What are the names of our French Suppliers?
1. Create a Select query and enter a simple criteria expression to filter only the
French wines.
2. Enter the label French Suppliers as the column heading for the Company field.
3. Uncheck the Show box for the Country field.
learnresource.doc
27of 53
19/09/02
Database Design 1
Reference
Q2: How many red wines do we stock?
1. Create a Totals query with a criteria expression to filter red wines and a
COUNT function to total the result.
2. Note that the COUNT function is applied to the ProductID field as there is
one ProductID for each wine stocked. In other words, the query is
counting the number of ProductIDs for red wines.
3. Enter a label for the ProductID field.
Q3: Which suppliers do we use for white wines and in which countries are they
located?
1. Create a Select query and enter a criteria expression to filter only the white wines.
2. Note that this is a multi-table query as it needs data from both the Suppliers table
and the Products table.
3. Enter a label for the Suppliers field.
Some suppliers supply more than one type of white wine so they will appear more
learnresource.doc
28of 53
19/09/02
Database Design 1
Reference
than once in the query result. To list each supplier once only, click the Properties
button
on the toolbar and set the Unique records property to Yes.
Q4: What is the highest price received for a bottle of wine?
Create a Totals query and then use the MAX function to find the highest market value per
bottle of wine.
10.3 Creating and Running Queries
Using QBE (Query By Example) you can create your queries by dragging fields from the
upper portion of the query window to the QBE grid in the lower portion of the window.
learnresource.doc
29of 53
19/09/02
Database Design 1
Reference
In the QBE grid each column contains information about a field included in the query.
The QBE Design Grid:
Detailed Query Design Overview:
You can open a query in either of two views:
1. In Design View, you can create and modify the structure of the query.
2. In Datasheet View, you can view and, in some cases, add and edit data.
learnresource.doc
30of 53
19/09/02
Database Design 1
Reference
10.4 Viewing a Query's Results as a Datasheet
After you run a select query, a set of records fulfilling the specified criteria is displayed and
this set of records is called a dynaset.
A dynaset is a dynamic set of records that results from running a query or applying a filter.
Microsoft Access updates the data in the underlying table or tables when you make changes
to a dynaset.
The Datasheet view displaying the dynaset looks much like a table in Datasheet view:
10.5 Totals Queries
In a select query, you can also add to the QBE grid a Totals row for entering summary
calculations (counts, mean, average etc.) and a Table Names row to display the source table
name for each field.
To turn a select query into a totals query press the sigma toolbar button
Totals. To display the table name for each field select VIEW, Table.
or select VIEW,
Working with Totals Queries:
10.6 Multiple Tables and Query Joins
When you create a select query the fields included can be from tables, queries or calculated
fields. Joins are created by dragging field names between tables and queries. If default
relationships between tables have been defined, Microsoft Access automatically displays
default join lines:
learnresource.doc
31of 53
19/09/02
Database Design 1
Reference
10.7 Criteria
A query can be refined by entering expressions for criteria, sorting, creating calculated fields,
totalling data, and hiding fields.
Criteria are instructions you use to tell Microsoft Access which records to display. You can
enter criteria in one or more fields in a query or filter. For example in the Figure below, the
expression:
like "H*"
will display only information beginning with the letter H .
10.8 Expressions
Expressions are a fundamental part of many Microsoft Access operations. You use
expressions for calculations, to specify criteria for queries or to control macros, and as
arguments in functions or parts of Access Basic modules.
For example:
Between 20 And 30
would find any number between 20-30.
learnresource.doc
32of 53
19/09/02
Database Design 1
Reference
Depending on where you enter the expression, Microsoft Access automatically inserts:
·
Brackets ([]) around form, report, field or control names
·
Number signs (#) around dates
·
Quotation marks ("") around text.
The figure below shows that an expression can include a combination of operators, identifiers,
functions, literal values, and constants:
Operator Overview
An operator is a symbol or word, such as > and Or, that indicates an operation to be
performed on one or more elements. Microsoft Access has several classes of operators,
including arithmetic, comparison, concatenation, and logical operators.
Arithmetic
Logical
Concatenation
^
Exponent - Used to
Used to perform a
raise a number to
And logical conjunction on
the power of an
two expressions.
exponent.
*
Multiply - Used to
multiply two
numbers.
/
Division - Used to
divide two numbers
Used to perform a
and return a
Imp logical implication on
two expressions.
floating-point
result.
\
Used to perform a
Used to force string
concatenation of two
expressions.
Comparison
Eqv logical equivalence on
two expressions.
Division - Used to
divide two numbers
Used to perform
and return an
logical negation on an
Not
integer result.
expression.
Division - Used to
divide two numbers
Mod
and return only the
remainder.
&
Used to perform a
Or logical disjunction on
two expressions.
<
Less than
<= Less than or equal to
>
Greater than
+
Used to perform a
Plus - Used to sum
Xor logical exclusion on
two numbers.
two expressions.
>=
-
Minus - Used to
find the difference
between two
numbers or to
indicate the
negative value of a
numeric
expression.
<> Not equal to
learnresource.doc
33of 53
Greater than or equal
to
19/09/02
Database Design 1
Reference
10.9 Expression Examples
Some example expressions can be seen below. To see a more detailed set of examples,
refer to the Access Help Index and search for Expressions / examples of.
Criteria Expression
Shows records where:
France
Value is France
Not France
Value is not France
In(France, Germany, Italy)
Value is France, Germany, or Italy
<M
Value begins with letters A-L
>=M
Value begins with letters M-Z
100
Numeric value is 100
<=20
Numeric value is less than or equal to 20
Date()
Date is today's date
>=1/1/94
Date is on or after 1/1/94
Between 1/1/93 And 31/12/93
Date is in the year 1993
"/2/"
Date is in the month of February
Null
The field does not contain a value
Is Not Null
The field contains a value
10.10 Calculated Expressions
In the example given below, a calculated expression has been used to create a derived field
that concatenates the results of two fields (forename and Surname). The field name (Contact)
must be followed by a colon (:) in order to define it as a label and the & operator has been
used rather than + because the calculation is joining text fields together.
Contact:[contfname) & " " & [contsurname]
Calculated Expression Example:
learnresource.doc
34of 53
19/09/02
Database Design 1
Reference
Brackets ([ ]) around an element of an identifier indicate that the element is the name of a
table, query, form, report, field, or control. If the name you're entering doesn't contain a space
or punctuation, you can type the name without brackets, and Microsoft Access often inserts
them automatically.
Number signs (#) around an element of an expression indicate that the element is a
date/time value. Microsoft Access automatically evaluates a value surrounded by number
signs as a date/time value and lets you type the value in any common date or time format.
Microsoft Access displays the value according to the International setting in the Microsoft
Windows Control Panel. You can change the output format of a date using the Format
property.
Quotation marks (") around an element of an expression indicate that the element is text.
For example, if you type English Oak Microsoft Access displays the expression as "English
Oak". The LIKE operator is used if the expression contains or is entered in a different case
from the field entry.
10.11 Wildcard Characters
The asterisk (*), question mark (?), number sign (#), exclamation point (!), hyphen (-), and
brackets ([ ]) are wildcard characters and you can use these characters in queries,
commands, and expressions to include all records, file names, or other items that begin with
specific characters or match a certain pattern. See examples which follow:
Symbol
Example
Usage
*
wh*
Finds what, white, and why whilst *at would find cat, bat, and
what. Like the MS-DOS asterisk (*) wildcard character, this
asterisk matches any number of characters. But unlike MSDOS, it can be used as the first or last character in the character
string.
?
b?ll
Finds ball, bell, and bill. Like the MS-DOS ? wildcard character,
this symbol matches any single character.
#
1#3
Finds 103, 113, 123. Matches any single digit.
[]
b[ae]ll
learnresource.doc
Finds ball and bell but not bill. Matches any single character
within brackets.
35of 53
19/09/02
Database Design 1
Reference
!
b[!ae]ll
Finds bill and bull but not bell or ball. Matches any character not
in the list.
-
b[a-c]d
Finds bad, bbd, and bcd. Matches any one of a range of
characters.
10.12 Sorting Records
·
In table and form datasheets and in forms, you can click the Sort Ascending or Sort
Descending buttons on the toolbar to quickly sort the current records based on the
selected column:
·
You can sort the records in a query in alphabetic or numeric sequence, in either
ascending (A-Z, 0-9) or descending (Z-A, 9-0) order. You can sort on just one field,
such as a Last Name field, or on as many as 10 fields.
·
The order of fields on the QBE grid is important when you want to sort on multiple
fields. Microsoft Access sorts on the leftmost Sort field first, then on the next Sort field
to the right, and so on.
·
When you close a query, Microsoft Access moves Sort fields to the leftmost columns
on the QBE grid. If you later open the query in Design view, make changes to it, and
save the changes, Microsoft Access displays the Sort fields at the left end of the
datasheet. You can rearrange the fields if necessary.
Tips - Queries
·
When naming the query, give it a name unique from all tables and queries within the
database.
·
You can create a quick query by selecting a table or query name in the Database
window and then click the New Query button on the tool bar. The Query window
opens in Design view with the table or query field list displayed.
·
In multi-table queries, you can keep track of which table each field is associated
with by displaying the Table Name row beneath the Field row in the QBE grid. From
the View menu, choose Table Names to display row.
·
Select queries are the default query type.
learnresource.doc
36of 53
19/09/02
Database Design 1
Reference
11. Forms
11.1 Forms overview
A form is used to view and edit information in your database record by record. With a form,
you can:
·
Display the information you want to see in the way you want to see it.
·
Use familiar controls such as text boxes and check boxes that you already use in
Windows.
·
Make the job of viewing and entering data easy.
·
Make your form colourful and distinctive because you have control over the size and
appearance of everything on it.
A form has 4 views: Form Design, Form, Datasheet and Print Preview.
You can create a form in two ways:
1. Using FormWizards you can create a form from a choice of number of styles. As you
gain more experience you may find it easier to let FormWizards do all the basic work
for you and then modify the basic design using Microsoft Access's Form design
utilities.
2. You can also start with a blank form and design the form from scratch the way you
want. This gives you greater control over how the form appears and works, but it will
take longer.
You will use the Form window's Design View to create and modify a form. You can see how
your form appears on screen by clicking the Form View button, view it in Datasheet View or
how it will look in print by clicking the Print Preview button.
learnresource.doc
37of 53
19/09/02
Database Design 1
Reference
11.2 Form Design View
You can use the Form window's Design tools to create and modify a form. There are 5
elements that make up a form:
Element
Description
Detail section
Displays records. You can either display one record on the screen or
page, or you can display as many as will fit.
Form header/
footer sections
Displays information that you want to show for every record, such as a
title for the form, or command buttons that open related forms or carry
out other tasks. A form header appears at the top of the screen in
Form view and at the top of the first page when printed. To add or
remove these sections (as a header-footer pair), choose Form
Header/Footer from the VIEW menu.
Page
header/footer
sections
Displays information such as a title, graphics, column headings, or any
information that you want at the top of every printed page. Page
headers appear only on printed forms.To add or remove these
sections (as a header-footer pair), choose Page Hdr/Ftr from the
VIEW menu.
learnresource.doc
38of 53
19/09/02
Database Design 1
Reference
Rulers
Help you position controls and determine the size of sections on your
form. To show or hide the rulers, choose Ruler from the VIEW menu.
Grid
Helps you position controls on your form. If the grid is too fine, it is
invisible. To show or hide the grid, choose Grid from the VIEW menu.
To create a form, you work in Design view. Viewing a form in Design view is like sitting at a
workbench surrounded by useful tools.
Form Design Example:
learnresource.doc
39of 53
19/09/02
Database Design 1
Reference
11.3 Control
A control is a graphical object, such as a text box, a check box, a command button, or a
rectangle, that you place on a form or report in Design view to display data, perform an action,
or make the form or report easier to read.
11.4 Form Design Tools
You can use the following tools to help you create and modify a form:
Use this tool:
To do this:
Toolbox
Place controls on the form.
Field list
Create controls bound to fields in the underlying table or query..
Property sheet
Formatting
toolbar
learnresource.doc
Set properties for selected control or section or for the form itself.
Change the appearance and colours of the selected control or
section within the form.
40of 53
19/09/02
Database Design 1
Reference
11.5 Toolbox
You can use the toolbox to add controls to a form or report.
·
To open or close the toolbox select VIEW / Toolbox or press the Toolbox button
on the Form Design Toolbar
·
To add a control, click to select the tool, drag it from the toolbox to the desired
location in the form or report's Design View, and click again.
11.6 Field List
The field list is a small window that lists the names of all the fields in an underlying table or
query. You can display field lists in forms, reports, and queries. Microsoft Access
automatically displays the appropriate field lists in the Filter window:
·
The names of primary key fields appear in bold in a field list.
·
Field lists in the Query and Filter windows include an asterisk (*) option. Select this
option to move the table or query as a whole to the grid.
·
Double-clicking the title bar of a field list selects all fields.
·
To open or close the field list in a form's or report's design view, click the button
on the tool bar.
11.7 Property Sheet
You use the property sheet to set, view, or change the properties of a table, form, report, or
the selected section or control within a form or report. The property sheet is available within
Design view of the Table, Form, or Report window.
learnresource.doc
41of 53
19/09/02
Database Design 1
Reference
In the Form or Report window only, you can:
·
Double-click a section or control or click the Properties tool
to display the
property sheet. When the property sheet is displayed, you can select another section
or control to see its properties.
·
Display the properties of the form or report itself by choosing EDIT / Select Form or
Select Report, by clicking in the grey area outside any of the sections or by doubleclicking the form selector (marked here with a green cross):
·
See the default properties for a particular control by clicking the associated tool in the
toolbox.
11.8 Formatting a form in Design View
You can change the appearance of an entire form or just parts of it.
To change the font, font size, and line weight for all text and lines on the form at once, click
AutoFormat on the toolbar
and then select a new autoformat for the form.
To change the appearance of one control, for example, a text box, you just click the control to
select it. On the Formatting toolbar, you can then choose a different font, font size, or other
formatting option.
To add a background picture to a form, in the form's property sheet, type the name of a
next to the property box to
graphic file in the Picture property box, or click the Build button
open the Insert Picture dialog box.
11.9 Combo Lists and List Boxes
On a form or report, you can create a list box or combo box yourself or, if you prefer, by
using a Wizard.
A list box or combo box can make data entry easier, quicker, and more accurate by
presenting a scrollable list of values from which you can choose an option. These lookup lists
cut down on repetitive data entry and minimise the risk of errors.
A list box is a control that provides a list of choices. A list box consists of a list and an
optional label.
learnresource.doc
42of 53
19/09/02
Database Design 1
Reference
A combo box is similar to a list box and text box combined in which you enter a value or
select an item from a list.
Tips - Choosing Between a List Box and a Combo Box
·
Use a list box when you want a list that appears at all times and when you want to
limit the options to those in the list.
·
Use a combo box when you need to conserve screen space (since a combo box list
appears only when you click its arrow), or when you want the option of selecting a
value from a list or typing a value in the box. Like a list box, you can limit the options
to those listed in the box.
11.10 Working with Form Filters
There are four methods you can use to filter records:
·
Filter By Selection
·
Filter By Form
·
Filter For Input
·
Advanced Filter/Sort
Filter By Selection
You would choose to use Filter By Selection
if you want to choose the values you're
searching for from a list without scrolling through all the records in a datasheet or form.
Filter By Form
If you want to specify multiple criteria at once, Filter By Form
option.
would be the easiest
Filter for Input
If the focus is in a field in a form or datasheet and you just want to type in place the exact
value you're searching for or the expression whose result you want to use as your criteria,
use Filter For Input.
clicking in any field while entering data.
. You can access this option by right-
Advanced Filter/Sort
For complex filters you would choose to use Advanced Filter/Sort. You can access
Advanced Filter/Sort via the RECORDS menu
.
Filter By Selection, Filter By Form, and Filter For Input are the easiest ways to filter records.
Use Filter by Selection if you can easily find and select in the form, subform, or datasheet an
instance of the value you want the filtered records to contain.
learnresource.doc
43of 53
19/09/02
Database Design 1
Reference
Extra Information - Filters
In a report, you can't create a filter using the filtering techniques mentioned previously.
However, a report (as well as a form) can inherit a filter.
Extra Information - Comparison of Filtering Methods
What do you
want the filter
to do?
Filter By Selection
Filter By Form and
Filter For Input
Advanced Filter/Sort
Search for
records that
meet multiple
criteria.
Yes (but you must
specify the criteria
one at a time)
Yes (and you can
specify the criteria
all at once)
Yes (and you can
specify the criteria all
at once)
Search for
records that
meet one criteria
or another
criteria.
No
Yes
Yes
Allow you to
enter
expressions as
criteria.
No
Yes
Yes
Sort records in
ascending or
descending
order.
No (however, after
applying the filter,
you can sort all
filtered records by
clicking
No (however, after
applying the filter,
you can sort all
filtered records by
clicking
Yes (you can sort
some fields in
ascending order and
other fields in
descending order)
Sort Ascending
or
Sort Descending
learnresource.doc
Sort Ascending
or
Sort Descending
44of 53
19/09/02
Database Design 1
Reference
11.11 Subforms
A subform is a form within a form. The primary form is called the main form, and the form
within the form is called the subform. A form/subform combination is often referred to as a
hierarchical form, a master/detail form, or a parent/child form.
Subforms are especially effective when you want to show data from tables or queries with a
one-to-many relationship. For example, you could create a form with a subform to show data
from a Categories table and a Products table. The data in the Categories table is the "one"
side of the relationship. The data in the Products table is the "many" side of the relationship each category can have more than one product.
Two Subform examples:
learnresource.doc
45of 53
19/09/02
Database Design 1
Reference
The main form and subform in this type of form are linked so that the subform displays only
records that are related to the current record in the main form. For example, when the main
form displays the Beverages category, the subform displays only the products in the
Beverages category.
When you use a form with a subform to enter new records, Microsoft Access saves the
current record in the main form when you enter the subform. This ensures that the records in
the "many" table will have a record in the "one" table to relate to. It also automatically saves
each record as you add it to the subform.
A subform can be displayed as a datasheet or it can be displayed as a single or continuous
form. A main form can only be displayed as a single form.
learnresource.doc
46of 53
19/09/02
Database Design 1
Reference
12. Macros
12.1 Macro Overview
A macro is a named list of instructions that you create for Microsoft Access to follow. Each
instruction is called an action. When you run the macro, Microsoft Access carries out the
actions in the order they're listed, using the objects or data you've specified for the action
arguments. You can use macros to automate repetitive tasks and to extend the capabilities of
your database.
The following macro is composed of a series of actions. Microsoft Access carries out these
actions each time the macro runs. To run this macro you refer to the macro name
ReviewProducts.
12.2 The AutoExec Macro
You can create a special macro that runs automatically whenever you open a Microsoft
Access database. For example, you may wish to open certain tables and forms every time
you open a database. When you've finished entering the macro actions you must save it
under the name AUTOEXEC.
12.3 Group Macros
If you have numerous macros, grouping related macros in group macors can help you to
manage your database more easily. To display the names of macros for a macro group, from
the Macro Window select:
VIEW / Macro names
Shortcut: click
on the Macro toolbar
In the example below, the macro group named Buttons is made up of three related macros:
Employees, Products, and Suppliers. Each macro carries out the OpenForm action, and the
Products macro also carries out the MoveSize action.
learnresource.doc
47of 53
19/09/02
Database Design 1
Reference
Macro Name
Action
Employees
OpenForm
Products
OpenForm
MoveSize
Suppliers
OpenForm
12.4 Conditional Actions
In some cases, you may want to carry out an action or series of actions in a macro only if a
particular condition is true. To create a conditional macro from the Macro Window you select:
VIEW / Conditions
Shortcut: click
on the Macro toolbar
In the example below, the conditional macro carries out the StopMacro action when there is
no value in the Country field (when the value is Null). It carries out one of several pairs of
MsgBox and CancelEvent actions if the length or form of the PostalCode value isn't
appropriate for the country in the Country field.
Condition
Action
IsNull([Country])
StopMacro
IsNull([Postalcode])
Msgbox
…
CancelEvent
[Country] In ("France","Italy","Spain") And Len([PostalCode])<>5
Msgbox
…
CancelEvent
[Country] In ("Australia","Singapore) And Len([PostalCode])<>4
Msgbox
…
CancelEvent
([Country] = "Canada") And [PostalCode] Not Like "[A-Z]# [A-Z]# [A-Z]#")
Msgbox
…
CancelEvent
GoToControl
learnresource.doc
48of 53
19/09/02
Database Design 1
Reference
A condition is a logical expression. The macro follows different paths depending on whether
the condition is true or false.
You enter conditions in the Condition column in the Macro window. If a condition is true,
Microsoft Access carries out the action in that row. You can have Microsoft Access carry out a
series of actions if the condition is true by typing an ellipsis (...) in the Condition column of the
actions that immediately follow the condition.
12.5 Command Buttons
A command button, which is used to perform standard actions such as printing the current
record or opening another form, is a control that runs a macro, calls an Access basic function,
or executes an event procedure. A command button is added to a form from the Form
Designer.
Access has the added advantage of being able to use the Command Button Wizard to help
you to set up these buttons. The Wizard lets you choose an action you want the button to
perform and a picture you want on the button. Buttons created with the Wizard are driven by
Visual Basic event procedures.
All users can set up their own buttons using a macro, an Access Visual Basic function or an
event procedure.
Tips - Command Buttons
·
You can also create a command button on a form, and then In Design view, enter a
macro name in the OnClick property box for the command button. Click the Build
button to the right of the OnClick property box, and use the Macro Builder to create
and attach a macro to the command button. This button runs the macro.
·
If you want to attach a macro to a button make sure that the Control Wizard on the
Toolbox is switched off when you create the button.
·
To change the caption on a command button, edit the Caption property setting for the
button.
·
You may want to give a macro that you will run from a command button a short,
descriptive name when you save it, so that the name fits easily into the button.
learnresource.doc
49of 53
19/09/02
Database Design 1
Reference
13. Reports
13.1 Overview
Although you can print records from a table or query datasheet or form, reports offer you
much more flexibility for presenting your data.
A report is an object that allows you to present your information formatted and organised to
your specifications. You can choose how to group, sort and arrange your data on each page,
include graphics to enhance your report's appearance and can create reports that calculate
totals or even the percentage of total for each group of records.
A report:
·
displays only the information you want in the way you want to see it
·
can group records into many levels and compute totals and averages by checking
values from many records at once
·
is attractive and distinctive because you have control over the size and appearance of
everything on it.
Some examples of typical reports are summaries,
address lists, mailing labels, monthly sales figures, etc.:
learnresource.doc
50of 53
19/09/02
Database Design 1
Reference
Creating a Report
You can create a report in 2 ways:
1. The ReportWizards assist you in creating reports by asking you questions about the
report you want to create and they will build the report based on your answers.
2. You can also start with a blank report and design your report from scratch the way
you want. This gives you greater control over how the report appears and works, but
it will take longer.
13.2 The Report Window
You will use the Report window to create and preview your reports. The Report window can
be opened in one of three views:
1. Design View
2. Print Preview
3. Layout Preview
In Design View, you can create and modify the structure of a report.
learnresource.doc
51of 53
19/09/02
Database Design 1
Reference
In Print Preview, you can view a report exactly as it will appear when printed.
In Layout Preview, you can get a quick look at the basic layout of the report.
To Switch Report Views while you are working in the Report window, press the down arrow
on the view tool and select a view .
learnresource.doc
52of 53
19/09/02
Database Design 1
Reference
14. Printed Output
14.1 Previewing Access Objects
You can use the View button
object.
on the toolbar to switch to other views of the database
Using Print Preview will allow an object prior to printing.The figure below shows a form
displayed in Print Preview View. You can change to print preview by selecting FILE / Print
Preview or by pressing the Print Preview toolbar button
.
You can use the features listed below to view your objects in the following ways:
·
The One Page
button displays one page. The Two Pages
two pages. The Multiple Pages
to preview.
button displays
button allows you to select the number of pages
·
The Zoom box
object.
lists the zoom percentages at which you can view the
·
The Zoom tool
will allow you to zoom in and out order to view the screen.
·
Pressing the printer icon
the previous view.
will print the details and pressing Close will return to
Printing
·
A datasheet will print as it appears on the screen. If you have changed the layout of
your datasheet (font, row height, column width, etc) these changes will be reflected in
your printed output. For large datasheets, Microsoft Access prints from left-to-right
and then from top-to-bottom. For example, if your datasheet is three pages wide and
two pages long, Microsoft Access prints the top three pages first, then the bottom
three pages.
·
A form can be printed from the Database window or any view of the form.
·
To set the page orientation, margins, etc. you select FILE / Page Setup.
·
To set printing options for objects, select FILE / Print.
learnresource.doc
53of 53
19/09/02


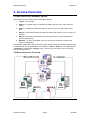
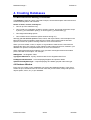
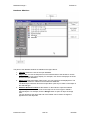
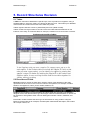
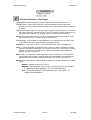


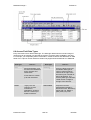
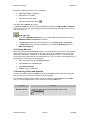
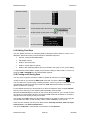


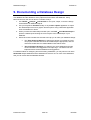


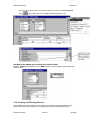

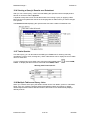


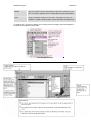

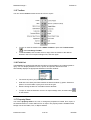
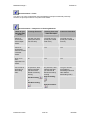
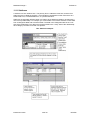
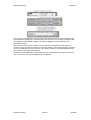

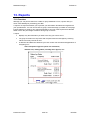


![Intergraph Geomedia [6.1-2013] User manual](http://vs1.manualzilla.com/store/data/005689587_1-58c82d14f3ba8ebe92b5c45af00d079c-150x150.png)