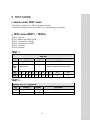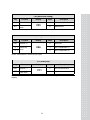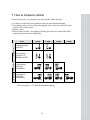
1
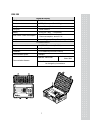
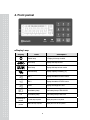
2 Table of Contents 1. Introduction.......................................... 5 2. Feature & Main function ..................... 6 3. Technical Specification ...................... 6 4. Front Panel........................................... 8 5. Test mode ........................................... 11 6. Setting mode......................................13 7. How to measure vehicle...................17 8. Method of using(RW-15B)................18 9. How to save data ...............................20 10. Change roll of print .........................22 11. Error Message ................................23 3 1. Introduction Thank you for purchasing the CAS RW-2201B Series weighing indicator. We have designed this equipment with many advanced features, high quality construction, and user-friendly menu driven programming. We are confident that you will find the CAS RW-2201B Series will meet all of your most demanding needs. CAS indicator is shaped firmly and delicately designed to coincide with the special requirements of several industrial fields and includes many functions and various external interfaces. Also, it contains help display functions to be used easily. Before using RW-2201B, It is recommended to read this manual carefully and to apply the function application fully. Precautions Observe the following safety precautions : Warning When any damage or defect occurs, contact your CAS authorized dealer immediately for proper repair. Do not pull the plug by its cord when unplugging. Damaged cord could cause electric shock or fire. Insert plug firmly to wall outlet to Avoid placing the scale near heather or in direct sunlight. prevent electric shock. To prevent from fire occurring, Do not place or use the scale near flammable or corrosive gas. 4 To reduce electric shock or incorrect reading, Do not spill water on the scale or place it in humid condition. Attention For consistent and accurate reading, maintain periodical check by your CAS authorized dealer. Avoid sudden shock to the scale. Internal mechanism could by damaged. Place the scale on firm and temperature consistent environment. Keep the scale away from the electromagnetic generation devices. This may interfere with accurate reading. Attach the rubber pad to the bottom of the indicator. Elimination is possible. Our Dealers : CAS feels that each of its valued customers should get the best service available. Whether it’s the initial installation of our product, maintenance/repair work, or simply answering questions about our products, CAS Corporation and all of its Authorized Dealers are highly trained to assist you with any need regarding CAS products. 5 2. Feature & Mainfunction Feature Simple & Light & Portable. Easy Control Internal battery. Internal battery charger With Backlight Internal Printer 3. Technical Specification RW-2201B Digital & Display Display LCD (6 digit + Sign) Character size 24 mm (height) Display under zero "-" minus display Display status ZERO, STABLE, UNIT(kg) Power AC 220 V 50/60Hz Operation temperature -10℃℃ ~ 40℃℃ Wireless communication Blue tooth Composition RW-2201B , RW-15B(2sets) Product weight About 10.6kg Using time About 48 hours Charging time About 24 hours 6 RW-15B Digital & Display A/D Speed 10 times/second External resolution 1/750( Max capa : 15t, 1d : 20kg ) Using time about 10hours(Continue comm.) Using key Power ON/OFF Battery 4.8V(1.2V * 4EA), 1.3A (NI-MH) Inner Power / Power consumption Inner Power : 3.3V / Power consumption : about 0.5 W Weight About 27kg(except Ramp, Ramp Weight : 10kg) Communication Wireless communication BLUETOOTH method (CLASS 1) Frequency 2.402 ~ 2.483GHz CHANNEL 78 CHANNELS(HOPPING method) Communication speed 9600bps Opensite : about 50M Communication distance At barrier place : about 30M Notice. Communication distance will be changed by circumstance. 7 4. Front pannel ■ Display Lamp Display LO Brief Description Stable lamp A Display this lamp at stable Zero lamp Display this lamp at zero Sum lamp Display this lamp at sum mode Percent lamp Display capacity of battery (%) RX 1 Display the status of PAD1 comm. RX 2 Display the status of PAD2 comm. PAD1 Display the weight of PAD1 Low battery lamp Low battery lamp of RW-2201B Low battery lamp Low battery lamp of RW-15B Red lamp on printer Power lamp of printer Green lamp on printer Self-Test lamp of printer Display the power-on of printer Display the ok or not ok of printer 8 ■ Key Board ZERO Short Used to remove small vibration PAD Short Check the weight of each PAD Long Power off the all PAD (Display “OFF”) PRINT Short Used to print and sum weight Long Used to lock print (To print, input the pre-setting password in F02) Notice. Check first the setting mode before use this function. (F03->1). SUM Short Print all PAD weight of one vehicle Notice. It can not print weight of all vehicle one day. FIND Short Find saved data Notice. Yon can print data of saved data TRUCK No. Short To input vehicle number(4 digit) 9 SAVE Short To save the weight of PAD ( Max 10 vehicle/ Max 4 PAD weight of one vehicle) Long To move next mode. Notice. If you press this key very often, it will be saved data every time at other memory. SET Short To go next mode or to save data Long To enter SET mode CLR Short To erase data Long To enter TEST mode 10 5. TEST MODE □ How to enter TEST mode Turn on Power while press ‘CLR’ key to enter test mode.. You will see massage (conect ). Press ‘SET’ key and then move to test menu. □ TEST menu(TEST1 ~ TEST6) TEST 1 : Key test TEST 2 : Battery test of RW-2201B TEST 3 : Load-cell test of PAD1 TEST 4 : Load-cell test of PAD2 TEST 5 : Clock test TEST 6 : Print test TEST 1 Key test Key Function Display SET Move to TEST2 tESt 1 Other key Operate test 1 Description This is status of TEST 1 Press key, display value of key code. key 1 2 3 4 5 6 7 8 9 0 CLR SET code 1 2 3 4 5 6 7 8 9 0 A b TEST 2 Battery TEST of RW-2201B Key SET Function Move to TEST3 Display tESt 2 Description This is status of TEST 2 6.00 Battery value of RW-2201B 11 TEST 3 Load Cell TEST of PAD1 Key SET Function Move to TEST4 Display Description tESt 3 This is status of TEST 3 24750 AD value of PAD1 TEST 4 Load Cell TEST of PAD2 Key SET Function Move to TEST5 Display Description tESt 4 This is status of TEST 4 23564 AD value of PAD2 TEST 5 Clock test Key SET Function Move to time setting or TEST6 Display tESt 5 06.11.09 12.02.32 Description This is status of TEST 5 dAtE : Display date. tIME : Display time TEST 6 Printer test Key SET Function Display Move to weighing mode tESt 6 This is status of TEST 6 Description 600d Operate printer test Notice. Output of print is below. TEST OK 12 6. SET MODE □ How to enter SET mode Turn on Power while press ‘SET’ key or press long ‘SET’ key in weighing mode. □ SET Mode menu Menu Description F01 Setting backlight F02 Change the password F03 Setting lock of print key F04 Setting communication error message display F05 Setting auto-save data at printing F06 Setting number of using PAD F11 Setting auto-print F12 Setting line-feed F13 Setting time F01 (Setting backlight) Key Other Key SET Function Display Value 0 0 ~ 3 key Save and exit the set mode F01 13 Description Always off 1 At pressing key 2 At changing weight 3 Always on F02 (Change password) Key Function Display Select 0 or 1 SET F02 Save and exit the set mode Description Value 0 To do not change pass word 1 To change password F02 = 1(To change password) Key SET PASS ___0 Good PASS 1 ___0 PASS 2 ___0 Enter the pas sword SET SET Display Input 4 number of password Input new password Retry input new password Notice. Initial password is ‘1234’ in factory If PASS 1 is different from PASS 2, RW-2201B display error message ‘Err 31’, come back input mode of PASS1 . F03 (Setting lock of print key) Key Function Display Key Select 0 ~ 1 SET Exit set mode F03 Value Description 1 Use of lock 0 Don’t use. You must check F02 before this mode. F04 (Display comm. Error message) Key Function Key Select 0 ~ 1 SET Exit set mode Display F04 14 Value Description 1 Don’t use. 0 Display comm Error . F05 (Auto save setting) Key Function Key Select 0 ~ 1 SET Exit the set mode Display Value 1 F05 Description Auto save at print 0 Manual save F06 (Setting number of pad) Key Key Function Display Select 0 ~ 2 S E T Exit the set mode S E T F06 Value Description 0 Use 2 PAD 1 Use 1 PAD(Number 1) 2 Use 1 PAD(Number 2) Notice. PAD number is written on spec-plate. F11 (Auto print) Key Function Key Select 0 ~ 1 SET Move the next mode Display F11 Value Description 0 Don’t use this function 1 Only status of stable Notice. If you select 1 of F11, this function is operated when the weight is over 1% max capacity. 15 F12 (Line feed) Key Function Key Select 0,1,5 SET Move the next mode Display F12 Value Description 0 0 line feed. ∫ ∫ 5 5 line feed. Format Total Format 2006.11.24 14:32:54 ---- TOTAL PRINT ---- Truck No.:1234 Truck No. : 1234 ------------- AXLE 1 ----------- TOTAL AXLE. : 2 WEIGHT1: WEIGHT2: 12056 kg TOTAL : 4234kg 10150 kg ------------------------------AXLE1 TOTAL : 22206 kg ` ------------ AXLE 2 ----------WEIGHT1: WEIGHT2: 2056 kg 4150 kg ------------------------------AXLE2 TOTAL : 6206 kg F13 (Setting time) Key Function Key Select 0or1 SET End of mode set Display Value F13 06.09.18 10.30.54 Notice. If date-input is done, it will be change mode of input- time. 16 Description Input date Input time 7. How to measure vehicle See the below picture. As you shown, you can weigh the vehicle four time 1) If vehicle is on the PAD, press print key because save the data and print data. 2) If weighing is done, you can ready next weighing. Also if vehicle is on the PAD, press print key. The reason is same. 3) Repeat 2 times. 4) Gross weight of vehicle : If weighing is all done, press sum key because RW-2201B print gross data (with 4 axel weight data) Sort 2 A X E L 1 step 2 step 3 step 4 step 1) without dummy (2 PLATE) 2) use dummy (2 PLATE + 2 DUMMY PLATE ) 3 A X E L 1) use dummy (2PLATE + 12 DUMMY) 4 A X E L 1)use dummy (2PLATE + 12 DUMMY) Notice : Even measuring by Dummy plate, error of the actual weight can happen. (The error range is +/-3% from the Maximum capacity) 17 8. Method of using(RW-15B) Using POWER ON/OFF 1. POWER ON : Press power S/W for 2 sec. 2. POWER OFF : Press power S/W POWER LAMP 1. LAMP OFF : This is status of power off. 2. LAMP ON : This is status of power on. 3. LAMP blinking : RW-15B is needed for charging. notice. As you shown side picture, raised antenna help communication n far more than lay. 18 9. How to save data Method 1. 1. If wheel of vehicle on pad, press save key. - “1 SAVE” is display. This means wheel weight save done . 2. Repeat the procedure 4times (1 vehicle) 3. If you done, press save key long. Then It will show END message - This procedure is for save data. The result is saved weight of one vehicle. - If you see the “FULL” message, memory is full. - It has memory of 10 vehicle. Method 2 If you set 1 of F05, auto save function is used. Auto save function is saved at print. It is done at Total print. Notice . It is saved 4 axel weight data per vehicle. If exceed 4 axel weight data, will overwrite old data. Search the saved data 1. Press FIND key.“Then it will be show 0-XXXX. - First number means order of saving and second number means number of vehicle. 2. Press 2 key or 8 key. It will be show save vehicle number. 3. If you find what you want vehicle number, press print key. 4. If you delete data, press CLR. All saved data is erased. 19 10. Change printer roll. As you show above picture, press line feed key after insert roll. Then the paper is passing through cartridge. Press line feed key again. Then the paper is stop. This is done. See above the picture. It is picture of removed cartridge. If letter is not clear, you must change cartridge. Method of change is very simple. Hold on the cartridge and pull up. 20 11. Error message & Trouble shooting No Reason Trouble shooting t1-out t2-out Fail to communication t1-out : PAD1, t2-out : PAD 2 Too far or many barrier. Get close or remove barrier. Err2-1 Err2-2 A/D value is wrong Err2-1 : PAD 1, Err2-2 : PAD 2 Check the pad power. Then operate TEST3, TEST 4. Check A/D value Err 11 Err 12 Over the initial zero range. Err 11 : PAD 1 , Err12 : PAD 2 Clear on the pad. Initial zero range is within 20% of Max weight. Err 30 Entered password numbers. Err 31 Entered password is different from old Enter new password again. password. Err 50 Internal memory is erased Call your CAS dealer BT-Err Fail to communication Retry communication. exceed OUER 1 Over the max weight of PAD1 OUER 2 Over the max weight of PAD2 batt Low battery of RW-2201B 4 Input only 4 number. This may damage load-cell. You must reduce the weight under the max capacity. This may damage load-cell. You must reduce the weight under the max capacity. You must recharge the RW-2201B. 21 MEMO 22 MEMO 23 24