1
User Manual
August 2011
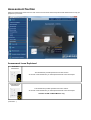
Using the Program
The sections from 'Collision Regulations' through to 'Safety' contain a mixture of Question and Answer sections, Step-by-Step guides and
instructional videos and documents.
The 'Reference' and 'Bonus Titles' sections contain legislative documents and other useful industry reference material.
The 'Assessment' section contains advice and practice assessments to assist in preparation for your exams.
You can access any of these sections by clicking on the item in the menu on the left hand side or in the carousel on the right hand side.
Use the
and
buttons or the slider above the carousel to spin the carousel round to access items which are not currently visible.
Navigation using the Menu
Simply click on the study section you wish to view and the carousel will be populated with the available items in that section.
If there is a small + symbol next to a menu item, that indicates that there are sub-sections underneath that section.
Click on the + symbol to expand the menu to show the sub-sections.
The menu also contains some useful shortcut commands. These are:
Return to the Home screen
Open the Search Screen with all sections selected for searching
Open this Help File
Open your personal bookmark list
Open the eBook catalogue
Close any eBooks, Q and A sections, etc. that are currently open
Exit MSE v6
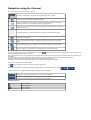
Keyboard Shortcuts
Previous Menu Item
Next Menu Item
Expand Sub-sections
Collapse Sub-sections
Activate Menu Item
Ctrl + Up Arrow
Ctrl + Down Arrow
Ctrl + Right Arrow
Ctrl + Left Arrow
Ctrl + Spacebar
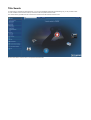
Navigation using the Carousel
For a given section the carousel items can consist of:
A picture can represent a Q & A section, Step-by-Step guide, video or eBook.
A book icon indicates an eBook or reference document.
A grid icon indicates a group of related documents. These will be displayed in a grid and a
particular document can be opened by double-clicking the grid row.
A folder icon (or a photo with a folder icon in the top-left corner) indicates another sub-section
below the current one
An assessment section - these are explained in more detail on the 'Assessment' page.
Search the current section
Open your personal bookmark list - only appears in the top-level Carousel (i.e. the Home
screen)
Open the eBook catalogue - only appears in the top-level Carousel (i.e. the Home screen)
Open this Help file - only appears in the top-level Carousel (i.e. the Home screen)
You can navigate through the current carousel items by clicking the
buttons above the carousel, moving the slider control or pressing the
left or right arrow keys while holding the shift key.
If you place the mouse cursor over the trackbar a pop-up will appear showing which item will be moved to the foreground if you click that point on
the trackbar.
You can activate a carousel item by either left-clicking on it with your mouse, or pressing the space bar while holding the shift key.
Activating a Q&A section, Step-by-Step guide, video or eBook will open that particular item.
Activating a sub-section (folder icon) will navigate into that sub-section and repopulate the carousel.
There are two other buttons above the carousel.
The
button will take you back up to the current section's parent level.
Depending on whether the carousel is in 'flat mode' or 'ellipse mode' one of these buttons will be visible
These buttons allow you to toggle between two slightly different views of the carousel.
Ellipse mode: in ellipse mode clicking on any item will activate that item
Flat mode: in flat mode clicking on a carousel item in the background will bring that item to the
front of the carousel. Clicking on the front item will activate that item.
Keyboard Shortcuts
Shift + Left Arrow
Shift + Right Arrow
Shift + Up Arrow
Activate Carousel Item
Shift + Spacebar
Title Search
To avoid having to navigate to a particular section, or if you cannot remember what section the item belongs to, you can just enter a word
or a few characters in the 'Find' box at the top of the main screen and press the Search button.
The carousel will be populated with a list of all items and sections whose title matches the search term.
Click the Clear Search button to return to the previous carousel section
Question & Answer Sections
In the carousel each Question and Answer section will display the percentage of questions that you have already viewed for that section.
When browsing a Question and Answer section you can skip the questions that you have already by clicking the 'Next Unread Question' button.
Once you have viewed 100% of the questions in a particular section the 'Next Unread Question' button will no longer be visible. If you wish, at
any time you can reset the % Viewed values to 0% from the carousel screen.
To do this, right-click on a subject and you will be presented with a context menu which gives you 3 choices:
Reset Completion Percentage (This Section only)
Reset Completion Percentage (All Sections)
Cancel
- This will only reset the subject that you have currently
selected.
- This will reset ALL the Q&A sections!
- Close without any changes.
When browsing a Question and Answer section the text may appear on the left hand side or on the bottom depending on which layout best suits
the image displayed with that question.
You can expand and collapse the different text sections by clicking the
and
buttons on the left of the section heading.
For more information regarding the interface controls, please refer to the Question & Answer Screen Controls section of the user
manual.
Question & Answer Screen Controls
Bottom Toolbar
From left to right the commands on the toolbar are:
Shortcut Key
1
Text Zoom - Increase/Decrease the size of the text for the questions and answers.
Ctrl + Left Arrow = Decrease Text Zoom
Ctrl + Right Arrow = Increase Text Zoom
2
Questions - Browse through the questions.
First Question | Previous Question | Jump to any question using slider control | Next
Question | Last Question
Shift + Left Arrow = First Question
Left Arrow = Previous Question
Right Arrow = Next Question
Shift + Right Arrow = Last Question
3
Next Unread Question - The program keeps track of which questions you have already
looked at.
Click this button to skip the questions in this section that you have already viewed and
go to an unread question.
Ctrl + U
If you have viewed all of the questions in a particular section this button will not be
available until you reset that section's completion percentage.
4
Shuffle - The questions in each section are normally displayed in the same order each
time. Tick this box to shuffle them into a random order.
Ctrl + S
5
Show Picture in New Window - Sometimes the picture or movie clip for a question will
contain information needed to answer the question. Click this button to view it in a
separate window, giving you more space to zoom in if there are details you can't make
out.
Ctrl + P
6
Exit - Close the Question & Answer Browser window.
Alt + F4, or Ctrl + X
Picture Control
You can also adjust the size and position of the pictures displayed in the Question & Answer Browser window.
Use the + and - buttons to zoom in or out, and hold the left mouse button down on the image to drag it around.
Click Reset to return the picture to it's original size.
Shortcut Keys
Zoom In - Small Change
Up Arrow
Zoom In - Large Change
Shift + Up Arrow
Zoom Out - Small Change
Down Arrow
Zoom Out - Large Change
Shift + Down Arrow
Reset Picture
Ctrl + R
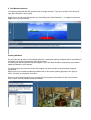
Viewing an eBook or Document
The left-hand panel displays the book table of content and can be used to quickly jump to
any part of the document.
The right-hand panel displays the document itself.
The table of contents sections can be expanded or collapsed using the +/- symbols next to
the section name.
You can hide the table of contents with the
button on the left hand side and reshow it
with
Use the left and right arrows at the bottom of the screen to go to the first, last, previous or
next pages.
You can also navigate to a specific page by entering the page number you want to go to in
the box next to the 'Go To Page' button
and either clicking the button or pressing [Enter].
The vertical scrollbar can scroll on either the current page only, or the entire document,
depending on the current Page View Mode.
You can toggle the page view mode using the toolbar button
The page number reference box displays the page number of the paper document.
If the paper document starts with pages numbered like i, ii, iii, iv, ..., there will be displayed
as such
and can be accessed by typing i, ii, iii, iv, ... in the box next to the 'Go To Page' button.
Note that if the paper document has a complex numbering system (i.e. by section like 1-1,
1-2, ...,1-19, 2-1, 2-2, ...) then the page
number reference box will only display the page number of the electronic document (1, 2, 3,
...).
The top toolbar controls can be used to adjust the viewing options or copy/print parts of the
document etc.
Document Viewer Controls
Top Toolbar
From left to right the commands on the top toolbar of the document viewer window are:
Description
Shortcut Key
1
Bookmarks - Opens the 'My Bookmarks' section in the main MSE v6 window.
Ctrl + B
2
Search - Opens the search screen and selects the current document as the document
Ctrl + S
to search.
3
Toggle Select Area mode - normally clicking and dragging with the mouse will scroll
the current page view. Click this button to switch to Area Select mode enabling an
area to be selected for use with the Snapshot or Copy functions described below.
Click again to clear the selection and return to Page Scroll mode.
Ctrl + A
4
Copy the previously selected area (mouse) to the clipboard as text. It is possible that
this function will be disabled for some documents.
Ctrl + C
5
Snapshot - Save on disk an image of the selected area (mouse). It is possible that this
Ctrl + Shift + C
function will be disabled for some documents.
6
Print - Send to printer.
Ctrl + P
Ctrl + Z = Zoom Out
7
Document Zoom Controls - you have a Zoom In and Zoom Out button and a dropdown menu offering a range of zoom levels.
You can also choose your own custom zoom level (between 10% and 1600%).
The magnifying glass button lets you zoom in on a region which you have selected
with the mouse.
Ctrl + Shift + Z= Zoom In
F12 = Zoom to Selection
Ctrl + R = Clockwise
8
Document Rotate Controls - you have Rotate Clockwise or Rotate Anti-Clockwise.
Ctrl + Shift + R = Anti-Clockwise
9
Toggle Page View Style - toggles between Single Page mode, where the vertical
scrollbar on the right hand side will only scroll within the current page, and Continuous F2
Page mode, where the scrollbar will scroll within the entire document.
Find in this document - enter a search term in the textbox and you can search either
forward or backwards within the current document for that term (this is a simplified
10
search for one keyword in one document, use the Search function for complex
search).
Ctrl + F = Find Next
Ctrl + Shift + F = Find Previous
11 Help - Opens this help file
F1
12 Exit - Close the Document Viewer window
Ctrl + X, or Alt + F4
Side Toolbar - Note: This toolbar is only available if the document contains a table of contents
From top to bottom the commands on the side toolbar of the document viewer window are:
Icon
Description
Shortcut Key
Hide / Show the panel containing the document's
Alt + Left Arrow = Hide
table of contents - can be useful if your screen is
not large enough to comfortably display the table of
contents and the pages of the document at the
Alt + Right Arrow = Show
same time
Collapse all of the sections in the document's table
Alt + Up Arrow
of contents
Expand all of the sections in the document's table
of contents
Alt + Down Arrow
Table of Contents
Action
Previous Entry
Next Entry
Expand Sub-sections
Collapse Sub-sections
Select Entry
Shortcut Key
Ctrl + Up Arrow
Ctrl + Down Arrow
Ctrl + Right Arrow
Ctrl + Left Arrow
Ctrl + Spacebar
Bottom Toolbar
Icon
Description
Shortcut Key
Add Bookmark
Ctrl + Shift + B
First Page
Ctrl + Shift + Left Arrow
Previous Page
Shift + Left Arrow
Next Page
Shift + Right Arrow
Last Page
Ctrl + Shift + Right Arrow
Go To Page
Type page number in box and press Enter
Assessment Section
Select the Assessment section from the main menu to access exam advice and practice self-assessments to help you
prepare for your exams.
Assessment Icons Explained
OOW Self
Assessment
This assessment provides questions from each section.
At the end of this assessment you will be presented with a test result report.
Chief Mate Self
Assessment
This assessment provides questions from each section.
At the end of this assessment you will be presented with a test result report.
Available in MSE v6 Mates/Masters only
(continued ...)
Master Self
Assessment
This assessment provides questions from each section.
At the end of this assessment you will be presented with a test result report.
Available in MSE v6 Mates/Masters only
Test yourself with questions from one particular section.
Single Section
Assessment
Custom Assessment
Setup
Customize assessments as per your requirements.
At the end of customized assessment you will be presented with a test result report.
User-Created
Custom Assessment
Start one of your previously created custom assessments.
Orals Advice - OOW
A guide to help you prepare and pass the OOW exams.
(continued...)
Orals Advice Mates/Masters
A guide to help you prepare and pass the Mates/Masters exams.
Available in MSE v6 Mates/Masters only
Custom Assessments
To go to the custom assessment setup screen, click the
Click 'Create New' and enter a name for your assessment.
icon in the carousel.
Click 'Edit' and choose how many questions you want to include from each section.
When you have finished choosing your questions, click Save, then click Start Test to perform the assessment.
You do not have to start the assessment immediately after setting it up. Your customized test settings will be stored
permanently and can
be started at any time by clicking the relevant custom assessment icon
in the main assessment
carousel.
From the Customized Test Settings screen you can also edit an existing test setup to change the sections and number
of questions included or delete an existing test setup.
Assessment Screen Controls
Bottom Toolbar
From left to right the commands on the toolbar are:
Shortcut Key
1
Text Zoom - Increase/Decrease the size of the text for the questions and answers.
Ctrl + Left Arrow = Decrease Text Zoom
Ctrl + Right Arrow = Increase Text Zoom
Show Picture in New Window - Sometimes the picture or movie clip for a question will
contain information needed to answer the question. Click this button to view it in a
separate window, giving you more space to zoom in if there are details you can't make
out.
Ctrl + P
3
Main Menu - Quit the assessment and return to the main screen. If you have answered
at least one question a performance report will be displayed.
Alt + F4, or Ctrl + X
4
Next Question - Go to the next question
Right Arrow
2
On self-assessed questions this button will be disabled until you reveal the answer
and award yourself a grade.
On multiple choice and text-based questions you can click Next Question without
providing an answer.
On text-based questions if the program thinks you have made a spelling mistake
the red 'Spelling?' warning will be displayed and the program will not advance to
the next question.
You can either correct any spelling mistakes as described below or ignore the
warning.
When you click Next Question for a second time the program will advance to the
next question even if there are still possible spelling mistakes.
Picture Control
You can also adjust the size and position of the pictures displayed in the Question & Answer Browser window.
Use the + and - buttons to zoom in or out, and hold the left mouse button down on the image to drag it around.
Click Reset to return the picture to it's original size.
Shortcut Keys
Zoom In - Small Change
Up Arrow
Zoom In - Large Change
Shift + Up Arrow
Zoom Out - Small Change
Down Arrow
Zoom Out - Large Change
Shift + Down Arrow
Reset Picture
Ctrl + R
Question Types
There are 3 different types of questions used in the MSE v6 assessments.
1. Multiple Choice Questions
You will be presented with the question and a list of possible answers. Underneath the answers you
will be told if you have to select only 1 possible answer, or if there are multiple correct answers.
Incorrect answers will receive negative marks, but you can simply press 'Next Question' without
selecting any answers if you do not know the answer.
Click on one of the answers to select it - it will appear highlighted in yellow. If you change your mind
you can deselect an answer by clicking on it again.
When you are happy with the answers you have selected, click 'Next Question'.
If you have selected too many answers when only 1 answer is required the 'Next Question' button
will be disabled until you deselect some of your choices.
2. Text-Based Questions
You will be presented with the question and an empty text box. Type your answer in the box and
click 'Next Question' when ready.
Again, if you do not know the answer you can simply click 'Next Question' - no negative marks are
applied for incorrect answers.
Spelling Mistakes
As you type your answer for text-based questions, suspected spelling mistakes will be underlined in
red when you click the spacebar to start a new word.
A flashing red warning symbol will also appear if you click Next Question while there are possible
spelling mistakes in your answer.
For simple typos and common errors the program will often be able to automatically suggest
corrections.
Right-click on an underlined spelling mistake and, if the correct spelling appears in the pop-up
menu, left-click to accept the correction.
When you click Next Question for a second time the program will advance to the next question
even if there are still possible spelling mistakes.
3. Self-Assessed Questions
Read the question and think about how you would answer it. When ready, reveal the answer by
clicking the header of the answer box or pressing the spacebar.
The model answer will be displayed.
Compare it to your own answer and award yourself a score between 0% and 100% by moving the
slider control, then click 'Next Question'.
Bookmarks
You can create a bookmark for any book that you have open in the program by clicking the Add Bookmark button
at the desired page.
Each bookmark is saved under a particular Description and Category. These are pre-filled based on the book
title/page number
and the section of the program content tree that the book belongs in, but can be edited manually.
The Category can be entered either by typing in a new category, or selecting an existing category from a dropdown list
Access your list of personal bookmarks by clicking either the
or the
icon in the menu on the left hand side toolbar,
icon on the Home carousel screen.
The bookmarks are displayed in the carousel view initially but you can switch to a grid layout by clicking the
button.
To return to the carousel just click whichever of the
or
buttons is visible in the bottom
left corner.
The program will remember whichever setting you used last and display the bookmarks either in the carousel or
the grid format
accordingly the next time you open your bookmark list.
From the carousel simply click on the item in the carousel to open one of your bookmarked documents
A pop-up window listing the description and page number of all bookmarks in that document will appear highlight the page
you want to open and click OK.
You can also delete bookmarks from the pop-up window - just highlight the row you want to delete and click the
Delete bookmark button
From the grid simply double-click one of the rows to open a bookmark.
Again you can delete a bookmark by selecting a row and clicking the Delete Bookmark button.
From the grid you can also save your bookmark list to an external file using the Save As button, and load a
bookmark list using
the Load button.
This allows you to share bookmarks with other users or backup and restore your list when upgrading your PC,
etc.
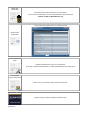
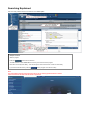
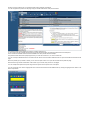
Searching Explained
One of the really powerful features of the software is the search option.
.
Example of search:
Start the program
Press the
button from the left menu.
The default search is set to search all which allows you to search the entire program.
Now search for the keyword "safety". This will find approx 340 documents which contain the word safety.
If you want to clear the search, press the
button (top-right of the search screen).
Note:
The search button at the top of the carousel screen is only for locating a particular book or section.
It does not search for the text inside the books or questions!
How To Search - what you should know
The search panel is as follows:
All Words: all of the words in the search request must be present for a document to be retrieved.
E.g. if you search for ‘emergency plan’, you will find the documents where ‘emergency’ and ‘plan’ are present.
The words can be separated by many pages, though.
The matches are displayed in a table. Double-click on a table row to go to the relevant document page.
Any Words": the document is retrieved if one or more words are found.
You can use quotation marks around phrases, put + in front of any word or phrase that is required, and - in front of
a word or phrase to exclude it.
Examples:
risk "contractual liability"
risk -insurance
Exact Phrase: the exact sentence (all words as typed, in the same order separated by the same number of
characters) in the search request must be present for a document to be retrieved.
"Expert": expert mode. See Expert Search for more details.
"Noise words", such as 'if' and 'the', are ignored in All Words and Any Word searches.
Synonyms search is not enabled by default, but there are some synonyms that are always active like:
ship, boat, vessel
captain, master
survey, inspection
water, H2O
etc...
Advanced Options:
Near X Words: enabled by default. Finds the documents where all of the words in the search request are present
and each of them is separated by a maximum number of words (1 to 25).
This is the best method to find terms that are logically connected: if you search for ‘emergency plan’, you will only
find the references to an emergency plan, not 'emergency exit' on one page and 'financing plan' on another.
Stemming: enabled by default. Stemming extends a search to cover grammatical variations on a word.
For example, a search for 'risk' would also find 'risks', 'risked', 'risking', ...
Synonyms: disabled by default. Synonym searching finds synonyms of a word that you include in a search
request.
For example, a search for fast would also find quickly or boat would find vessel or ship.
Phonic: disabled by default. Phonic searching looks for a word that sounds like the word you are searching for and
begins with the same letter.
For example, a phonic search for Smith will also find Smithe and Smythe.
Fuzziness: : disabled by default. Fuzzy searching will find a word even if it is misspelled.
For example, a fuzzy search for 'personel' will find 'personnel'. You can adjust the level of fuzziness from 1 to 5.
Result Length: Allows you to adjust the amount of text that is displayed in the results table for each match.
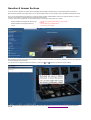
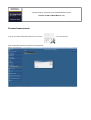
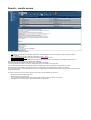
Search - results screen
The search screen is divided in 4 panels:
Left: table of contents. Select/unselect the checkboxes to add/exclude books or whole sections (e.g. Cargo or Communications)
from the search.
Right - top (Search Input): search settings as described in Search - Basic.
Right - middle (Search Results): the list of documents where keywords were found .
Right- bottom (Hit Details): when selecting a document, the list of hits in that document showing the surrounding text for each hit.
After searching a list of all matching documents will be displayed.
The Search Input panel collapses at this stage to give more space to the results.
You can expand the panel again by clicking on the arrows symbol on the top left corner of the panel.
You can resize the Search Results and Hit Details panels by dragging the dividing line between the panels with your mouse.
Selecting a document will display a list of all the hits within that document in the Hit Details section (bottom right window).
If you need more space to view the Hit Details section you can collapse/expand the Search Results section using the arrows symbol on the top
left corner of the panel.
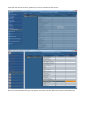
For each occurrence of one of your search terms in the document, the Hit Details screen will show:
The page number where the hit was found
The block of text surrounding the hit
(you can adjust the size of the block of text using the 'Result Length' slider in the Search Input section)
A clickable link for the actual word or phrase that matched your search term.
Clicking one of the links will pop up a preview window showing that part of the eBook.
You can navigate to the previous or next page using the arrows at the bottom of the preview window.
The preview window can be resized and moved to a position that suits you.
If you scroll through the hit details window while the preview window is visible, the preview window will become transparent.
This is so that the hit details window will still be readable even if the preview window overlaps it.
The preview window will become opaque again when you move the mouse over it, or click on another link.
You can click 'Open Selected Document' or double-click the relevant row in the Search Results section to open the selected document at the first
page.
When the preview pop-up window is visible, you can click the 'Open' button on it to open the document at that particular page.
Use the left and right arrows at the bottom of the screen to go to the first, last, previous or next pages.
You can collapse and expand each panel using the arrows symbol on the top left corner of the panel.
You can change the colour used to highlight the hits in both the document and the Hit Details section by clicking the highlight Colour button in the
Search Input section
How To Search - nice to know (expert mode)
In expert mode, the advanced options are no longer available from the control panel.
You access the advanced options by adding special keywords in the search request. Some features
are only available in expert mode.
AND/OR/NOT connector (Boolean search)
Use the AND connector in a search request to connect two expressions, both of which must be found
in any document retrieved.
Use the OR connector to connect two expressions, at least one of which must be found in any
document retrieved.
For example:
safety equipment and enclosed lifeboat would retrieve any document that contains both phrases.
safety equipment or enclosed lifeboat would retrieve any document that contained safety equipment,
enclosed lifeboat, or both.
Use NOT in front of any search expression to reverse its meaning. This allows you to exclude
documents from a search. Example:
safety equipment and not fire
not crew (retrieve all documents that did not contain crew).
W/N Connector
Use the W/N connector in a search request to specify that one word or phrase must occur within N
words of the other.
For example, safety w/5 equipment would retrieve any document that contains safety within 5 words of
equipment.
The following are examples of search requests using W/N:
(safety w/5 equipment) w/10 fire
(fire or safety) w/5 equipment
(fighting and equipment) w/10 fire
(fire or flood) and (safety w/5 equipment) would retrieve any document that (1) contains either fire OR
flood, AND (2) contains
safety within 5 words of equipment
The NOT W/ ("not within") operator allows you to search for a word or phrase not in association with
another word or phrase.
Example:
safety not w/20 equipment
Unlike the W/ operator, NOT W/ is not symmetrical. That is, safety not w/20 equipment is not the same
as equipment not w/20 safety.
In the safety not w/20 equipment request, the system searches for safety and excludes cases where
safety is too close to equipment.
In the equipment not w/20 safety request, the program searches for equipment and excludes cases
where equipment is too close to safety.
Words and Phrases
To search for a phrase, use quotation marks around it, like this:
fire w/5 "safety equipment"
If a phrase contains a noise word, the search engine will skip over the noise word when searching for
it.
For example, a search for state of seaworthiness would retrieve any document containing the word
state, any intervening word,
and the word seaworthiness.
Variable Term Weighting
When the search engine sorts search results after a search, by default all words in a request count
equally in counting hits.
However, you can change this by specifying the relative weights for each term in your search request,
like this:
fire:5 and flood:1
This request would retrieve the same documents as fire and flood but the system would weight fire five
times as
heavily as flood when sorting the results.
Special characters
Character
Meaning
?
matches any character
=
matches any single digit
matches any number of
*
characters
%
fuzzy search
#
phonic search
~
stemming
&
synonym search
~~
numeric range
*?
A search word can contain the wildcard characters * and ?. A ? in a word matches any single
character, and a * matches
any number of characters.
The wildcard characters can be in any position in a word. For example:
appl* would match apple, application, etc.
*cipl* would match principle, participle, etc.
appl? would match apply and apple but not apples.
ap*ed would match applied, approved, etc.
Use of the * wildcard character near the beginning of a word will slow searches somewhat.
%#~&
You can add fuzziness selectively using the % character. The number of % characters you add
determines the number of
differences the search engine will ignore when searching for a word. The position of the % characters
determines how many
letters at the start of the word have to match exactly.
Examples:
per%sonnel: Word must begin with per and have at most one difference between it and personnel.
p%%ersonnel: Word must begin with p and have at most two differences between it and personnel.
To add stemming selectively, add a ~ at the end of words that you want stemmed in a search.
Example: apply~
To search for a word phonically, put a # in front of the word in your search request. Examples: #smith,
#johnson
You can enable synonym searching selectively by adding the & character after certain words in your
request.
Example: improve& w/5 search
~~
A numeric range search is a search for any numbers that fall within a range. To add a numeric range
component to a search request,
enter the upper and lower bounds of the search separated by ~~ like this:
temperature w/10 60~~90
This request would find any document containing temperature within 10 words of a number between 60
and 90.
Notes
1. A numeric range search includes the upper and lower bounds (so 60 and 90 would be retrieved in
the above example).
2. Numeric range searches only work with positive integers.
3. For purposes of numeric range searching, decimal points and commas are treated as spaces and
minus signs are ignored.
For example, -123,456.78 would be interpreted as: 123 456 78 (three numbers).
Regular Expressions
Regular expression searching provides a way to search for advanced combinations of characters.
A regular expression included in a search request must be quoted and must begin with ##.
Examples:
Year and "##199[0-9]"
Year and "##19[0-9]+"
A regular expression must match a single whole word.
For example, you could not search for "fire drill" with a regular expression "##fir.*ll".
Special characters in a regular expression are:
. [ ] - ^ * ? + $ \
Regular
expression
. (period)
^ (caret)
$
(continued overleaf)
Effect
Matches any single character. Example: "##sampl." would match 'sample' or
'samplZ'
"##L.L" matches 'LEL' and 'LFL'
Matches the start of a line
Matches the end of a line
Treat next character literally. Example: in "##\$100", the \ indicates that the
pattern is '$100', not end-of-line ($) followed by '100'
Brackets indicate a set of characters, one of which must be present. For
[abc]
example, "##sampl[ae]" would match 'sample' or 'sampla', but not 'samplx'
Inside brackets, a dash indicates a range of characters. For example, "##[a-z]"
[a-z]
matches any single lower-case letter.
[^a-z]
Indicates any character except the ones in the bracketed range.
An asterisk means "0 or more" of something, so .* would match any string of
.* (period, asterisk)
characters, or nothing
A plus means "1 or more" of something, so .+ would match any string of at least
.+ (period, plus)
one character
[a-z]+
Any sequence of one or more lower-case letters.
\
Technical Specifications
The software requires the Microsoft .NET Framework 2.0 to run properly.
The .NET Framework 2.0 is pre-installed on Vista & Windows 7 PCs. Multiple versions of this framework can coexist on the same machine.
If your machine has the version 2.0, 3.0, 3.5 or 4.0 of the .NET framework installed, then the software will run out
of the box.
The program does not need any other external application to display the documents (i.e. Adobe Acrobat Reader
is not required).
The program runs on a standalone PC from a local drive (recommended) or a network drive.
The software needs to be unlocked and can only be used on a single dedicated computer.
Compatible Operating Systems:
Microsoft Windows:
Microsoft Windows 7 (all versions incl. 32-bit & 64-bit)
Microsoft Windows Vista (all versions incl. 32-bit & 64-bit)
Microsoft Windows Server 2008
Microsoft Windows Server 2003 family
Microsoft Windows XP (Home or Professional with Service Pack 2 & 3)
There are currently no versions available for Mobile OS, Apple Mac OSX or Linux.
Need support?
Please visit the support page at (http://www.witherbyseamanship.com/cm/support.htm/).