1
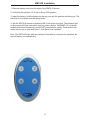
DVI to HD-SDI
Conversion Box
USER
MANUAL
www.gefen.com
ASKING FOR ASSISTANCE
Technical Support:
Telephone
(818) 772-9100
(800) 545-6900
Fax
(818) 772-9120
Technical Support Hours:
8:00 AM to 5:00 PM Monday thru Friday.
Write To:
Gefen, Inc.
c/o Customer Service
20600 Nordhoff Street
Chatsworth, CA 91311
www.gefen.com
[email protected]
Notice
Gefen Inc. reserves the right to make changes in the hardware, packaging and any
accompanying documentation without prior written notice.
The DVI to HD-SDI Conversion Box is a trademark of Gefen Inc.
© 2006 Gefen Inc., All Rights Reserved
© 2005 Gefen Inc., All Rights Reserved
TABLE OF CONTENTS
1
Introduction
2
Operation Notes
3
Panel Descriptions
4
Supported Input/Output Resolutions/OSD and Infrared Remote Functions
5
RMT-4IR Installation
6
Wiring of the RS422-RS232 Cable
7
Firmware Update Procedure
8
Specifications
9
Warranty
INTRODUCTION
Gefen's DVI to HD-SDI Conversion Box is a universal DVI-D / SDI (HD and SD)
converter. It converts DVI-D to SDI (SD or HD digital YPbPr). It automatically detects
the input scan rate and supports a wide variety of video formats including PAL, NTSC,
720p, 1080p, 1080i.
The DVI to HD-SDI Conversion Box is an easy to use plug-and-play box that allows the
use of much lower priced DVI video sources for SD and HD pictures on SDI displays.
Set-up and operation are easy as they should be. But to ensure that the images look
good always, Gefen has focussed attention on the technical detail of the many facets of
the conversion process.
- Accurate spatial interpolation for clear sharp rendition of static images
- Advanced de-interlace processing for clear, accurate output of moving images
- Temporal processing for smoother frame rate conversion
- Small size, low power consumption
The SDI output of the DVI to HD-SDI Conversion Box makes it a full featured scan
converter that can take DVI-D and convert it to SD-SDI or HD-SDI based on an output
selection. So you can convert from NTSC to PAL, from PAL to NTSC, from NTSC to
1080i, from RGB to 1080i, etc….
CONTENTS
The DVI to HD-SDI Conversion Box consists of:
--- (1) DVI to HD-SDI Conversion Box
--- (1) 6 foot DVI Cable (m-m)
--- (1) RMT-4IR Remote Control
--- (1) 5V DC Power Supply
--- (1) User's Manual
1
OPERATION NOTES
On power up, the DVI to HD-SDI Conversion Box will automatically detect the input
format of the input.
Resolution
The factory default is 720p-59.94. If your SDI monitor does not support that mode and
cannot display a picture to allow you to use the OSD, you can cycle through the output
mode according to the following table:
PAL -> NTSC -> 720p30 -> 720p59 -> 720p60 -> 1080i23 -> 1080i24 -> 1080i25 ->
1080i29 -> 1080i30 -> 1080p23 -> 1080p24 -> 1080p25 -> 1080p29 -> 1080p30
Button 4 on the remote cycles forward and button 3 in reverse
2
PANEL DESCRIPTIONS
DVI-D Input
5V Power
Connector
RS-422
Uplink Port
HD-SDI
Output
3
SUPPORTED INPUT/OUTPUT RESOLUTIONS
Supported Output Resolutions
The DVI to HD-SDI Conversion Box can output SD-SDI (NTSC or PAL) and HD-SDI
(1080i, 1080p and 720p).
Supported Input Resolutions
Input
DVI-D
Resolution
All DVI-D interlaced and progressive scan formats up to 1920x1200
OSD and INFRARED REMOTE FUNCTIONS
The DVI to HD-SDI Conversion Box works with the Gefen RMT-4IR remote control.
Button 1 - Displays source and display information
Button 2 - Resets the Conversion Box to default settings (requires power cycle)
Button 3 - Cycles backwards through output resolutions
Button 4 - Cycles forward through output resolutions
* Both dip switches under the remote batter cover must be in the ON position to
communicate with the conversion box
Restore I/O settings - Push down button 2 and then recycle power on the conversion
box
4
RMT4-IR Installation
1. Remove battery cover from the back of the RMT4-IR remote.
2. Verify that dip switches 1 & 2 are in the up (ON) position.
3. Insert the battery, hold the battery so that you can see the positive side facing up. The
side that is not marked must be facing down.
4. Test the RMT4-IR remote by pressing ONLY one button at a time. The indicator light
on the remote will flash once each time you press a button. WARNING: Do not press
multiple buttons simultaneously and do NOT press buttons rapidly. These actions will
cause the remote to reset and steps 1-4 will have to be repeated.
Note: The RMT4-IR ships with two batteries. One battery is required for operation, the
second battery is complimentary.
5
WIRING OF THE RS422-RS232 CABLE
The DVI to HD-SDI Conversion Box has an RS422 port that is used to upgrade the firmware of the unit. You can make the cable using the wiring diagram shown at the end of
this document or purchase a cable form KK Systems.
Note: For a true RS422 connection, you can use an adapter made by KK Systems (Part
Number K422-99). This adapter connects to the RS232 port on the PC and provides
an RS422 connection on the other side. To connect the K422-99 to the DVI to HD-SDI
Conversion Box, use a standard RS422 cable (Male DB9 to Male DB9 pin to pin). A true
RS422 connection allows for a better connection and longer cables.
6
FIRMWARE UPDATE PROCEDURE
To upgrade the firmware of the DVI to HD-SDI Conversion Box, you need to have the
DVI to HD-SDI Conversion Box RS422-PC cable. You also need to have the 3 files
HDVI20.exe, HDVI-20_Uploader.bat and the HDVI-20 bin file (version 1.30 or higher,
DO NOT USE ANY EARLIER VERSION) in your DOS directory. The DOS directory
is the default directory when you launch the Command Prompt application under
Windows.
1. Connect the DVI to HD-SDI Conversion Box RS422-PC cable to a COM port on your
PC.
2. Connect the DVI to HD-SDI Conversion Box to a DVI monitor
3. Force the DVI to HD-SDI Conversion Box in flash mode by pressing and holding the
TV/Video on your infrared remote until the picture becomes red.
4. Double click on the HDVI20_Uploader.bat icon and enter the serial port connected to
the DVI to HD-SDI Conversion Box and hit ENTER
5. Enter the binary file name of the HDVI-20 bin file and hit ENTER
6. The screen will start showing you progress and it will quit after the upgrade is over.
7. Recycle power on the DVI to HD-SDI Conversion Box and go to the last menu and
make sure the new firmware is installed.
7
SPECIFICATIONS
Input .................................. DVI-D up to 1920x1200 progressive scan and 1080i formats
Output ................................. SD-SDI SMPTE 259M, HD-SDI SMPTE 292M and 720p-50
Power Supply ......................................................................................................... 5V DC
Power Consumption .................................................................................. 10 watts (max)
Dimensions ..................................................................................... 5.5”W x 1”H x 3.75”D
Shipping Weight ....................................................................................................... 5 lbs.
8
WARRANTY
Gefen Inc. warrants the equipment it manufactures to be free from defects in material
and workmanship.
If equipment fails because of such defects and Gefen Inc. is notified within one
(1) year from the date of shipment, Gefen System will, at its option, repair or replace
the equipment, provided that the equipment has not been subjected to mechanical,
electrical or other abuse or modifications.
Equipment that fails under conditions other than those covered will be repaired at the
current price of parts and labor in effect at the time of repair. Such repairs are warranted
for ninety (90) days from the day of shipment to the Buyer.
This warranty is in lieu of all other warranties expressed or implied, including without
limitation, any implied warranty or merchantability or fitness for any particular purpose,
all of which are expressly disclaimed.
The information in this manual has been carefully checked and is believed to be
accurate. However, Gefen Inc. assumes no responsibility for any inaccuracies that may
be contained in this manual. In no event will Gefen Inc., be liable for direct, indirect,
special, incidental, or consequential damages resulting from any defect or omission
in this manual, even if advised of the possibility of such damages. The technical
information contained herein regarding the DVI to HD-SDI Conversion Box features and
specifications is subject to change without notice.
9