1
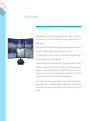
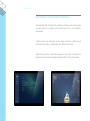
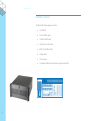
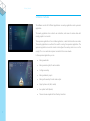
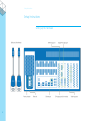
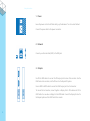
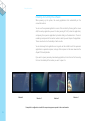
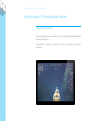
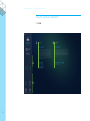
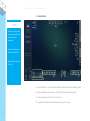
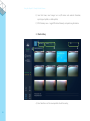
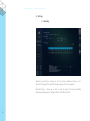
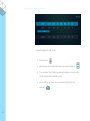
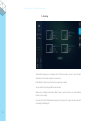
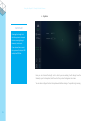
INSTALATION AND OPERATION MANUAL ABYSSAL OS Overlay Module Version 1.2 Thank you for purchasing the Abyssal OS Overlay Module for your ROV. This instruction manual contains all the information you’ll need for installing and operating the Overlay Module for the Abyssal OS. This system includes a processing computer to receive telemetry and video, process it, and output up to 4 HD video feeds with overlay. An installation USB Pen is also included, which contains the Supervisor Application to be installed on an external PC connected to the same network. There is already a Supervisor application installed on the processing unit, which can be used instead of an external computer. Please check the support page on our web www.abyssal.eu/support for the latest software versions. site at We are continuously working on new features and improvements. Feel free to send your feedback to [email protected] so we can build a system that fits your needs. Manuel Parente CTO Abyssal S.A. Contents 1 What’s new in version 1.2 2 Getting Started 3 4 Introducing Abyssal OS 4 Introducing the Overlay Module for Abyssal OS 5 Hardware Overview 6 Software Overview 7 3 Setup Instructions 8 Setting up the Hardware 8 Installing and running the software 11 4 Using the Abyssal OS Overlay Module Software 12 The Overlay Application 12 Using the supervisor application 13 What’s new in version 1.2 What’s new in version 1.2 Added Media Manager module, which allows taking and reviewing snapshots. Improved overlay editor by allowing undoing actions and snapping elements to a grid. 3 Getting Started Getting Started Introducing Abyssal OS Abyssal Operating System for ROVs is the indispensable tool to operate in the harshest environments with the world’s most advanced 3d technology, augmented reality, and precise navigation. The Abyssal OS is a suite of tools for everyone involved in subsea operations. It allows asset tracking, life-of-field management, mission planning, and much more. It is especially useful for Subsea Construction, Decommissioning, Renewable Energy operations, seabed trenching and well Intervention. A new era of offshore Oil & Gas operations is starting. The increasing complexity of subsea oil fields requires the most innovative solutions. With the Abyssal Operating System installed on your Remotely Operated Vehicles you will be able to have an instant overview of the operation in real time. Using the Augmented Reality System with each of the ROV cameras, the pilot will be able to locate targets with incredible efficiency. It’s the perfect tool for supervisors, superintendents and managers. Organize work sites, keep track of every mission, and manage all the data from the mission in real time. Monitor multiple assets with live positioning data. Manage multi-ROV operations with safety and efficiency. 4 Getting Started Introducing the Overlay Module for Abyssal OS The Overlay Module for the Abyssal OS is a software and hardware solution that provides an overlay system for a mission's real-time video feed, with the current telemetry superimposed. It offers an easy-to-use configurable real-time display of telemetry in different visual formats (textual or graphic), compatible with all the different video formats. Abyssal Overlay System is a module already prepared to be used as an interface with Abyssal OS, the most advanced Visualization System for ROVs currently in the market. 5 Getting Started Hardware Overview The Abyssal OS Overlay package contains: 6 1 4U Rack PC 3 DVI to HDMI cables 1 HDMI to HDMI cable 1 Display Port to DVI cable 4 BNC to Mini BNC cables 1 Power Cable 1 User Manual 1 Installation USB Pen with Supervisor App for external PCs Getting Started Software Overview The software consists of 2 different applications: an overlay application and a supervisor application. The overlay application has no direct user interaction, and serves to render video with overlay graphics in a monitor. The supervisor application is the controller application, in which all interactions are made. The overlay applications run without the need for running the supervisor application. The supervisor application is used to monitor and configure the overlays, and can run on the overlay PC or on an external computer connected to the same network. In the supervisor application you can: 7 Manage worksites Manage mission (jobs) for each worksite Configure overlays Manage telemetry inputs Manage the overlays for each video output Adjust system units (feet, meters) See system health (alarms) Take and review snapshots from Overlay’s monitors Setup Instructions Setup Instructions Setting up the Hardware 8 Setup Instructions 1. Power Leave the power-cut button off while setting up the hardware. Turn it on when finished. Connect the power cable to the power connection. 2. Network Connect your ethernet cable (RJ45) to the RJ45 jack. 3. Outputs Use DVI to HDMI cables to connect the DVI output ports to two of the monitors. Use the HDMI end on the monitors, and the DVI end on the Abyssal OS system. Use an HDMI to HDMI cable to connect the HDMI output port to a third monitor. To connect the last monitor, connect together a Display Port to DVI cable and a DVI to HDMI cable. You now have a Display Port to HDMI cable. Connect the Display Port end to the Abyssal system and the HDMI end to the monitor. 9 Setup Instructions 4. Inputs Connect each of the 4 BNC cables to your video sources, and the mini-BNC terminator to the desired video input port in the Abyssal system. SD Format Support 625/25 PAL, 525/29.97 NTSC. HD Format Support 720p50, 720p59.94, 720p60, 1080p23.98, 1080p24, 1080p25, 1080p29.97, 1080p30, 1080i50, 1080i59.94 and 1080i60. SDI Compliance SMPTE 259M, SMPTE 292M, SMPTE 296M. 5. Telemetry If you will use serial telemetry, connect it to the serial port. For using telemetry via ethernet (JSON), simply setup the network (see Network above). 10 Setup Instructions Installing and running the software When powering up the system, the overlay applications start automatically on the connected monitors. You can use the supervisor application on one of the monitors by focusing (with a mouse click) the overlay application you want to close, pressing ALT+F4 (to close the application), and opening the supervisor application by double-clicking on the desired icon. The icon’s numbering corresponds to the monitor number in which you want to open the application. There is one shortcut on the desktop of each monitor. You can also keep the 4 applications running and use the installer to add the supervisor application to a separate computer, as long as that computer is in the same network as the Abyssal OS Overlay Module. If you want to open a previously closed overlay application, click on the icon for the overlay that is on the desktop of the monitor you want to open it in. Monitor 1 Monitor 2 Monitor 3 Example of a configuration in which the supervisor app was opened in the second monitor 11 Monitor 4 Using the Abyssal OS Overlay Module Software Using the Abyssal OS Overlay Module Software The Overlay Application The overlay application has no user interaction, it is remotely configured and controlled by the supervisor application. This application is focused in processing the video and overlaying the telemetry information. 12 Using the Abyssal OS Overlay Module Software Using the supervisor application 1. Home C A B 13 D Using the Abyssal OS Overlay Module Software NOTE Geographical Coordinates are used to specify the geographical coordinate system that you are using for that worksite. It is used to parse the positioning system data stream so that the system can convert from Latitude and Longitude to Northing and Easting. Projected coordinates are used to specify the projection system for the Northing and Easting. Additionally, if the system is receiving the positioning data in northing and easting, it uses these coordinates to convert back to Latitude and Longitude for use in the overlay. 14 A) System Status – turns red or yellow to raise issues, such as failing to connect to the Abyssal OS Server or finding problems with the telemetry input; B) Main Menu; C) Worksite management – Shows you the current selected worksite, geographical coordinates and projected coordinates; clicking on the worksite opens the worksite management – in which you can add, remove, or edit worksite information; D) Mission management – Shows you the current selected mission; clicking on the mission opens the mission management – in which you can add, remove, or edit mission information. Using the Abyssal OS Overlay Module Software 2. Overlay Editor F NOTES Drag items in the profile overlay to organize them according to your preference. You can also change the font size for each item. Select multiple item with Ctrl+Click A B C D E A) Overlay Profile List – you can add new profiles, edit the name, clone or delete a profile; B) Tether Management System menu – toggle TMS/Cage telemetry information; C) Undo the previous action (also Ctrl+Z shortcut); D) Toggle the edition grid, which makes elements snap to its points; 15 Using the Abyssal OS Overlay Module Software E) Insert text boxes, insert images, turn on/off mission and worksite information, import/export profiles, or delete profiles; F) ROV Telemetry menu – toggle ROV related telemetry and positioning information. 3. Media Gallery A D B A) Select whether or not the new snapshots include the overlay; 16 C Using the Abyssal OS Overlay Module Software B) Take a new snapshot of the selected monitors; C) Search the snapshots by file name; D) Review the snapshots, grouped by date: a. Expand or collapse a group of snapshots; b. Edit the file name of a snapshot; c. Open the snapshot; d. Open a new folder and select the snapshot. 17 Using the Abyssal OS Overlay Module Software 4. Settings a. Telemetry Telemetry Input Settings – Allows you to invert certain variables according to your standard. For example, for some ROV models negative pitch means upwards. Ethernet Settings – Allows you to start or stop the server that receives SerialTap (Oceaneering) telemetry and configure the IDs of the ROV and TMS. 18 Using the Abyssal OS Overlay Module Software In the Serial configuration area, you can: Add new source; Rescan for new sources (only works if sources are currently streaming); If you are using a Tritech Positioning system with multiple units, you can add a Unit-ID under the relevant telemetry source; You can click the “eye” button on a source to see the live feed on that serial port. 19 Using the Abyssal OS Overlay Module Software b. Routing These settings allow you to configure each of the four screens. Screen 1 uses the Input Video Feed 1 on the video capture card, and so on. Press Identify to show on each screen their respective number. You can select the overlay profile for each camera. Make sure to configure the camera’s field of view, in order to have an accurate artificial horizon on the overlay. If you have Pan and Tilt telemetry streaming to the system for a given camera, enable it and specify its telemetry ID. 20 Using the Abyssal OS Overlay Module Software c. System IMPORTANT Choosing the Length Unit tells the system to interpret the data coming through telemetry in that unit. If you choose feet as a unit, the system will interpret 200 in depth as 200 feet. Here you can choose the length unit in which you are working; it will change how the telemetry input is interpreted, and the units of any value that appears on screen. You can also configure the time the system waits before raising a “no positioning” warning. 21 Error! No text of specified style in document.