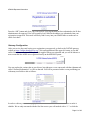
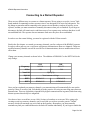
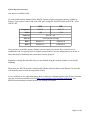
1
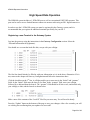
KD0IAN D-Star Repeater System
Des Moines, IA
User Documentation
Configuration Assistance
Michael A. Waldron, AE0MW
Document Version 1.3, 2009-12-01
Table of Contents
About This Document................................................................................................................................1
Intent......................................................................................................................................................1
Other Resources....................................................................................................................................1
Hardware...........................................................................................................................................1
Software............................................................................................................................................1
Web Resources..................................................................................................................................1
Mailing Lists.....................................................................................................................................2
About the D-Star Network.........................................................................................................................3
Trust Servers..........................................................................................................................................3
Nodes.....................................................................................................................................................3
Gateways...............................................................................................................................................3
Ports.......................................................................................................................................................3
Stations..................................................................................................................................................4
Hardware...............................................................................................................................................4
The Des Moines Area D-Star System........................................................................................................5
Hardware...............................................................................................................................................5
System Administration..........................................................................................................................5
Thanks...................................................................................................................................................5
Operating Locally......................................................................................................................................6
General D-Star Operation......................................................................................................................6
KD0IAN Local Use...............................................................................................................................7
Cross Band Operations...............................................................................................................................8
Registering for Gateway Use.....................................................................................................................9
Gateway Registration............................................................................................................................9
Gateway Configuration.......................................................................................................................11
Contacting an Out-of-Town Friend..........................................................................................................13
Connecting to a Distant Repeater.............................................................................................................15
Unlinking.............................................................................................................................................16
Linking................................................................................................................................................16
Connecting to a Reflector.........................................................................................................................18
GPS Operations........................................................................................................................................19
GPS and D-Star...................................................................................................................................19
Setup for GPS Mode............................................................................................................................19
Setup for GPS-A Mode........................................................................................................................20
Sending GPS Data out the Gateway (D-PRS Operation)....................................................................20
High Speed Data Operation.....................................................................................................................22
Registering a new Terminal in the Gateway System...........................................................................22
Configuring your ID-1 for Internet Access.........................................................................................23
Configuring your computer for D-Star Internet access.......................................................................25
Windows XP Configuration............................................................................................................25
Returning your computer to normal operations..............................................................................27
Quick Reference.......................................................................................................................................28
Icom Radio Manuals................................................................................................................................29
KD0IAN Repeater Information
About This Document
Intent
This document is comprised of knowledge gained from many sources. I claim none of it as original.
Unfortunately in my learning binge about the D-Star system in the last few months I have very few
sources that I can point to and say “They taught me this” although many such places exist.
It is my intent to distill the knowledge I have gained and translate it into an appropriate and relevant
form for Des Moines area Amateurs who may not have the endless time required to devote to learning
the inner nuts and bolts of this system before they can key their microphone for the first time on a new
and exciting mode. Knowledge comes with time and practice. In the beginning we all stumble; do not
get discouraged. Every single mode we use in Amateur Radio was new at one point in time. Today, this
is the new mode for all of us.
For the latest version of this document, you can always email me at my call sign at arrl.net.
Other Resources
There are many extensive D-Star resources available on the Internet. I will list a few of them here,
however keep in mind that the Internet is constantly changing and updating. A quick search for D-Star
will likely produce much more current results.
Hardware
●
DV-Dongle D-Star Computer Interface: http://www.dvdongle.com/DV_Dongle/Home.html
Software
●
●
●
●
●
D-Rats Communication Tool: http://d-rats.danplanet.com/wiki/
NJ6S's D-Star Chat application: http://nj6n.com/dstar/dstar_chat.html
D-StarLet ARES Tool: http://www.dstarlet.com/
Dstar Comms Pro: http://www.dstarcomms.com/
D-Star TV: http://www.dstartv.com/
Web Resources
●
●
●
D-Star Users: http://www.dstarusers.org/
D-Star Calculator: http://www.dstarinfo.com/Calculator/Default.htm
IRC D-Star Reflector List: http://www.ladstar.org/ref.htm
Page 1 of 29
KD0IAN Repeater Information
Mailing Lists
●
●
●
Yahoo Group: Dstar-Gateway
Yahoo Group: dstar_digital
Yahoo Group: DVDongle
73's de Mike, AE0MW
Page 2 of 29
KD0IAN Repeater Information
About the D-Star Network
The D-Star network is a new digital mode of communication for Amateur operators the world over.
Using open protocols defined by the JARL (Japan's ARRL equivalent) licensed Amateur operators
around the world have been given a completely digital voice and data communications network
designed from the ground up for Amateurs, by Amateurs (albeit very professional “amateurs”).
The system makes use of both the Internet as well as 10GHz RF for backbone operations allowing for
traffic (voice and data both, voice is data in this system) to be transferred throughout the network to
reach it's destination. Your Amateur call sign is your unique address in this system. If someone in New
Zealand wishes to send you a text message or tell you about the local beach conditions ahead of your
impending trip he needs only to program your call sign into his HT and start talking. The system will
find the last repeater you used and his transmission will automatically be routed to you through that
repeater.
The D-Star system is comprised of trust servers, nodes, gateways, ports and stations.
Trust Servers
Trust Servers are backbone infrastructure. Trust servers are regional and they are the root of
authentication for their respective regions. The Texas Interconnect Team, K5TIT maintains the trust
server for the United States and most of the rest of the world excluding Japan. All nodes exchange data
about authenticated users to the trust server so that once you are registered on any node in the system,
your registration is valid anywhere in the D-Star network. Trust servers can also communicate with
each other, allowing your registration to be recognized globally (e.g., work in Japan)
Nodes
Nodes are the local access points to the D-Star repeater network. Nodes also function as standalone
repeaters in the event the D-Star network becomes unavailable. The KD0IAN repeater system is a node
on the D-Star network. All user interaction happens through nodes. You will register for gateway access
through a node as well as communicate through nodes.
Gateways
Gateways are the part of the node that deals with routing your traffic throughout the network. Gateways
also process registrations, and keep track of authenticated users via communications with the Trust
servers.
Ports
Ports are the actual RF modules that function as repeaters. D-Star has defined 3 RF ports and numerous
Page 3 of 29
KD0IAN Repeater Information
other ports such as gateways. The common ports are:
Port A: 23cm Voice
Port B: 73cm Voice
Port C: 2m Voice
Port G: Gateway
Stations
You and I are stations. Stations can communicate with each other, with ports, gateways and nodes. The
only thing stations cannot directly communicate with are trust servers.
One last important detail. Proper character placement is imperative in the D-Star system. Throughout
this document when referring to call signs I will use the “·” character to denote a space. It is very
important to take notice of this space when programming your radio. Some characters must be placed
in certain slots in order for the system to properly respond to your requests.
Hardware
Use of the D-Star system requires D-Star capable hardware. Currently Icom (www.icomamerica.com)
is the only commercial producer of D-Star compatible amateur radio equipment. You can see a list of
Icom's current D-Star compatible equipment at their website,
http://www.icomamerica.com/en/amateur/. While Icom is the only current producer of D-Star
compatible equipment, it does not have to be that way. Please contact your favorite equipment
manufacturer and inquire about their plans to support D-Star. The more user requests that are
generated, the more likely they are to support this growing mode of communication.
There is an active home brew community surrounding D-Star. Much of the activity currently centers
around software, but there are several hardware projects that center around D-Star modules and
interfacing D-Star equipment to other systems such as APRS. A fine example of this is repeater linking
and reflectors. Those systems are the product of the D-Star home brew community.
Page 4 of 29
KD0IAN Repeater Information
The Des Moines Area D-Star System
Hardware
The Des Moines are D-Star system is currently comprised of VHF, UHF, and 1.2GHz Data modules
housed in Grimes, Iowa. This system has a very nice coverage footprint of approximately 50nm and is
comparable to 146.610 W0DAY repeater on VHF. The UHF coverage is similarly impressive.
The system uses the call sign KD0IAN.
The VHF port is reachable at 145.350, -600kHz offset and is addressed as KD0IAN·C.
The UHF port is reachable at 443.175, +5MHz offset and is addressed as KD0IAN·B.
The 1.2GHz DD port is reachable at 1253.5 no offset and is addressed as KD0IAN·A.
All of these ports are open for any licensed Amateur operator.
The Des Moines D-Star system is also fully Internet accessible via the KD0IAN·G gateway. In order to
access the Internet functions of any D-Star repeater you must be an approved user on the D-Star
network. Details on becoming approved appear later in this document.
System Administration
The KD0IAN System Administrators are:
N0BKB, Larry Vandewater
AE0MW, Mike Waldron
N0VPR, Tom Reis
N0XR, Dean Madsen
Thanks
The KD0IAN Repeater System was made possible by the generous donations of the Des Moines area
Amateur community.
Page 5 of 29
KD0IAN Repeater Information
Operating Locally
Operating on a D-Star repeater is a bit different from the conventional repeaters you are likely
accustomed to using. The main differences are:
●
●
●
●
There is no courtesy beep on a D-Star repeater. The beep that you hear is added by your radio,
and can be disabled or made to be louder or quieter as you desire.
The D-Star repeater identifies itself continuously during each transmission. There is no audible
voice identification.
Fringe areas of repeater coverage do not really exist. You will either be in the repeater, or your
transmission will be completely unintelligible. There is very little middle ground where you will
be told you have “R2D2.”
You do not, technically, have to identify yourself audibly when using D-Star. Your call sign (as
long as your radio is properly programmed) is continuously transmitted while you speak. It's
probably still a good idea to keep in the ID habit, but it is not required.
General D-Star Operation
In order to program your radio general (local) operation on any D-Star repeater you need three pieces
of information in addition to the usual frequency and offset data required by any analog repeater.
●
Destination (YourCall)
●
Your Amateur Call sign (MyCall)
●
The Repeater Call sign (RPT1)
There are additional fields available, but they are used for advanced operations and will be explained
later in this document. For the time being, leave them blank while we discuss each of the three required
pieces of information above.
Destination
This field is the most confusing field. This field should contain the callsign
of the station you are trying to talk to. What? You don't know who you want
to talk to yet? Well you can't leave this field blank! For general ragchew and
normal operations on the local repeater, this field always contains the same
value. That value is “CQCQCQ”. If you want to talk to anyone, calling CQ
is the time-tested way to get the job done.
Your Amateur Callsign This should be programmed with your Amateur call sign. Include no spaces,
no dashes, no extra letters or numbers. For example mine is set to
“AE0MW”
Page 6 of 29
KD0IAN Repeater Information
The Repeater Callsign
This is the call sign of the repeater port you are talking to. On the KD0IAN
repeater there are two possibilities. Use “KD0IAN·C” if you are
transmitting on the VHF (2m) port. Use “KD0IAN·B” if you are
transmitting on the UHF (73cm) port. Note that throughout this document
each “·” in the call sign denotes a space. It is imperative that you enter those
spaces.
KD0IAN Local Use
Assuming you are creating two memory channels, one for each port of the repeater, this is the data you
would use to create them.
Frequency
Offset
VHF
UHF
145.350
443.175
- .600
+ 5.00
YourCall
MyCall
CQCQCQ
Your Amateur call sign
RPT1
KD0IAN·C
KD0IAN·B
RPT2
KD0IAN·G
KD0IAN·G
You now have the basics to operate locally on both the UHF and the VHF ports of the Des Moines DStar system. The RPT2 fields are not required, but strongly recommended for local operation. They are
explained later in the this document.
Page 7 of 29
KD0IAN Repeater Information
Cross Band Operations
The D-Star repeater system is capable of cross band operations at will for all users of the system. This
allows a user on the UHF system to communicate with a person who may only have a VHF radio, or
who may only be within range of the VHF side of the machine.
It is recommended that if you intend to use the cross banding facilities offered by the D-Star system
that you create an additional set of memories specifically for when you wish to cross band, and that you
only use them when cross band operation is appropriate. The design of the D-Star system does not
allow for you to monitor all activity on the other band that you are using when you cross band, so in
essence you are always talking without listening. This means you can be interfering with a QSO on the
other band of the repeater without being aware of it! For this reason, we suggest limiting your use of
cross band operations.
Configuring your radio for cross band operation is exactly the same as local operation, but with 1
additional piece of information added to the memory channel. It is now time to introduce the RPT2
field. Remember the RPT1 field was the call sign of the port you were talking to. Similarly the RPT2
field is the call sign of any additional port that you wish to be heard on. If you were transmitting on
VHF, and you wished for people on UHF to hear you, you would put KD0IAN·B into the RPT2 field in
your memory channel.
Again we are creating two memory channels, one for each port of the repeater. This time however the
RPT2 field will be populated in each memory channel with the other port's call sign.
Frequency
Offset
VHF
UHF
145.350
443.175
- .600
+ 5.00
YourCall
MyCall
CQCQCQ
Your Amateur call sign
RPT1
KD0IAN·C
KD0IAN·B
RPT2
KD0IAN·B
KD0IAN·C
If you use the scanning functions on your radio, it's probably a good idea to program all additional
channels to be skipped when scanning. Since the settings only effect who hears you, and not who you
hear simply including the basic two channels in a scan list is sufficient and can prevent accidental cross
band use when answering a call on the repeater.
Page 8 of 29
KD0IAN Repeater Information
Registering for Gateway Use
In order to use any of the Internet-based communications features of the D-Star system it is necessary
to register your callsign with the root D-Star server in your region. For us in North American region
this server resides in Texas.
This registration process occurs through your local D-Star node, and is a manual process. That is to say
there are steps that require human intervention and therefore it is not instantaneous. An actual human
being, usually in the form of one of the D-Star system administrators, must review and approve your
registration before it is forwarded to the root server. Due to this delay you should sign up for your
gateway account now, even if you do not intend to use it for weeks. Approvals do not expire, and once
you are approved on our system that approval is recognized by all other D-Star nodes in the network so
you do not have to do it again.
In order to register you will require a computer, Internet connection, email address, and a modern web
browser (Internet Explorer 6+ or FireFox 2+).
Gateway Registration
Navigate your web browser to the KD0IAN repeater status page: https://kd0ian.dstargateway.org
You should bookmark this status page, it contains much information you may find useful:
●
Current link status (reflector connections)
●
Current DV-Dongle users
●
A list of the repeater's users over the last 24 hour period.
Click the registration link on the upper left side of the web page.
Page 9 of 29
KD0IAN Repeater Information
You will be presented with the main login page:
Click on the “Register” button towards the bottom of the page and you will be presented with a few
fields asking for information:
None of these fields are optional. You must click the Yes button and then enter valid data in all the
remaining fields. If these fields do not contain correct and valid information, your gateway application
will be rejected. Please remember your password. If you forget your password it cannot be
retrieved. A D-Star administrator will be forced to delete your account and you will have to recreate it.
This process will take several days. When finished entering date press OK button to continue. You will
be presented with a confirmation screen:
Page 10 of 29
KD0IAN Repeater Information
Press the “OK” button and close your web browser. Your registration has been submitted to the D-Star
administrators for approval. You will be notified via E-Mail at the address you submitted when your
registration is approved. This email will likely find it's way into your SPAM folder so make sure to
check for it there.
Gateway Configuration
After you receive the email saying your registration was approved, go back to the D-STAR gateway
website at https://kd0ian.dstargateway.org. Click on Registration in the upper left corner as you did
earlier. Enter your call sign and the password supplied when you registered and you will be taken to a
new screen that lists all the users registered locally on the KD0IAN system:
You can explore the various tabs at your leisure, but right now we are concerned with the rightmost tab,
called “Personal Information” so click on that tab. You will be presented with a screen presenting you
with many text fields to edit as follows:
In order to edit any value on this page you need to click the check box next to that line to make it
editable. We are only concerned with the first line next to your call marked with a “1:” so click the
Page 11 of 29
KD0IAN Repeater Information
check box next to this line.
The first field we come to is “Initial”. This field is currently empty, but it MUST contain a SINGLE
SPACE. Enter 1 space in this field. Leave the RPT field unchecked, you will not be using it. The
“pcname” needs a short name entered into it. It's used for creating a host name lookup for your IP
address, which will probably never concern you. It must contain all lowercase letters with no
punctuation or spaces whatsoever. I recommend that all users use their callsign in lower case, or first
initial and last name.
No other configuration is required on this page, so click the “Update” button.
You are now finished configuring your account for the D-Star gateway. You can click the “Logout”
button in the top right corner of your web browser, and then close the browser.
Page 12 of 29
KD0IAN Repeater Information
Contacting an Out-of-Town Friend
One of the exciting advantages of the D-Star system is that the central server keeps track of your
general location by knowing which repeater you last used. This data is kept in real-time. In fact, you
can go out on the Internet and see current D-Star activity at any point in time by visiting the D-Star
Users website at http://www.dstarusers.org/. This website keeps up to date data on all D-Star nodes and
repeater status and is an invaluable tool for D-Star users who travel.
The actual reason for the system keeping track of you is that D-Star is the first Amateur voice protocol
to be routable. What this means is just like the old days of packet radio BBS' (and subsequent APRS
layers) the network knows where you are and how to find you. What this means to you is that if you are
on a repeater here in Des Moines I can be in Kansas City, Omaha, London, or Tokyo, we can still
converse without you having to know anything about where I'm sitting. Here's how the magic works.
I'm going to play the part of the globe-trotting playboy, you get to hang out in Des Moines for a while.
I'm sitting in my hotel in Tokyo enjoying a nice room temperature sake with my radio over by the
window. I've already been playing around on the local UHF D-Star port, JP1YIW·B, today so the
system knows where I am.
In order to contact me, here's how you're going to set up your radio.
Frequency
Offset
VHF
UHF
145.350
443.175
- .600
+ 5.00
YourCall
MyCall
RPT1
RPT2
AE0MW
Your Amateur call sign
KD0IAN·C
KD0IAN·B
KD0IAN·G
If you set your radio up like this, the network will find me, wherever I am in the world, and within a
split second your voice will come out of the JP1YIW UHF Repeater in Tokyo Japan. The challenge is
now on me to reply to you. Depending on my reaction time (which may be influenced by the level of
sake remaining in the bottle) and my knowledge of my radio there is a window of opportunity where I
can push a single button on my radio and instantly configure it to reply to you. No further configuration
would be necessary on my part.
The button you press differs from radio to radio. It's generally called “One-Touch Reply” and you
should consult your manual for the appropriate way to use it. Here are some examples:
On the Icom IC-92AD you press and hold the “RX-->CS” button for 1 second.
Page 13 of 29
KD0IAN Repeater Information
On the Icom IC-D800 press and hold the “TONE T-SCAN BK” until 2 regular and 1 long beep sound.
If I fail to get the reply set up properly, you won't be able to hear me, and the people on the local
repeater will think I'm talking to myself.
Some models of radio have a setting that allows you to automatically record the heard call signs, but
this setting must be turned on. Consult your user's manual for information regarding turning on the
automatic storing of received call signs.
Page 14 of 29
KD0IAN Repeater Information
Connecting to a Distant Repeater
There are two different ways to connect to a distant repeater. We are going to cover the “newer” linkbased method of connecting to other repeaters since it was designed to be easier for both parties. The
big things to remember when connecting to the remote site are that they can hear all activity on our
repeater, and that you must remember to manually disconnect when you are finished. If you forget to
disconnect, the link will remain active and future users of our repeater may not know that there is still
an established link. The repeater does not announce links once they have been established.
In order to use the remote linking, you must be registered with the D-Star network.
Back in the first chapter we created two memory channels, one for each port of the KD0IAN repeater.
In order to allow gateway use we will now add gateway information to those two channels. These two
modified memory channels can still be used for local communications, the new modification will not
effect them.
Change your memory channels as shown below. The addition of KD0IAN·G to the RPT2 field is the
only change:
Frequency
Offset
VHF
UHF
145.350
443.175
- .600
+ 5.00
YourCall
MyCall
CQCQCQ
Your Amateur call sign
RPT1
KD0IAN·C
KD0IAN·B
RPT2
KD0IAN·G
KD0IAN·G
Once you have updated your memory channels, your transmissions will automatically be sent out the
gateway if there is an active link. You should get in the practice of leaving an extra long pause between
transmissions. There are slight delays introduced by digital communications in general, and when using
distant repeaters those delays are magnified.
Now that we have covered how to use a link, it's time to learn how to create one. We're going to be
creating several new memory channels, one for each link you wish to use and a generic “Unlink”
memory which will terminate any active link on the frequency. Remember, you must manually
terminate any link you establish otherwise the link will continue indefinitely. If you forget to unlink the
Page 15 of 29
KD0IAN Repeater Information
repeater when you are finished you are preventing others from linking to our machine. You are also
preventing others from linking to the remote repeater as well.
Unlinking
To create a generic unlink memory channel, program your radio as follows:
Frequency
Offset
VHF
UHF
145.350
443.175
- .600
+ 5.00
YourCall
MyCall
·······U
Your Amateur call sign
RPT1
KD0IAN·C
KD0IAN·B
RPT2
KD0IAN·G
KD0IAN·G
The YourCall field is seven spaces followed by the capital letter 'U'.
All you need to do is transmit on that memory channel and any links will be dropped. The repeater will
play a confirmation message to let you know that the link has been disconnected. You will need 1
memory channel for each band you intend to link with.
Linking
Have you ever wondered why modern HT has 1000+ memory channels when there were only 20 active
repeaters you could hit with it? D-Star linking is the answer. With repeater linking and reflectors we're
going to put a good chunk of those channels to use.
The easiest way for a new user to link another repeater is to create a memory channel for use in
establishing a link to it. This means that each repeater you wish to contact will require a separate
memory channel that you use only to connect to that repeater. Once you have established your
connection (the repeater will acknowledge your request with a link established message) you must
move back to your normal memory channel for that band in order to converse. You do not use the
repeater's “link” memory channel to talk to that repeater. It is only used to establish the link.
We are going to use the W0CW repeater in Kansas City as our example repeater. The W0CW repeater
has two ports, a UHF port and a 1.2GHz port. Like all D-Star repeaters the UHF port is port B, the
1.2GHz port is port A. The W0CW repeater has no VHF port, if it did then the VHF port would be C.
You can choose which of the ports on the repeater you wish to link to. You do this by placing the port
ID in 7th character position in the YourCall field. The 8th position contains the character “L”, denoting
Page 16 of 29
KD0IAN Repeater Information
your desire to establish a link.
To create a link memory channel for the W0CW repeater on port A program a memory channel as
follows, if you wish to create a link to the UHF port, change the YourCall field from W0CW··AL to
W0CW··BL:
Frequency
Offset
VHF
UHF
145.350
443.175
- .600
+ 5.00
YourCall
MyCall
W0CW··AL
Your Amateur call sign
RPT1
KD0IAN·C
KD0IAN·B
RPT2
KD0IAN·G
KD0IAN·G
Once you have created the memory channel, you need only to key down for a second or two to
establish the link. It is good practice to identify yourself and say you are linking when you do this so
others that may be monitoring the system know what is going on.
Remember to bring down the link when you are finished using the memory channel we created for
unlinking.
Please note, the W0CW repeater is often locally linked to other machines in the Kansas City area and
will normally return an error message that it is busy.
A very useful site to use when determining how to connect to a distant repeater is the D-Star Calculator.
You can access this invaluable tool from http://www.dstarinfo.com/Calculator/Default.htm. The
KD0IAN node should be included on their site with the next update.
Page 17 of 29
KD0IAN Repeater Information
Connecting to a Reflector
Connecting to a reflector is exactly like connecting to a distant repeater. From a user's perspective, the
only difference between a reflector and a remote repeater is that multiple repeaters can be connected to
a reflector at any given time.
At the time of the creation of this document, there are well over 20 reflectors in operation throughout
the world. Each reflector has various ports, just like a repeater, that you can connect to. For a current
list of reflectors as well as their intended uses consult the D-Star Info site's reflector list page at
http://www.dstarinfo.com/Reflectors/Reflectors.aspx.
At this time, the REF001C reflector is generally regarded as the most popular reflector so we will use it
for our examples.
When connecting to a reflector it's treated just like any other call sign. REF001 is the call sign, C is the
port, and L will be used to request that a link be established. Your new memory channel will look like
this:
Frequency
Offset
VHF
UHF
145.350
443.175
- .600
+ 5.00
YourCall
MyCall
REF001CL
Your Amateur call sign
RPT1
KD0IAN·C
KD0IAN·B
RPT2
KD0IAN·G
KD0IAN·G
Once you have connected to a reflector, using it is just like any other linked repeater. Switch back to
your normal memory channel and don't forget to leave a bit of an extra delay between transmissions.
Also, just like the remote repeater, you must remember to disconnect using your unlink memory
channel when finished using the reflector.
Page 18 of 29
KD0IAN Repeater Information
GPS Operations
GPS operation over Icom D-Star radios is similar to, but not a replacement for the existing APRS
system. Most notably, D-Star's implementation of GPS is not designed for fixed-channel automated
operation. It is designed to “tag” your voice transmissions with location data. This is particularly useful
for emergency responders, search and rescue teams and other similar applications.
GPS operation is built into many Icom D-Star radios. In most circumstances, a GPS is connected to the
radio using the DATA port. For specific information on how to interface a GPS to your radio you will
need to consult your radio's operating manual. After you have connected your GPS, you will need to
tell your radio to transmit your location data. Unlike traditional APRS, there is not a dedicated
frequency for GPS operation. Your position data will piggyback on on your voice transmission to
whichever repeater you are currently using. Since this data must coexist with voice traffic transmitting
your location only when you are talking on the repeater is the recommended mode of operation. Your
position data will be retransmitted by the repeater and will show up in the GPS section of any
compatible radios monitoring the repeater when your transmission is made.
GPS and D-Star
GPS operation is not part of the D-Star specification. The D-Star specification calls for the 4800bps DV
data stream to be divided into 2 sub channels. The voice channel occupies the lion's share of the
bandwidth, but a 900bps text sub channel remains. Icom choose to use this for messaging, and GPS
position reporting. Since this GPS mode of operation was not specified in the D-Star specification, It
has evolved through 2 different iterations: GPS, and GPS-A. It may continue to evolve, and other
manufacturers of D-Star equipment may choose to not implement GPS at all. I'm going to get into
some detail here, but what you need to know is this: If your radio supports GPS-A it's better, easier
to configure with less bandwidth used and fewer places to make a mistake in configuration, but
older radios that only support the original GPS mode will not be able to see your position reports.
It's unfortunate, but standards evolve.
Setup for GPS Mode
You will need to consult you manual for many of these settings. In the GPS Sentence Options set RMC
and GGA on, all others set to off. RMC and GGA are the NEMA sentences that GPS devices output,
this setting tells the radio to transmit those sentences as the GPS data. GPS Data will be automatically
sent whenever you talk on the repeater. GPS Auto TX should be set to Off. If your voice
communication is not long enough for the radio to finish transmitting it's data, it will remain in transmit
mode until it has completed sending the data. The data speed for this transmission is only 900bps, or
approximately 125 characters per second. You will be transmitting both NEMA sentences in full
(roughly 130 characters) plus your user message if you have one enabled. This can easily take 2
Page 19 of 29
KD0IAN Repeater Information
seconds regardless of how quick your voice response was. There is no error correction or detection on
this data, it can arrive with corrupted position or message information.
Setup for GPS-A Mode
GPS-A mode setup is fairly straightforward, and resembles APRS setup. You can accept the radio's
default for all settings but you may wish to change your radio's Symbol and position comment. GPS-A
format uses a binary format (TNC2 message format wrapped in a CRC) for the transmitted message so
it is much shorter than GPS mode. The GPS-A packet is constantly retransmitted during your voice
transmission ensuring that a bit of bad data will not keep your packets off of the system. When you are
done talking the radio will immediately un-key, as even the briefest response will have provided
sufficient time for at least one packet to have been sent.
Sending GPS Data out the Gateway (D-PRS Operation)
An interface, called D-PRS, has been implemented in the D-Star network to send GPS position data
into the existing APRS infrastructure. Almost all D-Star repeaters with gateway connectivity run this
interface.
D-PRS is a specification for a repeater gateway software package designed and maintained by Peter
Loveall, AE5PL and first presented at the TAPR DCC conference in 2007. D-PRS acts as a “bridge”
between Icom's GPS position reporting and the rest of the world.
In order to send your position data to the APRS network including Internet based sites like Find-U and
APRSWorld it is necessary to configure your radio to properly use the repeater's gateway. Your radio is
probably already set this way for voice communications, but if you experience problems ensure that
KD0IAN·G is in the RPT2 field.
If you are using the GPS-A mode, no further configuration will be necessary.
If you are using the original GPS mode, you will need to configure the C1 message in your radio in
order to be seen by the D-PRS system. Configuration of the C1 message involves picking a APRS
symbol for your station, setting your message, and wrapping that data inside a XOR hash. As
previously noted, the GPS mode of position reporting does not employ any form of data integrity
check. The XOR hash is a rudimentary attempt to ensure corrupt data does not make it to the APRS
network. Although they cannot check the entire data stream since it is generated dynamically, they can
make the assumption that the data was valid if their XOR hash arrives at the gateway intact.
To generate this special C1 message, visit the D-PRS Calculator web page at http://www.aprsis.net/DPRSCalc.aspx. Note that the output of this page must be entered exactly as shown into your
Page 20 of 29
KD0IAN Repeater Information
radio including any spaces, and it must be entered into the C1 message slot.
Page 21 of 29
KD0IAN Repeater Information
High Speed Data Operation
The KD0IAN system includes a 1.2GHz DD port as well as conventional UHF/VHF repeaters. This
port can be used to access limited Internet content via amateur radio using an ID-1 digital transceiver.
In order to use the 1.2GHz DD system you must be registered in the Gateway system, and it is
recommended that you register an additional terminal specifically for your ID-1.
Registering a new Terminal in the Gateway System
Log into the gateway using the instructions in the Gateway Configuration section. Select the
“Personal Information tab (rightmost).
You should see a screen that looks like this, except with your callsign:
The first line should already be filled in with your information as it is in the above illustration. If it is
not, return to the chapter on Gateway Configuration and follow the instructions there.
Click the checkbox on the 2nd line, it will then enable you to enter text in the “Initial” and “pcname”
fields. In the “Initial” field enter the letter D, for Data. In the “pcname” field, enter your callsign
followed by a dash and then the letter d. The “pcname” field should be all lower case, and include only
your callsign, a dash, and the letter d as shown below.
Make a note of the contents of the “local IP” filed for your new entry. You will need it shortly.
Press the “Update” button at the bottom of the page to save your changes. After a few seconds, you will
see a dialog box confirming that your update was successful.
Page 22 of 29
KD0IAN Repeater Information
Configuring your ID-1 for Internet Access
This section assumes you have attached the ID-1 to your PC via USB and are able to run the control
software that came with the ID-1. For help in getting to this stage, consult the documentation that came
with your ID-1.
Connect the ID-1 to your PC via the USB cable, and start the ID-1 software package. You will be
greeted by a virtual ID-1 control panel that we will be interacting with to set for data operation.
Push the “CS” button to bring up the call sign entry screen and enter the appropriate information as
shown below:
1.2GHz DD
Frequency
1253.5
Offset
None
YourCall
MyCall
KD0IAN
Your Amateur Callsign with “D” in 8th Position.
RPT1
RPT2
Make sure “Enable” is checked next to “RPT2.”
KD0IAN·A
KD0IAN·G
When you are done, it should look like this, except with your own information:
Page 23 of 29
KD0IAN Repeater Information
Push the “Mode” button until “DD” appears on the display.
Push the “RP” button until “RPS” appears on the display.
Configure your computer to use the appropriate IP settings for D-Star. After your computer is properly
configured, disable the “TX inh” function by pusing the button. The green light above it will go out
when it is disabled.
Page 24 of 29
KD0IAN Repeater Information
Configuring your computer for D-Star Internet access
Every computer is different, and all can be used with the ID-1 for access. Configuring your computer
for use with the ID-1 requires an understanding of computer networking and system configuration
beyond the scope of this document. A brief tutorial using Windows XP is presented below, Windows
Vista and Windows 7 will be different but the concepts presented here are still valid.
Note: Once your computer is configured for access through the ID-1, it will not be able to access the
internet through your home or office network until you undo the following changes.
For people who already know what they're doing, here is the information you will need:
Addresses
IP Address
Found in Gateway Software Website
Subnet
255.0.0.0
Gateway
10.0.0.1
Preferred DNS
10.0.0.1
Secondary DNS
None
DHCP will not function over the high speed network.
Your IP address is located in the D-Star gateway registration system as shown below. You must match
your IP address to the correct callsign/initial pair.
Windows XP Configuration
●
Click on the Start Menu.
●
Select “Control Panel”.
●
Double click the “Network Connections” icon in Control Panel.
Page 25 of 29
KD0IAN Repeater Information
●
Right-click the “Local Area Connection” icon.
●
Select “Properties.”
●
Click “Internet Protocol (TCP/IP).”
●
Click the “Properties” button.
Page 26 of 29
KD0IAN Repeater Information
●
Click “Use the following IP address”
●
Click “Use the following DNS server addresses”
Note: If there is already information entered in these fields, it is extremely important that your record
that information so you can restore your computer to normal use once you are through experimenting
with D-Star high-speed data.
●
Enter the information from the above chart.
●
Click OK to close the “Internet Protocol (TCP/IP) Properties” widow.
●
Click OK to close the “Local Area Connection Properties” window.
●
Your computer will likely pause at this point while it applies the new settings.
Connect your ID1's Ethernet cord to your computer, and turn off TX Inhibit. You should now be ale to
access the Internet via the ID-1. Be patient, even though it's called High Speed data, it's only High
Speed compared to packet. It will be significantly slower than the High Speed Internet you are used to
from your cable or DSL provider.
Returning your computer to normal operations
Follow the above procedure again, except select “Obtain IP address automatically” and “Obtain DNS
server addresses automatically” in the “Internet Protocol (TCP/IP) Properties” window. If you had
existing data there, restore those values instead of selecting the automatic options.
Page 27 of 29
KD0IAN Repeater Information
Quick Reference
Here's a quick reference for the KD0IAN repeater system. You can use these examples to quickly
determine the proper settings for your intended operation.
KD0IAN Repeater in Grimes, Iowa
Serving the Des Moines Area
KD0IAN·C
145.350- (~40nm Range)
KD0IAN·B
443.175+ (~40nm Range)
KD0IAN·A
1253.5 DD Simplex (No Voice)
KD0IAN·G
https://kd0ian.dstargateway.org/
Usage Examples
(Change KD0IAN·C to KD0IAN·B in RPT1 if using UHF)
Talk on the local repeater, use
an already established link
YourCall: CQCQCQ
RPT1: KD0IAN·C
RPT2: KD0IAN·G
Cross band (VHF->UHF)
YourCall: CQCQCQ
RPT1: KD0IAN·C
RPT2: KD0IAN·B
Establish a link to the REF001
reflector on port C
YourCall: REF001CL
RPT1: KD0IAN·C
RPT2: KD0IAN·G
Establish a link to the UHF
port B on the W0CW repeater
in Kansas City
YourCall: W0CW··BL
RPT1: KD0IAN·C
RPT2: KD0IAN·G
Disconnect any active link (7
spaces followed by U)
YourCall: ·······U
RPT1: KD0IAN·C
RPT2: KD0IAN·G
The '·' character denotes a single space in all call signs.
Page 28 of 29
KD0IAN Repeater Information
Icom Radio Manuals
Icom provides a great many of their manuals on the web. I find it convenient to print them off so I can
make notes right on the page without damaging my original instruction manuals.
Here is a list of manuals for the current D-Star equipment:
●
●
●
●
●
●
●
●
ID-1: http://www.icomamerica.com/en/downloads/DownloadDetails.aspx?Document=152
ID-800H: http://www.icomamerica.com/en/downloads/DownloadDetails.aspx?Document=154
ID-880H: http://www.icomamerica.com/en/downloads/DownloadDetails.aspx?Document=451
IC-2200H: http://www.icomamerica.com/en/downloads/DownloadDetails.aspx?Document=2
IC-2820H: http://www.icomamerica.com/en/downloads/DownloadDetails.aspx?Document=10
IC-80AD: http://www.icomamerica.com/en/downloads/DownloadDetails.aspx?Document=452
IC-91AD: http://www.icomamerica.com/en/downloads/DownloadDetails.aspx?Document=33
IC-92AD: http://www.icomamerica.com/en/downloads/DownloadDetails.aspx?Document=338
Page 29 of 29