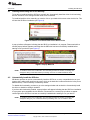
1
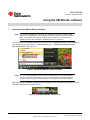
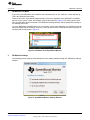
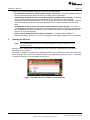
TUSB926x SpeedBoost Monitor User's Guide
User's Guide
Literature Number: SLLU129
September 2010
2
SLLU129 – September 2010
Submit Documentation Feedback
Copyright © 2010, Texas Instruments Incorporated
1
2
1
1
2
3
4
Definitions .......................................................................................................................... 5
Required Equipment ............................................................................................................ 5
Running the Setup Program ................................................................................................. 6
Opening the SpeedBoost Monitor Software ............................................................................ 8
SB Monitor List Menu .......................................................................................................... 9
SB Monitor Settings ............................................................................................................ 9
Installing the SB Driver ...................................................................................................... 10
1
2
.......................................................................... 11
.................................................................................. 11
4.3
Automatically Install the Driver on Hard Drive Change ........................................................... 12
TUSB9260/TUSB9261 Not Detected After Installing SB Driver ................................................. 13
Transfer Performance is Not Improved After Installing the SB Driver ....................................... 13
4.1
Installing/Uninstalling the Driver Manually
4.2
Automatically Install the SB Driver
SLLU129 – September 2010
Submit Documentation Feedback
Table of Contents
Copyright © 2010, Texas Instruments Incorporated
3
www.ti.com
List of Figures
1
.NET Framework 3.5 Installation .......................................................................................... 6
2
Software Installation Completed .......................................................................................... 7
3
SpeedBoost Monitor Software Locations ................................................................................ 8
4
SpeedBoost Monitor Task Bar Icon
5
Item Menu of the SpeedBoost Monitor ................................................................................... 9
6
SpeedBoost Monitor Settings Window ................................................................................... 9
7
SpeedBoost Driver Installed on Your Hard Drive
8
9
4
......................................................................................
.....................................................................
Click on Your Device Name on the Device’s List .....................................................................
Pop-Up Balloons ...........................................................................................................
List of Figures
8
10
11
11
SLLU129 – September 2010
Submit Documentation Feedback
Copyright © 2010, Texas Instruments Incorporated
User's Guide
SLLU129 – September 2010
Introduction
This document will serve as a user’s manual for the TUSB9260 SpeedBoost Monitor GUI. It provides
details on using the SpeedBoost Monitor software used with TUSB9260 based devices. The software is a
Windows-based tool that provides a fast and friendly way for installing the SpeedBoost Driver to
TUSB9260 based device. User can select between different types of settings for performing the
installation depending on user’s needs.
The term ‘SB’ is equivalent to ‘SpeedBoost’.
1
Definitions
The following are useful definitions for your reference:
• GUI – Graphical user interface
• SW – Software
• VID – Vendor ID
• PID – Product ID
2
Required Equipment
The following is required in order to use the SB Monitor software:
• TUSB9260/TUSB9261 based device with the latest firmware
• Hard drive attached to the TUSB9260/TUSB9261 based device
• USB interface cable (Type A connector to Type B connector)
• PC running Windows XP™, Windows Vista™ or Windows 7™ (32-bit or 64-bit OS)
• USB 3.0 host already present in your system
Windows XP, Windows Vista, Windows 7 are trademarks of Microsoft.
SLLU129 – September 2010
Submit Documentation Feedback
Introduction
Copyright © 2010, Texas Instruments Incorporated
5
User's Guide
SLLU129 – September 2010
Installing the SB Monitor Software
1
Running the Setup Program
Extract the setup program on a directory of your choice. Run the “9260_SpeedBoost-Monitor_Setup.exe”
file and let the “Installshield Wizard” guide you through the installation process.
The SB Monitor GUI needs MS .NET Framework 3.5 as a pre-requisite in order to work properly. The
installer will guide you through this process in case such .NET framework version is not installed on your
machine. Ensure that you have a proper internet connection since the installation will be performed
through a web download directly from the MS site (see Figure 1).
Figure 1. .NET Framework 3.5 Installation
After the .NET validation has finished, the installer will copy the necessary files to your local disk into the
‘Program Files’ directory.
Once necessary files have been copied into your system, the installer will give you the option to “Restart”
the system in order to properly update the files.
It is highly recommended to choose “Yes, I want to restart my computer now.” and Click “Finish” when the
installer wizard indicates that the SB Monitor software installation has been completed (see Figure 2).
6
Installing the SB Monitor Software
SLLU129 – September 2010
Submit Documentation Feedback
Copyright © 2010, Texas Instruments Incorporated
Running the Setup Program
www.ti.com
Figure 2. Software Installation Completed
SLLU129 – September 2010
Submit Documentation Feedback
Installing the SB Monitor Software
Copyright © 2010, Texas Instruments Incorporated
7
User's Guide
SLLU129 – September 2010
Using the SB Monitor software
1
Opening the SpeedBoost Monitor Software
NOTE: For Windows Vista/Windows 7 64-bit OS, you must press F8 during the machine’s initial
boot process and disable the “Driver Signature Enforcement” option from the advanced boot
menu. This will allow you to install an unsigned driver and this way you won’t face any
installation troubles when installing the ‘SpeedBoost Driver’ to your device.
You can access the SB Monitor application by clicking on the “SpeedBoost Monitor” shortcut added on
your desktop or by going to “Start → Texas Instruments Inc → TUSB9260 SpeedBoost Monitor →
SpeedBoost Monitor” (see Figure 3).
Figure 3. SpeedBoost Monitor Software Locations
NOTE: If you are running SB Monitor under a Windows Vista/Windows 7 platform and depending
on your ‘User Account Control Settings’ you may be prompted with a window asking that if
you want to allow the program to make changes to your computer. Please click Yes/Allow.
After executing the TUSB9260 SpeedBoost Monitor application, the following icon will appear on your
‘Task Bar’s notification area’ (see Figure 4):
Figure 4. SpeedBoost Monitor Task Bar Icon
8
Using the SB Monitor software
SLLU129 – September 2010
Submit Documentation Feedback
Copyright © 2010, Texas Instruments Incorporated
SB Monitor List Menu
www.ti.com
2
SB Monitor List Menu
If you click on the SB Monitor Icon located at the ‘notification area’ of your ‘task bar’, a menu will pop up.
This is the SB Monitor Item Menu.
There are two menu items that will appear always in the menu regardless of the SB Monitor compatible
devices in your system: ‘Close’ and ‘Settings’ (see the blue square in Figure 5). By clicking at the ‘Close’
item, the application will be terminated. The ‘SB Monitor Settings Window’ will be displayed by clicking at
the ‘Settings’ menu item.
For every SB Monitor compatible device on your system, a menu item displaying your hard-drive’s friendly
name will appear. Below each disk menu item, users can also check the name of the volumes present on
that disk (see the red square in Figure 5).
Figure 5. Item Menu of the SpeedBoost Monitor
3
SB Monitor Settings
The following section contains a brief description of the setting available through the ‘SB Monitor Settings
Window’.
Figure 6. SpeedBoost Monitor Settings Window
SLLU129 – September 2010
Submit Documentation Feedback
Using the SB Monitor software
Copyright © 2010, Texas Instruments Incorporated
9
Installing the SB Driver
www.ti.com
There are four options available through the SB Monitor Settings window:
• Run Speed Boost Monitor at startup (default setting: unchecked) – If checked, SB Monitor will run
always at Windows startup without the need to manually open the application.
• Automatically install the driver for all monitoring devices (default setting: checked) – If checked,
every time that the SB Monitor detects a compatible device, the SB Driver will be installed
automatically without the need from the user to click at device on the menu item. Otherwise, users will
need to manually check/un-check every SB compatible device in order to Install/Un-install the SB
driver.
• Automatically install the driver on hard drive change (default setting: checked) – If checked, if
you had previously installed the SB Driver on a specific hard drive and you change the hard drive from
your TUSB9260 device where the SB driver is not installedr, SB Monitor will automatically install the
SB driver on your new hard drive.
• Ask for user confirmation (default setting: unchecked) – If checked, before SB Monitor
installs/un-installs the SB Driver to a device, a message box will appear asking for user’s confirmation.
4
Installing the SB Driver
NOTE: Only TUSB9260 based devices are recognized by SB Monitor; therefore, SB Driver can only
be installed on them.
SB Driver can be installed into a compatible device either manually or automatically by SB Monitor
depending on your settings.
If the driver is installed in your device, the background color of your hard-drive’s name on the device’s list
will be green and you will also see a checkmark next to your hard-drive’s name (see Figure 7). Otherwise,
it means the SB driver is not yet installed on that device.
Figure 7. SpeedBoost Driver Installed on Your Hard Drive
10
Using the SB Monitor software
SLLU129 – September 2010
Submit Documentation Feedback
Copyright © 2010, Texas Instruments Incorporated
Installing the SB Driver
www.ti.com
4.1
Installing/Uninstalling the Driver Manually
To be able to install/uninstall the SB Driver manually the ‘Automatically install the driver for all monitoring
devices’ checkbox in the settings window needs to be unchecked.
To install/uninstall the driver manually you need to click on your hard-drive’s name at the device’s list. This
will start the SB Driver Installation (see Figure 8).
Figure 8. Click on Your Device Name on the Device’s List
A pop-up balloon will appear indicating that the SB Driver installation is in progress. Please wait while a
second pop-up balloon appears confirming that the SB Driver has been successfully installed before
starting to use your device (see Figure 9).
Figure 9. Pop-Up Balloons
NOTE: If checkbox ‘Ask for user confirmation’ from the settings window is checked, a message box
will appear asking confirmation before proceeding. Click ‘Yes’ to install/uninstall the driver.
4.2
Automatically Install the SB Driver
SB Monitor provides an option to automatically install the SB Driver on every compatible device on your
system; this is without the need from the user to click on the hard-drive’s name at the device’s list (as we
detailed above). This functionality is enabled by default.
To disable this functionality you have to go to the settings window and uncheck the ‘Automatically install
the driver on hard drive change’ checkbox.
If you have this functionality enabled, a popup balloon will appear indicating that the SB Driver installation
is in progress upon compatible device detection. Please wait for a second pop up balloon to appear
confirming that the SB Driver has been successfully installed before starting to use your device.
NOTE: If checkbox ‘Ask for user confirmation’ from the settings window is checked, a message box
will appear asking for your confirmation before proceeding. Click ‘Yes’ to install the driver.
SLLU129 – September 2010
Submit Documentation Feedback
Using the SB Monitor software
Copyright © 2010, Texas Instruments Incorporated
11
Installing the SB Driver
4.3
www.ti.com
Automatically Install the Driver on Hard Drive Change
When changing the hard-drive attached to your TUSB9260 based device, it’s normal that the SB driver
installation on your device gets lost. In order to fix this, you can enable the “Automatically install the driver
on hard drive change” option.
By enabling this option, the SB Monitor will automatically install the SB driver on your hard drive if it
determines that the SB driver was previously installed on that TUSB9260 based device.
To disable this functionality you have to go to the settings window and uncheck the ‘Automatically install
the driver on hard drive change’ checkbox.
NOTE: If checkbox ‘Ask for user confirmation’ from the settings window is checked, a message box
will appear asking for your confirmation before proceeding. Click ‘Yes’ to install the driver.
12
Using the SB Monitor software
SLLU129 – September 2010
Submit Documentation Feedback
Copyright © 2010, Texas Instruments Incorporated
User's Guide
SLLU129 – September 2010
Troubleshooting
1
TUSB9260/TUSB9261 Not Detected After Installing SB Driver
If you’re running the SB Monitor under Windows Vista/Windows 7 (64 bits), remember to always disable
the ‘Driver Signature Enforcement’ each time you start Windows. This issue is occurring because the SB
Driver is not digitally signed by Windows.
In order to disable the ‘Driver Signature Enforcement’, you must press F8 during the machine’s initial boot
process and disable the “Driver Signature Enforcement” option from the advanced boot menu. This will
allow you to install an unsigned driver.
2
Transfer Performance is Not Improved After Installing the SB Driver
Transfer performance depends on many factors like:
• Your USB host performance
• Internal bus performance (i.e. PCI/PCI Express)
• Your hard drive’s performance
Regardless of these facts, there is some times where during the SB Driver installation your hard-drive was
being used by another application, and so, the SB Monitor couldn’t disable your device to properly
instantiate the driver. If that is the case, please restart your system so the SB driver can work properly.
NOTE: If you’re running the SB Monitor under Windows Vista/Windows 7 (64 bits), remember to
always disable the ‘Driver Signature Enforcement’ each time you start Windows.
SLLU129 – September 2010
Submit Documentation Feedback
Troubleshooting
Copyright © 2010, Texas Instruments Incorporated
13
IMPORTANT NOTICE
Texas Instruments Incorporated and its subsidiaries (TI) reserve the right to make corrections, modifications, enhancements, improvements,
and other changes to its products and services at any time and to discontinue any product or service without notice. Customers should
obtain the latest relevant information before placing orders and should verify that such information is current and complete. All products are
sold subject to TI’s terms and conditions of sale supplied at the time of order acknowledgment.
TI warrants performance of its hardware products to the specifications applicable at the time of sale in accordance with TI’s standard
warranty. Testing and other quality control techniques are used to the extent TI deems necessary to support this warranty. Except where
mandated by government requirements, testing of all parameters of each product is not necessarily performed.
TI assumes no liability for applications assistance or customer product design. Customers are responsible for their products and
applications using TI components. To minimize the risks associated with customer products and applications, customers should provide
adequate design and operating safeguards.
TI does not warrant or represent that any license, either express or implied, is granted under any TI patent right, copyright, mask work right,
or other TI intellectual property right relating to any combination, machine, or process in which TI products or services are used. Information
published by TI regarding third-party products or services does not constitute a license from TI to use such products or services or a
warranty or endorsement thereof. Use of such information may require a license from a third party under the patents or other intellectual
property of the third party, or a license from TI under the patents or other intellectual property of TI.
Reproduction of TI information in TI data books or data sheets is permissible only if reproduction is without alteration and is accompanied
by all associated warranties, conditions, limitations, and notices. Reproduction of this information with alteration is an unfair and deceptive
business practice. TI is not responsible or liable for such altered documentation. Information of third parties may be subject to additional
restrictions.
Resale of TI products or services with statements different from or beyond the parameters stated by TI for that product or service voids all
express and any implied warranties for the associated TI product or service and is an unfair and deceptive business practice. TI is not
responsible or liable for any such statements.
TI products are not authorized for use in safety-critical applications (such as life support) where a failure of the TI product would reasonably
be expected to cause severe personal injury or death, unless officers of the parties have executed an agreement specifically governing
such use. Buyers represent that they have all necessary expertise in the safety and regulatory ramifications of their applications, and
acknowledge and agree that they are solely responsible for all legal, regulatory and safety-related requirements concerning their products
and any use of TI products in such safety-critical applications, notwithstanding any applications-related information or support that may be
provided by TI. Further, Buyers must fully indemnify TI and its representatives against any damages arising out of the use of TI products in
such safety-critical applications.
TI products are neither designed nor intended for use in military/aerospace applications or environments unless the TI products are
specifically designated by TI as military-grade or "enhanced plastic." Only products designated by TI as military-grade meet military
specifications. Buyers acknowledge and agree that any such use of TI products which TI has not designated as military-grade is solely at
the Buyer's risk, and that they are solely responsible for compliance with all legal and regulatory requirements in connection with such use.
TI products are neither designed nor intended for use in automotive applications or environments unless the specific TI products are
designated by TI as compliant with ISO/TS 16949 requirements. Buyers acknowledge and agree that, if they use any non-designated
products in automotive applications, TI will not be responsible for any failure to meet such requirements.
Following are URLs where you can obtain information on other Texas Instruments products and application solutions:
Products
Applications
Amplifiers
amplifier.ti.com
Audio
www.ti.com/audio
Data Converters
dataconverter.ti.com
Automotive
www.ti.com/automotive
DLP® Products
www.dlp.com
Communications and
Telecom
www.ti.com/communications
DSP
dsp.ti.com
Computers and
Peripherals
www.ti.com/computers
Clocks and Timers
www.ti.com/clocks
Consumer Electronics
www.ti.com/consumer-apps
Interface
interface.ti.com
Energy
www.ti.com/energy
Logic
logic.ti.com
Industrial
www.ti.com/industrial
Power Mgmt
power.ti.com
Medical
www.ti.com/medical
Microcontrollers
microcontroller.ti.com
Security
www.ti.com/security
RFID
www.ti-rfid.com
Space, Avionics &
Defense
www.ti.com/space-avionics-defense
RF/IF and ZigBee® Solutions www.ti.com/lprf
Video and Imaging
www.ti.com/video
Wireless
www.ti.com/wireless-apps
Mailing Address: Texas Instruments, Post Office Box 655303, Dallas, Texas 75265
Copyright © 2010, Texas Instruments Incorporated