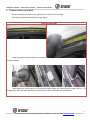
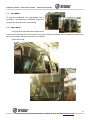
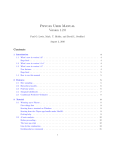
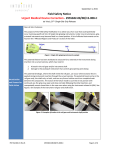
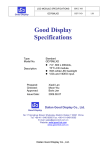
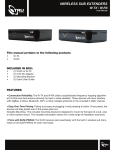
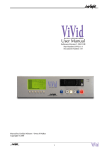
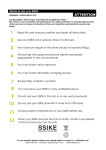
1
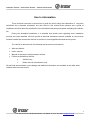
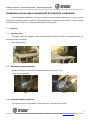
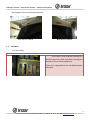
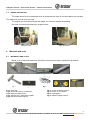
A DAPT INSTRUCTIONS OF HOW TO CHANGE ONE - PIECE WINDSHIELD INTO BIPA RTITE WINDSHIELD . IRIZAR PB Rod. Marechal Rondon, KM 252,5 BOTUCATU – SP- BRASIL Tel. 55 14 3811 8000 [email protected] www.irizar.com.br ÍNDICE USER’S INFORMATION.................................................................................................................................................. 3 ALL TECHNICAL DOCUMENTATION, PART CATALOGS AND ADDITIONAL INFORMATION ARE AVAILABLE ON THE AFTER SALES WEBSITE WWW.IRIRZAR-SAT.COM.BR ................................................................................................... 3 1 PREPARATION ....................................................................................................................................................... 4 1.1 Support desk 4 1.2 Windshield wiper's removal 4 1.3 Rearview mirror's removal 4 1.4 Fuse box 5 1.5 Edge's protection 6 2 MATERIALS AND TOOLS ........................................................................................................................................ 6 2.1 Materials and tools 6 3 WINDSHIELD REMOVAL ........................................................................................................................................ 2 3.1 Cut the rubber of the glass with a steel cable. 2 3.2 Residue removal 2 4 FIXATION OF THE CENTRAL PILLAR ....................................................................................................................... 4 5 LOCAL CLEANING .................................................................................................................................................. 6 5.1 Structure's cleaning 6 5.2 Windshield cleaning 6 6 APPLICATION......................................................................................................................................................... 6 6.1 Windshield protection 6 6.2 Betaprime's application 7 6.3 Windshield support 8 6.4 Applying the adhesive 8 7 PLACING THE WINDSHIELD ................................................................................................................................... 9 7.1 Placing the windshield 9 7.2 Finishing 9 7.3 Alignment 10 7.4 Final image 10 Instrução Técnica – Instrucción Técnica – Technical Instruction User’s information These technical instruction manual aims to guide the client during the substitution of one-piece windshield into a bipartite windshield. Are also found in this manual some advices and a guide of installation which will allow the substitution of the windshield with safety and speed, extending the vehicle's life. During the windshield installation, it is possible that doubts rises regarding some installation process and used materials. We also provide a technical assistance network available on the services network's leaflet that comes with the bus as well as our homologated authorized service points. The vehicle is delivered with the following documents and accessories: Warranty bulletin User's manual Manual of the electric and pneumatic scheme Folheto de Assistência técnica Vehicle's key Radio manual, manufacturer's cd. All technical documentation, part catalogs and additional information are available on the after sales website www.irirzar-sat.com.br 3 Rod. Marechal Rondon, KM 252,5, BOTUCATU – SP- BRASIL Tel. 55 14 3811 8000 [email protected] Instrução Técnica – Instrucción Técnica – Technical Instruction Adaptation of one-piece windshield for bipartite windshield. The windshield's installation, can only be done by experienced professionals, in caso of doubts during the installation, please contact the technical assistance available on the leaflet of service network that come with all vehicles, as well as our authorized services points. 1 1.1 Preparation SUPPORT DESK This table allows the installer to have the necessary support to handle the equipments and the necessary tools with safety. See images below: Support desk 1.2 Support desk WINDSHIELD WIPER'S REMOVAL Will be necessary to remove the windshield's wiper using a N°17 key. Follow the image below: wiper 1.3 wiper REARVIEW MIRROR'S REMOVAL The rearview mirror of both sides must be removed. Use an Allen key N°5. 4 Rod. Marechal Rondon, KM 252,5, BOTUCATU – SP- BRASIL Tel. 55 14 3811 8000 [email protected] Instrução Técnica – Instrucción Técnica – Technical Instruction See images of the mirror already removed: Rear mirror's removal 1.4 Rear mirror's removal FUSE BOX Fuse box image. Fuse box The number 1 fuse must be removed so it doesn't happen any kind of accident. Avoiding the activation of any electric equipment. This fuse is responsible for the windshield wiper's activation 5 Rod. Marechal Rondon, KM 252,5, BOTUCATU – SP- BRASIL Tel. 55 14 3811 8000 [email protected] Instrução Técnica – Instrucción Técnica – Technical Instruction 1.5 EDGE'S PROTECTION The edge where fits the windshield must be protected with tape to avoid scratches on the paint. The tape must cover all over the edge. The bottom part must be protected with paper, so it doesn't scratch the painting. See how to proceed visualizing the images below: Tape protection 2 2.1 Paper protection Materials and tools MATERIALS AND TOOLS Below, a list of materials and tools, that will be necessary during the substitution procedure. Fig. 1 Fig. 2 Fig. 3 Fig. 4 Fig. 5 Fig. 6 Fig.7 Fig.8 Fig.1: glass saw Fig.2: pneumatic knife to cut adhesive. Fig.3: Betaprime 5500 (Dow) Fig.4: Adesivo Dow – Betamate 7120BN Fig.5: lateral windshield support. Fig.9 Fig.6: central windshield support Fig.7: wrench 17 and Allen 5. Fig.8: cuppingglass Fig.9: Adhesive applier's bomb 6 Rod. Marechal Rondon, KM 252,5, BOTUCATU – SP- BRASIL Tel. 55 14 3811 8000 [email protected] Instrução Técnica – Instrucción Técnica – Technical Instruction 3 3.1 Windshield removal CUT THE RUBBER OF THE GLASS WITH A STEEL CABLE. The windshield to be removed, must be cut with a glass saw, or with a steel cable, as shown below. Cut with glass saw: Cut the window's corner, without affect the edge. Corte com cabo de aço: Cut all the rubber, see below the image sequence. Cut with glass saw. The cut must be done by trained people, using all security protections to avoid any type of accident. See below the image, of how the windshield must be removed, also see the cut distance to the edge. Corte com cordão de aço The cut can only be made by trained personnel, using all security protections to avoid any type of accident. See the left image of how the windshield must be cut. 3.2 RESIDUE REMOVAL 2 Rod. Marechal Rondon, KM 252,5, BOTUCATU – SP- BRASIL Tel. 55 14 3811 8000 [email protected] Instrução Técnica – Instrucción Técnica – Technical Instruction All adhesive residue must be removed with a pneumatic knife or similar tools, avoiding any tool contact with the structure, especially if the residue is glued to the structure. It is necessary to remove the rubber excess, does not need to remove completely, just enough to let 1 to 2 mm so the adhesive has a better adherence. Careful while removing adhesive, avoid getting too close to the anti-corrosion paint (green). In case of a scratch on the ink, paint the place with a anti-corrosion ink. See below the image. rests of adhesive 3 Rod. Marechal Rondon, KM 252,5, BOTUCATU – SP- BRASIL Tel. 55 14 3811 8000 [email protected] Instrução Técnica – Instrucción Técnica – Technical Instruction 4 Fixation of the central pillar Will be necessary to measure the gap center to install the central pillar. See how to proceed visualizing the image below. Central support bar. Make the superior gap measure and mark the center, then make the same for the bottom part and mark the center. Sand down the inferior gap on the structure's base where the central pillar's support will be. It is important to clean the place where the central pillar will be, to increase the weld surface. 4 Rod. Marechal Rondon, KM 252,5, BOTUCATU – SP- BRASIL Tel. 55 14 3811 8000 [email protected] Instrução Técnica – Instrucción Técnica – Technical Instruction On the superior gap, make a cut so the pillar can fit. Fix the central pillar to verify the measures. Cut a 10 cm strip that bends as shown on the image, do not remove the strip because the weld is done from the inside of the central pillar. Welding inside the pillar avoid any damaged to the external finishing. Base Topo See the weld on the base and on the top. Remember that the superior part was welded from inside de structure. At end paint the central pillar with anti-corrosive paint, case the pillar is not painted yet. 5 Rod. Marechal Rondon, KM 252,5, BOTUCATU – SP- BRASIL Tel. 55 14 3811 8000 [email protected] Instrução Técnica – Instrucción Técnica – Technical Instruction 5 5.1 Local cleaning STRUCTURE'S CLEANING The structure must be cleaned with a air jet ( oil's free ), removing completely the glass dust generated during the process. Following, will be necessary to use a clean cloth with alcohol all over the area that had the adhesive removed, so all impurities are removed, like digitals, liquids, etc. 5.2 WINDSHIELD CLEANING The new windshield to be installed must be cleaned on the edge using a flannel with alcohol ( let evaporate for 5 minutes ). Some products will be used to increase the glue adherence on the cleaned area. Use for this job a plastic glove and a clean flannel with alcohol. 6 6.1 application WINDSHIELD PROTECTION The windshield protection must be made passing a masking tape, from the inside, over the window's edge leaving only a 2 cm area that will receive the primer. On the window's front side, the tape must cover all the edge, providing a windshield's external protection. See below how to proceed: 6 Rod. Marechal Rondon, KM 252,5, BOTUCATU – SP- BRASIL Tel. 55 14 3811 8000 [email protected] Instrução Técnica – Instrucción Técnica – Technical Instruction Proteção com fita 6.2 BETAPRIME'S APPLICATION Check the image on the left, the distance to spread the Betaprime 5500. otice that the Betaprime 5500 is spread all over the window's and the structure's edge to a better adhesive adherence. Apply the layer over the surface in a uniform way avoiding overlap of layers, so it dries faster. Remember that the layer of Betaprime must be spread over the window's edge and structure's edge. It is important to let it dry for 15 minutes, Betaprime 5500 before applying the glue. 7 Rod. Marechal Rondon, KM 252,5, BOTUCATU – SP- BRASIL Tel. 55 14 3811 8000 [email protected] Instrução Técnica – Instrucción Técnica – Technical Instruction 6.3 WINDSHIELD SUPPORT See the windshield's support images below. Follow the instructions aside to learn how to install them. Remember that the support cannot have bigger a hardness compared to the cured adhesive's material. Fix the lateral support in the windscreen wiper's screw thread. The central support must be fixed on the center, at the windshields's bottom, so the windshield can be supported. 6.4 APPLYING THE ADHESIVE The 7210 BN Betamate serve as adhesive to glue the windshield to the structure. Must be applied a equal amount over the structure's edge, where the windshield will fit. The amount of adhesive must give the final finishing to the process. It is important to make sure that there is no empty gaps between the glue string and the finishing. The minimum time to dry is of eight hours depending on the temperature and humidity conditions. 8 Rod. Marechal Rondon, KM 252,5, BOTUCATU – SP- BRASIL Tel. 55 14 3811 8000 [email protected] Instrução Técnica – Instrucción Técnica – Technical Instruction 7 7.1 Placing the windshield PLACING THE WINDSHIELD The windshield must be placed on the place where the old has been taken off. It is importante to me sure that he new windshield is compatible with the structure, check the parts catalog. The image shows the windshield already placed. Guarantee the windshield's alignment. At the end of the process, remove the adhesive's excess, give the final finishing making the surface smooth. Remove the tape before the cure time Check the images on the left. 7.2 FINISHING The finishing must be done moistening one of the hands with water and soap, spreading around the adhesive, letting the surface smoother. 9 Rod. Marechal Rondon, KM 252,5, BOTUCATU – SP- BRASIL Tel. 55 14 3811 8000 [email protected] Instrução Técnica – Instrucción Técnica – Technical Instruction 7.3 ALIGNMENT To align the windshield, the cuppingglass tool is necessary. The alignment is important, because it prevents the wiper's vanes from wearing. 7.4 FINAL IMAGE If the job done has followed the steps on this manual, the final result will be the same as the picture shows. remember that the adhesive needs some days to cure totally, during this period, drive carefully. Check the image: 10 Rod. Marechal Rondon, KM 252,5, BOTUCATU – SP- BRASIL Tel. 55 14 3811 8000 [email protected]