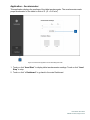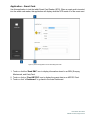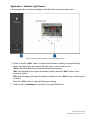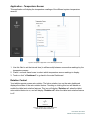
1
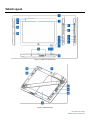
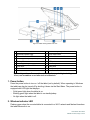
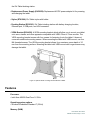
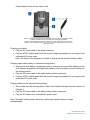
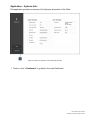
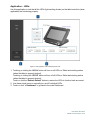
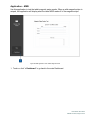
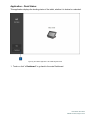
USER MANUAL Elo Touch Solutions Elo® Tablet SW602113 Rev. B Table of Contents Read this first................................................................................................. 4 Chapter 1: Product Overview ....................................................................... 8 Product Description ............................................................................8 Precautions ........................................................................................8 Tablet Layout .....................................................................................9 Tablet Docking Station (optional accessory) Layout .........................13 Accessories (optional) ......................................................................16 Features ...........................................................................................17 Specifications ...................................................................................19 Chapter 2: Getting Started .......................................................................... 20 Unpacking the Tablet .......................................................................20 Installing the Battery into your Tablet ...............................................20 Charging your Tablet and/or Battery.................................................20 Installing the Hand Strap onto your Tablet........................................22 Using the Multi-touch Screen ...........................................................23 Using the Onscreen Keyboard .........................................................24 Using the Elo Tablet Stylus ..............................................................24 Screen Lock Mode ...........................................................................25 Payment Features ............................................................................25 Using Elo Tablet Diagnostic Suite ....................................................27 Chapter 3: Docking Station ......................................................................... 39 General Mounting Information ..........................................................39 Unpacking the Docking Station ........................................................39 Tablet Docking Instructions ..............................................................39 Connecting Docked Tablet to External Peripherals ..........................41 Chapter 4: Operation ................................................................................... 42 Power ...............................................................................................42 Charging Battery ..............................................................................48 Audio ................................................................................................48 Chapter 5: Technical Support ..................................................................... 49 Solutions to Common Problems .......................................................49 Technical Assistance........................................................................49 Chapter 6: Safety & Maintenance ............................................................... 50 User Manual: Elo® Tablet SW602113 Rev B, Page 2 of 59 Safety ...............................................................................................50 Tablet Care and Handling ................................................................51 Tablet Battery Care and Handling ....................................................51 Waste Electrical & Electronic Equipment ..........................................51 Battery Disposal ...............................................................................52 Chapter 7: Regulatory Information............................................................. 53 Chapter 8: Warranty Information ................................................................ 58 User Manual: Elo® Tablet SW602113 Rev B, Page 3 of 59 Read this first Before using the tablet, read the important safety and handling information (this section), Safety & Maintenance (Chapter 6), Regulatory Notice (Chapter 7), and the Warranty Information (Chapter 8) chapters in this user manual. This section provides guidance on the safe handling and use of your tablet. Please read to understand all of the details. Important safety and handling information To avoid personal injury, property damage, or accidental damage to your Elo Tablet I (hereafter referred to as the tablet), please read through all of the information provided in this section before using the tablet. For detailed operating instructions, refer to the Tablet User Manual (this publication). Handle your tablet with care: Do not drop, bend, puncture, insert foreign objects, or place heavy objects on your tablet, as this may damage the tablet. Your tablet screen is made of glass, and may break if the tablet is dropped on a hard surface, subjected to high impact, or crushed by a heavy object. In the event that the glass chips or cracks, do not touch the broken glass or attempt to remove it from the tablet. Stop using the tablet immediately and contact Elo technical support for repair, replacement, and/or disposal information. Do not disassemble or modify your tablet: Your tablet is a sealed unit and is not user-serviceable, meaning it is not designed for disassembly or internal hardware modification by end users. All internal repairs must be done by an Elo-authorized repair facility or an Elo-authorized technician. Attempting to disassemble or modify your tablet will void any warranty. Prevent your tablet and charger from getting wet: • Do not immerse your tablet in water or leave it in a location where it can get saturated with water or other liquids. • Do not use the Elo Tablet AC/DC power adapter kit outdoors. Battery Safety: Warning: Using an incompatible battery may increase the risk of fire or explosion. Replace the battery only with a compatible battery purchased from Elo Touch Solutions that is designed to work with your Elo Tablet. Do not use a battery from other tablets. Do not use/operate your tablet with a damaged battery. Do not charge a damaged battery. A User Manual: Elo® Tablet SW602113 Rev B, Page 4 of 59 damaged battery may pose a risk of personal injury. Damages include dents or punctures to battery due to impact or shock, exposure to flame, and/or other deformations. If the battery is damaged, electrolyte may leak from the cells and/or fire may result which may cause personal injury. Handle a damaged or leaking battery pack with extreme care. Contact Elo technical support for replacement and/or disposal information. Do not disassemble the battery. Use approved charging methods only: Use only the AC/DC power adapter kit supplied by Elo Touch Solutions for the tablet. You can safely recharge the tablet battery using any of the following configurations: 1. AC/DC power adapter kit connected to tablet. 2. AC/DC power adapter kit connected to tablet while tablet is mounted onto docking station. 3. AC/DC power adapter kit connected to docking station while tablet is mounted onto docking station. 4. AC/DC power adapter kit connected to docking station while spare battery is installed into battery compartment on docking station, with or without tablet mounted onto docking station. The AC/DC power adapter kit may heat up during normal operation of your tablet. Ensure adequate ventilation around the charging device. Unplug the charging device if any of the following occurs: The charging device has been exposed to rain, liquid, or excessive moisture. The charging device shows signs of physical damage. You want to clean the charging device. Elo is not responsible for the performance or safety of products not manufactured or approved by Elo. Prevent hearing damage: Your tablet has an audio port that allows you to connect headphones (also called a headset) or earphones to the tablet. CAUTION: Excessive sound pressure from earphones and headphones can cause hearing loss. Adjustment of the equalizer to maximum increases the earphone and headphone output voltage and the sound pressure level. Therefore, to protect your hearing, adjust the equalizer to an appropriate level. User Manual: Elo® Tablet SW602113 Rev B, Page 5 of 59 Take care when using your tablet in a motor vehicle or on a bicycle: Always prioritize your safety and the safety of others. Follow the law. Local laws and regulations might govern how you can use mobile electronic devices, such as your tablet, while you drive a motor vehicle or ride a bicycle. Dispose according to local laws and regulations: When your tablet reaches the end of its useful life, do not crush, incinerate, immerse in water, or dispose of your tablet in any manner contrary to local laws and regulations. Some internal parts contain substances that can explode, leak, or have an adverse environmental affect if disposed of incorrectly. See Chapter 6 “Safety & Maintenance” for additional information on how to appropriately dispose of your tablet at the end of its useful life. Keep your tablet and accessories away from small children: Your tablet contains small parts that can be a choking hazard to small children. Additionally, the glass screen may break or crack if dropped on or thrown against a hard surface. Protect your data and software: Do not delete or change the name of files or directories that were not created by you; as this may prevent the tablet software from operating properly. Be aware that accessing network resources can render your tablet vulnerable to computer viruses, hackers, spyware, and other malicious activities that might damage your tablet, software, or data. It is your responsibility to ensure that your tablet have adequate protection in the form of firewalls, antivirus software, and anti-spyware software and keep them up to date. Keep electrical appliances such as an electric fan, radio, high-powered speakers, air conditioner, and microwave oven away from your tablet because the strong magnetic fields generated by these appliances can damage the screen and the data on the tablet. Take precautions with plastic bags: The tablet comes with plastic packaging material. DANGER: Plastic bags can be dangerous. Keep plastic bags away from babies and children to avoid danger of suffocation. Be aware of heat generated by your tablet: Your tablet may heat up during tablet operation and/or battery charging. The tablet surface temperature depends on the amount of system activity and the level of charge in the battery. Extended contact with your body, even through clothing, could cause discomfort or even a skin burn. Avoid placing your hands, your lap, or any other parts of your body in contact with a User Manual: Elo® Tablet SW602113 Rev B, Page 6 of 59 hot section of the tablet for any extended time. When removing the tablet from its docking station, please take caution before holding the tablet by the hand strap as the tablet may be hot. Radio Frequency (RF) Energy Exposure When the transmitter and receiver on your device are powered on, they transmit and receive Radio Frequency (RF) energy. The use of wireless technology may be restricted in certain situations or environments where risk of RF interference are perceived or identified as harmful. Turn off your device when instructed to do so by an airline staff, or when posted notices instruct you to do so. To minimize user RF Energy exposure, keep device further away from body. Polyvinyl Chloride (PVC) cable and cord notice: WARNING: Handling the cord on this product or cords associated with accessories sold with this product, will expose you to lead, a chemical known to the State of California to cause cancer, and birth defects or other reproductive harm. Wash hands after handling. User Manual: Elo® Tablet SW602113 Rev B, Page 7 of 59 Chapter 1: Product Overview This chapter provides an overview of the tablet, including the locations of the connectors and controls, tablet features, accessories, specifications, and operating environment. Product Description Your new tablet combines Elo Touch Solutions reliable performance with the latest developments in touchscreen technology and display design. This combination creates a natural flow of information between a user and the tablet. This tablet incorporates a 24-bit color, 1366x768 LCD panel to provide superior display performance with 4-point touch panel. The Elo Tablet’s 720p HD resolution is suitable for displaying graphics and images and running applications. This tablet is equipped with a hand strap to assist mobile operation of this device. Other features that enhance this tablet performance include Plug & Play compatibility, built-in speaker and microphone, and an optional docking station (Elo Tablet Dock) that adds an Ethernet, 3 USB, a VGA, and a power interface to the tablet. The tablet is designed to integrate into the tablet docking station without affecting its form factor and without requiring extra cabling. Optional accessories such as spare batteries, stylus, and spare hand straps are also available for purchase from Elo Touch Solutions. Precautions Follow all warnings, precautions and maintenance tips as recommended in this user manual to maximize the life of your unit and prevent risks to user safety. See Chapter 6 for more information on safety. This manual contains information that is important for the proper setup and maintenance of the tablet and docking station. Before setting up and powering on your new tablet and docking station, read through this manual. User Manual: Elo® Tablet SW602113 Rev B, Page 8 of 59 Tablet Layout Figure 1. Tablet front and side view Figure 2. Tablet back view User Manual: Elo® Tablet SW602113 Rev B, Page 9 of 59 1 Power button 2 Smart Card Reader (SCR) 3 USB port 4 5 6 7 8 9 10 11 12 13 Audio port (green) Power port (yellow) Magnetic Stripe Reader (MSR) Front-facing camera USB port cover Power / Audio port cover Microphone (built-in) Payment LED Tablet-Dock connector Wireless indicator LED 14 Battery indicator LED 15 Dock pin ports (bottom) Near Field Communication (NFC) 16 reader 17 Ambient light sensor 18 Tablet stylus string holes 19 Tablet stylus holder port cover 20 Rear-facing camera 21 Hand strap 22 Dock pin ports (top) 23 Battery screw 24 Speaker (built-in) 25 Battery 26 - 1. Power button Press the power button to turn on / off the tablet (set by default). When operating in Windows the tablet can also be turned off by shutting it down via the Start Menu. Next to the power button is an LED light that displays: - Solid green light when the tablet is on. - Blinking green light when the tablet is on standby/sleep. - No light when the tablet is off. 2. Smart Card Reader Your tablet has a Smart Card Reader, refer to “Payment Features” section in Chapter 2 for more information. Remove the Smart Card Reader slot cover that comes with your tablet in order to access the Smart Card Reader. When not in use, restore Smart Card Reader slot cover to prevent and/or minimize dust and liquid intrusion into the tablet. 3. USB port Use the full-size USB port to connect a compatible USB device (e.g. storage device or other external peripherals). 4. Audio port Headphones, microphones, and headsets with integrated microphones can be connected to the tablet via the audio port. Do not plug headphones, microphones, and headsets into the power port. The green audio port is distinguishable from the yellow power port. Plug in headphones to tablet before turning headphones on or putting them on your ears. 5. Power port User Manual: Elo® Tablet SW602113 Rev B, Page 10 of 59 Plug the DC cable of the AC/DC power adapter kit into the power port to power and charge the tablet. Do not plug the DC power cable into the audio port. The yellow power port is distinguishable from the green audio port. 6. Magnetic Stripe Reader The tablet has a built in magnetic stripe reader and can read various credit cards and other cards (e.g. loyalty cards, drivers licenses). Refer to “Payment Features” section in Chapter 2 for more information. 7. Front-facing camera Your tablet has a 2-megapixel front-facing camera, which you can use to take pictures, create videos, or make video calls. 8. USB port cover Open the USB port cover to access the full-size USB port. 9. Power / Audio port cover Open the power/audio port cover to access the power and audio port. 10. Microphone (built-in) The built-in microphone captures sound and voice when it is used with an application that is capable of using audio input. 11. Payment LED Flashes when Magnetic Swipe Reader, NFC Reader, or Smart Card Reader successfully captures data. 12. Tablet-Dock connector When the tablet is mounted properly onto the Elo Tablet Dock, this connector connects with the Dock-Tablet connector located on the docking station to establish connection between the two devices. Refer to Chapter 3 for more information on tablet integration to the docking station. The optional Elo Tablet Dock is available for purchase from Elo Touch Solutions. 13. Wireless indicator LED Flashes green when the tablet is connected to a Wi-Fi network and flashes blue when the tablet Bluetooth is on. 14. Battery indicator LED This light-emitting diode will: User Manual: Elo® Tablet SW602113 Rev B, Page 11 of 59 - Display solid green light when the battery is fully charged - Flash amber light when the battery is charging. 15. Dock pin ports (bottom) When mounting the tablet onto the docking station, align the docking station docking pins with the tablet docking pins to ensure proper mounting. For more information on how to mount the tablet onto the docking station, refer to Chapter 3. 16. Near Field Communication (NFC) Your tablet has Near Field Communication function, refer to “Payment Features” section in Chapter 2 for more information. 17. Ambient light sensor The built-in ambient light sensor detects the brightness of the environment and allows the screen brightness to automatically adjust according to ambient light conditions. 18. Tablet Stylus string holes These holes may be used to tether a stylus to the tablet. 19. Tablet Stylus holder port cover Open the tablet stylus holder port cover to access the tablet stylus holder port. The Elo Tablet stylus accessory comes with a holder that can be installed into this port. You can use the holder to store your tablet stylus. 20. Rear-facing camera Your tablet has a 2-megapixel rear-facing camera, which may be used for barcode reading functionality in addition to picture or video capture. 21. Hand strap Use the hand strap to ease mobile use of the tablet. The hand strap comes with thumb screws for easy user installation/uninstallation onto the tablet. The hand strap can be installed onto the tablet for right hand use or for left hand use. Refer to Chapter 2 for more information on how to install/uninstall the hand strap onto the tablet. 22. Dock pin ports (top) When mounting the tablet onto the docking station, align the docking station docking pins with the tablet docking pins to ensure proper mounting. For more information on how to mount the tablet onto the docking station, refer to Chapter 3. 23. Battery Screw User Manual: Elo® Tablet SW602113 Rev B, Page 12 of 59 Loosen the battery thumb screw to remove the battery from the tablet. Tighten the battery thumb screw to secure a battery onto the tablet. 24. Speaker (built-in) The integrated speaker provides audio output for video and music playback. 25. Battery The tablet battery is a Lithium-ion battery with a rating of 41.81 Wh. For more information regarding agency approval of the tablet battery, refer to Chapter 7. Tablet Docking Station (optional accessory) Layout Figure 3. Tablet docking station front view User Manual: Elo® Tablet SW602113 Rev B, Page 13 of 59 Figure 4. Tablet docking station rear view 1 Power button 10 Dock battery compartment 2 Wireless indicator LED 11 Dock cable cover 3 Ethernet indicator LED 12 Dock cable cover lock* 4 Dock alignment pins (bottom) 13 Dock cable cover release buttons 5 Battery Screw 14 VGA port 6 Dock alignment pins (top) 15 Ethernet port 7 Dock lock* 16 USB ports 8 Dock release button 17 Dock power port 9 Dock-Tablet connector 18 Dock screw holes *The docking station will come with a set of keys for easy locking/unlocking. If lost, use screwdriver or a similar tool to lock/unlock. 1. Power button Press the power button to turn on / off the tablet (set by default). When operating in Windows the tablet can also be turned off by shutting it down via the Start Menu. The power button is equipped with LED light that displays: - Solid green light when the tablet is on. - Blinking green light when the tablet is on standby/sleep. - No light when the tablet is off. 2. Wireless indicator LED Flashes green when the mounted tablet is connected to a Wi-Fi network and flashes blue when the tablet Bluetooth is on. User Manual: Elo® Tablet SW602113 Rev B, Page 14 of 59 3. Ethernet indicator LED Flashes green when the mounted tablet is connected to a network via an Ethernet cable. 4. Dock alignment pins (bottom) These pins support tablet mounting onto the docking station. Align and slide these pins into the docking pin ports located on the tablet to mount the tablet to the docking station. For more information on how to mount the tablet onto the docking station, refer to Chapter 3. 5. Battery Screw Loosen the battery thumb screw to remove battery from the docking station battery compartment. Tighten the battery thumb screw to secure a battery into the docking station battery compartment. 6. Dock alignment pins (top) These pins support tablet mounting onto the docking station. Align and slide these pins into the docking pin ports located on the tablet to mount the tablet to the docking station. For more information on how to mount the tablet onto the docking station, refer to Chapter 3. 7. Dock lock Turn this accordingly to lock/unlock a mounted tablet onto the docking station. When in the ‘locked’ position, pressing the dock release button will not release the tablet from the dock. 8. Dock release button Press this button to remove the tablet from the docking station. Turning the dock lock to ‘locked’ position will disable this functionality. 9. Dock-Tablet connector When the tablet is mounted properly onto the Elo Tablet Dock, this connector connects with the Tablet-Dock connector located on the tablet to establish connection between the two devices. Refer to Chapter 3 for more information on tablet integration to the docking station. 10. Dock battery compartment To access the dock battery compartment, remove the dock battery compartment door (by loosening its screw) that comes with the docking station. Use this battery compartment to charge a spare battery via the dock. The docking station is designed to allow simultaneous charging of a spare battery mounted in this battery compartment and a tablet mounted onto the docking station. 11. Dock cable cover Remove dock cable cover to access the USB ports, Ethernet port, and VGA located behind the User Manual: Elo® Tablet SW602113 Rev B, Page 15 of 59 docking station. 12. Dock cable cover lock When the dock cable cover is properly installed to the docking station, turn this accordingly to lock/unlock the cable cover onto the docking station. Note: You cannot install the cable cover onto the docking station when it’s in the ‘locked’ position. For more information on how to install/uninstall the cable cover to the docking station, refer to Chapter 3. 13. Dock cable cover release buttons Press these buttons to remove the cable cover from the docking station. Turning the dock cable cover lock to the ‘locked’ position will disable this functionality. 14. VGA port Use this port to connect a VGA cable between the docking station and an external monitor. 15. Ethernet port Use this port to connect the tablet to a network via an Ethernet RJ-45 cable. 16. USB ports Use the full-size USB port to connect a compatible USB device (e.g. storage device, scanner wand, or other external peripherals). 17. Dock power port Connect the DC cable of the tablet AC/DC power adapter kit to the docking station power port to charge the tablet and/or a spare battery via the docking station. 18. Dock screw holes Use these holes to mount the docking station to a countertop or other furniture surface. Note: Mounting screws are not provided with the docking station. Accessories (optional) The following optional accessories and spare parts are available for purchase from Elo Touch Solutions. Shown in parenthesis is the Elo orderable part number. • Accessory Battery (E840851): Spare battery for the Elo Tablet. • Replacement Hand Strap (E697779): Replacement hand strap for the Elo Tablet. • Replacement Docking Station cable cover (E108413): Replacement dock cable cover for User Manual: Elo® Tablet SW602113 Rev B, Page 16 of 59 the Elo Tablet docking station. • Replacement Power Supply (E452058): Replacement AC/DC power adapter kit for powering and charging the tablet. • Stylus (E761200): Elo Tablet stylus with holder. • Docking Station (E518363): Elo Tablet docking station with battery charging location, Ethernet port, 3 USB ports, and VGA connector. • VESA Bracket (E624438): A VESA mounting bracket which will allow you to mount your tablet onto arms, stands, and other apparatus compatible with VESA 75mm x 75mm mounts. The VESA mounting bracket comes with four screws for fastening it onto the tablet. It does not come with additional mounting screws. When mounting the tablet with VESA mount, use four M4 threaded screws. The VESA mounting bracket allows for a maximum screw depth of 10 mm from the mounting surface. Mounting the tablet with VESA mount with longer screws may damage the tablet. Figure 5. Optional VESA mounting bracket attaches to tablet Features Processor • Intel Atom N2600 Dual Core 1.6 GHz Operating system options • Windows Embedded Standard 7 (32-bit) Memory (RAM) User Manual: Elo® Tablet SW602113 Rev B, Page 17 of 59 • 2 GB DDR3 – 1066 MHz (not expandable beyond 2GB) Storage • 32 GB mSATA SSD Bios • Phoenix Chipset • Intel NM10 Display • Screen Size : • Active Display Area: • Aspect ratio: • Native (optimal) resolution: • Brightness (typical): 257 mm (10.1 inches) 222 mm x 125 mm 16:9 (wide) 1366 x 768 LCD on tablet; VGA DB15 output via docking station LCD Panel: 380 nits With touchscreen: 335 nits 800:1 PCAP (Projected Capacitive) Multi Touch (4 touch) • Contrast Ratio (typical): • Touch Technology : • Automatic brightness control • Thin Film Transistor Liquid Crystal Display (TFT LCD) technology with LED backlight Integrated cameras • Front-facing camera, auto-focus 2 megapixel • Rear-facing camera, auto-focus 2 megapixel Connectors • 1 x USB 2.0 on tablet; 3 x USB 2.0 on docking station • 1 x LAN RJ45 (10/100Mbps) (when docked in docking station) Payment features • Integrated Magnetic Swipe Reader (MSR) • Internal/integrated Barcode Reader (via rear-facing camera) • Internal/integrated Smart Card Reader • Integrated Near Field Communication Reader Wireless features • Wi-Fi (802.11 b/g/n, 2.4 GHz band, max. 150 Mbps) • Bluetooth 4.0 / 3.0 +HS • Near Field Communication User Manual: Elo® Tablet SW602113 Rev B, Page 18 of 59 Other features • Built-in speaker • Built-in microphone Languages • English (default) • French • German • Italian • Spanish • Simplified Chinese • Traditional Chinese Specifications Maximum Dimensions (W x H x D) • Tablet : 11.52‘’ x 0.79’’ x 8.17’’ • Docking station : 11.1’’ x 5.75’’ x 7.8’’ Tablet Weight: • 1.18 kg (2.6 lb) Battery • 41.8 Wh 5650mAh Li-ion battery Power • Power Adapter Input: AC 120/220V (50/60 Hz), 36 W • Tablet Input Power: 12Vdc, 3.0A • Typical power consumption (w/o peripherals): 12 Watts – estimated battery run time up to 7 hours Temperature: • Operating • Storage : 0°C to 40.0°C (32°F to 104°F) : -20.0°C to 60°C (4°F to 140°F) Humidity (non-condensing): • Operating : 20% to 80% • Storage : 5% to 95% If possible, place your tablet in a dry, well-ventilated area without direct exposure to sunshine. Do not use or store your tablet in dusty, dirty areas, or extreme hot or cold areas. User Manual: Elo® Tablet SW602113 Rev B, Page 19 of 59 Chapter 2: Getting Started Unpacking the Tablet To unpack the tablet: 1. Open the box. 2. Check that the following items are present and in good condition: Tablet Quick Install Guide AC/DC Power adapter kit o AC/DC power adapter w/ DC power cable o Charger plug adapter for North America, Europe/Korea, and U.K. Battery 3. Remove the protection bag/cover, desiccant packs, and other packaging materials appropriately. Please take extra caution to ensure they are not accessible by small children. 4. Press the power button to start using the tablet. The tablet may need to be charged before initial use. We recommend that the tablet be charged for at least 2.5 hours prior to initial use. Installing the Battery into your Tablet To install the battery into the tablet, slide battery into the battery compartment. Tighten the battery screw to properly secure the battery to the tablet. The tablet battery is designed for easy installation and removal by end users. Turn off and shut down the tablet before removing the battery. The battery can be removed by loosening the battery screw on the back of the tablet. When the tablet is powered by and plugged to the power supply, the battery may be replaced without turning off the tablet. Additional batteries are available for purchase (P/N E840851). Charging your Tablet and/or Battery Setting up the AC/DC Power adapter kit: Push the release button on the AC/DC Power adapter head, and slide out the protective cover that came with the AC/DC Power adapter kit. Select the appropriate charger plug adapter for your region and slide it into the AC/DC User Manual: Elo® Tablet SW602113 Rev B, Page 20 of 59 Power adapter head until you hear a click. Figure 6. The charger plug adapter (A) is detachable from the AC/DC Power adapter head by pushing the release button (B) and sliding out the charger plug adapter. Plug the AC/DC adapter head (left) into a standard AC power outlet and plug the DC power cable (C) to the yellow tablet power port (5, Figure 1) or yellow docking station power port (17, Figure 4) to charge. Charging your tablet: Plug the DC power cable to the tablet power port. Plug the AC/DC adapter head (with the correct charger plug adapter for your region) into a standard AC power outlet. Note: The tablet is also designed to be able to charge via the optional docking station. Charging spare tablet battery on optional docking station: Remove the dock battery compartment door by loosening its screw. Slide battery into the dock battery compartment and tighten the battery screw to properly secure the battery to the docking station. Plug the DC power cable to the tablet docking station power port. Plug the AC/DC adapter head (with the correct charger plug adapter for your region) into a standard AC power outlet. Charging tablet via the optional docking station: Mount tablet onto the docking station. Refer to the Tablet Docking Instructions section of Chapter 3. Plug the DC power cable to the tablet docking station power port. Plug the AC adapter into a standard AC power outlet. Note: The tablet docking station allows for a tablet and a spare battery to charge simultaneously. User Manual: Elo® Tablet SW602113 Rev B, Page 21 of 59 Installing the Hand Strap onto your Tablet The hand strap is designed for easy user installation/uninstallation to/from the tablet. As shown in Figure 7, the hand strap can be installed onto the tablet in two different orientations for right hand use or for left hand use. If you plan to hold the tablet with your left hand, use the hand strap screw ports on the top left and bottom right (as you face the back of the tablet) on the back of the tablet. If you plan on using your right hand to hold the tablet, use the hand strap screw ports on the top right and bottom left (as you face the back of the tablet) located on the back of the tablet. To install the hand strap onto the tablet: 1. Align the hand strap such that the slotted screw holder on the hand strap aligns with the designated top hand strap screw port on the back of the tablet. Fasten them together by tightening the screw. 2. Align the screw on the other end of the hand strap with the designated bottom hand strap screw port on the back of the tablet. Fasten them together by tightening the screw. Figure 7 highlights how the two screw holders located at the two ends of the hand strap differ from each other. To uninstall the hand strap from the tablet, loosen the two hand strap screws from the hand strap screw ports located on the back of the tablet. Figure 7. Hand strap can be installed onto tablet in two different orientations: 1) for holding the tablet with left hand (green arrows) and 2) for holding the tablet with right hand (blue arrows). Slotted hand strap screw holder (A) to be fastened to a top screw port located on the back of the tablet. User Manual: Elo® Tablet SW602113 Rev B, Page 22 of 59 Using the Multi-touch Screen This section provides instructions on how to use the multi-touch screen. Some of the touch features listed below may not always work, as it depends on whether the gesture or action is supported by the application software you have loaded on your tablet. Touch Tap gently on the screen with your fingertip to select an item, open a menu, or type text using the onscreen keyboard. When operating in Windows, a touch acts like a left mouse click. Touch and hold Touch and hold an object or a blank area on the screen until an action occurs. When operating in Windows, a touch and hold acts like a right mouse click. Drag To move an item such as an image and an icon on the screen, touch and hold your finger on the item, move your finger to the desired location, and then take your finger off the screen. Swipe or slide Move your finger in a vertical or horizontal direction on the screen to scroll through Home screens, Web pages, lists, picture thumbnails, etc. Zoom • Zoom out: Move two fingers close together on the screen as if you are picking something up to reduce the view of an image or a Web page. • Zoom in: Move two fingers apart on the screen to enlarge the view of an image or a Web page. Editing • To cut or copy text: 1. Select the text you want and to copy/cut by dragging across the text. To select all text, touch and hold on the text, and touch Select All on the pop-up menu. Selected text will be highlighted. 2. Touch and hold on the highlighted texts, and touch Copy or Cut on the pop-up menu. The text is saved to the clipboard. • To paste text: 1. Touch and hold the area where you want to paste the text that you cut or copied. 2. Touch Paste on the pop-up menu to paste the text. User Manual: Elo® Tablet SW602113 Rev B, Page 23 of 59 Using the Onscreen Keyboard Typing text, numbers, symbols, and other characters When you need to type text, touch the text field to bring up the onscreen keyboard and then touch keys on the keyboard to type. Using the Elo Tablet Stylus To use the Elo tablet stylus, hold the stylus and gently touch the screen with the tip to accomplish actions such as touch, touch and hold, drag, and slide. Use the stylus instead of your finger in the following conditions: • When you need precise and detailed input, such as drawing a picture or using handwriting mode • When too many elements are crowded on the screen, for example, when you are playing games • If you want to keep your screen free from smudges • If you have long fingernails and it is difficult for you to type The Elo Tablet stylus comes with a stylus holder that is installable into the stylus holder port located on the side of the tablet (Refer to Figure 8 below for installation instructions). When you are not using the stylus, store it in the stylus holder. If you need to use the stylus frequently, string the stylus to the Elo Tablet string holes to avoid losing it. Refer to the Tablet Layout section in Chapter 1 for the location of the stylus holder port and stylus string holes. User Manual: Elo® Tablet SW602113 Rev B, Page 24 of 59 Figure 8. To install the stylus holder onto the tablet: Step 1 - Loosen and remove the screw (A) and remove the stylus holder port cover (B). Step 2 - Insert stylus holder (C) to the port and fasten it by tightening the screw (A) back to the tablet. Step 3 - Store the stylus (D) in the stylus holder when not in use. Screen Lock Mode To prevent unauthorized use and access to your data, lock your tablet when you are not using it. When operating on Windows Embedded Standard 7 (WES 7), setting up password protection upon standby mode be done via Control panel > All Control panel items > power options > Systems Settings. Payment Features The Elo Tablet contains three features for payment processing. It includes a magnetic swipe reader (MSR), smart card reader (SCR) and near field communications (NFC) functionality. User Manual: Elo® Tablet SW602113 Rev B, Page 25 of 59 Magnetic Swipe Reader (MSR) A magnetic stripe card is a type of card capable of storing data on a band of magnetic material on the card. The magnetic stripe, sometimes called swipe card or magstripe, is read by swiping past a magnetic reading head. The tablet is capable of reading three tracks - these are known as tracks 1, 2, and 3. Track 3 is typically unused by the major worldwide card processing networks, and often isn't even physically present on the card by virtue of a narrower magnetic stripe. Point-of-sale card readers almost always read track 1, or track 2, and sometimes both, in case one track is unreadable. The minimum cardholder account information needed to complete a transaction is present on both tracks. Track 1 has a higher bit density (210 bits per inch vs. 75), and is the only track that may contain alphabetic text, and hence is the only track that contains the cardholder's name. Smart Card Reader (SCR) The smart card reader is capable of reading smart card, chip card, or integrated circuit card (ICC) of many pocket-sized cards with embedded integrated circuits. The SCR is capable of reading EMV (Europay, MasterCard, Visa) standard cards. Near Field Communication (NFC) Near field communication (NFC) is a set of standards for smartphones and similar devices to establish radio communication with each other by touching them together or bringing them into close proximity, usually no more than a few centimeters. Present and anticipated applications include contactless transactions and data exchange. Communication is also possible between an NFC device and an unpowered NFC chip, called a "tag". The NFC reader meets standards covered by communications protocols and data exchange formats, and is based on existing radio-frequency identification (RFID) standards including ISO/IEC 14443 and FeliCa. The standards include ISO/IEC 18092 and those defined by the NFC Forum. User Manual: Elo® Tablet SW602113 Rev B, Page 26 of 59 Using Elo Tablet Diagnostic Suite The Elo Tablet Diagnostic Suite is a tool that provides Systems information and allows users to test or control the functionality of different Tablet hardware and in-built peripherals. By default, the Elo Tablet Diagnostic Suite is factory-installed onto your tablet. When operating in Windows, the Elo Tablet Diagnostic Suite may be accessed via the Control Panel: Control Panel\All Control Panel Items\EloDiagSuite, Main Dashboard: Different applications of the Elo Tablet Diagnostic Suite can be accessed via the main Dashboard (as shown in Figure 9a), by clicking on their icon. Touch or click the “Exit” button to exit the Elo Diagnostic Suite. Figure 9a. Main Dashboard of Elo Tablet Diagnostic Suite User Manual: Elo® Tablet SW602113 Rev B, Page 27 of 59 Application – Front Camera: Use this application to test the functionality of the front camera. Figure 9b. Front Camera application of Elo Tablet Diagnostic Suite 1. Main display that shows what the front camera sees. 2. When a picture is taken via this application, the picture will be displayed on this window. 3. Touch or click: “Take Photo” button to capture an image via the front camera. “View Photo” button to view the captured image via Windows Image Viewer. “Record Video” button to start recording a video via the front camera. “Stop Recording” button to stop recording the video. “View Video” button to view the captured video via Windows Media Player. 4. After capturing a video or photo, the file destination (file name and folder) to which the photo/video was saved to will be displayed here. 5. Touch or click “< Dashboard” to go back to the main Dashboard. User Manual: Elo® Tablet SW602113 Rev B, Page 28 of 59 Application – Rear Camera: Use this application to test the functionality of the rear camera. Figure 9c. Rear Camera application of Elo Tablet Diagnostic Suite 1. Main display that shows what the rear camera sees. 2. When a picture is taken via this application, the picture will be displayed on this window. 3. Touch or click: to turn on/off the ‘flash’ LED located next to the rear camera. to turn on/off the ‘pointer’ LED located next to the rear camera. “Take Photo” button to capture an image via the rear camera. “View Photo” button to view the captured image via Windows Image Viewer. “Record Video” button to start recording a video via the rear camera. “Stop Recording” button to stop recording the video. “View Video” button to view the captured video via Windows Media Player. 4. After capturing a video or photo, the file destination (file name and folder) to which the photo/video was saved to will be displayed here. 5. Touch or click “< Dashboard” to go back to the main Dashboard. User Manual: Elo® Tablet SW602113 Rev B, Page 29 of 59 Application – Systems Info: This application provides a summary of the Systems information of the Tablet. Figure 9d. Systems Info application of Elo Tablet Diagnostic Suite 1. Touch or click “< Dashboard” to go back to the main Dashboard. User Manual: Elo® Tablet SW602113 Rev B, Page 30 of 59 Application – LEDs: Use this application to test that all the LEDs (light emitting diodes) on the tablet and dock (when applicable) are functioning properly. Figure 9e. LEDs application of Elo Tablet Diagnostic Suite 1. Touching or clicking the “All On” button will turn on all LEDs on Tablet and docking station (when the tablet is properly docked). Touching or clicking the “All Off” button will turn off all LEDs on Tablet and docking station (when the tablet is properly docked). Touch or click the “Restore Default” button to restore the LEDs to function back as normal. 2. Use these check boxes to manually turn on/off individual LEDs 3. Touch or click “< Dashboard” to go back to the main Dashboard. User Manual: Elo® Tablet SW602113 Rev B, Page 31 of 59 Application – MSR: Use this application to test the tablet magnetic swipe reader. When a valid magnetic stripe is swiped, this application will display what the tablet MSR reads off of the magnetic stripe. Figure 9f. MSR application of Elo Tablet Diagnostic Suite 1. Touch or click “< Dashboard” to go back to the main Dashboard. User Manual: Elo® Tablet SW602113 Rev B, Page 32 of 59 Application – Dock Status: This application displays the docking status of the tablet, whether it is docked or undocked. Figure 9g. Dock Status application of Elo Tablet Diagnostic Suite 1. Touch or click “< Dashboard” to go back to the main Dashboard. User Manual: Elo® Tablet SW602113 Rev B, Page 33 of 59 Application – NFC: Use this application to test the tablet Near Field Communication (NFC) reader. When NFC Reader is enabled, this application will display the Answer to Reset (ATR) information of the NFC-enabled device or tag that is tapped near the tablet NFC reader. Figure 9h. NFC application of Elo Tablet Diagnostic Suite 1. Check box to enable NFC Reader, uncheck to turn it off. 2. Touch or click “< Dashboard” to go back to the main Dashboard. By default, this will turn off the NFC Reader. User Manual: Elo® Tablet SW602113 Rev B, Page 34 of 59 Application – Accelerometer: This application displays the readings of the tablet accelerometer. The accelerometer reads proper acceleration of the tablet in units of G. (G = 9.81 m/s2) Figure 9i. Accelerometer application of Elo Tablet Diagnostic Suite 1. Touch or click “Accel Start” to display tablet accelerometer readings. Touch or click “Accel Stop” to stop. 2. Touch or click “< Dashboard” to go back to the main Dashboard. User Manual: Elo® Tablet SW602113 Rev B, Page 35 of 59 Application – Smart Card: Use this application to test the tablet Smart Card Reader (SCR). When a smart card is inserted into the smart card reader, this application will display what the SCR reads off of the smart card. Figure 9j. Smart Card application of Elo Tablet Diagnostic Suite 1. Touch or click the “Read EMV” icon to display information stored in an EMV (Europay, Mastercard, and Visa) Card. 2. Touch or click on “Read MPCOS” icon to display the preset data in an MPCOS Card. 3. Touch or click “< Dashboard” to go back to the main Dashboard. User Manual: Elo® Tablet SW602113 Rev B, Page 36 of 59 Application – Ambient Light Sensor: Use this application to read the readings of the tablet built-in ambient light sensor. Figure 9k. Ambient Light Sensor application of Elo Tablet Diagnostic Suite 1. Touch or click the “Start” button to capture the illuminance reading of the ambient light sensor (amount of light that reaches the light sensor), given in units of lux. “Value” field will display the instantaneous illuminance reading. “Max” field will display the highest illuminance reading since the “Start” button is last touched or clicked. “Min” field will display the lowest illuminance reading since the “Start” button is last touched or clicked. Press the “Stop” button to stop the illuminance reading. 2. Touch or click “< Dashboard” to go back to the main Dashboard. User Manual: Elo® Tablet SW602113 Rev B, Page 37 of 59 Application – Temperature Sensor This application will display the temperature readings of the different system temperature sensors. Figure 9l. Temperature application of Elo Tablet Diagnostic Suite 1. Use this field to set the interval time (in milliseconds) between consecutive readings by the temperature sensor. 2. Check / uncheck these boxes to select which temperature sensor readings to display. 3. Touch or click “< Dashboard” to go back to the main Dashboard. Rotation Control Your tablet supports screen auto-rotation. The below rotation icon on the main dashboard displays the status of the auto-rotation feature. Touching or clicking this icon will disable or enable the tablet auto-rotation features. This icon will display “Rotation on” when the tablet auto-rotation feature is on, and will display “Rotation off” when the tablet auto-rotation feature is off. Figure 9m. Rotation icon on main Dashboard when the auto-rotation feature is on User Manual: Elo® Tablet SW602113 Rev B, Page 38 of 59 Chapter 3: Docking Station General Mounting Information The optional Elo Tablet docking station is available for purchase (P/N E518363). The docking station provides additional connectors and interfaces to support peripherals such as keyboards, cash drawers, printers, etc. The Elo Tablet and docking station is also designed to allow the tablet and/or a spare battery to charge via the dock. Unpacking the Docking Station To unpack the docking station: 1. Open the box. 2. Check that the following items are present and in good condition: a. Docking station with removable cable cover b. Quick Install Guide c. AC/DC Power adapter kit i. AC/DC power adapter w/ DC power cable ii. Charger plug adapter for North America, Europe/Korea, and U.K. d. Two keys for easy locking/unlocking of dock lock and dock cable cover lock. 3. Remove the protection bag/cover, desiccant packs, and other packaging materials appropriately. Please take extra caution to ensure they are not accessible by small children. 4. The docking station is ready for use with the tablet. Tablet Docking Instructions To place the Elo Tablet into the docking station: - Align the tablet with the docking station such that the top dock alignment pins align with top dock pin ports and the bottom dock alignment pins align with the bottom dock pin ports, as shown in Figure 10 below. For proper mounting of the tablet to the docking station, the Dock-Tablet connector will need to join with the Tablet-Dock connector, while the top and bottom dock alignment pins will need to slide into the top and bottom dock pin ports on the tablet, respectively. - Ensure that the backside of the tablet rests against the front face of the docking station and gently slide the tablet into the docking station until you hear a click. - The tablet is now properly placed into the docking station. User Manual: Elo® Tablet SW602113 Rev B, Page 39 of 59 Figure 10. Mounting the tablet onto the docking station. (A) Align top dock alignment pins with top dock pin ports. (B) Align bottom dock alignment pins with bottom dock pin ports User Manual: Elo® Tablet SW602113 Rev B, Page 40 of 59 Connecting Docked Tablet to External Peripherals When the tablet is properly placed into the docking station, the tablet connects and can utilize the connections and interfaces available on the docking station. To access these connections and interfaces: 1. Remove the dock cable cover by pressing the dock cable cover release buttons while the dock cable cover lock is in the ‘unlocked’ position, and slide the dock cable cover away from the docking station. 2. Connect the AC/DC power adapter kit to the docking station power port to charge the tablet and/or a spare battery via the docking station. 3. Use the VGA port to connect an external video display to the tablet. 4. Use the USB ports to connect external peripherals to the tablet. 5. Slide the dock cable cover back onto the docking station (as shown in Figure 11 below) until you hear a click to re-install the cable cover. The dock cable cover has an opening through which cables can route through. Note: When dock cable cover lock is in the ‘locked’ position, the dock cable cover will not install properly to the docking station. Ensure that the dock cable cover lock is in the ‘unlocked’ position before sliding the dock cable cover back to the docking station. Figure 11. Sliding the back cover back onto the docking station User Manual: Elo® Tablet SW602113 Rev B, Page 41 of 59 Chapter 4: Operation Power To turn the tablet on and off, press the tablet power button once. When the tablet is installed onto the docking station, then the tablet can also be turned on and off using the power button on the docking station. To gracefully shut down the tablet, follow the operating systems normal power off procedure. To abruptly power off the tablet, press and hold either of the power button until the tablet shuts off. In the event that your tablet does not respond and does not turn off via the power button, reset the tablet by removing the battery. A Power Status LED is provided on the tablet and docking station that functions according to the following table: Tablet/Dock status OFF SLEEP ON LED status OFF BLINKING ON The system consumes low power when in SLEEP and OFF modes. If long periods of non-use are planned, turn off tablet to save power. For detailed power consumption specifications, refer to technical specifications available on the Elo website www.elotouch.com. The maximum voltage, frequency and current for the Elo Tablet, are provided in the power ratings table below: Tablet Operating Voltage Range 100 - 240Vac Operating Frequency Range 50/60 Hz Operating Current Range 0.15~0.35A Putting your tablet to sleep: Put the tablet to sleep using the Sleep option instead of shutting it down. You can also change Windows’ power saving options to have the tablet automatically sleep after it has not been used for a set period of time. User Manual: Elo® Tablet SW602113 Rev B, Page 42 of 59 Figure 12a. To put the tablet to sleep, touch “Sleep” By default, power management settings were configured on the tablet. The tablet display was set to enter sleep mode after 15 minutes of inactivity, for energy saving purposes. To manually activate/configure power management on the tablet that runs on Windows 7: - Touch / select “Power Options” icon from the Control Panel. This will open the Power Options window. Figure 12b. Access Power Options window via the Control Panel - In the Power Options window, customize one of the pre-configured plans by touching / selecting the “Change plan setting” option. This will open the Edit Plan Setting window. User Manual: Elo® Tablet SW602113 Rev B, Page 43 of 59 Figure 12c. “Change plan setting” option on the Power Options window - In the Edit Plan Setting window, the time of inactivity before the display will dim or turn off, and before the tablet will go to sleep (both when the tablet is plugged into a power source or when its running on battery), can be set. Figure 12d. The Edit Plan Setting window allows users to set the time of inactivity before the display will dim or turn off, and before the tablet will go to sleep. - To configure other Power Management options, access the advance power option settings by touching or clicking “Change advanced power settings”. User Manual: Elo® Tablet SW602113 Rev B, Page 44 of 59 Addendum: The US EPA recommends setting computers to enter sleep mode after 15 to 60 minutes of inactivity. To save even more energy, set the display to enter sleep mode after 5 to 20 minutes of inactivity. The lower the inactivity time prior to going into sleep mode, the more energy you will save. Note: The tablet may not enter sleep mode when it has a network file opened. Graphics-intensive screen savers can also prevent the tablet from entering sleep mode, and should be disabled. Otherwise, Windows 7 should not allow software applications to stop the tablet from going to sleep. It is, however, possible for a network administrator to change this setting, allowing applications to “veto” sleep when they are busy. The setting can be changed via Group Policy, but is not configurable via the Control Panel Power Options window. References: http://windows.microsoft.com/en-US/windows7/Power-plans-frequently-asked-questions http://windows.microsoft.com/en-US/windows7/Change-what-happens-when-you-press-the-po wer-button-on-your-computer Waking your tablet from sleep: When you put your tablet into sleep mode, touching the screen (if set to do so) or pressing the power button once will bring the tablet out of sleep mode. It is possible to have your tablet wake up automatically at a set time. This can be done by creating scheduled task. To do so: - Touch / click the Start Button - Type Task Scheduler in the Start menu search box - Touch / click Enter or touch / select “Task Scheduler” from the search results. The Task Scheduler window will appear. Figure 12e. Type “Task Scheduler” into the Start menu search box and select Task Scheduler from the search results. - In the Task Scheduler window, create a new task by touching / selecting “Create Task”. This User Manual: Elo® Tablet SW602113 Rev B, Page 45 of 59 will open the Create Task window. Figure 12f. Touch or select “Create Task” to create a new task - In the General tab in the Create Task Window, name the task (e.g. Wake From Sleep), and select whether to allow the task to run only when a user is logged on. Set the task to “Run with highest privileges”. Figure 12g. General tab in the Create Task Window - Go to the Triggers tab in the Create Task Window and create a new trigger by touching / selecting “New”. Set the desired time at which to run the task. Click “OK”. User Manual: Elo® Tablet SW602113 Rev B, Page 46 of 59 Figure 12h. Set up schedule for task via the New Trigger Window - Go to the Conditions tab in the Create Task Window and enable the “Wake the computer to run this task” option. Figure 12i. Enable the “Wake the computer to run this task” option in the Create Task Window - - You must then specify at least one action for the task (e.g. task to launch a file-downloading program). To wake up the system without running a program, an option will be to set the task to run cmd.exe with the /c “exit” arguments. This will launch a Command Prompt window and immediately close it, effectively doing nothing. Save your new task after you finish configuring it. It is also possible to wake the tablet up from sleep via Remote Wake-up. Wake on LAN is the technology that allows someone to turn on a tablet remotely, and is often used by system administrators to perform computer maintenance tasks remotely. By default, the Wake on LAN feature is disabled on the tablet. To enable this feature: - Open Network and Sharing Center. This can be done by touching / selecting the Start button, then typing Network and Sharing in the Start menu search box, and pressing Enter. - Touch / select “Change adapter settings” located on the upper left of the navigation pane - Right click on the relevant network connection for which to enable/disable power User Manual: Elo® Tablet SW602113 Rev B, Page 47 of 59 - - management support. Touch / select “Properties”. This will open the Wireless Network Connection Properties window. Touch / select “Configure”. On the Power Management tab, check / uncheck the “Allow the computer to turn off this device to save power” check box to enable / disable power management on the network adapter. Check / uncheck the “Allow this device to wake the computer” to enable / disable Wake on LAN. Check “Only allow a magic packet to wake the computer” check box to only enable Wake on LAN for magic packets. Touch / select “OK”. Note: For devices that do not support ARP and NS offloads, Windows will default to wake only on magic packet. Charging Battery Use only the AC/DC power adapter kit supplied by Elo Touch Solutions to charge the tablet and its battery. The tablet battery has a ‘charging threshold’, and will only charge once it falls below this threshold level. The threshold level of the tablet battery has been set to 90% by default. Once the battery falls below this threshold limit, the battery can be charged back to 100%. The tablet has a battery indicator LED that shows the charging status of the tablet battery. This light emitting diode will: - Display solid green light when the battery is fully charged - Flash amber light when the battery is charging. In the event that the tablet battery was allowed to fully discharge, it is recommended to recharge the battery to at least 80%. To prevent over-discharge, charge the tablet battery at least every 3 months. Audio Audio can be played over the tablet internal speaker. When headphones are plugged into the tablet audio jack, the internal speaker turns off and audio is played over the headphones. When external microphones are plugged into the tablet audio jack, the internal microphone will turn off. User Manual: Elo® Tablet SW602113 Rev B, Page 48 of 59 Chapter 5: Technical Support If you are experiencing trouble with your tablet, refer to the following suggestions. If the problem persists, please contact your local dealer or contact Elo Touch Solutions Customer Service. Solutions to Common Problems Problem Suggested Troubleshooting The Tablet does not respond when turning on the system. Check that the AC/DC power adapter kit is properly connected or that the battery is charged. Verify the AC power source is functioning. Tablet does not respond with charged battery or AC/DC power adapter kit connected Remove the battery, wait 1 minute, reinstall battery, and try again. Monitor display is blank. If the Power Status LED is blinking, the tablet may be in SLEEP mode. Press the power button to see if the image reappears. Technical Assistance Visit http://www.elotouch.com/Support/TechnicalSupport/default.asp for technical support. Refer to the last page of this user manual for Elo contact information worldwide. User Manual: Elo® Tablet SW602113 Rev B, Page 49 of 59 Chapter 6: Safety & Maintenance Safety To avoid risk of electric shock, follow all safety notices and do not disassemble the Elo Tablet. The Elo Tablet is not user-serviceable. Do not block or insert anything into any of the ventilation slots. The Elo Tablet and docking station is equipped with an AC/DC power adapter kit. Do not use a damaged AC/DC power adapter kit. Use only the AC/DC power adapter kit supplied by Elo Touch Solutions for the tablet and tablet docking station. Use of an unauthorized AC/DC power adapter kit may invalidate your warranty. Ensure that the system is maintained and runs within the specified environmental conditions listed below. Environmental conditions for operating and storage Temperature: Operating Storage Humidity (non-condensing): Operating Storage 0°C to 40°C -20°C to 60°C 20% to 80% 5% to 95% Altitude: Operating Storage 0 to 3,500 m 0 to 12,000 m User Manual: Elo® Tablet SW602113 Rev B, Page 50 of 59 Tablet Care and Handling The following tips will help maintain optimal performance of your Elo Tablet: Disconnect the power cable before cleaning. To clean the tablet (except touchscreen), use a soft cotton or microfiber cloth lightly dampened with a mild detergent. It is important that your unit remains dry. Do not get liquids on or inside the unit. In the event that liquid does get inside, have a qualified service technician inspect the unit before you power it on again. Do not wipe the screen with a cloth or sponge that could scratch the surface. When cleaning the touchscreen, use window or glass cleaner applied to a clean cloth. Never apply the cleaner directly on the touchscreen or Elo Tablet. Do not use alcohol (methyl, ethyl or isopropyl), thinner, benzene, or other abrasive cleaners. Tablet Battery Care and Handling Please follow these tips to ensure safe handling of the battery: When transporting / shipping Li-ion batteries, please refer and abide to local and international regulations that govern Lithium-ion battery shipments. Proper packaging, shipping documentations, and/or labeling may be required to ensure safe battery handling and transport. Short-circuiting may occur when an electrically conductive material (e.g. metal) electrically connects the two terminals of a battery. When handling the battery, be careful to not short circuit the battery. Do not puncture or crush battery. Use specified charger only. Do not immerse in water. Keep away from fire. Keep away from small children. Waste Electrical & Electronic Equipment This product should not be disposed of with household waste. It should be deposited at a facility that enables recovery and recycling. Ensure that product is disposed at the end of its useful life according to local laws and regulations. Elo has put in place recycling arrangements in certain parts of the world. For information on how you can access these arrangements, please visit http://www.elotouch.com/AboutElo/ewaste-program/. User Manual: Elo® Tablet SW602113 Rev B, Page 51 of 59 Battery Disposal The tablet battery is a rechargeable Lithium-ion battery. Discard battery at the end of its useful life according to local laws and regulations. User Manual: Elo® Tablet SW602113 Rev B, Page 52 of 59 Chapter 7: Regulatory Information I. Electrical Safety Information Compliance is required with respect to the voltage, frequency, and current requirements indicated on the manufacturer label. Connection to a different power source than those specified herein will likely result in improper operation, damage to the equipment or pose a fire hazard if the limitations are not followed. There are no operator serviceable parts inside this equipment. There are hazardous voltages generated by this equipment which constitute a safety hazard. Service should be provided only by a qualified service technician. Contact a qualified electrician or the manufacturer if there are questions about the installation prior to connecting the equipment to mains power. II. Emissions and Immunity Information Notice to Users in the United States: This device complies with part 15 of the FCC Rules. Operation is subject to the following two conditions: (1) This device may not cause harmful interference, and (2) this device must accept any interference received, including interference that may cause undesired operation. Note: This equipment has been tested and found to comply with the limits for a Class B digital device, pursuant to Part 15 of FCC Rules. These limits are designed to provide reasonable protection against harmful interference in a residential installation. This equipment generates, uses, and can radiate radio frequency energy and, if not installed and used in accordance with the instructions, may cause harmful interference to radio communications. However, there is no guarantee that interference will not occur in a particular installation. If this equipment does cause harmful interference to radio or television reception, which can be determined by turning the equipment off and on, the user is encouraged to try to correct the interference by one or more of the following measures: - Reorient or relocate the receiving antenna. - Increase the separation between the equipment and receiver. - Connect the equipment to an outlet on a circuit different from that to which the receiver is connected. - Consult the dealer or an experienced radio/TV technician for help. Caution: Any changes or modifications not expressly approved by the party responsible for User Manual: Elo® Tablet SW602113 Rev B, Page 53 of 59 compliance to this equipment would void the user’s authority to operate this device. Canada Compliance Statement: This Class B digital apparatus complies with Canadian ICES-003. Cet appareil numérique de la classe B est conforme à la norme NMB-003 du Canada. This device complies with Industry Canada license-exempt RSS standard(s). Operation is subject to the following two conditions: (1) this device may not cause interference, and (2) this device must accept any interference, including interference that may cause undesired operation of the device. Le présent appareil est conforme aux CNR d'Industrie Canada applicables aux appareils radio exempts de licence. L'exploitation est autorisée aux deux conditions suivantes : (1) l'appareil ne doit pas produire de brouillage, et (2) l'utilisateur de l'appareil doit accepter tout brouillage radioélectrique subi, même si le brouillage est susceptible d'en compromettre le fonctionnement. Notice to Users in Canada: This equipment complies with the Class B limits for radio noise emissions from digital apparatus as established by the Radio Interference Regulations of Industrial Canada. Notice to Users in the European Union: Use only the provided power cords and interconnecting cabling provided with the equipment. Substitution of provided cords and cabling may compromise electrical safety or CE Mark Certification for emissions or immunity as required by the following standards: This Information Technology Equipment (ITE) is required to have a CE Mark on the Manufacturers label which means that the equipment has been tested to the following Directives and Standards: This equipment has been tested to the requirements for the CE Mark as required by EMC Directive 2004/108/EC as indicated in European Standard EN 55022 Class B and the Low Voltage Directive 2006/95/EC as indicated in European Standard EN 60950. General Information to all Users: This equipment generates, uses, and can radiate radio frequency energy. If not installed and used according to this manual the equipment may cause interference with radio and television communications. There is, however, no guarantee that interference will not occur in any particular installation due to site-specific factors. 1. In order to meet emission and immunity requirements, the user must observe the following: a. Use only the provided I/O cables to connect this digital device with any computer. b. To ensure compliance, use only the provided manufacturers approved line cord. c. The user is cautioned that changes or modifications to the equipment not expressly User Manual: Elo® Tablet SW602113 Rev B, Page 54 of 59 approved by the party responsible for compliance could void the user’s authority to operate the equipment. 2. If this equipment appears to cause interference with radio or television reception, or any other device: a. Verify an emission source by turning the equipment off and on. If you determine that this equipment is causing the interference, try to correct the interference by using one or more of the following measures: I. Move the digital device away from the affected receiver. II. Reposition (turn) the digital device with respect to the affected receiver. III. Reorient the affected receiver’s antenna. IV. Plug the digital device into a different AC outlet so the digital device and the receiver are on different branch circuits. V. Disconnect and remove any I/O cables that the digital device does not use. (Unterminated I/O cables are a potential source of high RF emission levels.) VI. Plug the digital device into only a grounded outlet receptacle. Do not use AC adapter plugs. (Removing or cutting the line cord ground may increase RF emission levels and may also present a lethal shock hazard to the user.) If you need additional help, consult your dealer, manufacturer, or an experienced radio or television technician. III. Specific Absorption Rate US FCC & Canada IC: Your mobile device is a radio transmitter and receiver. It is designed not to exceed the limits for exposure to radio waves (radio frequency electromagnetic fields) adopted by the Federal Communications Commission (FCC) and Industry Canada (IC). These limits include a substantial safety margin designed to assure the safety of all persons, regardless of age and health. The radio wave exposure guidelines use a unit of measurement known as the Specific Absorption Rate, or SAR, to measure the amount of radio frequency energy absorbed by the human body. The United States and Canada have set the allowable SAR limits for mobile devices to 1.6 W/kg. Tests for SAR are conducted using standard operating positions with the device transmitting at its highest certified power level in all tested frequency bands. The highest measured SAR value under the FCC and IC testing guidelines for your device model is: BODY SAR (1g) Wi-Fi, Bluetooth: 1.205 W/kg User Manual: Elo® Tablet SW602113 Rev B, Page 55 of 59 During use, the actual SAR values for your device are usually well below this value. This is because, for purposes of system efficiency and to minimize interference on the network, the operating power of your mobile device is automatically decreased when full power is not needed for the wireless connection. The lower the power output of the device, the lower its SAR value. If you are interested in further reducing your RF exposure then you can easily do so by limiting your usage or simply using accessories to keep the device further away from the body. European Union: The SAR limit recommended by The Council of the European Union is 2.0W/kg. This device’s maximum SAR value is well below the EU limits with the following highest measured SAR value under the EU testing guidelines: Body SAR, 0 cm distance (10g) Wi-Fi, Bluetooth: 0.420 W/kg The tablet Wi-Fi and Bluetooth device complies with the Specific Absorption Rate (SAR) for general population/uncontrolled exposure limits (2.0W/Kg) as specified in EN 62311:2008 / EN 62209-2:2010 and EN 62479:2010, respectively. IV. EC R&TTE Directive This equipment conforms to all the essential requirements of Directive 1999/5/EC. The conformity assessment procedure referred to in Article 10 and detailed in Annex [IV] of Directive 1999/5/EC has been with the involvement of the following notified body: Timco Engineering, Inc. P.O. BOX 370 Newberry, Florida 32669 Identification mark: 1177 (Notified body number) The relevant technical documentation is held at: Elo Touch Solutions, Inc. 1033 McCarthy Boulevard Milpitas, CA 95035-7920 USA User Manual: Elo® Tablet SW602113 Rev B, Page 56 of 59 V. Agency Certifications The following certifications and marks have been issued or declared for the tablet and the docking station: - Europe Union CE - United States FCC - Canada IC - United States and Canada UL - Energy Star® The following certifications and marks have been issued or declared for tablet battery: - United States and Canada UL - European Union CE mark - UN Manual of tests and criteria, Part III, subsection 38.3 (Lithium ion battery transportation test) The tablet is designed to comply with IP-54 standards (limited protection against dust ingress (no harmful deposit) and protected against splash water from any direction) provided that the Smart Card Reader slot cover is installed properly onto the Smart Card Reader slot. User Manual: Elo® Tablet SW602113 Rev B, Page 57 of 59 Chapter 8: Warranty Information For warranty information, go to http://www.elotouch.com/Support/warranty.asp User Manual: Elo® Tablet SW602113 Rev B, Page 58 of 59 Check out Our Website www.elotouch.com Get the latest... Product Information Specifications Upcoming events Press releases Software drivers Getting in Touch with us To find out more about the extensive range of Elo touch solutions, visit our website at www.elotouch.com, or simply call the office nearest you: North America Elo Touch Solutions 1033 McCarthy Blvd Milpitas, CA 95035 Tel 800-ELO-TOUCH Tel 1-408-597-8000 Fax 1-408-597-8050 [email protected] Europe Tel +32 (0) 16 70 45 00 Fax +32 (0) 16 70 45 49 [email protected] Asia-Pacific Tel +86 (21) 3329 1385 Fax +86 (21) 3329 1400 www.elotouch.com.cn Latin America Tel 786-923-0251 Fax 305-931-0124 www.elotouch.com Disclaimer The information in this document is subject to change without notice. Elo Touch Solutions, Inc. and its affiliates (collectively "Elo") makes no representations or warranties with respect to the contents herein, and specifically disclaims any implied warranties of merchantability or fitness for a particular purpose. Elo reserves the right to revise this publication and to make changes from time to time in the content hereof without obligation of Elo to notify any person of such revisions or changes. No part of this publication may be reproduced, transmitted, transcribed, stored in a retrieval system, or translated into any language or computer language, in any form or by any means, including, but not limited to, electronic, magnetic, optical, chemical, manual, or otherwise without prior written permission of Elo Touch Solutions, Inc. Elo, the Elo logo, Elo Touch, Elo Touch Solutions, Elo TouchSystems, AccuTouch, CarrollTouch, IntelliTouch and iTouch are trademarks of Elo Touch Solutions, Inc. and its affiliates. All other product and company names used herein may be trademarks of their registered owners. First Edition (May 2013) Copyright 2013 Elo Touch Solutions, Inc. All rights reserved. User Manual: Elo® Tablet SW602113 Rev B, Page 59 of 59