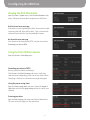
1
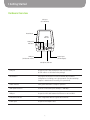
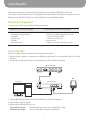
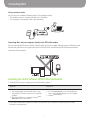
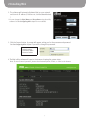
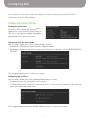
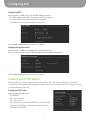
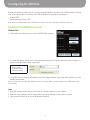
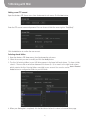
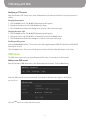
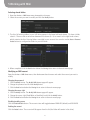
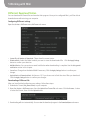
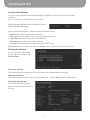
Experience Over IP
Mini
Network Storage Adapter
User Manual
For support, click here to visit the IPEVO website
Table of Contents
1 Getting Started ................................................................................3
Key elements of your Mini.........................................................................................................................3
Hardware............................................................................................................................................ 3
Software............................................................................................................................................. 3
Server support.................................................................................................................................... 3
Hardware Overview....................................................................................................................................4
2 Installing Mini ........................................................................................5
Preparing the Equipment ..........................................................................................................................5
Connecting Mini..................................................................................................................................5
Using a wireless router ...................................................................................................................... 6
Connecting Mini and your computer directly to the DSL/cable modem ............................................... 6
Installing the Utility Software (IPEVO Mini Dashboard) ..............................................................................6
3 Configuring Mini .....................................................................................8
Configuring System Settings......................................................................................................................8
Viewing the system status.................................................................................................................. 8
Configuring Host and Group name..................................................................................................... 8
Configuring Date and Time ................................................................................................................ 8
Configuring SNTP................................................................................................................................ 9
Changing the login password............................................................................................................ 9
Configuring the TCP/IP Settings................................................................................................9
Viewing the TCP/IP status .................................................................................................................. 9
Configuring the TCP/IP settings ........................................................................................................ 10
4 Configuring USB Drive............................................................................11
Exploring Your USB Drive Content........................................................................................... 11
Windows ........................................................................................................................................... 11
Mac/Linux.......................................................................................................................................... 11
Viewing the Disk Information .................................................................................................................. 12
Using the Disk Utilities Features.........................................................................................................12
Formatting your drive to FAT32 ......................................................................................................... 12
Using the power saving timer ........................................................................................................... 12
Scanning your drive ......................................................................................................................... 12
1
Table of Contents
5 Working with Mini.................................................................................13
FTP Server................................................................................................................................................13
Configuring FTP server settings ........................................................................................................ 13
Adding a new FTP account................................................................................................................ 14
Selecting shared folders ................................................................................................................... 14
Modifying an FTP account ................................................................................................................ 15
SMB Server .............................................................................................................................................15
Adding a new SMB account .............................................................................................................. 15
Selecting shared folders ................................................................................................................... 16
Modifying an SMB account................................................................................................................ 16
BitTorrent Download Station.....................................................................................................................17
Configuring BitTorrent settings ......................................................................................................... 17
Downloading BitTorrent file............................................................................................................... 17
Using the email notification.............................................................................................................. 18
Managing the download................................................................................................................... 18
Media Server ..............................................................................................................................19
Configuring media server settings .................................................................................................... 19
Sharing media server with your PS3, XBOX 360, and iTunes ............................................................. 19
6 Useful Tips ......................................................................................20
Resetting/Reloading Configurations ........................................................................................................20
Restarting Mini ................................................................................................................................ 20
Reloading default firmware settings ................................................................................................ 20
Reloading default hardware settings ................................................................................................ 20
Retrieving the Default Password..............................................................................................................20
Upgrading the Firmware..........................................................................................................................20
Using Static IP Address ...........................................................................................................................21
7 Appendix ..........................................................................................22
Technical Specifications...........................................................................................................................22
Troubleshooting and FAQ ........................................................................................................................23
Version History........................................................................................................................................23
Safety Information...................................................................................................................................23
Acknowledgements .................................................................................................................................23
2
1 Getting Started
Mini Network Storage Adapter is a versatile file sharing device that allows you to add a USB drive to your
local network for sharing online storage, downloading BitTorrent files, or streaming multimedia content to
iTunes and game consoles.
Key Benefits of your Mini:
Hardware
• 10/100Mbps Ethernet
• High speed USB 2.0
• Dimensions: Small (2.9 x 2.5 x 1.2”), and lightweight (2 oz) without cables
Software
• Highly secure, password-protected utility software interface via web browser
• Compatible with Windows, Mac and Linux
Server support
• FTP server: up to 8 concurrent clients
• Samba server: up to 8 concurrent clients
• Media server: for XBOX 360, PS3, or iTunes
3
1 Getting Started
Hardware Overview
USB port
(To USB drive)
Reset button
Status
indicator
LAN speed
indicators
Power input
(To AC adapter)
LAN port
(To Ethernet router)
USB (drive) indicator
USB port
Accepts the USB cable between the USB drive and Mini.
(A USB cable is not included in the package)
Reset button
Pressing the Reset button reloads the default Mini hardware
configurations, including your Login password. (See the Useful Tips
chapter for details about recovering a lost password).
Status indicator
Turns green when Mini is ready for operation.
LAN speed indicators
Show the current LAN speed, 10 Mbps or 100 Mbps .
LAN port
Accepts the LAN cable between the Ethernet router and Mini.
USB (drive) indicator
Turns orange when Mini recognizes the USB drive.
Power input
Accepts the AC adapter cable.
4
2 Installing Mini
Follow these instructions to connect Mini and install the utility software (IPEVO Mini Dashboard).
This section assumes that Mini uses an IP assigned by the router (dynamic IP) and your computer shares an
Ethernet router with Mini. If Mini uses a static (public) IP, see the Useful Tips chapter.
Preparing the Equipment
To set up and use Mini, you need the following components:
Included in your Mini product package
Not included in your Mini product package
•
•
•
•
•
• USB drive and cable with USB 2.0 connection
- Must be formatted in FAT32 *
- USB hub cannot be used
• Ethernet router
• Computer connected to the Ethernet router
Mini Network Storage Adapter
AC adapter
Ethernet cable
CD-ROM
Quick Start Guide
* See the Configuring USB Drive chapter for reformatting your drive to FAT32.
Connecting Mini
Before you begin, disconnect the power (the AC adapter) from Mini.
1.Make sure your computer is connected to an Ethernet router (which is also connected to the DSL or cable
modem).
2. Connect Mini to the Ethernet router. The connections should look like this diagram:
DSL/cable modem
Mini
Computer
Ethernet router
3. Connect Mini directly to your USB drive. Do NOT insert a USB hub in between.
4. Connect Mini to the AC adapter.
5. Make sure the LED indicators turn on.
Status indicator (green)
Flashes three times, then stays on when Mini is ready.
USB indicator (orange)
Turns on when Mini recognizes the USB drive.
5
2 Installing Mini
Using a wireless router
You can also use a wireless Ethernet router. In the diagram below:
• The wireless router is connected to Mini via a LAN cable.
• The computer is connected to the router wirelessly.
Connecting Mini and your computer directly to the DSL/cable modem
You can connect Mini directly to the DSL/cable modem only if your modem officially supports Ethernet router
functionality. (Mini does not support the Point-to-Point Protocol over Ethernet (PPPoE) required for direct
connection to the modem.)
Installing the Utility Software (IPEVO Mini Dashboard)
1. Insert the CD into your computer and run the setup program. *
Windows
Mac/Linux
1.The setup program runs automatically (or open
autorun.exe ). Follow the instructions to install the
software.
2.After the installation is completed, activate Find
IPEVO Mini from the Start menu.
1.Go to the Apple_MacOS_X or the Unix_and_Linux
folder and copy Sdisk-enUS.jar to your computer.
2. Activate Sdisk-enUS.jar.
* If you cannot activate the software, you need to install Java on your computer. See http://java.com for more
information and downloads.
6
2 Installing Mini
2. The software will automatically detect Mini on your network
and show its IP address (if it does not, click the Search button).
*
* You can change the (Host) Name and Group Name using the utility
software. See the Configuring Mini chapter for more details.
3. Click the Connect button. A prompt will appear, asking you for the username and password.
See the Configuring Mini chapter if you wish to change the password.
Default settings
Username: admin
Password: admin
4. The Mini utility software will open in the browser, showing the system status.
Note: To ensure smooth operation, please select Internet Explorer, Firefox, or Safari as the browser.
7
3 Configuring Mini
You can view the current status of Mini and configure its settings including your password and TCP/IP
configurations using the utility software.
Configuring System Settings
Viewing the system status
Activate the utility software and go to the Status >
System menu to see the current system settings of
Mini. You can change the Host Name , Group Name ,
Date and Time in the configuration menu.
Configuring Host and Group name
Open the Setup > System menu, then the System Settings sub-menu.
• Host name is the default host name displayed in System Information .
• G roup name is the name of the default workgroup that Mini joins (for Windows, it is usually WORKGROUP or
MSHOME).
Click the Apply Settings button to confirm your changes.
Configuring Date and Time
Open the Setup > System menu, then the Date and Time Settings sub-menu.
• The Date setting sets the current year, month, and date.
• The Time setting sets the current hour, minute, and second. You can import your computer’s time setting by
pressing the Synchronize from PC button.
Click the Apply Settings button below the SNTP Settings sub-menu to confirm your changes.
8
3 Configuring Mini
Configuring SNTP
Open the Setup > System menu, then the SNTP Settings sub-menu.
• The SNTP setting enables SNTP (choose auto mode) or disables it.
• The Time Server setting allows choosing the time server.
• The Time Zone setting enables Daylight Savings Time.
Click the Apply Settings button to confirm your changes.
Changing the login password
Open the Setup > System menu, Administrator’s Password sub-menu.
Type in a new password to both the New Password and Re-type New Password fields.
Click the Apply Settings button to confirm your changes.
Configuring the TCP/IP Settings
By default, Mini uses the IP assigned by the router (dynamic IP). In the utility software, you can view the
current TCP/IP setting (which might change from time to time if you’re using dynamic IP) or change IP settings
to a permanent value (static IP).
Viewing the TCP/IP status
Open the Status > TCP/IP menu.
• DHCP/BOOTP:
ON = uses dynamic IP
OFF = uses static IP
• If you choose static IP (DHCP/BOOTP OFF), you can manually
configure the IP Address, Subnet Mask, Gateway, Primary
DNS and Secondary DNS.
9
3 Configuring Mini
Configuring the TCP/IP settings
Open the Setup > TCP/IP menu.
• If you choose dynamic IP for Mini, select Obtain TCP/IP...
• If you choose static IP for Mini, select Use the following...
Click the Save & Restart button to confirm your changes and
reboot Mini.
10
4 Configuring the USB Drive
Browse your USB drive, make sure it is correctly recognized by Mini, and use the disk utility features to format,
scan, or set sleep mode for your drive. Your USB drive needs to meet these requirements:
• Format: FAT32
• Maximum single file size: 4GB
Note: We do not recommend using a USB flash drive. Please use a hard drive with a USB 2.0 connection.
Exploring Your USB Drive Content
Windows/Mac
1. Click the Browse contents button in the Find IPEVO Mini interface.
2. A prompt will appear, asking you for the username and password. Enter the username Guest to login as a
guest account (no need to enter a password).
Guest account
Username: Guest
Password: (none)
3. The Public folder in the drive will appear in the file manager window. Copy, paste and store files as in your
desktop environment.
(Note: you can enter your drive with different accounts. For more details, see the descriptions on SMB Server in this
user manual.)
Linux
1. Open file manager and locate your USB drive as a shared computer on your network.
2. Enter the same username and password (admin for both by default) to view the drive content.
3. Copy, paste and store files as in your desktop environment.
11
4 Configuring the USB Drive
Viewing the Disk Information
Open the Status > System menu, then the Disk Information submenu. It displays how the Mini recognizes your USB drive.
Disk Not found! error message
If the drive is not recognized by the Mini, disconnect the cable
connecting the USB drive and the Mini. Then, reconnect the
cable and restart the Mini. See the Useful Tips chapter.
Not formatted error message
Your drive must be formatted in FAT32. See the next section,
Formatting your drive to FAT32 .
Using the Disk Utilities Features
Open the Services > Disk Utility menu.
Formatting your drive to FAT32
Back up your drive before formatting it.
Click Format in the Disk Formatting sub-menu. It will take
several minutes (depending on the size of your drive). When
formatting is finished, a confirmation message will appear.
Using the power saving timer
Open the Power-saving mode sub-menu. Select the Length of
Sleep timer and click the Apply Settings button to confirm your
selection.
Scanning your drive
Open the Disk Scanning sub-menu and click the Start button.
The scan results will appear in the area below.
12
5 Working with Mini
This section covers how to configure the Mini for the following applications:
• FTP Server
• SMB Server
• BitTorrent Download Station
• Media Server
You will learn how to create accounts, modify them, download or upload files, and share USB drive content
with your PS3, XBOX 360, or iTunes.
FTP Server
An FTP server service lets you upload/download files from a local network or the Internet.
Configuring FTP server settings
Open the Services > FTP Server menu.
• F TP Service : Select Enable (if it is disabled)
and click the Apply Settings button.
• F TP Port Number : Set the FTP port and click
the Apply Settings button.
• F TP Codepage : Select the character encoding
language from the list and click the Apply
Settings button. *
* Some European languages do not have their own language codes. To locate a language, click the Language Map
button. The language code map will appear in your browser. The table below lists the full language mappings.
Language
Encoding
Language
Encoding
Albanian
Arabic
Belorussian
Bulgarian
Chinese (Simplified)
Chinese (Traditional)
Croat
Czech
Danish
Dutch
English
Estonian
Faroese
Finnish
French
German
Greek
Hebrew
Hungarian
Icelandic
Irish
Italian
cp1252 (Latin I)
cp1256
cp1251 (Cyrillic)
cp1251 (Cyrillic)
cp936
cp950
cp1250 (Central Europe)
cp1250 (Central Europe)
cp1252 (Latin I)
cp1252 (Latin I)
Japanese
Korean
Latvian
Lithuanian
Macedonian
Moldavian
Norwegian
Polish
Portuguese
Romanian
Russian
Serbian
Slovak
Slovene
Sorbian
Spanish
Swedish
Turkish
Thai
Ukrainian
Vietnamese
cp932
cp949
cp1257 (Baltic)
cp1257 (Baltic)
cp1251 (Cyrillic)
cp1251 (Cyrillic)
cp1252 (Latin I)
cp1250 (Central Europe)
cp1252 (Latin I)
cp1250 (Central Europe)
cp1251 (Cyrillic)
cp1251 (Cyrillic)
cp1250 (Central Europe)
cp1250 (Central Europe)
cp1250 (Central Europe)
cp1252 (Latin I)
cp1252 (Latin I)
cp1254
cp874
cp1251 (Cyrillic)
cp1258
cp1257 (Baltic)
cp1252 (Latin I)
cp1252 (Latin I)
cp1252 (Latin I)
cp1252 (Latin I)
cp1253
cp1255
cp1250 (Central Europe)
cp1252 (Latin I)
cp1252 (Latin I)
cp1252 (Latin I)
13
5 Working with Mini
Adding a new FTP account
Open the Services > FTP Server menu, then the Account List sub-menu. Click the New button.
Enter the FTP account name and password. You can choose to limit the access right to “Read Only”.
Click the Add button to confirm the new account.
Selecting shared folders
1. Open the Services > FTP Server menu, then the Account List sub-menu.
2. Select the account you want to modify and click the Modify button.
3. The list of all existing folders in your USB drive appears in the lower left-hand column. To share a folder,
select it. Then use the arrow buttons between the columns (&/)) to move it to the right-hand column,
which contains the list of sharing folders accessible in your account. You can also use the Create / Rename /
Delete buttons to configure the folders in your USB drive.
4. When your Sharing List is completed, click the Back button below it to return to the main menu page.
14
5 Working with Mini
Modifying an FTP account
Open the Services > FTP Server menu, then the Account List sub-menu and select the account you want to
modify.
Changing the password
1. Click the Modify button. The Modify FTP Account page will appear.
2. Change the password and click the Modify button again.
3. Click the Back button below the Sharing List to go back to the main menu page.
Changing the access right
1. Click the Modify button. The Modify FTP Account page will appear.
2. Change the access right (Read/Write or Read Only) and click the Modify button.
3. Click the Back button below the Sharing List to return to the main menu page.
Disabling/enabling access
Click the Enable/Disable button. The account status will toggle between ENABLED (default) and DISABLED.
Deleting the account
Click the Delete button. The account will disappear from the list (the folder will remain in the drive).
SMB Server
The SMB server service lets you upload/download files from a local network or the Internet.
Adding a new SMB account
Open the Services > SMB Server menu, then the Account List sub-menu. Click the New button.
Enter the SMB account name and password. If you want to limit the access right to “Read Only”,
you can do so.
Click the Add button to confirm the new account.
15
5 Working with Mini
Selecting shared folders
1. Open the Services > SMB Server menu, Account List sub-menu.
2. Select the account you want to modify and click the Modify button.
3. T he list of all existing folders in your USB drive appears in the lower left-hand column. To share a folder,
select it. Then use the arrow buttons between the columns (&/)) to move it to the right-hand column,
which contains the list of sharing folders accessible in your account. You can also use the Create / Rename /
Delete buttons to configure the folders in your USB drive.
4. When completed, click the Back button below the Sharing List to return to the main menu page.
Modifying an SMB account
Open the Services > SMB Server menu, then the Account List sub-menu and select the account you want to
modify.
Changing the password
1. Click the Modify button. The Modify SMB Account page will appear.
2. Change the password and click the Modify button.
3. Click the Back button below the Sharing List to return to the main menu page.
Changing the access right
4. Click the Modify button. The Modify SMB Account page will appear.
5. Change the access right (Read/Write or Read Only) and click the Modify button.
6. Click the Back button below the Sharing List to return to the main menu page.
Disabling/enabling access
Click the Enable/Disable button. The account status will toggle between ENABLED (default) and DISABLED.
Deleting the account
Click the Delete button. The account will disappear from the list (the folder will remain in the drive).
16
5 Working with Mini
BitTorrent Download Station
You can download BitTorrent files and monitor their progress. Once you’ve configured Mini, you’ll be able to
download even without using your computer.
Configuring BitTorrent settings
Open the Services > BitTorrent menu, BitTorrent sub-menu.
• System ID and Number of Downloads : These show the current status.
• D ownload Path : Select the folder in which you want to store the downloaded file. Click the Apply Settings
button to confirm your selection.
• M
ail Notification : You can receive an email notification when downloading is complete. See the Using email
notification section in this chapter.
• S erver Port : Change from the default 6881 if necessary. Click the Apply Settings button to confirm your
change.
• U pload Limit and Download Limit : Set these as “0” if you choose not to limit the size of files you download.
Click the Apply Settings button to confirm your changes.
Downloading a BitTorrent file
After you have finished configuring your settings, follow these steps:
1. Download a Torrent (file_name.torrent ) to your computer.
2.Open the Services > BitTorrent menu, then the Upload Your Torrent File sub-menu. Click the Browse... button
to select the Torrent, then click the Upload button.
3.Downloading will start automatically. You can view the download progress in the Download Queue sub-menu.
17
5 Working with Mini
Using the email notification
If you wish to be notified by email when downloading completes, you can set up an automatic email
notification.
Note: You must have an SMTP email server as the sender.
Open the Services > BitTorrent menu, BitTorrent sub-menu
and click the Mail Setup button.
A pop-up window will appear. Configure the mail notification settings.
• Enable/Disable : Check to enable email notification.
• SMTP Server : Enter the address of the server for sending notifications.
• Sender/Recipient : Enter the respective email addresses.
• Mail Authentication : Check to use an SSL certificate.
• User Name : Enter the username and password for the SMTP server.
Click the Save button to confirm your entry, and the Back button to return to the main menu screen.
Managing the download
You can control the downloading
process and view its status in the
Download Queue .
Pausing and restarting
Click the Pause button to temporarily halt downloading; click the Restart button to resume it.
Aborting the download
Select the download you wish to abort. Click the Stop button; ; click the Remove button to delete the file.
Viewing the download status
Click the Show button to view the
details of the download as shown to
the right.
18
5 Working with Mini
Media Server
You can use your PlayStation 3, XBOX360 and iTunes to access the sharing folder on the network. The files are
organized in photo, music, and video categories.
Configuring the media server settings
Open the Services > Media Server menu.
1. Select a Sharing List from the Photo , Music , or Video folders.
2. Select the folder you want to share.
Note: To use Mini with iTunes, you need to select the PUBLIC folder.
3.Click the Set Folder button to confirm your selection. The folder name will appear under the directory name.
4. To undo the folder selection, click the Disable Folder button.
Sharing the media server with your PS3, XBOX 360, and iTunes
1.Make sure your PS3/XBOX/iTunes (or your computer) is
connected to the Internet through the same router as Mini.
(For PS3, you need to enable the media server from its Settings
> Network Settings menu.)
2.Locate Mini and enjoy playing your multimedia files.
PS3
Click the Photo , Music , or Video icon in the Settings menu and
select Mini. If you do not see the Mini, click the Search for
Media Servers icon.
XBOX 360
Go to Photo , Music , or Video in the Dashboard and select the
Mini.
iTunes
Mini appears in the SHARED list in the sidebar.
Note: information regarding PS3/XBOX/iTunes is subject to change without notice.
19
6 Useful Tips
Resetting/Reloading Configurations
If you encounter problems such as a sudden disconnect from the router or an unrecognized drive, here are
several things you can try. (For the most up-to-date product information and FAQs, please visit www.ipevo.
com.)
Restart the Mini
Open the Restart menu and click the Restart button. Mini and IPEVO Mini Dashboard will reboot after 60
seconds. All your configurations will remain intact.
Reload default firmware settings
Open the Firmware > Default menu and click the Reset Defaults button. Mini will reload the default
configurations and automatically reboot after 60 seconds.
Reload default hardware settings
1. Disconnect the USB drive, router, and AC power adapter from Mini.
2.Press and hold down the Reset button at the side of Mini using a small pin (you may use an unfolded
paper clip).
3. While the Reset button is pressed, connect the AC power adapter to Mini.
4. Wait for several seconds, or until the Status indicator (green LED) stops flashing.
5. Release the pin from the Reset button. Mini has reloaded the default hardware configurations.
Retrieving the Default Password
If you have forgotten the password, reload the default password by following these steps.
Retrieving the default login
password admin
Reset the hardware. See Reloading default hardware
settings in the previous section.
Retrieving the default FTP / SMB
password
Reset the firmware. See Reloading default firmware
settings in the previous section.
Upgrading the Firmware
Upgrading the firmware will reset all configurations. Make sure you note them down before proceeding with
the upgrade.
1. Check the Support page at www.ipevo.com and download new firmware if it is available.
2.Go to the Firmware > Upgrade menu in the utility software. Select the new firmware file and click the
Upgrade button. The firmware upgrade will start automatically, and will finish in several minutes.
20
6 Useful Tips
Using a Static IP Address
Follow these instructions to assign a static (public) IP address to Mini.
Note: Mini does not support the Point-to-Point Protocol over Ethernet (PPPoE) necessary for direct connection to your
DSL/cable modem. You can connect Mini directly to the modem only if the modem officially supports Ethernet router
functionality.
1.Connect the Mini directly to your computer via a LAN cable (without
inserting the Ethernet router in between).
2. Configure your computer’s TCP/IP settings as follows.
- Static (public) IP
- IP address: 169.254.0.2
- Subnet Mask: 255.255.0.0
3. Open the web browser and enter this address:
http://169.254.0.10
Enter the username and to open the utility software (IPEVO Mini Dashboard).
Default settings
Username: admin
Password: admin
4.Open the Setup > TCP/IP menu and select the Use the following TCP/IP settings option.
5.Enter the TCP/IP settings and click the Save & Restart button. Mini will apply the changes, then reboot.
6.Disconnect your computer from Mini and set your computer’s TCP/IP settings back to the original.
7. Connect Mini to the Internet.
21
7 Appendix
Technical Specifications
Hardware
Software
CPU
X86-based SoC
Operation System
Windows 2000 or above (32-bit
version only), Mac OS X 10.5 or
above, Linux
Memory
16Mbytes SDRAM + 1Mbytes Flash
Network Protocol
Samba, FTP (UTF8), BitTorrent,
UPnP AV
Ethernet
10/100Base-TX auto-detection
IP
Configuration
DHCP Client, Static IP
USB
1.1/2.0 High speed
Software (IPEVO Mini
Dashboard)
Web interface
LED Indicator
Status, Network speed x 2, USB
User Login
Maximum 8 for FTP or Samba
server (Total 64 TCP connections at
the same time)
Dimensions
(L x W x H)
2.6 x 1.8 x 1”
(66 x 46 x 24 mm)
File System
FAT32
Weight
2 oz (58g) (without cables)
HDD Capacity
Up to 1.5TB
Power
5V DC / 2A, 100-240V adapter
FTP Server
Maximum 16 user accounts
Maximum 8 login users
Maximum 16 folders shared by one
account
Temperature
Operating: 0 – 50 °C
Storage: -5 – -65 °C
Samba Server
Shared level access, Maximum 16
folders shared by root
Humidity
Operating: 0 – 70 %
Storage: 0 – 80 %
BitTorrent Station
Support Tracker & DHT
Download Throughput : 8Mbps
Maximum 4 concurrent torrent
downloads
Maximum 32 torrent queuings
Certification
CE, FCC Class B, VCCI-B
Media server
XBOX 360, PS3, iTunes
Throughput
Read: ± 9Mbytes
Write: ± 10Mbytes
22
7 Appendix
Troubleshooting and FAQ
Please visit the product support page on www.ipevo.com for the most recent FAQs and up-to-date product
information.
Version History
Version
Date
Details
V1.0.MM.E
Dec 25th, 2009
• First official release version
All content and specifications are subject to change without notice.
Safety Information
For your safety and the best performance of your Mini:
• Keep Mini from touching heat sources such as radiators and stoves.
• Do not immerse Mini in liquids, and protect it from moisture.
• Supervise children using Mini.
This equipment has been tested and found to comply with the limits for a Class B digital device, pursuant to
Part 15 of the FCC Rules.
Acknowledgements
• “ Windows”, “XBOX 360”, and “Internet Explorer” are registered trademarks of Microsoft Corporation,
registered in the US and other countries.
• “Macintosh”, “Mac”, “iTunes”, and “Safari” are registered trademarks of Apple Computer, Inc., registered
in the US and other countries.
• “Linux” is a registered trademark of Linus Torvalds, registered in the US and other countries.
• “BitTorrent” is a registered trademark of BitTorrent, Inc., registered in the US and other countries.
• “PlayStation 3” and “PS3” are registered trademarks of Sony, Inc., registered in the US and other countries.
• “Firefox” is a registered trademark of Mozilla Foundation, registered in the US and other countries.
© 2009 IPEVO Inc. All rights reserved. IPEVO, Mini, the IPEVO logo, and other IPEVO marks are owned by IPEVO Inc. and may be registered. All other trademarks are
the property of their respective owners.
All screen images are either simulated or properties of IPEVO Inc.
Customer Service (USA)
Email: [email protected] Live Online Help
at www.ipevo.com
9am - 5pm PST, Monday - Friday
GO! http://www.ipevo.com