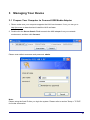
1
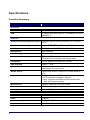
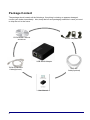
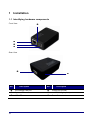
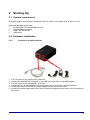
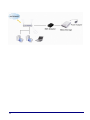
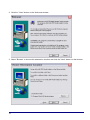
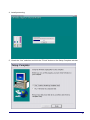
USB 2.0 Port
USB Media Adapter
User Manual
Table of Contents
Introduction ................................................................................... 4
Product Feature............................................................................. 5
Specifications ................................................................................ 6
Package Content ........................................................................... 8
1
Installation ............................................................................. 10
1.1
1.2
2
Starting Up ............................................................................ 13
2.1
2.2
2.3
3
Identifying hardware components ..................................................................................10
LED indicators .................................................................................................................11
System requirement ........................................................................................................13
Hardware installation ......................................................................................................13
Utility Installation .............................................................................................................15
Managing Your Device ......................................................... 19
3.1
3.2
3.3
3.4
3.5
3.6
3.7
3.8
3.9
3.10
3.11
Prepare Your Computer to Connect USB Media Adapter ...........................................19
Status of USB Media Adapter ........................................................................................20
Setup Your USB Media Adapter ....................................................................................21
Setting FTP Server..........................................................................................................27
Setup SMB Server ..........................................................................................................29
BitTorrent .........................................................................................................................32
Media Server ...................................................................................................................37
Disk Utility ........................................................................................................................38
Misc: Factory Default and Firmware Upgrade ..............................................................39
Restart ..............................................................................................................................41
Linux and Mac system ....................................................................................................42
4
Internet Connection ............................................................. 44
5
Troubleshooting ................................................................... 46
1
Copyright
This publication, including all photographs, illustrations and software, is protected under
international copyright laws, with all rights reserved. Neither this manual, nor any of the material
contained herein, may be reproduced without written consent of the author.
Disclaimer
The information in this document is subject to change without notice. The manufacturer makes
no representations or warranties with respect to the contents hereof and specifically disclaims
any implied warranties of merchantability or fitness for any particular purpose. The
manufacturer reserves the right to revise this publication and to make changes from time to time
in the content hereof without obligation of the manufacturer to notify any person of such revision
or changes.
Trademark recognition
All product names used in this manual are the properties of their respective owners and are
acknowledged.
Federal Communications Commission (FCC)
This equipment has been tested and found to comply with the limits for a Class A digital device,
pursuant to Part 15 of the FCC Rules. These limits are designed to provide reasonable
protection against harmful interference in a residential installation. This equipment generates,
uses, and can radiate radio frequency energy and, if not installed and used in accordance with
the instructions, may cause harmful interference to radio communications. However, there is no
guarantee that interference will not occur in a particular installation. If this equipment does
cause harmful interference to radio or television reception, which can be determined by turning
the equipment off and on, the user is encouraged to try to correct the interference by one or
more of the following measures:
Reorient or relocate the receiving antenna.
Increase the separation between the equipment and the receiver.
Connect the equipment onto an outlet on a circuit different from that to which the receiver is
connected.
Consult the dealer or an experienced radio/TV technician for help.
Shielded interconnect cables and a shielded AC power cable must be employed with this
equipment to ensure compliance with the pertinent RF emission limits governing this device.
Changes or modifications not expressly approved by the system’
s manufacturer could void the
user’
s authority to operate the equipment.
CE MARK
This device complies with the requirements of the EEC directive
89/336/EEC with regard to “Electromagnetic compatibility”and
73/23/EEC “Low Voltage Directive”.
2
About this manual
This manual is intended for system administrators who are familiar with setting up a new system
and installing an operating system.
Safety information
Before installing and using the USB Media Adapter, take note of the following precautions:
·
Read all instructions carefully.
·
Do not place the unit on an unstable surface, cart, or stand.
·
Do not block the slots and opening on the unit, which are provided for ventilation.
·
Do not push objects in the ventilation slots as they may touch high voltage components
and result in shock and damage to the components.
·
Only use the power source indicated on the marking label. If you are not sure, contact
your dealer or the Power Company.
·
Do not place anything on the power cord. Place the power cord where it will not be in
the way of foot traffic.
·
Follow all warnings and cautions in this manual and on the unit case.
·
When replacing parts, ensure that your service technician uses parts specified by the
manufacturer.
·
Avoid using the system near water, in direct sunlight, or near a heating device.
The USB ports can be damaged if care is not taken when connecting
devices. Ensure USB devices are correctly inserted.
Plugging a phone line into the LAN port (RJ-45 connector) can damage
the connector. Take care only plug an RJ-45 connector into the LAN
port.
3
Introduction
Thank you for purchasing the USB Media Adapter. This product is specifically designed for
Small Office and Home Office needs, providing a reliable and centralized data storage solution.
With it you will be able to access your shared files from any desktop or laptop within your
network.
The USB Media Adapter is a convenient and economical solution for adding any USB storage
devices onto your LAN (Local Area Network). Once on the network, the USB storage can be
shared by any network user, just like an ordinary NAS device.
Come built-in with a USB 2.0 connection and a fast Ethernet 10/100Mbps connection, the USB
Media Adapter supports both SMB (Server Message Block) and the open source Samba
network protocols, allowing for cross-platform access of all shared data for most versions of
Windows 2000/XP/2003/Vista, Mac OS X or above, and various Linux distributions. For remote
users who are not connected over the LAN, the NAS Adapter provides FTP access for up to 8
simultaneous users anywhere in the world with an internet connection. In addition, the NAS
adapter can also be used as a print server or as a BitTorrent downloading appliance.
4
Product Feature
· Convert any USB 2.0 mass storage device into a Network Attached
Storage device
· Great for creating a custom Network Attached Storage appliance.
· Support Fast Ethernet 10/100Mbps.
· Simple to install.
· Small and light weight. Can be installed practically anywhere.
· Can be set as DHCP server or client.
· Support Samba server for up to 8 concurrent clients.
· Support FTP server for up to 8 concurrent users.
· Can be set as a print server to attach any USB printer to the network
· Built-in BitTorrent client for direct download to the attached USB storage
device
· Can be set as a UPnP AV server to share photo/music/film files stored on
the file server with XBOX 360 video game consoles, PS3 and iTunes
connected to the LAN
· User management to allow read only or read/write access to folders
· Administrative management access via web browser with password
security.
· Compatible with all Windows OS, Mac OS, and Linux.
5
Specifications
Function Summary
Item
Descriptions
Interfaces
USB
1-USB2.0 high speed compliant port
LAN
Complies with IEEE 802.3/3u, 10/100Base-TX, Auto
MDI/MDI-X
Software
Network Operating System Support
Windows 2000/XP/2003/Vista,Mac OS X or above,
Linux
Network Protocol Support
Samba /FTP (UTF8) / BitTorrent/UPnP AV
IP Configure
DHCP Server or DHCP Client /Static IP
Management
Web interface
Software Upgradeable
Web interface
Maximum User Login
FTP 8 User/Samba 8 User
(Total 64 TCP connection at the same time)
File System
FAT32 (Maximum single size: 127GB)
HDD Capacity
20GB ~ 1.5TB
FTP Server
Maximum create 16 user account, maximum16
folder share by one account
Samba Server
Share Level Access, maximum 16 folder share by
root
BitTorrent Station
‧Support Tracker & DHT
‧BT Download Throughput : 8M bps
‧Max. 4 torrents download at the same time and
Max. 32 Torrents queuing
Media Server
Support XBOX360, PS3 and iTunes
Print Server
LPR protocols (Optional)
Throughput
Read ± 9M Bytes ,±Write 10M Bytes
Hardware
6
CPU
x86-based SoC
Flash
1Mbytes
System Memory
16Mbytes SDRAM
LAN
10/100Base-TX Auto MDI/MDI-X
‧
‧
‧
Item
Descriptions
USB Port
1-USB2.0 high-speed port
Reset Button
Yes (Reset / Load Factory Defaults )
Power Adapter
5V/2A, switching
Dimension
73.5(Length) x 63(Width) x 30(Height) mm
Weight
58g (device only)
Temperature
Operating:0 ~ 50‧; Storage:-5 ~ 65‧
Humidity
Operating:0 ~ 70%; Storage:0 ~ 80%
This product does not support use of USB hubs for daisy-chained connection,
USB-to-Parallel connectors, or USB cable extenders.
All contents and specifications are subject to change without notice.
Other brands and product names are trademarks or registered trademarks of their
respective owners.
7
Package Content
The package should contain all the followings. If anything is missing or appears damaged,
contact your dealer immediately. Also, keep the box and packaging materials in case you need
to ship the unit in the future.
CD-ROM with manual
and driver
Power Adapter
USB Media Adapter
75CM RJ-45 LAN
Cable(Optional)
USB 2.0
Cable(Optional)
User Manual
8
Chapter 1
Installation
1.1
Identifying hardware components
1.2
I/O ports’locations
1.3
LED Indicators
9
1 Installation
1.1 Identifying hardware components
Front View
v
u
w
x
Rear View
y
z
NO
Description
NO
Description
u
10/100Base LAN port
x
Power port (5V/2A)
v
System LED
y
1-USB 2.0 high-speed port
w
USB LED
z
Reset Button
10
1.2 LED indicators
Function
Color
Location
State
System LED
Green
Front
When system power on, the LED will blink
for self-test. After booting successfully,
the LED will keep light.
USB LED
Orange
Front
When plug in the USB Disk, the LED will
turn on. When there is traffic with USB
DISK, the LED will blink.
.
11
Chapter 2
Starting Up
2.1
System requirement
2.2
Hardware installation
12
2 Starting Up
2.1 System requirement
Operating system and software: Windows 2000, XP, 2003, Vista, Mac OS X or above, Linux
Required hardware resources:
·
10/100 base-TX Auto MDI/MDI-X LAN
·
JAVA-enabled computer
·
USB 2.0 External HD
·
USB cable
2.2 Hardware installation
2.2.1
1.
2.
3.
4.
5.
6.
Connecting the NAS Adapter
Turn off power of the external HD enclosure.
Connect the external HD enclosure to the USB port of the rear of the NAS adapter.
Turn on power of the external HD enclosure.
Connect the AC power adapter cord to the power port to the front of the NAS adapter.
Connect the other end of the AC power adapter cord to an electric outlet.
Connect the twisted-pair cable to the front of the NAS adapter and the other end of the cable to
the router.
13
14
2.3 Utility Installation
Please double click "Utility Installation" to start the installation steps as follow:
1. Preparing to install the USB Media Adapter Setup.
15
2. Click the " Next" button on the Welcome window.
3. Select "Browse" to choose the destination location and click the "Next" button on the window.
16
4. Install processing.
5. Check the “Yes”selection and click the "Finish" button on the Setup Complete window.
17
Chapter 3
Managing Your Device
3.1
Prepare Your Computer to Connect USB Media Adapter
3.2
Status of USB Media Adapter
3.3
Setup Your USB Media Adapter
3.4
Setting FTP Server
3.5
Setup SMB Server
3.6
BitTorrent
3.7
Media Server
3.8
Disk Utility
3.9
Misc : Factory Default and Firmware Upgrade
3.10
Restart
18
3 Managing Your Device
3.1 Prepare Your Computer to Connect USB Media Adapter
1. Please make sure your computer supports the JAVA environment. If not, you can go to
http://java.com to download and install the JAVA software.
2. Double click the Server Search Tool to search the NAS adapter from your network
environment, and then click Connect.
Please enter default username and password: admin.
Note:
Please setup the fixed IP after you login the system. Please refer to section "Setup > TCP/IP"
for further information.
19
3.2 Status of USB Media Adapter
After logging in, user may find the current system and TCP/IP information by clicking on “Status”.
System Information:
It provides system and disk information. System information includes the basic information such
as Host Name, Group Name, Firmware version, MAC Address and Date/Time.
Disk Information:
It provides the information of attached HDD such as device name, free size and total size.
20
TCP/IP Information
TCP/IP provides current TCP/IP settings and information. The Status of DHCP, IP address,
Subnet Mask, Gateway, Primary DNS, Secondary DNS setting will be shown here.
3.3 Setup Your USB Media Adapter
Before attaching you external HDD, please check the following items:
1.
USB Media Adapter can recognize only the partition in FAT 32, maximum single file size
is 127GB.
2.
If your external HDD is not FAT 32 format, please use the disk utility in “Service > Disk
Utility”to format your HDD into FAT 32.
3.
If your external HDD contains one FAT 32 partition already, formatting HDD could be
unnecessary.
Note: Formatting HDD will cause data lost.
21
Format your External HDD
Attached and Format your HDD At first Time Setup
Please attach your USB external HDD to the USB port of USB Media Adapter.
Log-in USB Media Adapter and check the “Disk information”in System to see if the external HDD
is recognized successfully.
22
Format your External HDD
If the external HDD is recognized correctly, please go to Services > Disk Utility and click on
Format to process. Formatting time depends on the size of the external HDD. It takes 2 to 5
minutes in general.
Format Finished
After finish formatting, a new webpage will be redirected and shows “Format successfully!”
23
Setting your USB Media Adapter
Before setting your USB Media Adapter, please check the following items:
1. “Group Name”, “Subnet Mask”, “Gateway”need to be set as the same as your local network. If
the setting is different, your USB Media Adapter is not able to be found on local network.
2. Host Name will be shown in “workgroup Computers”.
3. Setting a fixed IP for USB Media Adapter is highly recommended. The IP of USB Media
Adapter MUST in the same segment with local LAN. For example, if the local LAN IP is at
192.168.1.x, the IP of USB Media Adapter also has to be 192.168.1.x (x=available IP from 1 to
253)
24
System
System Settings
Host Name: The name you want to be shown in local LAN.
Group Name: The workgroup that you would like to join. By Windows are generally “MSHOME”or
“Workgroup”
Tips: You may reference the subnet Mask, Gateway, Primary DNS and secondary DNS setting in
your Computer. Those information could be found at Control Panel>Network>TCP/IP
25
TCP/IP
TCP/IP Settings
1. Obtain TCP/IP settings automatically: When this option is enabled, USB Media Adapter will
use the IP assigned by router. However, this IP may changes from time to time.
2. Use the following TCP/IP settings: Enable this option will allow user to setup a fixed IP, Subnet
Mask, Gateway, Primary DNS and Secondary DNS. You may reference the setting in Control
Panel>Network>TCP/IP.
26
3.4 Setting FTP Server
FTP (File Transfer Protocol)
Enable FTP server service let the user to upload/download files from local network or internet.
FTP Settings
1. FTP Service: Click “Enable”and “Apply”will start the FTP service. To stop FTP service,
click ”Disable”and “Apply”to take effect.
2. FTP Port Number: By default is port 21. User may also enter the number from 1025 to 65599.
3. Codepage: choose the language and click “Apply”.
27
Create, modify, enable, disable and delete a FTP account.
Create a FTP account: Click on “New”, the browser will bring up a “FTP New Account”windows.
Enter an account name and password. You may also choose the “Access Right”for the added
account, it could be “Read only”or “Read/Write”. After a new FTP created, a default folder will be
created; name of the folder is the same as account name.
Modify a FTP account: Click on “Modify”, the browser will bring up a “Modify FTP Account”
window. Here you may change the password and the read/write attribute of selected account.
Also, you may change the folder name by renaming it.
In “Sharing List”, you may decide which folder you would like allow the user to browse and write.
Enable/Disable: This function allows the administrator temporary stop the FTP service to certain
user.
Delete: To delete the ftp user account.
28
3.5 Setup SMB Server
SMB Server:
Enable SMB service let the user to read or read/write files in local network
Create, modify, enable, disable and delete a SMB account.
Create a SMB account: Click on “New”, the browser will bring up a “SMB New Account”
windows. Type an account name and password. You may also choose the “Access Right”for the
added account, it could be “Read only”or “Read/Write”. After a new SMB account created, a
default folder will be created; name of the folder is the same as account name.
29
Modify a SMB account: Click on “Modify”, the browser will bring up a “Modify SMB Account”
window. Here you may change the pass word and the read/write attribute of selected account.
Also, you may change the folder name by renaming it.
In “Sharing List”, you may decide which folder you would allow the user to browse and write.
Enable/Disable: This function allows the administrator temporary stop the SMB service to certain
account.
Delete: To delete the SMB user account.
30
Login SMB server:
After setting a SMB account, user may go to My Network Places>View Group computers to find
the SMB server. The server name is the same as the “Host name”in system setup.
Click on the server and the system will pop up a login window. Please enter your account name
and password.
If the user name and password are correct, you may login successfully and the accessible folders
will be shown.
31
3.6 BitTorrent
BitTorrent, or “BT download”is a Peer-to-Peer application. By using BitTorrent, nodes in
Peer-to-Peer download and share file in P2P network.
32
Setting BitTorrent
Download Path: Setting a download path to store the completed file.
Mail Notification: USB Media Adapter will send a notification to your email to inform you the
download is complete.
Upload a Torrent to USB Media Adapter
Find and download a Torrent
User may find the legal Torrent from Internet easily.
Save the Torrent on Desktop.
33
Click on “Browse”to select the Torrent
Click on “Upload”button to upload the Torrent into USB Media Adapter.
34
Upload complete. In Download Queue will show the downloading file.
35
Now the torrent is active and communicating with other nodes. Several minutes later the
download will start and show the complete level in percentage.
TIP: USB Media Adapter supports maximum 4 torrents download at the same time and maximum
32Torrents queuing.
36
3.7 Media Server
USB Media Adapter supports Upnp and allows PS3, XBOX360 and even iTunes to access the
sharing folder. User may organize their file by types. USB Media Adapter provides Photo, Music
and Video category.
TIPS: User may use SMB service save the file to specific category and select it in Media Server
to share and play back with PS3, XBOX360 and iTunes.
37
3.8 Disk Utility
Disk Utility contains 3 basic Disk tools: Format the Disk, Power-saving mode setting and Scan the
Disk.
Format the Disk: Format attached external to FAT 32, the only supported format.
Power-saving mode: If attached external HDD support power-saving, it will enter the
power-saving mode automatically.
Scan the Disk: This utility scans attached external HDD to get the detail information like files,
directory and used size in total. It also detects the hard disk error as well.
38
3.9 Misc: Factory Default and Firmware Upgrade
Factory Default
By pressing “OK”, the USB Media Adapter adaptor will reload the default setting and all the
current setting will be erased.
39
Firmware Upgrade
User may enhance better performance and stability by upgrading Firmware. Simply
download the firmware to computer and click on “Browse”to select it. Make sure the firmware is
correct and press “Firmware Upgrade”to process it. Firmware Upgrade will spend several
minutes and the current setting will also be erased.
40
3.10
Restart
This function let user to restart the USB Media Adapter without pressing the physical reset button.
To restart USB Media Adapter, click on “OK”.
41
Restart will complete in 60 seconds and will automatically redirected to status page if it is
setting with a fixed IP.
3.11 Linux and Mac system
The following two procedures are for Linux and Mac, other procedures are similar as previous.
1. Please install the JAVA environment for Linux and Mac system.
2. Double click the SDisk.jar to search the NAS adapter from your network environment, and the
click Connect.
42
Chapter 4
Internet Connection
43
4 Internet Connection
Connection to NS2101 over the Internet:
NS2101 has a fixed IP:
1. Open the IE of the external network computer and input the IP of SD201BT in the address
bar to access the WEB management interface.
NS2101has no fixed IP:
Method 1: DMZ connection
1. Set the NAT function of the IP sharer connected to NS2101 first. (The NAT setting may vary
among different IP sharers. Set the virtual IP of the internal network whose DMZ default server
IP is SD201BT.)
2. Record the external IP of the IP sharer.
3. Open the IE of the external network computer and input the external IP of the IP sharer in the
address bar to access the SD201BT WEB management interface.
Method 2: DDNS connection
1. Register a domain (for instance: sd201btsandy.mine.nu) with a Dynamic DNS website (e.g.
www.dyndns.org) and write down the domain, ID and password.
2. Set the DDNS function at the IP sharer connected to NS2101. (The DDNS setting may vary
among different IP sharers. It is necessary to input the domain, ID and password applied on
the Dynamic DNS website.)
3. Open the IE of the external network computer and input in the address bar the domain, ID and
password applied on the Dynamic DNS website to access the SD201BT WEB management
interface.
44
Chapter 5
Troubleshooting
45
5 Troubleshooting
Often after time spent troubleshooting, the problem is traced to something as simple as a loose
connection. Check the following before proceeding to the problem-specific solutions.
In each problem-specific section, try the steps in the order suggested. This may help you to
solve the problem more quickly.
Keep a record of the steps you take when troubleshooting: The information may be useful when
calling for technical support or for passing on to service personnel.
· Use some other electrical device to confirm that the electrical outlet is working.
· Ensure all connections are securely attached.
General Problems
Refer to the following general problems you may encounter.
PROBLEM
What can DHCP do as well
with NAS Dongle?
SOLUTION
You can setup NAS Dongle as a DHCP server if there is no
other DHCP Server existing in your LAN. Otherwise, NAS
Dongle will automatically disable its DHCP server function
and become a DHCP client. For example, if you have
installed a router with a built-in (active) DHCP Server, NAS
Dongle will be automatically set up as a DHCP client.
Any limitation on the length of The length of the file name is limited to 12 bytes.
the NAS Dongle file name?
What is the limitation on users 1.
of NAS Dongle FTP and
Samba and account mode?
2.
3.
FTP 8 Users / Samba 8 Users (Total 24 sessions at
the same time).
FTP Server: Account (maximum 32 user accounts
created, 8 user accounts connected at the same time,
and maximum 16 folders shared by one account).
Samba Server: Share Level Access (maximum 16
folders shared by root)
May I use a USB Media
Adaptor with a USB flash
drive?
Not suggested. A USB flash drive may slow down the
BT/FTP transmission rate or cause instability.
Why can’t I create/share
folders in an SMB or FTP
server?
To avoid any language support issue, you are suggested to
create/share folders with English characters only.
46