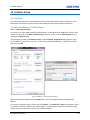
1
Technical Documentation LIO LINUX SCSI TARGET Administrator’s Manual Version: 4.0 Print Date: 6 August 2015 Copyright © 2015 Datera, Inc. LIO Admin Manual Copyright Copyright © 2015 Datera, Inc. All rights reserved. No part of this publication may be reproduced, stored in a retrieval system, or transmitted in any form or by any means, electronic, mechanical, photocopying, recording or otherwise, without the prior written consent of Datera, Inc., 2570 W El Camino Real, Suite 380, Mountain View, CA 94040. Trademarks Datera™, LIO™ and the Datera logo are trademarks of Datera, Inc., which may be registered in some jurisdictions. Microsoft and Windows are trademarks of Microsoft Corp. in the US and other countries, used under license. vSphere is a trademark of VMware Inc. in the US and other countries, used under license. All other trademarks are the property of their respective owners. Changes The material in this document is for information only and is subject to change without notice. While reasonable efforts have been made in the preparation of this document to assure its accuracy, Datera, Inc. assumes no liability resulting from errors or omissions in this document, or from the use of the information contained herein. Datera, Inc. reserves the right to make changes in the product design without reservation and without notification to its users. Disclaimer If this product directs you to copy materials, you must have permissions from the copyright owner of the materials to avoid violating the law, which could results in serious damages and/or remedies. Datera, Inc. 2570 W El Camino Real, Suite 380 Mountain View, CA 94040 www.datera.io Phone: +1-650-384-6284 Email: [email protected] Document: Version 4.0 Print date: 6 August 2015 Language: English Copyright © 2015 Datera i LIO Admin Manual Contents Contents ............................................................................................................................................ 2 1 Introduction ............................................................................................................................... 1 2 Overview ................................................................................................................................... 2 2.1 The LIO Linux Stack ....................................................................................................................... 2 2.2 Fabrics ........................................................................................................................................... 2 2.3 Backstores..................................................................................................................................... 3 3 RAID Device Setup ...................................................................................................................... 5 3.1 Overview ....................................................................................................................................... 5 3.2 System Management .................................................................................................................... 5 3.3 Creating a RAID Set ....................................................................................................................... 7 3.4 Deleting a RAID Set ....................................................................................................................... 8 3.5 Expanding a RAID Set .................................................................................................................... 8 3.6 Failure Management .................................................................................................................... 9 3.7 Best Practices.............................................................................................................................. 10 4 LVM Setup ............................................................................................................................... 11 4.1 Overview ..................................................................................................................................... 11 4.2 Initializing Disks or Disk Partitions .............................................................................................. 11 4.3 Creating Volume Groups ............................................................................................................ 11 4.4 Creating Logical Volumes............................................................................................................ 11 4.5 Deleting Logical Volumes............................................................................................................ 11 4.6 Resizing Logical Volumes ............................................................................................................ 11 4.7 Resizing Physical Volumes .......................................................................................................... 12 4.8 Best Practices.............................................................................................................................. 12 5 Targetcli Quick Start Guide ....................................................................................................... 13 5.1 Startup ........................................................................................................................................ 13 5.2 iSCSI ............................................................................................................................................ 14 5.3 Fibre Channel .............................................................................................................................. 16 5.4 InfiniBand/SRP ............................................................................................................................ 18 5.5 InfiniBand/iSER ........................................................................................................................... 19 5.6 Persistence.................................................................................................................................. 21 6 Targetcli Concepts .................................................................................................................... 23 6.1 General ....................................................................................................................................... 23 6.2 Working with Contexts ............................................................................................................... 23 6.3 Command Completion and Help ................................................................................................ 23 6.4 Command Syntax ........................................................................................................................ 24 Copyright © 2015 Datera ii LIO Admin Manual 6.5 6.6 6.7 6.8 6.9 Command Chains ........................................................................................................................ 24 Object Tree ................................................................................................................................. 24 Creating a LUN and exporting it ................................................................................................. 25 Object Tree Example................................................................................................................... 25 Best Practices.............................................................................................................................. 27 7 Targetcli Commands ................................................................................................................. 28 7.1 The bookmarks Command .......................................................................................................... 28 7.2 The cd Command ........................................................................................................................ 28 7.3 The exit Command ...................................................................................................................... 29 7.4 The get Command ...................................................................................................................... 29 7.5 help Command ........................................................................................................................... 29 7.6 The ls Command ......................................................................................................................... 29 7.7 The pwd Command ..................................................................................................................... 29 7.8 The refresh Command ................................................................................................................ 29 7.9 The set Command ....................................................................................................................... 29 7.10 The status Command .................................................................................................................. 30 7.11 Variable Types ............................................................................................................................ 30 7.12 The global Config Group ............................................................................................................. 30 8 Targetcli Contexts ..................................................................................................................... 32 8.1 The Root (“/”) Context ................................................................................................................ 32 8.2 The backstores Context .............................................................................................................. 32 8.3 The FILEIO Backstore Context ..................................................................................................... 32 8.4 The PSCSI Backstore Context ...................................................................................................... 33 8.5 The RDDR Backstore Context...................................................................................................... 33 8.6 The Storage Objects Context ...................................................................................................... 34 8.7 The Fabric Modules Context ....................................................................................................... 35 8.8 The Target Context ..................................................................................................................... 36 8.9 The TPG Context (iSCSI) .............................................................................................................. 36 8.10 The LUNs Context ....................................................................................................................... 40 8.11 The luns Context ......................................................................................................................... 41 8.12 The Node acls Context ................................................................................................................ 41 8.13 The Node ACLs Context .............................................................................................................. 41 8.14 The Mapped LUNs Context ......................................................................................................... 43 8.15 The Portals Context (iSCSI) ......................................................................................................... 43 8.16 The portals Context (iSCSI) ......................................................................................................... 43 9 Targetcli Examples.................................................................................................................... 44 9.1 Startup ........................................................................................................................................ 44 9.2 Backstores................................................................................................................................... 44 9.3 iSCSI Endpoints ........................................................................................................................... 45 Copyright © 2015 Datera iii LIO Admin Manual 9.4 iSCSI Network Portals ................................................................................................................. 46 9.5 Access Control ............................................................................................................................ 47 9.6 Discovery Control ....................................................................................................................... 50 9.7 Object Tree ................................................................................................................................. 51 9.8 Persistence.................................................................................................................................. 52 9.9 Navigation and Auto-Completion ............................................................................................... 52 9.10 Bookmarks .................................................................................................................................. 53 10 RTSlib – Storage Management Library and API .......................................................................... 55 10.1 iSCSI ............................................................................................................................................ 55 10.2 Fibre Channel .............................................................................................................................. 56 10.3 InfiniBand/SRP ............................................................................................................................ 57 11 VMware VAAI........................................................................................................................... 58 11.1 Overview ..................................................................................................................................... 58 11.2 Features ...................................................................................................................................... 58 11.3 Primitives .................................................................................................................................... 58 11.4 Performance ............................................................................................................................... 61 11.5 Statistics ...................................................................................................................................... 62 11.6 Best Practices.............................................................................................................................. 63 12 Initiator Setup .......................................................................................................................... 64 12.1 Overview ..................................................................................................................................... 64 12.2 Microsoft Windows 7 iSCSI Initiator ........................................................................................... 64 12.3 Microsoft Windows Server 2012 SRP Initiator ........................................................................... 68 12.4 VMware vSphere 5 iSCSI Initiator ............................................................................................... 69 12.5 Linux iSCSI Initiator ..................................................................................................................... 72 12.6 VirtualBox iSCSI Initiator ............................................................................................................. 73 13 Glossary ................................................................................................................................... 74 14 References ............................................................................................................................... 76 Copyright © 2015 Datera iv LIO Admin Manual 1 Introduction The target audience of this manual are system and storage administrators. The intent of this manual is to provide the necessary background, concepts, tools and commands for effectively administrating data storage arrays running the LIO Linux SCSI Target and the targetcli system management tools. The key steps to configure LIO based SANs are described in this LIO Admin Manual as follows: Section 2 provides an overview over LIO. Section 3 describes how to setup hardware RAID devices to use for your backstore. Section 4 describes how to use and setup the Logical Volume Manager (LVM) for your backstore. Section 5 provides a quick start tutorial how to set up Linux LIO SAN targets with targetcli. Sections 6–9 provide an in-depth technical description of targetcli. Section 12 describes how to setup Microsoft Windows, vSphereVMware, Linux and VirtualBox iSCSI initiators for Linux LIO SANs. Copyright © 2015 Datera 1 LIO Admin Manual 2 Overview 2.1 The Linux Storage Stack The following diagram depicts the basic architecture of the Linux storage stack with LIO iSCSI: Figure 1: Structural overview over SCSI entities and relationships (“BS” means back store). The LIO software stack is divided in two main sections, software modules and hardware drivers. 2.2 Fabrics The LIO Linux SCSI Target supports the following network fabrics and protocols for exporting storage devices (backstores): 2.2.1 iSCSI iSCSI (Internet SCSI) encapsulates the Small Computer System Interface (SCSI) protocol in TCP/IP packets to link storage devices over commodity IP networks. LIO can provide SANs over any standard IP network infrastructure, including LANs, WANs, cellular, and the Internet. Note: Datera strongly recommends against using iSCSI TOE functionality with LIO. 2.2.2 Fibre Channel Fibre Channel (FC) is a low-latency high-performance storage area network (SAN) protocol and fabric. LIO supports Fibre Channel with the Host Bus Adapters (HBAs) from QLogic: QLogic 2400 Series (single-port QLE246x), 4GBFC QLogic 2500 Series (dual-port QLE256x), 8GBFC QLogic 2600 Series (dual-port), 16 GBFC incl. high-speed and SR-IOV support Copyright © 2015 Datera 2 LIO Admin Manual 2.2.3 Fibre Channel over Ethernet Fibre Channel over Ethernet (FCoE) tunnels Fibre Channel packets traffic through enhanced Ethernet networks. FCoE is layered directly on top of Ethernet, i.e. it doesn’t use IP and thus isn’t routable. As a result, FCoE storage devices cannot be accessed beyond the Ethernet subnet that they reside on, and they require specific FCoE enabled switches. 2.2.4 InfiniBand/SRP SRP is a high-performance communication protocol that allows the transport of SCSI traffic across RDMA InfiniBand interconnects. It has traditionally been used in high-performance computing (HPC) environments, and recently has enjoyed increasing popularity for SANs. LIO supports SRP on Host Channel Adapters (HCAs) from Mellanox: Mellanox ConnectX-2 VPI PCIe Gen2 HCAs (x8 lanes), single/dual-port QDR 40 Gb/s IB Mellanox ConnectX-3 VPI PCIe Gen3 HCAs (x8 lanes), single/dual-port FDR 56 Gb/s IB Mellanox ConnectX-IB PCIe Gen3 HCAs (x16 lanes), single/dual-port FDR 56 Gb/s IB 2.2.5 InfiniBand/iSER iSER is a high-performance communication protocol that extends iSCSI to use RDMA. RDMA has been supported on InfiniBand networks, and is now also supported by RoCE on "lossless" Ethernet networks and by iWARP enhanced TOE NICs over standard Ethernet networks. LIO supports iSER on Host Channel Adapters (HCAs) from Mellanox: Mellanox ConnectX-2 VPI PCIe Gen2 HCAs (x8 lanes), single/dual-port QDR 40 Gb/s IB Mellanox ConnectX-3 VPI PCIe Gen3 HCAs (x8 lanes), single/dual-port FDR 56 Gb/s IB Mellanox ConnectX-IB PCIe Gen3 HCAs (x16 lanes), single/dual-port FDR 56 Gb/s IB 2.2.6 Loopback The loopback fabric module is a high-speed SCSI emulation device that can export any type of raw hardware to local applications and virtual machines as a fully SCSI SPC-3/4 compliant block device, including emulation of advanced functionality. 2.2.7 vHost The LIO vHost fabric module implements very high-speed SCSI I/O processing based on the Linux virtio mechanism. LIO vHost provides virtually bare-metal local SCSI storage performance for KVM guests. Linux guest VMs are supported, while Windows guest support is currently in Alpha release stage with a virtual LSI MegaRAID SAS driver. 2.3 Backstores LIO supports the following backstores (physical or virtual block storage devices) for export over any of the above fabrics via the LIO Linux SCSI Target: 2.3.1 FILEIO FILEIO is any file on a mounted filesystem, which may be backed by a file or an underlying real block device. FILEO is recommended mostly for testing purposes, as the performance bottleneck with a block device residing in a filesystem is limited to the filesystem performance envelope. Copyright © 2015 Datera 3 LIO Admin Manual 2.3.2 IBLOCK IBLOCK is any block device visible to LIO to be exported for native block-based device access. LVM represents its logical volumes as block devices, and therefore is the recommended approach for exporting block devices. 2.3.3 PSCSI The PSCSI backstore device provides pass-through SCSI for any SCSI storage backstore object without SCSI emulation. PSCSI does not contain any emulation, and this exposes SCSI devices natively. This provides maximum performance for such SCSI backstores, but at the same time minimizes architectural layering and device encapsulation. Warning: Do not use PSCSI backstore devices unless you know exactly how they will be used. Advanced SCSI CDBs such as for Persistent Reservations (PR) or ALUA (as used e.g. by VMware vSphere) are typically not implemented in the storage device firmware, and can thus cause severe malfunction of the storage array. Instead, use IBLOCK for such production setups. 2.3.4 Memory Mapped RAMDISK The memory mapped RAM disk (rd_mcp) devices provide RAM disk drive-based SCSI emulation. It has multi-session capability, as it supports separate memory mappings for initiators using memory copy. rd_mcp is a backend that is most useful for ultra-fast volatile mass-storage, such as with HPC environments that need maximum performance storage for volatile data hot spots. Copyright © 2015 Datera 4 LIO Admin Manual 3 RAID Device Setup 3.1 Overview 3.1.1 RAID Controllers Linux typically uses RAID volumes for its backstore storage media, which can be implemented with hardware or software RAID. Hardware-based RAID controllers include Adaptec and LSI MegaRAID RAID controllers. Adaptec RAID controllers can be configured via arcconf, Adaptec's CLI for RAID devices, or via the Adaptec Storage Manager (ASM). LSI MegaRAID controllers can be configured via MegaCLI, LSI’s CLI for RAID devices, or via the graphical LSI MegaRAID Storage Manager (MSM). For Adaptec, run arcconf as follows: # arcconf [options] For LSI, run the MegaCLI as follows: # MegaCli [options] For more information, please also refer to the Adaptec manuals [1] and [2], or the LSI manuals [7]. 3.1.2 Drive identification The Adaptec and LSI RAID CLIs always require the controller number to be supplied as a command line parameter. The exact numerical value depends on your Linux system array configuration. The RAID controller IDs start with ‘1’ on Adaptec controllers and ‘0’ on LSI MegaRAID controllers. Identify the drive(s) to operate on with the following commands, respectively: Adaptec # arcconf IDENTIFY <controller#> DEVICE <channel#> <slot#> LSI # MegaCLI –PDLocate –PhysDrv[<enclosure#:slot#>, …] -a<controller#> The corresponding drive(s) can then be identified by the blinking activity LED in their respective ports. 3.2 System Management The health of your system is instrumental for the effective SAN operation, and Linux includes a number of options to manage and monitor the systems operation. 3.2.1 Viewing RAID States The Adaptec and LSI RAID CLIs allow viewing the current status of the RAID configuration. Every RAID set is referred to as a “logical device”, and therefore the state of the logical device is the most important information for administrators to monitor in terms of its functionality and performance. A healthy RAID set shows its status as “optimal” to indicate fully operational state with optimal performance. Any other status mandates careful investigation by the systems administrator, including taking the appropriate action to restore the array back to its 100% fully functional status. A “degraded” logical device is still operational, but this state indicates that an SSD or HDD failed, the logical RAID is not operating at full performance and reliability, and requires attention. Copyright © 2015 Datera 5 LIO Admin Manual Note: With failed hard drives, the write back cache of RAID controllers is significantly less effective, therefore causing additional RAID performance degradation. 3.2.2 Adaptec Display comprehensive information about the RAID controller, including RAID state, etc.: # arcconf GETCONFIG <controller#> LD ---------------------------------------------------------------------Controller information ---------------------------------------------------------------------Controller Status : Optimal Channel description : SAS/SATA Controller Model : Adaptec 5405 Installed memory : 256 MB Copyback : Disabled Background consistency check : Disabled Automatic Failover : Enabled Global task priority : High Performance Mode : Default/Dynamic Stayawake period : Disabled Spinup limit internal drives : 0 Spinup limit external drives : 0 Defunct disk drive count : 0 Logical devices/Failed/Degraded : 2/0/0 SSDs assigned to MaxIQ Cache pool : 0 Maximum SSDs allowed in MaxIQ Cache pool : 8 MaxIQ Read Cache Pool Size : 0.000 GB MaxIQ cache fetch rate : 0 MaxIQ Cache Read, Write Balance Factor : 3,1 NCQ status : Enabled Statistics data collection mode : Enabled -------------------------------------------------------Controller Version Information -------------------------------------------------------BIOS : 5.2-0 (18252) Firmware : 5.2-0 (18252) Driver : 1.1-5 (2461) Boot Flash : 5.2-0 (18252) -------------------------------------------------------Controller Battery Information -------------------------------------------------------Status : Not Installed ---------------------------------------------------------------------Logical device number 0 Logical device name : data RAID level : 5 Status of logical device : Optimal Size : 11427830 MB Stripe-unit size : 1024 KB Read-cache mode : Enabled MaxIQ preferred cache setting : Enabled MaxIQ cache setting : Disabled Write-cache mode : Enabled (write-back) Write-cache setting : Enabled (write-back) Partitioned : No Protected by Hot-Spare : Yes Global Hot-Spare : 0,31 Bootable : No Copyright © 2015 Datera 6 LIO Admin Manual Failed stripes Power settings 3.2.3 : No : Disabled LSI Display comprehensive information about the RAID controller, including RAID state, etc.: # MegaCli –AdpAllinfo –a<controller#> Display the information of one or more logical drives on one or more selected RAID controllers: # MegaCli –LDInfo –L<drive#> –a<controller#> The drive ID and controller ID can be wildcarded by substituting the ID with the “ALL” qualifier. With storage arrays based on LSI RAID controllers, Linux also supports remote alert notifications. The corresponding alert settings, mail server setup, and email recipients can be configured through the LSI MSM client. To that end, launch the MSM client and connect to the IP or FQDN of the Linux array to be managed. From the toolbar, select Tools Configure Alerts. The “Configure Alerts” dialog then appears where the desired RAID controller alert notifications can be configured. Figure 2: LSI MSM – Configure Alerts. For more information, please refer to the corresponding LSI manual [8]. 3.3 Creating a RAID Set 3.3.1 Adaptec Before creating a new RAID set, check which disk drive ports that should be used for the new RAID set: # arcconf GETCONFIG <controller#> PD | egrep "Device #|State\>|Reported Location| Reported Channel|S.M.A.R.T. Warnings" Copyright © 2015 Datera 7 LIO Admin Manual Create the new RAID set: # arcconf CREATE logicaldrive <controller#> STRIPESIZE <stripe#> MAX <raid-level> <channel#> <slot#>, … 3.3.2 LSI List all physical disk details including enclosure number and slot numbers for a RAID controller: # MegaCli –PDList –a<controller#> Create new RAID sets: # MegaCli -CfgLDAdd –r0|r1|r5|r6[<enclosure#>:<slot#> …] [WT|WB] [NORA|RA] [Direct|Cached] [CachedBadBBU|NoCachedBadBBU] [-strpsz<mb>] [-Hsp[<enclosure#>:<drive#> …]] -a<adapter#> For instance, create a RAID5 set for enclosure 0, drives 0–2 with writeback, read ahead, direct cache and hotspare assigned on port 3 on installed adapter 0: # MegaCli –CfgLDAdd –r5[0:0,0:1,0:2] WB RA Direct –Hsp[0:3] –a0 3.4 Deleting a RAID Set Warning: Deleting a RAID set cannot be reverted. All data on the RAID set will be lost. Only delete a RAID set if you are certain what you are doing. 3.4.1 Adaptec Use GETCONFIG to get a listing of all logical drives available on a RAID controller: # arcconf GETCONFIG <controller#> LD Permanently remove a logical drive from a RAID set on a RAID controller: # arcconf DELETE <controller#> logicaldrive <drive#> 3.4.2 LSI Use PDList to get a listing of all logical drive ports available on a RAID controller: # MegaCli –PDList –aALL | egrep ‘Adapter|Enclosure|Slot|Inquiry’ Permanently remove a logical drive from a RAID set on a RAID controller: # MegaCli –CfgLdDel –L<drive#> –a<controller#> 3.5 Expanding a RAID Set 3.5.1 Adaptec List the logical drives that are available on a RAID controller: # arcconf GETCONFIG <controller#> LD List the available disk drive slots and pair down the information a bit: # arcconf GETCONFIG 1 PD | egrep "Device #|State\>|Reported Location |Reported Channel|S.M.A.R.T. Warnings" Identify the slot numbers of the drive: # arcconf IDENTIFY <controller#> DEVICE <channel#> <slot#> will help to identify the drive in the chassis by blinking the corresponding activity LED. Copyright © 2015 Datera 8 LIO Admin Manual When the array and all drive members to be used for the array extension have been identified, and only then, perform the online capacity expansion or RAID level migration: # arcconf MODIFY <controller#> FROM <DRIVE#> TO MAX <raid-level> <channel#> <port#> \ [<channel#> <port#> …] 3.5.2 LSI Display the logical drive information on a RAID controller: # MegaCli –LDInfo–L[<enclosure#:slot#>, …] -a<controller#> List the available disk drive slots and pair down the information a bit: # MegaCli –PDList –a<controller#> | egrep ‘Adapter|Enclosure|Slot|Inquiry’ Identify the slot numbers of the drive(s): # MegaCli –PDLocate –PhysDrv[<enclosure#:slot#>, …] -a<controller#> will help to identify the drive in the chassis by blinking the corresponding activity LED. When the array and all drive members to be used for the array extension have been identified, and only then, perform the online capacity expansion or RAID level migration: # MegaCli –LDRecon -Start -r<raid-level>[Add|Rmv PhysDrv[<enclosure#:slot#, …]] -L<drive#> –a<controller#> For instance, perform an online capacity expansion or RAID level migration with the physical drive(s) in enclosure 0, slot 4 on logical drive 1 in RAID controller 0 as setup above: # MegaCli –LDRecon -Start -r5[Add PhysDrv[0:4]] -L1 –a0 3.6 Failure Management A soft error doesn’t necessarily indicate a hard drive failure. For instance, after years of operation, some drives may occasionally not respond fast enough, so the RAID controller flags them as failed, despite the fact that they are still fully operational. In such cases, a rescan of the SCSI bus may re-add drives back to the array without the need of any drive replacements. However, soft errors are a frequent characteristic of aging devices, and in many cases are indicative of subsequent hard drive failures, so Datera highly recommends replacing drives that exhibit soft errors. In any event, failed drives must promptly be replaced with a spare drive. Depending on the underlying RAID level, a degraded RAID set might not be fault tolerant during RAID reconstruction (e.g., RAID5). 3.6.1 Adaptec Rescan the SCSI bus: # arcconf RESCAN <controller#> A drive failure condition can be identified as follows: # arcconf GETCONFIG 1 PD | egrep "Device #|State\>|Reported Location|Reported Channel|S.M.A.R.T. Warnings" After the failed drive has been replaced with a standby, add a new dedicated hot spare drive: # arcconf SETSTATE <controller#> DEVICE <channel#> <port#> HSP LOGICALDRIVE <drive#> Copyright © 2015 Datera 9 LIO Admin Manual 3.6.2 LSI A drive failure condition can be identified as follows: # MegaCli –PDList –a<controller#> | egrep ‘Adapter|Enclosure|Slot|Inquiry|Firmware |Error|Failure|Event’ After the failed drive has been replaced with a standby, add a new dedicated hot spare drive: # MegaCli –PDHSP –Set [–Dedicated –Array<drive-group#> –PhysDrv[<enclosure#:slot#, …] -a<controller#> For instance, add a new hot spare in enclosure 0, drive 6 to drive group 0 on controller 0: # MegaCli –PDHSP –Set –Dedicated –Array0 –PhysDrv[0:6] –a0 3.7 Best Practices 3.7.1 RAID Construction Considerations Datera recommends against configuring SSDs in RAID10 sets, as that involves a significant loss of available net storage capacity (which is rather expensive with SSDs) and endurance, without much performance gain. In practice, the performance gain (IOPS) of SSD RAID10 configurations is typically less than 15%, at the expense of a loss of 50% of net storage capacity. Instead, Datera recommends using RAID5 with hot spare drives for SSD based volume groups. The performance loss of RAID5 vs. RAID10 in terms of latency and IOPS is typically less than 15%, and considering the much higher performance levels of SSDs doesn’t really matter in practice. For SSD speed and endurance, Datera recommends using a stripe size of either 64kB or 128kB, depending on the SSD size, in conjunction with RAID5. As a further optimization, Datera recommends keeping the SSDs net storage capacity below the 80% utilization mark, which results in in more robust long-term performance, especially in comparison with RAID10 with less disk space. For HDD arrays with an emphasis on high-performance and fault tolerance, RAID10 typically provides the best tradeoffs between performance, reliability and price in a single-shelf environment. Depending on the block size of filesystem, Datera recommends using a stripe size that equals 8x to 16x of the defined block size. Example: For a block size of 4KiB with an ext4 filesystem, Datera recommends a stripe size of 32kB to 64kB as “guidance.” If the filesystem typically uses larger files, larger stripe sizes will result in higher sustained performance. This is because the block pre-allocation on the drive can be done in larger chunks, and therefore reduce the amount of head seeks operations necessary to be performed on the HDDs. Copyright © 2015 Datera 10 LIO Admin Manual 4 LVM Setup 4.1 Overview For ease of configuration and modularity, while maintaining scalability, Datera recommends using the Logical Volume Manager (LVM). 4.2 Initializing Disks or Disk Partitions Before using a drive or a drive partition as a physical volume, it must be properly initialized: # pvcreate <device> Warning: Not initializing the LVM device with pvcreate can cause subtle integrity errors on the backstores that later result in system instabilities and crashes. For instance, fast initialization of RAID devices from the LSI RAID BIOS creates seemingly valid RAID devices that can cause system crashes during operation under load. In order to use a whole drive as the physical volume, specify a raw disk device for <device>, e.g., “/dev/sdb.” This creates a volume group descriptor at the beginning of the drive “/dev/sdb.” On the other hand, to use a logical partition on a disk device, specify the corresponding primary or extended partition for <device>, e.g., “/dev/sdb1.” This creates a volume group descriptor at the beginning of the logical partition “/dev/sdb1.” Note: LVM works fine with whole disk physical volumes, but other OSs may not recognize the LVM metadata, and display the drive as free and possibly overwrite it. 4.3 Creating Volume Groups To create a volume group, the following command is used: # vgcreate <vg_name > <device> 4.4 Creating Logical Volumes To create a logical volume within a volume group, the following command can be used: # lvcreate -L <size> --name <lv_name> <vg_name> 4.5 Deleting Logical Volumes Warning: Deleting a logical volume cannot be reverted. All data on this logical volume will be lost. Please make sure to unmount the logical volume before deleting it. # umount <mount_point> # lvremove -f <vg_name>/<lv_name> 4.6 Resizing Logical Volumes If a logical volume needs to be resized, it is recommended to logout any attached initiators from this device, as an initiator relogin is necessary to provide the new block device specifications. # lvresize -L+1G <vg_name>/<lv_name> Copyright © 2015 Datera 11 LIO Admin Manual Warning: Resizing the volume does not resize the drive contents, so the file system on the block device needs to be resized as well, which is a filesystem-dependent operation. Resizing a volume with logged in initiators practically guarantees file system corruption. Please refer to the system manuals on how to properly resize the file system on the block devices. It is highly recommended to resize the filesystem via the iSCSI-provided target, and not on the storage node itself. 4.7 Resizing Physical Volumes In case of extending the underlying RAID volume, the size needs to be made available to the physical volume as well. Using the command: # pvresize <device> expands the physical volume to the maximum value possible (disk boundaries). After expanding the physical volume the maximum value, the new space will automatically be available to the corresponding volume group. Note: Datera recommends using LVM block devices to provide the backstores, however the remainder of this manual uses examples with simple block devices. 4.8 Best Practices Usually, disabling the LVM write cache is a good idea. Otherwise, small problems with stale information in the LVM cache may arise, such as duplicate physical volumes being displayed, etc. However, disabling the LVM write setting becomes crucial in case of failover situations, where stale information in the LVM cache can have serious adverse effects. To disable the LVM write cache, add the following entries into the file /etc/lvm/lvm.conf: write_cache_state=0 readahead=”none” Copyright © 2015 Datera 12 LIO Admin Manual 5 Targetcli Quick Start Guide This section provides a simple step-by step cook book to setup a simple LIO Linux SCSI target, and export a Linux block device, to which all initiators can connect without further authentication. The same basic setup is described for iSCSI, Fibre Channel and InfiniBand fabrics. 5.1 Startup 5.1.1 Cookbook Command Comment targetcli Run the LIO admin shell /backstores/iblock create my_disk /dev/sdb Create a block backstore on /dev/sdb iSCSI: follow Section 5.2 Fibre Channel: follow Section 5.3 InfiniBand/SRP: follow Section 0 /saveconfig Commit the configuration Table 1: Login and setup a block backstore. 5.1.2 Invoke the LIO Shell The LIO shell is invoked by running targetcli as root from the underlying Linux shell: # targetcli Welcome to the targetcli CLI: Copyright (c) 2014 by Datera, Inc. All rights reserved. Visit us at http://www.datera.io. Using Using Using Using /> loopback fabric module. ib_srpt fabric module. qla2xxx fabric module. iscsi fabric module. 5.1.3 Display the Initial Object Hierarchy The initial object hierarchy is empty: /> ls o- / ..................................................................... [...] o- backstores .......................................................... [...] | o- fileio ............................................... [0 Storage Object] | o- iblock ............................................... [0 Storage Object] | o- pscsi ................................................ [0 Storage Object] | o- rd_dr ................................................ [0 Storage Object] | o- rd_mcp ............................................... [0 Storage Object] o- ib_srpt ........................................................ [0 Target] o- iscsi .......................................................... [0 Target] o- loopback ....................................................... [0 Target] o- qla2xxx ........................................................ [0 Target] /> Copyright © 2015 Datera 13 LIO Admin Manual 5.1.4 Create a Backstore First, create the underlying backstore device, here my_disk on the physical SCSI disk device /dev/sdb: /> /backstores/iblock create my_disk /dev/sdb Generating a wwn serial. Created iblock storage object my_disk using /dev/sdb. Entering new node /backstores/iblock/my_disk. /backstores/iblock/my_disk> Alternatively, a backstore can also be created on an LVM volume: /> /backstores/iblock create my_disk /dev/vg0/lv1 Generating a wwn serial. Created iblock storage object my_disk using /dev/vg0/lv1. Entering new node /backstores/iblock/my_disk. /backstores/iblock/my_disk> In either case, targetcli automatically creates a WWN serial ID for the backstore device and then changes the working context to it. 5.2 iSCSI 5.2.1 Cookbook Command Comment /iscsi create Create an iSCSI target In /iscsi/<IQN>/tpgt1: portals/ create <IP_address> Associate an <IP_address> In /iscsi/<IQN>/tpgt1: luns/ create /backstores/iblock/my_disk Export the LUN my_disk In /iscsi/<IQN>/tpgt1: set attribute authentication=0 demo_mode_write_protect=0 generate_node_acls=1 cache_dynamic_acls=1 Enable Demo Mode. Beware! Table 2: Setting up an iSCSI target. 5.2.2 Instantiate an iSCSI Target Instantiate an iSCSI target on the backstore device, to form a Target Portal Group (TPG): /backstores/iblock/my_disk> /iscsi create Created target iqn.2003-01.org.linux-iscsi.targetcli-demo.x8664:sn.05135a0e4a11. Selected TPG Tag 1. Successfully created TPG 1. Entering new node /iscsi/iqn.2003-01.org.linux-iscsi.targetclidemo.x8664:sn.05135a0e4a11/tpgt1. /iscsi/iqn.20...a0e4a11/tpgt1> Targetcli creates the TPG, automatically assigns the next default TPG tag ‘1’, and changes the working context to the resulting tagged TPG. Assign an IP address (here IPv4: 192.168.1.139) to the TPG, to make it accessible to iSCSI initiators: /iscsi/iqn.20...a0e4a11/tpgt1> portals/ create 192.168.1.139 Using default IP port 3260 Copyright © 2015 Datera 14 LIO Admin Manual Successfully created network portal 192.168.1.139:3260. Entering new node /iscsi/iqn.2003-01.org.linux-iscsi.targetclidemo.x8664:sn.05135a0e4a11/tpgt1/portals/192.168.1.139:3260. /iscsi/iqn.20...68.1.139:3260> Targetcli adds the iSCSI Network Portal and automatically changes the working context to it. Return to the underlying TPG, as no attributes need to be set for a standard iSCSI Network Portal: /iscsi/iqn.20...68.1.139:3260> cd < Taking you back to /iscsi/iqn.2003-01.org.linux-iscsi.targetclidemo.x8664:sn.05135a0e4a11/tpgt1. /iscsi/iqn.20...a0e4a11/tpgt1> 5.2.3 Export LUNs via iSCSI Declare a LUN for the backstore device, to form an Endpoint (a valid network storage object): /iscsi/iqn.20...a0e4a11/tpgt1> luns/ create /backstores/iblock/my_disk Selected LUN 0. Successfully created LUN 0. Entering new node /iscsi/iqn.2003-01.org.linux-iscsi.targetclidemo.x8664:sn.05135a0e4a11/tpgt1/luns/lun0. /iscsi/iqn.20...gt1/luns/lun0> Targetcli automatically assigns the default ID ‘0’ to the LUN, and then changes the working context to the Endpoint. Now the target is created, and exports the local device /dev/sdb as iSCSI LUN 0. Return to the underlying TPG, as no attributes need to be set or modified for standard LUNs: /iscsi/iqn.20...gt1/luns/lun0> cd < Taking you back to /iscsi/iqn.2003-01.org.linux-iscsi.targetclidemo.x8664:sn.05135a0e4a11/tpgt1. /iscsi/iqn.20...a0e4a11/tpgt1> 5.2.4 Define Access Control Configure access control. Typically, this involves setting up ACLs with individual login information for each initiator. For a simple demo setup, allow access to all initiators without any authentication: /iscsi/iqn.20...a0e4a11/tpgt1> set attribute authentication=0 demo_mode_write_protect=0 generate_node_acls=1 cache_dynamic_acls=1 Parameter demo_mode_write_protect is now '0'. Parameter authentication is now '0'. Parameter generate_node_acls is now '1'. Parameter cache_dynamic_acls is now '1'. /iscsi/iqn.20...a0e4a11/tpgt1> cd / /> Warning: Exporting “open” LUNs with no authentication requirements create a significant security and data integrity hazards. Don’t do this for production setups, unless you know exactly what you are doing. Please see Section 9.5 for detailed examples on how to configure iSCSI authentication for production setups. 5.2.5 Display the Object Hierarchy The resulting object hierarchy looks as follows (displayed from the root object): /> ls o- / ..................................................................... [...] o- backstores .......................................................... [...] Copyright © 2015 Datera 15 LIO Admin Manual | o- fileio ............................................... [0 Storage Object] | o- iblock ............................................... [1 Storage Object] | | o- my_disk .......................................... [/dev/sdb activated] | o- pscsi ................................................ [0 Storage Object] | o- rd_dr ................................................ [0 Storage Object] | o- rd_mcp ............................................... [0 Storage Object] o- ib_srpt ........................................................ [0 Target] o- iscsi .......................................................... [1 Target] | o- iqn.2003-01.org.linux-iscsi.targetcli-demo.x8664:sn.05135a0e4a11 . [1 TPG] | o- tpgt1 ....................................................... [enabled] | o- acls ........................................................ [0 ACL] | o- luns ........................................................ [1 LUN] | | o- lun0 .................................. [iblock/my_disk (/dev/sdb)] | o- portals .................................................. [1 Portal] | o- 192.168.1.139:3260 ........................................... [OK] o- loopback ....................................................... [0 Target] o- qla2xxx ........................................................ [0 Target] /> 5.3 Fibre Channel 5.3.1 Cookbook Command Comment /qla2xxx create <WWPN> Create a Fibre Channel target In /qla2xxx/<WWPN>: luns/ create /backstores/iblock/my_disk Export the LUN my_disk In /qla2xxx/<WWPN>: acls/ create <Initiator WWPN> Allow access for the initiator at <WWPN> Table 3: Setting up a Fibre Channel target. 5.3.2 Instantiate a Fibre Channel Target Alternatively, instantiate a Fibre Channel target on the backstore device. The Fibre Channel ports available on the storage array might be presented with the following WWPNs: 21:00:00:24:ff:31:4c:48 21:00:00:24:ff:31:4c:49 /backstores/iblock/my_disk> /qla2xxx create 21:00:00:24:ff:31:4c:48 Created target 21:00:00:24:ff:31:4c:48. Entering new node /qla2xxx/21:00:00:24:ff:31:4c:48. /qla2xxx/21:0...4:ff:31:4c:48> Note that targetcli automatically changes the working context to the resulting tagged Endpoint. 5.3.3 Export LUNs via Fibre Channel Declare a LUN for the backstore device, to form a valid SAN storage object: /qla2xxx/21:0...4:ff:31:4c:48> luns/ create /backstores/iblock/my_disk Selected LUN 0. Successfully created LUN 0. Entering new node /qla2xxx/21:00:00:24:ff:31:4c:48/luns/lun0. /qla2xxx/21:0...:48/luns/lun0> Targetcli automatically assigns the default ID ‘0’ to the LUN, and then changes the working context to the new SAN storage object. Now the Fibre Channel target is created, and exports /dev/sdb as LUN 0. Copyright © 2015 Datera 16 LIO Admin Manual Return to the underlying Endpoint, as no attributes need to be set or modified for standard LUNs: /qla2xxx/21:0...:48/luns/lun0> cd < Taking you back to /qla2xxx/21:00:00:24:ff:31:4c:48. /qla2xxx/21:0...4:ff:31:4c:48> 5.3.4 Define Access Rights Configure the access rights. This involves setting up individual access rights for each initiator based on its WWPN. First, determine the WWPN for the respective Fibre Channel initiator. For instance, for Linux initiator systems, use: # cat /sys/class/fc_host/host*/port_name | sed -e s/0x// -e 's/../&:/g' -e s/:$// For a simple setup, allow access to the initiator with the WWPN as determined above: /qla2xxx/21:0...4:ff:31:4c:48> acls/ create 21:00:00:24:ff:31:4c:4c Successfully created Node ACL for 21:00:00:24:ff:31:4c:4c. Created mapped LUN 0. Entering new node /qla2xxx/21:00:00:24:ff:31:4c:48/acls/21:00:00:24:ff:31:4c:4c. /qla2xxx/21:0...4:ff:31:4c:4c> cd / /> The targetcli shell then automatically adds the appropriate mapped LUNs per default. 5.3.5 Display the Object Hierarchy The resulting Fibre Channel SAN object hierarchy looks as follows (displayed from the root object): /> ls o- / ..................................................................... [...] o- backstores .......................................................... [...] | o- fileio ............................................... [0 Storage Object] | o- iblock ............................................... [1 Storage Object] | | o- my_disk .......................................... [/dev/sdb activated] | o- pscsi ................................................ [0 Storage Object] | o- rd_dr ................................................ [0 Storage Object] | o- rd_mcp ............................................... [0 Storage Object] o- ib_srpt ........................................................ [0 Target] o- iscsi .......................................................... [0 Target] o- loopback ....................................................... [0 Target] o- qla2xxx ........................................................ [1 Target] o- 21:00:00:24:ff:31:4c:48 ....................................... [enabled] o- acls .......................................................... [1 ACL] | o- 21:00:00:24:ff:31:4c:4c .............................. [1 Mapped LUN] | o- mapped_lun0 ........................................... [lun0 (rw)] o- luns .......................................................... [1 LUN] o- lun0 .................................... [iblock/my_disk (/dev/sdb)] /> Copyright © 2015 Datera 17 LIO Admin Manual 5.4 InfiniBand/SRP 5.4.1 Cookbook Command Comment /ip_srpt create <WWPN> Create an SRP target In /ip_srpt/<WWPN>: luns/ create /backstores/iblock/my_disk Export the LUN my_disk In /ip_srpt/<WWPN>: acls/ create <Initiator WWPN> Allow access for the initiator at <WWPN> Table 4: Setting up an SRP target. 5.4.2 Instantiate an SRP Target Alternatively, instantiate an SRP target on the backstore device. The SRP ports available on the storage array might be presented with the following WWPNs: 0x00000000000000000002c903000e8acd 0x00000000000000000002c903000e8ace /backstores/iblock/my_disk> /ip_srpt create 0x00000000000000000002c903000e8acd Created target 0x00000000000000000002c903000e8acd. Entering new node /ib_srpt/0x00000000000000000002c903000e8acd. /ib_srpt/0x00...2c903000e8acd> Note that targetcli automatically changes the working context to the resulting tagged Endpoint. 5.4.3 Export LUNs via Fibre Channel Next, declare a LUN for the backstore device, to form a valid SAN storage object: /ib_srpt/0x00...2c903000e8acd> luns/ create /backstores/iblock/my_disk Selected LUN 0. Successfully created LUN 0. Entering new node /ib_srpt/0x00000000000000000002c903000e8acd/luns/lun0. /ib_srpt/0x00...acd/luns/lun0> Targetcli automatically assigns the default ID ‘0’ to the LUN, and then changes the working context to the new SAN storage object. Now the InfiniBand target is created, and exports /dev/sdb as LUN 0. Return to the underlying Endpoint, as no attributes need to be set or modified for standard LUNs: /ib_srpt/0x00...act/luns/lun0> cd < Taking you back to /ib_srpt/0x00000000000000000002c903000e8acd. /ib_srpt/0x00...2c903000e8acd> 5.4.4 Define Access Rights Configure the access rights. This involves setting up individual access rights for each initiator based in its WWPN. First, determine the WWPN for the respective SRP initiator. For instance, for Linux initiator systems, use: # cat /sys/class/infiniband/*/ports/*/gids/0 | sed -e s/fe80/0x0000/ -e 's/\://g' For a simple setup, simply grant access to the initiator with the WWPN determined above: /ib_srpt/0x00...2c903000e8acd> acls/ create 0x00000000000000000002c903000e8be9 Successfully created Node ACL for 0x00000000000000000002c903000e8be9. Created mapped LUN 0. Copyright © 2015 Datera 18 LIO Admin Manual Entering new node /ib_srpt/0x00000000000000000002c903000e8acd/acls/ 0x00000000000000000002c903000e8be9. /ib_srpt/0x00...2c903000e8be9> cd / /> The targetcli shell then automatically adds the appropriate mapped LUNs per default. 5.4.5 Display the Object Hierarchy The resulting object hierarchy looks as follows (displayed from the root object): /> ls o- / ..................................................................... [...] o- backstores .......................................................... [...] | o- fileio ............................................... [0 Storage Object] | o- iblock ............................................... [1 Storage Object] | | o- my_disk .......................................... [/dev/sdb activated] | o- pscsi ................................................ [0 Storage Object] | o- rd_dr ................................................ [0 Storage Object] | o- rd_mcp ............................................... [0 Storage Object] o- ib_srpt ........................................................ [1 Target] | o- 0x00000000000000000002c903000e8acd ............................ [enabled] | o- acls .......................................................... [1 ACL] | | o- 0x00000000000000000002c903000e8be9 ................... [1 Mapped LUN] | | o- mapped_lun0 ........................................... [lun0 (rw)] | o- luns .......................................................... [1 LUN] | o- lun0 .................................... [iblock/my_disk (/dev/sdb)] o- iscsi .......................................................... [0 Target] o- loopback ....................................................... [0 Target] o- qla2xxx ........................................................ [0 Target] /> 5.5 InfiniBand/iSER 5.5.1 Cookbook Command Comment /iscsi create Create an iSCSI target In /iscsi/<IQN>/tpgt1: portals/ create <IP_address> Associate an <IP_address> In /iscsi/<IQN>/tpgt1/<IP_address:port>: iser_enable Enable iSER In /iscsi/<IQN>/tpgt1: luns/ create /backstores/iblock/my_disk Export the LUN my_disk In /iscsi/<IQN>/tpgt1: set attribute authentication=0 demo_mode_write_protect=0 generate_node_acls=1 cache_dynamic_acls=1 Enable Demo Mode. Beware! Table 5: Setting up an iSER target. Copyright © 2015 Datera 19 LIO Admin Manual 5.5.2 Instantiate an iSER Target Instantiate an iSER target on the backstore device, to form a Target Portal Group (TPG): /backstores/iblock/my_disk> /iscsi create Created target iqn.2003-01.org.linux-iscsi.targetcli-demo.x8664:sn.05135a0e4a11. Selected TPG Tag 1. Successfully created TPG 1. Entering new node /iscsi/iqn.2003-01.org.linux-iscsi.targetclidemo.x8664:sn.05135a0e4a11/tpgt1. /iscsi/iqn.20...a0e4a11/tpgt1> Targetcli creates the TPG, automatically assigns the next default TPG tag ‘1’, and changes the working context to the resulting tagged TPG. Assign an IP address (here IPv4: 192.168.1.139) to the TPG, to make it accessible to iSER initiators: /iscsi/iqn.20...a0e4a11/tpgt1> portals/ create 192.168.1.139 Using default IP port 3260 Successfully created network portal 192.168.1.139:3260. Entering new node /iscsi/iqn.2003-01.org.linux-iscsi.targetclidemo.x8664:sn.05135a0e4a11/tpgt1/portals/192.168.1.139:3260. /iscsi/iqn.20...68.1.139:3260> Targetcli adds the iSER Network Portal and automatically changes the working context to it. 5.5.3 Enable iSER Enable the iSER protocol for the TPG: /iscsi/iqn.20...68.1.139:3260> iser_enable iser operation has been enabled. /iscsi/iqn.20...68.1.139:3260> ls o- 192.168.1.139:3260 ....................................... [OK, iser enabled] /iscsi/iqn.20...68.1.139:3260> cd < Taking you back to /iscsi/iqn.2003-01.org.linux-iscsi.targetclidemo.x8664:sn.05135a0e4a11/tpgt1. /iscsi/iqn.20...a0e4a11/tpgt1> 5.5.4 Export LUNs via iSER Declare a LUN for the backstore device, to form an Endpoint (a valid network storage object): /iscsi/iqn.20...a0e4a11/tpgt1> luns/ create /backstores/iblock/my_disk Selected LUN 0. Successfully created LUN 0. Entering new node /iscsi/iqn.2003-01.org.linux-iscsi.targetclidemo.x8664:sn.05135a0e4a11/tpgt1/luns/lun0. /iscsi/iqn.20...gt1/luns/lun0> Targetcli automatically assigns the default ID ‘0’ to the LUN, and then changes the working context to the Endpoint. Now the target is created, and exports the local device /dev/sdb as iSER LUN 0. Return to the underlying TPG, as no attributes need to be set or modified for standard LUNs: /iscsi/iqn.20...gt1/luns/lun0> cd < Taking you back to /iscsi/iqn.2003-01.org.linux-iscsi.targetclidemo.x8664:sn.05135a0e4a11/tpgt1. /iscsi/iqn.20...a0e4a11/tpgt1> 5.5.5 Define Access Control Configure access control. Typically, this involves setting up ACLs with individual login information for each initiator. For a simple demo setup, allow access to all initiators without any authentication: Copyright © 2015 Datera 20 LIO Admin Manual /iscsi/iqn.20...a0e4a11/tpgt1> set attribute authentication=0 demo_mode_write_protect=0 generate_node_acls=1 cache_dynamic_acls=1 Parameter demo_mode_write_protect is now '0'. Parameter authentication is now '0'. Parameter generate_node_acls is now '1'. Parameter cache_dynamic_acls is now '1'. /iscsi/iqn.20...a0e4a11/tpgt1> cd / /> Warning: Exporting “open” LUNs with no authentication requirements create a significant security and data integrity hazards. Don’t do this for production setups, unless you know exactly what you are doing. 5.5.6 Display the Object Hierarchy The resulting object hierarchy looks as follows (displayed from the root object): /> ls o- / ..................................................................... [...] o- backstores .......................................................... [...] | o- fileio ............................................... [0 Storage Object] | o- iblock ............................................... [1 Storage Object] | | o- my_disk .......................................... [/dev/sdb activated] | o- pscsi ................................................ [0 Storage Object] | o- rd_dr ................................................ [0 Storage Object] | o- rd_mcp ............................................... [0 Storage Object] o- ib_srpt ........................................................ [0 Target] o- iscsi .......................................................... [1 Target] | o- iqn.2003-01.org.linux-iscsi.targetcli-demo.x8664:sn.05135a0e4a11 . [1 TPG] | o- tpgt1 ....................................................... [enabled] | o- acls ........................................................ [0 ACL] | o- luns ........................................................ [1 LUN] | | o- lun0 .................................. [iblock/my_disk (/dev/sdb)] | o- portals .................................................. [1 Portal] | o- 192.168.1.139:3260 ............................. [OK, iser enabled] o- loopback ....................................................... [0 Target] o- qla2xxx ........................................................ [0 Target] /> 5.6 Persistence The target configuration (without the user data contained on the LUNs) can be persisted across reboots by invoking saveconfig from the root context: /> saveconfig WARNING: Saving targetcli-demo current configuration to disk will overwrite your boot settings. The current target configuration will become the default boot config. Are you sure? Type 'yes': yes Making backup of LIO-Target/ConfigFS with timestamp: 2011-11-24_16:37:10.887853 Generated LIO-Target config: /etc/target/backup/lio_backup-2011-1124_16:37:10.887853.sh Making backup of Target_Core_Mod/ConfigFS with timestamp: 2011-1124_16:37:10.887853 Generated Target_Core_Mod config: /etc/target/backup/tcm_backup-2011-1124_16:37:10.887853.sh Successfully updated default config /etc/target/lio_start.sh Successfully updated default config /etc/target/tcm_start.sh /> Copyright © 2015 Datera 21 LIO Admin Manual Note: Without saveconfig, the target configuration will be lost upon rebooting or unloading the target service, as the target configuration will be rolled back to the last saved one. Copyright © 2015 Datera 22 LIO Admin Manual 6 Targetcli Concepts 6.1 General Targetcli is an interactive shell with which users can create, delete and configure LIO storage objects. The fundamental metaphor of targetcli are context objects, which represent the target stack objects. Context objects are unified in a single hierarchical object tree that reflects their logical structure and relations. Context objects are named by their full path in the hierarchical object tree, which allows addressing and navigating them. “Entering” an object changes the current object context, corresponding to its current working path, which is depicted in the command prompt. pwd displays the complete current path (e.g., if the prompt displays an abbreviated path for space efficiency). cd navigates the object tree. Without parameters, cd presents the full objects tree. The destination path can be selected via cursor keys. help cd lists context-sensitive navigation tips. Due to the hierarchical structure of a Target object tree, multiple context changes might be required to enter and traverse objects. 6.2 Working with Contexts create context context_name, or short #context_name, saves the current context under “name,” which simplifies traversal of the object tree. Saved contexts can be restored at any time and remain persistent across sessions. enter context context_name, or short @context_name, restores the corresponding saved context “name” and enters it at the same time. Saved contexts allow both naming and bookmarking available transport objects. Each context objects provides context-sensitive operations, i.e. different context objects (or paths) provide different command sets. For instance, a path pointing at an iSCSI target provides different commands than a path pointing at a storage object. 6.3 Command Completion and Help At any time in the targetcli shell, [TAB] triggers command auto-completion. With a unique option, pressing [TAB] once auto-completes the current command being edited. With multiple options, hitting [TAB] twice produces a list of available command completions, if any, and a quick syntax help on the command currently being edited. This is useful when the exact next parameters available for the current command are not known. Each command parameter can be passed either as a positional parameter, in order of the command syntax, or as a key=value pair, in any order. Command auto-completion will reflect and present all available options. To list a full command syntax and description: help <command> Copyright © 2015 Datera 23 LIO Admin Manual 6.4 Command Syntax [<path>] <command> [<parameters>] <path> provides an optional path name (or context) in which the <command> is executed. <command> is run from the current path (or in the current context), if path is omitted. <parameters> depend on the command and its context-sensitive options. 6.5 Command Chains Targetcli has the ability to chain commands, which provides powerful semantics for creating complex command sequences. Command chains are constructed by chaining multiple single commands together, separated by a comma: <command1>, <command2> [, <command3> ...] When a command results in a context change (i.e. enter target iqn.1999-03.org.foobar:1234 enters that target context), the next command in the chain executes in that new context. In addition, create context and enter context can be used in command chains, enabling easy scripting of creation, deletion and query operations of objects embedded deeply in the Target object tree. 6.6 Object Tree The tree of objects managed by targetcli changes according to which objects are created or deleted, and which fabric modules are loaded on the system. Notably, not all fabric modules have all possible features and functions. A key difference of the iSCSI fabric module is that it has an intermediate level, Target Portal Groups (TPG), between the fabric target (defined by its IQN name) and the ACL, LUN and Network Portal objects. This intermediate level does not exist for other fabric modules, whose target node (defined by its WWN in the format supported by the specific fabric module) is directly attached to the lower objects. The basic layout of the targetcli object tree is as follows: o- / o- backstores | o- fileio | | o- fileio_storage_object[1…n] | o- iblock | | o- iblock_storage_object[1…n] | o- pscsi | | o- pscsi_storage_object[1…n] | o- rd_dr | | o- rd_dr_storage_object[1…n] | o- rd_mcp | o- rd_mcp_storage_object[1…n] o- ib_srpt | o- target[1…n] | | o- acls | | | o- node_acl[1…n] | | | o- mapped_lun[0…n] | o- luns | o- lun[0…n] o- iscsi | o- target[1…n] | | o- tpgt[1…n] Copyright © 2015 Datera 24 LIO Admin Manual | | | | | | | | | o- acls | | | o- node_acl[1…n] | | | o- mapped_lun[0…n] o- luns | o- lun[0…n] o- portals o- IP:port[1…n] o- qla2xxx o- target[1…n] | o- acls | | o- node_acl[1…n] | | o- mapped_lun[0…n] o- luns o- lun[0…n] 6.7 Creating a LUN and exporting it Creating a LUN requires the following steps: Create a backstore object: The backstore object is created by navigating to cd /backstores and creating a corresponding object in the specific context. Create a Target: A base Target can be created by navigating to the corresponding fabric (e.g., cd /iscsi or cd /qla2xxx) and entering the create command. For iSCSI, targetcli automatically assigns a TPG and TPG tag, and for all other fabrics, targetcli masks the TPG. Create the corresponding LUN: The LUN is created and “connected” to the backstore object. Create an iSCSI Network Portal: For iSCSI, Network Portals provide the access points to the Target. An iSCSI Network Portal always requires an IP address to be accessible, which needs to be available on the storage array before being associated with portal. Create ACLs: ACLs need to be defined for initiators to connect, unless authentication is disabled via the corresponding attributes. Disabling authentication is only available for iSCSI target, and it is deprecated for production setups. Set a LUN mapping: ACLs allow the mapping of LUN IDs onto Mapped_LUN IDs, which represent the LUN IDs presented to initiators. These mappings implement preferred LUN IDs for particular initiators. For instance, LUN 1 can be mapped onto Mapped_LUN 0 to make LUN 1 appear as iSCSI LUN 0 on the initiator. Usually, LUNs are identically mapped, however. 6.8 Object Tree Example # targetcli Welcome to the targetcli CLI: Copyright (c) 2014 by Datera, Inc. All rights reserved. Visit us at http://www.datera.io. Using Using Using Using loopback fabric module. ib_srpt fabric module. iscsi fabric module. qla2xxx fabric module. /> ls o- / ..................................................................... [...] o- backstores .......................................................... [...] | o- fileio ............................................... [0 Storage Object] Copyright © 2015 Datera 25 LIO Admin Manual | o- iblock ............................................. [18 Storage Objects] | | o- ib_DBBackup ....................... [/dev/vg_hdd/lv_DBBackup activated] | | o- ib_DBData01 ....................... [/dev/vg_ssd/lv_DBData01 activated] | | o- ib_DBData02 ....................... [/dev/vg_ssd/lv_DBData02 activated] | | o- ib_DBData03 ....................... [/dev/vg_ssd/lv_DBData03 activated] | | o- ib_DBData04 ....................... [/dev/vg_ssd/lv_DBData04 activated] | | o- ib_DBData05 ....................... [/dev/vg_ssd/lv_DBData05 activated] | | o- ib_DBData06 ....................... [/dev/vg_ssd/lv_DBData06 activated] | | o- ib_DBFlash1 ....................... [/dev/vg_hdd/lv_DBFlash1 activated] | | o- ib_DBFlash2 ....................... [/dev/vg_hdd/lv_DBFlash2 activated] | | o- ib_DBRedo1 ......................... [/dev/vg_ssd/lv_DBRedo1 activated] | | o- ib_DBRedo2 ......................... [/dev/vg_ssd/lv_DBRedo2 activated] | | o- ib_DBVote1 ......................... [/dev/vg_ssd/lv_DBVote1 activated] | | o- ib_DBVote2 ......................... [/dev/vg_ssd/lv_DBVote2 activated] | | o- ib_DBVote3 ......................... [/dev/vg_ssd/lv_DBVote3 activated] | | o- ib_VSAL ............................... [/dev/vg_hdd/lv_VSAL activated] | | o- ib_VSALArchiveMeta ......... [/dev/vg_hdd/lv_VSALArchiveMeta activated] | | o- ib_VSALMeta ....................... [/dev/vg_hdd/lv_VSALMeta activated] | | o- ib_VSALarch ....................... [/dev/vg_hdd/lv_VSALarch activated] | o- pscsi ................................................ [0 Storage Object] | o- rd_dr ................................................ [0 Storage Object] | o- rd_mcp ............................................... [0 Storage Object] o- ib_srpt ........................................................ [0 Target] o- iscsi ......................................................... [5 Targets] | o- iqn.2003-01.org.linux-iscsi.san01.x8664:-Sn.1ecefb4a1a9c ........ [1 TPG] | | o- tpgt1 ....................................................... [enabled] | | o- acls ........................................................ [0 ACL] | | o- luns ....................................................... [6 LUNs] | | | o- lun0 ............... [iblock/ib_DBData01 (/dev/vg_ssd/lv_DBData01)] | | | o- lun1 ............... [iblock/ib_DBData02 (/dev/vg_ssd/lv_DBData02)] | | | o- lun2 ............... [iblock/ib_DBData03 (/dev/vg_ssd/lv_DBData03)] | | | o- lun3 ............... [iblock/ib_DBData04 (/dev/vg_ssd/lv_DBData04)] | | | o- lun4 ............... [iblock/ib_DBData05 (/dev/vg_ssd/lv_DBData05)] | | | o- lun5 ............... [iblock/ib_DBData06 (/dev/vg_ssd/lv_DBData06)] | | o- portals ................................................. [4 Portals] | | o- 10.101.0.58:3260 ............................................. [OK] | | o- 10.101.0.59:3260 ............................................. [OK] | | o- 10.202.0.58:3260 ............................................. [OK] | | o- 10.202.0.59:3260 ............................................. [OK] | o- iqn.2003-01.org.linux-iscsi.san01.x8664:-Sn.70562938c1f1 ........ [1 TPG] | | o- tpgt1 ....................................................... [enabled] | | o- acls ........................................................ [0 ACL] | | o- luns ....................................................... [3 LUNs] | | | o- lun0 ................. [iblock/ib_DBVote1 (/dev/vg_ssd/lv_DBVote1)] | | | o- lun1 ................. [iblock/ib_DBVote2 (/dev/vg_ssd/lv_DBVote2)] | | | o- lun2 ................. [iblock/ib_DBVote3 (/dev/vg_ssd/lv_DBVote3)] | | o- portals ................................................. [4 Portals] | | o- 10.101.0.58:3260 ............................................. [OK] | | o- 10.101.0.59:3260 ............................................. [OK] | | o- 10.202.0.58:3260 ............................................. [OK] | | o- 10.202.0.59:3260 ............................................. [OK] | o- iqn.2003-01.org.linux-iscsi.san01.x8664:-Sn.bea2e958b27b ........ [1 TPG] | | o- tpgt1 ................................................ ....... [enabled] | | o- acls ........................................................ [0 ACL] | | o- luns ....................................................... [4 LUNs] | | | o- lun0 ....................... [iblock/ib_VSAL (/dev/vg_hdd/lv_VSAL)] | | | o- lun1 ............... [iblock/ib_VSALMeta (/dev/vg_hdd/lv_VSALMeta)] | | | o- lun2 ............... [iblock/ib_VSALarch (/dev/vg_hdd/lv_VSALarch)] | | | o- lun3 . [iblock/ib_VSALArchiveMeta (/dev/vg_hdd/lv_VSALArchiveMeta)] | | o- portals ................................................. [4 Portals] | | o- 10.101.0.58:3260 ............................................. [OK] Copyright © 2015 Datera 26 LIO Admin Manual | | o- 10.101.0.59:3260 ............................................. [OK] | | o- 10.202.0.58:3260 ............................................. [OK] | | o- 10.202.0.59:3260 ............................................. [OK] | o- iqn.2003-01.org.linux-iscsi.san01.x8664:-Sn.bf71dfd55c34 ........ [1 TPG] | | o- tpgt1 ....................................................... [enabled] | | o- acls ........................................................ [0 ACL] | | o- luns ....................................................... [2 LUNs] | | | o- lun0 ................. [iblock/ib_DBRedo1 (/dev/vg_ssd/lv_DBRedo1)] | | | o- lun1 ................. [iblock/ib_DBRedo2 (/dev/vg_ssd/lv_DBRedo2)] | | o- portals .................................................. [0 Portal] | o- iqn.2003-01.org.linux-iscsi.san01.x8664:-Sn.dda986cc6261 ........ [1 TPG] | o- tpgt1 ....................................................... [enabled] | o- acls ........................................................ [0 ACL] | o- luns ....................................................... [3 LUNs] | | o- lun0 ............... [iblock/ib_DBBackup (/dev/vg_hdd/lv_DBBackup)] | | o- lun1 ............... [iblock/ib_DBFlash1 (/dev/vg_hdd/lv_DBFlash1)] | | o- lun2 ............... [iblock/ib_DBFlash2 (/dev/vg_hdd/lv_DBFlash2)] | o- portals ................................................. [4 Portals] | o- 10.101.0.58:3260 ............................................. [OK] | o- 10.101.0.59:3260 ............................................. [OK] | o- 10.202.0.58:3260 ............................................. [OK] | o- 10.202.0.59:3260 ............................................. [OK] o- loopback ....................................................... [0 Target] o- qla2xxx ........................................................ [0 Target] /> 6.9 Best Practices 6.9.1 LUNs per TPG For 1 GbE iSCSI targets, Datera recommends using no more than 4–8 LUNs per TPG. For 10 GbE iSCSI targets, Datera recommends using no more than 8–16 LUNs per TPG. Each TPG uses a single Initiator_Target nexus for all logins, and thus shares the same processor core resources among all associated LUNs, so too many LUNs in a single TPG can limit the overall performance per initiator. 6.9.2 Command Queue Depth The fabric command queue depth is different from the TCQ depth of the storage object. The fabric command queue depth is enforced by the target to determine how many outstanding I/Os a given initiator can send to all of the LUNs for a given initiator on a given target Endpoint. Once an I/O has been cleared by the fabric command queue, it still is enforced by the underlying storage object TCQ, which is shared for the storage objects across all of the fabric module exports. For larger storage arrays, Datera recommends increasing the command queue depth to 128. To increase the command queue depth, enter in the TPG context: /iscsi/iqn.20...a0e4a11/tpgt1> set attribute default_cmdsn_depth = 128 6.9.3 Write Cache Emulation For iSCSI initiators that are not fully standards-conformant (such as with Red Hat RHEL5), emulation of the write cache is recommended on the IBLOCK device level. To enable write-cache emulation, enter in the IBLOCK device context: /backstores/iblock> set emulate_write_cache = 1 Copyright © 2015 Datera 27 LIO Admin Manual 7 Targetcli Commands 7.1 The bookmarks Command bookmarks <action> [<bookmark>] Manage personal bookmarks. Bookmarks can also be accessed with the cd command. For instance, the following commands are equivalent: cd mybookmark bookmarks go mybookmark Bookmarks can be used anywhere for a path, and can be conceptualized as a variable for that path: @mybookmark ls performs the ls command in the bookmarked path. ls @mybookmark shows the object tree beneath the bookmarked path. <action> can be either: add adds the current path to the bookmarks. del deletes a bookmark. go navigates to a bookmarked path. show shows all bookmarks. <bookmark> is an optional parameter that specifies the name of the bookmark. 7.2 The cd Command cd [<path>] Change current working path (or context) to path. <path> is constructed like a Unix path: “/” as separator, “.” for the current node,”..” for the parent node. Example: Assume the following a object tree: +-/ +-a0 | +-b0 | +-c0 +-a1 +-b0 +-c0 +-d0 (1) (*) (3) (2) Assume that the current node is the one marked by (*) above for all following examples: cd . navigate to node (1) cd . don’t change the current object (neutral operation) cd /a1/b0/c0/d0 navigate to node (2) cd ../../a1 navigate to node (3) cd /a1 navigate to node (3), too cd / navigates to the root node (“/”) Copyright © 2015 Datera 28 LIO Admin Manual cd /a0/b0/./c0/../../../a1/. navigates to node (3) The path history can be traversed with “<” and “>”: cd < navigates one step back in the path history (inverse operation) cd > navigates one step forward in the path history 7.3 The exit Command exit Exit the targetcli command line interface. 7.4 The get Command get [<group>] [<parameter>] List the value of one or more configuration parameter in the given group. With only a group specified, list all available parameters within that group. With no group or parameter specified, list all available groups. Example: get global color_mode loglevel_console 7.5 help Command help [<topic>] Display the manual page for a topic, or provides the list of available topics. 7.6 The ls Command ls [<path>] [<depth>] Display either the nodes tree relative to path or relative to the current node. <path> depicts the root path of the nodes tree to display. path can be an absolute path, a relative path or a bookmark. <depth> specifies the maximum depth of the tree to display. The default is ‘0’, which displays the full complete tree. 7.7 The pwd Command pwd Display the current path. 7.8 The refresh Command refresh Refresh and update the objects tree from the current path. 7.9 The set Command set [<group>] [<parameter>=<value>…] Copyright © 2015 Datera 29 LIO Admin Manual Set one or more configuration parameters in the given group. The global group contains all global CLI preferences. Other groups are context-sensitive, i.e. depend on the current path. With only a group specified, list all available parameters within that group. With no group or parameters specified, list all available groups. Example: set global color_mode=true loglevel_console=info 7.10 The status Command status Display the current node’s status summary. 7.11 Variable Types The following variable types are used for targetcli command parameters and attributes: bool: Boolean. Values: {TRUE|FALSE} bool-iSCSI: Boolean per RFC 3720. Values: {Yes|No} enum: List of alphanumeric values. integer: Digits. Values: [0–9] string: Alphanumeric characters color: {black|blue|cyan|default|green|magenta|red|white|yellow} loglevel: {critical|debug|error|info|warning} 7.12 The global Config Group auto_add_mapped_luns = <bool> Default value: TRUE If TRUE, automatically creates node ACLs mapped LUNs after creating a new target LUN or a new node ACL. auto_cd_after_create = <bool> Default value: TRUE If TRUE, changes current path to the new object that was just created. auto_enable_tpgt = <bool> Default value: TRUE If TRUE, automatically enables TPGTs upon creation. color_command = <color Default value: cyan Color for command completions. color_default = <color> Default value: none Default color for text display. The default is to use the terminal foreground color. This is the preferred setting, as individual user background colors can’t be known in advance. color_keyword = <color> Default value: cyan Copyright © 2015 Datera 30 LIO Admin Manual Color for keyword completions. color_mode = <bool> Default value: TRUE Console color display mode. Display in color if TRUE, and display in black and white if FALSE. color_parameter = <color> Default value: magenta Color for parameter completions. color_path = <color> Default value: magenta. Color for path completions. completions_in_columns = <bool> Default value: TRUE If TRUE, display command and parameter completions in columns, not lines. legacy_hba_view = <bool> Default value: TRUE If TRUE, use the legacy HBA view, which allows creating more than one storage object per HBA. logfile = <string> Default value: “~/.targetcli/log.tst” Logfile to use. Targetcli keeps its configuration and logs, etc. in the home directories under “.targetcli/”. A dedicated user log file contains only session information for that user’s sessions. Users can share a log file, and the corresponding session data will be merged. loglevel_console = <loglevel> Default value: info Log level for messages going to the console. loglevel_file = <loglevel> Default value: debug Log level for messages going to the log file. prompt_length = <integer> Default value: 30 Maximum length of the shell prompt path, 0 for infinite. tree_max_depth = <integer> Default value: 0 Maximum depth of displayed node tree. tree_round_nodes = <bool> Default value: TRUE Tree node display style. tree_show_root = <bool> Default value: TRUE Whether or not to display the root of the tree. tree_status_mode = <bool> Default value: TRUE Whether or not to display status in the tree. Copyright © 2015 Datera 31 LIO Admin Manual 8 Targetcli Contexts 8.1 The Root (“/”) Context 8.1.1 The saveconfig Command saveconfig Save the whole configuration tree to disk so that it will be restored on next boot. Unless this command is executed, changes are lost across reboots. 8.1.2 The version Command version Display the targetcli version and the support libraries versions. 8.2 The backstores Context There are no command or parameter groups that apply to this context. 8.3 The FILEIO Backstore Context 8.3.1 The create Command create <name> <file_or_device> [<size>] [<generate_wwn>] [<buffered>] Create a FILEIO storage object. <name> is the name of the FILEIO new storage object. <file_or_device> specifies the path to the file or a block device to be used for the storage backend. <size> is an optional parameter that specifies the size of the file to be used if file_or_device depicts a regular file. Otherwise, if file_or_device depicts a block device, size must be omitted. The size syntax is: If size is an integer, it represents a number of bytes. If size is a string, the following units can be used: B or no unit for bytes k, K, kB, KB for kB (kilobytes) m, M, mB, MB for MB (megabytes) g, G, gB, GB for GB (gigabytes) t, T, tB, TB for TB (terabytes) <generate_wwn> is an optional Boolean parameter specifying whether or not a T10 WWN serial should be created for the unit (by default, yes). <buffered> is an optional Boolean parameter specifying whether buffered mode is enabled. The default is disabled by default (i.e. synchronous I/O mode). 8.3.2 The delete Command delete <name> Recursively delete the storage object with name. If there are LUNs using this storage object, they will be deleted as well. Copyright © 2015 Datera 32 LIO Admin Manual Example: delete mystorage Deletes the storage object “mystorage” and all associated LUNs. 8.4 The PSCSI Backstore Context 8.4.1 The create Command create <name> <device> Create a new PSCSI storage object with name, and on the physical SCSI device. <name> is the name of the PSCSI new storage object. <device> can either be a full path name to a SCSI device or the SCSI device ID. If device is a path name, Datera recommends using the /dev/disk/by-id hierarchy to ensure consistent naming across reboots and/or modifications of the underlying physical SCSI system. Specifying device as a SCSI device ID in the traditional H:C:T:L format is not recommended, as SCSI IDs can vary over time. 8.4.2 The delete Command delete <name> Recursively delete the storage object with name. If there are LUNs using this storage object, they will be deleted as well. Example: delete mystorage Deletes the storage object “mystorage” and all associated LUNs. 8.5 The RDDR Backstore Context 8.5.1 The create Command create <name> <size> [<generate_wwn>] Create a new RDDR (direct memory mapped ramdisk) storage object with name. <name> is the name of the RDDR new storage object. <size> specifies the size of the ramdisk. The size syntax is: If size is an integer, it represents a number of bytes. If size is a string, the following units can be used: B or no unit for bytes k, K, kB, KB for kB (kilobytes) m, M, mB, MB for MB (megabytes) g, G, gB, GB for GB (gigabytes) t, T, tB, TB for TB (terabytes) <generate_wwn> is an optional Boolean parameter that specifies whether or not a T10 WWN serial number should be generated for the LUN. The default is true. Copyright © 2015 Datera 33 LIO Admin Manual 8.5.2 The delete Command delete <name> Recursively delete the storage object with name. If there are LUNs using this storage object, they will be deleted as well. Example: delete mystorage Deletes the storage object “mystorage” and all associated LUNs. 8.6 The Storage Objects Context 8.6.1 The version Command version Display the version of the current backstore plugin module. 8.6.2 The attribute Config Group block_size = <integer> Values: {512|1024|2048|4096} The physical block size of the underlying device. For IBLOCK and PSCSI backstores, this is determined by the underlying physical device. For FILEIO backstores, this is a logical value. emulate_tas = <bool> Values: {0|1}, default value: 1 (enabled) Control for emulated task aborted status. This attribute determines whether the target will send a status response to the initiator upon task abort. emulate_ua_intlck_ctrl = <bool> Values: {0|1}, default value: 0 (disabled) Control for unit attention interlock. This attribute determines which unit attention to report when multiple unit attentions have been generated. enforce_pr_isids = <bool> Values: {0|1}, default value: 1 (enabled) Control for using persistent reservation with initiator session IDs (ISIDS). This attribute determines if ISIDS are included in the initiator port tuple (iSCSI only). max_sectors = <integer> Values: [1–hw_max_sectors], default value: hw_max_sectors The user settable max_sectors for the backstore device. Its value may be up to hw_max_sectors as reported by the backstore device. queue_depth = <integer> Values: [1–hw_queue_depth], default value: 1 The user settable queue depth for the backstore device. Its value may be up to hw_queue_depth as reported by the backstore device. task_timeout = <integer> Values: [0–300], default value: 0 Value of legacy tasks timeout in seconds. Removed in v4.1 target code. Copyright © 2015 Datera 34 LIO Admin Manual 8.7 The Fabric Modules Context 8.7.1 The create Command create <target> [<wwn>] Creates a new target. <wwn> is an optional parameter that specifies the T10 WWN unique serial number to be used for the target. Its format depends on the transport(s) supported by the fabric module. If the wwn is omitted, a target will be created using either a randomly generated WWN of the correct type, or the first unused WWN in the list of possible WWNs if one is available. If WWNs are constrained to a list (i.e. for hardware targets addresses), and all WWNs are in use, the target creation will fail. The info command provides more information about WWN types and values. 8.7.2 The delete Command delete <wwn> Recursively delete the target with the specified wwn, including all storage objects under it. 8.7.3 The info Command info Display information about the fabric module, notably the supported transports(s) and accepted WWN format(s), along its supported features. 8.7.4 The version Command version Display the target fabric module version. 8.7.5 The discovery_auth Config Group Note: This group is only active for the iSCSI fabric module. It appears under the global iSCSI context in “/sys/kernel/config/target/iscsi/discovery_auth”. Discovery authentication is typically disabled, as it is only used by initiators to query the available target endpoints. If discovery authentication is enabled, the initiator must provide one-way authentication by sending matching password and userid login credentials. If mutual_userid and mutual_password is also set, the target must use mutual authentication by responding with its login credentials. enable = <bool> Values: {0|1}, default value: 0 (disabled) Controls enforcing iSCSI discovery authentication. mutual_password = <string> Default value: “” The password for mutual iSCSI discovery authentication. mutual_userid = <string> Default value: “” The user name for mutual iSCSI discovery authentication. Copyright © 2015 Datera 35 LIO Admin Manual password = <string> Default value: “” The password for one-way iSCSI discovery authentication. userid = <string> Default value: “” The user name for one-way iSCSI discovery authentication. 8.8 The Target Context The Target context and contains all objects that belong to a specific fabric target. iSCSI targets contain associated Target Portal Groups (TPGs) contexts, identified by their TPG tags. Thus, the tpg_tag_iscsi parameter only applies to iSCSI targets. For all other targets or fabrics, the targetcli shell masks the TPG contexts. LUNs are then exported for all fabrics via fabric specific Endpoints from their respective LUN object context. 8.8.1 The create Command create [<tpg_tag_iscsi>] Create a new Endpoint within the current target. <tpg_tag_iscsi> is an optional iSCSI parameter that must be a positive integer. If omitted, the next available ordinal number will be used as the TPG tag. 8.8.2 The delete Command delete <tpg_tag_iscsi> Delete the TPG with the specified TPG tag, including all storage objects under it. <tpg_tag_iscsi> specifies the iSCSI TPG to be deleted. It must be positive integer matching an existing TPG tag. 8.9 The TPG Context (iSCSI) The TPG context is specific to iSCSI. It has no equivalent in other fabrics. 8.9.1 The disable Command disable Disable the TPG. 8.9.2 The enable Command enable Enable the TPG. 8.9.3 The attribute Config Group authentication = <bool> Values: {0|1}, default value: 1 (enabled) Control for enforcing iSCSI authentication for iSCSI Target portal group context. Copyright © 2015 Datera 36 LIO Admin Manual cache_dynamic_acls = <bool> Values: {0|1}, default value: 0 (disabled) Control for caching dynamically generated initiator NodeACLs from generate_node_acls = 1. crc32c_x86_offload = <bool> Values: {0|1}, default value: 1 (enabled) Control for enabling SSE v4.2 CRC32C offload on supported x86 processors. CRC32C offload will automatically be used if the underlying processor supports it, which is true for Intel processors starting from the Nehalem microarchitecture. Removed in mainline v4.1 target code. default_cmdsn_depth = <integer> Values: [1–2^32-1], default value: 16 Default iSCSI CmdSN (session wide queue) depth used by explict NodeACLs and dynamic NodeACLs with write_protect = 1. The value '16' is recommended for 1 GbE networks, and the value '64' is recommended for 10 GbE networks." demo_mode_write_protect = <bool> Values: {0|1}, default value: 1 (enabled) For initiator NodeACLs dynamically created with generate_node_acl = 1, this attribute controls if LUNs appear with write_protect = 1, i.e. per default initiators only obtain read access to LUNs. Warning: Disabling demo mode write protection for a LUN exports that LUN with global read/write access. Concurrent writes from multiple initiators on that LUN can cause data corruption on it, unless the writes accesses are serialized by a higher-level protocol, e.g., by a cluster file system such as VMware VMFS. Disable this attribute only if you are sure what you are doing, see also Section 9.5. generate_node_acls = <bool> Values: {0|1}, default value: 0 (disabled) Allow all iSCSI initiators to login by dynamically generating an initiator NodeACL at login time. Warning: Enabling dynamic NodeACL creation for a LUN exposes that LUN to unauthenticated logins from initiators. The resulting security hole for that LUN may compromise the data on it, unless other security means are in place, such as physical security by deploying a separate SAN network. Enable this attribute only if you are sure what you are doing, see also Section 9.5. login_timeout = <integer> Values: [1–30], default value: 15 Value in seconds to wait for an iSCSI login to complete before explicitly failing the login attempt. netif_timeout = <integer> Values: [1–15], default value: 2 Value in seconds to check for physical NIC link failure. prod_mode_write_protect = <bool> Values: {0|1}, default value: 0 (disabled) Control for explicit initiator NodeACLs, determining whether all associated LUNs should appear with write_protect = 1. Copyright © 2015 Datera 37 LIO Admin Manual 8.9.4 The parameter Config Group The following parameters are used to directly control iSCSI control properties per RFC 3720, see [6]. AuthMethod = <enum Values: {CHAP,None|CHAP|None} Defines the authentication method used by the iSCSI target portal group (TPG) endpoint. CHAP is the Challenge Handshake Authentication Protocol as defined in RFC 1994, see [17]. DataDigest = <enum> Values: {CRC32C|None}, default value: None Used to control the data digest usage by the iSCSI target portal group (TPG) endpoint. RFC 3385 provides a discussion on the selection criteria for the CRC, see [3]. DataPDUInOrder = <bool-iSCSI> Default value: Yes 'No' is used by iSCSI to indicate that the data PDUs within sequences can be in any order. 'Yes' indicates that data PDUs within sequences have to be at continuously increasing addresses and overlays are prohibited. DataSequenceInOrder = <bool-iSCSI> Default value: Yes A Data Sequence is a sequence of Data-In or Data-Out PDUs that end with a Data-In or Data-Out PDU with the 'F' bit set to '1'. A Data-Out sequence is sent either unsolicited or in response to an R2T. Sequences cover an offset-range. 'Yes' indicates that data sequences must be transferred using continuously non-decreasing sequence offsets (R2T buffer offset for writes, or the smallest SCSI Data-In buffer offset within a read data sequence). A target may retry at most the last R2T, and an initiator may request at most retransmission for the last read data sequence. For this reason, if DataSequenceInOrder is 'Yes' and ErrorRecoveryLevel is not '0', then MaxOustandingR2T must be set to '1'. 'No' indicates that Data PDU sequences may be transferred in any order. DefaultTime2Retain = <integer> Values: [0–3600], default value: 20 The initiator and target negotiate the maximum time, in seconds after an initial wait (Time2Wait), before which an active task reassignment is still possible after an unexpected connection termination or a connection reset. This value is also the session state timeout if the connection in question is the last LOGGED_IN connection in the session. '0' indicates that connection/task state is immediately discarded by the target. DefaultTime2Wait = <integer> Values: [0–3600], default value: 2 The initiator and target negotiate the minimum time, in seconds, to wait before attempting an explicit/implicit logout or an active task reassignment after an unexpected connection termination or a connection reset. '0' indicates that logout or active task reassignment can be attempted immediately. ErrorRecoveryLevel = <integer> Values: [0–2], default value: 0 Copyright © 2015 Datera 38 LIO Admin Manual The Initiator and target negotiate the supported recovery level. Recovery levels represent a combination of recovery capabilities. Each recovery level includes all the capabilities of the lower recovery levels and adds some new ones to them, see also [11]. FirstBurstLength = <integer> Values: [512–2^24-1] not to exceed MaxBurstLength, default value: 65353 The initiator and target negotiate the maximum amount in bytes of unsolicited data an iSCSI initiator may send to the target during the execution of a single SCSI command. This covers the immediate data (if any) and the sequence of unsolicited Data-Out PDUs (if any) that follow the command. HeaderDigest = <enum> Values: {CRC32C|None}, default value: None Used to control the HeaderDigest usage by the iSCSI target portal group endpoint. RFC 3385 provides a discussion on the selection criteria for the CRC, see [3]. IFMarkInt = <integer> Values: [1–65535], default value: 2048 Used to set the interval for the target to initiator markers on the connection. IFMarker = <bool-iSCSI> Default value: No Used to control the usage or the target to initiator markers on the connection. ImmediateData = <bool-iSCSI> Default value: No (typically goes to 'Yes' for life sessions) The Initiator and target negotiate support immediate data. To turn immediate data off, the initiator or target must state its desire to do so. ImmediateData can be enabled if both the initiator and target set ImmediateData = Yes. If both ImmediateData and InitialR2T are set to 'Yes' (the default), then only immediate data is accepted in the first burst. If ImmediateData is set 'Yes' and InitialR2T is set to 'No', then the initiator may send unsolicited immediate data and/or one unsolicited burst of Data-Out PDUs. If ImmediateData is set to 'No' and InitialR2T is set to 'Yes', then the initiator must not send unsolicited data and the target rejects unsolicited data with the corresponding response code. If both ImmediateData and InitialR2T are set to 'No', then the initiator must not send unsolicited immediate data, but may send one unsolicited burst of Data-Out PDUs. InitialR2T = <bool-iSCSI> Default value: Yes Used to turn off the default use of R2T for unidirectional and the output part of bidirectional commands, thus allowing an initiator to start sending data to a target as if it has received an initial R2T with Buffer Offset = <Immediate Data Length> and Desired Data Transfer Length = MIN(FirstBurstLength, <Expected Data Transfer Length>) - <Received Immediate Data Length>. R2T is required as a default action, unless both initiator and target send this key-pair attribute, specifying InitialR2T = No. Only the first outgoing data burst (immediate data and/or separate PDUs) can be sent unsolicited (i.e. not requiring an explicit R2T). MaxBurstLength = <integer> Values: [512–2^24-1], default value: 262144 Copyright © 2015 Datera 39 LIO Admin Manual The Initiator and target negotiate maximum SCSI data payload in bytes in a Data-In or a solicited Data-Out iSCSI sequence. A sequence consists of one or more consecutive Data-In or Data-Out PDUs that end with a Data-In or Data-Out PDU with the 'F' bit set to '1'. MaxConnections = <integer> Values: [1–65535], default value: 1 This value controls the usage of MC/S. Initiator and target negotiate the maximum number of connections requested and/or acceptable MaxOutstandingR2T = <integer> Values: [1–65535], default value: 1 The Initiator and target negotiate the maximum number of outstanding R2Ts per task, excluding any implied initial R2T that might be part of that task. An R2T is considered outstanding until the last data PDU (with the 'F' bit set to '1') is transferred, or a sequence reception timeout is encountered for that data sequence. MaxRecvDataSegmentLength =<integer> Values: [512–2^24-1], default value: 8192 (typically jumps to >64535 for life sessions) The Initiator or target declare the maximum data segment length in bytes they each can receive in an iSCSI PDU. The transmitter (initiator or target) is required to send PDUs with a data segment that does not exceed MaxRecvDataSegmentLength of the respective receiver. A target receiver is additionally limited by MaxBurstLength for solicited data and FirstBurstLength for unsolicited data. An initiator must neither send solicited PDUs exceeding MaxBurstLength nor unsolicited PDUs exceeding FirstBurstLength (or FirstBurstLength minus <Immediate Data Length> if immediate data were sent). OFMarkInt = <integer> Values: [0–65535], default value: 2048 Used to set the interval for the initiator to target markers on the connection. OFMarker = <bool-iSCSI> Default value: No. Used to control the usage or the initiator to target markers on the connection. TargetAlias = <string> If a target has been configured with a human-readable name or description, this name should be communicated to the initiator during a Login Response PDU if SessionType = Normal. This string is not used as an identifier, nor is it meant to be used for authentication or security purposes. It can be displayed by the initiator's user interface in a list of targets to which it is connected. 8.9.5 The parameter Config Group This group’s parameters are specific to each fabric module. If no parameters are available for a fabric module, this group is omitted. 8.10 The LUNs Context There are no command or parameter groups that apply to this context. Copyright © 2015 Datera 40 LIO Admin Manual 8.11 The luns Context 8.11.1 The create Command create <storage_object> [<lun>] [<add_mapped_luns>] Create a new LUN in the TPG, and export it as a new storage_object. <storage_object> specifies the full path to the new storage object to be created. Example: For the storage object “mydisk” in the virtual HBA pscsi0, the full path would be “/backstore/pscsi0/mydisk.” <lun> is an optional parameter specifying the LUN number. If omitted, the first available LUN in the TPG is used. <add_mapped_luns> is an optional Boolean parameter that specifies whether mapped LUNs should be created for all existing node ACLs, thus automatically mapping those new LUNs. If this parameter is omitted, it defaults to the global parameter auto_add_mapped_luns. 8.11.2 The delete Command delete <lun> Delete the specified LUN from the TPG. <lun> must be an integer matching an existing LUN. 8.12 The Node acls Context 8.12.1 The create Command create <wwn> [<add_mapped_lun>] Create a Node ACL for the initiator node with the specified wwn. <wwn> must match the expected WWN type of the target’s fabric module. <add_mapped_luns> is an optional Boolean parameter that specifies whether mapped LUNs should be created for all existing node ACLs, thus automatically mapping those new LUNs. If this parameter is omitted, it defaults to the global parameter auto_add_mapped_luns. 8.12.2 The delete Command delete <wwn> Delete the Node ACL with the specified wwn. <wwn> must be a valid existing WWN. 8.13 The Node ACLs Context 8.13.1 The create Command create <mapped_lun> <tpg_lun_iscsi> [<write_protect>] Create a mapping for an existing TPG LUN, to be exported to the initiator referenced by the ACL. <mapped_lun> is the Mapped LUN that appears for the initiator. <tpg_lun_iscsi> is the corresponding TPG LUN (iSCSI only). Copyright © 2015 Datera 41 LIO Admin Manual <write_protect> is an optional Boolean parameter that specifies whether the initiator will have write access to the Mapped LUN. 8.13.2 The delete Command delete <mapped_lun> Delete the specified Mapped LUN from the TPG. <mapped_lun> must be a integer matching an existing Mapped LUN. 8.13.3 The auth Config Group CHAP authentication is enforced by default for each explicit initiator NodeACL that is created. Enforcing CHAP authentication is controlled by the TPG authentication attribute, and the minimum requirement for initiators is one-way authentication. Initiator NodeACL authentication also depends on having “CHAP” set in the AuthMethod TPG attribute list, which is the default for each TPG. Warning: CHAP authentication can be disabled for all initiator NodeACLs on a TPG endpoint basis. The data on the resulting “open” LUN may be compromised, unless other security means are in place, such as physical security by deploying a separate SAN network. Disable CHAP authentication only if you are sure what you are doing, see also Section 9.5. Note: CHAP authentication is disabled by default in TPG demo-mode when it is configured with generate_node_acl = 1. mutual_password = <string> Default value: ”” The password for mutual iSCSI initiator NodeACL authentication. mutual_userid = <string> Default value: ”” The username for mutual iSCSI initiator NodeACL authentication. password = <string> Default value: ”” The password for one-way iSCSI initiator NodeACL authentication. userid = <string> Default value: ”” The username for one-way iSCSI initiator NodeACL authentication. 8.13.4 The attribute Config Group The following attributes are specific to Initaitor NodeACL context. dataout_timeout = <integer> Values: [0–60], default value: 3 The timeout value in seconds for an outstanding Data-Out request before invoking recovery. dataout_timeout_retries = <integer> Values: [0–15], default value: 5 The number of data out timeout recovery attempts before invoking a failed path. default_erl = <integer> Values: [0–2], default value: 0 Copyright © 2015 Datera 42 LIO Admin Manual The default ErrorRecoveryLevel to enforce for this Initiator NodeACL. nopin_response_timeout = <integer> Values: [0–60], default value: 5 The value in seconds to wait before failing a path due to a non-received NopIN response. nopin_timeout = <integer> Values: [0–60], default value: 5 The value in seconds to wait before sending a target-generated NopIN. random_datain_pdu_offsets = <bool> Values: {0|1}, default value: 0 (disabled) Boolean value per RFC 3720 (see [6]) to signal randomization of DataIN PDU offsets when using DataPDUInOrder = No. random_datain_seq_offsets = <bool > Values: {0|1}, default value: 0 (disabled) Boolean value per RFC 3720 (see [6]) to signal randomization of DataIN Sequence offsets when using DataSequenceInOrder = No. random_r2t_offsets = <bool> Values: {0|1}, default value: 0 (disabled) Boolean value per RFC 3720 (see [6]) to signal randomization of Ready to Transmit (R2T) offsets when using MaxOutstaningR2T > 1." 8.14 The Mapped LUNs Context There are no command or parameter groups that apply to this context. 8.15 The Portals Context (iSCSI) This portals context is specific to iSCSI. It has no equivalent in any other fabric. In iSCSI, there are currently no command or parameter groups that apply to it. 8.16 The portals Context (iSCSI) This portals context is specific to iSCSI. It has no equivalent in any other fabric. 8.16.1 The create Command create [<ip_address>] [<ip_port>] Create an iSCSI Network Portal with specified ip_address and ip_port. <ip_address> is an optional parameter that specifies the IP address of the new iSCSI Network Portal. If it is omitted, the first IP address found matching the local hostname will be used. <ip_port> is an optional parameter that specifies the IP port number of the new iSCSI Network Portal. If it is omitted, the default port for the target fabric will be used. 8.16.2 The delete Command delete <ip_address> <ip_port> Delete the iSCSI Network Portal with the ip_address and ip_port. Copyright © 2015 Datera 43 LIO Admin Manual 9 Targetcli Examples This section includes a number of examples of how setup the target, create objects, such as backstores, Endpoints and Target Portal Groups. It also illustrates some “syntax sugar” that targetcli uses, such as object directory history, command history, TAB completion and bookmarks. Note: These examples assume auto_cd_after_create = false to better demonstrate how object paths (i.e. execution contexts) function, including the different context and command use scenarios. The default of auto_cd_after_create = true automatically changes to the new object context upon creation of the associated object. Also, these examples are based on iSCSI, but the concepts apply symmetrically to all other fabrics and protocols. 9.1 Startup Targetcli can be invoked by running targetcli as root from the underlying Linux system shell: # targetcli Welcome to the targetcli CLI: Copyright (c) 2014 by Datera, Inc. All rights reserved. Visit us at http://www.datera.io. Using Using Using Using /> loopback fabric module. ib_srpt fabric module. iscsi fabric module. qla2xxx fabric module. Upon targetcli initialization, the underlying RTSlib loads the installed fabric modules, and creates the corresponding configfs mount points (at /sys/kernel/config/target/<fabric>), as specified by the associated spec files (located in /var/target/fabric/fabric.spec). Set auto_cd_after_create = false to prevent targetcli from automatically changing the object context (or working directory) to new objects after their creation: /> set global auto_cd_after_create=false Parameter auto_cd_after_create is now 'false'. /> This is the default behavior assumed for the following examples. 9.2 Backstores Enter the top-level backstore object, and create a few backstores (storage objects) using IBLOCK, FILEIO and PSCSI type devices: /> cd backstores/ /backstores> Create an IBLOCK backstore from a /dev/sdb block device. Note that this device can be any TYPE_DISK block-device, and can also use /dev/disk/by-id/symlinks: /backstores> iblock/ create dev=/dev/sdb name=block_backend Generating a wwn serial. Copyright © 2015 Datera 44 LIO Admin Manual Created iblock storage object block_backend using /dev/sdb. /backstores> Alternatively, logical volume created by LVM can be used as a backstore. For instance, create an IBLOCK backstore from an LVM logical volume at /dev/<volume_group>/<logical_volume>: /backstores> iblock/ create dev=/dev/vg0/lv1 name=block_backend Generating a wwn serial. Created iblock storage object block_backend using /dev/vg0/lv1. /backstores> Create an (unbuffered) FILEIO backstore with 2 GB size for the underlying file: /backstores> fileio/ create name=file_backend file_or_dev=/usr/src/fileio size=2G Generating a wwn serial. Not using buffered mode. Created fileio file_backend. /backstores> Create a PSCSI (SCSI pass-through) backstore for a physical SCSI device, in this case a TYPE_ROM device using /dev/sr0: /backstores> pscsi/ create name=pscsi_backend dev=/dev/sr0 Created pscsi storage object pscsi_backend using /dev/sr0 /backstores> Display the resulting active backstores: /backstores> ls o- backstores ............................................................ [...] o- fileio ................................................. [1 Storage Object] | o- file_backend .............................. [/usr/src/fileio deactivated] o- iblock ................................................. [1 Storage Object] | o- block_backend .................................... [/dev/sdb deactivated] o- pscsi .................................................. [1 Storage Object] | o- pscsi_backend .................................... [/dev/sr0 deactivated] o- rd_dr .................................................. [0 Storage Object] o- rd_mcp ................................................. [0 Storage Object] /backstores> 9.3 iSCSI Endpoints Change to the top level iSCSI fabric object and instantiate an iSCSI target, using a default IQN based on the system hostname and architecture: /backstores> cd /iscsi /iscsi> create Created target iqn.2003-01.org.linux-iscsi.san01.x8664:sn.35ee770c82fb. Selected TPG Tag 1. Successfully created TPG 1. /iscsi> Targetcli per default automatically adds a Target Portal Group (TPG) and per default assigns a sequentially increasing TPG tag, starting from ‘1’, thereby adding a TPG 1 to the iSCSI target. Now add the backstores (IBLOCK and FILEIO) to the TPG: /iscsi> cd iqn.2003-01.org.linux-iscsi.san01.x8664:sn.35ee770c82fb/tpgt1 /iscsi/iqn.20...70c82fb/tpgt1> luns/ create /backstores/iblock/block_backend Selected LUN 0 Successfully created LUN 0. /iscsi/iqn.20...70c82fb/tpgt1> luns/ create /backstores/fileio/fileio_backend Selected LUN 1 Copyright © 2015 Datera 45 LIO Admin Manual Successfully created LUN 1. /iscsi/iqn.20...70c82fb/tpgt1> Targetcli per default automatically assigns sequentially increasing LUN numbers, starting from ‘0’, thereby exporting LUN 0 and LUN 1 in the example above. The LUN ID can be explicitly set by using create with the lun=0 attribute. Display the resulting iSCSI TPG: /iscsi/iqn.20...70c82fb/tpgt1> ls ../ o- iqn.2003-01.org.linux-iscsi.san01.x8664:sn.35ee770c82fb ............. [1 TPG] o- tpgt1 ........................................................... [enabled] o- acls ............................................................ [0 ACL] o- luns ........................................................... [2 LUNs] | o- lun0 ................................ [iblock/block_backend (/dev/sdb)] | o- lun1 ........................ [fileio/fileio_backend (/usr/src/fileio)] /iscsi/iqn.20...70c82fb/tpgt1> Instantiate a second iSCSI target, using another default IQN, and add a backstore (PSCSI) to it: /iscsi/iqn.20...70c82fb/tpgt1> cd /iscsi /iscsi> create Created target iqn.2003-01.org.linux-iscsi.san01.x8664:sn.bf919196ff4e. Selected TPG Tag 1. Successfully created TPG 1. /iscsi> iqn.2003-01.org.linux-iscsi.san01.x8664:sn.bf919196ff4e/tpgt1/luns/ create /backstores/pscsi/pscsi_backend Selected LUN 0 Successfully created LUN 0. /iscsi> cd < Taking you back to /iscsi/iqn.2003-01.org.linuxiscsi.san01.x8664:sn.35ee770c82fb/tpgt1. /iscsi/iqn.20...70c82fb/tpgt1> Targetcli per default automatically adds another TPG and per default assigns a sequentially increasing TPG tag, starting again from ‘1’, thereby adding another TPG 1 to the second ISCSI target. For the new LUN, targetcli also automatically assigns sequentially increasing LUN numbers, starting from ‘0’, thereby exporting LUN 0 in the example above. The LUN ID can be set by using create with lun=0. 9.4 iSCSI Network Portals Assign an IPv4 address to the iSCSI TPG to form a valid iSCSI Endpoint: /iscsi/iqn.20...70c82fb/tpgt1> portals/ create 192.168.62.151 Using default IP port 3260 Successfully created network portal 192.168.62.151:3260. /iscsi/iqn.20...70c82fb/tpgt1> Targetcli automatically uses the iSCSI default port number of ‘3260’, thereby forming a valid new iSCSI Endpoint. Display the resulting iSCSI targets: /iscsi/iqn.20...70c82fb/tpgt1> ls /iscsi o- iscsi ........................................................... [2 Targets] o- iqn.2003-01.org.linux-iscsi.san01.x8664:sn.35ee770c82fb ........... [1 TPG] | o- tpgt1 ......................................................... [enabled] | o- acls .......................................................... [0 ACL] | o- luns ......................................................... [2 LUNs] | | o- lun0 .............................. [iblock/block_backend (/dev/sdb)] | | o- lun1 ...................... [fileio/fileio_backend (/usr/src/fileio)] | o- portals .................................................... [1 Portal] Copyright © 2015 Datera 46 LIO Admin Manual | o- 192.168.62.151:3260 .............................................. [OK] o- iqn.2003-01.org.linux-iscsi.san01.x8664:sn.bf919196ff4e ........... [1 TPG] o- tpgt1 ......................................................... [enabled] o- acls .......................................................... [0 ACL] o- luns .......................................................... [1 LUN] | o- lun0 ............................... [pscsi/pscsi_backend (/dev/sr0)] o- portals .................................................... [1 Portal] o- 192.168.62.151:3260 ............................................ [OK] /iscsi/iqn.20...70c82fb/tpgt1> 9.5 Access Control There are three basic setups for LUN authentication: “demo mode”, CHAP Initiator authentication and Mutual CHAP authentication. Each are discussed below. 9.5.1 Demo mode “Demo mode" describes a security configuration in which all access control to the LUNs in a TPG is disabled. “Open” LUNs use automatic ACLs without authentication in their TPG context. Such a configuration is called “demo mode”, because it usually only makes sense for simple demo setups. Enable “demo mode” TPG operation for the PSCSI Endpoint: /iscsi/iqn.20...70c82fb/tpgt1> /iscsi/iqn.2003-01.org.linuxiscsi.san01.x8664:sn.bf919196ff4e/tgpt1/ set attribute authentication=0 demo_mode_write_protect=0 generate_node_acls=1 cache_dynamic_acls=1 Parameter demo_mode_write_protect is now '0'. Parameter authentication is now '0'. Parameter generate_node_acls is now '1'. Parameter cache_dynamic_acls is now '1'. /iscsi/iqn.20...70c82fb/tpgt1> This exports the PSCSI backstore as LUN 0 without any access restrictions. Warning: Exporting “open” LUNs with no authentication requirements creates significant security and data integrity hazards. Don’t do this for production setups, unless you are sure what you are doing. Datera strongly recommends using "demo mode" only under the following conditions: You have established physical security through a closed, controlled SAN environment. You are using your SAN in conjunction with a clustered filesystem that guarantees coherence across multiple initiators, typically via distributed locking. You have carefully analyzed your ACL setup with regard to its security and data integrity requirements and risks. For access control configurations that are suitable for production setups, please see below. 9.5.2 CHAP Initiator Authentication Enable secure sessions for the initiator with the IQN “iqn.1991-05.com.microsoft:ibm-t410s”: /iscsi/iqn.20...70c82fb/tpgt1> acls/ create iqn.1991-05.com.microsoft:ibm-t410s Successfully created Node ACL for iqn.1991-05.com.microsoft:ibm-t410s Created mapped LUN 0. /iscsi/iqn.20...70c82fb/tpgt1> This creates an iSCSI Node ACL with a mapped LUN 0. Copyright © 2015 Datera 47 LIO Admin Manual Node ACLs allow mappings of actual LUN IDs onto arbitrary Mapped_LUN IDs, which are the LUN IDs presented to initiators. These mappings can match preferred LUN IDs for particular initiators, so for instance, a LUN1 can be mapped onto Mapped_LUN0 to make LUN1 appear as iSCSI LUN0 on the initiator. Usually, LUNs are identically mapped, however. Setup the CHAP logon information for an initiator, which consists of the userid (login name) and password (target secret) from the initiator: /iscsi/iqn.20...70c82fb/tpgt1> cd acls/iqn.1991-05.com.microsoft:ibm-t410s/ /iscsi/iqn.20...oft:ibm-t410s> set auth userid=iqn.1991-05.com.microsoft:ibm-t410s Parameter userid is now ‘iqn.1991-05.com.microsoft:ibm-t410s’. /iscsi/iqn.20...oft:ibm-t410s> set auth password=mytargetsecret Parameter password is now ‘mytargetsecret’. /iscsi/iqn.20...oft:ibm-t410s> get auth AUTH CONFIG GROUP mutual_password= mutual_userid= password=mytargetsecret userid=iqn.1991-05.com.microsoft:ibm-t410 /iscsi/iqn.20...oft:ibm-t410s> cd /iscsi /iscsi> The iSCSI Endpoint is to ready for secure logins from the specified iSCSI initiator. Note: The Microsoft Windows iSCSI Initiator uses its IQN as a default login name. It requires the password length to be at least 12 bytes (96 bits), and it rejects passwords that are too simple. The Microsoft Windows iSCSI initiator allow changing the default login name through the Targets tab Connect button Connect To Target dialog Advanced… button Advanced Settings dialog Enable CHAP log on checkbox. The resulting two iSCSI targets, one with ACLs for CHAP initiator authentication, and one in Demo Mode, look as follows: /iscsi> ls o- iscsi ........................................................... [2 Targets] o- iqn.2003-01.org.linux-iscsi.san01.x8664:sn.35ee770c82fb ........... [1 TPG] | o- tpgt1 ......................................................... [enabled] | o- acls .......................................................... [1 ACL] | | o- iqn.1991-05.com.microsoft:ibm-t410s ................. [2 Mapped LUNs] | | o- mapped_lun0 ........................................... [lun0 (rw)] | | o- mapped_lun1 ........................................... [lun1 (rw)] | o- luns ......................................................... [2 LUNs] | | o- lun0 .............................. [iblock/block_backend (/dev/sdb)] | | o- lun1 ...................... [fileio/fileio_backend (/usr/src/fileio)] | o- portals .................................................... [1 Portal] | o- 192.168.62.151:3260 ............................................ [OK] o- iqn.2003-01.org.linux-iscsi.san01.x8664:sn.bf919196ff4e ........... [1 TPG] o- tpgt1 ......................................................... [enabled] o- acls .......................................................... [0 ACL] o- luns .......................................................... [1 LUN] | o- lun0 ............................... [pscsi/pscsi_backend (/dev/sr0)] o- portals .................................................... [1 Portal] o- 192.168.62.151:3260 ............................................ [OK] /iscsi> For configuring explicit Node ACL authentication, see Section 8.13.3. For the corresponding Microsoft Windows iSCSI initiator configuration, see Section 12.2.2, and for the corresponding VMware vSphere iSCSI initiator configuration, see Section 12.4.2. Copyright © 2015 Datera 48 LIO Admin Manual 9.5.3 Mutual CHAP Authentication Enable secure sessions for the initiator with the IQN “iqn.1991-05.com.microsoft:ibm-t410”: /iscsi/iqn.20...70c82fb/tpgt1> acls/ create iqn.1991-05.com.microsoft:ibm-t410s Successfully created Node ACL for iqn.1991-05.com.microsoft:ibm-t410s Created mapped LUN 0. /iscsi/iqn.20...70c82fb/tpgt1> This creates an iSCSI Node ACL with a mapped LUN 0. Node ACLs allow mappings of actual LUN IDs onto arbitrary Mapped_LUN IDs, which are the LUN IDs presented to initiators. These mappings can match preferred LUN IDs for particular initiators, so for instance, a LUN1 can be mapped onto Mapped_LUN0 to make LUN1 appear as iSCSI LUN0 on the initiator. Usually, LUNs are identically mapped, however. Setup the Mutual CHAP logon information for an initiator, which consists of: The userid (login name) and password (target secret) for the target. The mutual_userid (login name) and mutual_password (initiator secret) for the initiator. /iscsi/iqn.20...70c82fb/tpgt1> cd acls/iqn.1991-05.com.microsoft:ibm-t410s /iscsi/iqn.20...oft:ibm-t410s> set auth userid=iqn.1991-05.com.microsoft:ibm-t410s password=mytargetsecret mutual_userid=iqn.2003-01.org.linuxiscsi.san01.x8664:sn.35ee770c82fb mutual_password=mymutualsecret Parameter userid is now ‘iqn.1991-05.com.microsoft:ibm-t410s’. Parameter password is now ‘mytargetsecret’. Parameter mutual_password is now ‘mymutualsecret’. Parameter mutual_userid is now ‘iqn.2003-01.org.linuxiscsi.san01.x8664:sn.35ee770c82fb’. /iscsi/iqn.20...oft:ibm-t410s> get auth AUTH CONFIG GROUP mutual_password=mymutualsecret mutual_userid=iqn.2003-01.org.linux-iscsi.san01.x8664:sn.35ee770c82fb password=mytargetsecret userid=iqn.1991-05.com.microsoft:ibm-t410s /iscsi/iqn.20...oft:ibm-t410s> cd /iscsi /iscsi> Both the iSCSI initiator and target Endpoints are ready for secure logins. Note: The Microsoft iSCSI Initiator uses its IQN for the default login name. It requires the password length to be between 12 bytes (96 bits) and 16 bytes (128 bits), and it rejects passwords that are too simple. The Microsoft Windows iSCSI initiator allow changing the default login name through the Targets tab Connect button Connect To Target dialog Advanced… button Advanced Settings dialog Enable CHAP log on checkbox. The resulting two iSCSI targets, one with ACLs for Mutual CHAP authentication, and one in Demo Mode, look as follows: /iscsi> ls o- iscsi ........................................................... [2 Targets] o- iqn.2003-01.org.linux-iscsi.san01.x8664:sn.35ee770c82fb ........... [1 TPG] | o- tpgt1 ......................................................... [enabled] | o- acls .......................................................... [1 ACL] | | o- iqn.1991-05.com.microsoft:ibm-t410s ................. [2 Mapped LUNs] | | o- mapped_lun0 ........................................... [lun0 (rw)] | | o- mapped_lun1 ........................................... [lun1 (rw)] | o- luns ......................................................... [2 LUNs] Copyright © 2015 Datera 49 LIO Admin Manual | | o- lun0 .............................. [iblock/block_backend (/dev/sdb)] | | o- lun1 ...................... [fileio/fileio_backend (/usr/src/fileio)] | o- portals .................................................... [1 Portal] | o- 192.168.62.151:3260 ............................................ [OK] o- iqn.2003-01.org.linux-iscsi.san01.x8664:sn.bf919196ff4e ........... [1 TPG] o- tpgt1 ......................................................... [enabled] o- acls .......................................................... [0 ACL] o- luns .......................................................... [1 LUN] | o- lun0 ............................... [pscsi/pscsi_backend (/dev/sr0)] o- portals .................................................... [1 Portal] o- 192.168.62.151:3260 ............................................ [OK] /iscsi> For configuring explicit Node ACL authentication, see Section 8.13.3. For the corresponding Microsoft Windows iSCSI initiator configuration, see Section 12.2.2, and for the corresponding VMware vSphere iSCSI initiator configuration, see Section 12.4.2. 9.5.4 TPG Authentication Setting up authentication information for every single initiator separately can be cumbersome, so targetcli provides the capability to define common login information for all Endpoints in a TPG. Consequently, all initiators connecting to that TPG can use the same login credentials. Enable common TPG Authentication for all Endpoints in a TPG: /iscsi/iqn.20...70c82fb/tpgt1> /iscsi/iqn.2003-01.org.linuxiscsi.san01.x8664:sn.bf919196ff4e/tgpt1/ set attribute demo_mode_write_protect=0 generate_node_acls=1 cache_dynamic_acls=1 Parameter demo_mode_write_protect is now '0'. Parameter generate_node_acls is now '1'. Parameter cache_dynamic_acls is now '1'. /iscsi/iqn.20...70c82fb/tpgt1> Setup the common TPG Authentication credentials for all Endpoints in a TPG, which consists of: The userid (login name) and password (target secret) for the target. The userid_mutual (login name) and password_mutual (initiator secret) for the initiator. /iscsi/iqn.20...70c82fb/tpgt1> set auth userid=rts-user Parameter userid is now 'rts-user'. /iscsi/iqn.20...70c82fb/tpgt1> set auth password=b492785e-bc91-4710 Parameter password is now 'b492785e-bc91-4710'. /iscsi/iqn.20...70c82fb/tpgt1> set auth userid_mutual=mutual-rts-user Parameter userid_mutual is now 'mutual-rts-user'. /iscsi/iqn.20...70c82fb/tpgt1> set auth password_mutual=aeae2e26-f043-42a7 Parameter password_mutual is now 'aeae2e26-f043-42a7'. /iscsi/iqn.20...70c82fb/tpgt1> Note: Login credentials for specific initiators can be created by adding corresponding ACL entries, as individual ACL entries override common TPG Authentication information. 9.6 Discovery Control The iSCSI protocol can also control the visibility of iSCSI targets for discovery by iSCSI initiators. 9.6.1 CHAP Initiator Discovery Authentication Enable CHAP initiator discovery authentication for all initiators by setting up a CHAP userid (login name) and password (target secret) in the global discovery_auth group: Copyright © 2015 Datera 50 LIO Admin Manual /iscsi> set discovery_auth enable=1 userid=mytargetuid password=mytargetsecret Parameter enable is now ’1’. Parameter password is now ’mytargetsecret’. Parameter userid is now ‘mytargetuid’. /iscsi> Only iSCSI initiators that can authenticate themselves with a user id of “mytargetuid” and a password of “mytargetsecret” can now discover this iSCSI target. 9.6.2 Mutual CHAP Discovery Authentication Enable Mutual CHAP discovery authentication for all initiators by setting up Mutual CHAP information in the global discovery_auth group: The userid (login name) and password (target secret) for the target. The mutual_userid (login name) and mutual_password (initiator secret) for initiators. /iscsi> set discovery_auth enable=1 userid=mytargetuid password=mytargetsecret mutual_userid=mymutualuid mutual_password=mymutualsecret Parameter password is now ’mytargetsecret’. Parameter userid is now ‘mytargetuid’. Parameter mutual_password is now ’mymutualsecret’. Parameter mutual_userid is now ‘mymutualuid’. Parameter enable is now ’1’. /iscsi> get discovery_auth enable=1 mutual_password=mymutualsecret mutual_userid=mymutualuid password=mytargetsecret userid=mytargetuid /iscsi> Only iSCSI initiators that can authenticate themselves with a user id of “mytargetuid” and a password of “mytargetsecret” can now discover this iSCSI target, and conversely, the iSCSI target can only discover iSCSI initiators that can authenticate themselves with a user id of “mymutualuid” and a password of “mymutualsecret”. 9.7 Object Tree Display the resulting object tree (from the top-level root object): /iscsi> ls o- / ..................................................................... [...] o- backstores .......................................................... [...] | o- fileio ............................................... [1 Storage Object] | | o- fileio_backend ............................ [/usr/src/fileio activated] | o- iblock ............................................... [1 Storage Object] | | o- block_backend .................................... [/dev/sdb activated] | o- pscsi ................................................ [1 Storage Object] | | o- pscsi_backend .................................... [/dev/sr0 activated] | o- rd_dr ................................................ [0 Storage Object] | o- rd_mcp ............................................... [0 Storage Object] o- ib_srpt ........................................................ [0 Target] o- iscsi ......................................................... [2 Targets] | o- iqn.2003-01.org.linux-iscsi.san01.x8664:sn.35ee770c82fb ......... [1 TPG] | | o- tpgt1 ....................................................... [enabled] | | o- acls ........................................................ [1 ACL] | | | o- iqn.1991-05.com.microsoft:ibm-t410s ............... [2 Mapped LUNs] | | | o- mapped_lun0 ......................................... [lun0 (rw)] | | | o- mapped_lun1 ......................................... [lun1 (rw)] | | o- luns ....................................................... [2 LUNs] Copyright © 2015 Datera 51 LIO Admin Manual | | | o- lun0 ............................ [iblock/block_backend (/dev/sdb)] | | | o- lun1 .................... [fileio/fileio_backend (/usr/src/fileio)] | | o- portals .................................................. [1 Portal] | | o- 192.168.62.151:3260 .......................................... [OK] | o- iqn.2003-01.org.linux-iscsi.san01.x8664:sn.bf919196ff4e ......... [1 TPG] | o- tpgt1 ....................................................... [enabled] | o- acls ........................................................ [0 ACL] | o- luns ........................................................ [1 LUN] | | o- lun0 ............................. [pscsi/pscsi_backend (/dev/sr0)] | o- portals .................................................. [1 Portal] | o- 192.168.62.151:3260 .......................................... [OK] o- loopback ....................................................... [0 Target] o- qla2xxx ........................................................ [0 Target] /iscsi> cd / /> 9.8 Persistence The target configuration (without the user data contained on the LUNs) can be persisted across reboots by invoking saveconfig from the root context: /> saveconfig WARNING: Saving san01.linux-iscsi.org current configuration to disk will overwrite your boot settings. The current target configuration will become the default boot config. Are you sure? Type 'yes': yes Making backup of qla2xxx/ConfigFS with timestamp: 2011-11-15_21:49:58.574752 Successfully updated default config /etc/target/qla2xxx_start.sh Making backup of loopback/ConfigFS with timestamp: 2011-11-15_21:49:58.574752 Successfully updated default config /etc/target/loopback_start.sh Making backup of srpt/ConfigFS with timestamp: 2011-11-15_21:49:58.574752 Successfully updated default config /etc/target/srpt_start.sh Making backup of LIO-Target/ConfigFS with timestamp: 2011-11-15_21:49:58.574752 Generated LIO-Target config: /etc/target/backup/lio_backup-2011-1115_21:49:58.574752.sh Making backup of Target_Core_Mod/ConfigFS with timestamp: 2011-1115_21:49:58.574752 Generated Target_Core_Mod config: /etc/target/backup/tcm_backup-2011-11-15_21:49:58.574752.sh Successfully updated default config /etc/target/lio_start.sh Successfully updated default config /etc/target/tcm_start.sh /> Note: Without saveconfig, the target configuration will be lost upon rebooting or unloading the target service, as the target configuration will be rolled back to the last saved one. 9.9 Navigation and Auto-Completion 9.9.1 Context History Using “<” and “>” for navigating the object context history: /> cd < Taking you back to /iscsi/iqn.2003-01.org.linuxiscsi.san01.x8664:sn.bf919196ff4e/tpgt1. /iscsi/iqn.20...196ff4e/tpgt1> cd > Taking you back to /. /> Copyright © 2015 Datera 52 LIO Admin Manual 9.9.2 Command History Using CTRL-R bash style command history recollection (note context sensitivity): /> cd /iscsi /iscsi> <CTRL-R> (reverse-i-search)`cd iqn': cd iqn.2003-01.org.linuxiscsi.san01.x8664:sn.bf919196ff4e/tpgt1/ /iscsi> cd iqn.2003-01.org.linux-iscsi.san01.x8664:sn.bf919196ff4e/tpgt1/ /iscsi/iqn.20...196ff4e/tpgt1> cd / /> 9.9.3 TAB Completion Using TAB completion for directory objects: /> cd<TAB> < @. backstores/ iscsi/ qla2xxx/ > @last ib_srpt/ loopback/ path= ......path|keyword= /> cd backstores/<TAB> backstores/fileio/ backstores/pscsi/ backstores/rd_mcp/ backstores/iblock/ backstores/rd_dr/ ......path /> cd backstores/iblock/<TAB>block_backend /backstores/i...block_backend> Using TAB completion for object parameters. The following example shows changing a per backend device attribute: /backstores/i...block_backend> set attribute<TAB> block_size= enforce_pr_isids= emulate_dpo= max_sectors= emulate_fua_read= max_unmap_block_desc_count= emulate_fua_write= max_unmap_lba_count= emulate_tas= optimal_sectors= emulate_tpu= queue_depth= emulate_tpws= task_timeout= emulate_ua_intlck_ctrl= unmap_granularity= emulate_write_cache= unmap_granularity_alignment= .............................................keyword= /backstores/i...block_backend> set attribute emulate_write_cache=1 Parameter emulate_write_cache is now '1'. /backstores/i...block_backend> 9.10 Bookmarks Bookmark the second IQN as my_second_target. /iscsi/iqn.20...196ff4e/tpgt1> bookmarks add my_second_target Bookmarked /iscsi/iqn.2003-01.org.linux-iscsi.san01.x8664:sn.bf919196ff4e/tpgt1 as my_second_target. /iscsi/iqn.20...196ff4e/tpgt1> Illustrate using @my_second_target bookmark and change directory from the top-level root context: /iscsi/iqn.20...196ff4e/tpgt1> cd / /> ls @my_second_target o- tpgt1 ............................................................. [enabled] o- acls .............................................................. [0 ACL] o- luns .............................................................. [1 LUN] | o- lun0 ................................... [pscsi/pscsi_backend (/dev/sr0)] o- portals ........................................................ [1 Portal] o- 192.168.62.151:3260 ................................................ [OK] Copyright © 2015 Datera 53 LIO Admin Manual /> cd @my_second_target /iscsi/iqn.20...196ff4e/tpgt1> Create a bookmark for the first iSCSI target IQN, from the top-level root object: /iscsi/iqn.20...196ff4e/tpgt1> cd / /> iscsi/iqn.2003-01.org.linux-iscsi.san01.x8664:sn.35ee770c82fb/tpgt1/ bookmarks add my_first_target Bookmarked /iscsi/iqn.2003-01.org.linux-iscsi.san01.x8664:sn.35ee770c82fb/tpgt1 as my_first_target /> ls @my_first_target o- tpgt1 ............................................................. [enabled] o- acls .............................................................. [1 ACL] | o- iqn.1991-05.com.microsoft:ibm-t410s ..................... [2 Mapped LUNs] | o- mapped_lun0 ............................................... [lun0 (rw)] | o- mapped_lun1 ............................................... [lun1 (rw)] o- luns ............................................................. [2 LUNs] | o- lun0 .................................. [iblock/block_backend (/dev/sdb)] | o- lun1 .......................... [fileio/fileio_backend (/usr/src/fileio)] o- portals ........................................................ [1 Portal] o- 192.168.62.151:3260 ................................................ [OK] /> cd @my_first_target /iscsi/iqn.20...196ff4e/tpgt1> Copyright © 2015 Datera 54 LIO Admin Manual 10 RTSlib – Storage Management Library and API 10.1 iSCSI 10.1.1 Setup Script The following Python code illustrates how to setup a basic iSCSI target and export a mapped LUN: #!/usr/bin/python # iSCSI setup script example with RTSlib from rtslib import * # Setup an IBLOCK backstore backstore = IBlockBackstore(3, mode='create') try: so = IBlockStorageObject(backstore, "sdb", "/dev/sdb", gen_wwn=True) except: backstore.delete() raise # Create an iSCSI target endpoint using an iSCSI IQN fabric = FabricModule('iscsi') target = Target(fabric, "iqn.2003-01.org.linux-iscsi.x.x8664:sn.d3d8b0500fde") tpg = TPG(target, 1) # Setup a network portal in the iSCSI TPG # The IP address must already be active on the system portal = NetworkPortal(tpg, "192.168.1.128", "5060") # Export LUN 0 via the 'so' StorageObject class lun0 = tpg.lun(0, so, "my_lun") # Setup the NodeACL for an iSCSI initiator, and create MappedLUN 0 node_acl = tpg.node_acl("iqn.2003-01.org.linux-iscsi.y.x8664:sn.abcdefghijkl") mapped_lun = node_acl.mapped_lun(0, 0, False) 10.1.2 Object Tree The resulting object tree looks as follows: o- / ..................................................................... [...] o- backstores .......................................................... [...] | o- fileio ............................................... [0 Storage Object] | o- iblock ............................................... [1 Storage Object] | | o- sdb .............................................. [/dev/sdb activated] | o- pscsi ................................................ [0 Storage Object] | o- rd_dr ................................................ [0 Storage Object] | o- rd_mcp ............................................... [0 Storage Object] o- iscsi .......................................................... [1 Target] o- iqn.2003-01.org.linux-iscsi.x.x8664:sn.d3d8b0500fde ............. [1 TPG] o- tpgt1 ....................................................... [enabled] o- acls ........................................................ [1 ACL] | o- iqn.2003-01.org.linux-iscsi.y.x8664:sn.abcdefghijkl [1 Mapped LUN] | o- mapped_lun0 ......................................... [lun0 (rw)] o- luns ........................................................ [1 LUN] | o- lun0 ...................................... [iblock/sdb (/dev/sdb)] o- portals .................................................. [1 Portal] o- 192.168.1.128:5060 ........................................... [OK] Copyright © 2015 Datera 55 LIO Admin Manual 10.2 Fibre Channel 10.2.1 Setup Script The following Python code illustrates how to setup a basic Fibre Channel target and export a mapped LUN: #!/usr/bin/python # Fibre Channel setup script example with RTSlib from rtslib import * # Setup an IBLOCK backstore backstore = IBlockBackstore(3, mode='create') try: so = IBlockStorageObject(backstore, "fioa", "/dev/fioa", gen_wwn=True) except: backstore.delete() raise # Create an FC target endpoint using a qla2xxx WWPN fabric = FabricModule('qla2xxx') target = Target(fabric, '21:00:00:24:ff:31:4c:48') tpg = TPG(target, 1) # Export LUN 0 via the 'so' StorageObject class lun0 = tpg.lun(0, so, "my_lun") # Setup the NodeACL for an FC initiator, and create MappedLUN 0 node_acl = tpg.node_acl('21:00:00:24:ff:31:4c:4c') mapped_lun = node_acl.mapped_lun(0, 0, False) Note that while Fibre Channel TPGs are masked by targetcli, they are not masked by RTSlib. 10.2.2 Object Tree The resulting object tree looks as follows: o- / ..................................................................... [...] o- backstores .......................................................... [...] | o- fileio ............................................... [0 Storage Object] | o- iblock ............................................... [1 Storage Object] | | o- my_disk .......................................... [/dev/sdb activated] | o- pscsi ................................................ [0 Storage Object] | o- rd_dr ................................................ [0 Storage Object] | o- rd_mcp ............................................... [0 Storage Object] o- ib_srpt ........................................................ [0 Target] o- iscsi .......................................................... [0 Target] o- loopback ....................................................... [0 Target] o- qla2xxx ........................................................ [1 Target] o- 21:00:00:24:ff:31:4c:48 ....................................... [enabled] o- acls .......................................................... [0 ACL] | o- 21:00:00:24:ff:31:4c:4c ............................. [1 Mapped LUN] | o- mapped_lun0 .......................................... [lun0 (rw)] o- luns .......................................................... [1 LUN] o- lun0 .................................... [iblock/my_disk (/dev/sdb)] Copyright © 2015 Datera 56 LIO Admin Manual 10.3 InfiniBand/SRP 10.3.1 Setup Script The following Python code illustrates how to setup a basic SRP target and export a mapped LUN: #!/usr/bin/python # InfiniBand setup script example with RTSlib from rtslib import * # Setup an IBLOCK backstore backstore = IBlockBackstore(3, mode='create') try: so = IBlockStorageObject(backstore, "fioa", "/dev/fioa", gen_wwn=True) except: backstore.delete() raise # Create an IB target endpoint using an ib_srpt WWPN fabric = FabricModule('ib_srpt') target = Target(fabric, '0x00000000000000000002c903000e8acd') tpg = TPG(target, 1) # Export LUN 0 via the 'so' StorageObject class lun0 = tpg.lun(0, so, "my_lun") # Setup the NodeACL for an IB initiator, and create MappedLUN 0 node_acl = tpg.node_acl('0x00000000000000000002c903000e8acd') mapped_lun = node_acl.mapped_lun(0, 0, False) Note that while SRP TPGs are masked by targetcli, they are not masked by RTSlib. 10.3.2 Object Tree The resulting object tree looks as follows: o- / ..................................................................... [...] o- backstores .......................................................... [...] | o- fileio ............................................... [0 Storage Object] | o- iblock ............................................... [1 Storage Object] | | o- my_disk .......................................... [/dev/sdb activated] | o- pscsi ................................................ [0 Storage Object] | o- rd_dr ................................................ [0 Storage Object] | o- rd_mcp ............................................... [0 Storage Object] o- ib_srpt ........................................................ [1 Target] o- 0x00000000000000000002c903000e8acd ............................ [enabled] o- acls .......................................................... [1 ACL] | o- 0x00000000000000000002c903000e8be9 ................... [1 Mapped LUN] | o- mapped_lun0 ........................................... [lun0 (rw)] o- luns .......................................................... [1 LUN] o- lun0 .................................... [iblock/my_disk (/dev/sdb)] o- iscsi .......................................................... [0 Target] o- loopback ....................................................... [0 Target] o- qla2xxx ........................................................ [0 Target] Copyright © 2015 Datera 57 LIO Admin Manual 11 VMware VAAI 11.1 Overview VMware introduced the vStorage APIs for Array Integration (VAAI) in VMware vSphere 4.1 with a plugin, and provided native VAAI support with VMware vSphere 5. VAAI significantly enhances the integration of storage and servers by enabling seamless offload of locking and block operations onto the storage array. LIO provides native VAAI support for VMware vSphere 5, see also [13]. 11.2 Features The LIO Linux SCSI Target supports the following VAAI functions: Name T10 Primitive Description Block NFS LIO Atomic Test & Set (ATS) Hardware Assisted Locking Enables granular locking of block storage devices, accelerating performance. Yes N/A Yes Zero Block Zeroing Communication mechanism for thin provisioning arrays. Used when creating VMDKs. Yes N/A Yes Commands the array to duplicate data in a LUN. Used for Clone and VMotion operations. Yes N/A Yes Allow thin provisioned arrays to clear unused VMFS space. Yes Yes Yes COMPARE_AND_WRITE WRITE_SAME Clone Full Copy, XCopy EXTENDED_COPY Delete Space Reclamation UNMAP Disabled Table 6: Overview over VAAI Primitives. The presence of VMware VAAI and its features can be verified from the VMware ESX 5 CLI as follows: ~ # esxcli storage core device vaai status get naa.6001405a2e547c17329487b865d1a66e VAAI Plugin Name: ATS Status: supported Clone Status: supported Zero Status: supported Delete Status: unsupported Note: Delete is disabled per default, see below for more details. 11.3 Primitives 11.3.1 ATS ATS (Atomic Test and Set) is arguably one of the most valuable storage technologies to come out of VMware. It enables locking of block storage devices at much finer granularity than with the preceding T10 Persistent Reservations, see [12], which can only operate on full LUNs. Hence, ATS allows more concurrency and thus significantly higher performance for shared LUNs. For instance, HP reported that it can support six times more VMs per LUN with VAAI than without it. Copyright © 2015 Datera 58 LIO Admin Manual ATS uses the T10 COMPARE_AND_WRITE command to allow comparing and writing SCSI blocks in one atomic operation. NFS doesn’t need ATS, as locking is a non-issue and VM files are shared differently than LUNs are. Feature presence can be verified from the VMware ESX 5 CLI: ~ # esxcfg-advcfg -g /VMFS3/HardwareAcceleratedLocking Value of HardwareAcceleratedLocking is 1 VMware actually uses ATS depending on the underlying filesystem type and history: On VAAI Hardware New VMFS-5 1 Single-extent datastore reservations ATS only Multi-extent datastore when locks on non-head Only allow spanning on ATS hardware2 Upgraded VMFS-5 VMFS-3 ATS but fall back to SCSI-2 reservations ATS but fall back to SCSI-2 reservations ATS except when locks on non-head ATS except when locks on non-head Table 7: Use of ATS depending on filesystem and history. 1 If a new VMFS-5 is created on a non-ATS storage device, SCSI-2 reservations will be used. 2 When creating a multi-extent datastore where ATS is used, the vCenter Server will filter out non-ATS devices, so that only devices that support the ATS primitive can be used. 11.3.2 Zero Thin provisioning is difficult to get right because storage arrays don't know what’s going on in the hosts. VAAI includes a generic interface for communicating free space, thus allowing large ranges of blocks to be zeroed out at once. Zero uses the T10 WRITE_SAME command, and defaults to a 1 MB block size. Zero only works for capacity inside a VMDK. vSphere 5 can use WRITE_SAME in conjunction with the T10 UNMAP command. Feature presence can be verified from the VMware ESX 5 CLI: ~ # esxcfg-advcfg -g /DataMover/HardwareAcceleratedInit Value of HardwareAcceleratedInit is 1 To disable Zero from the ESX 5 CLI: ~ # esxcfg-advcfg -s 0 /DataMover/HardwareAcceleratedInit Value of HardwareAcceleratedInit is 0 This change takes immediate effect, without requiring a “Rescan All” from VMware. 11.3.3 Clone This is the signature VAAI command. Instead of reading each block of data from the array and then writing it back, the ESX hypervisor can command the array to duplicate a range of data on its behalf. If Clone is supported and enabled, VMware operations like VM cloning and VM vMotion can become very fast. Speed-ups of a factor of ten or more are achievable, particularly on fast flash-based backstores over slow network links, such as 1 GbE. Clone uses the T10 EXTENDED_COPY command, and defaults to a 4 MB block size. Feature presence can be verified from the VMware ESX 5 CLI: ~ # esxcfg-advcfg -g /DataMover/HardwareAcceleratedMove Value of HardwareAcceleratedMove is 1 Copyright © 2015 Datera 59 LIO Admin Manual To disable Clone from the ESX 5 CLI: ~ # esxcfg-advcfg -s 0 /DataMover/HardwareAcceleratedMove Value of HardwareAcceleratedMove is 0 This change takes immediate effect, without requiring a “Rescan All” from VMware. 11.3.4 Delete VMFS operations like cloning and vMotion didn’t include any hints to the storage array to clear unused VMFS space. Hence, some of the biggest storage operations couldn't be accelerated or "thinned out.” Delete uses the T10 UNMAP command to allow thin-capable arrays to offload clearing unused VMFS space. However, vCenter 5 doesn't correctly handle waiting for the storage array to return the UNMAP command status, so the use of Delete is disabled per default in vSphere 5. Feature presence can be verified from the VMware ESX 5 CLI: ~ # esxcli –server=<my_esx_server> -u root system settings advanced list -–option /VMFS3/EnableBlockDelete Type: integer Int Value: 0 Default Int Value: 0 Min Value: 0 Max Value: 1 String Value: Default String Value: Valid Characters: Description: Enable VMFS block delete To enable Delete from the ESX 5 CLI (see also [16]): ~ # esxcli –server=<my_esx_server> -u root system settings advanced set –intvalue 1 -–option /VMFS3/EnableBlockDelete Value of EnableBlockDelete is 1 Many SATA SSDs have issues handling UNMAP properly, so it is disabled per default in LIO. To enable UNMAP, start the targetcli shell, enter the context of the corresponding backstore device, and set the emulate_tpu attribute: /backstores/iblock/fioa> set attribute emulate_tpu=1 Parameter emulate_tpu is now '1'. /backstores/iblock/fioa> Reboot the ESX host, or re-login into the backstore, in order to get the Delete operation as recognized, then verify its presence from the VMware ESX 5 CLI: ~ # esxcli storage core device vaai status get naa.6001405a2e547c17329487b865d1a66e VAAI Plugin Name: ATS Status: supported Clone Status: supported Zero Status: supported Delete Status: supported Copyright © 2015 Datera 60 LIO Admin Manual 11.4 Performance 11.4.1 Overview Performance improvements offered by VAAI can be grouped into three categories: Reduced time to complete VM cloning and Block Zeroing operations. Reduced use of server compute and storage network resources. Improved scalability of VMFS datastores in terms of the number of VMs per datastore and the number of ESX servers attached to a datastore. The actual improvement seen in any given environment depends on a number of factors, discussed in the following section. In some environments, improvement may be small. 11.4.2 Cloning, migrating and zeroing VMs The biggest factor for Full Copy and Block Zeroing operations is whether the limiting factor is on the front end or the back end of the storage controller. If the throughput of the storage network is slower than the backstore can handle, offloading the bulk work of reading and writing virtual disks for cloning and migration and writings zeroes for virtual disk initialization can help immensely. One example where substantial improvement is likely is when the ESX servers use 1 GbE iSCSI to connect to a Linux storage system with SSDs or flash memory. The front end at 1 Gbps doesn't support enough throughput to saturate the back end. When cloning or zeroing is offloaded, however, only small commands with small payload go across the front, while the actual I/O is completed by the storage controller itself directly to disk. 11.4.3 VMFS datastore scalability Documentation from various sources, including VMware professional services best practices, has traditionally recommended 20 to 30 VMs per VMFS datastore, and sometimes even fewer. Documents for VMware Lab Manager suggest limiting the number of ESX servers in a cluster to eight. These recommended limits are due in part to the effect of SCSI reservations on performance and reliability. Extensive use of some features, such as VMware snapshots and linked clones, can trigger large numbers of VMFS metadata updates, which require locking. Before vSphere 4.1, reliable locks on smaller objects were obtained by briefly locking the entire LUN with a SCSI Persistent Reservation. Any other server trying to access the LUN during the reservation would fail and would wait and retry up to 80 times by default. This wait and retry added to perceived latency and reduced throughput in VMs. In extreme cases, if the other server exceeded the number of retries, errors would be logged in the VMkernel logs and I/Os could return as failures to the VM. When all ESX servers sharing a datastore support VAAI, ATS can eliminate SCSI Persistent Reservations, at least reservations due to obtaining smaller locks. The result is that datastores can be scaled to more VMs and attached servers than previously. Datera has tested up to 128 VMs in a single VMFS datastore. The number of VMs was limited in testing to 128 because the maximum addressable LUN size in ESX is 2 TB, which means that each VM can occupy a maximum of 16 GB, including virtual disk, virtual swap, and any other files. Virtual disks much smaller than this generally do not allow enough space to be practical for an OS and any application. Load was generated and measured on the VMs by using iometer. For some tests, all VMs had load. In others, such as when sets of VMs were started, stopped, or suspended, load was placed only on VMs that stayed running. Copyright © 2015 Datera 61 LIO Admin Manual Tests such as starting, stopping, and suspending numbers of VMs were run with iometer workloads running on other VMs that weren't being started, stopped, or suspended. Additional tests were run with all VMs running iometer, and VMware snapshots were created and deleted as quickly as possible on all or some large subset of the VMs. The results of these tests demonstrated that performance impact measured before or without VAAI was either eliminated or substantially reduced when using VAAI, to the point that datastores could reliably be scaled to 128 VMs in a single LUN. 11.5 Statistics The VMware esxtop command in ESX 5 has two new sets of counters for VAAI operations available under the disk device view. Both sets of counters include the three VAAI key primitives. To view VAAI statistics, run esxtop from the VMware ESX 5 CLI and follow the steps below: ~ # esxtop 1. Press “u” to change to the disk device stats view. 2. Press “f” to select fields, or “o” to change their order. Note: This selects sets of counters, not individual counters. 3. Press “o” to select VAAI Stats and/or “p” to select VAAI Latency Stats. 4. Optionally, deselect Queue Stats, I/O Stats, and Overall Latency Stats by pressing “f”, “g”, and “i” respectively in order to simplify the display. 5. To see the whole LUN field, widen it by pressing “L” (capital) then entering a number (“36” is wide enough to see a full NAA ID of a LUN). The output of esxtop looks similar to the following: 4:46:50am up 44 min, 281 worlds, 0 VMs, 0 vCPUs; CPU load average: 0.00, 0.00, 0.00 DEVICE CLONE_RD CLONE_WR RO_F MBZERO/s DELETE DELETE_F MBDEL/s naa.60014050e4485b9bdc841d09478888e6 0 0 0 0.00 0 0 0.00 naa.600140515743d5195b0498b8aad6fdd2 1583 792 0 0.00 0 0 0.00 naa.60014053937c69d44ff4e0b9e5a95398 0 0 0 0.00 0 0 0.00 naa.60014055fcf891d0c5b4a60a66942400 4746 3955 0 0.00 0 0 0.00 naa.600140573d94f8e531d4d1ab5c8a72ef 0 0 0 0.00 0 0 0.00 naa.6001405a2e547c17329487b865d1a66e 3164 4746 0 0.00 0 0 0.00 naa.6001405a3a17fe4483c46f994f74b4e6 0 0 0 0.00 0 0 0.00 t10.ATA_____ST3400832AS_____________ 0 0 0 0.00 0 0 0.00 CLONE_F MBC_RD/s MBC_WR/s ATS ATSF ZERO 0 0.00 0.00 23 0 0 0 0.00 0.00 1322 0 23 0 0.00 0.00 0 0 0 0 0.00 0.00 4402 0 45 0 0.00 0.00 23 0 0 0 0.00 0.00 5692 0 54 0 0.00 0.00 0 0 0 0 0.00 0.00 0 0 0 ZE- The VAAI counters in esxtop are: Counter Name Description DEVICE Devices that support VAAI (LUNs on a supported storage system) are listed by their NAA ID. You can get the NAA ID for a datastore from the datastore properties in vCenter, the Storage Details—SAN view in Virtual Storage Console, or using the vmkfstools -P /vmfs/volumes/<datastore> command. LIO LUNs start with naa.6001405. Note: Devices or datastores other than LUNs on an external storage system such as CD-ROM, internal disks (which may be physical disks or LUNs on internal RAID controllers), and NFS datastores are listed but have all zeroes for VAAI counters. Copyright © 2015 Datera 62 LIO Admin Manual CLONE_RD Number of Full Copy reads from this LUN. CLONE_WR Number of Full Copy writes to this LUN. CLONE_F Number of failed Full Copy commands on this LUN. MBC_RD/s Effective throughput of Full Copy command reads from this LUN in megabytes per second. MBC_WR/s Effective throughput of Full Copy command writes to LUN in megabytes per second. ATS Number of successful lock commands on this LUN. ATSF Number of failed lock commands on this LUN. ZERO Number of successful Block Zeroing commands on this LUN. ZERO_F Number of failed Block Zeroing commands on this LUN. MBZERO/s Effective throughput of Block Zeroing commands on this LUN in megabytes per second. Table 8: VAAI statistics available in VMware ESX. Counters that count operations do not return to zero unless the server is rebooted. Throughput counters are zero when no commands of the corresponding primitive are in progress. Clones between VMFS datastores and Storage VMotion operations that use VAAI increment clone read for one LUN and clone write for another LUN. In any case, the total for clone read and clone write columns should be equal. 11.6 Best Practices For VAAI Clone operations, ESX can increase or decrease the size of the transferred data chunks to adjust to the available network bandwidth. From the ESX 5 shell, the procedure is as follows. Check the current data transfer chunk size for VAAI Clone operations: ~ # esxcfg-advcfg –g /DataMover/MaxHWTRansferSize Value of MaxHWTransferSize is 4096 For vSphere 5, the default chunk size is 4096 kB. Increasing the VAAI Clone chunk size causes more data to be copied with a single EXTENDED_COPY command, thereby reducing protocol overhead and the overall time required for the Clone operation: ~ # esxcfg-advcfg /DataMover/MaxHWTRansferSize –s 16384 Value of MaxHWTransferSize is 16384 The best performance is usually achieved with the maximum chunk size of 16384 kB. The LIO SCSI Target also allows adjusting the command queue size, i.e. the maximum number of outstanding SCSI commands in flight. For optimal performance, the queue size should be set to the maximum value. From the targetcli shell, in the corresponding TPG context, the procedure is as follows: /iscsi/iqn.20...a0e4a11/tpgt1> set attribute default_cmdsn_depth=128 /iscsi/iqn.20...a0e4a11/tpgt1> See also Section 9.5. Copyright © 2015 Datera 63 LIO Admin Manual 12 Initiator Setup 12.1 Overview This section describes how to setup Windows, Linux and VirtualBox iSCSI initiators to login into Linux based SANs. Instructions for Fibre Channel and InfiniBand initiators will be added in the future. 12.2 Microsoft Windows 7 iSCSI Initiator 12.2.1 Connecting to Targets To connect to an iSCSI target using Microsoft Windows 7 or Windows Server 2008/R2, the built-in iSCSI initiator can be used. Go to Start Control Panel, search for “iSCSI,” start the iSCSI Initiator snap-in and select the Discovery tab. In the discovery window, click Discover Portal… and the Discover Target Portal dialog appears. Enter the “IP address or DNS name” and “Port” number (the pre-filled iSCSI default is “3260”) of your iSCSI target and click OK. Figure 3: Windows 7 – Discovering iSCSI targets. Back in the discovery window, click the Targets tab. A list of the targets and their storage devices appears. To connect to a specific target, select it and click Connect. The Connect To Target dialog appears. Select to “Add this connection to the list of Favorite Targets” to automatically restore the connection during system startup, and optionally select to also “Enable multipath”: Copyright © 2015 Datera 64 LIO Admin Manual Figure 4: Windows 7 – Connecting to an iSCSI target. 12.2.2 Configuring CHAP Authentication The Connect To Target dialog Advanced button brings up a window that allows configuring the iSCSI connection with regard to CHAP Authentication and IPSec. To configure CHAP Initiator Authentication, click the checkbox Enable CHAP log on, and enter the target credentials (see Section 9.5.2 for the corresponding settings in the targetcli auth group): Enter the “target secret” (matching the targetcli userid), and Optionally adjust the “name” (matching the targetcli password). To configure Mutual CHAP Authentication, return to the iSCSI Initiator Properties, select the Configuration tab, and: Click CHAP…, and enter the “Initiator CHAP Secret” (matching the targetcli mutual_password), and Optionally click Change…, and set “New initiator name” (matching the targetcli mutual_userid). Click the Targets tab Connect button Advanced… button, and check the Enable CHAP logon and Perform mutual authentication checkboxes, then enter the target credentials (see Section 9.5.3 for the corresponding settings in the targetcli auth group): Enter the “target secret” (matching the targetcli userid), optionally adjust the “name” (matching the targetcli password) Copyright © 2015 Datera 65 LIO Admin Manual Figure 5: Windows 7 – Configuring CHAP Authentication. Then click the OK buttons to complete the connection to the target. The LIO iSCSI Target will now appear as a Windows volume (and if configured, reconnect after reboots). For more information on CHAP Authentication, please see also the Windows iSCSI Initiator manual [9]. 12.2.3 Configuring LUNs Block devices can be configured with the Disk Management snap-in, which is part of the Computer Management console in the Administrative Tools. Go to Start Control Panel, search for “Create and format hard disk partitions,” and start the Disk Management snap-in. The Disk Management window is in four parts. On the left is the Computer Management pane of the Computer Management console. The lower pane contains the information for all the block devices. The upper pane contains descriptions of those drives, including data on the amount of space used and free, the type of file system, and the health of that system. The right pane contains a list of actions you can perform. The list changes based on the object you select. To use Disk Management to create or delete partitions, format drives, and create striped or volume sets, click the drive that you want to modify, and select the change that you want to make from the Action menu or Actions pane. Alternatively, you can right-click on the drive that you want to modify, and then select the appropriate action from the context menu. Copyright © 2015 Datera 66 LIO Admin Manual Figure 6: Windows 7 – Configuring LUNs (such as iSCSI LUNs Disk 1, Disk 2, Disk 3). The first time Disk Management starts with a new connection and the disk area has not been previously configured, the Disk Manager will prompt to initialize the disk with a particular partition style: Figure 7: Windows 7 – Initializing a LUN. After the disk is initialized by writing the MBR, right click on the new volume, select “format,” and mark the partition as “active.” For more technical information, including iSCSI tuning parameters, refer to the Windows iSCSI Initiator manual [9]. Copyright © 2015 Datera 67 LIO Admin Manual 12.3 Microsoft Windows Server 2012 SRP Initiator First make sure that your Windows Server 2012 installation is current with all available updates. Then, follow these steps to install the Mellanox OFED 3.1 SRP Initiator for Windows Server 2012: Create the folder C:\Program Files\OFED\ Copy "ofed.msi" into the folder C:\Program Files\OFED\ Install "ofed.msi" from C:\Program Files\OFED\ Disable the IPoIB adapter(s) Disable Mellanox Connect-X VPI Reboot Windows Server 2012 into “Safe Mode” Update the following drivers: o The Mellanox Connect-X VPI driver: Click on “Update” Browse “My Computer” to look for the new driver Pick the new driver from the list of available drivers Choose the version with the "Authenticode Signature" Reboot o Other drivers: MT25408 – C:\Program Files\OFED\drivers\IOU SRP miniport – C:\Program Files\OFED\drivers\SRP Reboot Windows Server 2012 into “Normal Mode” Copyright © 2015 Datera 68 LIO Admin Manual 12.4 VMware vSphere 5 iSCSI Initiator 12.4.1 Connecting to Targets Start the VMware vSphere Client and connect to the VMware vCenter Server or directly to the to the ESX host. In the VMware vSphere Client resource menu on the left side, select the datacenter, cluster and ESX host on which you like to connect the new data store. Go to the Configuration tab Storage Adapter, right click iSCSI Software Adapter and Properties: Figure 8: vSphere 5 – Adding iSCSI Targets in the Storage Adapters View. The iSCSI Initiator dialog appears. Go to the Static Discovery tab Add, and enter the pertinent information of the iSCSI Target, then click OK Close. Copyright © 2015 Datera 69 LIO Admin Manual Figure 9: vSphere 5 – Discovering and connecting to iSCSI Targets. Press OK to get back to the Storage Adapter view in the main vSphere Client window. In the Details section on the bottom, right-click the new iSCSI device and Attach it. 12.4.2 Configuring CHAP Authentication In the iSCSI Initiator Properties dialog, the CHAP button optionally brings up the CHAP Credentials dialog, which allows configuring CHAP Authentication for the iSCSI connection(s): Figure 10: vSphere 5 – Configuring iSCSI CHAP Authentication. If physical security has been established for the iSCSI network, there is no need to enable CHAP, as the VMware VMFS ensures data integrity for VMware data stores. Consequently, for VMware environments, the LIO Linux SCSI Target should be configured in Demo Mode as described in Section 9.5.1. Copyright © 2015 Datera 70 LIO Admin Manual 12.4.3 Configuring LUNs Back in the Storage Adapters view of the main vSphere Client window, select Storage to create VMFS data stores on the iSCSI LUNs. If the new LUNs don’t yet show up, klick Rescan All… Figure 11: vSphere 5 – Adding storage to VMFS stores in the Storage View. Click Add Storage… to bring up the Add Storage dialog, check Disk/LUN Next, select the newly added iSCSI LUN, check VMFS-5 Next Next, and enter a datastore name, e.g. “VMFS-FIO1”. Click Next, and the final Add Storage dialog summarizes the information for the newly added LUN. Click Finish to complete its setup. Figure 12: vSphere 5 – Adding LUNs to VMFS stores. Copyright © 2015 Datera 71 LIO Admin Manual The new VMFS store “VMFS-FIO1” now shows up in the Storage view of the vSphere Client: Figure 13: vSphere 5 – the Storage View. 12.5 Linux iSCSI Initiator A Linux iSCSI initiator can be setup as follows to use your Linux array. This example is based on RHEL. First, install the Linux iSCSI initiator (iscsi-initiator-utils) with: # yum install iscsi-initiator-utils Determine the iSCSI IQN of the client to be used for ACL creation on the iSCSI target: # cat /etc/iscsi/initiatorname.iscsi Start the iSCSI service daemon: # service iscsi start Discover the available iSCSI targets: # iscsiadm -m discovery -t sendtargets -p 192.168.1.59 Login to the iSCSI target: # iscsiadm -l -m node -T iqn.2003-01.org.linux-iscsi.san01.x8664:sn.35ee770c82fb -p 192.168.1.59 At this point, all exported devices are visible in the kernel message ring buffer via dmesg, or can be checked via fdisk -l. Copyright © 2015 Datera 72 LIO Admin Manual 12.6 VirtualBox iSCSI Initiator Virtualbox has an integrated iSCSI initiator, which be used to access exported LUNS natively without the host needing to be configured at all. For more information on how to register iSCSI-based LUNs please use the “VBoxManage storageattach” command, as documented in the Oracle VM VirtualBox User’s Manual, Section 8, “VBoxManage StorageAttach,” see [10]. Copyright © 2015 Datera 73 LIO Admin Manual 13 Glossary Backstore: A physical storage object that provides the actual storage underlying an iSCSI Endpoint. CDB (Command Descriptor Block): The standard format for SCSI commands. CDBs are commonly 6, 10, or 12 bytes long, though they can be 16 bytes or of variable length. CHAP (Challenge Handshake Authentication Protocol): An authentication technique for confirming the identity of one computer to another. Described in RFC 1994, see [17]. CID (Connection Identifier): A 16-bit integer, generated by the Initiator, that uniquely identifies a connection between two iSCSI devices. This integer is presented during the login phase. Endpoint: The combination of a Target name with an explicit or masked TPG (IQN/WWN + Tag). EUI (Extended Unique Identifier): A 64-bit number that uniquely identifies every device in the world. The format consists of 24 bits that are unique to a given company, and 40 bits assigned by the company to each device it builds. Initiator: The originating end of a SCSI session. Typically a controlling device such as a computer. IPS (Internet Protocol Storage): The class of protocols or devices that use the IP protocol to move data in a storage network. FCIP, iFCP, and iSCSI are all examples of IPS protocols. IQN (iSCSI Qualified Name): A name format for iSCSI that uniquely identifies every device in the world (e.g. iqn.5886.com.acme.tapedrive.sn-a12345678). ISID (Initiator Session Identifier): A 48-bit number generated by the Initiator that uniquely identifies a session between the Initiator and the Target. This value is created during the login process, and is sent to the target with a Login PDU. MC/S (Multiple Connections per Session): A part of the iSCSI specification that allows multiple TCP/IP connections between an Initiator and a Target. MPIO (MultiPah I/O): A method by which data can take multiple redundant paths between a server and storage. Network Portal: The combination of an iSCSI Endpoint with an IP address plus a TCP port. The TCP port number for the iSCSI protocol defined by the IANA is 3260. OUI (Organizationally Unique Identifier): A 24-bit number that is purchased from the IEEE Registration Authority. This identifier uniquely identifies a vendor (referred to by the IEEE as the “assignee”) globally and effectively reserves a block of each possible type of derivative identifier (such as MAC addresses). SAM (SCSI Architectural Model): A document that describes the behavior of SCSI in general terms, allowing for different types of devices communicating over various media. Target: The receiving end of a SCSI session, typically a device such as a disk drive, tape drive, or scanner. Target Group: A collection of fabric module SCSI target endpoints containing SCSI target ports that provide access to individual storage objects. Target Port: The combination of an iSCSI Endpoint with one or more LUNs. TPG (Target Portal Group): A list of IP addresses and TCP port numbers that determines which interfaces a specific iSCSI target will listen to. Copyright © 2015 Datera 74 LIO Admin Manual TSID (Target Session Identifier): A 16-bit number, generated by the target, that uniquely identifies a session between the initiator and the target. This value is created during the login process, and is sent to the initiator with a Login Response PDU. WWN (World Wide Name): A unique identifier that identifies a particular Fibre Channel or InfiniBand target. Each WWN is an 8 byte number derived from an IEEE OUI and vendor-supplied information. Copyright © 2015 Datera 75 LIO Admin Manual 14 References [1] Adaptec RAID controller. Command line utility. User’s Guide. Adaptec, 2008. http://download.adaptec.com/pdfs/user_guides/CLI_v6_10_Users_Guide.pdf [2] Adaptec Storage Manager, User’s Guide. Adaptec, 2008. http://download.adaptec.com/pdfs/user_guides/asm_v6_10_users_guide_for_das.pdf [3] Dafna Sheinwald. Internet Small Computer Interface (iSCSI) Cyclic Redundancy Check (CRC) / Checksum Considerations. RFC 3385, September 2002. http://www.ietf.org/rfc/rfc3385.txt [4] Ethereal web site. http://www.ethereal.com/ [5] Glen Turner. Remote Serial Console HOWTO. Australian Academic and Research Network. http://www.tldp.org/HOWTO/Remote-Serial-Console-HOWTO/ [6] Julian Satran. Internet Small Computer Interface (iSCSI). RFC 3720, IETF, August 2004. http://www.ietf.org/rfc/rfc3720.txt [7] LSI Embedded MegaRAID Software. User’s Guide. Version 2.0, LSI, November 2006. http://www.lsi.com/downloads/Public/Storage%20Products/Internal%20RAID/embedded_mr_sw _ug.pdf [8] LSI MegaRAID SAS Software. User’s Guide. Version 2.0, LSI, June 2007. http://techpubs.sgi.com/library/manuals/0000/860-0488-001/pdf/860-0488-001.pdf [9] Microsoft iSCSI Initiator, Windows Server 2008 R2 and Windows 7. Microsoft, March 2012. http://www.microsoft.com/en-us/download/confirmation.aspx?id=6408 [10] Oracle VM Virtual Box. User Manual. Oracle, 2011. http://www.virtualbox.org/manual/ [11] Datera. Error Recovery Level, Linux Target wiki, 2013. http://linux-iscsi.org/wiki/Error_Recovery_Level [12] Datera. Persistent Reservations, Linux Target wiki, 2013. http://linux-iscsi.org/wiki/Persistent_Reservations [13] Datera. vStorage APIs for Array Integration, Linux Target wiki, 2013. http://linux-iscsi.org/wiki/VAAI [14] SuSe. Zypper Usage. Version 11.1, 27 November 2009. http://old-en.opensuse.org/Zypper/Usage/11.1 [15] Vivek Goyal. Documentation for Kdump. November 2011. http://www.kernel.org/doc/Documentation/kdump/kdump.txt [16] VMware. Disable Space Reclamation. In: ESXi and vCenter Server 5 Documentation. April 2012. http://pubs.vmware.com/vsphere-50/index.jsp?topic=%2Fcom.vmware.vsphere.storage.doc_50%2FGUID-EB15AF57-0AD2-414D-BE5D-3AAF4623133D.html [17] William Allen Simpson. PPP Challenge Handshake Protocol (CHAP). RFC 1994, August 1996. http://www.ietf.org/rfc/rfc1994.txt [18] Wireshark web site. Riverbed Technology. http://www.wireshark.org/ Copyright © 2015 Datera 76 Datera, Inc. 2570 W El Camino Real, Suite 380 Mountain View, CA 94040 Copyright © 2015 Datera, Inc. All rights reserved. Datera™, LIO™ and the Datera logo are trademarks of Datera, Inc., which may be registered in some jurisdictions.