1
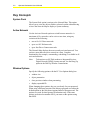
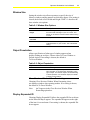
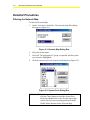
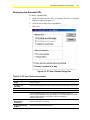
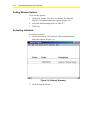
Operator Workstation User’s Manual
2-1
Chapter 2
Using the Network Map
Introduction
This chapter explains how to use the Network Map. The chapter
describes how to:
•
filter the Network Map
•
display the expanded IDs
•
set window options
•
activate a network
© November 1, 2001 Johnson Controls, Inc.
Code No. LIT-120166
www.johnsoncontrols.com
2-2
Operator Workstation User’s Manual
Key Concepts
System Peek
The System Peek option is unique to the Network Map. This option
allows you to view the objects within a selected system without having
to leave the Network Map to display a System summary.
Active Network
Use the Activate Network option to switch between networks. A
maximum of five networks can be active at one time, using any
variation of the following:
•
one to five N1 Direct networks
•
up to two NC Dial networks
•
up to four Direct Connect networks
The Network Map displays the most recently activated network. You
can have more than one active network at a time. Complete
functionality (for example, commanding, scheduling) is available in all
activated networks.
Note:
To deactivate an NC-Dial (modem or Integrated Services
Digital Network [ISDN]) remote network, use the Hang Up
option in the Dial-Up Window Control menu.
Window Options
Specify the following options with the PC User Options dialog box:
•
window size
•
object penetration
•
close previous window when penetrating
•
display expanded ID
When changing these options, they are saved only for your password.
When using a different password, the Metasys program uses either the
default options or the last chosen options linked to that password. The
options are saved for that Operator Workstation only. If the same
options are desired on another OWS, you must set the options using
that OWS.
Operator Workstation User’s Manual
2-3
Window Size
Setting the window size allows operators to specify the size of
Metasys windows and the manner in which they appear. If no setting is
chosen, the default is Full Width and Height. Table 2-1 describes the
three window size options.
Table 2-1: Window Size Options
Widow Size
Description
Full Width and Full
Height
Allows viewing of Metasys screens covering almost
the entire width and height of your PC monitor. This
allows you to view the most information without having
to scroll.
Full Width and
Cascaded
This option is not available at this time
Default Size and Order
Allows the windows to appear in a smaller size and a
scattered fashion on your monitor. This is the default
setting.
Object Penetration
Allows specification of what type of window appears when
double-clicking on an object. Choose either To Focus Window or
Default Action. If no setting is chosen, the default is
To Focus Window.
Table 2-2: Object Penetration
Option
Description
To Focus Window
Allows viewing of detailed information about the object
Default Action
Allows commanding of the object. The default action is
either operation or communication, depending on the
type of object. For software objects, the default setting
is Action-Operation. For hardware objects, the default
is Action-Communication.
Close Previous Window When Penetrating
Choosing Close Previous Window When Penetrating closes
one Metasys window when opening another. If no setting is chosen,
the default is To Focus Window.
Note:
An X appears in the Close Previous Window When
Penetrating option box.
Display Expanded ID
Choosing Display Expanded ID allows the expanded ID for each item
on the Network Map to appear. The expanded ID appears to the right
of the item’s icon and name. If no setting is chosen, the expanded IDs
do not appear.
2-4
Operator Workstation User’s Manual
Detailed Procedures
Filtering the Network Map
To filter the Network Map:
1.
On the View menu, click Filter. The Network Map-Filter dialog
box appears (Figure 2-1).
Figure 2-1: Network Map Dialog Box
2.
Select the system name.
3.
Click OK. The appropriate PC group is expanded, and the system
you selected is highlighted.
4.
Click the system to go to the System Peek dialog box (Figure 2-2).
Figure 2-2: System Peek Dialog Box
IMPORTANT: For Metasys software releases prior to Release 10.02,
click the Cancel button to close the System Peek
dialog box (do not click on the X in the upper right
corner). This prevents reporting problems with the
Global Alarm indicator on the Network Map.
Operator Workstation User’s Manual
2-5
Displaying the Expanded IDs
To display expanded IDs:
1.
On the SetUp menu, click PC User Options. The PC User Options
dialog box appears (Figure 2-3).
2.
Click the box to the left of expanded ID.
3.
Click Save.
Figure 2-3: PC User Options Dialog Box
Table 2-3: PC User Options Parameters
Field
Description
Full Width and Full
Height
Allows viewing of Metasys screens covering most of the entire width and height of
your PC monitor
Full Width and
Cascaded
Allows viewing of Metasys screens covering most of the entire width of PC monitor
Default Size and Order
Restores object to default size and order
To Focus Window
Allows viewing of detailed information about the object
Default Action
Allows commanding of the object. The default action is either operation or
communication, depending on the type of object. For software objects, the default
setting is Action-Operation. For hardware objects, the default is
Action-Communication.
Close Previous
Window When
Penetrating
Closes one Metasys window when opening another. If no setting is chosen, the
windows close when penetrating.
Display Expanded ID
On Map
Displays the expanded ID of the object
2-6
Operator Workstation User’s Manual
Setting Window Options
To set window options:
1.
On the SetUp menu, click PC User Options. The Network
Map PC User Options dialog box appears (Figure 2-3).
2.
Select the desired settings. Refer to Table 2-3.
3.
Click Save.
Activating a Network
To activate a network:
1.
On the SetUp menu, click Network. The Network Summary
dialog box appears (Figure 2-4).
Figure 2-4: Network Summary
2.
Click the desired network.
Operator Workstation User’s Manual
3.
2-7
On the Action menu, click Activate Network. The Network Map
displays the newly activated network.
Note:
When a network is activated, certain windows remain open.
This allows operators to have windows from up to
five different networks displayed on the screen at one time.
Complete functionality (for example, commanding,
scheduling) is available in all active networks. If the facility
has multiple dial-up networks defined, switching from one
dial-up network to another results in the first being
disconnected if there are no windows open for that network
(with the exception of the Network Map).