1
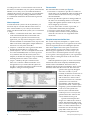
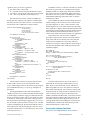
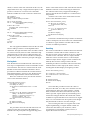
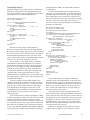
Smart Access
Solutions for Microsoft® Access® Developers
Dynamic Menus
George Hepworth
2000
2002
2003
If you really love the switchboard menus created by the Access Switchboard
menu, this article isn’t for you. However, if you’re one of those people who think
“There has to be a better way,” read on. George Hepworth takes you from design to
implementation as he shows you how he creates an alternative to the switchboard.
D
O you remember how excited you were the first time you discovered
the Switchboard Wizard in Access? With your input, the wizard did all
the heavy lifting to create a menu system to guide your users through
the forms and reports in your brand-new application. The Switchboard
Wizard helped put a professional-looking face on your databases with very
little experience or expertise on your part. The Switchboard provided a central
platform from which all of the functions in the database could be launched. As
an organizing principle, the switchboard concept had some real advantages.
However, for me at least, the excitement was short-lived.
First, I discovered the Switchboard Wizard limited the number of buttons
that I could use to eight per page. I soon discovered that I also had to use one
of the eight buttons to close the database, which meant I could have no more
than seven functional buttons on the main page. And, of course, adding a
second page meant using another button to navigate to it, leaving only six
functional buttons on the main page. Quite quickly, I ended up with multiple
layers of menus—and lots of confusion on my users’ part as they drilled
down through all those layers and back up to move from function to function
in the database.
To make matters worse, with switchboard-style navigation the forms
tended to pop open one on top of the other—or on top of the switchboard
menus. Not only was it cluttered, many users found it confusing and
cumbersome. Users especially disliked having to click on a button to close
one form in order to reveal the menu underneath it just so they could click
another button (or series of buttons) to navigate to yet another menu where
they could open another form or report. And, after a while, I just got tired of
looking at the chunky, square switchboards themselves. They all began to
look alike to me and they all shouted “Access Newbie.”
To be fair, I have seen some interesting and attractive graphic features in
Continues on page 4
Sample Issue
1
Dynamic Menus
George Hepworth
2
Editorial: Communication
Peter Vogel
10
Access Interfaces: Creating
Paired Listbox Controls, Part 2
Rebecca M. Riordan
15
Access Answers: Shortcuts,
Quotes, and What Have I Done?
Doug Steele
20
Downloads
Applies to
Access 95
Applies to
Access 97
2000
2002
Applies to
Access 2000
Applies to
Access 2002
2003
Applies to
Access 2003
Accompanying files available online at
www.pinnaclepublishing.com
Editorial Smart Access
Communication
Peter Vogel
F
OR someone who makes a sizeable portion of his
income from technical writing (there are years when
my tech writing revenue matches my consulting
revenue), you’d think I’d be better at communicating. As
I get older and deafer, most of my problems arise when
listening to people—especially people with accents (I, of
course, have no accent).
For instance, I was in England teaching for Learning
Tree International a month or two ago. Coincidentally, my
son was coming to London on a school trip and we would
be able to get together for dinner (with the rest of his
group) on his first night in town. He sent me the name of
the restaurant the group was going to and, since I had a
class full of experts on London, I asked my class what
kind of restaurant it was. “Oh,” replied one lady, “it’s a
good place. It’s a nudie restaurant.”
<significant pause on my part>
“Pardon?” I squeaked.
“It’s a noodle restaurant,” she repeated.
I started to breathe again.
Part of the problem is that since I live in a small town
in North America, I’m just not exposed to a variety of
accents. We seem to pick up our phonemes (the limited
range of sounds that our language uses vs. the wider
range of sounds available to all languages) very early in
life—and it’s darn hard to say or even to hear other
phonemes without lots of exposure. So, when I travel, I
spend a lot of time hoping that I’m getting the other
person’s message.
Lately, when I’m having trouble understanding
people I go into “grinning moron” mode: I smile and
nod encouragingly while my brain runs around shouting
“What does this mean! What does this mean!” I look,
basically, like the world’s biggest bobble-head doll. At
random intervals, I have a spasm and repeat back to the
speaker some word or phrase that shows that I’m taking
it all in.
I’m not taking it all in.
A recent incident of grinning moron mode was at a
Kaiseki restaurant that my wife and I like very much. The
chef’s wife delivers the food and always takes the time to
explain what you’re getting (there’s no menu—you eat
what the chef cooks). If you thought I had a problem with
speakers from the UK who share most of their phonemes
with me, you can imagine how I deal with people whose
language has less “sound overlap” with my language.
This sophisticated lady was explaining the dressing that
2
Smart Access Sample Issue
went on this part of the meal, that the dressing included
walnuts and was an “ah-dum” sauce. I had a spasm and,
still grinning, repeated “ah-dum sauce” back to her as a
gesture of cross-cultural understanding. In return, I got a
peculiar look before she left us to enjoy the meal. I get a
lot of peculiar looks when in grinning moron mode.
However, this one looked like she was concerned not just
for my intelligence but for my sanity. My wife leaned over
the table to me and said, “Autumn, you idiot—it’s an
autumn sauce!” We didn’t go back for six months and,
even then, took a friend for camouflage.
The problem is that I’m no help in these kinds of
miscommunications. Last week I was checking out of the
parking lot at the airport where I leave my car when I
travel. I do this often enough that I’m on a first-name basis
with most of the cashiers. There was a new woman on
the cash register who only got a quick look at my license
plate as I drove up to the booth (my license plate says
PHANDV, the name of my company). She figured that it
would be easy to confirm my plate number with me
before writing it down. She obviously had no idea who
she was dealing with.
The question I heard was, “What’s the fifth letter of
your license number: O O D?” I looked blank. Brave soul,
she tried again: “The fifth letter of your license plate: Is it
O O D?” Silence.
Suddenly, I realized that she was asking if the fifth
letter was “O or D.” I then gave what must rank as the
most useless answer in the world: “Ohhh... D.” Think
about it from her point of view. Fortunately, this time I
realized what the problem was and said, “D... The fifth
letter is D.” She filled out the form and I went on my way.
I won’t tell you how the person waiting behind me (at
2:00 in the morning) felt about this.
However, it got me thinking about the work that I do
as an application developer (it’s a 2.5-hour drive home—
I think a lot). I tried thinking about my work differently,
just for today. Instead of thinking of it as programming, or
building applications, or delivering functionality, just for
the heck of it, I tried thinking of it as communication.
How well do I communicate the information that the user
is looking for? How well do I communicate how the user
should interact with my application? What part of this
happens in my user interface? What part happens in the
Help system? Or the user manual? Or in training?
It was an interesting experience and one with an
interesting result, which I’ll discuss next issue. ▲
www.pinnaclepublishing.com
RESERVED SPACE FOR ADVERTISING
For details about advertising opportunities,
contact Roger Stojsic at 312.960.4404 or [email protected].
www.pinnaclepublishing.com
Smart Access Sample Issue
3
Dynamic Menus...
Continued from page 1
other people’s switchboards, along with some innovative
layouts. At the end of the day, though, even they are still
subject to the functional limitations I listed. So, like a
lot of other developers, I began experimenting with
different methods of creating interfaces for my Access
applications. This article describes my solution, but I’m
going to give you some insight into the complete design
and development process—including some dead ends
along the way.
False starts and empty promises
by the menu.
That design works well, but eventually the TreeView
control revealed some problems of its own. Most
significantly, it shares the problem of missing references
documented by Doug Steele in the December 2003 issue
of Smart Access (“Access Answers: But it Worked
Yesterday!”). After complaints about that issue from
users, I finally dropped the TreeView control in favor
of a native Access ListBox bound to the menu table.
That’s shown in Figure 3, which is the home page for an
application I built for a client
The list box not only solved the major headache of
broken references, it simplified the creation of the menu
control itself because it was just an ordinary list box with
two columns, one with subform names and the other with
the associated menu item. However, this design left a lot
of unusable, and therefore wasted, space on the form.
Over time, I came to resent the amount of screen
real estate wasted on the left side of the form, especially
the space below the menu control itself. As you can see
in Figure 3, I often used that space to display static
Figure 1 illustrates one approach to menu design with
which I experimented for a while. I’ll only give you a brief
overview of this menu design because this design isn’t the
main focus of the article, although it was a step along the
way. Not everything works out, but everything you do
contributes to making you smart, and this design helped
clarify my thinking about what makes for good menus.
In this design, I used a TreeView
control to create and embed a menu
directly into a form that would
replace the switchboard. The menu
appears on the left in Figure 1. The
majority of the space on the form
was given over to a subform control
(it’s on the right). I referred to that
subform control as the “Workspace.”
I set up a table, similar to the
Switchboard table created by the
Switchboard Wizard, called
“tblTreeMenu” (see Figure 2) to hold
subform names and arguments.
This combined menu and
working form works something like
the standard switchboards, in that
code in the Load event of the main
working form creates nodes on the
TreeView control from records in
Figure 1. An initial design for a dynamic Access menu.
the table. The difference is that all
of the menu items are loaded into the
TreeView control at once and remain permanently available
to the user. A simple bit of code on the Node_Click event
of the TreeView control loads the proper form into the
Workspace subform control by doing a lookup into the
menu table.
One of the main advantages of this design is that,
because the main form never has to be closed, the screen
display remains stable—the user “pulls” subforms to the
workspace as they’re needed. Still another advantage is
that I can make the main form a modal popup, thereby
preventing the user from accessing tool and menu bars
or opening other forms or reports except through the
subform control in the workspace, which is controlled
Figure 2. The table that drives the TreeView design.
4
Smart Access Sample Issue
www.pinnaclepublishing.com
information, like the name of the
client, but essentially it was just
wasted space, even when I crowded it
as far to the left as possible. In short,
while I think this approach to menu
design has some very good points, it
still wasn’t quite what I wanted.
Requirements for a
dynamic menu system
After some reflection on the strengths
and weaknesses of my previous
efforts, I came up with several goals
when I set out to create this ultimate
menu system.
Visibility and accessibility
I’ve come to the conclusion that the
most effective user interfaces remain
visible and accessible all the time. If
Figure 3. A native Access ListBox is bound to the menu table.
possible, the user should never have
to manually close one form in order to get to another form
changing, or deleting table entries, not by modifying
forms or other database objects. Code that runs when the
or to a menu. The ListBox and TreeView control menus
meet that goal well because a single click event handles
application opens dynamically generates a new menu
with the updated table values. That level of automation
both tasks simultaneously.
An alternative to menu forms would be to generate
seemed like one of the good features of the standard
switchboard that I wanted to keep if I could.
custom toolbars or menus for an application. However,
The result was the menu system described in the
because each application has different functions, that
next section.
would mean creating a new set of toolbars for each
application, and that conflicts with my second goal.
Dynamic menu
Portability
I wanted to create a menu system that’s portable
between applications. Once the menu form was created, I
wanted to be able to copy it into each new database
without having to modify it any more than absolutely
necessary. Tool and menu bars can’t do that, except for
some very generic functions like Spell Checking, Printing,
and Sorting.
These design criteria are satisfied by the newest menu
method I’ve been working on. In some ways, it goes back
to the strengths of the original switchboard concept in
which all functions are launched from a central form. It
also regenerates the menu dynamically from values stored
in a table. Plus, it adds some enhancements I’ve worked
out from my own experiments.
Advantages
Stability and minimal space requirements
I wanted a menu that would take up a minimum of
screen space and that would remain in the same location
at the top of the window, like a tool or menu bar. The
ListBox and TreeView controls met the stability part of
this goal but not the space-saving goal. Moreover, by
their very nature, they’re vertical rather than horizontal,
which means that they have to remain on the left side of
the screen.
Dynamically generated
I wanted a menu that can be dynamically generated each
time the application is opened, using values stored in a
menu table in the database (as is the case with the
Switchboard Wizard). Changes to functions within the
application are reflected in the menu system by adding,
www.pinnaclepublishing.com
One advantage this menu has over the original
switchboard is that it abandons command buttons in
favor of hyperlinks. Hyperlinks take up less space on the
menu (meeting the third goal), and, with a little bit of
additional coding, they can also do things like launch
Web sites or send e-mail directly from the menu.
A second advantage this menu has is that it isn’t
limited to a fixed number of items on the menu. Each
menu item generates its own hyperlink, from one to as
many as you need. Unlike the old-style switchboards,
which began to pile up in layers as you added functions,
this menu simply gets a little taller (approximately 1/5
of an inch in height for every seven menu items that you
add at 1024x768, using Arial 10pt type).
A third big advantage is that the menu form
generated by this code resizes itself (within limits)
Smart Access Sample Issue
5
according to the user’s screen resolution. The version in
this article accommodates only two options, 1024x768 and
800x600, as I’ve rarely, if ever, encountered a different
setting in the past few years. However, you can add other
resolutions quite easily by adding additional branches
to a conditional statement in the function that generates
the menu.
Menu components
To make this menu system work in any database, you
need four objects: one table and three forms. Some of
these will be familiar to you, as they’re derived from
earlier switchboard and menu systems you’re accustomed
to using.
• tblMenu—Contains the menu items. This is similar
to the old Switchboard table, reincarnated with
new functions. To generate a new menu for any
application, you only need to change the entries in
this table. tblMenu accommodates forms, reports, and
URLs on the menu, although the sample database in
this article uses only forms and URLs.
• frmSplash—Contains the code to generate the menu
dynamically and doubles as a splash screen.
• frmMenuDynamic—Serves as a template for the menu.
You create frmMenuDynamic once and copy it into
every database that uses this menu system. It’s a
template; it shouldn’t be changed, except for making
the background color match a color scheme.
• frmQuit—Called by the Quit command on the
menu. You could use a different method to close
the application if you wanted, but this Quit form
provides a consistent look and feel to the form and
simplifies coding for menu hyperlinks.
Figure 4. Table to support the dynamic menu.
Figure 5. The splash screen that builds the dynamic menu.
6
Smart Access Sample Issue
The menu table
The menu table has five fields (see Figure 4):
• ItemNumber is only there to provide a sort order for
menu items. You can shuffle the order in which menu
items are added to the menu form by re-assigning
their ItemNumber.
• ItemText provides the captions for the hyperlinks on
the menu. You should keep them to a reasonable
length, although the dynamic nature of the process
allows lengths up to 10 inches.
• Argument is the name of a form, report, URL, or
e-mail address launched by the hyperlink.
• ObjectType is Form, Report, mailto:, or http://.
• ScreenTip is the text for the screen tip displayed
when the cursor moves over a hyperlink on the
menu form.
The splash screen/menu builder form
The second component, frmSplash, is a splash screen,
opening as the startup form for an application, but it has
the more important function of building the dynamic
menu form. Figure 5 shows the splash screen for the
sample database from my book. What a splash looks
like in any given application, of course, is up to you.
You can create a customized splash screen for each app,
or use a generic version appropriate to your organization.
What counts in creating the menus is the code it runs
when it opens.
When the splash form opens, it creates a new menu
form based on the menu template (frmMenuDynamic)
and the values from tblMenu. The Timer event of
frmSplash calls the function fCreateMenu, which creates
the menu, rather than the Load event. This is because
splash screens typically disappear
after a few seconds, so you’d
normally set the timer for the form to
4000 or 5000 (four or five seconds),
and use the form’s Timer event to
close the form. However, I need this
splash form to run a function—
fCreateMenu, which dynamically
generates the menu—when it opens.
Originally, I put fCreateMenu in the
Load event of the splash form.
However, that caused the menu
creation process to occur before the
splash form became visible on the
screen, and that wasn’t good.
I put the menu template into
design view while the new menu is
rebuilt, and I definitely didn’t want
users to see that. Even though it only
takes a second to rebuild a menu, I
found the view disconcerting and I
really didn’t want users to be
confused by seeing it before the
www.pinnaclepublishing.com
splash screen appeared. The solution was to move
fCreateMenu from the Load event to the Timer event and
set the value of the timer to a fraction of a second (say, 500
milliseconds). This allows the splash form to open before
the menu is rebuilt. Although the menu template still
flashes briefly on the screen while the menu is being built,
the splash screen helps anchor the user’s attention.
Here’s the code that runs on the Timer event of
frmSplash. I’ll explain what it does shortly (I’ve omitted
error handling for readability, here and in the code
that follows):
Private Sub Form_Timer()
Dim DelayEnd As Date
fCreateMenu
CloseAllForms ("frmSplash")
DelayEnd = DateAdd("s", 4, Now)
While DateDiff("s", Now, DelayEnd) > 0
Wend
DoCmd.OpenForm "frmMenu"
End Sub
The function CloseAllForms is a piece of code I
“recycled” from someone else a long time ago.
Unfortunately, I don’t know the original source, so I can’t
give proper credit. It closes all the forms except the form
whose name is passed in the FormName parameter:
Function CloseAllForms(FormName As String)
Dim FormCount As Integer
Dim i As Integer
Dim F As String
FormCount = Forms.Count
For i = FormCount - 1 To 0 Step -1
If Forms(i).Name <> FormName Then
DoCmd.Close acForm, Forms(i).Name
End If
Next i
End Function
Forms.Count returns the number of open forms in the
database. (AllForms.Count would return the total number
of forms, both open and closed.) The For...Next statement
steps through any open forms in the database, closing
each form in turn, except for the form passed in as an
argument to the function. In this case, I want to leave
frmSplash open while the menu is rebuilt, but I want to
close the new menu after it’s built. So this is the line of
code that does both:
CloseAllForms("frmSplash")
Next, because I’ve already used the form’s Timer
event to fire this code to create the new menu, I had to
come up with a delay mechanism that would display
the splash screen for a few more seconds. I found this
technique, using the While...Wend loop in Microsoft
Knowledge Base Article 141537. You can use any pause or
delay technique you like, and you can set the delay to be
shorter or longer than the four seconds I used. The last
line in the Timer event procedure opens the new menu.
www.pinnaclepublishing.com
(I’ll show you why I don’t need to close the splash screen
itself later.)
fCreateMenu—Doing the heavy lifting
The heavy lifting required to create a menu is done by the
function fCreateMenu, located in the code module for
frmSplash. Here’s how it works. fCreateMenu includes
the GetSystemMetrics API call to get the current screen
resolution. The API call and relevant constants are
declared in frmSplash’s Code Module. The constant, TPI,
is also set to 1440, representing the number of twips per
inch. I need that number in order to set the maximum
menu width:
Option Compare Database
Option Explicit
Private Declare Function apiGetSys Lib "user32"_
Alias "GetSystemMetrics" (ByVal nIndex As Long) _
As Long
Private Const SM_CXSCREEN = 0
Private Const SM_CYSCREEN = 1
'TPI, or Twips Per Inch
Private Const TPI As Integer = 1440
Here’s the menu creation function, fCreateMenu. It’s
rather long, but I’ve broken it up with explanations to
help you navigate through it:
Public Function fCreateMenu()
Dim
Dim
Dim
Dim
Dim
Dim
Dim
Dim
Dim
intMenuItems As Integer
i As Integer
intLabelX As Integer
intLabelY As Integer
intMenuWidth As Integer
intMenuCount As Integer
ctl As Control
ctlLabel As Control
rs As DAO.Recordset
A quick explanation of these variables: fGetCurRes
determines current screen resolution—this version of the
function provides for two screen resolutions, 1024x768
and 800x600. If your users need other resolutions, add
metrics for them in the conditional. inMenuCount is an
arbitrary number that assumes approximately 10 inches
of usable screen width at 1024x768 and approximately 8
inches of usable screen width at 800x600. Any resolution
higher than 1024x768 will default to 10.
In the next code, fCreateMenu sets the value of the
variable intMenuItems, which determines the maximum
permissible width for the menu. The values I settled on—
8 inches at 800x600 and 10 inches at 1024x768—are
somewhat conservative, but I’d rather err on the side of
caution. I don’t want the menu spilling off the right side
of the screen. Establishing a maximum width for the
menu, instead of a maximum number of menu items,
allows me to put hyperlinks of any width on the menu,
subject only to the maximum width of the menu itself. A
10-inch-wide hyperlink label is hard to imagine, but it
could be accommodated with this menu system:
If fGetCurRes = "1024x768" Then
intMenuCount = 10
ElseIf fGetCurRes = "800x600" Then
Smart Access Sample Issue
7
intMenuCount = 8
Else
intMenuCount = 10
End If
Now I convert my menu count to either 8 inches or
10 inches. TPI is a constant, defined as 1440, and converts
from inches to twips:
intMenuWidth = intMenuCount * TPI
The next step is to open the template form,
frmMenuDynamic, in design view as an icon, so that it’s
as unobtrusive as possible. I experimented with a variety
of approaches to this step—hiding the template form
while it’s being built, for example. However, the form
must be made visible at some point in order to save it as
the new menu. After experimenting with several options,
I decided opening it as an icon was the least intrusive
way to do that:
DoCmd.OpenForm "frmMenuDynamic", acDesign,,,, acIcon
I’m ready now to begin adding menu items. The first
step is to open the menu table and count the menu items
in it. I’ve used DAO but you could use ADO just as easily:
Set rs = CurrentDb.OpenRecordset("tblMenu", _
dbOpenDynaset)
rs.MoveLast
rs.MoveFirst
intMenuItems = rs.RecordCount
Next, I position the first label to hold a menu item by
putting it in the upper left corner of the form:
intLabelX = 0
intLabelY = 0
Then, a For... loop steps through each record in the
menu table, creating one label on the menu for each
record, using the CreateControl method. The loop starts
at 0 because index values for controls on a form are
zero-based—that is, the first control has an index of
“0”. The labels themselves are named Cmd(i), with the
maximum value of i being the number of labels on the
form minus one. The label captions themselves are taken
from the ItemText field of the menu table:
With rs
'Index values for controls on a form
'are 0 based
For i = 0 To intMenuItems - 1
Set ctlLabel = CreateControl_
(Forms!frmMenuDynamic.Name, acLabel, , , _
"cmd" & i, intLabelX, intLabelY)
ctlLabel.Visible = True
ctlLabel.Caption = !ItemText
During testing I found that the SizeToFit method
of a label (which is supposed to make the label big
enough to hold its text) isn’t reliable if the default width
of a control is narrower than its contents. I set the label’s
width to 2 inches as a workaround to ensure the label
resizes correctly:
8
Smart Access Sample Issue
ctlLabel.Width = TPI * 2
ctlLabel.SizeToFit
The conditional in the next section of the function
checks the object type of the current label to see
whether it needs to create a hyperlink address (for links
to external URLs or e-mail addresses) or a hyperlink
subaddress (for internal links to forms, reports, and
so on):
If !ObjectType = "mailto:" Or _
!ObjectType = "http://" Then
ctlLabel.Hyperlink.Address = _
!ObjectType & !Argument
However, internal links to forms or reports must be
set in the hyperlink SubAddress property:
Else
ctlLabel.Hyperlink.SubAddress = _
!ObjectType & " " & !Argument
End If
Just to finish off the process (and to provide the
user with some onscreen help), I create a screen tip for
the control:
ctlLabel.Hyperlink.ScreenTip = !ScreenTip
With the next control ready, it’s time to determine
whether to leave it in place or move it down to a new row.
If adding the label would extend the menu past the predetermined width of the menu form, I have to move the
item. Otherwise, it stays where it is. At this point in the
process, the value of intLabelX is still equal to the left
edge of the previous control (or 0 if I’m still building the
first label). If intLabelX plus the width of the current
control is greater than the maximum permissible menu
width, intMenuWidth, I know the menu could be too
wide to fit on the screen, so that control has to move
down a row on the menu. Therefore, intLabelX is reset to
0 (the left edge of the form), and intLabelY, which is the
top edge of the control, is set to the default height of the
control, plus the previous value of intLabelY. That is to
say, the new label is at the lower edge of the labels on the
previous row:
If intLabelX + ctlLabel.Width >= intMenuWidth _
Then
intLabelX = 0
intLabelY = intLabelY + ctlLabel.Height
ctlLabel.Top = intLabelY
End If
ctlLabel.Left = intLabelX
intLabelX = intLabelX + ctlLabel.Width
With the hyperlink label created and in its proper
place, I move to the next menu item in the recordset and
start the loop again:
.MoveNext
Next i
End With
When all of the required labels have been created, it’s
www.pinnaclepublishing.com
time to resize the new menu, so that it’s as small as
possible. The function does this by resetting the height
and width of the form’s detail section to “0”. Since the
form can’t be made narrower or shorter than the controls
in its detail section, this has the effect of shrinking the
new menu form as much as possible:
Opening or activating the menu
Forms!frmMenuDynamic.Detail.Height = 0
Forms!frmMenuDynamic.Width = 0
DoCmd.SetWarnings False
'The "Moveable" property is not available
'in Access 2000 or earlier.
Now that the menu form is built, I save the form as
“frmMenu”, overwriting any existing instance of the
menu form. Issuing DoCmd.Save with a different name
has the same effect as selecting File | Save As from the
Access menus. I can then close the menu template,
abandoning changes made to it (it will be ready for the
next time):
DoCmd.Save , "frmMenu"
DoCmd.Close acForm, "frmMenuDynamic", acSaveNo
DoCmd.SetWarnings True
This code is in the Open event of the menu template form,
frmMenuDynamic. Because frmMenu is a copy of the
menu template, it contains this code from the template:
Private Sub Form_Open(Cancel As Integer)
DoCmd.MoveSize 0, 0
Me.Moveable = False
DoCmd.RunCommand acCmdSizeToFitForm
End Sub
This is primarily “housekeeping” code in that it’s
there to make sure the menu stays in its proper location at
the top of the screen, and at its proper dimensions. Only
the first command, which relocates the form to the upper
left corner, is really necessary, I suppose. However, I left
the rest in as sort of a “belt and suspenders” gesture.
Finally, the last bit of code required to make the menu
work is in the Activate event of the menu form.
'Clean up
Set rs = Nothing
End Function
At this point, the new menu is complete and open
in design view. One last note: My fGetCurRes function
(called at the start of the routine) returns the user’s
current screen resolution as X by Y (for example,
1024x768), using the GetSystemMetrics API:
Private Sub Form_Activate()
DoCmd.MoveSize 0, 0
CloseAllForms ("frmMenu")
End Sub
Each time the user moves focus to the menu form
by clicking on one of the hyperlink labels on it, the
Continues on page 19
Function fGetCurRes() As String
Dim strRet As String
fGetCurRes = apiGetSys(SM_CXSCREEN) & "x" & _
apiGetSys(SM_CYSCREEN)
End Function
After the menu
From here, processing resumes with the code in the
Timer event of the splash form following the call to
fCreateMenu:
RESERVED SPACE FOR
ADVERTISING
Private Sub Form_Timer()
…
CloseAllForms ("frmSplash")
DelayEnd = DateAdd("s", 4, Now)
While DateDiff("s", Now, DelayEnd) > 0
Wend
DoCmd.OpenForm "frmMenu"
For details about advertising opportunities,
contact Roger Stojsic at 312.960.4404 or
[email protected].
End Sub
As I previously discussed, after the menu form
creation function runs, the newly created menu form is
closed, leaving the splash form open for another four
seconds. Then, the new menu form, frmMenu, is
reopened, this time in form view, ready to go to work.
And that brings me to the code that runs when
the menu form opens and the code that runs when
it’s activated by getting the focus from any other form
or report.
www.pinnaclepublishing.com
Smart Access Sample Issue
9
Access Interfaces Smart Access
Creating Paired Listbox
Controls, Part 2
2000
Rebecca M. Riordan
This month, Rebecca Riordan continues her examination of
paired Listbox controls by adding two additional functions:
deferring data updates until users explicitly commit their
changes, and restoring the contents of the paired Listbox
controls to their initial state.
L
AST month, I showed how to implement paired
Listbox controls like the ones shown in Figure 1. If
you can afford the space, a pair of Listbox controls
is an excellent mechanism for allowing a user to select
multiple items from a list.
In Part 1, I looked at the basic implementation
techniques for paired Listbox controls that update their
data source immediately. This month, I’m going to look at
the (only slightly) more complicated process of deferring
updates until the user explicitly commits them. The same
technique allows the user to restore the Listbox controls to
their initial state.
Obviously, since I’m only expanding on the
functionality of the sample forms from last month,
there’s a lot of overlap in the code between last month
and this month. Where this month’s sample duplicates
last month’s, I’ll include the sample code without
2002
2003
much discussion.
I showed in Part 1 that your implementation method
depends upon the source of the data being displayed,
and that there are three choices: The data for both Listbox
controls can come from a single table or from two
different tables, or can be created and manipulated in
memory and never stored to the database at all. The
same options are available when you’re requiring users
to explicitly commit the changes they make.
Deferring changes
When you’re working with in-memory data, there really
isn’t anything to update, so moving to an explicit-commit
model is simply a matter of adding the appropriate
buttons to the form—do whatever you were going to do
with the data, but do it as a result of the user selecting a
button rather than closing the form.
If you’re drawing your data from tables, you need
to overcome the way that Microsoft Access handles data
updates (that is, data is updated in the database and
then displayed in the Listbox). You could, in theory, use
a transaction: Create the transaction when the form is
opened, and either commit or roll back your changes
based on the button the user selects. Unfortunately, in
order to make this work, you need to use a completely
unbound form, and it’s been my experience that this
approach requires more code than handling the data
updates manually.
The simplest way that I’ve found to accomplish
this is to use essentially the same technique for databound lists as for in-memory data: Store the data in a
collection. The sample in this month’s Download uses two
collections, collSource and collDestination, for the source
and destination Listbox controls. Since the collections are
referenced by multiple procedures within the form’s codebehind module, both are declared at the module level.
Sourcing the Listboxes: One table
Figure 1. A pair of Listbox controls is a useful technique for
allowing users to select multiple items from a list.
10
Smart Access Sample Issue
Microsoft Access allows the RowSourceType property of
the Listbox control to be set to the name of a user-defined
function (minus the ending parentheses: myFunction, not
myFunction()). When using a function to provide the
data, you should leave the RowSource property blank.
All Listbox data functions must have the same
www.pinnaclepublishing.com
signature. They receive five arguments:
• fld—The Listbox control itself.
• id—A variant used to uniquely identify the control.
• row and col—The position of the value to be returned.
• code—The action the function should perform.
The function must return a variant. In addition to
having the same signature, the majority of Listbox data
functions also have the same structure, a case statement
based on the code variable. Here’s the procedure:
Function DisplayLBData(fld As Control, _
id As Variant, _
row As Variant, _
col As Variant, _
code As Variant) As Variant
Dim varReturn As Variant
Select Case code
Case acLBInitialize
If Not hasBeenLoaded Then
LoadData
End If
hasBeenLoaded = True
varReturn = True
Case acLBOpen
varReturn = Timer
Case acLBGetRowCount
If fld.Name = "lbSource" Then
varReturn = collSource.Count
Else
varReturn = collDestination.Count
End If
Case acLBGetColumnCount
varReturn = 1
Case acLBGetColumnWidth
varReturn = -1
Case acLBGetValue
If fld.Name = "lbSource" Then
varReturn = collSource.Item(row + 1)
Else
varReturn = collDestination.Item(row + 1)
End If
Case acLBGetFormat
varReturn = -1
Case acLBEnd
varReturn = Null
Case acLBClose
varReturn = Null
End Select
DisplayLBData = varReturn
In addition to the two collection variables I’ve already
discussed, the procedure uses a module-level Boolean,
hasBeenLoaded, as a simple flag to determine whether
the collections have been initialized. When the Listbox
data function receives a value of acLBInitialize, it checks
the hasBeenLoaded flag, and if that’s false, it calls the
LoadData procedure.
The LoadData procedure loads the initial data from
the data table(s) to the collections. The structure of the
procedure depends, of course, on the structure of the
underlying data. For a one-table schema, the only thing
that’s required is a display field (called Description in the
example) and a field to indicate selection. In the example,
this is a Boolean field named InSelectedList, but you
could use any table structure that suited your application.
The next block of code shows the LoadData
procedure for this schema. The first two lines declare a
string value and set it to the first part of the selection
string to be used against the source table. This isn’t
strictly necessary (you could include the entire string in
the call to the OpenRecordset method), but it increases
readability slightly:
Sub LoadData()
Dim theSQL As String
theSQL = "SELECT Description FROM BooleanList WHERE "
Dim rs As DAO.Recordset
Set rs = CurrentDb.OpenRecordset(theSQL & _
"NOT InSelectedList")
Do While Not rs.EOF
collSource.Add (rs!Description)
rs.MoveNext
Loop
Set rs = CurrentDb.OpenRecordset(theSQL & _
"InSelectedList")
Do While Not rs.EOF
collDestination.Add (rs!Description)
rs.MoveNext
Loop
rs.Close
End Function
End Sub
I discussed the structure of a Listbox data function
in last month’s article, but it’s also explained in the
Access online Help (search for “RowSourceType Property
(User-Defined Function)”), so I won’t go through it in
detail here.
The DisplayLBData Listbox data function differs
slightly from the version used last month (and the sample
in online Help), in that this single procedure handles the
data for both of the Listbox controls. The function is able
to do that by checking the name of the control passed in
the fld parameter. Online Help suggests that you can use
the id variable to perform this test, and you can... but that
requires manipulating the id field, and I find the control
name rather more self-documenting (it’s easier for me to
remember which Listbox is called “lbSource” than which
Listbox has the id “1”).
The third and fourth lines open a Recordset, rs,
that holds the records where InSelectedList is set to
False. These are the unselected records, and the Do...
While loop adds each one to the collSource collection
(the collection that fills the source Listbox control). One
of the drawbacks of using collections rather than arrays
is that collections don’t expose an equivalent to the
GetRows method of the Recordset, so the items must be
moved from the Recordset to the Listbox in a loop. The
remainder of the procedure duplicates the process of
opening the Recordset and loading the records into the
collDestination collection, this time selecting records
where InSelectedList is equal to True.
www.pinnaclepublishing.com
Sourcing the Listboxes: Two tables
The process for loading the data from two tables is
Smart Access Sample Issue
11
similar, as shown in the next code block. In this case, the
sample tables have only a single field, Description, as the
presence or absence of a record in one of the tables
indicates whether the record is selected or unselected:
Sub LoadData()
Dim theSQL As String
theSQL = "SELECT Description FROM "
Dim rs As DAO.Recordset
Set rs = CurrentDb.OpenRecordset(theSQL & _
"SourceTable")
Do While Not rs.EOF
collSource.Add (rs!Description)
rs.MoveNext
Loop
Set rs = CurrentDb.OpenRecordset(theSQL & _
"DestinationTable")
Do While Not rs.EOF
collDestination.Add (rs!Description)
rs.MoveNext
Loop
rs.Close
End Sub
The only significant difference between the one-table
and two-table procedures is in the OpenRecordset
statements. The SQL statements in the one-table solution
use selection criteria; in the two-table solution the SQL
statements load records from two different tables. In a
production system your criteria will almost certainly be
more complex, but the same basic principle will apply.
Moving data
Once the data has been loaded into the collections, the
next step is to implement the Click event handlers for the
various buttons. The next two routines show the event
handlers for the Select and Select All buttons. These
procedures are identical in both the one-table and twotable implementations, and are, in fact, identical to the
in-memory implementation I discussed last month.
Here’s the solution to move just one item from the
source to the destination Listbox:
Private Sub btnSelect_Click()
Dim theDescr As String
Dim theBug As String
If Me.lbSource.ItemsSelected.Count = 0 Then
Beep
Exit Sub
End If
For Each Itm In Me.lbSource.ItemsSelected
theBug = Me.lbSource.ItemData(0)
theDescr = collSource.Item(Itm + 1)
collSource.Remove (Itm + 1)
collDestination.Add (theDescr)
Next Itm
Me.lbSource.Requery
Me.lbDestination.Requery
End Sub
The procedures move the selected items from one
collection to the other using the Add and Remove
methods. The only tricky bit is the apparent bug in the
12
Smart Access Sample Issue
Listbox control that returns a Null value the first time the
ItemData collection is referenced using an enumerator.
The otherwise unnecessary assignment of theBug to
the first value in the Select handler is a workaround for
this problem.
And here’s the code to move all the items from the
Source to the destination Listbox:
Private Sub btnSelectAll_Click()
For Each Itm In collSource
collDestination.Add (Itm)
Next Itm
For x = 1 To collSource.Count
collSource.Remove (1)
Next x
Me.lbSource.Requery
Me.lbDestination.Requery
End Sub
The Deselect and DeselectAll procedures are identical
to their counterparts, but move items from collDestination
to collSource. Again, both the one-table and two-table
versions use identical procedures.
Resetting
The Click event handlers for the Reset button are identical
for both the one-table and two-table solutions as well.
The first two lines of this procedure set the two collection
variables to new collections. This is a simple, efficient
method to remove all of the items in a collection (the
Collection object doesn’t support a Clear or RemoveAll
method). The next line of the procedure calls the
LoadData procedure to reload the values from the table,
while the final two lines requery the Listbox controls,
ensuring that the data display is brought up-to-date:
Private Sub btnReset_Click()
Set collSource = New Collection
Set collDestination = New Collection
LoadData
Me.lbSource.Requery
Me.lbDestination.Requery
End Sub
Notice that this procedure restores the values as
they are in the table, not as they were when the user first
opened the form. If the user makes changes, commits
them, and then selects Reset, the behavior may not be
what’s expected. A quick (and very unscientific) poll of
clients and colleagues indicates that about half of them
would have expected the data to be restored to its original
state, as it was when the form first opened, even though
they had clicked a button to save their changes.
Since restoring the data to its original state would
require implementing a complex double-commit and
confuse the other half of your client base, I don’t
recommend it. You should be careful, however, to
explain the situation to the users.
www.pinnaclepublishing.com
Committing changes
While the handlers for the other buttons are identical for
both the one-table and two-table implementations, the
Click event handlers for the commit buttons differ. Here’s
the handler for the one-table implementation:
Private Sub btnCommit_Click():
Dim rs As DAO.Recordset
Set rs = CurrentDb.OpenRecordset("BooleanList", _
dbOpenDynaset)
For Each Itm In collSource
rs.FindFirst ("Description = '" & Itm & "'")
rs.Edit
rs!InSelectedList = False
rs.Update
Next Itm
For Each Itm In collDestination
rs.FindFirst ("Description = '" & Itm & "'")
rs.Edit
rs!InSelectedList = True
rs.Update
Next Itm
rs.Close
End Sub
The first two lines of the procedure declare a
Recordset variable and set it to the table being updated,
BooleanList in the example. The first For...Each loop looks
for each item in the source collection and sets the value of
the InSelectedList field to False. The second For...Each
loop is almost identical, but sets the InSelectedList field to
True for every item in the destination collection.
This procedure is very simple, both to implement
and understand, but the algorithm that I’ve used may
not be the most efficient for a real-world application. In
the first place, the sample procedure uses the FindFirst
method. In most situations it would be more efficient
to use the Seek method, but this requires building and
setting an index on the appropriate field. I’ve used
FindFirst because it’s slightly easier to read, and of course
the sample only has a few records so the performance hit
would be indiscernible.
In the second place, the procedure updates every
single record in the table, whether or not the record has
actually been changed. When you’re working with small
data sets, this is actually (and somewhat surprisingly)
more efficient than checking the state of each record
and updating only those that have changed. With very
large Recordsets, you may want to try a couple of
other approaches.
You could test each record before updating it, adding
a read but limiting the number of writes. This can provide
significant performance benefits in situations where
write-locks are an issue. In a few situations, it might even
be worthwhile to keep a local copy of the data and avoid
the read-locks, but frankly, if you’re facing that situation,
I’d use a disconnected ADO Recordset instead. (Although
DAO is generally considered more efficient for working
www.pinnaclepublishing.com
with Jet databases, ADO’s disconnected Recordset has
its advantages.)
The Click event handler for a two-table commit is
coming next. Unfortunately, this is a moderately tedious
procedure. There isn’t any tricky, quick way of bringing
the two Recordsets in line with the two collections. You
must go through each item in each collection and compare
it to the records in one of the tables. If necessary, you
move the record by explicitly adding it to one table and
deleting it from the other:
Private Sub btnCommit_Click()
Dim rsSource As DAO.Recordset
Dim rsDestination As DAO.Recordset
Set rsSource = _
CurrentDb.OpenRecordset("SourceTable",dbOpenDynaset)
Set rsDestination = CurrentDb.OpenRecordset _
("DestinationTable", dbOpenDynaset)
For Each Itm In collSource
rsDestination.FindFirst ("Description = '" & _
Itm & "'")
If Not rsDestination.NoMatch Then
rsSource.AddNew
rsSource!Description = _
rsDestination!Description
rsSource.Update
rsDestination.Edit
rsDestination.Delete
End If
Next Itm
For Each Itm In collDestination
rsSource.FindFirst ("Description = '" & Itm & "'")
If Not rsSource.NoMatch Then
rsDestination.AddNew
rsDestination!Description = _
rsSource!Description
rsDestination.Update
rsSource.Edit
rsSource.Delete
End If
Next Itm
rsSource.Close
rsDestination.Close
End Sub
The procedure begins by setting two Recordset
variables, rsSource and rsDestination, to the source and
destination tables, respectively. The first For...Each loop
performs the same FindFirst method call used by the onetable version. The call is subject to the same proviso, as
well—with non-trivial Recordsets, you’ll probably get
better performance from a Seek.
Notice that the procedure is looping through the
source collection, but searching the destination table. The
point is that you take action only if the record is where it’s
not supposed to be. If you looked for a match in the table
matching the collection—the source table for this loop—
and didn’t find it, you’d have to move it from the other
table. That would require finding it in the other table, so
you’d execute the search anyway.
If that isn’t confusing enough, the DAO syntax for
“if the search succeeded” is “if you didn’t fail”: If Not
Smart Access Sample Issue
13
rs.NoMatch. Yikes. I’m sure there’s some very good
reason why the original designer(s) of DAO chose to
use a property to indicate failure rather than success.
On my less generous days, I suspect dyslexia: I am not a
nice person.
Within that ugly If statement, the procedure first adds
the record to the source table and then deletes it from the
destination table, effectively moving the record from one
table to another. The schema of the sample tables is
identical, consisting of only a single field each. In a realworld application your tables would undoubtedly be
more complicated, and your tables’ schemas may not
match. You will, of course, need to replace the line that
sets the Description field in the source table equal to the
same field in the destination table.
The second For...Each loop performs the same steps
for each item in the destination collection—looking for it
in the source table, and moving it if found.
When to use?
As you’ve probably gathered from all this code, paired
Listbox controls that defer updating data changes are
slightly more resource-hungry than immediate-update
control pairs. But in the majority of cases this isn’t an
issue. The choice is more often one of usability and
efficiency. Don’t assume that adding deferred updating to
a pair of Listbox controls will add usability to the form. It
may simply add an extra step to the process.
As always, you need to consider the user. How
likely are your users, really, to want to quit without
saving their changes or want to start over? How difficult
would it be to re-create the original state of the data?
If, for example, the form always opens with no items
selected, then there really is little value in the ability to
reset—the button would only duplicate the select all or
deselect all functionality.
But there are situations in which deferred updating
adds significantly to the usability of a form. This is
particularly the case in multi-user situations, or when
the paired Listbox controls are updating “real” data
rather than, for example, configuration options. These
are also most likely to be the situations in which
reducing the number of trips to the data server is likely
to improve performance, although that must, of course,
be balanced against the resource use. ▲
RIORDAN.ZIP at www.pinnaclepublishing.com
Rebecca M. Riordan is an author, systems architect, Microsoft MVP,
and a darn good cook. Her current projects include a book on
designing user interfaces for database applications implemented
with .NET, to be published by Addison-Wesley this summer, and a book
on low-carbohydrate baking that’s currently looking for a publisher.
[email protected].
RESERVED SPACE FOR ADVERTISING
For details about advertising opportunities,
contact Roger Stojsic at 312.960.4404 or [email protected].
14
Smart Access Sample Issue
www.pinnaclepublishing.com
Access Answers Smart Access
Shortcuts, Quotes, and What
Have I Done?
2000
Doug Steele
This month, Doug Steele shows one way to add shortcuts to
your application, demonstrates how to handle embedded
quotes in SQL statements, and provides a quick documenter
to list the objects in your application.
My applications get installed on users’ computers, and I’d
like to make it as easy as possible for my users to start my
applications. Is there an easy way to add a shortcut to a
user’s computer that will start my application without
having to use an installation program?
Shortcuts are just files on the computer (they have an
extension of .lnk, although that extension doesn’t show
up in File Explorer, even if you’ve told it to show the
extension). It’s possible to create the shortcut on your
machine and just copy the file to other machines.
However, since the path to the application is hard-coded
into the link, copying the file assumes that everyone will
put your application in exactly the same place. As well,
sometimes your users may not be adept at navigating to
where their program shortcuts are, so you may wish to
automate where the link is placed.
One way to automate the link creation plan is to
take advantage of the CreateShortcut method of the
WshShortcut object that’s available in the Windows Script
Host (WSH). While the objects that I’m going to use here
are part of the WSH, they can be used from Access (as
this code shows) like any other object installed on your
computer (or your user’s computer).
In the example that follows, I’m going to use late
binding to invoke WSH. This means you don’t have
to set any references to get the code to work (and also
minimizes the possibility of versioning problems).
Programs that use early binding (picking up their objects
at runtime by selecting them in the References list and
using explicit object names in Dim statements) run faster
than programs with late binding (not using the References
list and using the Object datatype in Dim statements)
because late binding programs don’t know anything
about their objects until runtime. However, installation
programs are typically only run once, so speed isn’t a
primary consideration. You’ll also note, if you type in
my code, that late binding means that you give up
IntelliSense support.
www.pinnaclepublishing.com
2002
2003
The first thing you need to decide is where you want
to place a shortcut: on the desktop, in the Start menu, in
the Programs menu structure in the Start menu, in the
Startup folder, or in any combination of those places. You
also need to decide whether you want the shortcut to be
only for the specific user, or for all users of the machine.
WSH gives you an easy method to determine where
the shortcut needs to be in each of the cases that I
mentioned: Just use the WshSpecialFolders collection.
For example, to determine where the current user’s
Desktop is located, you instantiate an instance of the
WshShell object, and then look for the Desktop folder
in the WshSpecialFolders collection:
Dim objWshShell As Object
Dim strDesktop As String
Set objWshShell = CreateObject("WScript.Shell")
strDesktop = objWshShell.SpecialFolders("Desktop")
The WshSpecialFolders collection contains objects
with the following names. Hopefully it’s obvious what
location is pointed to by each object:
• AllUsersDesktop
• AllUsersPrograms
• AllUsersStartMenu
• AllUsersStartup
• Desktop
• Programs
• StartMenu
• Startup
The WshSpecialFolders collection also contains
objects for other locations, but I think it’s unlikely you’ll
want to put a shortcut in any of them. For the record,
though, the other locations are: Favorites, Fonts,
MyDocuments, NetHood, PrintHood, Programs, Recent,
SendTo, and Templates.
While it’s possible to create a shortcut to an Access
application that simply points to the MDB file itself, a
“proper” shortcut contains the full path to the Access
executable (msaccess.exe) and passes the full path to the
MDB file to the msaccess program. This method also lets
you pass to msaccess any option switches that you wish.
Putting the full path to the executable in your link
could be a problem, since you may not know where
Smart Access Sample Issue
15
your users have installed Access on their machines.
Fortunately, Access can tell you where it exists through
the SysCmd function by passing the constant
acSysCmdAccessDir to the function:
Dim strProgLocn As String
strProgLocn = SysCmd(acSysCmdAccessDir) & _
"msaccess.exe"
Now you need the full path to the MDB file that
contains your application. One way to determine the
complete path to the MDB is to use the Name property
of the CurrentDb object:
Dim strDBLocn As String
strDBLocn = CurrentDb.Name
If you’re using Access 2000 or higher, you can also
use the CurrentProject object:
Dim strDBLocn As String
strDBLocn = CurrentProject.FullName
You also may want to determine the folder where
the application resides, so that you can set the
WorkingDirectory property of the shortcut. If you know
the full path to the database, it’s relatively easy to pull
the folder out of the MDB’s path:
Dim strDBLocn As String
Dim strDBPath As String
strDBLocn = CurrentDb.Name
strDBPath = Left$(strDBLocn, _
Len(strDBLocn) – Len(Dir$(strDBLocn)))
Alternatively, you can (again) use the CurrentProject
object:
Dim strDBPath As String
strDBPath = CurrentProject.Path
Now that you know how to determine all of the
components necessary to create a shortcut, here’s how to
put the pieces together. The following will create a
shortcut to the application on the current user’s desktop:
Dim
Dim
Dim
Dim
Dim
Dim
objWshShell As Object
objWshShortcut As Object
strProgLocn As String
strDBLocn As String
strDBPath As String
strDesktop As String
Set objWshShortcut = Nothing
Set objWshShell = Nothing
When you create the shortcut using Set
objWshShortcut = objWshShell.CreateShortcut(...), you’re
not only telling WSH where to put the shortcut (the
contents of strDesktop in the previous code), but also
what name to give the shortcut (“Smart Access 2004-05”).
I used Chr$(34) to put double quotes around the
database name, to handle the possibility that there may
be embedded spaces in the path to the database. If you
don’t do this, Windows will assume that the name of the
database ends wherever the first space is in the path.
If you want to learn more about what you can do
using WSH, there’s a reference to all of the objects,
methods, and properties available to you through WSH
at http://msdn.microsoft.com/library/en-us/script56/
html/wsoriWSHLanguageReference.asp (or try going to
www.microsoft.com/scripting and navigating through
the Documentation section until you find Windows
Script Host).
I’m building SQL strings in code, but I’m having problems
handling text that includes quotation marks.
When you’re building your SQL strings dynamically,
incorporating variables in the string can sometimes be
problematic. Remember that what you need to do is
enclose, in quotes, any text values in the SQL string.
In other words, you need your SQL string to look
something like this:
...WHERE [Comment] = "Smith"
or:
...WHERE [Comment] = 'Smith'
To use a variable rather than the constant, you need
to explicitly add the quote marks, and concatenate the
value of the variable (instead of the variable itself) into
your SQL string. In other words, you need to write code
like this, which puts double quotes around the value:
Set objWshShell = CreateObject("WScript.Shell")
strDesktop = objWshShell.SpecialFolders("Desktop")
strSQL = strSQL & "WHERE [Comment] = """ _
& strText & """"
strProgLocn = SysCmd(acSysCmdAccessDir) & _
"msaccess.exe"
strDBLocn = CurrentDb.Name
strDBPath = Left$(strDBLocn, _
Len(strDBLocn) – Len(Dir$(strDBLocn)))
You can also write code like this that puts single
quotes around the value:
Set objWshShortcut = objWshShell.CreateShortcut( _
16
strDesktop & "\Smart Access 2004-05.lnk")
With objWshShortcut
.TargetPath = strProgLocn
.Arguments = Chr$(34) & strDBLocn & Chr$(34)
.WorkingDirectory = strDBPath
.WindowStyle = 4
.Save
End With
Smart Access Sample Issue
strSQL = strSQL & "WHERE [Comment] = '" _
& strText & "'"
www.pinnaclepublishing.com
It may be hard to make out the last part of the code:
After the last ampersand, I have a double quote-single
quote-double quote combination.
It’s also possible to create a constant cQuote and set
it to """", so that you can use:
must double any occurrence of that character within your
string. A function such as the following will suffice:
Function CorrectText( _
InputText As String, _
Optional Delimiter As String = "'") As String
Dim strTemp As String
strSQL = strSQL & "WHERE [Comment] = " _
& cQuote & strText & cQuote
This eliminates some of the ugliness of the first
example. Since Chr$(34) is the same as ", you can also use:
strTemp = Delimiter
strTemp = strTemp & _
Replace(InputText, Delimiter, Delimiter & Delimiter)
strTemp = strTemp & Delimiter
CorrectText = strTemp
End Function
strSQL = strSQL & "WHERE [Comment] = " _
& Chr$(34) & strText & Chr$(34)
The problem with any of these approaches is that they
can fail to work if strText contains quotes. For example, if
you use the second approach, it’s going to fail if strText
contains a single quote in it (such as O’Brien). Any of the
other three approaches will work with O’Brien, but will
fail if you’ve got a double quote in your string (such as
The “Olde Sodde”). In other words, this will work:
strText = "O'Brien"
strSQL = strSQL & "WHERE [Comment] = """ _
& strText & """"
On the other hand, this will not:
strText = "O'Brien"
strSQL = strSQL & "WHERE [Comment] = '" _
& strText & "'"
Similarly, this will work:
strText = "The ""Olde Sodde"""
strSQL = strSQL & "WHERE [Comment] = """ _
& strText & """"
The Replace function in the preceding code only
works in Access 2000 and higher. If you’re using Access
97 or earlier, you’ll need to write your own equivalent
function. The database in the accompanying Download
includes such a function.
It’s easy to extend such a function to allow for its use
with the Like function as well:
Function CorrectLikeText( _
InputText As String, _
Optional FrontWildcard As Boolean = False, _
Optional EndWildcard As Boolean = False, Optional Delimiter As String = "'") As String
Dim strTemp As String
strTemp = Delimiter
If FrontWildcard = True Then
strTemp = strTemp & "*"
End If
strTemp = strTemp & _
Replace(InputText, Delimiter, Delimiter & Delimiter)
If EndWildcard = True Then
strTemp = strTemp & "*"
End If
strTemp = strTemp & Delimiter
CorrectText = strTemp
End Function
And this will not:
strText = "The ""Olde Sodde"""
strSQL = strSQL & "WHERE [Comment] = '" _
& strText & "'"
It also depends on what database you’re talking to. If
you’re writing SQL to go against SQL Server, for example,
often you must use single quotes as a delimiter.
Since you don’t always know what your users are
going to be keying in for search purposes, you need
something a little more flexible than just concatenating
single or double quotes. What I find easiest to do is to
create a function that corrects the quotes for you. With
such a function, rather than having to worry about
counting quotes, you can simply do something like this:
strSQL = strSQL & "WHERE [Comment] = " _
& CorrectText(strText)
The “trick” is to ensure that whatever character
you’re using to delimit your text strings (either ' or "), you
www.pinnaclepublishing.com
So what happens if strText contains O’Brien? You’d
use my function like this to find any record whose
Comment field ends in O’Brien:
strSQL = strSQL & "WHERE [Comment] LIKE " & _
CorrectLikeText(strText, True)
If you want to find those records with O’Brien at the
start of the Comment field, use this:
strSQL = strSQL & "WHERE [Comment] LIKE " & _
CorrectLikeText(strText, False, True)
Finally, if you want to find O’Brien anywhere in the
Comment field, call my function like this:
strSQL = strSQL & "WHERE [Comment] LIKE " & _
CorrectLikeText(strText, True, True)
If you’re going to be going against a DBMS other than
Jet, or if you’re using ADO, you’ll need to rewrite my
function to use % instead of * as the wildcard. Enhancing
Smart Access Sample Issue
17
the function to accept the wildcard character as a
parameter is another way of accommodating this:
Function CorrectLikeText( _
InputText As String, _
Optional FrontWildcard As Boolean = False, _
Optional EndWildcard As Boolean = False, Optional Wildcard As String = "*", _
Optional Delimiter As String = "'") As String
Dim strTemp As String
strTemp = Delimiter
If FrontWildcard = True Then
strTemp = strTemp & Wildcard
End If
strTemp = strTemp & _
Replace(InputText, Delimiter, Delimiter & Delimiter)
If EndWildcard = True Then
strTemp = strTemp & Wildcard
End If
strTemp = strTemp & Delimiter
CorrectText = strTemp
End Function
Here’s my new version of the function in action:
strSQL = strSQL & "WHERE [Comment] LIKE " & _
CorrectLikeText(strText, True, True, "*")
strSQL = strSQL & "WHERE [Comment] LIKE " & _
CorrectLikeText(strText, True, True, "%")
With this version of the function, you must specify
True or False for both FrontWildcard and EndWildcard in
order for this to work. This will succeed:
strSQL = strSQL & "WHERE [Comment] LIKE " & _
CorrectLikeText(strText, True, False, "*")
This will not:
strSQL = strSQL & "WHERE [Comment] LIKE " & _
CorrectLikeText(strText, True, , "*")
Is there an easy way to list all of the objects in my
database? I know that the Database Documenter exists,
but it produces far more paper than I want.
It’s always possible to write code that uses DAO to
return a list of objects in the application. Access 2000
and newer versions expose additional objects that
make this even easier. Another alternative is to use
ADOX to query the catalog. However, sometimes simpler
is better.
There’s a hidden system table, MSysObjects, in every
database that can be queried to determine a list of highlevel objects (tables, queries, forms, reports, macros, and
modules). If all you want is a list of objects and you don’t
care about, say, what fields are in each table, a query
against that system table should suffice.
For example, a query to retrieve all of the tables in the
database would be something like this:
SELECT [Name]
FROM MsysObjects
WHERE (Left$([Name],1)<>"~")
AND (Left$([Name],4)<>"MSys")
18
Smart Access Sample Issue
AND (Type In (1,4,6))
ORDER BY [Name]
Why that specific WHERE clause? Tables are stored in
the catalog as type 1, and linked tables are stored as type
6. Temporary tables are prefixed with ~, while the system
tables all start with MSys.
How can you know what specific type values you
need for each object? They’re not documented anywhere;
you need to examine the MSysObjects table to be able to
figure it out. I’ve listed the relevant values that I’ve
determined in Table 1.
Table 1. Object type values in MSysObjects.
Object
Tables
Queries
Forms
Reports
Macros
Modules
Type
1, 4, 6
5
-32768
-32764
-32766
-32761
If you’ve got a query that returns a Recordset of the
objects of interest to you, you can use that query as the
RecordSource of a report. You can easily create a series of
subreports, one for each object type of interest to you, and
a report that contains each of those subreports. You also
have the option of writing a slightly more complicated
query as the RecordSource, and doing everything in a
single report. The accompanying Download has examples
of both approaches.
By simply importing this report (and all of the
subreports, if applicable) into your application, you
can easily produce a report of all of the objects in your
application. Alternatively, you can write a little
application that dynamically resets the RecordSource
of each subreport to something like this:
SELECT [Name]
FROM MsysObjects IN 'C:\Program Files\MyApp.MDB'
WHERE (Left$([Name],1)<>"~")
AND (Left$([Name],4)<>"MSys")
AND (Type In (1,4,6))
ORDER BY [Name]
You can then query the objects in another database.
(Be aware, though, that security can make you unable
to connect to the system tables in other databases.)
Which raises another question: Is it a good idea to
rely on undocumented features in Access for information?
Long-time readers of Smart Access will undoubtedly
recognize the name Michael Kaplan. A few years ago,
Michael posted an article about the wisdom of relying
on undocumented system tables. You can read what he
had to say at www.trigeminal.com/usenet/usenet017.asp.
One of the comments he makes is that it’s reasonable
to rely on specific existing values within the tables,
since changing those values would make it extremely
difficult to be able to open older version databases in
www.pinnaclepublishing.com
newer versions of Access. Furthermore, now that
Microsoft has essentially stopped development on the
Jet engine, I’d think there’s even less risk in using these
undocumented values. However, only you can make
the decision as to whether you’re comfortable using
undocumented features.
Thanks to Jeff Conrad, self-confessed “Access
Junkie,” for the original idea. ▲
Dynamic Menus...
Continued from page 9
CloseAllForms routine makes sure that every open form
except the menu is closed. This eliminates any need for
Close or Done buttons on other forms. To make sure that
the menu stays in its designated location at the top of the
screen, I included the MoveSize command.
frmQuit
The last piece of the system is a Quit form, opened by the
Quit command on the menu. It’s a custom dialog form
that asks the user to confirm that he or she wants to quit.
STEELE.ZIP at www.pinnaclepublishing.com
Doug Steele has worked with databases, both mainframe and PC, for
many years. Microsoft has recognized him as an Access MVP for his
contributions to the Microsoft-sponsored newsgroups. Check http://
I.Am/DougSteele for some Access information, as well as Access-related
links. He enjoys hearing from readers who have ideas for future columns,
though personal replies aren’t guaranteed. [email protected].
There are a couple of reasons for using it instead of a
message box, or just issuing the Application.Quit
command. The most important is that you can make
frmQuit match the color scheme of your application
by changing its background color, contributing to a
consistent look and feel. Second, it doesn’t require special
quit handling code because it opens just as any other form
does. And, finally, it’s a lot more user-friendly than just
closing the application would be.
Figure 6 shows the menu generated by the sample
database for Grover Park George on Access (my recently
released book). I gave the menu a white background to
make it more readable, but the menu can take on a range
Figure 6. The dynamic menu in action.
Don’t miss another issue! Subscribe now and save!
Subscribe to Smart Access today and receive a special one-year introductory rate:
Just $129* for 12 issues (that’s $20 off the regular rate)
❑ Check enclosed (payable to Pinnacle Publishing)
❑ Purchase order (in U.S. and Canada only); mail or fax copy
❑ Bill me later
❑ Credit card: __ VISA
__MasterCard __American Express
NAME
COMPANY
ADDRESS
EXP. DATE
CARD NUMBER
STATE/PROVINCE
CITY
ZIP/POSTAL CODE
SIGNATURE (REQUIRED FOR CARD ORDERS)
COUNTRY IF OTHER THAN U.S.
E-MAIL
Detach and return to:
Pinnacle Publishing ▲ 316 N. Michigan Ave. ▲ Chicago, IL 60601
Or fax to 312-960-4106
PHONE (IN CASE WE HAVE A QUESTION ABOUT YOUR ORDER)
* Outside the U.S. add $30. Orders payable in
U.S. funds drawn on a U.S. or Canadian bank.
WEB4
Pinnacle, A Division of Lawrence Ragan Communications, Inc. ▲ 800-493-4867 x.4209 or 312-960-4100 ▲ Fax 312-960-4106
www.pinnaclepublishing.com
Smart Access Sample Issue
19
of colors to match any color scheme.
In Figure 6, you can also see the default Access menu
bar. You can create a custom menu bar to replace it and
really lock down the application. The sample database
that accompanies this article incorporates one such menu
bar. It’s a generic version with Spell Checking and Sorting
only. In fact, you can make it part of the dynamic menu
package along with the other four pieces.
That’s it. With these four (or five) objects—three
forms and a menu table, along with the generic toolbar—
you can dynamically create a menu in any application.
The menu will always move itself to the top of the screen
and take up an absolute minimum amount of screen
space. In addition, the menu can be given any color
background, so that it matches the color scheme of your
application. You can even let your menu handle tasks like
opening Web pages and sending e-mail messages, which
aren’t normally included in switchboard menus.
It isn’t perfect, of course. And it doesn’t completely
take the place of built-in or custom menus and toolbars.
However, at this point, I consider it a big improvement
over what I was using before. ▲
HEPWORTH.ZIP at www.pinnaclepublishing.com
George Hepworth is a database developer and instructional designer.
He operates Grover Park Consulting, providing database design and
development and training. He’s also the author of a recently released
book on Microsoft Access, Grover Park George on Access, from Holy Macro
Press. [email protected].
Downloads
Monthly, you will find links to downloadable source code within a number of articles
as well as in the Source Code section online at www.pinnaclepublishing.com.
All current and past source code downloads are available to paid subscribers.
Take advantage of this valuable resource and subscribe today.
For access to current and archive content and source code, log in at www.pinnaclepublishing.com.
Editor: Peter Vogel ([email protected])
Contributing Editors: Mike Gunderloy, Danny J. Lesandrini,
Garry Robinson, Russell Sinclair
CEO & Publisher: Mark Ragan
Group Publisher: Michael King
Executive Editor: Farion Grove
Questions?
Customer Service:
Phone: 800-493-4867 x.4209 or 312-960-4100
Fax: 312-960-4106
Email: [email protected]
Advertising: [email protected]
Editorial: [email protected]
Pinnacle Web Site: www.pinnaclepublishing.com
Subscription rates
United States: One year (12 issues): $149; two years (24 issues): $258
Other:* One year: $179; two years: $318
Single issue rate:
$20 ($25 outside United States)*
* Funds must be in U.S. currency.
20
Smart Access Sample Issue
Smart Access (ISSN 1066-7911)
is published monthly (12 times per year) by:
Pinnacle Publishing
A Division of Lawrence Ragan Communications, Inc.
316 N. Michigan Ave., Suite 300
Chicago, IL 60601
POSTMASTER: Send address changes to Lawrence Ragan Communications, Inc., 316
N. Michigan Ave., Suite 300, Chicago, IL 60601.
Copyright © 2004 by Lawrence Ragan Communications, Inc. All rights reserved. No part
of this periodical may be used or reproduced in any fashion whatsoever (except in the
case of brief quotations embodied in critical articles and reviews) without the prior
written consent of Lawrence Ragan Communications, Inc. Printed in the United States
of America.
Brand and product names are trademarks or registered trademarks of their respective
holders. Microsoft is a registered trademark of Microsoft Corporation. Microsoft Access is a
registered trademark of Microsoft Corporation. Smart Access is an independent publication
not affiliated with Microsoft Corporation. Microsoft Corporation is not responsible in any
way for the editorial policy or other contents of the publication.
This publication is intended as a general guide. It covers a highly technical and complex
subject and should not be used for making decisions concerning specific products or
applications. This publication is sold as is, without warranty of any kind, either express or
implied, respecting the contents of this publication, including but not limited to implied
warranties for the publication, quality, performance, merchantability, or fitness for any
particular purpose. Lawrence Ragan Communications, Inc, shall not be liable to the purchaser
or any other person or entity with respect to any liability, loss, or damage caused or alleged
to be caused directly or indirectly by this publication. Articles published in Smart Access do
not necessarily reflect the viewpoint of Lawrence Ragan Communications, Inc. Inclusion of
advertising inserts does not constitute an endorsement by Lawrence Ragan Communications,
Inc., or Smart Access.
www.pinnaclepublishing.com