1
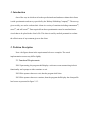
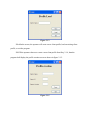
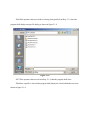
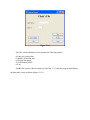
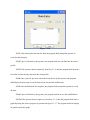
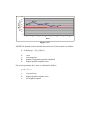
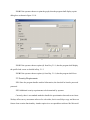
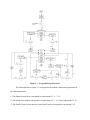
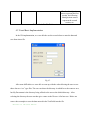
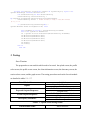
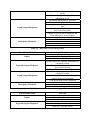
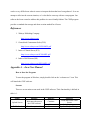
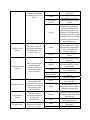
Senior Software Engineering Project
CSSP Project
CEN 4935
April 5, 2006
Adam Cox
Tass Oscar
1. Introduction
One of the ways in which social worker professionals and students evaluate their clients
is with questionnaires and surveys provided by the Walmyr Publishing Company[1]. The surveys,
given weekly, are used to evaluate their clients in a variety of emotions including contentment[2],
stress[3], and self-esteem[4]. Data acquired from these questionnaires must be translated into a
visual chart to be placed in the client’s file. This chart is used by medical personnel to evaluate
the effectiveness of any treatment given to the client.
2. Problem Description
Note: the figures shown in the requirements below are examples. The actual
implementation screens may differ slightly.
2.1 Functional Requirements
2.1.1 Upon starting, the program shall display a welcome screen summarizing its basic
functionality and a prompt to either continue or exit.
2.1.2 If the operator chooses to exit, then the program shall close.
2.1.3 If the operator chooses to continue, then the program shall display the client profile
load screen as presented in figure 2.1.3.
Figure 2.1.3
2.1.4 On the screen, the operator will create a new client profile, load an existing client
profile, or exit the program.
2.1.5 If the operator chooses to create a new client profile from Req. 2.1.4, then the
program shall display the profile creation screen as shown in figure 2.1.5.
Figure 2.1.5
2.1.6 If the operator chooses to load an existing client profile from Req. 2.1.4, then the
program shall display an open file dialog as shown in figure 2.1.6.
Figure 2.1.6
2.1.7 If the operator chooses exit from Req. 2.1.4, then the program shall close.
2.1.8 Once a profile is selected the program shall display the client information screen as
shown in figure 2.1.8.
Figure 2.1.8
2.1.9 The client information screen presents the following options:
a) Enter new session data
b) Modify old session data
c) Display data graph.
d) Load another profile.
e) Exit
2.1.10 If the operator chooses option (a) from Req. 2.1.9, then the program shall display
the data entry screen as shown in figure 2.1.10.
Figure 2.1.10
2.1.11 After entering the data into the form the program shall prompt the operator to
verify the data integrity.
2.1.12 Upon verification by the operator, the program shall save the data into the client’s
profile.
2.1.13 If the operator chooses option (b) from Req. 2.1.9, then the program shall present a
list of the sessions already entered in the client profile.
2.1.14 Once a specific previous session has been chosen by the operator, the program
shall display the data entry screen for that session for possible modification.
2.1.15 Once modifications are complete, the program shall prompt the operator to verify
the data.
2.1.16 Upon verification by the operator, the program shall now save the modified data.
2.1.17a If the operator chooses option (c) from Req. 2.1.9, then the program shall show a
graph depicting the client’s progress as presented in figure 2.1.17. The program shall also display
an option to print the graph.
70
ISE Score
Dependent Variable
60
53.33
50
41.33
40
44.67
41.33
34.00
30
34.00
20
10
0
1
2
3
4
5
6
7
8
Weeks
Figure 2.1.17
2.1.17b The formula used to calculate the total score of each session is as follows:
S = (100[Sum(y) – N]) / (N[k-1])
S:
y:
N:
k:
score
item responses
number of questions properly completed
highest possible response score
For reverse questions, the y score is calculated as follows:
y = (k + 1) – x
y:
k:
x:
reversed score
highest possible response score
the original response
2.1.18 If the operator chooses to print the graph, then the program shall display a print
dialog box as shown in figure 2.1.18.
Figure 2.1.18
2.1.19 If the operator chooses option (d) from Req. 2.1.9, then the program shall display
the profile load screen as detailed in Req. 2.1.3.
2.1.20 If the operator chooses option (e) from Req. 2.1.9, then the program shall close.
2.2 Security Requirements
2.2.1 Since the program handles medical information, the data shall at least be password
protected.
2.2.2 Additional security requirements to be determined by operator.
Currently, there is no standard method to handle the questionnaire data and create charts.
Walmyr offers survey assessment software for sale online, but it costs $60 per copy and does not
feature chart creation functionality. Another option is to use spreadsheet software like Microsoft
Excel to store the data and generate the charts, but not all users have the skills necessary to
operate this type of software. Also, each user may input their data into the spreadsheet
differently. Without a standard template, sharing data becomes confusing as one social worker
must decipher another’s data.
3. Solution
Our solution is to create a simple, user-friendly, stand-alone application to standardize
data input and chart creation between users. The program shall be GUI driven, with descriptive
buttons and separate windows for each program task.
The overall design of the program is shown in the flowchart below:
Figure 3.1 – Program Design Flowchart
The function blocks in figure 3.1 correspond to the software functional requirements in
the following manner:
1.) The Splash Screen block corresponds to requirements 2.1.1 – 2.1.2.
2.) The Profile Select block corresponds to requirements 2.1.3 – 2.1.4 and requirement 2.1.19.
3.) The Profile Create Screen and the Create Profile blocks correspond to requirement 2.1.5.
4.) The Profile Load Screen and Load Profile blocks correspond to requirements 2.1.6 – 2.1.7.
5.) The Client Info Screen block corresponds to requirements 2.1.8 – 2.1.9 and requirement
2.1.20.
6.) The Data Entry Screen, Verify, and Save blocks joined to the “New” section of the Client
Info Screen block correspond to requirements 2.1.10 – 2.1.12.
7.) The Session Select Screen, Load Session, Data Entry Screen, Verify, and Save blocks joined
to the “Modify” section of the Client Info Screen block correspond to requirements 2.1.13 –
2.1.16.
8.) The Show Graph Screen, Print, and Print Dialog blocks joined to the “Graph” section of the
Client Info Screen block correspond to requirements 2.1.17 and 2.1.18.
4. Implementation
There are two versions of our program in development. Each version is written using a
different programming language. One version of the program is coded in Java using the Swing
GUI interface, while the other version is created using Visual Basic. Given the time constraints
we programmers have to create the application, it was important to choose programming
languages which have easy GUI editing capabilities.
Considering our audience, it is important to emphasize that our application must be very
user-friendly. Therefore, our program is GUI driven, with program operation flowing between
several small windows. Each window shows a limited amount of information as to prevent
overwhelming the user with too much data and too many options. Special care is taken to ensure
that each program function is clearly labeled and represented in the program windows by
buttons.
Menu bars are avoided as to keep all options represented by buttons. However, his
deviation from standard office-type applications may upset some users. If our primary user
requests that menu bars be implemented, they could be added into the program relatively easily.
The programs perform the same functionality, but they differ in two ways: look and feel,
and profile format. The differences between each will be shown below.
4.1 Java Implementation
Development Tools:
The Java implementation of the software was developed on the Windows XP Pro
operating system using Java version 1.5.0 update 6 and the Netbeans 4.1 IDE. Both Java and
Netbeans can be downloaded as a single executable package at the following URL:
http://java.sun.com/j2se/1.5.0/download-netbeans.html. Running the downloaded file will start a
standard installation wizard which installs both Netbeans and the Java SDK.
The program executable was created using a free tool called JSmooth, version 0.9.7. The
purpose of JSmooth is to convert a Java jar file into a Windows executable. To install JSmooth,
simply download and run its wizard-based installation program at this URL:
http://jsmooth.sourceforge.net/.
Running the Program:
To run the CSSP software, the user must have Java 1.5.0 update 6 runtime environment
(JRE) installed on their computer. The proper JRE can be downloaded at the following URL:
http://java.sun.com/j2se/1.5.0/download.jsp. This webpage offers several installation options,
including online and offline installation methods.
To execute the program, the user simply has to double click on the “cssp.exe” program
icon in Windows. For help operating the Java version of the software, refer to the user manual in
Appendix A at the end of this document.
Source Code Package:
The final package (containing source code, build files, etc.) is kept in a single Netbeans
project folder called “cssp.” The cssp folder hierarchy is detailed in table 4.1.1. Each module in
the source directory of the cssp folder is detailed in table 4.1.2.
File/Directory
Build
Dist
Nbproject
Src
Test
Build.xml
Manifest.mf
Purpose:
Contains Java *.class files
Contains distribution files (*.jar)
Contains files for compiling/building the program through Netbeans
Contains *.java source code files and *.form Netbeans GUI editor files
Empty
File for compiling/building application
File for compiling/building application
Table 4.1.1 – CSSP folder hierarchy
Name:
Org
csspProfile.java
PrintUtilities.java
frmClientInformation.form
frmClientInformation.java
frmDataEntry.form
frmDataEntry.java
frmGraph.form
frmGraph.java
frmProfileCreate.form
frmProfileCreate.java
frmProfileSelect.form
frmProfileSelect.java
Purpose:
Package containing Netbeans awtextra files
File containing profile handling methods
File containing printing methods
File containing Netbeans GUI data for Client
Information screen
File containing Client Information screen
methods
File containing Netbeans GUI data for Data
Entry screen
File containing Data Entry screen methods
File containing Netbeans GUI data for Graph
screen
File containing Graph screen methods
File containing Netbeans GUI data for Profile
Create screen
File containing Profile Create screen methods
File containing Netbeans GUI data for Profile
Select screen
File containing Profile Select screen methods
Requirement(s):
2.1.18
2.1.8 – 2.1.9 &
2.1.20
2.1.8 – 2.1.9 &
2.1.20
2.1.10 – 2.1.12 &
2.1.14 – 2.1.16
2.1.10 – 2.1.12 &
2.1.14. – 2.1.16
2.1.17
2.1.17
2.1.5
2.1.5
2.1.3 – 2.1.4 &
2.1.6 – 2.1.7 &
2.1.19
2.1.3 – 2.1.4 &
frmSessionSelect.form
File containing Netbeans GUI data for
Session Select screen
File containing Session Select screen methods
File containing Netbeans GUI data for Splash
screen
File containing Splash screen methods and
program entry point
Table 4.1.2 – Source Module Details
frmSessionSelect.java
frmSplash.form
frmSplash.java
2.1.6 – 2.1.7 &
2.1.19
2.1.13
2.1.13
2.1.1 – 2.1.2
2.1.1 – 2.1.2
Profile Data Format:
The client profiles are saved in a binary file using Java’s default byte size and byte order.
The data types are described in table 4.1.3 and the file format is described in table 4.1.4.
Name:
INT
BOOL
CHAR
Type:
Integer
Boolean
Character
Size:
4-bytes
1-byte
2-bytes
Table 4.1.3 – Data types and byte sizes
Type:
INT
Name:
MagicNumber
Number to Read:
1
INT
LengthFirstName
1
INT
LengthLastName
1
INT
LengthId
1
INT
NumSessions
1
INT
NumQuestions
1
INT
MaxScore
1
CHAR
FirstName
LengthFirstName
CHAR
LastName
LengthLastName
CHAR
Id
LengthId
CHAR
Survey
3
QUESTION
Questions
(NumSessions*NumQuestions)
QUESTION
Structure
(INT, BOOL)
5-bytes (4, 1)
Notes:
Must equal 1668510576
Number of chars in first
name string
Number of chars in last
name string
Number of chars in id
number string
Number of completed
sessions in the file
Number of questions per
session
Highest allowed answer
for each question
Series of chars in first
name string
Series of chars in last
name string
Series of chars in id string
Three character string
indicating survey type
Series of question structs
containing answer data.
The first NumQuestions
structs represent the first
session, the following
NumQuestions structs
represent the second
session, etc.
Table 4.1.4 – Profile file format
4.2 Visual Basic Implementation
In the VB implementation, we were able the use the screen below to enter the data and
save them into a file.
Fig 4.2
After some difficulties we were able to come up with the codes allowing the user to save
these data as a “css” type files. The user can chose the directory in which he or she wants to save,
but My Documents is the directory being offered to the user as the default directory. After
selecting the directory the user can then give a name to the file save it for later use. Below are
some codes examples to save the data entered in the TextFields into the file.
'Button1 is the save Button.
Private Sub Button1_Click(ByVal sender As System.Object, ByVal e As
System.EventArgs) Handles Button1.Click
Dim SaveFileDialog As New SaveFileDialog
SaveFileDialog.InitialDirectory =
My.Computer.FileSystem.SpecialDirectories.MyDocuments
SaveFileDialog.Filter = "CSSP Files (*.css)|*.css|All Files
(*.*)|*.*"
If (SaveFileDialog.ShowDialog(Me) =
System.Windows.Forms.DialogResult.OK) Then
Dim FileName As String = SaveFileDialog.FileName
Dim tw As System.IO.TextWriter
tw = System.IO.File.CreateText(SaveFileDialog.FileName)
tw.WriteLine(TextBox1.Text)
tw.WriteLine(TextBox2.Text)
tw.WriteLine(TextBox3.Text)
tw.WriteLine(TextBox4.Text)
tw.Flush()
tw.Close()
End If
End Sub
5. Testing
Java Version
The program has seven modules which need to be tested: the splash screen, the profile
select screen, the profile create screen, the client information screen, the data entry screen, the
session select screen, and the graph screen. The testing procedures and results for each module
are detailed in tables 5.1 – 5.7.
frmSplash
User clicks Continue button
Inputs:
User clicks Exit button
Profile Select screen is displayed
Expected Outputs/Responses:
Program exits
Profile Select screen is displayed
Actual Outputs/Responses:
Program exits
Works as expected
Discrepancy Statement:
Works as expected
Table 5.1 – Splash screen testing results
Tested Module Name:
Tested Module Name:
frmProfileSelect
Profile pathname from textbox
User clicks Browse button
User clicks Load button
Inputs:
User clicks Create Profile button
User clicks Cancel button
None
File open dialog is displayed
If the pathname is a valid cssp profile, the file
loads; otherwise, a warning is displayed.
Expected Outputs/Responses:
Profile Create screen is displayed
If a profile hasn’t already been loaded, then the
program will close; otherwise, the program
will return to the Client Information screen
None
File dialog displays
If the pathname is valid, the profile loads;
otherwise, the error displays
Actual Outputs/Responses:
Profile create screen displays
If a profile isn’t loaded, then the program exits;
otherwise, the Client Information screen
displays
Works as expected
Works as expected
Works as expected
Discrepancy Statement:
Works as expected
Works as expected
Table 5.2 – Profile select screen testing results
Tested Module Name:
Inputs:
Expected Outputs/Responses:
Actual Outputs/Responses:
Discrepancy Statement:
frmProfileCreate
User-completed strings in textboxes
User clicks Save button
User clicks Cancel button
None
First, a confirmation dialog will pop up
warning the user about unchangeable data.
Then, the save dialog will appear. If the user
strings are formatted properly, the file will
save; otherwise, an error message will appear.
Profile Select screen is displayed
None
Confirmation dialog is displayed, then save
dialog. Malformed strings are properly flagged
and the error message displays
Profile Select screen is displayed
Works as expected
Works as expected
Works as expected
Table 5.3 – Profile create screen testing results
frmClientInformation
Client information from profile
User clicks New button
User clicks Modify button
Inputs:
User clicks Graph button
User clicks Switch Profile button
User clicks Quit Program button
Text fields are populated with client
information
Blank Data Entry screen is displayed
Session Select screen is displayed
Expected Outputs/Responses:
Graph screen is displayed
Profile Select screen is displayed
Program exits
Text fields are populated with correct client
information
Blank Data Entry screen is displayed
Session Select screen is displayed
Actual Outputs/Responses:
Graph screen is displayed
Profile Select screen is displayed
Program exits
Works as expected
Works as expected
Works as expected
Discrepancy Statement:
Works as expected
Works as expected
Works as expected
Table 5.4 – Client information screen testing results
Tested Module Name:
Tested Module Name:
Inputs:
Expected Outputs/Responses:
frmDataEntry
Client information from profile
Current session number
Current session data
User clicks Save button
User clicks Cancel button
Information labels populate with the proper
information
Session label displays the current session
number
Data entry form is populated with current
session data
Display confirmation dialog to verify saving
profile
Abandon changes and display Client
Information screen
Information labels properly populated
Session label displays current session
Data entry form populates with current session
data
Actual Outputs/Responses:
Confirmation dialog displays. Once verified,
data is saved in profile.
Changes to session data is abandoned and
Client Information screen displays
Works as expected
Works as expected
Works as expected
Discrepancy Statement:
Works as expected
Works as expected
Table 5.5 – Data entry screen testing results
frmSessionSelect
Number of sessions from profile
User clicks Continue button
Inputs:
User clicks Back button
Session combo box populates with number of
completed sessions
Data Entry screen is displayed with answers
Expected Outputs/Responses:
from selected session
Client Information screen is displayed
Session combo box properly populates with
completed sessions
Data Entry screen is displayed with correct
Actual Outputs/Responses:
answers from selected session
Client Information screen is displayed
Works as expected
Works as expected
Discrepancy Statement:
Works as expected
Table 5.6 – Session select screen testing results
Tested Module Name:
Tested Module Name:
Inputs:
Expected Outputs/Responses:
frmGraph
Session data from client profile
User clicking Print button
User clicking Back button
Graph with correctly mapped scoring dots
Print dialog and successful print
Return to Client Info Screen
Correctly drawn graph
Print dialog is displayed, printing is correct
Actual Outputs/Responses:
Graph screen closes and Client Info screen
opens
Works as expected
Works as expected
Discrepancy Statement:
Works as expected
Table 5.7 – Graph screen testing results
Visual Basic Version
Let’s first talk about the VB example of the program. When launching the program the
user gets at first to the screen where he’s being asked if he wants to continue or cancel, when
testing this part we were successful in getting both buttons to work properly. Getting to the new
screen now the user can either create a new profile or load a new profile unless he wants to exit
of course, each button works perfectly and we get the results expected. After getting to these
screens that’s when our testing comes across some difficulties, after creating a new profile, we
were able to save the data but not as expected, the data entered in the text field to save but just as
a simple text file. The other problem that we encounter is with the loading and it is linked
directly to the previous problem (the saving one). Since we were not able to save the file
properly being able to load it was a major problem, so unfortunately we didn’t have any success
in loading the files saved. Not being able to get data in yet that we tried to save made it even
harder to interpret them which later lead to us not being able to produce graphs, print.
6. Conclusion
Social workers evaluate their client’s mental health with data collected from
questionnaires and surveys. This data must be compiled and shared with other medical
professionals in the form of a chart. However, there is currently no standard method for storing
this data and creating the necessary chart is available right now. That made the job of the social
worker a very difficult one when it comes to interpret the data that have been gathered. So as an
attempt to alleviate the current situation, we’ve decided to come up with our own program. Our
software has been created to address this problem in a user-friendly fashion. The CSSP program
provides a standard data storage and chart creation method for all users.
References
1. Walmyr Publishing Company
http://www.walmyr.com/
2. Generalized Contentment Scale (GCS)
http://www.walmyr.com/GCSSAMPL.pdf
3. Index of Clinical Stress (ICS)
http://www.walmyr.com/ICSSAMPL.pdf
4. Index of Self-Esteem (ISE)
http://www.walmyr.com/ISESAMPL.pdf
Appendix A – Java User Manual
How to Start the Program:
To start the program in Windows, simply double click on the “evaluator.exe” icon. This
will launch the CSSP software.
Screens:
There are seven main screens used in the CSSP software. Their functionality is defined in
table A.1.
Name:
Purpose:
Buttons:
Splash Screen
Welcomes the user to
the CSSP software
Continue
Profile Load
Provides options for
Exit
Browse
Function:
Loads the Profile Load
Screen
Quits the program
Opens a file open dialog to
Screen
either loading an
existing client profile
or creating a new client
profile.
Load
Create New
Profile
Cancel
Profile Create
Screen
Data entry screen for
new client information,
including name, id,
survey type, etc.
Create
Cancel
New
Client Information
Screen
Shows general client
information and
provides options to
create and modify
survey sessions.
Modify
Graph
Switch Profile
Quit Program
Data Entry Screen
Session Select
Screen
Graph Screen
Displays an array of
answer fields to be
completed. Answering
a question as 0 causes it
to be ignored in the
score calculation.
Provides a list of
previously completed
sessions for
modification.
Draws a graph
depicting the client’s
survey scores and
Save
Back
Continue
Back
Print
Back
search for an existing client
profile file
Loads the profile name in
the pathname text field
Opens the Profile Create
Screen
If no session has been
loaded into the program,
clicking this button will
cause the program to exit.
Otherwise, this button will
return the user to the Client
Information Screen with the
previously opened session’s
data loaded into it.
Opens a save file dialog to
save the profile file to disc.
Automatically appends the
“.cssp” extension to the
created profile file
Returns to the Profile Select
Screen
Opens a blank Data Entry
Screen to
Opens the Session Select
screen to modify previous
session data
Opens the Graph Screen to
view session scores
Opens the Profile Load
Screen
Quits the program
Saves the session data to
the profile file
Returns to the Client
Information Screen without
saving the session data
Loads the selected session
for modification in the Data
Entry Screen
Returns to the Client
Information Screen
Opens a print dialog to print
the graph
Returns to the Client
provides an option to
Information Screen
print the graph.
Table A.1 – program screens functionality
Program Output:
The CSSP software outputs only two different forms of data: the binary client profiles
and printed graphs showing the client’s progress. The client profiles are saved to disc at three
points in the program: upon profile creation, upon the saving of new session data, and upon
saving modified session data. Each of these disc writes is preceded by a confirmation dialog
instructing the operator to verify writing of the profiles to disc. Creating a profile writes a profile
with only the basic header information in the file (name, id, survey, etc.). Adding new sessions
modifies the number of question structures within the profile, while modifying sessions rewrites
the file with the changed session answers.
How to Exit the Program:
Like most other Windows applications, clicking the X button in the corner of any CSSP
screen will quit the program. However, aside from this, the CSSP software contains three other
methods to exit the program which are detailed in table A.2.
Window:
Splash Screen
Button:
Exit
Profile Select Screen
Cancel
Client Information Screen
Quit Program
Table A.2 – exit procedures
Appendix B: Visual Basic User Manual
Notes:
Exits immediately
Only exits as long as a client
profiles hasn’t already been
loaded into the software. If a
profile has already been
loaded into the software,
clicking this button will take
the user back to the Client
Information Screen.
Exits immediately