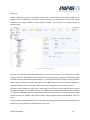
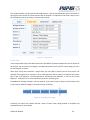
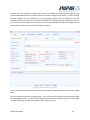
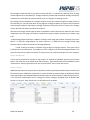
1
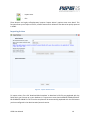
Using the Pisys ATMS System Authors : Peter Henderson, Akmal Muhammad, Brian Sutherland Date : February 2015 ATMS version 5.0 onwards This manual and its contents are copyright (c) Pisys Limited 2015. All rights reserved. Table of Contents Using the Pisys ATMS System _______________________________________________ 1 Introduction_____________________________________________________________ 5 What's new in v5.0 _______________________________________________________ 5 Projects and Sub-Projects ___________________________________________________ 5 Teams ___________________________________________________________________ 5 Organisation______________________________________________________________ 5 Project Visibility ___________________________________________________________ 5 Control Groups ____________________________________________________________ 6 Categories and Sub-Categories _______________________________________________ 6 Sub Actions_______________________________________________________________ 6 Other Features ____________________________________________________________ 6 New System-Wide Settings Available __________________________________________ 7 Overview _______________________________________________________________ 8 Logging In ________________________________________________________________ 8 The Main Actions Screen __________________________________________________ 9 Toolbar __________________________________________________________________ 9 Importing Actions ________________________________________________________ 10 Action Filters Options _____________________________________________________ 11 Paging __________________________________________________________________ 13 Control Group Tabs _______________________________________________________ 14 The Context Menu ________________________________________________________ 14 Adding Actions ___________________________________________________________ 15 Generating Linked Actions _________________________________________________ 19 Generate Sub Actions _____________________________________________________ 20 Reset All ________________________________________________________________ 21 Audit & Action Notes ______________________________________________________ 21 Recurrence ______________________________________________________________ 22 ATMS User Manual 2 Recur By Day _______________________________________________________ 23 Recur By Week ______________________________________________________ 24 Recur By Month _____________________________________________________ 24 Recur By Year _______________________________________________________ 25 Reminders ______________________________________________________________ 26 Processing Actions ________________________________________________________ 28 Reviewing Actions ________________________________________________________ 30 Reporting______________________________________________________________ 33 Action Summary by Status Report ___________________________________________ 33 Detailed Action Summary by Status Report ____________________________________ 34 Outstanding Actions Report ________________________________________________ 34 Detailed Outstanding Actions Report _________________________________________ 35 Outstanding Actions by Users Report _________________________________________ 35 Detailed Outstanding Actions by Users Report _________________________________ 36 Overdue Actions by Accountable Graph _______________________________________ 37 Overdue Actions by Owner Graph ___________________________________________ 38 Overdue Actions by Priority Graph ___________________________________________ 39 Overdue Actions by Priority/Month Graph ____________________________________ 40 Overdue Actions by Projects Graph __________________________________________ 41 Actions Closed by Priority per Month Graph ___________________________________ 42 Overdue Action Summary Report ____________________________________________ 43 Administration _________________________________________________________ 44 General Tab _____________________________________________________________ 44 Configure Action Edit Screen Size _______________________________________ 44 Configure Action List Screen Page Size ___________________________________ 45 Configure Email Reminder settings ______________________________________ 45 Advanced Administration Options _______________________________________ 46 Tabs ___________________________________________________________________ 46 Controls ________________________________________________________________ 46 ATMS User Manual 3 Organisation_____________________________________________________________ 50 Mail____________________________________________________________________ 52 Projects_________________________________________________________________ 55 Project Roles _______________________________________________________ 56 Project Attachments _________________________________________________ 58 Project Controls _____________________________________________________ 58 Project Visibility __________________________________________________________ 59 Users ___________________________________________________________________ 62 User Teams_________________________________________________________ 63 User Permissions ____________________________________________________ 64 ATMS User Manual 4 Introduction This manual describes the key elements of ATMS. It assumes reasonable IT skills and an understanding of how actions are raised and managed within the organisation. It’s also worth mentioning that we have a web page at http://pisys.co/atms-updates/ which carries details of the latest revisions. Our development cycle is driven by what our customers tell us - so if there’s something you feel that should be there, or something that’s not quite working the way you need it to, please let us know. What's new in v5.0 If you're familiar with ATMS, this section contains a brief overview of the major changes. Please see the individual sections for full details. Projects and Sub-Projects Previously, the projects in the system could have at most one level of nesting. A project could be a subproject of another project. Now you can nest projects to any level, and the new administration screen for projects will provide a tree view for organising your projects. Teams As well as the existing companies and departments for organising users, we have added teams. Teams are a flexible addition to your organisation model. Users from different companies and departments can be added into the same team, and a user can be a member of multiple teams. The real power of teams comes in with the new Project Visibility screen, below. Organisation Another reworked administration screen, which replaces the Companies and Departments screens. Now we have a tree view showing all companies, departments, teams and users in your organisation. Project Visibility The administration of which users can see which projects has received a major overhaul, due to a more flexible system, bringing together the new project and organisation trees. Here you can manage which projects a particular company, department, team or individual user can see, or select a project and manage who all in your organisation can see it. ATMS User Manual 5 Control Groups To allow for greater flexibility for modelling a wider range of projects in the system, we have introduced control groups. You may be familiar with the set of controls (and additional user-created custom controls) available in the system. These controls can be renamed, resized, and reordered on actions. This set of controls applied system-wide. Now with control groups, the whole set of controls can be duplicated and managed as separate complete groups of controls. With multiple control groups available, new projects (and therefore actions) can use a different control group, allowing for completely different naming and ordering of controls, and separate user defined controls, if desired. The most visible result of this is that you can have different action edit screens for different projects, and the system generated email settings can also be tailored for different projects. Categories and Sub-Categories In addition to the existing Category control, we have added Sub-Categories. As the name suggests these will be further lists with Category as a parent. These will be available as main action list screen filters and apply across all control groups i.e. system wide. Very useful to filter your list of actions if you’re looking at a top level project, across multiple control groups. Sub Actions Now you can create sub actions which provides a hierarchy based relationship between actions where one action can have one or more sub-actions and each of its sub-actions can have one or more sub-actions and so on. A new status “Awaiting Sub Action Closure” will be added into the system. If the review cycle of a parent action is complete then it will not close and its status will become ”Awaiting Sub Action closure” until all of its children and grandchildren and so on actions are closed out. Other Features Improved searching and filtering on user administration screen Improved colour coding to clearly show closed actions on the main action list screen. The action list screen filters can be hidden to give more space to the actions themselves. Reports can be filtered by companies, departments and teams. Reports now have an improved, consistent look. DropDown custom controls can now have a default value specified. Treeview custom controls can now be created. Actions can now be copied. Two additional pre-approval stages are available for Actions. ATMS User Manual 6 New System-Wide Settings Available Review Comments – When an action is approved/rejected, a text area will appear to allow comments to be added. These comments will be included in the email generated by the approval/rejection and these will also appear on action edit screen under Review Comments tab. Default: OFF All Company Projects Visible to New User – New users automatically have visibility on their companies’ projects. This can now be switched off so no automatic visibility is given, and is granted manually via the Project Visibility screen. Default: ON New Projects visible to Parent Company – New projects are automatically visible to everyone in the parent company. Now this is an option too so visibility can be handled manually. Default: ON Show Non-visible Project Names – Hide all details, including names, of projects to users who don’t have visibility on those projects. A placeholder of fixed length ‘******’s will appear in any project tree Default: OFF Allow Inter-Project Linked Actions – Allow actions from different projects to be linked Default: ON Allow Inter-Project Sub Actions – Allow actions from different projects to be dependent. Default: ON Please contact Pisys Support if you require any of these settings changed. ATMS User Manual 7 Overview ATMS allows actions to be raised and managed within a simple web based interface. The basic principle behind ATMS is that an individual creates an action and assigns it to someone who does some work with it before indicating that it is complete. Up to four more people can then get involved in the action lifecycle, each with the ability to approve or reject the action. Actions carry a comprehensive set of information plus any required file attachments and an audit trail showing the various stages in the approval process. An email system keeps everyone informed about the status of actions, and a powerful reminder system ensures that the appropriate people are informed about actions reaching their due dates. Configurable security allows a high degree of control over access levels and also allows selected actions to be restricted to defined companies or individuals within companies. ATMS has thousands of users worldwide - once configured to fit your business processes it is extremely easy to use. Logging In The figure below shows the main login screen. If you have a user name and password then enter them in the appropriate fields. Note that the top section of the login screen will display your own company logo. Figure 1 - Login screen ATMS User Manual 8 The Main Actions Screen The figure below shows the main action screen. This screen is displayed first as most users will spend the majority of their time interacting with this screen. Figure 2 - Main Action Screen Toolbar The toolbar shown at the top left of the screen contains a set of buttons. Some of these buttons are only available on certain screens, or when you have a particular item selected. Figure 3 - Toolbar From left to right these buttons perform the following functions: - Create a new action, project, control or user - Open a highlighted action, project, control or user for editing - Delete an action, project, control or user - Print actions, projects, controls or users - Change password - Save search filter - Export actions or reports - Import actions ATMS User Manual 9 - Import users - Exit These buttons are largely self-explanatory however ‘Import Actions’ requires some more detail. This function allows you to import a CSV file, a useful feature which allows off-site data to be quickly captured in ATMS. Importing Actions Figure 4 - Import Actions Screen To import actions, first click ‘download blank template’ to download a CSV file pre-populated with the fields which you have set up in your database. It is important to note that the IMPORT TEMPLATE MUST BE GENERATED PRIOR TO USE. Since the template will be automatically populated with the field names you have configured in the administration/controls section. ATMS User Manual 10 Once you have captured the required data in your CSV file, select the project to which you want actions to be added. If you want to automatically generate sub-projects during the import, tick the “Create SubProject” option. You should also select a default user to whom all unassigned actions will be assigned - in case no match can be made with user names in the CSV file (it happens!) Browse to the CSV file you have populated, and click the ‘Upload’ button. The system will now run a check on the validity of the data file. If the file is ok the information panel will display details of the number of actions, projects and new companies which it has found in the file, but if errors were found a list of these errors will be displayed. Fix any errors and repeat this process before proceeding. If the file is valid, the ‘Import’ button will be enabled - click this button to perform the data import. If you add new fields to the system you can generate a template to capture these at any time by clicking ‘download blank template’ Action Filters Options The actions displayed can be filtered by using various filter options on the main action screen as follows Figure 5 - Filtering Visible Actions ATMS allows filtering by: Project - select a project from the pull-down list to see all actions related to the project. Status - View all actions with a particular action status (open, closed etc.). Priority - Show all actions at the selected priority. Category - Show all actions with selected category. Role / Name - Show all actions with a particular person in a particular role. Overdue - Show only actions that are still not closed beyond their due date. Strategy overdue – if a strategic review stage has been included you can track actions that haven’t passed this stage by the strategy due date. Include Archived - Closed actions can be archived - by default they don’t appear on action views but you can force them to be displayed. ATMS can be configured to automatically archived closed actions - contact Pisys to organize this. Require My Attention - Show only actions that you are required to complete or approve. ATMS User Manual 11 Actions Involving Me - Show only actions that you are or have been involved with (includes actions you have already approved). Note: you are considered to be involved with an action if you are either of the creator, owner, reviewer, approver or final approver of the action. Actions Involving My Company - Show only actions that you or any of your company colleagues are or have been involved with. Note: you are considered to be involved with an action if you are either of the creator, owner, reviewer, approver or final approver of the action. Print on A3 paper – This is not a filter option. This option can be used if you want to force any prints from the action screen to be at A3 paper size - this is handy if you have a lot of fields to display. Of course you can combine these filter parameters to provide a fairly flexible search tool - there are other ways to search which we’ll cover later, but this is a fast way to narrow down the list of actions you’re looking at. Once you’ve defined the filter, you can print or export the actions as required. Note you can use the “reset all” button to clear all the filters and therefore display all actions. It is worth mentioning here that if you frequently apply similar filters, you can use the Save Search Filter feature to save it as a default filter which will be automatically applied every time you login to the system. If you are still unable to find the action(s) you are looking for, you can use the free-text search facility located to the right of the toolbar buttons at the top of the main page: Figure 6 - Free-Text Search Facility Enter the required search criteria in the search box and click “GO” or press the ENTER key. The actions list will then be filtered by actions containing the search phrase, in the example, the word “safety’. Note that unless you check the “Search visible items only” checkbox, ATMS will search ALL actions in the system, ignoring your previous filter selections (which will be reset). If you only wish to search within the actions currently displayed in the actions list, you should check this box. Note also that at the time of writing, user names are not searchable. ATMS will always filter the actions list by actions matching the search criteria until you click the “Clear” or the “Reset All” button. Any of the column headings can be used to sort displayed actions in ascending and descending order– for example, clicking on ‘Created Date will group the actions in order of their created date as shown. ATMS User Manual 12 Figure 7 - Action List It’s worth pointing out at this stage that column headings are customisable – so you can change the nomenclature to fit your business processes, or add extra fields to capture relevant information - we’ll cover this in more detail later. Use the print button to get a hard copy output - if you have a lot of fields on screen you might want to tick the 'Print on A3 paper' box on the filter bar. You can also export everything displayed on the main screen to an Excel spreadsheet by clicking the export button. Even though ATMS has separate fixed and custom report functions, this combination of search filters along with print and export can also be used as a power reporting mechanism. Paging If you have a lot of actions, you can select paging from the navigation bar at the bottom of the screen. Figure 8 – Page Navigation bar System Administrators can enable/disable paging or configure the default page size through the administration section. In the admin/'General' tab, alter the required paging parameters as shown : Figure 9 – Paging Options ATMS User Manual 13 Control Group Tabs Figure 10 - Control Group tabs on the action list screen The actions to be listed will include all those in child projects of the project you have chosen in the Project filter. Depending on which Project you have selected (and its sub projects), the actions to be listed may come from more than one control group. As control groups could have different names for controls, and different columns displayed on the action list screen, they must be shown separately. Tabs for each control group with a count of the actions within will be displayed. The Context Menu The “context menu” is available by right-clicking on an action. Figure 11 - Action context menu ATMS User Manual 14 This example shows the context menu in which New, Edit, Delete and Print options are all identical in function to their corresponding entries in the toolbar at the top of the screen. Adding Actions Click the ‘New’ button at the top left of the screen to add a new action. You will get a popup to select which project the action will belong to: Figure 12 - Select project screen Selecting a project and clicking OK will show the action edit screen - similar to the one shown below. ATMS User Manual 15 Figure 13 – Add/Edit Action Screen NOTE: If you want to reveal the screen behind the action entry page, click the button at the top right of the page - this applies to several areas of ATMS and allows easy viewing of data when working with actions and reports etc. Fields marked with ‘Required’ are mandatory and if a user tries to save the action without filling the mandatory fields then ATMS will generate an Error message as shown. Figure 14 – ATMS Validation Message ATMS User Manual 16 Project action number - Can be in any format and could for example be linked to reference an external system. If you need an automatically generated number this can be enabled by our support team - please contact us to arrange. Date Raised - Today’s date Due Date - Date by which action must be closed out - this is a date-picker Creator - Name of person who created the action Owner - This is a user-defined name representing the individual responsible for completing the action. Reviewer 1, Reviewer 2, Approver, Final Approver - Again, user defined names representing the people who are responsible for signing off the action as it passes each stage. Action Summary - A summary of what you want the owner to do - this can be supplemented by attachments in the ‘Attachments’ tab shown here. Figure 15 - Action Attachments Tab Here a document reference file has been attached to assist in locating the documents required - any type of file may be attached here although it must be remembered that ATMS is not intended as a formal document control system - it’s merely a way of storing information which can be used to assist an action ATMS User Manual 17 owner in completing an action. To add another file to the action, click the ‘browse’ button and select the desired file. You can add as many files as you need here. Note that the key roles for the selected project are displayed when a project is selected. We have used some generic labels here (reviewer 1, reviewer 2, approver, final approver) but the names can be changed to suit your own business. It’s also possible to have fewer approval stages - this is set up at the project definition stage (more later). It’s also worth mentioning that although the default roles for the project are populated, you also have the option of assigning other people to these positions. The pull-down list for each approval stage will be populated with Individuals who work for a company which either owns or has access to the project. You also have the ability to assign individuals from other companies to projects - more about this later! This facility is useful as it allows a high degree of control over workflow - it also allows delegated authority to be exercised if key individuals are absent for any reason. Selecting ‘Print’ produces a summary report of the action to be produced - you can use this facility as a handy means of producing quick action summaries for distribution ‘on the fly’. 'Print Tab' allows any single tab to be printed. Select the priority of the action - actions here are colour coded when displayed on the main actions screen (Red-High, Yellow-Medium and Green-Low) - but you can of course change this coding method in the administration controls section (Priority control) The ‘Category’ field is a pull down customizable list. You can enter various other references to further identify or quantify the action - guideword/deviation, consequences and safeguards can all be entered here (and of course you can alter these labels to reflect your business needs). If you don’t need these fields you can simply switch them off. Another key point to note is that the majority of the fields on the form can be switched on or off by setting the ‘visible’ and ‘printing’ flags in the ‘Controls’ administration section. ATMS User Manual 18 Generating Linked Actions Sometimes you may want to group certain actions. ATMS provides a simple way to link actions together. Figure 16 - Generate Linked Action button The figure above shows the ‘Generate Linked Action’ button at the bottom of the Action Edit screen. This button will open a blank action screen to allow you to create a new action. The action you create will be ‘linked’ to the action you were looking at when you clicked the button. There is no other relationship created by linking actions - you don’t for example have to close off all linked actions when closing an action - the link facility is simply a way to ‘group’ actions together. The action you create is a normal action in every sense - it carries its own workflow and status and behaves exactly like any other action. On the main screen, actions which have linked actions will be indicated by a link symbol in the linked actions column. Click on the Linked actions symbol and a preview list of linked actions will appear on the screen as shown. Click on any of the actions in the preview list to view full details of linked actions. All ATMS User Manual 19 linked actions will be displayed. Clicking the Reset All button (see Reset All) will return the view to all actions. Figure 17 - Linked actions Generate Sub Actions In addition to Linked Actions you can create sub actions – these actions actually have a relationship with the parent action. A parent action cannot be closed out until all its sub actions are completed. Figure 18 - Generate Sub Action Button ATMS User Manual 20 The figure above shows the ‘Generate Sub Action’ button at the bottom of the Action Edit screen. This button will open a blank action screen to allow you to create a new sub action. Sub actions can also have sub actions. If the review cycle of a parent action is complete then it will not close and its status will become ”Awaiting Sub Action closure” until all of its children and grandchildren and so on actions are closed out. Figure 19 - Sub Actions On the main screen, actions which have sub actions will be indicated by a hierarchy symbol in the sub actions column. Click on the hierarchy symbol and a preview list of sub actions will appear on the screen as shown. Click on any of the actions in the preview list to view the full details of the sub action. This preview list only shows the direct one-level-down sub actions of the selected actions. But further levels can be navigated by clicking the hierarchy symbol of the relevant action and repeating the process. Clicking the Reset All button (see Reset All below) will return the view to all actions. Reset All To clear all the filters on the main screen click ‘Reset All’ as shown. Figure 20 - The Reset All button Audit & Action Notes Audit events are logged when the action has been raised. The system automatically adds to the audit log when certain events take place - for example an action is reopened or the status is changed. There is also a facility for actionees to add their own notes on the action. The figure below shows the audit notes. ATMS User Manual 21 Figure 21 – Audit Notes As part of the approval process one or more of the individuals involved in ‘signing off’ an action may add comments to this section - for example if an action is rejected a note can be made here to provide guidance to the next individual involved in the process. We would recommend that any notes supporting rejection of an action be entered here to guarantee their visibility throughout the action lifecycle. If any of the action fields are changed during the action lifecycle the audit log is updated to reflect this you can see the original field values along with the changes made- this is a useful time-stamped audit trail. Recurrence The figure below shows the ‘Recurrence’ tab which allows you to create recurring actions. A recurring action is a special type of action in ATMS which allows you to create an action once, and then have it recreated automatically after a designated time interval. Any user with permission to create actions can create recurring actions. Existing non-recurring actions can also be converted into recurring actions. Only the creator of an existing action or the system administrator can set an existing action as a recurring action. The “Recurrence Tab” on Action Edit Screen can be used to create a Recurring Action. Actions can recur by day, week, month or year. ATMS User Manual 22 Figure 22 - Recurrence Tab To create a recurring action, edit the action you want to change to a recurring action and click on the ‘Recurrence’ tab. Select the frequency (daily, weekly, monthly or yearly) at which you want the action to recur. Depending upon the frequency select other recurrence options and recurrence end date and save the action. If you don’t want the action to stop recurring after a certain date then leave the recurrence end date as blank. Once an action is configured for recurrence, then when that action reaches its due date it will recur – a new copy will be made. When that new copy of the action will recur will depend on the setting you have chosen. See below. Recur By Day This example shows an action which is configured to recur by day. If an action is configured to recur after every three days and it was created on 15/01/2013 with due date 02/03/2013 then the first time it will be recreated on 02-03-2013 with due date of 05/03/2013 and the second time will be recreated on 05/03/2013 with due date 18/03/2013 and so on until recurrence end date is reached. ATMS User Manual 23 Figure 23 - Recurrence by Day Recur By Week This example shows an action which is configured to recur by week. If an action is configured to recur after every 4 weeks on Tuesday (every 4th Tuesday) and it was created on 15/01/2013 with due date 26/02/2013 then the first time it will be recreated on 26-02-2013 with due date of 26/03/2013 and the second time will be recreated on 26/03/2013 with due date 23/04/2013 and so on until the recurrence end date is reached. We will discuss the ‘Copy Custom Controls Data’ checkbox functionality later in this section. Figure 24 - Recurrence by Week Recur By Month This example shows an action which is configured to recur by month. If an action is configured to recur after every 2 months on the 31st day of the month and it was created on 31/10/2012 with due date 31/12/2012 then first time it will be recreated on 31-12-2012 with due date of 28/02/2013(if there is no 31st day in the month then it will be replaced with the last day of the month) and second time will be recreated on 28/02/2013 with due date 30/04/2013 and so on until the recurrence end date is reached. ATMS User Manual 24 Figure 25 - Recurrence by Month Recur By Year This example shows an action which is configured to recur by year. If an action is configured to recur after every 2 years on 19th February and it was created on 31/10/2012 with due date 31/12/2012 then the first time it will be recreated on 31-12-2012 with due date of 19/02/2013 and the second time it will be recreated on 19/02/2013 with due date 19/02/2015 and so on until the recurrence end date is reached. Figure 26 - Recurrence by Year ‘Copy Custom Controls Data’ checkbox is used if custom controls are used for the action screen and you want to copy the data of those controls into the recurred actions. This option is provided because if you populate the custom controls at different review stages then copying the data for those controls into the new recurred action doesn’t make any sense. By default custom controls data will not be copied into recurred actions until this checkbox is ticked. An extra column is included to flag recurring and recurred actions. Recurring actions are represented by and any recurred actions are represented by ATMS User Manual as shown in Figure 27. If there is a small green arrow 25 appearing on a recurring action then by clicking on it a user can view a list of all the actions recurred from this action as shown. Figure 27 - Recurred Action preview Figure 28 - Recurring/Recurred Action Tooltips Reminders ATMS can send email reminders to the accountable persons for actions which are already overdue or about to reach their due date. An accountable person is the person whose response is required for the action to progress to the next stage. You can have a default system wide email remainder settings and you can also have different reminders settings for individual actions. System wide email remainder settings can be done from Admin section and individual action’s reminder can be set from the action edit screen. Individual action setting will supersede the default settings. ATMS User Manual 26 Figure 29 – Reminders Tab – Custom Settings If ‘Number of Days Before Due Date’ is set to ‘7 days’ and ‘Number of Days After Due Date’ is set to ‘2 days’ then the accountable person will get a reminder e-mail 7 days before action’s due date. Then the next reminder will be sent on the day when the action will become overdue and after that a reminder will be sent after every 2 days until the action is closed out. If the ‘Limit to One’ option is set then a reminder will be sent on the day when the action will become overdue and another reminder will be sent 2 days later and no reminder will be sent afterwards . For example if an action is due on 10th June 2015 and ‘Number of Days Before Due Date’ is set to ‘7 days’ and ‘Number of Days After Due Date’ is set to ‘2 days’ then on 03 rd June 2015 a reminder will be sent to the person accountable for that action stating that the action will be overdue in the next 7 days. Then on 11th June 2015 another reminder will be send to the accountable person stating that this action is overdue by one day and after that every 2nd day on 13, 15, 17 June 2015 and so on until the action is closed. If the ‘Limit to One’ option is set then a reminder will be sent on the accountable person on 11th June 2015 and another reminder will be send on 13 June 2015 and no overdue reminder will be sent after that. The ‘Reminders’ tab allows a system administrator or creator to customise or disable overdue action reminders settings. In this case the reminder setting is customised so that a reminder will be sent to the accountable person on the due date of the action and once the action becomes overdue a reminder will be sent every two days. ATMS User Manual 27 Processing Actions When an action is raised, one or more individuals will receive a notification email depending on how the system has been configured - this is described in more detail later. They will then log in to ATMS and open the action for which they are responsible, add any notes which may be required and indicate the completion of the stage. The action then gets passed to the next approval level, with each individual indicating completion or rejection, until the action has been finally approved and closed out by the relevant lead. If your system is configured to allow the Owner of the action to reassign, an action can be rejected by the Owner reassigning the action back to the Creator, with either explanatory text in the Action Notes or entered on the email preview page. Action status emails are sent to designated individuals with the Audit & Action Notes section automatically updated to reflect any status changes. Let’s look at an example - an action created earlier has been assigned to a user ‘Glenda Hepworth’. Let’s have a look at what Glenda sees when she logs into the system. Figure 30 - Actions List Screen We can see the actions requiring Glenda’s attention. As the action created earlier requires Glenda’s attention she opens it by double clicking on it as shown. ATMS User Manual 28 Figure 31 - Action Edit Screen The ‘Action Summary’ field tells Glenda what she needs to do. She can consult the ‘Attachments’ tab as described earlier to see any supporting files. She can also look at the ‘Audit’ tab to see both the history of the action and any changes made to any of the fields or action status. The ‘Project Details’ as shown in Figure 32 below tab displays detail about this action’s project. ATMS User Manual 29 Figure 32 - Project Details Tab on Action Edit Screen Any attachments from the main project record are can be downloaded from this tab. Once Glenda has completed her work on the action, she enters a note in the ‘Action response’ field. She then clicks the ‘Completed’ check box which automatically generates an email to the designated action reviewer (if you have configured this facility) If required, the system will also send regular reminders about overdue actions - our support team will configure this facility for you. Reviewing Actions Using our example above, Glenda has indicated that she has completed all work on the action she was assigned, and that the action is complete - it must now be signed off by the rest of the people in the list of reviewers - in this case Gregor is Reviewer 1 - Depending on how the mailer has been configured, Gregor will get an email telling him that an action requires his attention, and when he logs into the system he will see the action. ATMS User Manual 30 Figure 33 - Action Edit window The ‘Status’ has changed to ‘Response Complete’ - Gregor can see that Glenda has entered some text in the ’Action response’ field describing what she has done to complete the action. He can then decide whether to approve or reject the action. Let’s assume he isn’t satisfied with the work done and wants Glenda to re-do some of the task. Gregor Selects the ‘Reject’ radio button and enters comments as to why he is rejecting the action at this point: ATMS User Manual 31 Figure 34 - Adding Review Comments This will send an email to Glenda telling her about the rejection and it will set the action status to ‘Reopened for Action Response’ - Glenda must then revisit the action and repeat the process until Gregor is satisfied. Depending on how many people are involved in the review process, Gregor’s approval of the action will generate an email to the next person in the ‘chain’ and so on until it reaches the person responsible for final approval - rejection of the action at any stage will lead to the status being reset to ‘Reopened for Action Response’ and sent back to the beginning of the chain for re-work. ATMS User Manual 32 Reporting The ‘reports’ section gives access to a variety of tabular and graphical reports Figure 35 - Report menu Select a report type from the pull down list. The other drop down menus allow filtering on project, action status, owner and company/department as well as (for outstanding actions) actions due within specific periods. Reports will only show data to which you have access - you won't be able to see details of projects to which you haven't been assigned. Action Summary by Status Report This report is designed to list the number of actions at each status for each project/sub-project, it also shows how many action are overdue (not completed and their due date is passed). Figure 36 - Example of “Action Summary by Status” Report ATMS User Manual 33 Detailed Action Summary by Status Report This report lists total number of actions and a brief overview of each action at each status for each project/sub-project, it also shows overdue state of each action and how many actions are overdue for each project and sub project. Figure 37 - Example of “Detailed Action Summary by Status” Report Outstanding Actions Report This report lists the total number of outstanding actions per user for each project and how many of which are overdue. It also shows System ID of the actions which are overdue. An outstanding action is an incomplete action which is awaiting response/approval from a user. ATMS User Manual 34 Figure 38 - Example of “Outstanding Actions” Report Detailed Outstanding Actions Report This report lists the total number of actions and a brief overview of each action outstanding on a person for each project/sub-project. An outstanding action is an incomplete action which is awaiting response/approval from a user. Figure 39 – Example of “Detailed Outstanding Actions” Report Outstanding Actions by Users Report This report lists total number of actions outstanding on a person and how many actions are already overdue or due in next 30 days, 31 - 60 days, 61 - 90 days or due in 91 or more days. ATMS User Manual 35 Figure 40 - Example “Outstanding actions by users” report Detailed Outstanding Actions by Users Report This report lists total number of actions and a brief overview of each action outstanding on a person and if it is already overdue or due in next 30 days, 31 - 60 days, 61 - 90 days or due in 91 or more days. Figure 41 - Example “Detailed Outstanding Actions by Users” Report ATMS User Manual 36 Overdue Actions by Accountable Graph This graph shows the number of overdue actions by the persons on which these actions are outstanding on. Figure 42 - Example “Overdue Actions by Accountable Graph” ATMS User Manual 37 Overdue Actions by Owner Graph This graph shows the number of overdue actions by the Owner/Action Party of these actions. Figure 43 - Example “Overdue Actions by Owner Graph” ATMS User Manual 38 Overdue Actions by Priority Graph This graph shows the number of overdue actions by the priority of these actions. Figure 44 - Example “Overdue Actions by Priority Graph” ATMS User Manual 39 Overdue Actions by Priority/Month Graph This graph shows the number of overdue actions in each month of a selected year by their priority. Figure 45 - Example “Overdue Actions by Priority/Month Graph” ATMS User Manual 40 Overdue Actions by Projects Graph This graph shows the number of overdue actions in by projects. Figure 46 - Example “Overdue Actions by Projects Graph” ATMS User Manual 41 Actions Closed by Priority per Month Graph This graph shows the number of closed actions in each month of a selected year by their priority. Figure 47 - Example “Actions Closed By Priority per Month Graph” ATMS User Manual 42 Overdue Action Summary Report This report show you the total number of actions which are overdue and average number days these are overdue. If you are using Strategic Review stage then it also shows total number of actions which are overdue for strategic review and average number days their strategic review is overdue. An action can be overdue for strategic review if its strategic review is not complete and its strategic review due date is passed. Figure 48 - Example “Overdue Actions Summary Report” Project Actions Report This report print all the actions of a selected project and any attached PDF files in a single PDF file. It is important to note that only PDF attachments can be printed and it is possible that an attached PDF file may not print because it is password protected or corrupted or not supported by ATMS PDF reader. However, this report will always include the list of files which are not printed along with the system IDs of the actions these were attached to. Figure 49 - Example “Project Action Not Printable Files List” ATMS User Manual 43 Administration The main administration screen can be accessed by clicking the ‘Administration’ icon on the sidebar. It is important to note that only administrators will have the full access to this section and some user may have restricted access (may only see projects tab) to this section depending upon the permissions set on their login by the administrator. Figure 50 - Main Administration Screen General Tab Configure Action Edit Screen Size This section allows the administrators to set the height and width of the action edit screen. Depending upon the numbers and types of controls used on action edit screen an administrator can adjust the height and width of the screen to make it look appropriate. If the number of controls can’t fit within the screen size defined in “Configure Action Edit Screen Size” section then some controls may overlap or some portion of action edit screen may not appear. ATMS User Manual 44 Configure Action List Screen Page Size This section allows the administrators to set the number of actions displayed per page. The page size options allow the administrator to enable/disable paging or set the page size. Once page size is set, the page navigation bar at the bottom of the main action screen can be used to navigate between pages. Figure 51 - Paging Options Configure Email Reminder settings This section allows the administrators to set the system wide e-mail reminder settings. Admins can enable disable the reminders service, set default number of days for a due in reminders and default number of days for overdue reminders, they can also limit overdue reminder to just one reminder after the action is overdue Figure 52 - Paging Options ATMS User Manual 45 Advanced Administration Options This section allows large scale changes to be made to ATMS data. It’s intended as an advanced tool for experienced administrators and hence there is a big disclaimer before the main screen! Please contact our support team for detailed guidance on these options. Tabs ATMS allows customisation of the Action Edit screen. All controls (text box, date control, drop down list) are grouped onto Tabs on the action edit screen so all action data can be reviewed conveniently. In addition, tabs are organised in the system by control groups, (see controls section) so each group of controls can have their own set of tabs. By editing a tab you can determine what the tabs are called, their width, and the order you’d like them to appear in. Figure 53 – Edit Tab It is important to mention that three fixed tabs, Attachments, Notes and, Recurrence are used on every action and cannot be removed. If a user created tab has no controls defined for it then it will not be displayed on the action edit screen. Controls Every piece of data stored about an action or project is entered through a control - whether that is a drop down list, a text box, a date control, hyperlink or a check box. ATMS has standard (Fixed) controls which are necessary for each action. In addition to these, ATMS allows the creation of custom controls, so any data not stored against an action as standard can be defined by the user, by creating a control for its entry. These controls are grouped onto Tabs and can also be shown as a column on the main action list screen. There are two types of controls you can create - “Project” and “Action”. We will discuss the “Project Controls” in the project section but the process to create, update or delete the controls of both categories ATMS User Manual 46 is the same. Select the type of control you want to work with from the pull down list at the top of the control screen as shown. Here, action or project controls may be selected. Once control type is selected an admin can create, edit and delete controls via toolbar or context menu. Figure 54 - Control Category Controls belong to a control group. You can have multiple control groups in the system and different projects can use different, or the same, control groups. Control groups are created by copying an existing control group, as starting from scratch would take a very long time. Clicking the Add Control Group button will give the options below, where you specify which control group you’d like to copy, and provide a name. Then you will have another romplete set of controls, which you can rename and edit to suit projects requiring different controls. Figure 55 - Creating a Control Group The “Add Control” screen has two sections “Action Edit Screen Settings” and “Action List Screen Settings” “Action Edit Screen Settings” contains common settings and settings which are specifically related to how the control will appear on Action edit Screen. Such as its position on Edit screen can be selected by setting up sort order, under which tab it should appear can be selected by using Tab Name. A printing option is provided to select if the control data should be included when user print actions from the list screen. “Action List Screen Settings” contains settings which are specifically related to how the control will appear on Action List Screen for example its width, position and alignment. Depending upon the type of the controls, options on control Edit screen will vary. For example, in the case of a drop down control there will be an “Options” option which can be used to define the options for the dropdown control. ATMS User Manual 47 Figure 56 - Add Control Screen Once the “Visible” option is selected for a control from the “Action List Screen Settings” then the control will be visible on Action List Screen for all the actions as shown above. Figure 57 – A Custom Control “Severity” on Action List Screen Once visible option is selected for a control from the “Action Edit Screen Settings” section then the control will be visible on Add/Edit Action screen for all the actions. Figure 58The figure above shows the custom drop down control “Severity” on action edit screen. ATMS User Manual 48 Figure 58 – A Custom Dropdown Control “Severity” on Action Edit Screen ATMS fixed controls can be displayed in different orders and on different tabs, but can’t have their type changed (a dropdown for the final approver would make no sense as a checkbox, for instance). Use of controls in this way, along with defining tabs, and controlling the size of the action edit screen allows the user interface for actions and projects to be very flexible. ATMS User Manual 49 Organisation The organisation tree is used to model the companies, departments, teams and users in your organisation, and is important for granting visibility to projects, and as a way of grouping your users. Your organisation can contain one or many companies. A company can contain none, one or many departments. Teams are independent of any Company / departments hierarchy. You can have none, one or many teams in your organisation. You manage your organisation tree on the Organisation screen in administration: Figure 59 – Organisation Administration Screen The left side of the screen shows the tree. Clicking on one of the nodes of the tree will bring up the relevant edit screen (company, department, team, user) in the right hand side. The add new Company / Department / Team buttons are enabled based on where you are in the tree. ATMS User Manual 50 For instance, if you have a company node selected, you will have the ‘Add Company’ button enabled to add another company at the same (top) level. You will also have ‘Add Department’ enabled to add a new department for the company you have selected. Adding a new team is always available. A note about users. The existing User administration screen still exists, which allows for searching, filtering and the creation and deletion of users. Users can have their details edited on the Organisation screen, but their primary purpose for appearing here is to manage their membership of teams, and their place in the Company / department hierarchy. Not that once a user has active projects and actions, they cannot change company or department. A user must belong to a company. They can then optionally belong to one of that companies’ departments, or to any team in the system. They can be a member of multiple teams. So a user’s company must exist in the system before you can create that user. ATMS User Manual 51 Mail One of the key features of ATMS is its built-in workflow which allows selected users to be informed when key events take place. The “Edit E-Mail Screen” which allows the administrator to customise how these workflow email notifications are sent. For example, if you want to change the subject of an e-mail which is sent went a new action is created - double click on “Message sent on creation of new action” from the “Mail Type Description” list, this will open it for editing in “Mail Edit Screen” as shown in Figure 60. This screen describes what happens when a new action is created - the subject line, description and footer are all included in the email which is eventually sent on action creation. Figure 60 – Edit Mail Screen ATMS User Manual 52 For each mail type you can also specify which control data form the action is included in the subject line and body of the email, and in which order: Figure 61 - Mail Type Action fields Single line text fields can be assigned to the subject line and/or email body – select the sort order to control where they appear. Multi line text boxes (like action summary) can only be displayed in the email body. ATMS User Manual 53 To control who receives emails when an action is created click the ‘Distribution’ tab shown in Figure 63. Figure 62 - Mail Distribution Tab Here, we can select who from the review chain will be notified when a new action will be created – in addition to the next responsible person - we can also specify external email addresses which are not set up for any of the action participants. ATMS User Manual 54 Projects Projects represent one of the core entities within ATMS - actions and users both have strong links to projects and it is important to understand how they operate. An administrator or users with special permissions can create, update or delete projects in ATMS. This is done on the projects screen in Administration: Figure 63 – Projects Screen The tree on the left hand side shows the projects in the system. Projects can be sub-projects of other projects. Check the ‘Include Archived’ checkbox to see archived projects. Clicking the Add Project button will create a sub-project below the selected project – or at the top level if the ‘All Projects’ node is selected. When a project is selected its details will appear on the right hand side. A project will always belong to a company. A project has a control group and this cannot be changed once this project has actions. The short name field can be used to set a prefix which can be used to auto generate project action numbers (if enabled). For example if we set it as HRDW for the project shown and the auto generate “Project Action Number” feature is enabled then every time a new action is created it will have project actions numbers like “HRDW – 001” where number at the end (001) will be incremented for each new action. The Parent Project dropdown allows you to move the selected project (and the portion of the project tree below it if it has sub-projects) to a different part of the tree. ATMS User Manual 55 The ‘Archived’ option can be used to archive old projects - they are not deleted but will not be shown on the project screen unless the ‘Show Archived’ box is checked. It is important to note that a project can’t be archived unless all of its actions are closed and archived. Figure 64 – Project Roles Project Roles In the project Roles tab you will define who will be the default reviewers and approvers for the actions of this project. You can have up to 6 stages in the approval process, but if you don’t need a stage, just set it to ‘not required’ as shown. Note: Once actions are created for a project then you can’t add or remove roles for that project. For example if final approver for a project is set to “Not Required“ and an action is created for that project then a new “Final Approver” can’t be selected for that project and “Reviewer 1” can’t be set to “Not Required” - however you can select a different person for an existing role. The additional ‘Strategic reviewer’ roles are optional. If you select names in either or both of these roles it will create an additional stage in the action lifecycle as follows: Action creation Strategy creation Strategic review Action 'open' Action review Figure 65 – Strategic Review Stages Previously the action was created and had a state of ‘open’ before being marked as complete and reviewed by one or more people. ATMS User Manual 56 Now you can if you wish have a stage where an action is created but instead of going straight into the normal completion workflow you want someone to indicate a strategy for completion – once this strategy has been created it can be reviewed by up to two ‘strategy reviewers’ who can approve or reject the strategy in exactly the same way as actions are reviewed. Once strategy review is complete the action is ‘open’ and can be completed in the normal way. In the example below we’ve selected a HAZOP planning project which has been set up with some strategic reviewers. Figure 66 – Action with strategic review You can see that because the project has at least one strategic role selected we can now see the strategy fields. There’s an option to select the ‘strategy creator’ – this is the person who you want to describe the strategy for completing the action – it doesn’t have to be the same person who completes the action. The strategic reviewers have been automatically populated from the project roles. ATMS User Manual 57 The strategic review due date is just like the action due date – it indicates the date by which strategy review stage has to be completed (i.e. strategic response provided and reviewed by strategic reviewers). It defaults to 2 weeks after the creation date but you can change it to anything you like. The strategy creator completes the ‘strategic response’ and it then moves through the review process in the same way as a ‘normal’ action does. At any stage the strategic reviewers can reject or add a comment to the strategic response. Rejecting the strategic response will cause the action to revert to the strategy creator who will then have to resubmit the response. After the last strategic review stage has been completed the action becomes live and enters the normal completion and review stage, the actionee completes the action as before and the action reviewers sign it off. A Skip Strategic Response feature is added to strategic review stage which allows reviewing of an action before it is officially ‘assigned/open’ for action response. It is different from strategic review stage because it doesn’t require formulation of Strategic Response. If used, as soon as an action is created it will go to the first strategic reviewer. If he rejects it then it will become a cancelled action. If he approves it then it will go to the second Strategic Reviewer. If he rejects the action then it will be cancelled, if he approves it then it will become open for action response. Project Attachments If you have any attachments relevant to the project ( as opposed to individual actions) you can attach them in the same way as you would attach files to actions - these attachments will be available from the “Attachments” tab on project edit screen and “Project Details” tab on action edit screen. Project Controls Additional information for projects can be stored by customising already provided Project Controls from the controls section. ATMS have various built-in custom controls for projects which are disabled by default and a system admin can enable/disable and customise them to suit their need. To enable a project control, in the ‘Controls’ administration screen, change the ‘Control Category’ dropdown from its default view (‘Action’) to ‘Project’. Here you will see a list of fixed controls as shown. Figure 67 – Project Controls ATMS User Manual 58 You can customise any of these controls by double clicking on it. Here we’ve customised a project control which was originally named as Date1, changing it to store ‘Audit Date’ of the project. You can make this a required field for project edit screen by selecting the required option. Figure 68 – Edit Control Screen If enabled, these custom project controls will appear on the ‘Additional Info’ tab on the Project Screen as shown. Figure 69 – Project Screen Additional Info Tab Project Visibility Project Visibility is where you manage which companies, departments, teams and users can see which projects. This is done on the Project Visibility screen in administration by pulling together the project tree from the projects screen and the organisation tree from the organisation screen. ATMS User Manual 59 Figure 70 – Project Visibility Screen, Organisational Visibility for Project Visibility can be managed in two ways – selecting a project and seeing which parts of the organisation can see it, or selecting an organisation element (company, department, team or user) and seeing the projects that that element can see. Selecting a project on the project tree (‘Hardware’ above) populates checkboxes in the organisation tree to show who can see this project. Solidly-blocked checkboxes show that some checkboxes below this checkbox are checked while others are not. The checkbox for user Becky Morton above is checked and greyed out – she will have been selected as default in a role on the Hardware project, and will always have visibility unless removed on the project roles tab on the projects screen for the Hardware project. Checkboxes on the organisation tree are hierarchical. For instance if you check or uncheck a department checkbox, all the users in that department will check or uncheck also. Similarly, if you check all the users for their parent container (company, department, or team) then that container’s checkbox will also check as you have effectively given visibility to it. This also works for selecting all departments in a company – the company effectively has visibility. When you make changes to organisation visibility, the project tree will be locked until you click either save or cancel, to save the new selections or discard them. Then you will be able to select another project. A note about the ‘All Projects’ node at the top of the Projects tree. Selecting that will tick those elements on the organisation tree that have visibility on all the non-archived projects in the system (the project visibility screen only deals with non-archived projects and users). Checking any organisational elements while on this node will grant visibility to all proejcts as you’d expect. But unchecking someone while on ATMS User Manual 60 this view does not delete all their visibility. They may still have visibility on several sub-projects. This was to prevent unintended deletion of all of someone’s visibility. If you need to prevent a user from seeing any projects, click on that user in the organisation tree and uncheck projects in the project tree. Figure 71 – Project Visibility Screen, Project Visibility for Organisation Selecting a company, department, team or user (‘Becky Morton’ above) populates checkboxes in the project tree to show which projects Becky can see. The checkboxes on the project tree behave slightly differently – checking a project will automatically check all its sub-projects, as a way to save time, but unchecking the parent project will not uncheck all children. This allows for mixed visibility at all levels of the tree. The checkbox for the ‘Hardware’ project is greyed out due to Becky’s role in it as described. When you make changes to project visibility, the organisation tree will be locked until you click either save or cancel, to save the new selections or discard them. Then you will be able to select another project. ATMS User Manual 61 Users Figure 72 – Users Administration Screen This section allows the administration of ATMS users. For large lists of users a surname filter is provided. Users can also be filtered by organisation (company, department or team) and by projects they have visibility on. There is also a text search. To create a new user Click the ‘New’ button. The user screen will be displayed as shown in Error! eference source not found.. Enter the information required in “Details” tab. As ATMS uses email to communicate with users it is vital that a correct email address is entered. Figure 73 – Add User Screen ATMS User Manual 62 User Teams Figure 74 – User Teams Here a user can be assigned to Teams in the system. See the Organisation section for administrating Team memberships per Team. ATMS User Manual 63 User Permissions This tab allows the administrators to define some of the key ATMS user rights which are described below: Figure 75 – ATMS User Permissions Is System Admin? This option is used to set the user as system administrator. If selected, it allows the user to have full control over system. Generally a single point of contact within the organisation is set as system administrator. Can Create Actions If selected, users can be given the authority to create actions but if you don’t give them this right they will still be able to receive actions and complete them but they will not be able to create new actions. Can Edit Custom Report Template If selected, this will allow the user to save and edit report templates in the custom report window. Without this permission set, they can still utilise existing report templates to generate reports. ATMS User Manual 64 Can Create and Edit Projects You may have certain users that you don’t want to give full admin rights too, however you need them to be able to access the projects tab. In this case you should check this box. Can Create and Edit Teams You may have certain users that you don’t want to give full admin rights too, however you need them to be able to access the organisation tab to create and edit teams. In this case you should check this box. Own Company Only This permission works with the create/edit projects permission above to restrict the user to their own company’s projects. Lock ‘Require My Attention’ If selected, user will only be able to see the actions which require his attention, in other words actions which are outstanding on him. Lock ‘Actions Involving Me’ If selected, user will only be able to see the actions in which he/she is involved as creator, owner, reviewer 1, reviewer 2, approver, or final approver. Lock ‘Actions Involving My Company’ If selected, user will only be able to see the actions in which at least one member of his company is involved as creator, owner, reviewer 1, reviewer 2, approver, or final approver. ATMS User Manual 65