1
User Guide
Interact-AS Version 5.0
Enabling Communications for
Everyone, Anywhere, Anytime
Auditory Sciences, LLC • 205 South Water Street • Northfield, MN 55057
t: 507-645-8924 • f: 866-356-6644 • e: [email protected]
.
Copyright © 2014 SpeechGear, Inc.
All rights reserved
This product is protected by U.S. and foreign patents and patents pending including but not limited to
U.S. patents 7,046,137 and 7,359,849.
The software contains proprietary information of SpeechGear, Inc. and Auditory Sciences, LLC.; it is
provided under a license agreement containing restrictions on use and disclosure and is also protected by
copyright law. Reverse engineering of the software is prohibited.
Due to continued product development this information may change without notice. The information and
intellectual property contained herein is confidential between SpeechGear, Inc. and the client and remains
the exclusive property of SpeechGear, Inc. If you find any problems in the documentation, please report
them to us in writing. SpeechGear, Inc. does not warrant that this document is error-free.
No part of this publication may be reproduced, stored in a retrieval system, or transmitted in any form or
by any means, electronic, mechanical, photocopying, recording or otherwise without the prior written
permission of SpeechGear, Inc.
Windows XP®, Windows Vista®, Windows 7®, Windows 8®, Windows Mobile®, Word®, PowerPoint®,
and ActiveSync®, are trademarks of the Microsoft Corporation.
Sections "Advanced Dictation Tips", Appendices B and C, and parts of "Starting Interact-AS" and "Training
a Voice Profile" document the features of Dragon Naturally Speaking™ which is a product of Nuance
Communications, Inc.®
Contents
Chapter 1
Welcome
1
About Interact-AS.......................................................................................................................................... 2
Contact Technical Support ........................................................................................................................... 3
Contact Sales .................................................................................................................................................. 3
Starting Interact-AS ....................................................................................................................................... 4
New English Voice Profile ......................................................................................................................... 11
New Target Language Voice Profile ......................................................................................................... 13
Typographical Conventions....................................................................................................................... 14
Chapter 2
Getting Started
15
Setting Up Your Microphone ..................................................................................................................... 15
Troubleshooting Devices ............................................................................................................................ 18
Keyboard and Digitizer .............................................................................................................................. 19
Adjusting Regional and Language Settings ............................................................................................. 19
Tips for Optimal Performance ................................................................................................................... 22
Overview of Features .................................................................................................................................. 23
Welcome
1
About Interact-AS ........................................................................................................................................... 2
Contact Technical Support ............................................................................................................................ 3
Contact Sales .................................................................................................................................................... 3
Starting Interact-AS ........................................................................................................................................ 4
New English Voice Profile ..................................................................................................................... 11
New Second Language Voice Profile ................................................................................................... 13
Typographical Conventions ........................................................................................................................ 14
Getting Started
15
Setting Up Your Microphone ...................................................................................................................... 15
Troubleshooting Devices ............................................................................................................................. 18
Keyboard and Digitizer................................................................................................................................ 19
Adjusting Regional and Language Settings......................................................................................... 19
Tips for Optimal Performance .................................................................................................................... 22
Overview of Features ................................................................................................................................... 23
Transcription and Translation
25
Switching Languages ................................................................................................................................... 29
Voice Commands .......................................................................................................................................... 33
Advanced Dictation Tips ............................................................................................................................. 35
Using the Transcription Log ........................................................................................................................ 40
Changing Voice Synthesis ........................................................................................................................... 42
Configuration
43
User Options .................................................................................................................................................. 44
Translation Options ...................................................................................................................................... 46
Speech Recognition Options ........................................................................................................................ 48
Voice Synthesis Options............................................................................................................................... 50
Users
51
Creating a New User Configuration .......................................................................................................... 51
Training a Voice Profile................................................................................................................................ 54
Visualize
57
Using Images ................................................................................................................................................. 57
ComposerEditor
59
Main Window................................................................................................................................................ 60
File menu .................................................................................................................................................. 60
Edit menu ................................................................................................................................................. 60
Translation Memory menu .................................................................................................................... 61
Tools menu ............................................................................................................................................... 61
Window menu ......................................................................................................................................... 61
Help menu ................................................................................................................................................ 61
Creating a New Composer Domain ........................................................................................................... 61
Opening a Composer Domain .................................................................................................................... 65
Importing and Exporting Composer Domains ......................................................................................... 66
Editing Composer Domains ........................................................................................................................ 68
Acronym Expansion ..................................................................................................................................... 70
Loading or Unloading a Domain ................................................................................................................ 72
Glossary
75
Appendix A
77
NATO Alphabet ...................................................................................................................................... 77
Appendix B
79
Setting up Microphone Audio ............................................................................................................... 79
Appendix C
83
Training a Voice Profile .......................................................................................................................... 83
Appendix D
86
End User License Agreement ................................................................................................................ 86
Index
i
1
Chapter 1
Welcome
This document is designed to help get you started using the Interact-AS program.
The manual is divided into the following sections:
Getting Started (on page 17)
Translation (see "Transcription and Translation" on page 27)
Configuration (on page 45)
Users (on page 53)
Visualize (on page 59)
ComposerEditor (on page 61)
In This Chapter
About Interact-AS .............................................................................................. 2
Contact Technical Support................................................................................ 3
Contact Sales ....................................................................................................... 3
Starting Interact-AS ........................................................................................... 4
Typographical Conventions ........................................................................... 15
2
Interact User Guide v4.0 User's Guide
About Interact-AS
Interact-AS is an interactive language transcription and translation program that supports
conversational, continuous free speech. In its basic configuration whatever is spoken is
transcribed and displayed on the screen, and whatever is written or typed is spoken out
loud. This allows an individual that is deaf or hard-of-hearing, or someone who does not
have the ability to speak such as a person who has recently had a stroke, to hold
conversations with someone who does not know sign language. Interact-AS also gives you
the option of instantly translating conversations into a second language. If you purchase an
optional translation module, then whatever is spoken, typed or written in English will be
instantly translated and displayed and spoken in the desired foreign language; and
whatever is spoken, written or typed in that second language will be instantly translated
and shown and spoken in English. In all cases, Interact-AS generates a complete transcript
of the conversation that you can save for future reference. Human interpreters, dictionaries,
or memorization of pre-recorded phrases are not required.
How does Interact-AS work?
Interact-AS is based on the Interact-AS product developed by SpeechGear, Inc. SpeechGear
has developed a line of products that remove language barriers by instantly translating
conversations and documents; Auditory Sciences, LLC. is a subsidiary of SpeechGear that
is extending these products to support individuals that are deaf or hard-of-hearing or
otherwise are unable to speak.
Interact and Interact-AS use the latest voice recognition, machine translation, and speech
synthesis technology to remove communication barriers. During voice detection, the
system uses the surrounding context to correctly identify similar-sounding words, such as
"right" and "write". With continued use, the system adapts to your voice and the
translation improves even further. The real-time transcription and translation means that
errors, such as misspeaking or idiomatic phrases with no meaningful translation, can be
detected and corrected immediately. You can also rephrase and retranslate right after
translation has occurred.
Interact-AS also has a speech based user interface allowing you to speak commands. This
enables a complete hands-free interface that supports situations such as a teacher talking to
a class room of students, or people speaking in a conference room.
Welcome
3
How does Interact-AS differ from other language translation
dictionaries?
Other comparable voice-based translators rely on the user speaking a fixed set of phrases,
each of which corresponds to a pre-recorded translation. This method works only if you
don't need to translate more than you can memorize and as long as someone else
anticipates exactly what you need to say. SpeechGear understands that communication is
often unpredictable and this type of interpretation is not practical for real-life situations. If
you want the freedom to literally say any combination of words and transcribe and
translate what you say in real-time, Interact-AS is your solution.
Interact-AS supports bi-directional translation from English to the following languages:
Spanish, French, German, Italian, Dutch, Mandarin Chinese, Iraqi Arabic, and Modern
Standard Arabic (MSA).
How do I find out about related products?
Interact and Interact-AS are part of SpeechGear's Compadre™ product line. Compadre™'s
wide range of products work together to form a complete solution for all your interactive
language-translation needs. Visit http://www.speechgear.com/
(http://www.speechgear.com/) to learn more about these products.
Contact Technical Support
Contact Customer Support if you have questions about how to use this application or if
you are experiencing technical difficulties.
Start with the web site. There are FAQ and Release Notes that may have your question
answered.
1) Web: http://www.speechgear.com/support.aspx
2) E-mail: [email protected]
Contact Sales
To help us improve our products, we encourage you to provide us with feedback about this
guide or the product. Please contact us with any questions or comments you may have
regarding this product.
Auditory Sciences, LLC.
205 South Water Street
Northfield, MN 55057
E-mail: [email protected]
4
Interact User Guide v4.0 User's Guide
Starting Interact-AS
In order to use Interact-AS you need a User Configuration which keeps track of the speech
recognition settings for yourself (Source) and the settings of the speaker with whom you
will be talking (Target). When you start Interact-AS for the first time, the New User Wizard
launches to help you create these settings.
You have two options for choosing the Voice Profiles to use for both the Source and Target
speakers:
Create a new profile (recommended), which allows you to select your own preferred
settings.
Use a default profile, which uses preset microphone settings and speech recognition.
After you specify which profiles to use, anytime you start Interact-AS later, you can the
system without going through the setup process again.
To start Interact-AS
1) From your desktop, double-click the Interact icon.
NOTE: If you do not see the Interact icon on your desktop, click the Start button, point
to All Programs, point to SpeechGear, and then click Interact.
The Interact launch window appears. Wait for the program to load.
2) If this is your first time using Interact, the New User Wizard will launch to help you
configure voice recognition settings.
Click Next.
Welcome
5
3) The Name screen appears (Step 2 of 7).
Enter a name. This name will be used to identify your User Configuration.
NOTE: The name you choose must not contain special characters such as *<>/. Use
alphanumeric (letters or numbers) characters only. Spaces, hyphens, and underscores
are acceptable. Choose a name that is not in use for any other User Configuration.
NOTE: If your version of Interact-AS supports multiple languages you will be better
able to distinguish between supported languages if the target language is identified in
the name you provide. Example: John - Spanish
Click Next.
6
Interact User Guide v4.0 User's Guide
4) The Select Your Languages screen appears (Step 3 of 7).
NOTE: If there is only one available language in the drop-down list, it will be
pre-selected for you.
a) Click the language drop-down list, and select the language you will be using
(English).
b) From the second language drop-down list, select the language the other person will
be speaking. If you have not purchased a translation module, then only "English"
will be shown.
c) Click Next.
Welcome
7
5) The Select Your Profiles screen appears (Step 4 of 7).
NOTE: A profile refers to the settings Interact-AS uses to recognize each person's voice
when they speak into the microphone. Interact-AS includes a default voice profile that
individuals can use, but we recommend that you create your own custom voice profile.
Click the voice profile drop-down list, and select the voice profile that the person who
is speaking will be using for speech recognition
Click Add (
) to create a new voice profile see New English Profile (see "New
English Voice Profile" on page 11).
a) After your preferred voice profiles are loaded, click Next
NOTE: You will not be able to click Next until you have made your selection.
8
Interact User Guide v4.0 User's Guide
6) Microphone Setup (Step 5 of 7)
For each new Voice Profile that is created, Interact-AS will require you to setup the
microphone input levels.
b) Click Setup (
) and follow the directions on the screens. If you need help see
Appendix B (on page 81). Be patient while the Microphone Setup wizard launches.
c) Repeat this process for all voice profiles you created.
d) When you have finished setting up the microphone for both new voice profiles,
then click Next.
NOTE: You will not be able to click Next until you have run microphone setup for each
voice profile you created.
Welcome
9
7) Voice Profile Training (Step 6 of 7)
Once the microphone levels are setup, Interact-AS will prompt you to train your Voice
Profiles to the voices that will be using them.
e) Click Train (
) and follow the directions on the screens. If you need help see
Appendix C (on page 85). Be patient while the training wizard launches.
f)
Repeat this process for all voice profiles you created.
g) When you have finished training the profile(s), then click Next.
NOTE: You will not be able to click Next until you have trained each of the voice
profiles you created.
10
Interact User Guide v4.0 User's Guide
8) The Finished screen appears.
Click Finish.
The selected profile loads.
9) The Tip of the Day window appears. You can browse through the available tips, or
click Close to view the Interact-AS Translation window.
Welcome
11
New English Voice Profile
Continued from step 5 of Starting Interact-AS (on page 4)
To Create a new English Voice Profile
h) From the Voice Profile selections screen (step 4 of 7), click Add next to the English
voice profile drop-down list.
The Create Profile window appears.
i)
Enter a name for the profile, and click OK.
The Audio Setup Wizard –Step 1 of 3 appears.
j)
Position your microphone. 1
12
Interact User Guide v4.0 User's Guide
Follow the onscreen example for how to best position your microphone. Proper
positioning of the microphone can greatly increase the accuracy of voice
recognition. If the microphone is out of place, Interact-AS may not be able to hear
you clearly and may make more mistakes. Consistent position is also important.
Make sure that you position the microphone the same way each time you use
Interact.
Headset microphones: Position the microphone about a half-inch (approximately
the width of your thumb) from your mouth and a little off to the side. The
microphone should not touch your mouth, but it can be almost touching your lips.
If the volume display turns red, try holding the microphone slightly further from
your mouth.
If you need to move the microphone out of the way, you can lift the "boom" up and
over your head, rather than bending it out of position or removing the headset.
Handheld microphones: Although the wizard shows the use of a headset, the same
guidelines apply when using a handheld microphone, except you should hold the
microphone about an inch (two fingers'-width) away from your mouth, a little off
to the side and speak directly into the top of the microphone, not across it. If you
are using a handheld microphone and it is equipped with an on/off switch, be sure
to turn on the microphone before proceeding.
k) Check microphone volume.
When the Adjust Your Microphone: Volume Check screen appears, click the Start
Volume Check button, and then read aloud the text shown in the box. When the
program beeps to indicate it has finished checking the volume, click Next. If you
need more help with this step, see Appendix B (on page 81).
NOTE: For best results, wait 3-5 seconds after you press the button before you start
to read aloud.
l)
Check audio quality.
When the Adjust Your Microphone: Quality Check screen appears, click Start
Quality Check and then read aloud the text shown in the box. When the program
beeps to indicate it has finished checking the quality, click Next. If you need more
help with this step, see Appendix B (on page 81).
NOTE: For best results, wait 3-5 seconds after you press the button before you start
to read aloud.
You will return to the New User Wizard.
Skip back to step 6 of Starting Interact (see "Starting Interact-AS" on page 4)
Welcome
13
New Second Language Voice Profile
Continued from step 5 of Starting Interact-AS (on page 4)
To Create a new Voice Profile for the speaker in the Second language
m) From the Voice Profile selections screen (step 4 of 7), click Add next to the Target
(e.g. Spanish) profile drop-down list.
The Create Profile window appears.
n) Enter a name for the other speaker's profile, and click OK.
The Audio Setup Wizard –Step 1 of 3 appears.
o) Give the microphone to the other speaker (if sharing a microphone), or tell the other
speaker to turn on his or her microphone (if using two microphones).
The Audio Setup Wizard –Step 1 of 3 appears.
p) Have the other speaker complete the onscreen instructions for positioning his or her
microphone, checking microphone volume, and checking sound quality.
q) When finished with set up, tell the speaker to pass the microphone back to you
(if sharing a microphone).
14
Interact User Guide v4.0 User's Guide
You will return to the New User Wizard.
Skip back to step 6 of Starting Interact-AS (see "Starting Interact-AS" on page 4)
Typographical Conventions
The following kinds of formatting in the text identify special information.
Formatting Convention
Type of Information
To . . .
Step-by-step procedures. You can follow these
instructions to complete a specific task.
NOTE:
Tips or special instructions.
Special Bold
Denotes a description or a menu option or label.
Button
Denotes actiKey combinations for which you must
press and hold down one key and then press another,
for example, CTRL+P, or ALT+F4.on. Refers to items
you must select, such as menu options or command
buttons.
Used to emphasize the importance of a point or for
variable expressions such as parameters.
Emphasis
or
Identifies a dialog box, tab, or other interface item.
CAPITALS
Names of keys on the keyboard. for example, SHIFT,
CTRL, or ALT.
KEY+KEY
Key combinations for which you must press and hold
down one key and then press another, for example,
CTRL+P, or ALT+F4.
15
Chapter 2
Getting Started
If this is your first time using Interact-AS, use this section to help set up your system so you
can begin translating.
In This Chapter
Setting Up Your Microphone ......................................................................... 17
Troubleshooting Devices ................................................................................ 20
Keyboard and Digitizer ................................................................................... 21
Tips for Optimal Performance........................................................................ 25
Overview of Features ...................................................................................... 26
Setting Up Your Microphone
Before you can use Interact-AS, you need to set up a microphone so Interact-AS can hear
your voice. Interact-AS supports a variety of microphone configurations. Several options
are described here.
NOTE: For best results, set up your microphone before you turn on your computer.
16
Interact User Guide v4.0 User's Guide
NOTE: An analog adapter is required for computers that do not support a "mic in" (mini
jack) port. One end of the adapter is connected to the analog end of the mic cable. The other
end of the adapter connects to the USB port on the computer.
Microphone Option 1 (preferred)
One handheld microphone (shared) with analog (mini-jack) connector.
The example below shows one Shure handheld microphone, model SM58S, with a thumb
switch. A mic cable plugs into the base of the microphone and the other end of the plug
connects to the "mic in" (mini jack) port on the computer.
Microphone Option 2
One handheld microphone and one analog (mini-jack) headset.
The example below shows one Shure handheld microphone, model SM58S, with a thumb
switch. A USB adapter plugs into the base of the microphone and the other end of the plug
connects to a USB port on the computer. The analog headset is plugged into the "mic in"
(mini jack) port on the computer.
Chapter 2
Getting Started
17
Microphone Option 3
Two USB microphones (or one microphone shared between both speakers).
The example below shows two Shure handheld microphones, model SM58S, which has a
thumb switch. A USB adapter plugs into the base of each Shure microphone and the other
end of the plug connects to a USB port on the computer. Using two microphones requires
two available USB ports on the computer.
Microphone Option 4
One analog (mini-jack) headset.
The example below shows an analog headset plugged into the analog "mic in" (mini jack)
port on the computer.
18
Interact User Guide v4.0 User's Guide
Troubleshooting Devices
It is very important that you have your computer set up to recognize input from your
microphone and play back sounds through your speakers. You must make these settings in
the appropriate Control Panel and make sure that the settings in Interact-AS are the same.
Windows XP: Start > Control Panel > Sounds and Audio Devices > Audio tab
Under Sound playback, select your computer's internal sound card. This will ensure
that sounds get played back through your computer's speakers.
Under Sound recording, choose the type of microphone that you are using.
Windows Vista: Start > Control Panel > Classic View > Sound
On the Playback tab, choose your computer's internal speakers. This will ensure that
sounds get played back through your computer's speakers.
On the Recording tab, choose your microphone input type.
Note: If you need more help with these Control Panels then open Microsoft Windows
Help and search for "Sound".
Interact-AS will use the speaker setting that you made in the Control Panel. It does not
have any way to change the speakers that you are using.
There are two places inside Interact-AS where you can associate the type of microphone
with a Voice Profile. Both are reached by the Speech Recognition tab of the Configure
screen.
10) Each Voice Profile has an Input Device selection listed below the Voice Profile name.
11) Every time you Set the Microphone Input Levels, the wizard will ask you to choose a
sound system.
These both must match the settings that you have made in the Control Panel.
Unplugging from the PC or switching microphones while using Interact-AS may cause
input problems. If a USB microphone accidentally becomes unplugged during use, follow
these steps to recover an unplugged device.
To recover an unplugged device
12) Plug in the microphone again.
13) Click the Configure button from the Interact-AS main menu.
Interact-AS updates its list of plugged in audio-input devices when you open the
Configure screen.
14) Click the Speech Recognition tab.
15) Select the appropriate input device from the drop-down list for the device you want to
use.
Chapter 2
Getting Started
19
16) Go back to the Translate screen.
17) When asked to save configuration settings, click Yes.
NOTE: Occasionally the Speech Recognition will fail to load after this process. If that
happens, go back to the Configure tab, reselect the appropriate Voice Profile and input
device, and select the Translate screen again.
Keyboard and Digitizer
Interact-AS gives you the option to use the standard keyboard to enter text as an alternative
to voice recognition. Computers equipped with Microsoft Windows XP or Vista Tablet
Edition also allow you to enter text using either the standard or digitizer keyboard, or
handwriting recognition to enter text as an alternative to voice recognition. This is
particularly useful when users need quiet or privacy, when they are unable to speak for
any reason, or Interact-AS has difficulty recognizing their voice or dialect.
Adjusting Regional and Language Settings
To add languages and display the Language Bar for Vista
18) Click the Start menu, and click Control Panel.
19) Click Clock, Language, and Region.
20) From the Regional and Language Options area, click Change Display Language.
The Regional and Language Options window appears.
21) From the Keyboard and Languages tab, click Change Keyboards.
The Text Services and Input Languages window appears.
22) Click the Language Bar tab.
23) Select the Docked on the Taskbar option.
24) Click the General tab.
25) Click Add.
26) Select the language(s) to add to the Language Bar, and click OK.
The default language icon should appear in your desktop taskbar next to your date /
time information.
27) Click OK, and close the Control Panel.
20
Interact User Guide v4.0 User's Guide
To add languages and display the Language Bar for XP
28) Click the Start menu, and click Control Panel.
29) Double-click Regional and Language Options.
The Regional and Language Options screen appears.
30) On the Languages tab, under Text services and input languages, click Details.
31) Under Preferences, click Language Bar.
32) Select the Show the Language bar on the desktop check box.
33) Click Add.
34) Select the language(s) to add to the Language Bar, and click OK.
The default language icon should appear in your desktop taskbar next to your date /
time information.
35) Click OK, and close the Control Panel.
To type in non-English characters with the Standard Keyboard
36) In the text input window, use the mouse to place the cursor in the English recognition
area, and then use the keyboard to type English characters.
English text will appear in the English text box as you type.
37) Translate when ready.
38) When you are ready to type in another language, change the keyboard mode to another
language using the Language Bar.
NOTE: The available languages in the Language Bar will vary. To add more languages,
use the steps on the previous page (To add languages and display the Language Bar).
Vista:
XP:
To use the Digitizer Keyboard – Tablet PC Edition Only
39) Set the keyboard mode to "EN" (English).
Chapter 2
Getting Started
21
40) Select the onscreen digitizer keyboard from the Tablet System Tray at the bottom of the
screen.
41) Use the mouse to place the cursor in the English text input area, and then use the
keyboard to type English characters.
42) Translate when ready.
43) When you are ready to type in another language, change the keyboard mode to another
language using the Language Bar.
NOTE: The available languages in the Language Bar will vary. To add more languages,
use the procedure above (To add languages to the Language Bar).
44) Select the onscreen digitizer keyboard from the Tablet System Tray at the bottom of the
screen.
45) Use the mouse to place the cursor in the target language text input area, and then use
the keyboard to type non-English characters.
To use Handwriting Recognition – Tablet PC Edition Only
NOTE: Handwriting recognition can be used only for English text.
46) Select the onscreen digitizer input from the Tablet System Tray at the bottom of the
screen.
47) Use the mouse to place the cursor in the English text input area, and then use the stylus
to write English characters.
Click the Insert button to place the text in the English text input area.
22
Interact User Guide v4.0 User's Guide
Tips for Optimal Performance
The rest of this guide will help you learn how to perform specific tasks. For general
performance tips, use the following list as a guideline to help you optimize your experience
with Interact-AS and to help prepare foreign speakers for the translation process.
Set expectations with the speakers who are unfamiliar with Interact-AS to know that
translations may not always be perfect.
For best performance, we recommend that ALL speakers use a voice profile that is
trained to their voice.
Use the "Show New User Video" voice command to quickly show a foreign speaker
how to use Interact. You can also access this video by clicking Help > Show
Introductory Video from the Interact-AS main menu.
Use the Help button if you have questions during translation or setup.
Position the microphone not too close and not too far away from your mouth. The
correct position is one half-inch from your mouth (approximately the width of your
thumb).
Hold the microphone steady when speaking.
Speak clearly and concisely, but not too slowly.
Avoid using slang or extraneous words or pauses like "umm," or "you know".
Speak in grammatically correct sentences to produce more accurate translations. Think
about what you want to say before you say it.
Repeat a phrase or sentence in the same utterance (before translating), using different
words that mean the same thing to clarify a point. This idea of repetition before
translating can speed up the communication process, especially when asking questions.
Vocalize punctuation (commas, periods, question marks) where appropriate to
produce more accurate translation for longer sentences or multiple sentences in the
same utterance. For example, at the end of a question, you can say, "question mark,"
and "?" will appear in the recognized text area. Although this step is not required, it can
enhance the quality of the communication.
Use NATO alphabet ("delta" = D, "echo" = E, "alpha" = A) to spell words or say things
like license plate letters and numbers. See Appendix A (on page 79).
Verify and clear text if recognition is inaccurate BEFORE translating.
Use "thumbs up" or "thumbs down" hand signals if a translation or recognition is not
understood by you or the other speaker.
Chapter 2
Getting Started
23
Overview of Features
Interact-AS contains the following features on the main menu of the Translation window:
Button
Description
User:
To use Interact, you must create a User Configuration. You will
use these settings to tell Interact-AS which languages to translate,
which voices to use for synthesis, how to recognize speech, and
other user preferences.
Translate:
After you have created a User Configuration, you can begin
speaking from the Translate window. When Interact-AS
recognizes your voice, the recognized text will appear in the
appropriate text window. Upon translating the input, the
translated text will appear on the screen and translated audio will
play back through your headset or speakers.
Configure:
The Configure window allows you to adjust the translation
settings that make up a User Configuration.
Visualize:
The Visualize window allows you to view a movie or image
within Interact-AS to support your spoken message.
Help:
The Help menu allows you to launch the Interact-AS Help file,
watch a new user introduction video, display the Tip of the Day
screen, or view the product licensing and version information.
25
Chapter 3
Transcription and Translation
The Interact-AS Translation window allows you to translate words and display the
resulting text on the screen. Depending on your configuration options, you can
hear a spoken translation and generate a written log of the translated words and
even change the spoken translation voice to match a particular gender. If you have
purchased a translation module, you can choose to have the input text translated
into a second language. If you have not purchased such a module, then the text in
both boxes will be displayed in English.
In This Chapter
Switching Languages....................................................................................... 31
Voice Commands ............................................................................................. 35
Advanced Dictation Tips ................................................................................ 37
Using the Transcription Log ........................................................................... 42
Changing Voice Synthesis .............................................................................. 44
Interact-AS can operate by using voice commands, by clicking buttons, by typing text on
the screen, and if you have a tablet PC by writing on the screen, or any combination of
these methods.
The main interface is accessed by clicking on the "Translate" button, which is highlighted in
the figure below. This interface consists of three main boxes: the top box is owned by the
person who does not have the ability to speak; the second box is owned by the other
individual participating in the conversation; and the third box keeps a transcript of your
conversation that you can save for future reference.
When you have entered a phrase, you can review it to make sure that is entered correctly. If
you want to edit your phrase you can do so (we'll show you how to do that later in this
section). Once the phrase is correct, then click the Translate button and the text will be
displayed in the other person's box where it can be read by the other individual and, if
desired, spoken out loud.
26
Interact User Guide v4.0 User's Guide
In the following figure, the first person has either typed or written, "Can I help you?" and
then clicked the Translate button allowing the second person to hear the phrase spoken out
loud. The second person has responded by speaking, "Yes, thanks, I'd like to know more
about this bicycle." When the second person clicks on the Translate button, that text will
appear in the top box where the first person can read the phrase and respond
appropriately.
If you have purchased a translation module, then when you click Translate whatever you
enter in English in the top box will be translated and shown in the bottom box in the second
language; and whatever the second person enters in their native language will be
translated and shown in the top box in English.
Chapter 3
Transcription and Translation
27
NOTE: The following instructions apply to the default user options. To change the default
settings, see User Options (on page 46).
To transcribe and translate with Interact-AS
48) For individuals who cannot speak, you can enter text by typing, or if you have a tablet
PC, by writing. This is done in the top box of the user interface. To do this, click in the
top box to activate it. When it's activated, it will be highlighted in a green border as is
shown in the following figure. Then type the text you would like to be translated and
spoken out loud. Alternatively, if you have a tablet PC, touch the stylus into the box
and a writing pad will appear where you can enter text by writing directly on the
computer's screen. It is suggested that you use the "tools" feature of the writing pad to
dock it at the top of your computer's screen.
49) The bottom box supports the same ability to enter text as the top box, plus the ability to
recognize speech. For speech input, first make sure your microphone(s) is plugged in.
50) To tell Interact-AS that you want to use speech input, say "Start Listening," or click the
microphone button on the left side of the recognition area. Speech recognition is
enabled when you see the volume bars change from gray to color.
NOTE: If you click the button again, you will disable speech recognition. You might
want to disable recognition during breaks or when passing the microphone to another
person to avoid picking up unwanted sound. Enable speech recognition when ready to
speak again.
If you are using a microphone with an on/off switch, turn the switch on and off as
needed, while leaving the onscreen button enabled.
51) Begin speaking into the microphone. As you speak, Interact-AS will recognize your
voice and display the words in your text box.
28
Interact User Guide v4.0 User's Guide
NOTE: You can also type the words into the recognition area.
If Interact-AS did not recognize your words correctly, you can delete the text from the
screen and try again using any one the following options:
Press the Delete button (
).
Say "Clear" to clear the entire block of text. (Works only with English recognition,
not other languages.).
52) When you are ready for the second person to see your text, click the Translate button
in the middle of the screen, or say "Translate."
NOTE: The ability to speak command words must be enabled on the Configuration
screen. Voice Commands currently are available only when English recognition is
enabled.
Chapter 3
Transcription and Translation
29
The translation will appear in the top box and a log of the translation will appear in the
Transcription Log area.
NOTE: If you want to repeat a spoken translation, you can click the Play button (
next to the translated text. To automatically play speech synthesis or to change the
spoken voice, see the Configuration Options.
)
Switching Languages
If you are using Interact-AS to support a running conversation with someone who does not
speak the same language, you may frequently want to switch between language directions
so that the other person can speak into the microphone and translate back to you.
To switch language directions
53) From the Translation window, stop speaking.
54) Say "Switch Direction," or click the microphone button to the left of the language box
to enable speech recognition.
55) Pass the microphone to the other person (if sharing a microphone), or make sure the
other person's microphone is turned on (if using two microphones).
The new language will appear highlighted.
30
Interact User Guide v4.0 User's Guide
NOTE: The text in the recognition area will already be cleared. If it's not, click the
Delete button (
).
56) Prompt the speaker to begin speaking.
As the person speaks, the target language text should appear in the appropriate box on
the screen.
57) The person should verify what was said with the thumbs up or thumbs down hand
signal.
Thumb's down: Click the Delete (
) to clear the text and have the speaker try
it again.
Thumb's up: The speaker's text was recognized accurately.
Chapter 3
Transcription and Translation
31
58) When ready to translate the text, click the Translate button in the middle of the screen.
32
Interact User Guide v4.0 User's Guide
The translation will appear in the English language recognition area. A spoken
translation will be played back and a log of the translation will appear in the
Transcription area.
NOTE: If you did not hear a spoken translation, you can click the Play button (
)
next to the translated text. To automatically play speech synthesis or to change the
spoken voice, see the Configuration Options.
Chapter 3
Transcription and Translation
33
Voice Commands
Interact-AS will let you use your voice to do certain tasks in lieu of using the keyboard or
mouse. These commands are available only in English and only when you are on the
Translate screen.
If your system doesn't seem to recognize voice commands, make sure the Enable Voice
Commands option is selected in the User Options window User Options (on page 46).
To view the command word list
59) From the Translation window, either click Help > Available Voice Commands, or
speak: "What can I say?" A command word list window appears.
The full list of commands will be available only when the English speech recognition is
enabled. A subset of this list is available when English speech recognition is disabled.
You can keep the command list window open while you translate.
60) To use voice commands during translation, pause for a short time, speak a command
word and follow again with a short pause.
34
Interact User Guide v4.0 User's Guide
Command Word
Action Taken
Translate
Translates current contents of
the English recognition area.
Speak Native
Speaks current contents of the
English recognition area.
Clear All
Clears the contents of all text
boxes.
Clear Log
Clears the Log box.
Switch Direction
Switch language directions to
begin speaking in the target
language.
Sleep
Turns off speech recognition.
(The audio meter & microphone
button turn to gray.)
Auto Translate
Turns on automatic translation.
Manual Translate
Turns off automatic translation.
What Can I Say?
Opens the list of command
words.
Exit Interact
Closes the application.
Enable Log
Turns on the log.
Disable Log
Turns off the log.
Maximize Window
Maximizes the Interact-AS
window to fill your entire screen
area.
Minimize Window
Minimizes the Interact-AS
window to your Task Bar.
Enable Translation
Synthesis
Turns on the voice that speaks
the target language text upon
translation.
Equivalent Onscreen
Click in the text area or
the Microphone button
of the Inactive
Language Control.
Help > Available Voice
Commands
(none)
Chapter 3
Transcription and Translation
35
Command Word
Action Taken
Equivalent Onscreen
Disable Translation
Synthesis
Turns off the voice that speaks
the target language text upon
translation.
(none)
Enable Native
Synthesis
Turns on the voice that speaks
the native language text upon
translation.
(none)
Disable Native
Synthesis
Turns off the voice that speaks
the native language text upon
translation.
(none)
Restore Window
Returns a minimized window to
the size it was last shown
onscreen.
Click the application
from the Task Bar.
Hide Command
Window
Removes this pop-up window
from the screen.
(On the Available
Voice Commands
Window)
Show User Manual
Opens Interact-AS Help.
Help > Manual or F1
Show New User
Video
Opens the new user video
tutorial.
Help > Show
Introductory Video
Enable Continuous
Repeat
Turns on the function that
repeats what you say until there
is a different input to translate.
Advanced Dictation Tips
To Use the Results Box
Remember to click in the window of the language you want to use before you speak. Start
talking. As you talk, text displays in the Results box while Interact-AS figures out what you
said. The Results box is a small yellow window that appears on-screen as you dictate. The
words in the Results box may change as the program considers different interpretations of
what it heard.
36
Interact User Guide v4.0 User's Guide
To Dictate Punctuation and Line Breaks
You can dictate punctuation at any time while you are using Interact.
To Add…
Say…
,
"comma"
.
"period"
!
"exclamation point"
?
"question mark"
-
"hyphen"
:
"colon"
;
"semicolon"
To Correct Text Using Voice Commands
There are a number of ways you can correct the misrecognized words or phrases. The
following technique uses voice commands to open the Correction menu.
61) Say "Select" or "Correct."
The Correction menu appears. The Correction menu shows Interact's best guess of the
alternatives to the words you dictated and selected. In the following example,
Interact-AS heard the word "quick" as "clinic."
62) If an alternative is correct, say "Choose" and the number of that alternative. In this
example, you would say "Choose 2."
63) If none of the alternatives is correct, say "Spell That," spell the correct word or words
into the Spell window, and then click "OK" In this example, say "Spell That q-u-i-c-k."
NOTE: Selecting a large amount of text or an entire transcription, and then saying
"Spell That" can produce unpredictable results and is not recommended.
Chapter 3
Transcription and Translation
37
To Use Select-and-Say®
You can revise your dictation without correcting it by selecting the text using the "Select"
command and then saying new words to replace the selected text.
64) Dictate the sentence below:
Let's meet for lunch on Tuesday [period]
65) Say "Select lunch on Tuesday."
The words "lunch on Tuesday" should be highlighted on the screen.
66) Say "dinner on Wednesday."
These words should replace "lunch on Tuesday." Because "Tuesday" and "Wednesday"
sound completely different, Interact-AS will know you are not correcting a recognition
mistake but rather revising your dictated text.
67) Say "Select period." If there's more than one period, you can say "Select Again" to
select a different one.
68) To replace the period or full stop with an exclamation mark, say "exclamation mark."
NOTE: It is often easier for Interact-AS to find the matching text if you select a short
phrase rather than individual words. If you select some words that are already correct,
just say them again along with the ones you want to change.
38
Interact User Guide v4.0 User's Guide
To Select the same text again
If the words you're trying to select appear more than once on the screen and Interact-AS
selects the wrong ones, just say "Select Again." The program then looks for another
instance of the same word or words.
You can also say "Select Again" if Interact-AS selects a word that sounds like the word you
want, but is not the correct one (for example, "two" instead of "too").
To Unselect words
If the wrong text is selected, say "Unselect That." You can also "unselect" words by moving
your insertion point by clicking the mouse at another point of your transcription.
To Select a longer phrase
You can select a longer phrase by saying "Select [text] Through [text]." For [text], substitute
the actual word or words at the beginning and the end of the range of wrong words. For
example, you could correct the selected words in the following sentence:
With a little practice, who will develop a habit of dictating an unclear, steady voice, and the
computer will understand you better.
by saying:
"Select who Through unclear" or "Select who will Through an unclear"
Then dictate the correct text:
"you will develop the habit of dictating in a clear"
The final corrected sentence reads:
With a little practice, you will develop the habit of dictating in a clear, steady voice, and the
computer will understand you better.
NOTE: If you're correcting more than one word, the words must all be in sequence (next to
each other). You can't use a single command to correct words that are in different parts of
your transcription.
To Select a Word or Character
You can select the current word by saying "Select Word." To select a character, say "Select
Next Character" or "Select Previous Character." You can also select a number of words or
characters (up to 20). For example, say "Select Previous 2 Words."
Say…
Then…
Then…
"Select"
"Next"
"Word"
Chapter 3
Say…
Transcription and Translation
Then…
Then…
"Previous"
"2…20 Words"
"Forward"
"Character"
"Back"
"2…20 Characters"
39
"Last"
To Delete Specific Words
You can delete text by selecting it and saying "Delete That." You can also say "Scratch
That" to do the same thing.
To Spell As You Dictate
With the Spell command in Interact, you can easily spell a word or phrase you want to
dictate into your transcription. This can be useful if you are dictating a word that is not
likely to be in the Interact-AS vocabulary, such as a proprietary term, a proper name, or a
non-English word. Say, for example, "Spell b-u-o-n space g-i-o-r-n-o." The word you
spelled appears right in your transcription.
You must say "Cap" if the word contains a capital letter. For example, say "Spell Cap
R-u-m-p-e-l-s-t-i-l-s-k-i-n" to type "Rumpelstilskin."
If you say "Spell" by itself, without any letters after it, the Spell window opens. You can
then speak the letters and Interact-AS will type them or you can correct any errors in the
word you spelled. When spelling, you can say numbers and special characters as well as
letters. For example, to dictate an automobile license plate number, you could say "Spell
y-h-m-6-0-9." Interact-AS would type "yhm609." Say "Spell
Cap-m-a-c-Cap-m-i-l-l-a-n-trademark" to get "MacMillan™" in your transcription.
Spelling a word adds that word to the active vocabulary. Words that contain numbers are
not added to the vocabulary.
NOTE: To dictate unusual text such as automobile license plate numbers or product codes,
you can also switch to Spell mode by saying "Switch To Spell Mode," and then dictate
letters.
You can also access the Spell window when using the "Select" or "Correct" commands.
40
Interact User Guide v4.0 User's Guide
Using the Transcription Log
The Log records all translations that Interact-AS performs. Use the Log Display Options to
determine what information to track in a log entry. You can save log files and then re-load
them when you are ready to do another translation session. All log entries saved will be
appended to the end of the original log file.
To start a new transcription log
69) From the Interact-AS main menu, click the Configure button.
70) Verify that the following Log Settings are selected from the User Options tab User
Options (on page 46).
Enable Log
Show Timestamp (optional)
Show Native Text (optional)
Show Translated Text (optional)
71) Click the Translate button to save the configuration and return to the Translation
window.
72) Begin translating.
When Interact-AS translates text, a log entry appears in the Transcription Log area.
To save a log file
73) Click the Save Log File button (
). The Save As window appears.
74) Enter a name for the log file in the File Name box.
75) Choose the format in which to save the log file.
Plain text files (*.txt): Saves the contents of the log as a tab-delimited text file. A
text file is useful if you want to open and/or print the log file using another
program (for example, Microsoft Excel or Microsoft Word).
Compadre Interact-AS Log (*.cil): Saves the contents of the log as an Interact-AS
log file. You can only use files of this type with Interact.
Chapter 3
Transcription and Translation
41
Rich text files (*.rtf): Saves the contents of the log as a tab delimited Rich Text
Format document that can be opened directly in MS Word or WordPad
76) Click Save.
To load an existing log file
77) Click the Load Log File button (
).
The Open File window appears.
78) Select the log file you want to load.
The file must be in Compadre:Interact™ Log file format (.cil).
79) Click Open.
The selected file loads in the Log Content area on the Translation window. As you
translate, new translations will appear at the end of the text from the loaded file. The
new translations will be appended to the contents of the originally-loaded log file when
you save the file.
To clear the log contents
Click the Clear Log button (
).
The contents of the Log Content area are removed, and a pop-up window appears to
ask if you if you want to save the log file.
Click no if you want to permanently delete the log content.
Click yes if you want to save the log content to a file.
To recover a cleared log
80) If you want to recover a loaded or previously saved log file, click the Load Log File
button (
) to re-load the same file.
81) If you saved the log file prior clearing the log, re-load the newly created log file.
42
Interact User Guide v4.0 User's Guide
Changing Voice Synthesis
The spoken translation you hear relies on voice synthesis. You can change the gender of the
voice(s) that you hear using the Configure window. Changing the synthesis allows you to
accommodate translation scenarios that are gender specific.
To change voice synthesis
82) From the Interact-AS main menu, click the Configure button.
The Configure window appears.
83) Click the Voice Synthesis tab.
84) From the Voice drop-down list, choose a new voice synthesis for either language.
85) Click
to hear a sample sentence using the selected voice.
86) Drag the top slider bar
87) Drag the bottom slider bar
to adjust the volume of the voice.
to adjust the speed of the voice.
88) From the Interact-AS main menu, click the Translate button to save your settings and
return to the Translate window.
43
Chapter 4
Configuration
The Configure window allows you to adjust translation settings that make up a
user configuration. Use the New User Wizard to create a new user
configuration. After you create a user configuration, you can use the Configure
window to tweak settings and to train a voice profile to make translation more
accurate.
NOTE: If the current User Configuration drop-down list shows "None," click the Users
button from the main menu, and then double-click a user name before returning to the
Configure window.
In This Chapter
User Options ..................................................................................................... 46
Translation Options ......................................................................................... 48
Speech Recognition Options ........................................................................... 50
Voice Synthesis Options .................................................................................. 52
44
Interact User Guide v4.0 User's Guide
User Options
Chapter 4
Configuration
Command
Description
Enable Voice
Commands:
Allow Interact-AS to perform functions when you issue a
spoken command.
Speak Command
Confirmations:
Hear an audible confirmation of enabling or disabling the
speech recognition.
Enable Reverse
Translation:
Automatically run the initial translation through the MT
again to provide a translation back from the target
language into the source language. Note: This does not
necessarily show exactly what the initial translation is.
Repeat continuously:
Repeat what you say until there is different input to
translate. Use the Repeat Delay box to enter the time (in
seconds) to wait between repeated translations.
Enable
Automatic-Translate:
Tell Interact-AS to translate text when there is a pause or
break in your dictation. Clear the check box if you want
Interact-AS to translate only when you issue a "Translate"
command. Use the Auto-Translate Delay to set the time (in
seconds) to determine how long of a pause in your speech
will trigger an automatic translation of your words.
Acronym Expansion
Acronyms, idioms and abbreviations will be expanded into
more literal text before translation so that the translated text
means what you really wanted to say. You must enter the
acronym and its expansion ahead of time in a Composer
Domain using ComposerEditor. See Acronym Expansion
(on page 73)
Enable Log:
Keep a log of all translations that occur.
Show Native Text:
Show the native text with each log entry.
Show Translated
Text:
Show the translated text with each translation log entry.
Show Timestamp
Display a date and time next to each translation log entry.
Show Language
Names:
Display the associated language name next to each log
entry.
45
46
Interact User Guide v4.0 User's Guide
Translation Options
Chapter 4
Configuration
Command
Description
User
Configuration:
Lists the current User Configuration whose options you are
changing
Click on this button to launch ComposerEditor.
The machine translator (MT) engine is the software that will
translate from the source to the target language. For most
language pairs, there will be only one choice.
Engine:
The machine translation engines available with Interact-AS are
designed to translate the meaning of a source sentence. The
result may not be grammatically correct but will be
understandable.
The translation engines vary by language and may not be able
to process vocabulary that is unique to your application. Such
vocabulary could include acronyms or proper nouns. To
improve accuracy of translations that use such vocabulary,
Interact-AS can also use another translation approach that is
referred to as Translation Memory (TM).
Click to stack MT domains. If you have multiple domains, you
can choose the order in which the MT provides translation
suggestions. For example, if you have an "Internet" domain
that includes a lot of Internet-related terms and translations,
you can stack that on top of the "Core" domain. As you are
translating, the MT will first check the "Internet" domain for
matching translations. If nothing is found, it will then check the
"Core" domain.
The Composer Domain is a separate translation database that
includes custom phrases and translations specific to your
needs. For example, if you have a set of phrases that you
frequently use, you can set up the phrases and their
corresponding translations in advance and load the Domain
into Interact.
Memory:
Composer Domains are completely customizable and can be
created to accommodate a variety of translation scenarios and
language rules. For example, you can create one Domain that
contains more formal translations and another that contains
less formal usage.
Use ComposerEditor (ComposerEditor (on page 61)) to edit
translation memories.
Click to load or modify Composer Domains you wish to use
with this configuration. If this button is grayed out, a Domain
47
48
Interact User Guide v4.0 User's Guide
Command
Description
is not available for your configuration. Loading or Unloading a
Domain
Segmentation:
If you are using a Composer Domain, you can select the
segmentation method Interact-AS will use to break your words
into recognizable, translatable chunks.
Confidence:
If you are using a Composer Domain, you can select the
minimum confidence level used to determine a potential
match. When the Confidence is 100%, then the match must be
perfect, including capitalization and punctuation. However,
when the Confidence is too low the match might miss small,
but important, words like "not".
Speech Recognition Options
Chapter 4
Command
Voice
Profile:
Configuration
Description
The Voice Profile tells Interact-AS how to recognize your voice
when you speak into the microphone. You need a Voice Profile
for each language. For optimal speech recognition, set up and
train a new Voice Profile for each speaker in the language they
will be speaking. If you do not want to set up a new profile, you
can use the Default User (<Your Language>) profiles that are
loaded with Interact.
If you do not want to speak to Interact, you can also enter text
directly into the recognition area on the Translate window.
Add a new Voice Profile.
Remove a selected Voice Profile. You cannot delete the Default
User for each language; therefore, for those profiles this action
will instead remove microphone and voice training.
Train a Voice Profile.
Set the microphone levels for a Voice Profile.
Input
Device:
Select your preferred input (microphone) device. Input devices
are based on what your system recognizes as the default device
indicated in the Windows audio settings. If any devices are
plugged into the USB port or if you are using multiple
microphones, your system should detect these devices.
Unplugging from the PC or switching microphones while using
Interact-AS may cause input problems. If a USB microphone
accidentally becomes unplugged during use, you may need to
re-launch Interact-AS to make sure the system is listening.
49
50
Interact User Guide v4.0 User's Guide
Voice Synthesis Options
Command
Description
Voice:
Voice synthesis tells Interact-AS which voice to use when
playing spoken translations. Select a translation voice
based on gender that is appropriate to the context of the
translation environment.
Hear a playback of a sample sentence spoken in the
selected voice.
Volume:
Drag the slider from left to right to increase the volume of
the selected voice.
Speed:
Drag the slider to speed up or slow down the playback
rate for the selected voice.
51
Chapter 5
Users
To use Interact, you must create a User Configuration. This
configuration will keep track of the various translation, speech
recognition voice profiles, and speech synthesis voices for you and
another speaker. After you create a User Configuration using the
New User Wizard the first time you start Interact, your settings are
saved. During subsequent starts of Interact, you can reuse
previously created configurations to begin translating without
additional configuration. After you load the user configuration, you
can continue to train your speech recognition profiles for more
accurate recognition.
You can save as many User Configurations as needed. For example,
John can have his own, customized User Configuration with is own
trained voice profile, while Sarah can also save her own
configuration settings with her unique voice profile, all on the same
system running Interact. Each time a user logs on to Interact, he or
she can change their User Configuration.
In This Chapter
Creating a New User Configuration ............................................................. 53
Training a Voice Profile................................................................................... 56
Creating a New User Configuration
You can create a new User Configuration using one of two methods:
Use the New User Wizard
Create a copy of an existing User Configuration
To create a new user configuration using the New User Wizard
89) From the Interact-AS main menu, click the User button.
The User List screen appears.
52
Interact User Guide v4.0 User's Guide
90) Click the Add button to launch the New User Wizard.
91) Follow the onscreen instructions for creating a new English-speaking user Starting
Interact-AS (see "Starting Interact-AS" on page 4).
When finished, the new user configuration will automatically load and the Translation
window appears. If you go back to the User window, the new User Configuration now
appears in the list.
To create a copy of a user configuration
92) From the User window, select an existing User Configuration, and double-click to load
it.
NOTE: You can only copy an active / loaded User Configuration.
93) Click User > Copy.
The Enter Configuration Name window appears.
Chapter 5
Users
53
94) Enter a new name for the copied configuration, and click OK to save the configuration.
The new user is added to the list.
95) Double-click the new user, or select the new user and click the “Load” button to begin
using the configuration.
54
Interact User Guide v4.0 User's Guide
Training a Voice Profile
Although it is not required, to improve speech recognition and translation performance, we
recommend that you train a voice profile. This training allows Interact-AS to more
accurately recognize your speech. If you choose not to train a personal voice profile, you
can use the available default voice profile.
You should plan to spend about 5-10 minutes to fully set up and train a voice profile for
each language you are using. It is important that you complete the training process from
start to finish, so make sure you have enough time to complete the entire training before
continuing.
You only need to train a voice profile once. After initial training, you can save the profile
and reuse it in other User Configurations.
To Train a Voice Profile
To train a voice profile, you will need to perform the following steps:
Set up audio. You must set up your microphone before training the profile.
Train the voice profile.
Step 1 -
Microphone Setup
NOTE: You may have already completed microphone setup when you created a new
User Configuration. If so, you can skip this step and move to Step 2: Train Profile. If
you are using a different microphone than when you set up your microphone during
new user creation, you should repeat the microphone setup process again. Continue
with step 1.
96) Click the Configure button from the Interact-AS main menu.
97) Click the Speech Recognition tab.
98) From the voice profile drop-down list, select the profile you want to train.
NOTE: You can also create a new voice profile instead of training an existing voice
profile by clicking the Add button (
99) Click
).
.
The Audio Setup Wizard –Step 1 of 3 window appears.
Chapter 5
100)
Users
55
Position your microphone. 2
Follow the onscreen example for how to best position your microphone. Proper
positioning of the microphone can greatly increase the accuracy of voice recognition. If
the microphone is out of place, Interact-AS may not be able to hear you clearly and may
make more mistakes. Consistent position is also important. Make sure that you position
the microphone the same way each time you use Interact.
Headset microphones:
- Adjust the headset so that it fits comfortably on your head.
- Move the microphone element to the side of your mouth to avoid noise from
breathing.
- Make sure that the microphone element is close to your mouth, but not touching it
(about a thumb's width from the side of your mouth).
- Confirm that the front of the microphone points toward your mouth. The front
may be indicated by a colored dot, the word "Talk," or some other label.
- Position the headset consistently every time you use it.
NOTE: If you need to move the microphone out of the way, you can lift the "boom"
up and over your head, rather than bending it out of position or removing the
headset.
Handheld microphones: Although the wizard graphic shows the use of a headset,
the same guidelines apply when using a handheld microphone.
- Hold it in a comfortable position. Make sure not to hold it in an awkward, tiring
position.
- Point the microphone element to the side of or below your mouth to avoid noise
from breathing. Do not hold the microphone directly in front of your mouth.
- Make sure that the microphone element is about 1 to 3 inches away from your
mouth. You should keep the microphone distance in this range, but you don't have
to always keep the microphone at exactly the same distance.
- Hold the microphone so that the front/top points toward your mouth. Don't talk
into the side of the microphone.
- Hold the microphone consistently every time you use it. Be careful not to move
the microphone or your head suddenly.
- Do not use a microphone stand or holder because it will be harder to keep a
consistent position and the stand may conduct noise.
101)
Check microphone volume.
When the Adjust Your Microphone: Volume Check screen appears, click the Start
Volume Check button, and then read aloud the text shown in the box. When the
program beeps to indicate it has finished checking the volume, click Next. If you need
more help with this step, see Appendix B (on page 81).
56
Interact User Guide v4.0 User's Guide
102)
Check audio quality.
When the Adjust Your Microphone: Quality Check screen appears, click Start Quality
Check and then read aloud the text shown in the box. When the program beeps to
indicate it has finished checking the quality, click Finish. If you need more help with
this step or if the Quality check screen tells you the sound quality is too low, see
Appendix B (on page 81).
The Interact-AS Configure window reappears.
Step 2 - Train profile
103)
From the Speech Recognition tab, make sure you have selected the voice profile
that you want to train.
104)
Click
.
NOTE: If you have already trained the selected voice profile, you can perform
additional training at any time.
The General Training screen appears.
105)
Follow the instructions on the screens that follow. If you need more help with this
step, see Appendix C (on page 85).
106)
Click the Translate button from the Interact-AS main menu to begin translating.
57
Chapter 6
Visualize
The media options available with Interact-AS allow you to open an image,
video, or blank scribble pad to support your verbal message. The Visualize
button from the Interact-AS main menu allows you to open a media file without
having to leave the Interact-AS Translation window.
Using Images
The Visualize button allows you to open an image or video file from within Interact-AS to
help supplement your verbal message with a visual. You can create your own files using
any program you like and save them anywhere on your computer.
To open an image or video
107)
From the Interact-AS main menu, click Visualize.
A File Open window appears with a view into the default directory.
r) The default directory on XP is C:\Documents and Settings\Application
Data\Interact\Visualize.
s) The default directory on Vista is C:\ProgramData\SpeechGear\Visualize.
108)
Locate the image or video file that you want to view, and click Open.
A new window appears to display the image or video.
NOTE: You must have Windows Media Player or other media player software to view
video files. Images open in Microsoft Paint.
58
Interact User Guide v4.0 User's Guide
109)
Use the mouse or stylus to draw on or edit the image as needed. You can also save
the image using the File > Save menu in Microsoft Paint.
To open a blank drawing pad
110)
From the Interact-AS main menu, click Visualize.
A File Open window appears with a view into the default directory.
t)
The default directory on XP is C:\Documents and Settings\Application
Data\Interact\Visualize.
u) The default directory on Vista is C:\ProgramData\SpeechGear\Visualize.
111)
Select the blank drawing pad.gif file, and then click Open.
A new Microsoft Paint window appears to display the image.
112)
Use the mouse or stylus to draw on the image. For broader lines, select the paint
brush option, for narrow lines select the pencil.
59
Chapter 7
ComposerEditor
When you want to edit or create a Translation Memory Domain to be used in the
Document add-ins, use the Composer Translation Memory database features in
ComposerEditor. This tool allows you to customize translation capabilities for individual
or multi-user environments.
A Composer database supports multiple Language Pairs. Within each Language Pair, you
can add multiple Domains.
The default translator in Document Workbench is a software program called a Machine
Translator (MT). The MT is designed to give translations that represent the gist or general
meaning of a source phrase but those translations might not be grammatically correct. The
purpose of a Composer Domain is to keep exact translations of often-used phrases.
Therefore, if you know the grammatically correct translation of a phrase that you use
frequently, you can enter both the source and target phrases into a Composer Domain.
Document Workbench will use the translation from the Composer Domain instead of the one
generated by the Machine Translator.
Domains can be either Global, shared by all machine users, or Private, available only to the
user that's currently logged in. You can select a specific Domain on the Composer tab of the
Configure screen. By default, Document Workbench will query the selected Domain first,
and then query the other Global Domains to attempt to find the closest match for a specific
translation.
This section will walk you through the process of using ComposerEditor to select a
Language Pair, create or edit a new Domain, and add, edit or delete translations within a
Domain. At the end of this chapter, you will also find instructions for loading the new
Domain into the Document Workbench application.
In This Chapter
Main Window ................................................................................................... 62
Creating a New Composer Domain .............................................................. 63
Opening a Composer Domain........................................................................ 67
Importing and Exporting Composer Domains ............................................ 68
Editing Composer Domains ........................................................................... 70
Acronym Expansion ........................................................................................ 73
Loading or Unloading a Domain ................................................................... 75
60
Interact User Guide v4.0 User's Guide
Main Window
ComposerEditor's Main window contains the following features:
File menu
Contains all Composer Domain functions:
New ( ): Creates a new Composer Domain.
Open... (Ctrl + O
): Opens an existing Domain in the current database.
Close: Closes the current Domain.
Close All: Closes all open Domain windows.
Recent Documents: Lists the last Domains opened during the current session.
Choosing a Domain from the Recent Documents list saves loading time.
Exit (ALT + F4): Safely closes the ComposerEditor program.
Edit menu
Contains all text edit options:
Undo (Ctrl + Z
): Removes the last editing operation.
Redo (Ctrl + Y
): Redoes the last editing operation.
Cut (Ctrl + X
): Cuts the current selection of text.
Copy (Ctrl + C
): Copies the current selection of text.
Paste (Ctrl + V
): Pastes the last selection of text.
Delete (Del): Deletes the current entry in the Domain.
Chapter 7
ComposerEditor
61
Translation Memory menu
Contains all Domain editing options:
New Entry...: Adds a new entry to the Domain
Edit Entry...: Opens the Edit Entry dialog box.
Delete Entry: Deletes a selected entry.
Tools menu
For more information about Import and Export see Importing and Exporting Composer
Domains (on page 68).
Import...: Provides import functionality; allows you to choose a source file, in TMX or
Tab Delimited text format, and merge translations from the file with the selected target
Domain.
Export...: Opens a dialog box allowing you to save the active Domain into a tab
delimited text (.txt) file.
Window menu
Contains window display options:
Cascade: Stacks all open Domain windows in a diagonal order.
Tile Horizontally: Stacks all open Domain windows top-to-bottom.
Tile Vertically: Stacks all open Domain windows side-by-side.
Minimize All: Minimizes all open Domain windows; the main window becomes the
active window.
Maximize All: Maximizes all open Domain windows.
Help menu
Contains the ComposerEditor About and Help files.
Creating a New Composer Domain
To connect to a Composer Database
113)
Start ComposerEditor. (Click Start > All Programs > SpeechGear >
ComposerEditor.)
62
Interact User Guide v4.0 User's Guide
The ComposerEditor Start window appears.
114)
In the Start dialog, select SpeechGear Translation Memory.
115)
Click on the New or Open button
The Edit window appears.
All Global and Private Composer Domains which are available to the logged in user
will be listed in the Domain window.
To add a Language Pair to the Database
116)
Connect to your Composer database.
The Edit window appears.
117)
Click Add Language Pair.
The Select Language Pair window appears.
118)
Select the Source and Target languages to use in the new Language Pair, and then
click OK.
Chapter 7
ComposerEditor
63
A confirmation window appears.
119)
Click Yes to create the new Language Pair in the connected database.
The Language Pair is added to the list with a default (Global)General Domain.
NOTE: You may have to scroll to find the Language Pair in the list.
To Add a Domain to a Language Pair
120)
Connect to your Composer database.
121)
Select the Language Pair you want to add a Domain to.
By default, ComposerEditor will create a Private Domain. If you want to add a Global
Domain then expand the Language Pair and select the Global User under the
Language Pair
122)
Click Add Domain To User.
NOTE: If you have previously removed the Global\General domain you will be asked
here if you’d like to create a new one.
64
Interact User Guide v4.0 User's Guide
The Add Domain Name window appears.
123)
Enter a name and a description for the Domain, and then click OK.
A confirmation window appears.
124)
Click Yes to create the new Domain.
The Domain is added to the selected Language Pair.
To remove a Domain
125)
Connect to your Composer database.
126)
Right-click a Domain name, and then click Remove Domain.
A confirmation window appears.
127)
Click Yes.
NOTE: If the Domain was successfully deleted, you will no longer see it in the database
list.
Chapter 7
ComposerEditor
65
To remove a Language Pair
128)
Connect to your Composer database.
129)
Right-click a Language Pair name, and then click Remove Language.
A confirmation window appears.
130)
Click Yes.
The selected language and all related Domains will be removed from the database list.
However, if any entries were added by another user (besides the Global and current
user), the delete operation will abort.
Opening a Composer Domain
To open a Composer Domain
131)
Launch ComposerEditor and open SpeechGear Translation Memory
The Edit window will appear
132)
Click the "+" next to the Language Pair to expose the users Global and Private.
Select the Domain that you want to open.
133)
Click on the "+" next to either the Global or Private user to expose the domains
within each.
The selected Domain will open in a new window.
66
Interact User Guide v4.0 User's Guide
Importing and Exporting Composer Domains
ComposerEditor allows you to import translations from a file into a Composer Domain or
export translations from a Domain into a file.
Files to be imported from must be in Translation Memory eXchange (TMX) format or tab
delimited text files. TMX is a file format based on XML that is a standard of the
Localization Industry Standards Association (LISA). Exporting data will result in the
creation of a tab delimited text file.
NOTE: Importing of a file cannot be undone.
To import into a Composer database Domain
134)
Create a TMX file or an existing tab delimited text file that has the translations you
want to import.
135)
Create a new Domain or open an existing Domain into which to import the terms.
136)
From the ComposerEditor Main window, click Tools > Import....
Chapter 7
The Import Translation Memory window appears.
137)
Select the file that you want to import.
Click Open.
To export a Composer Domain
138)
Open a Composer Domain.
139)
From the Tools menu, click Export.
140)
Enter a name for the new file, and then click OK.
The file is exported into a new tab delimited text (.txt) file.
ComposerEditor
67
68
Interact User Guide v4.0 User's Guide
Editing Composer Domains
ComposerEditor uses right-click commands to display all editing menus. When working
with Composer Domains, you have the following edit commands:
New Record
Edit Record
Delete Record
Save a Domain
To Add a New Record
141)
Open the Domain you want to edit.
142)
Right-click anywhere in the Domain window, and then click New Record.
The New Domain Entry window appears.
143)
Enter the source text, target, and notes.
144)
Click OK.
The record is added in alphabetical order to the Domain.
Chapter 7
ComposerEditor
69
To Edit a Record
145)
Open the Domain you want to edit.
146)
Double-Click on the record you want to edit
Or
Right-click on the record you want to edit, and then select Edit Record.
The Edit Domain Entry window appears.
147)
Edit the source text, target, and notes.
148)
Click OK.
To Delete a Record
When you delete a record, it is permanently removed from the Domain. If you are working
in a Global Domain in a multi-user environment, deleting a record will remove it for all
users who are working with the Global Domain.
149)
Open the Domain you want to edit.
150)
Right-click on the record you want to delete, and then click Delete Record.
ComposerEditor removes the record from the list.
Note: No confirmation box will appear but there is an Undo command under the Edit
menu.
To Save a Domain
When working with Composer Domains connected to a shared database, changes will
automatically be written to the database as you work. If you make an error during editing,
you can undo the last editing operation from the Edit > Undo menu.
When you are finished editing entries, close the Domain window to close the connection to
the database.
70
Interact User Guide v4.0 User's Guide
Acronym Expansion
Acronym Expansion is a feature of Document Workbench that assists in getting the correct
translation of acronyms, idioms, abbreviations and technical phrases. For example, if you
dictated "We're like two peas in a pod." into the English recognition area on the Translate
screen and clicked the Translate button, the Target text might be talking about vegetables.
In order to get the correct translation of an idiom, Document Workbench has a mechanism to
substitute the idiom with another phrase in the same language that means the same but
uses a more literal phrase. Therefore, the literal phrase can be translated instead of the
words of the idiom.
For example:
"pet project" becomes "favorite project"
"We're like two peas in a pod." becomes "We're very similar."
"When pigs fly" becomes "Never"
This can be very helpful if you are using Document Workbench to communicate for your job
and your industry regularly uses abbreviations. You can see that it's important to create
your own list because different industries may use the same acronym for different terms.
"AMT" becomes "Alternative Minimum Tax"
"NSF" becomes "Not Sufficient Funds"
"PITI" becomes "Principle, Interest, Taxes and Insurance"
This feature is enabled by checking the box labeled "Expand Acronyms" on the Tools menu
on the Workbench main menu bar. See User Options (on page 46)
You create this list of idioms and literal phrases in ComposerEditor by using the
<language> to <language>\General Composer Domain.
Note: This feature can be used for any language, for example Spanish to Spanish, but only
the General Domain is currently supported.
To Add or Edit entries in Acronym Expansion
151)
In ComposerEditor, open the English to English\General Domain.
Chapter 7
152)
ComposerEditor
Then add or edit terms that the English speakers might use in conversation.
71
72
Interact User Guide v4.0 User's Guide
If the Acronym Expansion capability is enabled in Document Workbench, every time you
click the Translate button on the Translate screen, the text that is in the English recognition
area gets compared with each of the Source entries in the English to English\General
Domain. If an exact match is found, that phrase is replaced with the Target phrase before the
English text is translated.
Therefore, you will still see the Source phrase in the English recognition area on the
Translate screen, but the text that is translated will contain the Target phrase from the
Domain. If logging is enabled, the translated text with included expansion will be saved to
the log.
To reiterate, even though the examples are in English, this feature is available in other
languages, too.
Note: Acronym Expansion Segmentation is independent of Translation Segmentation. It
checks for matches in this order:
1.
Full sentence matches
2.
2-word matches, in any segments where full sentence matches were not found
3. 1-word matches, in any segments that were not expanded by full sentence or 2-word
matches
Loading or Unloading a Domain
To Load or Unload a Domain
153)
Within Interact, click the Configure button, and then the Composer tab
154)
Click the Select Translation Memory Domain (
The Select Domain window appears.
) button
Chapter 7
155)
ComposerEditor
73
There are three options on this window:
Click Clear to unload any Composer Domains from
Select the Composer Domain that you want to use and then click OK
The selected Composer Domain will load and you can use it in your translating
Click Cancel to exit the window with no change
Note: Composer Domain queries:
- Will query the selected Domain first (either Private or Global) followed by all the Global
Domains.
- Currently does not provide the option of selecting multiple Private Domains
75
Glossary
enable: (turn on)
disable: (turn off)
log: records all translations that Interact-AS performs. The Log Content area will display the
translations.
machine translator (MT) : a software program, sometimes called an engine, to translate text
from one language to another.
training: refers to the process of speaking a set of predetermined phrases in your normal, natural
voice to help the speech recognition engine more accurately recognize your voice.
translation memory (TM): a collection of phrases and their translations. TMs are used to
supplement an MT by providing acronym expansions or phrase translations specific to an
organization that an MT alone might not be able to translate correctly.
user configuration: refers to the settings used for an Interact-AS user. These settings include
speech recognition engine voice profiles, voice synthesis voices, as well as options set in the
Configure window.
voice profile: stores microphone settings and speech recognition settings to assist you in
translating your voice to text.
voice synthesis: the artificial production of human speech. Speech synthesis systems are often
called text-to-speech (TTS) systems in reference to their ability to convert text into speech.
77
Appendix A
NATO Alphabet
LETTERS
A - ALFA
B - BRAVO
C - CHARLIE
D - DELTA
E - ECHO
F - FOXTROT
G - GOLF
H - HOTEL
I - INDIA
J - JULIETT
K - KILO
L - LIMA
M - MIKE
N - NOVEMBER
O - OSCAR
P - PAPA
Q - QUEBEC
R - ROMEO
S - SIERRA
T - TANGO
U - UNIFORM
V - VICTOR
W -WHISKEY
X - XRAY
Y - YANKEE
Z - ZULU
79
Appendix B
NOTE: The following steps are continued from sections New English Profile (see "New English
Voice Profile" on page 11) and Training a Voice Profile (on page 56).
Setting up Microphone Audio
156)
The Audio Setup Wizard (Step 1 of 3) screen appears.
Position the microphone about a half-inch (approximately the width of your thumb)
from your mouth and a little off to the side. The microphone should not touch your
mouth, but it can be almost touching your lips.
If you need to move the microphone out of the way, you can lift the "boom" up and over
your head, rather than bending it out of position or removing the headset.
157)
Click Next.
The Audio Setup Wizard (Step 2 of 3) screen appears.
80
Interact User Guide v4.0 User's Guide
158)
The computer needs you to read some text aloud to set the input volume. Click the Start
Volume Check button to begin.
The text becomes readable.
159)
Read the text in the box. As you read, the volume bar levels will fluctuate.
When the system has had enough time to do the check, you will hear a beep. The Next
button will become available.
NOTE: If the volume check was not successful, you will receive a message to indicate that
either the sound level was too high, too low, or that your microphone is not successfully
connected. In the error message box, click the Help button to launch Dragon
NaturallySpeaking Help. It will include recommendations for adjusting your equipment.
When you are ready, start the volume check again.
160)
When you have passed the volume check, click Next.
The Audio Setup Wizard (Step 3 of 3) screen appears.
Appendix B
81
161)
The computer needs you to read some text aloud to test the quality of audio input on
your system. Click the Start Quality Check button to begin.
The text becomes readable.
162)
Read the text in the box.
As you read, the quality bar levels will fluctuate. Speak in your natural tone of voice.
When the system has had enough time to do the check, you will hear a beep. The results of
your speech-noise ratio and audio quality check will appear.
NOTE: If the audio quality results in a FAILURE, an error message will appear indicating
that the quality of the sound system is unacceptable. In the error message box, click the Help
button to launch Dragon NaturallySpeaking Help. It will include recommendations for
adjusting your equipment. When you are ready go back to the Volume Check, reposition
your microphone and do the volume & quality checks again.
Note: You should also click Play to hear what the system hears. If you have difficulty
understanding what is said, the system will too.
Tip: After clicking the Start Volume Check or Start Quality Check buttons wait 3-4 seconds
before you start reading the text. This gives the computer time to adjust to the background
noise.
82
Interact User Guide v4.0 User's Guide
163)
When you have passed the quality check, click Finish.
83
Appendix C
Training a Voice Profile
NOTE: The following steps are continued from section Training a Voice Profile (on page 56). If
you've already trained the selected voice profile, you can perform additional training at any
time.
The General Training screen appears
164)
Click Go and then read the onscreen sentence aloud.
To advance through the first two screens, you must say the sentences without pausing.
When the words change color, it means the computer has heard and recognized them. If
you keep reading the same words, and the computer still doesn't get it, just click Skip.
Otherwise, click Next to continue. As you read, more text will appear.
After you have finished the first two screens, the Select Text window appears.
84
Interact User Guide v4.0 User's Guide
165)
Choose a text to read aloud and click OK.
The selected text appears in the window.
166)
Start reading.
It's okay to pause in the middle of a sentence. To take breaks while you're training the
program, click Pause.
Don't worry if you make mistakes or laugh. You should try to read exactly what you see
on the screen, but it's okay if you read something incorrectly. The computer will either
ignore the mistake or display the yellow arrow to show you where to begin reading the
text again.
Appendix C
85
The progress bar shows how much text you have left to dictate. As you speak, the words
that you have already spoken will turn gray.
When you've read enough, the Dragon NaturallySpeaking Adaptation message appears.
167)
Click OK to return to the Interact-AS Configuration window.
86
Interact User Guide v4.0 User's Guide
Appendix D
End User License Agreement
IMPORTANT:
CAREFULLY READ THIS END-USER LICENSE AGREEMENT ("LICENSE")
BEFORE USING THIS PRODUCT.
* YOUR INSTALLATION, COPYING, OR USE OF THIS PRODUCT INDICATES YOUR ACCEPTANCE
OF THIS LICENSE, AND THAT YOU AGREE TO BE BOUND BY AND COMPLY WITH ALL OF ITS
TERMS.
* IF YOU DO NOT AGREE TO ALL OF THE TERMS AND CONDITIONS OF THIS LICENSE, THEN DO
NOT COPY, INSTALL, OR USE THIS PRODUCT.
Appendix D
87
Interact and Interact-AS™
This End-User License Agreement (“EULA”) is a legal agreement between you the Licensee (either an
individual or a single entity) and SpeechGear, Inc. for the software product(s) identified above, which
includes computer software and may include associated media, printed materials, and “online” or
electronic documentation (henceforth referred to as the “SOFTWARE PRODUCT”). By installing,
copying, or otherwise using the SOFTWARE PRODUCT, you agree to be bound by the terms of this
EULA. If you do not agree to the terms of this EULA, do not install or use the SOFTWARE PRODUCT.
Should you have any questions concerning this EULA, or if you desire to contact SpeechGear for any
reason, please send an email to [email protected] or send a letter to Customer Service;
SpeechGear, Inc.; 205 South Water Street; Northfield, MN 55057.
SPEECHGEAR, INC. AND AUDITORY SCIENCES, LLC
END USER SOFTWARE LICENSE AGREEMENT
This End User Software License Agreement (“Agreement”) applies to all Software and related
Documentation of SpeechGear, Inc. and its wholly owned subsidiary, Auditory Sciences, LLC.
(“SPEECHGEAR”), including any evaluation copies of said Software. The terms of this Agreement
applies to each Software license granted and to all services provided by SPEECHGEAR under this
Agreement. The “Licensee” under this Agreement is any person or entity who acquires a license to use
the Software and related Documentation from SPEECHGEAR or deploys the Software for use. The
Licensee accepts the terms and conditions of this Agreement by indicating its acceptance in a click wrap
license format, by deploying the Software for use, or by any other means. Capitalized terms are defined
in Section 9.
88
1
Interact User Guide v4.0 User's Guide
RIGHTS AND RESTRICTIONS
1.1
Subject to the payment of the applicable license fees as set forth in the Sales Invoice,
SPEECHGEAR grants to Licensee a non-exclusive, non-transferable license to use the Software,
in executable, object code form only, and the Documentation solely for Licensee’s own internal
use in the Territory in accordance with the terms of this Agreement and the applicable Sales
Invoice. The right of use is granted solely for the Software and Documentation specified in the
Sales Invoice.
1.2
SPEECHGEAR will supply one copy of the Software and Documentation licensed under
this Agreement to Licensee by shipment FOB origin or by making it available to Licensee via an
FTP download. Licensee may make one copy of the licensed Software for archival or backup
purposes, as reasonably necessary.
1.3
Licensee will further ensure that each copy of the Software and Documentation includes
notices of copyright and other proprietary rights legends as delivered to Licensee and will not
remove, obscure or alter any proprietary rights notice present on or in any of the Software or
Documentation.
1.4
Licensee will not acquire any intellectual property or other rights, express or implied, in
or relating to the Software or Documentation, other than those specified in this Agreement.
SPEECHGEAR or its licensors retain all such rights.
1.5
Licensee will not, directly or indirectly, modify, reverse engineer, disassemble,
decompile, translate the Software or make derivative works of or attempt to discover any source
code or underlying ideas or algorithms of any Software or part thereof.
1.6
Licensee will not sell, rent, lease or sublicense the Software or Documentation, or use the
Software to operate in or as a time-sharing, outsourcing or service bureau arrangement, or in any
way allow third party access to the Software or Documentation other than under the terms
specified in Sections 1.9 and 1.10 of this agreement.
1.7
Licensee may allow the Software and Documentation to be used by its contractors or
agents under a written agreement with Licensee, but only for Licensee’s internal use and in
accordance with the terms of this Agreement. Licensee will be fully responsible for any failure
of such parties to comply with the terms of this Agreement.
Appendix D
89
1.8
If Licensee has purchased a single machine license for Software, as indicated on the Sales
Invoice, Licensee’s use of the Software must be limited to a single machine and the location of
such machine, to be identified by Licensee. Licensee must provide the identification of the
machine and its location to SPEECHGEAR. SPEECHGEAR will develop a license key or license
file based on the machine name and will supply the key or file to the Licensee. If it becomes
necessary for the Licensee to change the machine name or replace the machine and Licensee
desires for the Software to be transferred to the new machine, Licensee must notify
SPEECHGEAR requesting the change, and SPEECHGEAR may at it's judgment issue a new
license key based on the new machine name pending payment by Licensee to SPEECHGEAR,
SPEECHGEAR's standard fee for such service. As a requirement of this service, Licensee must
remove all Software installed on the previously licensed machine.
1.9
If Licensee has purchased a global license for Software, Licensee’s use of the Software
will be limited to the number of machines specified in the Sales Invoice or other agreement
between SPEECHGEAR and Licensee.
1.10
If Licensee has purchased an enterprise license for Software, as indicated on the Sales
Invoice, Licensee may deploy and use the Software on any machines owned by the Licensee,
including machines located at the primary offices of Licensee and branch or regional offices of
Licensee. Unless otherwise specifically agreed by SPEECHGEAR, the enterprise license does
not include the right to use the Software for machines owned by parent companies, subsidiaries,
or affiliates of Licensee.
1.11
If Licensee has obtained an evaluation copy and license for the Software as indicated on
the Sales Invoice, Licensee will have the right to use the Software for a period of not more than
ten (10) days.
1.12
GOVERNMENT END USERS: This Section applies to all acquisitions of SPEECHGEAR
product by or for the Federal government or by any prime contractor or subcontractor (at any
tier) under any contract, grant, cooperative agreement, or other activity with the Federal
government. By accepting delivery of the product, the government hereby agrees that this
Software qualifies as "commercial" computer Software within the meaning of the acquisition
regulation(s) applicable to the procurement. The terms and conditions of this Agreement shall
pertain to the government's use and disclosure of the product and shall supersede any
conflicting contractual terms or conditions. If this Agreement fails to meet the government's
needs or is inconsistent in any respect with Federal law, the government agrees to return the
product, unused, to SPEECHGEAR. The following additional statement applies only to
acquisitions governed by DFARS Subpart 227.4 (October 1988): "Restricted Rights-Use,
duplication, and disclosure by the Government is subject to restrictions as set forth in
subparagraph (c)(1)(ii) of the Rights in Technical Data and Computer Software clause at DFARS
252.227-7013 (Oct. 1988)."
1.13
Licensee shall comply with all applicable laws relating to this Agreement.
90
2
Interact User Guide v4.0 User's Guide
SUPPORT SERVICES AND MAINTENANCE
SPEECHGEAR has no obligation to support or maintain the Software. To the extent that
SPEECHGEAR agrees to provide support and maintenance services to Licensee, such services
will be provided under the terms of Licensor’s then-standard support and maintenance services
agreement and subject to Licensee’s payments of any associated fees.
3
TERM AND TERMINATION
3.1
This Agreement and each Software license granted under it becomes effective on the
Effective Date and remains in effect until terminated as described in this Section 3.
3.2
Licensee may terminate this Agreement with respect to any or all of the Software
products listed on the Sales Invoice at any time by providing written notice to SPEECHGEAR.
3.3
SPEECHGEAR may terminate this Agreement with respect to any or all of the Software
products listed on the Sales Invoice upon written notice if Licensee breaches this Agreement and
fails to correct the breach within thirty (30) days following written notice specifying the breach.
Notwithstanding the above, SPEECHGEAR may terminate this Agreement or any license
immediately if Licensee: (i) fails to make payments due to SPEECHGEAR or (ii) is in breach of
the confidentiality provisions set forth in Sections 8.1 and 8.2, or (iii) attempts to undertake
prohibited conduct regarding reverse engineering, decompiling or disassembly contained in
Section 1.5.
3.4
Termination of this Agreement or any license will not prevent either party from
pursuing other remedies available to it, including injunctive relief, nor will such termination
relieve Licensee’s obligation to pay all fees that are owed by Licensee as of the date of
termination. The parties’ rights and obligations under Sections 1.3, 1.4, 1.5, 1.6, 3.5, 7.1 and 8.1
through 8.17 survive termination of this Agreement.
3.5
If a license granted under this Agreement terminates, Licensee must: (a) immediately
cease using the Software, and (b) certify in writing to SPEECHGEAR within thirty (30) days after
expiration or termination that Licensee has destroyed or has returned to SPEECHGEAR all
copies of the Software, all Documentation, and any SPEECHGEAR Confidential Information.
This requirement applies to copies in all forms, partial and complete, in all types of media and
computer memory, and whether or not modified or merged into other materials.
Appendix D
4
91
INDEMNITY
4.1
SPEECHGEAR will defend and indemnify Licensee against a claim that the Software
infringes a third-party intellectual property right, including copyright, patent and trademark,
provided that: (a) Licensee notifies SPEECHGEAR of the claim in writing within fifteen (15) days
after discovery of the claim by Licensee; (b) SPEECHGEAR has sole control of the defense and
all related settlement negotiations; and (c) Licensee provides SPEECHGEAR with the reasonable
assistance, information and authority necessary to perform SPEECHGEAR’s obligations under
this Section. SPEECHGEAR has no liability for any claim of infringement based on: (1) use of a
superseded or altered release of Software if the infringement would have been avoided by the
use of a current, unaltered release of the Software; or (2) modification of the Software other than
by SPEECHGEAR or combination of the Software with materials not specified in the
Documentation, if such a claim would not have arisen except for such modification or
combination.
4.2
In the event that the Software is held or believed by SPEECHGEAR to infringe,
SPEECHGEAR may, at its sole option and expense: (a) replace or modify the Software to be
non-infringing, provided that substantially equivalent functionality is maintained; (b) obtain for
Licensee a license to continue using the Software. Sections 4.1 and 4.2 state SPEECHGEAR’s
entire liability and Licensee’s exclusive remedy for any infringement
92
5
Interact User Guide v4.0 User's Guide
WARRANTIES
5.1
SPEECHGEAR PROVIDES THE SOFTWARE AND DOCUMENTATION ON AN “AS
IS” BASIS. SPEECHGEAR HEREBY DISCLAIMS ALL WARRANTIES, CONDITIONS,
GUARANTEES OR REPRESENTATIONS AS TO THE MERCHANTABILITY OR FITNESS FOR
A PARTICULAR PURPOSE OR ANY OTHER WARRANTIES, CONDITIONS, GUARANTEES,
OR REPRESENTATIONS, EXPRESS OR IMPLIED, ORAL OR IN WRITING, REGARDING THE
SOFTWARE OR THE PERFORMANCE OF THE SOFTWARE. NEITHER SPEECHGEAR NOR
ANY OF ITS SUPPLIERS MAKE ANY WARRANTY THAT THE SOFTWARE WILL (I) MEET
LICENSEES REQUIREMENTS (II) THAT THE RESULTS THAT MAY BE OBTAINED FROM
USING THE SOFTWARE INCLUDING BUT NOT LIMITED TO THE ACCURACY OR THE
RELIABILITY OF THE TRANSLATIONS (III) THAT THE QUALITY OF ANY CONTENT,
PRODUCTS, SERVICES, INFORMATION, OR OTHER MATERIAL OBTAINED BY LICENSEE
FROM SPEECHGEAR, INC. WILL MEET LICENSEE’S EXPECTATIONS (IV) THAT THE
SOFTWARE PRODUCT IS ERROR-FREE, OR THAT ANY ERRORS IN THE SOFTWARE
PRODUCT WILL BE CORRECTED, AND (V) THAT THE SOFTWARE WILL OPERATE
WITHOUT INTERRUPTION OR WILL WORK IN ALL COMBINATIONS SELECTED BY
LICENSEE. SPEECHGEAR EXPRESSLY PROHIBITS THE USE OF THE SOFTWARE
PRODUCT IN ANY SITUATION OR APPLICATION WHERE THE TRANSLATION QUALITY
AND/OR SOFTWARE PERFORMANCE IS OF IMPORTANCE. THIS INCLUDES, BUT IS NOT
LIMITED TO, THE USE OF THE SOFTWARE PRODUCT IN MEDICAL, EMERGENCY
RESPONSE, MILITARY AND/OR LEGAL SITUATIONS AND/OR APPLICATIONS.
6
LIMITATION OF LIABILITY
6.1
IN NO EVENT SHALL SPEECHGEAR OR ANY OF ITS SUPPLIERS BE LIABLE FOR
SPECIAL, INCIDENTAL, CONSEQUENTIAL, OR INDIRECT DAMAGES (INCLUDING BUT
NOT LIMITED TO, COSTS OR PROCURING SUBSTITUTE PRODUCTS OR SERVICES,
DAMAGES FOR LOSS OF PROFITS OR REVENUE, BUSINESS INTERRUPTION, LOSS OF
INFORMATION, PECUNIARY DAMAGES, PAIN AND SUFFERING, MEDICAL
MALPRACTICE, OR ANY HEALTH DEBILITATION LOSS ARISING OUT OF THE USE OR
INABILITY TO USE THE SOFTWARE OR DOCUMENTATION, HOWEVER CAUSED AND
UNDER ANY THEORY OF LIABILITY EVEN IF SPEECHGEAR OR ANY OF ITS SUPPLIERS
HAVE BEEN ADVISED OF THE POSSIBILITY OF SUCH DAMAGES. IN NO EVENT SHALL
MONEY DAMAGES FROM ANY AGGREGATE LIABILITY OF SPEECHGEAR AND ITS
SUPPLIERS EXCEED THE AMOUNT PAID BY YOU FOR THE COPY OF THE SOFTWARE
FROM WHICH THE CLAIM AROSE.
6.2
The provisions of this Agreement allocate the risks between SPEECHGEAR and
Licensee. SPEECHGEAR’s pricing reflects this allocation of risk and the limitation of liability
specified herein.
Appendix D
7
93
PAYMENT AND TAXES
7.1
All fees are payable fifteen (15) days from the date of the Sales Invoice, and will be
deemed overdue if they remain unpaid thereafter. All fees are net of any taxes, which are the
responsibility of Licensee, except for taxes on SPEECHGEAR’s income. Any amounts payable
by Licensee hereunder which remain unpaid after the due date will be subject to a late charge
equal to one and one-half percent (1.5%) per month or the highest rate allowable by law,
whichever is lower, from the due date until such amount is paid.
8
GENERAL TERMS
8.1
During the term of this Agreement, Licensee may have access to the Confidential
Information of SPEECHGEAR. SPEECHGEAR's Confidential Information does not include
information that: (a) is or becomes a part of the public domain through no act or omission of the
Licensee; (b) was in the Licensee's lawful possession prior to the disclosure and had not been
obtained by the Licensee either directly or indirectly from SPEECHGEAR; (c) is lawfully
disclosed to Licensee by a third party without restriction on disclosure; or (d) is independently
developed by Licensee. Licensee will treat results of any benchmark tests of the Software as
Confidential Information of SPEECHGEAR.
8.2
Licensee agrees to hold SPEECHGEAR's Confidential Information in confidence. This
duty will survive the termination of this Agreement for any reason. Unless required by law,
Licensee must not make Confidential Information available in any form to any third party or to
use Confidential Information for any purpose other than the implementation of this Agreement.
Licensee must take all reasonable steps to ensure that Confidential Information is not disclosed
or distributed by its employees or agents in violation of the terms of this Agreement.
Furthermore, Licensee may not use any Confidential Information of SPEECHGEAR to create any
computer Software program or user Documentation that is similar to any SPEECHGEAR
product.
8.3
The laws of the State of Minnesota, USA, excluding its conflicts laws, govern this
Agreement, and all matters arising out of or relating to this Agreement. The UN Convention
for the International Sale of Goods does not apply to this Agreement in whole or in part.
8.4
SPEECHGEAR and Licensee each submits to the jurisdiction of, and agrees that venue is
proper in, state or federal courts in the State of Minnesota in any legal action or proceeding
relating to this Agreement.
8.5
All notices under this Agreement will be in writing and be deemed to have been given
when sent electronically, by fax or email, or when mailed by first class mail to the address listed
in the purchase request, the Sales Invoice or other purchase documents.
94
Interact User Guide v4.0 User's Guide
8.6
If Licensee is a U.S. government entity, it acknowledges that the Software and
accompanying Documentation licensed in this Agreement are “commercial items”, “commercial
computer Software” and “commercial computer Software Documentation” as defined in FAR
section 2.101, and DFARS sections 252.227-7014(a)(1) and (5), respectively. Consistent with
DFARS section 227.7202 and FAR section 12.212, any use modification, reproduction, release,
performance, display, or disclosure of such commercial Software or commercial Software
Documentation by the U.S. Government shall be governed solely by the terms of this Agreement
and shall be prohibited except to the extent expressly permitted by the terms of this Agreement.
8.7
By agreeing to this EULA, you agree that to the maximum extent permitted by
applicable law, in no event shall SPEECHGEAR nor SPEECHGEAR’s suppliers, owners, officers,
directors, employees, affiliates, contractors, subsidiaries, or parent organizations, nor anyone
else who has been involved in the creation, production or delivery of any materials provided by
SPEECHGEAR, including but not limited to this product, be liable for any special, incidental,
indirect, or consequential damages whatsoever (including, but not limited to, damages for loss
of profits or confidential or other information, for business interruption, for personal injury, for
loss of privacy, for failure to meet any duty including of good faith or of reasonable care, for
negligence, and for any other pecuniary or other loss whatsoever) arising out of or in any way
related to the use of or inability to use the software product, the provision of or failure to
provide support services, or otherwise under or in connection with any provision of this EULA,
even in the event of the fault, tort (including negligence), strict liability, breach of contract or
breach of warranty of SPEECHGEAR or any supplier, and even if SPEECHGEAR or any
supplier has been advised of the possibility of such damages. This includes, but is not limited to,
any and all claims, actions, and damages (collectively “Claims”) that (i) result from the negligent
acts or omissions in the performance of Licensee under this Agreement, (ii) result from the
occurrence of a misrepresentation or other breach of this Agreement, or (iii) those made by
contractors or agents of end user. Licensee's indemnification of SPEECHGEAR under this
provision includes any and all costs, expenses, charges, and attorneys’ fees incurred by
SPEECHGEAR in connection with any such Claims. By agreeing to this EULA, you acknowledge
and agree that you have fully considered the foregoing allocation of risk and find it reasonable,
and that the limitations are an essential basis of the bargain between the parties
8.8
Licensee must comply fully with all relevant export laws and regulations of the United
States (“Export Laws”) to assure that neither the Software nor any direct product thereof is
exported, directly or indirectly, in violation of Export Laws. Software will not be given, sold,
leased, licensed, or in any way made available to any person, business, entity, governmental
unit, or government in or of any country which the United States Government, through the
Department of Commerce or any other department, lists as a country to whom the distribution
of the Software is prohibited by any law, including but not limited to, Executive Order 13224 and
the USA PATRIOT Act and such regulations as may be promulgated thereunder.
8.9
Licensee may not assign this Agreement or transfer a Software license or interest therein
to any third party without the prior written consent of SPEECHGEAR.
Appendix D
95
8.10
SPEECHGEAR may audit Licensee’s use of the Software after ten (10) days’ written
notice. Any such audit will be conducted during regular business hours at Licensee’s facilities
and will not unreasonably interfere with Licensee’s business activities. If an audit reveals
unauthorized use or use in excess of licensed capacity, Licensee must pay SPEECHGEAR for
such use at published SPEECHGEAR prices in effect at the time the audit is completed. The
audit will be at SPEECHGEAR’s expense. However, if the underpaid fees exceed five percent
(5%) of the license fees paid, then Licensee must pay SPEECHGEAR’s reasonable costs of
conducting the audit. Instead of, or in addition to, an audit, SPEECHGEAR reserves the right
to request a written statement of compliance with the terms of this Agreement and applicable
Sales Invoices, and Licensee must comply with such request within ten (10) business days.
8.11
It is expressly agreed that in the event of any conflict between this Agreement or any
applicable Sales Invoice, Licensee purchase order or other ordering document, the terms of this
Agreement will control. Any Licensee terms of trade stated or referenced in the Licensee
purchase order, or any terms to which SPEECHGEAR has not specifically agreed in writing, will
not be binding on SPEECHGEAR. This Agreement also supersedes all terms of any previous
“shrink-wrap” or “click-wrap” license included in any package, marketing media in any format,
any media or electronic version of SPEECHGEAR-furnished Software, or information
represented on SPEECHGEAR Web Site, and any such Software will be licensed under the terms
of this Agreement.
8.12
The failure of SPEECHGEAR to exercise or enforce any right or provision of the EULA
shall not constitute a waiver of such right or provision.
8.13
If any provision of the EULA is found by a court of competent jurisdiction to be invalid,
the parties nevertheless agree that the court should endeavor to give effect to the parties'
intentions as reflected in the provision, and the other provisions of the EULA remain in full force
and effect.
8.14
Licensee agrees that regardless of any statute or law to the contrary, any claim or cause
of action arising out of or related to use of the SOFTWARE PRODUCT must be filed within one
(1) year after such claim or cause of action arose or be forever barred.
8.15
Neither party will be responsible for failure of performance, other than for an obligation
to pay money, due to causes beyond its control, including, without limitation, acts of God or
nature; labor disputes; sovereign acts of any federal, state or foreign governments; or shortage of
materials.
8.16
SPEECHGEAR is an independent contractor. Nothing in this Agreement will be
construed to create a partnership, joint venture, or agency relationship between the parties
8.17
This Agreement constitutes the complete agreement between the parties concerning the
subject matter hereof and supersedes all prior agreements and representations, written or oral,
concerning the subject matter of this Agreement. This Agreement may not be modified or
amended except in a writing signed by a duly authorized representative of each party; no other
act, document, usage or custom will be deemed to amend or modify this Agreement
96
9
Interact User Guide v4.0 User's Guide
DEFINITIONS
9.1
“Confidential Information” means technical information contained in the Software, any
updates, modifications, enhancements, or upgrades of the Software, the Documentation or other
technical information, or SPEECHGEAR trade secrets disclosed in relation to this Agreement, the
terms and pricing under this Agreement and all information clearly identified as confidential by
SPEECHGEAR.
9.2
“Documentation” means the user manuals and other printed materials, and “online” or
electronic Documentation relating to the use and operation of the Software.
9.3
“Effective Date” means the date on which the applicable document (this Agreement or a
Sales Invoice) is signed by both parties or, for licenses of Software for which there is no
dual-signed Agreement, the date that the Software is delivered to Licensee or the date that
SPEECHGEAR issues the Sales Invoice, whichever is earlier.
9.4
“Licensee” means and includes any person or entity that acquires a license to use the
Software from SPEECHGEAR or deploys the Software for use.
9.5
“Sales Invoice” means the invoice issued by SPEECHGEAR to the Licensee in hardcopy,
electronically, or otherwise regarding the Software.
9.6
“Software” means the SPEECHGEAR computer software product, which is listed on the
Sales Invoice, if applicable, any updates, modifications, enhancements, or upgrades for such
Software.
9.7
"Territory" means the United States.
Appendix D
97
i
Index
A
About Interact-AS • 2
Acronym Expansion • 47, 73
Adjusting Regional and Language Settings • 21
Advanced Dictation Tips • 37
Appendix A • 25, 79
Appendix B • 8, 12, 58, 81
Appendix C • 9, 58, 85
C
Changing Voice Synthesis • 44
ComposerEditor • 1, 49, 61
Configuration • 1, 45
Contact Sales • 3
Contact Technical Support • 3
Creating a New Composer Domain • 63
Creating a New User Configuration • 53
D
Disable • 77
E
Edit menu • 62
Editing Composer Domains • 70
Enable • 77
F
File menu • 62
G
Getting Started • 1, 17
Glossary • 77
H
Help menu • 63
I
Importing and Exporting Composer Domains • 63, 68
K
Keyboard and Digitizer • 21
L
Loading or Unloading a Domain • 49, 75
ii
Index
Log • 42, 77
M
Machine Translator (MT) • 27, 48, 77
Main Window • 62
N
New English Voice Profile • 7, 11, 81
New Target Language Voice Profile • 13
O
Opening a Composer Domain • 67
Overview of Features • 26
S
Setting Up Your Microphone • 17
Speech Recognition Options • 50
Starting Interact-AS • 4, 11, 12, 13, 14, 54
Switching Languages • 31
T
Tips for Optimal Performance • 25
Tools menu • 63
Training • 11, 13, 56, 77, 85
Training a Voice Profile • 56, 81, 85
Transcription and Translation • 1, 27
Translation Memory (TM) • 48, 77
Translation Memory menu • 63
Translation Options • 48
Troubleshooting Devices • 20
Typographical Conventions • 15
U
User Configuration • 4, 46, 48, 50, 52, 53, 77
User Options • 29, 35, 42, 46, 73
Users • 1, 53
Using the Transcription Log • 42
V
Visualize • 1, 59
Voice Commands • 35
Voice Profile • 11, 13, 77, 81
Voice Synthesis • 2, 44, 52, 77
Voice Synthesis Options • 52
W
Welcome • 1
Window menu • 63


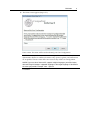

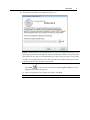


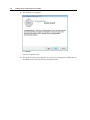


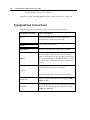
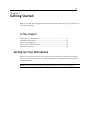


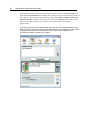

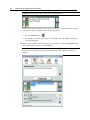
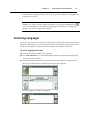
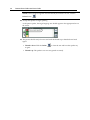
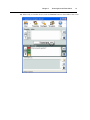


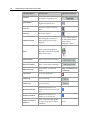
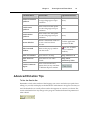


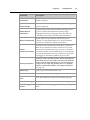


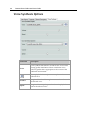

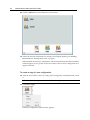
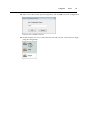


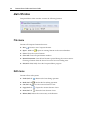

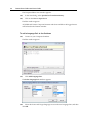

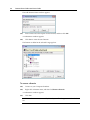


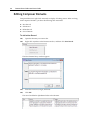


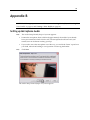

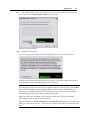


![[Scan] button on the ScanSnap.](http://vs1.manualzilla.com/store/data/005658366_1-513fc66afaf683e0c3b25d8948918383-150x150.png)