1
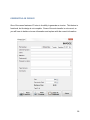
FUSION REPORTING APPLICATION May 2013 1 Automated Valuation Technologies, Inc. This introductory workbook was created by Automated Valuation Technologies, Inc. (AVT). The purpose of AVT is to fill the voids in appraisal practice that result from the rapidly changing appraisal environment. Appraisers often find themselves engaged in new activities which require the use of technology that has not yet reached their computer desktops. This is both unfortunate and unacceptable. It is unfortunate because appraisers are not fully effective in carrying out their duties. It is unacceptable because it compromises the vital role appraisers perform in the safekeeping of their country’s greatest wealth: real property. It is AVT’s mission to provide technologies real estate appraisers require to fulfill their duties. AVT operates under the belief that there is no substitute for the “Neighborhood Appraiser.” Their knowledge of the local market is unique and cannot be duplicated by remote computer analysis. These local appraisers are hardworking and dependable. Without question, these individuals will carry out their duties as long as they have the knowledge, training, and tools to do so. This Workbook is copyrighted. © 2011-2013 Automated Valuation Technologies, Inc. Maryville, TN 37804 2 Contents INTRODUCTION ............................................................................................................. 5 Specific design ............................................................................................................ 5 The features include: ................................................................................................... 6 LOADING THE SOFTWARE ........................................................................................... 7 Settings........................................................................................................................ 8 SETTING UP YOUR CATEGORIES ............................................................................... 9 ASSIGNMENTS ............................................................................................................ 10 Beginning a New Assignment .................................................................................... 10 Opening an Existing Assignment ............................................................................... 10 Open Windows Folder ............................................................................................... 10 ENTERING DATA ......................................................................................................... 11 Phrase Builder ........................................................................................................... 12 LOADING GEOGRAPHICAL MAP ................................................................................ 13 By address and by Geographical Codes ................................................................... 13 Copy and Pasting a Map ........................................................................................... 15 Omitting Map ............................................................................................................. 15 Manually Adjusting the Location Marker ................................................................... 15 LOADING SUBJECT PHOTOGRAGHS........................................................................ 16 THE “REGRESSION”, “ADJUSTMENT GRID”, AND THE “USL DOCUMENTER” ....... 18 Regression ................................................................................................................ 19 Qualitative Adjustment Grid ....................................................................................... 20 PROPERTY CHARACTERISTICS......................................................................... 23 ADDING COMP PHOTOS ..................................................................................... 24 WRAPING UP THE QAG ....................................................................................... 24 3 FINAL RECONCILIATION AND VALUE OPINION ................................................ 24 USL Documenter ....................................................................................................... 25 PRODUCING THE REPORT ........................................................................................ 27 GENERATING AN INVOICE ......................................................................................... 28 4 INTRODUCTION The Fusion report building software will only work if you have both the regression Plus, and the USL Report Documenter Loaded in addition to the Fusion program. Specificdesign The Fusion is designed for low scope of work residential property assignments. It is a report building software with some very unique design features. It is designed to be “General” rather than a “Uniform” form, because it is intended for use by many small appraisal offices for a multitude of clients and intended users. This form can meet the information requirements for most any client. It is really a narrative-form hybrid. While it presents an appraisal outline, it is really a highly sophisticated and automated report builder. Its only limitation that it has is that it does not produce the cost or income approaches which are typically not required in a low scope of work assignment. These can be produced in a spreadsheet or word processor and then added to the Fusion report if required based on the scope of work analysis. 5 Thefeaturesinclude: Expandable form with no number of character restrictions for each field. Comment fields are available at the end of each section so that most any amount of information can be included. The report automatically closes any unused fields so when a field is not needed it does not show up in the report. It has a sophisticated phrase builder o This allows you to add, edit, delete, and store unique phrases that can be posted to the report in a snap. o It includes a spell checker. Seamlessly integrates the Regression Plus application and its report into the Fusion report. Seamlessly integrates the USL Report Documenter o Dynamically creates all USPAP required documentation specific to each assignment. o Creates limiting conditions o Creates certification of the report. It is usable with any type of subject property data-gathering method; o Research Inventory method (Desktop) o Inventorying visually from the curb-side o Inventorying visually on-site from the exterior o Inventorying visually on-site from the interior and exterior o Home inspection Allows for the option of any report format; o Restricted Use o Summary o Self-contained Many form reports on the market are highly automated, but there has never been a residential report builder with this combination of flexibility and automation. A summary 6 report (excluding the cost and income approaches) can be completed in less than an hour including the regression analysis and all reporting requirements in most assignments. This does not include driving and property inspection time. Certainly there will be “problem” properties which will take longer to complete. LOADINGTHESOFTWARE Insert the CD and then open the “Fusion” folder. Next run the “Fusion Setup.msi file by double clicking on it. Most of the loading process is self-explanatory, but there has been some confusion about whether to choose load for “Everyone” or “Just me”. Most users will choose “Everyone”. If you share your computer with others and each has their own unique windows user interphase then choose “Just Me”. You can also choose a location for the “Fusions Document” folder. For most users just let the loader choose where to put it. Wherever the file is located it must be backed up. 7 Settings The “Settings” tab allows you to change the root folder location. This is the “Fusion Document” folder which holds the files associated with your assignments. You may store it anywhere on your C:\ drive or just let the program choose its location automatically. Remember to keep this file backed up. Under “Settings” click on “Default Appraiser Information” to load your personal appraiser information. 8 SETTINGUPYOURCATEGORIES You may store your assignments in various categories (storage Bins). Click on the “Category” link to control the names of these storage bins and how many you need. You may wish to categorize your assignments by whether they are work-in-process or completed. You could categorize by the city, or the type of property. I choose to categorize by the year completed. Use any system you wish. Simply click on the appropriate category to open it. Then when you start a new project it will be stored in that category. You can move an assignment from one category to another by clicking on the “Assignment” link while the assignment to be moved is open then click on “Move Current Assignment To…”. 9 ASSIGNMENTS BeginningaNewAssignment You can begin a new assignment by clicking the “New Assignment” icon. OpeninganExistingAssignment To open an existing assignment chose the appropriate storage bin category then single left click the assignment you wish to open. OpenWindowsFolder Open the assignment folder in Windows Explorer by clicking on the “Open Windows Folder” icon while the specific assignment is open. This folder stores all of the files associated with the assignment. If you wish to start the regression analysis completely over, delete the regression file. A new regression analysis will be created when you click on regression from inside the Fusion application. 10 ENTERINGDATA The data sheet is broken into ten sections. Some individual fields or entire sections may not apply or be necessary based on the scope of work analysis. Those sections should just be left blank as the report formatter will hide any topics left blank. Section “10. Appraiser Information” should fill in automatically once you fill out the default appraiser information under the “Settings” tab. This data must be loaded prior to the Fusion report being started. Otherwise select the text field to the right of the topic and simply type. Hit the “tab” key to move to the next field. Notice that you cannot enter text into any field that has a “+/-“ box. The field is either meant to be left blank, or will auto fill when the fields below it are filled in. Fields which have a “down arrow box” at the far right of the field have either a specific choice list or have access to the Phrase Builder. Use this area for extended typing. 11 PhraseBuilder The Phrase Builder is a system that allows the appraiser to create, store, edit, rename, delete, and retrieve common phrases. As many appraisers are uncomfortable with writing out their thoughts it is a good idea to save those comments that are well written. You can copy a phrase directly from your form to the Phrase Builder. To copy from the form (right click then hit copy). To paste into the Phrase Builder use the keyboard “Ctrl+v” method. You can combine multiple phrases by selecting each keyword and then clicking on the “Insert Phrase into Field Text”. This tool is very powerful and is especially handy for fields such as “Neighborhood” and “Market”. 12 LOADINGGEOGRAPHICALMAP If the user has internet connection the map can be gathered automatically from Google Maps based on the address or geocodes. If you do not have internet connection you can use a mapping program that is loaded on your computer and copy and paste that map into the Fusion report. To begin the process simply left click the map box which is shown below. ByaddressandbyGeographicalCodes The Google map can be fetched from the property's Address field or from the property's lat/long as entered in section “04. Subject Property Identification” of the form. To insert the map click on the “Update Map” button in the “Select a Property Map” display box. The property's latitude and longitude are updated in the Fusion project if these values are changed in the Map window and "Map by Location" is elected, after the user closes the window by pressing "Okay". A button has been added the map window to geocode the location from the address and put the results in the Latitude and Longitude fields, providing the same geocoding functionality as in the "Current Assignment" menu on the main Fusion form. 13 The map functions and choices are readily available in the “Select a Property Map” display box. 14 CopyandPastingaMap A button has been added to paste a map from the clipboard. The map image can be pasted from several clipboard data types, making the paste button robust for the end user. If the user copies a file in Explorer to the clipboard, that file is loaded as the map if it is a valid image file. If the user copies image data from another program to the clipboard (such as from mapping software or Photoshop), the image is pasted directly. If the user copies an image URL from a browser to the clipboard, the image is fetched from the web. If the user copies HTML code containing an image link to the clipboard, then the image is fetched from the web. The image ratios are maintained so a pasted map may not fill the entire map box. OmittingMap The map can be disabled and removed from the report by clicking the “do not include Map” button in the Select a Property Map” display box. ManuallyAdjustingtheLocationMarker The map's marker can be adjusted by clicking on the directional arrow then you may need to "Update Map". Default increments are 0.0001 degrees, which is roughly 30 feet (depending on the location on the globe), and values Lat & Long can also be entered manually. 15 LOADINGSUBJECTPHOTOGRAGHS There are two methods of inserting photos into the Fusion report. 1. Drag and drop 2. Using the “Import Photos Window” Method 1: Simply drag and drop the photo files into the photo box that appears on Fusions main page. 16 Method 2: Click “Current Assignment” Link on the Menu Bar, then choose the “Import Photos” link. Browse to your photos and select the photo you want (or Control-click to select multiple photos) and press "Open" to add them. The drag and drop does not work from this window. Once the photos are loaded you can manipulate them by right clicking on a photo to access a menu that allows you to: Add/edit a title and caption for each photo Change the order of the photos by moving an individual photo up or down. Remove a photo If you have the ability to capture screen shots and convert them to a photo with a program like Snag-it you can use the photo section to insert charts & grafts and additional maps. The ability to add comments to a photo makes this feature a powerful reporting tool. Fusion supports the following photo formats: .jpg, .gif, .png, .bmp, and .tiff. 17 THE“REGRESSION”,“ADJUSTMENTGRID”,ANDTHE“USLDOCUMENTER” After you have completed entering the subject and subject’s area data and related analysis you will proceed to the regression analysis, the qualitative adjustment grid, and then the USL Documenter. These applications must be opened by clicking on the icons found in the Fusion Application. 18 Regression To create a new regression analysis click on the “New Valuation” icon. It is necessary that you open the regression analysis from within the Fusion program. It is important that you do not perform a “Save-as”. It is only necessary to “save” as the Fusion will save the Regression Plus file in the associated assignment folder within MS Explore file management system. Once you have opened the Regression Plus it will behave exactly the same as it does when you operate it stand-alone (outside of the Fusion) except you must tell Fusion if you wish to include the Market Conditions Analysis including charts and comments. To do so, check or uncheck the box which is located on the main page of Fusion just above the Map Box. See the Regression Plus; for Real Estate Professionals User Manual for more information on its operation. 19 QualitativeAdjustmentGrid Once the regression analysis is complete the direct qualitative comparison can be performed. At this point we have the pool of sales and can distinguish between them based on their; (1 distance from the subject property, (2 days since sale, (3 features similar to the subject, (4 price close to subject as predicted by the regression model. It is important to keep in mind that the regression analysis and the direct comparison method are two distinct methods. For example, they will likely consider different property characteristics. These differences immensely enhance the over-all quality of appraisal. Click on the “Qualitative Adjustment Grid” icon to begin the process. Next, select the box to include the QAG. 20 Next, make the window full screen by clicking on the “full screen” button at the top right if necessary. The size of the page may be larger than the MS window. When this occurs, scroll bars will appear. Use these bars to navigate the page. DISTANCE FROM SUBJECT The distance from the subject is determined by geocoding the location of the subject and all of the sales with Google Maps©. You must have internet connection for this process. There is no per use fee for this, however, at the time of this writing Google limits the number of geocodes to 2,500 per day. This is more than adequate for most appraisers. The application will warn you when you reach 1,500 and again at 2,000. The geocoding takes place automatically using the data as entered in the regression analysis. In order for the geocoding to work you should have a field called “Address” which contains the street address and street name. If all of the sales are in the same city as the subject, you do not need a field for the city (likewise for the state). If the 21 cities and states vary then you will need fields for them. They should be titled as “City” and “State”. If the state is necessary go ahead and include a field for “zip code”. Once in the Qualitative Adjustment Grid (QAG) you can make corrections to the address of any of the comps used. Simply change the appropriate address and then hit the “Geocode Address” button found just above the address fields for each comp. Then click the “Map Sales” button found just below the Sales Location Map. The comp will be changed on the Sales Location Map. To move the map marker of a comp entered on the grid you can change the Latitude and longitude for it found under the “City” on the grid. Then click the “Map Sales” button. Simply click on the comparable map to enlarge it. DAYS SINCE SALE The most recent comps will be marked with the blue tag presented above. FEATURES SIMILAR TO THE SUBJECT The comps that are the most similar to the subject property are marked with the tag presented above. PRICE CLOSE TO SUBJECT The comps with actual sales prices most similar to the value predicted by the model for the subject property will be marked by the beige tag presented above. Notice that there is no saving in the Fusion. To save changes click the “OK” button. If you decide not to save then click the “Cancel” button. 22 PROPERTYCHARACTERISTICS The Fusion will automatically include the fields you used in the regression analysis (see those circled in red below). It will attempt to carry the values over from the regression to the QAG, converting some numeric data to back to text. It is the appraiser’s responsibility to be sure this information is correct. You can use the “Other” fields to include other property characteristics. If you left out bedrooms in the regression analysis because they were all the same then you should state that in the comment section. Suggestion: Load six comparables and then gather their photos and print out the MLS and/or the tax records. Review the data on each of the comps and then make a final decision of which of the six to keep. It is generally acceptable to include as few as three comps. 23 ADDINGCOMPPHOTOS To add a comp photo: Click on the appropriate comp picture frame which will trigger a browser. It is not possible to drag and drop photos directly in. To remove a photo: Use a right mouse click and then select “Delete”. Use a left mouse click to see a larger view of a photo. WRAPINGUPTHEQAG Be sure to; (1 report the reconciliation of the comps used in the text box, and (2 enter the value as indicated by the Direct Comparison Method. FINALRECONCILIATIONANDVALUEOPINION At this point you have two indications of value by two independent analysis methods. These will have to be reconciled. To do this click on the “Summary” button found at the top of the QAG above the subject photos. 24 USLDocumenter Follow the same directions to start a new USL Report Documenter (USL). The Fusion allows you to begin a totally new USL or open an existing template. I recommend always starting a USL from scratch. However, I know that many USL users like to begin with a USL that is partially filled out. In addition, a low scope of work product like the Fusion may be performed in a high volume each with essentially the same scope of work performed. In this case the appraiser could begin with a template of a “partially” completed USL. If you chose to do so it is important not to complete the fields which are unique to each assignment such as previous sales and listings of the subject property. To create a template: Open the USL Report Documenter independent of the Fusion. When you get the desired fields complete then do a save-as to the “_USL Templates” subfolder found in the “Fusion Documents” folder. Be sure to name the file something that associates it to the type of report you will be using it for (For example; “ABC BankCurbside”). 25 As an example, if you are performing an “evaluation” for a federally regulated lender then you would select the following in the USL wizard: Remember that the Regression Plus and the USL Report Documenter can be used stand-alone outside of the Fusion. Only use the fusion when you want a USPAP compliant report for low scope of work situations. It is recommended that appraisers use the USL for every appraisal assignment and include it in the appraisal report. See the USL manual for a discussion of the methods to incorporate the USL documentation in your appraisal reports. 26 PRODUCINGTHEREPORT Once you have completed the Fusion including the valuation and USL documentation you are ready to produce the report. To access the print functions click on “Current Assignment” on the Menu Bar. The page setup defaults to letter size paper with a portrait layout scheme. The Fusion is designed to be on letter sized paper and users seem to prefer this. You should always employ the “Print Preview” function to be sure you are indeed ready to publish. The report can be printed directly to hard copy by choosing “Print Report”. However, if you have access to a word processor it is recommended that you first “Copy Report to Clipboard” and paste directly into the word processor. This will allow you to control the page breaks and insert gridlines around the tables. After formatting the report in the word processor then you can print to a “.pdf” if you have a .pdf writer loaded on your computer. There are some free pdf printers that you can find on the web. 27 GENERATINGANINVOICE One of the newer features of Fusion is its ability to generate an invoice. This feature is functional, but its design is not complete. Some of the auto transfer is not correct, so you will have to delete out some information and replace with the correct information. 28