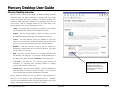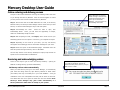
1
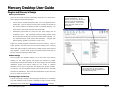
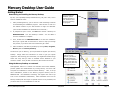
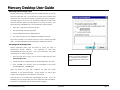
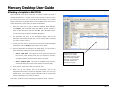
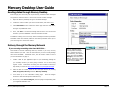
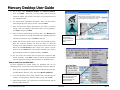
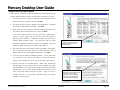
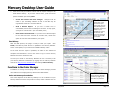
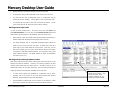
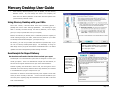
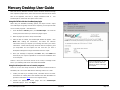
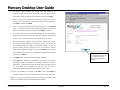
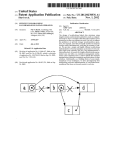
Mercury Desktop User Guide Welcome to the Mercury Desktop The ability to translate appraisal data into multiple formats is continuing to be a pressing issue in our industry. Instead of being simply one more converter or format in the evolution of appraisal data, the Mercury Network is based on open standards, which facilitate the flow of data from one format to another. Powered by net.X technology, Mercury seamlessly connects our programs to essential Internet data sources, servers and receivers worldwide, extending the network right to your desktop. • Mercury provides easy access to lenders, AMC’s and nationwide appraiser coverage to those who belong to the Mercury Network. • Mercury can be used with any of your existing clients as a means to provide online ordering right now. Click here for document 5030 – it will show you how to set up a client for online orders. • Mercury has an open plugin architecture that encourages nonproprietary data solutions and bi-directional data flow. • Plugins may also provide an interface for other operations, such as EDI or data analysis, in addition to converting files. Mercury’s capabilities are almost limitless with its plugin architecture, allowing you to meet new business challenges and to be adaptive when working with multiple clients’ EDI strategies. Contents of this guide This manual has been designed to educate you on the theory behind Mercury as well as introduce you to the basic interface. • Mercury's architecture and modular design • Installing and registering the Mercury Desktop • The Mercury order and delivery process • Features and tools in the Mercury Desktop • Support and updates for the Mercury Desktop Mercury Desktop User Guide We'll cover: In addition to making the process of moving appraisal data easy, the Mercury Network opens doors to new clients and keeps you in touch with the entire appraisal industry. 7/20/2003 Page 1 Mercury Desktop User Guide Plugins and Mercury’s Design Mercury’s architecture One source plugin may feed multiple destinations. To use plugins, click one from the source, then one from the destinations – then click Begin. If you use the same pair often, add it to your “Favorites”. There are two broad groups of functionality within Mercury’s architecture: Source plugins and Destination plugins. • Source plugins translate proprietary data, such as an appraisal file to TOTAL XML. They can actually contain entire processes for finding the file, creating a PDF to accompany the XML or practically anything. The main thing to note is that end result will contain XML. • Destination plugins take the result from the source plugin and “do something” with it. That something could be creating another output file and launching another process such as the AI Ready uploader. Or, the destination plugin could perform EDI operations – complete with E&O reviewing, uploads to a web site or even e-mail. Plugins are actually programs themselves and can do anything. They are simply special in that they know they are either handing off or receiving TOTAL XML data through the main Mercury Desktop engine which connects them together. In other words, plugins are special programs that “talk” to Mercury using the language of TOTAL XML. Modular design Since all plugins are separate modules, as are the areas of the Mercury Desktop, we can easily upgrade and expand the program as needed. Functionality increases exponentially as one source plugin can feed multiple destination plugins and plugins created by one vendor or software By building in extensive report converters, Mercury also levels the playing field, by letting appraisers use any software they wish. developer can be used in conjunction with plugins from another provider. To illustrate, note the WinTOTAL Report source feeds both the AI Ready and Value IT destinations. But, these same destinations can also be fed by any of our report converters, too. Creating plugins for Mercury If you’re a developer wishing to develop plugins for Mercury to accomplish your data workflow needs, an SDK is available to help you work through the process. See our web site at http://alamode.com/mercury for details. Mercury Desktop User Guide 7/20/2003 Page 2 Mercury Desktop User Guide Getting Started Downloading and installing the Mercury Desktop By now, you’ve probably already installed Mercury, but just in case, here is how our installation works: 1. After purchasing Mercury, you are sent an e-mail containing a web link Mercury Desktop’s SafeStart system creates shortcuts in your Windows Start menu for launching the program. for downloading the installation program. Click this link or enter it in the address window of your Web browser to begin the download. (CD’s are also available if the download isn’t convenient.) 2. If prompted to open or save, click Save and choose a directory for MERCINST2.EXE. Your PC’s desktop is easiest. You can delete it once the installation is complete. 3. Then, double-click the MERCINST2.EXE file to start the installation. We’ve put a great deal of instructions on screen to step you through the process, so you don’t have to be technical to get it done. 4. After installation, start Mercury Desktop by clicking Start, Programs, Mercury and then Mercury Desktop. The first time you run Mercury, you may be asked to register your Mercury Desktop. Simply follow the instructions on screen to get your system registered. After entering your information, our Registration Wizard will go online and verify that you have an available license attached to your customer number. Every PC that runs Mercury will need its own license. Using the Mercury Desktop on a network To set up additional stations on your network, just launch MERCURY.EXE from the shared installation folder. We’ll take care of registering files and setting up shortcuts. Multi-appraiser offices on a network can centralize their orders database, product updates and administration by running Mercury over their LAN. Just point the installation to a shared network directory. Then, to set up other workstations, browse to the Mercury program directory and run MERCURY.EXE. Our SafeStartTM technology will register files and set up icons on the workstation automatically. Each workstation that runs the Mercury Desktop will still require a separate license to be purchased, but you don’t have to run the installation on each PC. Mercury Desktop User Guide 7/20/2003 Page 3 Mercury Desktop User Guide Mercury Desktop overview Mercury 2.0 has a completely new design, providing information and links designed to make your Mercury experience a rewarding one. Many of the screens are actually web pages embedded in the Mercury Desktop with content we update frequently and prompt you to download. Across the top of the screen, you’ll see navigation buttons for the various areas of the Mercury Desktop. Here is a short description of each: • Today – Click Today, and you’re taken to a snapshot of your pending and completed orders, industry news and other information. • Plugins – Mercury’s Plugin Manager is where you match up source and destination plugins for EDI and other functions they perform. • Orders – The Order Manager shows your database of orders and where you see order details. Outside of individual plugins, most of the work you do in the Mercury Desktop is through the Order Manager. • Members – This area has links to sign up with the lenders and management companies that are on the Mercury Network. It’s a great way to expand your client list. • Web – This keeps you from having to run a separate application for web browsing. For instance, if you work with a particular AMC quite a bit, make it your default by clicking Set Home on their login screen. • a la mode – This takes you to our web site where you can find information on everything from formfilling software to Click to the Mercury Desktop Members page to see the latest members of the Mercury Network and open doors to working electronically with more clients. training seminars and the latest industry news. • Tools & Toys – We know you like gadgets. This area spotlights the latest technology in hardware, software and ideas. We’ve even put links to vendors that provide the technologies we spotlight. Mercury Desktop is started any time you launch a .ORD attachment or when you use the shortcut under Start|Programs|Mercury. WinTOTAL users can access destination plugins through a special Mercury menu that appears in WinTOTAL when Mercury is installed on a system. Mercury Desktop User Guide 7/20/2003 Page 4 Mercury Desktop User Guide Online ordering and delivery process This part of the manual addresses receiving and fulfilling orders that come When ORD files are opened, either through e-mail or from a web site download, they come up into the Order Manager. The next step is to acknowledge the order. to you through the Mercury Network. Much of this also applies to orders you may receive from sources outside the Mercury Network. Step 1: Receive the order as an ORD attachment in e-mail, or for Mercury Network orders, let Mercury’s Order Manager retrieve them when you start Mercury or click the Order Manager’s “Sync with web” option. Step 2: Acknowledge Acknowledge Order. the order. While the order is open, click There, you will have the opportunity to accept, decline or conditionally accept the order. Step 3: After accepting an order, click Export, and it will be sent to your formfilling system as a new request. From there, you complete the report. Step 4: Depending on the needs of your client, you may use Mercury throughout the formfilling process to send status messages to your client. Step 5: Deliver the report via the destination plugin. WinTOTAL users can start this process through a Mercury menu in WinTOTAL. See the Help section of the Mercury Desktop for step-by-step tutorials on specific source and destination combinations. Receiving and acknowledging orders The Order Manager automatically polls your Mercury Network account for orders that may have come in, but you didn’t see in e-mail. There are two ways to get an order into Mercury Desktop – opening an ORD file or letting Mercury get them automatically. Let Mercury retrieve orders automatically When you start Mercury and go to the Order Manager, it automatically goes online and bring down any open Mercury Network or XSite orders (and status) that may not already be in your local database. You’ll get notification of the new orders/status and they will be shown in bold text. Just double-click the row to open the order form and view details. Note: Mercury’s Order Manager only goes online automatically if a Mercury Network or XSite order is already in your system. Mercury Desktop User Guide 7/20/2003 Page 5 Mercury Desktop User Guide Receiving orders through e-mail Mercury orders come in as attachments with a .ORD extension, so you can also open orders this way. You’ll use this for clients such as ValueIT that order from their own internal systems, bypassing the Mercury Network. You’ll also need to do this for your first Mercury Network or XSite order since the automatic polling only takes effect if you have an order in your system and have “established” you use the Network or XSite ordering. 1. Open your e-mail client and receive all mail. 2. Find the message with the assignment. 3. Run the attachment with the .ORD extension. 4. The order then goes into your database and appears on screen. If an order is already in your system, there’s no harm in opening the .ORD again. The Order Manager has been designed to handle this scenario. Accepting and declining orders Mercury eliminates phone calls and faxes by giving you ways to communicate beyond ordering. It’s important to send back acknowledgements within 48 hours - even if you’re declining. This keeps your rating on our search engine high. 1. Before working with a Mercury Order, you need to acknowledge it. Comments can accompany your acceptance or decline of an order. Once the order form is open, you can view its details and then click Acknowledge Order. 2. Choose whether you accept, decline or conditionally decline the order. 3. Then, click OK. In a moment, you’ll see confirmation of your order acknowledgement. Click OK again. When you decline an order with conditions, the client will receive notification of your desired changes. If they accept, you will be sent another order to replace the one already in your system. That’s all there is to receiving and acknowledging an order. If you use WinTOTAL, the next section tells you how to import the order information. If you don’t use WinTOTAL, skip to Sending status on page 8 Mercury Desktop User Guide 7/20/2003 Page 6 Mercury Desktop User Guide Attaching a template in WinTOTAL Many WinTOTAL users don’t know that an existing request can have a template attached to it. In other words, once a request or report is saved, it’s not too late to clone. Our end result will be information in the request will be overlaid into any existing data in your template report. Here’s how it works with Mercury and a report you export to WinTOTAL. 1. When the order form is open in Mercury Desktop’s Order Manager, click Export, and the Export dialog will display. Choose a folder in which to save the report, and then click OK. (After WinTOTAL opens, you can exit out of the Mercury Desktop application.) 2. The Requester will open to the Description dialog, and the file description will already be filled out. You can change this to anything you want, or leave it as it is. 3. So that you don’t have to choose all your forms and retype boilerplate information, click the Filing shortcut where we can clone. 4. Once the Requester has opened to the Filing dialog, you can choose a clone method by clicking one of the following options: Clone... with data. This copies the entire report and data into the new file, while clearing items like your signature, borrower, occupant and other items that don’t need to be copied. Clone... without data. This uses the template forms structure, clearing all data from the forms, but keeping the request data. 5. Then, pick the report from which you want to clone. 6. When you go onto another area of the Requester, such as the WinTOTAL’s Requester enables you to merge information from the order into an existing template. That way, you can re-use pre-made reports and eliminate re-typing. Assignments area where you pick the appraiser, lender, etc. from your address book, your existing request information will be merged with whatever data was in the report you cloned. From there, continue on with completing your report as usual. That’s it! Mercury Desktop User Guide 7/20/2003 Page 7 Mercury Desktop User Guide Sending status through Mercury Desktop Even though your client may not require status, proactive status messages are great for customer service. Here’s how to send a status message. 1. Open the Mercury Desktop and go to the Order Manager. 2. Locate the order on which you wish to send status, and click it once. 3. Click Send Status. Then choose the status type from the drop-down, First, click your software brand, then choose Mercury Network and click Begin to initiate the XML conversion, E&O review and delivery process. and type any additional notes. 4. Then, click Save. The status message will be sent to our servers and stored in your local database. All times recorded are CST. In addition to being sent via e-mail, status messages for Mercury Network and XSite orders are instantly visible on the Mercury Network when you or your client logs in to check their orders. Delivery through the Mercury Network If you are using something other than WinTOTAL… Mercury Desktop makes sending status messages easy. Instead of using a web interface, just click the order once while in Order Manager; then click Send Status. From there, choose the status you want, enter notes and click Save. One benefit of clients embracing Mercury’s format is you may use any forms software you wish. Here are instructions if you use a forms package other than WinTOTAL. WinTOTAL users, see the section “How to send if you use WinTOTAL” on page 9. 1. Create a PDF of your appraisal report in your formfilling package as you normally would if you were going to deliver it to a client using regular e-mail. Instructions for doing this are included in Mercury’s help library or online at http://www.alamode.com/tech/pdf/5515.pdf 2. After the PDF is created, close the file and open Mercury by clicking Start, Programs, Mercury and then Mercury Desktop. 3. You’ll start up in our informative Today page. Click the Plugins shortcut to start the EDI process with Mercury. 4. On the left, under Source Plugins, click the plugin corresponding with your appraisal software once. Mercury Desktop User Guide 7/20/2003 Page 8 Mercury Desktop User Guide 5. On the right, under Destination Plugins, click Mercury Network. Then, click Begin. Note that if you are working with a client like ValueIT or RealEC, this process is the same; you just choose them as the destination plugin. 6. The Source plugin introduction will appear. Once you have read it, select the primary form used in your file. Then click Next. 7. Now, you will need to browse and search for your report in its native format. Once you navigate to its location, click it once to highlight it, click Open, and then click Next. 8. Now, we need to match that file up with the PDF. Click Browse again – this time to search for the PDF that matches the appraisal report you selected in the previous step. Click Next to continue. 9. Report data from the primary form will now be converted into XML. At your option, you can review the tracking data after it is converted to XML. Once the conversion finishes, you have the option to check the accuracy of the XML conversion. Either scroll the form shown in the Wizard, or click Full Screen to open a larger view. (When in the Full Screen view, click Close when you’re ready to get back to the wizard.) Once satisfied the report converted accurately, click Next. 10. The next screen will confirm that the report was converted to XML format accurately. Click Next to open the Mercury Network Wizard. (You can skip the next section with instructions for WinTOTAL users.) How to send if you use WinTOTAL… We have simplified the process greatly for appraisers that use our formfilling system. Here’s how to send a file through the Mercury Network. 1. When you’re through with the report, while it’s still open and onscreen, click WinTOTAL’s “Mercury” menu, and choose Mercury Network. 2. You’ll see WinTOTAL’s Print dialog because that’s how PDF files are created – through printing. Mark the pages to send, and click OK. 3. After printing the PDF, your report will be converted into XML, and the WinTOTAL has a special Mercury menu to launch various destination plugins based on an Athena “source”. delivery wizard will launch. Mercury Desktop User Guide 7/20/2003 Page 9 Mercury Desktop User Guide Using the Mercury Network Wizard When you have completed the process outlined in the previous section, the Mercury Network Wizard will open. (It may take a moment for it to load.) 1. The first screen you see will be an introduction and instructions for the Wizard. Once you’ve read this screen, click Next. 2. The plugin will then check for updates to its configuration. If updates are found, the wizard will be restarted. 3. Click Next. Next, verify or select the Mercury order that matches this report. You may have to pick the report from a list. Then, click Next. If you can’t locate the report in the list, you’ll need to redownload it. Cancel out of the plugin, then use the Sync with web function in Mercury’s Order Manager, or download the .ORD from your Mercury Network Order Summary page. You could also open the .ORD attachment originally received in e-mail if it is available. Once you have the original order, start over with the report delivery. 4. By tying your report to the order, you can be sure it is tracked properly on the receiving end. The plugin will next check for E&0 review script updates. Once again, this is automatic and always ensures the latest business rules are being followed so your report passes underwriting. Click Next. 5. You’ll then see the Delivery Guidelines Checklist. This is just a short list of things to verify. For your convenience, you can also have the option to view the PDF from here so you can see what you’re sending. 6. Mercury will now run the E&O review. When using the Mercury Network plugin, it uses a generic rule set. Once complete, the results will be displayed. You may see them in relation to the form by clicking Detailed View. If you make changes based on the review, you will need to start the delivery process over again – going so far as to recreate the PDF so it accurately represents what you would’ve included in a printed report. Mercury Desktop User Guide The Delivery Guidelines Checklist is one final place to verify you didn’t forget anything. Plus, it enables you to view your PDF one more time before delivery. 7/20/2003 Page 10 Mercury Desktop User Guide 7. Some errors may be marked “critical” and will require changes to be made before delivery. If you have critical errors, you’ll have three options available upon clicking Next. Cancel this wizard and make changes. Changes must be Click an item in the lower part of the screen and your cursor will move to the offending item. Changes need to be made in your formfilling system, so Mercury can reconvert the XML and a correct PDF generated. made in your formfilling software so that a new PDF may be regenerated as well as a corrected XML file. Send a Review Report. If you feel a critical error is unavoidable, this will send a message to the client. If they agree, you’ll get an override code. (See next bullet point.) Enter Review Override Code. If you have sent a Review Report to the client and have received an override code, choose this option to enter the code and deliver your report. Final delivery After the E&O process, the plugin is ready to send your report. Click Finish, and stand by while the file is uploaded to the Mercury Network. This is a web upload, so your file will be available instantly online. At the same time the report is uploaded, its status is also marked as complete and notification is sent to the client to log in to their Mercury Network account to retrieve the PDF. You and your clients on the Mercury Network can see a summary of all your Mercury Network transactions by logging into the Mercury Network web site at http://mercury.alamode.com and clicking Order Summary. Functions in the Order Manager In addition to viewing and accepting orders, the Order Manager provides other features for managing Mercury Network and XSite Orders. Your clients can manage their Mercury Network orders by logging into the Mercury web site. Order and status synchronization One of the objectives of the Mercury Desktop is to be a reflection of your Mercury Network account and provide an easier, faster interface than we Mercury Desktop User Guide 7/20/2003 Page 11 Mercury Desktop User Guide could with our web interface. Therefore, we have built in automatic “synchronization” tools to keep information consistent. • The first time the Order Manager is loaded after starting Mercury, it will go online and see if any new orders are available or if any new status messages have been posted to open orders tied to your profile. The Mercury Desktop will store your Mercury Network login so that you can perform network functions without logging in manually every time. Even if you or someone else in your organization has posted status via their installation of the Mercury Desktop or using the web interface, your system will still be accurate. • The first time you use Mercury Desktop features to communicate with the Mercury Network, you will be prompted for your Mercury Network login ID and password. This is so we can log these actions in our online database. Your Mercury Network ID may also be configured at anytime through the Mercury Desktop's "Settings" dialog. • By default, only information for open orders is retrieved. However, if you click the drop-down arrow on the right side of the “Sync with Web” button, you’ll see an option to download all orders and status messages associated with your Mercury Network profile. In most cases, you won’t need to use the “Get All” function, but it is there for situations when you want everything from the network to be in your local database, too. • All times for status messages are logged Central Standard Time as that is where our servers reside. Working with the list of orders The order listing has been designed to work somewhat like an e-mail inbox – facilitating actions with current or open items. • The list of orders may be filtered by either the Client or on their status of Open, Closed or All as well as items pertaining to synchronizing with the Mercury Network by using the drop-downs above the order list. • The upper pane lists of the orders you’ve received into Mercury. In the lower pane is the status history for the selected order. Mercury Desktop User Guide 7/20/2003 Page 12 Mercury Desktop User Guide • Orders that have never been opened will show in bold text. • A status item shown in blue indicates it was read on your last sync. • You may sort this list in descending order on a particular item by clicking the column heading. • Click it again to sort in ascending order. To switch from one order to the next, click with the mouse. At this time, arrow keys do not cause the active order to change. Working with an open order To open an order, double-click it. Or click it once; then click Open, and then Selected Report. You can also use the Browse for File option and then browse your directories for the ORD file. (But, this will be rare.) • Once opened, orders are copied to the Mercury\Orders sub-directory in folders named with the date and month they were received. • The Order Manager has an integrated messaging panel above the order form you see on an order you open. It allows you to fire off a quick reply to your client about the current order. This way, you can still send a "thanks, got it" e-mail to them without having to remember to load your e-mail and find their address. It's a timesaver and a good client relations reminder. The panel includes an option for boilerplate text and a Cc line, too. Working with non-Mercury Network orders Most of this manual has been about working with orders that come to you through the Mercury Network. However, the Mercury Desktop can also manage orders that come from other sources – as long as they are in our TOTAL XML format, we can work with them. And you gain the benefits of exporting and structured delivery with E&O on the front end. • The Mercury Order Manager shows all your orders. Sort the list by Client, order number, Address, etc, by clicking the column header. In cases where status isn’t available for a particular type of order, typically due to the source of the order being outside the Mercury Network, the Send Status button will be disabled. • Synchronization functions will have no effect on non-Mercury orders since those routines are centered on the Mercury Network servers. Mercury Desktop User Guide 7/20/2003 Page 13 Mercury Desktop User Guide • Some Mercury Network partners, such as RealEC, use the Mercury Network servers. So, even though the client is one company, the order source is “Mercury Network” so all status and other options work just like Mercury Network orders. Using Mercury Desktop with your XSite Since their release, a la mode XSites have been extremely popular – partially due to their online ordering capabilities. The ordering for your XSite is actually tunneled through the Mercury Network; we’ve simply given you a way to private label it for your company. Because we assume you already have a relationship with the majority of clients ordering through your XSite, orders that are placed on your XSite are already assumed acknowledged – just export and go. For delivery, you can use your XSite web interface to upload a PDF, or you can use our Mercury Desktop XSite plugin. In addition to being easy, the XSites Delivery Wizard enables you to customize the notification your clients receive when you send your report. The advantage to using our XSite Plugin is that you get all the features of WinTOTAL’s EDI + the status updates and online management provided through the XSite. SureReceipts for Report Delivery Get absolute confirmation that the client received your report Once you set up your boilerplate text, having meaningful information in the body of your message is just a click away. SureReceipts is an enhanced EDI system that is designed to ensure your clients get reports. There is no standard for receipts over the Internet, so this tool can be a great enhancement to your client communications. Instead of getting the actual PDF in their e-mail, the client gets a link to download it from the Mercury Network. When they download, it’s recorded in our database and you get a receipt sent to you. This feature is useful for clients that frequently “lose” reports or those with which you don’t normally e-mail files. It also overcomes limitations your client may have regarding large file attachments since the PDF is retrieved from a web download. Mercury Desktop User Guide 7/20/2003 Page 14 Mercury Desktop User Guide Note that Mercury Network and XSite orders should be delivered through their respective plugins which, when used to send a link and not the actual PDF of the appraisal, also have a receipt mechanism built in. Use SureReceipts for clients that don’t place orders online. Using WinTOTAL with the SureReceipts plugin When using our WinTOTAL formfilling system, the steps to send a report via SureReceipts are greatly reduced when comparing it to the process with non-a la mode programs – described next. 1. From WinTOTAL's Mercury menu, click SureReceipts. You'll see the normal print screen where you choose the pages to print. 2. Mark the pages you wish to send, and click OK. 3. After the PDF is created, the SureReceipts Wizard will appear. Next after reading the introduction, and follow the Click onscreen instructions where you compose your message and enter your client’s information. Notice that the plugin saves the last ten recipients, gives you drop-downs for the subject line and even lets you have a boilerplate message that merges information from the report. 4. Once your message is composed, click Next. Then, click Finish and stand-by as your report is uploaded to our server and notification sent to the recipient. That's it! Once your client clicks the link in the e-mail, a message will be Using SureReceipts, you can get an e-mail like this one letting you know a client got your report. sent to you indicating that the file was indeed downloaded. Using SureReceipts with non-a la mode programs There are a few more steps involved for documents created outside of WinTOTAL, but it is no more difficult than attaching a PDF to an e-mail. 1. Create your PDF as you normally would; remember where it is saved. Instructions for creating PDF’s with software other than WinTOTAL are provided in document 5515 found in our Support Library. 2. Choose the appropriate source plugin and the SureReceipts destination plugin. Then, click Begin. Mercury Desktop User Guide 7/20/2003 Page 15 Mercury Desktop User Guide 3. The Source plugin window will appear. The first screen is an introduction and instructions for the plugin. Once you have read the instructions, select the major form for the file, and then click Next. 4. Now, you will need to specify the filename your report in its native format. Once you navigate to its location, click it once to highlight it, click Open, and then click Next. 5. Now, we need to specify which PDF will be delivered. Click Browse again – this time to search for the PDF that matches the appraisal report you selected in the previous step. Click Next to continue. 6. Your report will now be converted into XML format. The SureReceipts plugin will only use a few of the data elements, however, for the body of your report. The client receives only the PDF and your notes. 7. Once the conversion finishes, you will have the opportunity to check the accuracy of the major form’s conversion to XML. You can do this by scrolling through the report in the provided window, or you can click Full Screen to open a larger view. (If you choose to view the major form in Full Screen mode, you must click Close to return to the Source plugin screen. When you are satisfied that the report converted When a client is sent a file via SureReceipts, they get an e-mail like this one with a link to download the file. accurately, click Next. 8. Click Next again, and the SureReceipts plugin will begin. 9. Click Next after reading the introduction, and follow the onscreen instructions where you compose your message and enter your client’s information. Notice that the plugin saves the last ten recipients, gives you drop-downs for the subject line and even lets you have a boilerplate message that merges information from the report. 10. Once your message is composed, click Next. Then, click Finish to upload your PDF to our servers which then send your client an e-mail. That's it! Once your client clicks the link in the e-mail, a message will be sent to you indicating that the file was indeed downloaded. Mercury Desktop User Guide 7/20/2003 Page 16 Mercury Desktop User Guide Updates and Support Getting updates to the Mercury Desktop Mercury is updated through our exclusive online system we call the Instant Customer Update (ICU). The ICU uses the Internet to connect to our update servers and download any new updates to Mercury. It’s all part of your Mercury Network membership. LAN users only need to get updates once, and they will be immediately available to all other stations. 1. From within the Mercury Desktop, click Update. 2. Once the ICU starts, click Next to begin the update process. 3. The first time you run it, you may be prompted to tell the Mercury Desktop about your Internet settings. Once you've selected the appropriate connection type, click Next to advance to the next screen. 4. Your connection choice of LAN or Modem in step 3 will determine the next window that pops up. If you chose LAN, skip to step 7. 5. If you specified that you connect using a modem and a phone line, the Internet Wizard will need to know which Dial-Up Networking connection to use. You should see your ISP in this list. Click it. 6. Click User Info to enter your login name and password for your Internet connection. Make sure you enter this information correctly! Our Instant Customer Update module will get updates for all plugins and automatically install them for you – even if you’re on a network. Click the boxes labeled Save password and Don’t Prompt so that the Internet connections will go on behind the scenes. Click OK on the User Info screen, and then proceed by clicking Next. 7. You’re now set up to get updates. Click Next and stand by as we connect to our servers and check for upgrades. 8. If you are on the most current update, we will notify you. Otherwise, you will see the updates transferred. 9. Once the updates are transferred, follow the onscreen Wizard to install them. At this point, users on a LAN should make sure nobody else is in the Mercury Desktop as well. Mercury Desktop User Guide 7/20/2003 Page 17 Mercury Desktop User Guide After updates are installed, you may see our SafeStartTM module upon running Mercury. This is our module that installs new system files and makes sure your Mercury Desktop application is intact and ready to run. Technical Support In the Mercury Desktop, click Help and choose Contents to reach our Help section. There, you will find links to all our manuals as well as a link to our online library of support documents. The Library ties into our web site, so it is always current and up to date with the latest tech tips. Technical support for Mercury is handled 6am to 9pm, Monday through Friday. The easiest way to contact us is to call 1-800-211-4511 or simply send e-mail to [email protected]. WinTOTAL users with a Platinum Partnership are eligible for support on Mercury and all other a la mode products 24 hours a day, 7 days a week. Your Mercury Desktop contains a wealth of information you may read on screen or print to your printer. Just click Help and choose Contents. Mercury Desktop User Guide 7/20/2003 Page 18