1
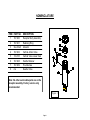
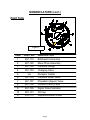
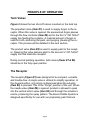
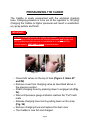
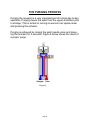
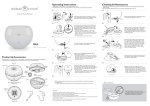
PAINT DISPENSING SYSTEM
USER MANUAL
Rev. 042004
Table of Contents
Package Contents
Nomenclature
Principle Of Operation
Tank Valves
The Receptor
EnviroCaddie™ Brand Paint
Filling the Caddie
Pressurizing the Caddie
Mixing Procedure
Applying Paint
The Purging Process
Replacing the Vertical Action Valve
Troubleshooting
Page 1
1
2
4
5
6
7
8
8
9
10
11
PACKAGE CONTENTS
EnviroCaddie Paint Dispenser Box
• EnviroCaddie™ Paint Delivery System
• 6’ Charging Hose Assembly
• Mixer Drive Assembly
• Trigger Handle Assembly
• User Manual
• Instructional CD Rom
Startup Kit
• Argon Regulator Assembly
• 6’ Charging Hose
• Paint Funnel (1 per color ordered)
• Paint Pouring Spout (1 per color ordered)
• Spare Parts Kit
Page 2
NOMENCLATURE
ITEM PART NO.
DESCRIPTION
1
167-200
Receptor Body Assembly
2
167-201
Retaining Ring
3
See Chart
Actuator
4
167-202
Vertical Action Valve
5
133-105
Vertical Valve Lower Seal
6
167-208
Handle Retainer
7
167-209
Thumbscrew
8
n/a
Needle Valve
Note: No other serviceable parts are on the
receptor assembly. Factory service only
recommended
Figure 1
Page 3
NOMENCLATURE (cont.)
Paint Tank
Figure 2
ITEM
1
2
3
4
5
6
7
8
9
10
11
PART NO.
267-110
267-125
267-102
267-103
n/a
267-104
267-107
267-106
267-105
267-101
233-115
DESCRIPTION
Bulkhead Connectors
Mixer Drive Assembly
Pressure Gauge
Charging Valve
Receptor Holder
Pressure Relief Valve
Propellant (Argon) Valve
Product (Paint) Valve
Argon Flow Controller
Fill Cap
Depressurization Valve
Page 4
PRINCIPLE OF OPERATION
Tank Valves
Figure 2 shows the two shut-off valves mounted on the tank top.
The propellant valve (Item #7) is used to supply Argon to the receptor. When this valve is opened, the pressurized Argon passes
through the flow controller (Item #9) and to the first ⅛” OD Teflon®
supply line feeding the receptor. A metered amount of Argon is
used for both, atomizing the paint, and purging (cleaning) the receptor. This process will be detailed in the next section.
The product valve (Item #8) is used to supply paint to the receptor. Opening this valve delivers paint to the second ⅛” OD Teflon®
supply line that feeds the receptor.
During normal painting operation, both valves (Items #7 & #8)
should be in the fully open position.
The Receptor
The receptor (Figure #1) was designed to be compact, versatile,
and trouble-free. A single valve is utilized to simplify operation. In
the closed position, only Argon is dispensed when the actuator
(Item #3) is pressed. This is the “Purge” position of the unit. When
the needle valve (Item #8) is opened, product is allowed to pass
into the vertical action valve (Item #4) and through the actuator’s
nozzle, producing the spray pattern. The EnviroCaddie System is
designed specifically for use with our proprietary paint formula.
Page 5
ENVIROCADDIE™ BRAND PAINT
The Sheboygan Paint Co, of Sheboygan, WI, provides our touchup paint that is formulated, specifically for the EnviroCaddie. SPC
is a mid-size, national paint company that specializes in “nichemarket” coatings for both OEM and industrial/maintenance applications.
Our EnviroCaddie touch-up paint is a modified, super fast air-dry
acrylic that provides superior adhesion, exterior durability, rust
protection, and high gloss retention. When sprayed by the EnviroCaddie, paint performance and productivity is greatly increased while cost, compared to the aerosol can, is dramatically
reduced.
Paint Preparation: Like all paint applications, it is important to
clean the area to be painted so that it is free from all dirt, oil,
grease, and loose (rust) material. It should also be dry to achieve
good adhesion.
Filling the EnviroCaddie: When filling the EnviroCaddie for the
first time, or when empty, it is important to open the gallon paint
can and stir the paint thoroughly with the provided paint stick so
that the pigment is fully suspended and not left on the bottom of
the can. This is very important as the pigment provides good hiding and in most cases one-coat coverage. Do not open the Caddie until this is done.
VERY IMPORTANT: EnviroCaddie paint is a very fast, air-dry
enamel coating and it is, therefore, important that a lid be kept on
the gallon pail until it is ready to pour. A re-usable plastic lid with
a pour spout is provided with each Caddie for this purpose.
Page 6
FILLING THE CADDIE
If the Caddie is being used for the first time, there is no pressure
inside, the fill cap (Fig. 2, Item #10) can be removed by turning it
counterclockwise until free.
IMPORTANT!!
If the Caddie has been in use and is under pressure,
open the depressurization valve (Fig. 2, Item #11) before
attempting to remove the fill cap!!
DO NOT TRY TO REMOVE THE COVER IF THE
UNIT IS UNDER PRESSURE
• Unscrew the fill cap to open the top of the tank. A removable filter made of 100-mesh Stainless Steel rests on a
rim inside the opening to prevent particles from entering
the Caddie that could potentially clog the orifices.
• Remove the paint container cover and stir with the
provided stick until thoroughly mixed.
• Snap the pouring spout on the paint can and pour contents into tank.
• Replace the fill cap by turning it clockwise until the seal
makes contact with the tank spout and tighten another ⅛
turn.
• The Caddie is now ready to be pressurized.
Page 7
PRESSURIZING THE CADDIE
The Caddie is easily pressurized with the enclosed charging
hose. Charging pressure is to be set at the regulator to 125 psig.
Charging the Caddie to higher pressures will result in unsatisfactory spray pattern and finish.
IMPORTANT!!
DO NOT use compressed air to charge the Caddie!!! This will result in a
vapor mixture inside the tank that will be highly flammable and Oxygen rich.
NFPA guidelines prohibit the use of compressed air in vessels with this
volume capacity. USE ONLY Argon for pressurization.
Figure 3a
•
•
•
•
•
•
•
Figure 3b
Close both valves on the top of tank (Figure 2, Items #7
and #8)
Remove cover from charging valve as described above in
the previous section
Attach charging hose by pressing down to engage lock (Fig.
3a)
Wait until pressure gauge indicator reaches the “Full” hash
mark
Release charging hose lock by pulling down on the snap
(Fig. 3b)
Remove charging hose and replace the dust cover
The Caddie is now full and charged.
Page 8
MIXING PROCEDURE
When a fresh batch of paint is first poured into the Caddie, it is
presumed to be thoroughly mixed and ready for use. If the Caddie
contains paint and has been unused for at least 4 hours*, re-mixing is necessary. Tools supplied with the Caddie to accomplish
this procedure are a 5/8” Swivel 3/8” Drive Drill Adaptor.
• Attach the 5/8” Swivel Adaptor to the drill.
• Place the 5/8” Socket on the Mixer Drive (Fig. 2, Item #2)
• Turn mixer drive at approximately 300-500 RPM (clockwise)
for about 3 minutes
• Paint is now mixed and ready for use.
APPLYING THE PAINT
The EnviroCaddie was designed to be as easy to use as the aerosol spray can, but with many added features. Spraying is as
simple as pointing the receptor and pressing the actuator. For
most paints, a spray distance of 6-8” is suitable, although experience and familiarity with the unit will result in the user developing
various techniques for the different formulas.
Advantages of the innovative receptor design include:
• Paint with the receptor in any orientation, even upside down
• Easily replace the vertical action valve (Fig.1, Item #4) if it
ever becomes clogged
• Locking trigger handle eliminates radial movement that can
block the spray pattern
• Provides Argon atomization of paint allowing for more even
surface coverage
• Easily purged for storage by simply closing the paint valve
and spraying Argon through actuator
Page 9
THE PURGING PROCESS
Purging the receptor is a very important part of normal day-to-day
operation. Purging cleans the paint from the upper chambers prior
to storage. This is similar to turning an aerosol can upside down
and pressing the actuator.
Purging is achieved by closing the paint needle valve and pressing the actuator for 5 seconds. Figure 4 below shows the result of
a proper purge.
Figure 4
Page 10
Replacing the Vertical Action Valve
Refer to figure #1(Receptor) except when otherwise noted.
IMPORTANT ! !
Follow these procedures carefully to avoid personal
injury or damage to the equipment !!
Removing The Vertical Action Valve
•
•
•
•
•
•
Close needle valve at the receptor (Item #8)
Depress the actuator (Item #3)to purge the unit
Close valves at tank (Items 7 & 8 Figure #2)
Depress the actuator again to release remaining pressure
Remove thumbscrew (Item #7) and handle retainer (Item #6)
Remove handle by turning clockwise ½ turn and pulling
down on handle
• Unscrew retaining ring (Item #2)
• Carefully pry up vertical action valve (Item #4) while being
careful not to lose the lower seal (Item #5)
• Inspect the lower seal for damage, if good it can be re-used
Page 11
Replacing The Vertical Action Valve
•
•
•
•
•
•
•
•
•
Place lower seal (Item #5) in receptor bore
Place the new vertical action valve (Item #4) on receptor
Replace and tighten retaining ring (Item #2)
Install new actuator (Item #3)
Replace the handle by placing the front into the receptor,
pressing the rear back and turning ½ turn clockwise.
Replace the handle retainer (Item #6) and the thumbscrew
(Item #7)
Open valves at tank (Items 7 & 8 Figure #2)
Depress actuator (Item #3) to check purge function
Caddie is now ready to dispense paint
Page 12
TROUBLESHOOTING
Problem
Possible Cause
Tank Valves Closed
Needle Valve Closed
Caddie Will Not
Spray
Low Argon Pressure
Actuator is clogged
Low Argon Pressure
Spray Pattern Is
Poor
Actuator is clogged
Spray is too close to
work
Temperature below
55°F
Paint Heavy Or Runs
Caddie temperature
below 55°F
Paint is not mixed thoroughly
Low Argon Pressure
Argon valve not fully
open
Paint Spray Sputters Faulty vertical action
valve
Partially clogged actuator
1
Solution
Open tank valves
Open needle valves
Pressurize tank
Replace actuator
Pressurize tank
Replace the actuator
Spray 6-8” from work
take work to warmer
area if possible
Store Caddie in
warm area
Mix paint as per procedure on page 8
Pressurize tank
Open Argon valve on
tank
Replace Valve
Replace actuator
To check for clogged actuator:
• Close all valves
• Open the tank Argon valve (Figure 2, Item #7)
• Depress the actuator (Figure 1, Item #3)
• Argon should be heard exiting lightly out of the actuator
Page 13
EnviroCaddie, LLC
PO Box 803
Bridgewater, MA 02324
Customer Service and Technical Support
888-867-1800
or fill out a support form at:
http://www.envirocaddie.com
Engineering and Compliance: Ray Valdes
[email protected]
Sales Support: Pete Fairlamb
[email protected]
Rev. 200906
Page 14