1
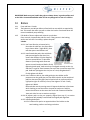
Owner’s Manual
Operation and Maintenance Instructions
Wisper 806fe
April 2009 1st edition
We strongly recommend that you read this entire manual before
using your Wisper bike
Wisper Limited
-1-
User Guide
Introduction
Page 3
Part 1 Caring for your Wisper bike and pre use checks
1
2
3
4
5
6
7
8
Before you set off for the first time
Before each use
Battery care
Recharging your battery
Water
Maintenance and adjustments
Technical specifications and performance
Simple trouble shooting
Part 2
Controls and Equipment
9
10
11
12
13
14
15
16
17
18
Battery on off and battery lock
Capacity indicator
Gear shifters
Pedelec mode
Throttle
Brakes
The front connection box
Rims and spokes
Chain and drive wheel
Derailleur
Page 4
Page 5
Page 5
Page 6
Page 6
Page 6
Page 8
Page 8
Page 9
Page 9
Page 9
Page 9
Page 9
Page 10
Page 11
Page 11
Page 11
Page 11
Warranty
Page 12
Service contacts
Page 13
-2-
Introduction
Thank for choosing a Wisper electric bicycle.
By making the decision to use an electric bike you are helping to safeguard our
environment by saving our planet’s precious resources and reducing carbon pollution.
Before you use your Wisper bike it is important that you read this manual carefully. If
there is anything you do not understand completely please contact your retailer.
Please observe traffic regulations, and don’t lend your bicycle to anyone who is
unfamiliar with it. The bicycle can only legally be used on the road by a person aged 14
years or older.
We strongly advise you to always wear a cycle helmet when using your bicycle and if you
are unfamiliar with cycling to attend a cycle proficiency course prior to using it. Your
Wisper Works 806fe is not toy and should be considered a serious mode of transport.
As with all bicycles it is important that you stay within safe limits, if you feel as if you are
traveling too quickly for the road conditions you probably are, so slow down. High speed
will increase forces in the case of an accident and increase the possibility of injury.
Test your brakes prior to using the bike every time you use it and remember the bike will
not stop as quickly in wet or icy conditions as it would on a dry road.
Before you use the bike for the first time you must make absolutely certain that it has
been correctly built. You can do this by either taking it to your nearest cycle engineer or
if you are proficient in cycle mechanics inspecting it yourself. In particular you must
make sure that the pedals, saddle, handle bars and any self assembly items have been
correctly fitted.
NEVER drink alcohol and ride your electric bike. The use of alcohol greatly reduces
reflexes and limits your ability to ride safely. Even a very small amount of alcohol will
limit your ability to be safe on the road.
When you need to replace your battery please either dispose of it properly or preferably
send it back to us or your supplier and we will make sure it is properly recycled.
Happy cycling!
Wisper Ltd
-3-
Part 1 Caring for your Wisper bike and checks
Although your Wisper bike has been thoroughly tested prior to delivery, it is very
important that you check the bike again before its first use. Equally important are
frequent and regular spot checks, they will protect you and your Wisper bike.
Please read this manual carefully. Only on full understanding of all the functions of this
electric bicycle should you attempt to use it.
Your retailer may have assembled your bike for you if not you will find fitting instructions
on the Wisper website www.wisperbikes.com
1 Before you set off for the first time
1.1
1.2
1.3
1.4
1.5
1.6
1.7
1.8
2
Check the handle bars and handle bar stem are properly tightened
Check all other nuts and bolts and fixings are properly tightened, pay particular
attention to the motor fixings, side kick stand, yoke and steering head bearings
Check brakes and brake isolators are functioning properly
Check tyre pressures are correct and tyres are not damaged
Check reflectors and lights if fitted are functioning properly
Make sure battery is fully charged
Load battery into your bicycle’s rear carrier and turn on the power on/off
button. Lock the battery into the rear carrier to ensure the battery’s output
connection is always connected properly.
Remember to validate your warranty by visiting
www.wisperbikes.com/mywarranty and filling in your details.
Before each use
It is important you perform a quick check of your bike every time you use it, checks
should include the following, if you find any damage or problems do not use the bike
until the problem has been solved or you have had the faulty item checked by a bike
mechanic or your retailer.
2.1
2.2
2.3
2.4
2.5
Check tyres for any visible damage
Check tyre pressures
Check for any lose nuts bolts or fixings
Check brake functions
Check electronic functions
-4-
2.6
2.7
Check reflectors are in place and lights are working
Check your battery for any visible signs of damage
3
Battery care
3.1
Before you use the battery for the first time it is best to give it a full deep charge
for 12 hours. To fully condition your new battery give it complete deep
charge/discharge cycles for the first three charges. This is achieved by charging
your battery for 12 hours and then using the bike until the battery is completely
drained. After this “conditioning” process you can then charge and discharge
the battery as and when you require for long or short periods
If you are going to leave your battery uncharged for more than eight weeks it is
best left half charged. You should then re charge it every four weeks for two
hours to keep it in top condition
Before setting off on any journey it is always better to have a fully charged
battery
Do not expose the bicycle or battery pack to fire, heat sources, acid or alkaline
substances
When leaving your bicycle during hot weather always leave in a shaded well
ventilated area
For best results always recharge the battery at room temperature
Before unloading the battery make sure it is
turned off at the key and unlocked, pull the
battery box from the rear carrier housing. Please
refer to the picture
If your battery is damaged or appears to be
overheating for any reason immediately return it
to your retailer for advice and a safety check
3.2
3.3
3.4
3.5
3.6
3.7
3.8
4
Recharging your battery
4.1
First connect the output connector plug with
the battery (Please refer to the recharge point
shown), then connect to the mains. Make sure
the charger is turned off and connect the
charger to your battery then turn on the charger.
Red and yellow lamps on the charger indicate
the battery is charging, when the yellow light
turns green the battery fully charged. Always
turn off the charger and disconnect from the mains after charging. Always
disconnect the charger from the mains before disconnecting the charger from
the battery. It is possible that the battery will take up to 12 hours to charge on
the first three charges.
-5-
4.2
4.3
Always charge the battery always in a well ventilated area.
Do not leave the charger connected to the mains when not in use.
5
Water
5.1
5.2
Your electric bicycle is rain and splash proof and can be used in all weathers.
The electrical components of the vehicle, such as motor, battery, and controller,
must not be submerged in water.
6
Maintenance and adjustments
6.1
IMPORTANT! Do not attempt to open the casings of the battery, motor or
controller it could be dangerous and all warrantees will become void. If you
experience a problem contact our service department or your retailer.
Wheel spokes should be adjusted after 300 miles riding. Saddle tube should
never be raised beyond the maximum indicated by a safety line around the
tubes. The recommendation of the torque on the nuts as follows:
6.2
(A) Front axle nuts.
70N.M
(B) Back axle nuts.
46N.M
(C) Handlebar stem expander bolt.
18 to 20N.M
(D) Seat pillar clamp nut/bolt.
5-8N.M
(E) Brake cable anchor bolt.
5N.M
(F) Brake centre bolt.
M6:11N.M
(G) Seat clamp nuts.
24N.M
(H) Cotter pin nuts.
R:42N.M
(I) Gear shifter nuts.
4N.M
(J) V brake caliper nuts.
10N.M
(K) Rear carrier nuts.
8N.M
(L) Mudguard bracket nuts.
8N.M
L: 46N.M
Other nuts/bolts torque depends on their size. M4:2.5-4.0N.M
M5:4.0-6.0N.M
6.3
6.4
6.5
6.6
M5:
M6:6.0-7.5N.M
Your bike has a rear derailleur that will automatically tension your chain.
However if the chain becomes loose or frequently comes off the drive wheel,
you can easily adjust the chain tension by loosening the rear axle nuts slightly,
and adjusting the tension bolts. Make sure that the chain runs freely and
re-tighten the axle nuts.
The brake leavers should lock the wheels when compressed half way between
their open position and touching the handle bars. When they need adjusting
please do according follows suggestions.
Warning: Handlebar hand grips or tube end plugs should be replaced if
damaged, as bare tube ends have been known to cause injury.
Warning: Replacement forks must have the same rake and same tube inner
-6-
diameter as those originally fitted to the bicycle.
IMPORTANT braking distances increase on wet or icy roads.
6.7
Lubrication:
6.7.1. Once a month to lubricate all pivot points on derailleur, derailleur pulleys
with chain lube.
6.7.2. Every three months lubricate the brake lever pivots, the gears and chain
with light oil and the brake bushes (not the rubber brake shoes or disc) with a
little grease.
6.7.3 Once a year, have your dealer re-grease the bottom bracket bearings,
headset bearings, wheel bearings or you lubricate pedal axles where they
thread into the crank arms, handlebar stem by yourself.
6.8
Recommended tools for proper maintenance:
Torque wrench with Nm gradations 2, 4, 5, 6, 8 mm Allen wrenches
9, 10, 15 mm open-end wrenches 15 mm box end wrench
Socket wrench, 14, 15, and 19 mm socket T25 Torque wrench
No. 1 Phillips head screwdriver Bicycle inner tube repair kit, tyre pump
7
Technical specifications & performance
Type
Performance
Assisted range
Maximum speed
Weight with battery
Maximum load
Wisper Works 806fe
(with 75kg 165lb rider)
Up to 40km
25kph (15.5mph)
19.6kg max
130kg (240kg)
Battery specifications
Cell Type
Capacity
Rated voltage
Advanced Environmental Panasonic Lithium Cells
9Ah
24V
Main Controller specifications
Low voltage safeguard
21.5V
Overload current safeguard 14A
Main hub motor specifications
Motor type
Hi speed brushless
Rated power
Aus NZ 200W / Europe 250W
Rated voltage
24V
Charger
Lithium 115 to 230V 24V fan cooled
-7-
8
Simple Trouble shooting
Problem
Possible reasons
Trouble shooting
Top speed too
slow
1. Low battery voltage
2. Damage to motor driveline
1. Recharge battery fully
2. Call service
Power on but
motor not working
1. Battery not connected position
2. Fused
3. Motor connection damaged
1. Re install battery
2. Replace fuse
3. Call service
Driving shorter
distance per
recharge
1. Tyre pressure too low
2. Undercharge or charger fault
1. Check pressures
2. Recharge completely or
have charger inspected
3. Replace battery
3. Battery capacity loss or
damage
Part 2 Controls and Equipment
In this section we will describe the functions and any specific maintenance needed on all
the main controls and ancillary equipment.
9
Battery on off and battery lock
9.1
Your Wisper bike has 1 key. This key is for locking
the battery into the bike. Please keep a careful
note of the key number as we cannot replace it
without this number should it become mislaid.
The battery is connected to the electrical system
on the bike automatically when you push the
battery into the rear carrier housing. To turn on
the bikes electrical system, switch the on/off
button in the battery box to on, to turn off the bikes electrical system, switch
the on/off button in the battery box to off. (Please refer to the picture)
After the battery has been turned on the bike is ready for use. The battery box
capacity indicator is on the handle bar for ease of use. Assistance from the
battery is then available.
9.2
9.3
-8-
9.4
9.5
9.6
To lock the battery into the bike frame turn the key clockwise the locking bolt
holds the battery, if you wan to unlock turn the key anti clockwise while the key
at lock position. Read 3 and 4 for battery care and advice on charging at the
beginning of this manual.
The battery can be charged either on or off the bike.
To remove the battery first turn off the power by switching the on/off button.
Unlock the battery and pull out from the rear carrier housing.
On the handle bars
10
The battery capacity box
10.1
When the battery is switched on the lights on the capacity indicator on the
handle bars will illuminate showing the battery capacity available. When the
battery is switched off the lights will go out and you will not get any assistance
from the battery or motor. The bike is then an unpowered push bike.
11
Gear shifters
11.1
806fe has 16 gears, 2 front chain drives (34 and 50
teeth) and 8 rear sprockets (11 to 30 teeth). The
front shifter will move the chain between the high
gear chain drive H and the low L. (Please refer to
the picture). The rear shifter will move the chain
from the highest gear to the lowest by simply moving the lever from left to
right.
12
Pedelec mode
12.1
When you first ride your Wisper bike you will notice that after one turn of the
pedals the motor will start working assisting you ride the bike by adding power
to the front wheel. This is the standard or pedelec mode, to continue using the
pedelec mode you must keep turning the pedals, if you stop the motor will stop
and the bike will slow to a halt. If you start pedaling again after one turn the
motor will start again.
13
Throttle
13.1
No throttle is available in this bike.
-9-
IMPORTANT Make sure your handle bar grips are always intact, in good condition and
on the bike. Uncovered handlebar tubes can be very dangerous in case of a collision.
14
Brakes
14.1
14.2
Front and Rear: V brake
The brakes on your Wisper bike are fitted with cut outs which are required by
law. This means that when you pull on either the back or front brake lever the
motor immediately stops working.
Full details of how to adjust and maintain your brakes:
Once a month, inspect brake pads for wear. If the grooves in the braking
surface are less than 2 mm deep, replace the pads.
V brake:
14.3.1. Use 5mm Allen key to loosen bolt A,
then take the cable out. Use 5mm Allen
key to loosen bolts C (right & left), then
take the spacers and washers out
14.3.2. Install new brake pads, then with both
pads pressed against the wheel rim,
ensure that distance B (in the diagram)
does not exceed 65mm. To decrease
distance B, exchange wide & narrow
spacers on each brake pad. Before finally
tightening brake pads, make sure they are aligned correctly on the rim,
and there is a gap of 1mm between the top of the rim and the top of the
pad. Hold each pad against the rim (one at a time) & tighten bolt C.
Finally tighten to 6-8N.M
14.3.3. Insert cable into bolt A, slot cable guide pipe into holder and fit
protector over the guide pipe end. Set cable in bolt A so that combined
pad/rim clearance (the gaps from left pad to left rim surface and from
right pad to right rim surface) is 2mm, then tighten “A” bolt. Finally
tighten to 6-8N.M.
Balance brake arms by turning screw D. Depress brake lever a few times
while checking to see that tension is equal for both arms. Pad/rim
contact should occur at the same time each side. Clearance should be
1mm each side. Do not set tensions too high.
14.3.4. Re adjusts pads so they are properly aligned (see step 2), as tension
adjustment will probably have altered the original pad alignment.
14.3.5. Installing brake pads.
14.3.5.1.Position each pad on an opposite side of the holder so that
two breaking surfaces are facing each other.
14.3
- 10 -
14.3.5.2. Take care not to touch the braking surfaces, push the pads in the
holder together and insert into the caliper so that the protruding
lip with the retainer bolt hole is aligned with the bolt hole on the
caliper.
14.3.5.3. Insert the retainer bolt and tighten it with a 3mm Allen wrench,
finally tighten to 3-5N.M
15
15.1
The front connection box
The front connection box allows for the easy removal for repair
or replacement of any of the electronic components on the
handle bars.
16
Rims and spokes
16.1
It is essential to get your spokes checked and tightened after 300 miles or
500km. This is a free service provided by your supplier. If this service has not
been undertaken at the correct time this may cause damage to the wheels and
spokes that will not covered under our guarantee.
17
Chain and drive wheel
17.1
17.2
Lightly oil with bicycle chain oil the chain at least once a month.
Because your bike has a rear derailleur the chain will be automatically adjusted.
18
Derailleur
18.1
Full details on how to adjust and maintain your derailleur can be found on our
website www.wisperbikes.com Electric bikes, Manuals.
- 11 -
Warranty
Repair or replacement of components
IMPORTANT To validate this Warranty the retail customer must register the bike at
www.wisperbikes/mywarranty within 14 days of purchase.
Only use this product in accordance with this user manual. We offer a limited warranty of on the
following items.
1
The main frame
Six years
2
Gears, bearings, motor shell, hub motor, front forks
Two years
3
Handle bar controls, brakes (excluding brake shoes and pads)
One year
4
Controller and Charger
Two years
5
Battery casing, battery leak, battery capacity step-down more than 30%
One year
6
Paintwork (excluding deliberate or accidental damage)
Two years
7
Front and rear axle, flywheel or chain wheel
One year
8
Electro plating, on wheel rims, rack and kickstand
Six months
9
Other cases that render the bike unsafe to use.
By negotiation
1. If the product has a quality fault within 15 days of delivery the part will be repaired or replaced or
in exceptional circumstances we may replace the whole vehicle.
2. The period of assurance shall commence from the day delivery was made to the retail customer,
or from the day the retail customer collected the bike from the retailer.
3. To validate this Warranty the retail customer must register his / her bike at
www.wisperbikes/mywarranty within 14 days of purchase.
Exceptions to Limited Warranties
1. Damage resulting from misuse, not maintaining the vehicle or not following the guidelines within
this user guide.
2. Accidental or deliberate damage.
3. Damage due to private repair or alteration by user or unauthorised service centre.
4. Failure to produce invoice or proof of purchase.
5. Spare parts and components worn in normal use.
6. Failure to register your bike at www.wisperbikes/mywarranty within 14 days of purchase.
- 12 -
It is essential to get your spokes checked and tightened after 300 miles / 500km. This
is a free service provided by your supplier. If this service has not been undertaken at
the correct time this may cause damage to the wheels and spokes that will not
covered under our guarantee.
Service through
Your retailer
or
Wisper Ltd
10 Oakenbrow
Sway
Hants
SO41 6DY
Tele: 01590 681553
Mobile: 07977 185830
[email protected]
www.wisperbikes.com
Copyright January 2009 Wisper Ltd
- 13 -