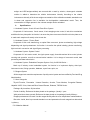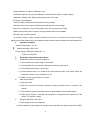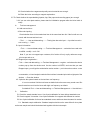
1
User
for
MS-IIM
MS-II
Chemi luminescence Immunoassay System
Modified Date 2007.2.1
Software Version 1.0.0
Signs
User’s Guide
Company’s Address
Issue Date
In-vitro Diagnostic Medical Device
Caution
Storage Temperature
Mark of Communities of European
Help
Take safety precaution measures in case there is
hazardous biologic waste.
-1-
Explanation
Warning
Please read carefully and operate in accordance with the user manual.
Attention:
We have tried our best to make every thing perfect. Potentially errors and omissions are, however,
virtually inevitable.MS highly appreciates your advice on correction.
We will constantly ameliorate our product at certain period to improve the equipment’s performance.
The details of this User Manual are subject to change without previous notification. MS will provide the
updated User Manual to her customers in the form of attachment in time.
Any suggestions either on product or on user manual will be awarded.
Company’s name
Medical Sources Co.,Ltd.
European Representative:Shanghai International Holding Corp.GmbH(Europe)
Address : Eiffestrasse 80, 20537 Hamburg Germany
User’s Guide
This User Manual is for Chemiluminescence Immunoassay System. The number of photons can be read
from the 96-well micro plate. Therefore, certain antigen or antibody concentration in patient’s blood serum
is clear.
Table of Contents
·Basic principle & performance ………………P. 4
·Standard operation rules ……………… P.9
·Installation Guidance
……………… P.20
·Shortcut User Manual ……………… P.21
·Daily Operation Manual ……………… P.23
·Maintenance Manual
………………P.39
·Troubleshooting …………P.39
Guarantee Two-year Free Maintenance
-2-
The quality of the Chemiluminescence Immunoassay System is assured. MS provides each
customer a 2-year guarantee sheet of repair. The guarantee is available, given that the equipment has
not been opened or repaired by technicians in other companies.
-3-
Basic Principle & performance
1
Basic Principle
1) Purpose
Chemiluminescence Immunoassay System is a kind of medical test equipment used for human
immunoassay by testing human body fluid. Chemiluminescence Immunoassay (CLIA) is high
sensitive test technology, applying for quantitative analysis of minim material in human body, such
as hypothyroid hormone, gonad hormone.
2: Basic Principle
2.1Reagents Characteristic
Chemiluminescence is light emission induced by chemical reactions under normal temperatures.
Chemiluminescence is a multi-step course. The principle is as follows: product molecules or
intermediate molecules are activated to electric excited state by the energy produced in chemical
reactions. When they decline to the ground state, energy is released in the form of photons (viz.
chemiluminescence). The chemiluminescence system includes two types: One creates
chemiluminescence signal by enzyme; and the other adopts non-enzyme chemicluminescent
labeling technique.
In the above mentioned first system, commonly used chemiluminescence reagents are
aminobenzene dihydrazide (mainly luminol and isoluminol ramification) and acridine esters. The
great success of chemiluminescence determination using isoluminol labeled biotin in 1976 led to
rapid development of chemiluminescence immunoassay. Besides, the detection sensitivity is
enhanced greatly and fleetly. The chemiluminescence system commonly used in the past is as
follows:
O
NH
NH HRP
Lumino
l
is
OH
NH 2
O
CO 2 -
light
+ (425nm)
CO 2 -
N2
NH 2
activated by oxidizers to amido phthalate ions in the excited state. It emits photons while declining to
the ground state.
The chemiluminescence technology wasn’t applied in the gene analysis and immunoassay
detection field due to its low sensitivity until people found in the 1980s two kinds of materials, namely,
6-hydroxybenzothiazole &its ramifications , and phenols with two p-substitutes (such as p-iodophenol
-4-
and p-phenylphenol). These two materials can increase the luminescence intensity by more than a
thousand times. Besides, they could also prevent background illuminescence caused by single
reaction between oxidizers and luminescent reagents while prolonging the luminescence time by a
few hours. Generally, the system requires using ALP and HRP. The additional substrate illuminates
under the effect of enzyme. The luminous flux is determined by substrate. The chemical reaction is as
follow:
Light Emission Mechanism of CSPD
marker
In the nonenzyme chemiluminescence labeling system, signal could be emitted in very short time
because its background signal is small. Generally, chemiluminescence is able to accelerate the
detection by ten times or even more, or to improve the sensitivity by ten times or above.
2.2Reaction Process
Put
quantitative
body
fluid
and
enzyme
labeled
substance
into
white
opaque
enzyme-labeled-plate which solid phase is coated with antibody. Sample molecules and enzyme
labeled substance will compete to combine with the antibodies on the solid phase. Separate and
wash the unbound components, and add chromogenic substrate. Then, the enzyme induces the
substrate to luminesce. At the time, put the enzyme-labeled-plate into the equipment and photon
counting system will read the luminescence value of each well. The sample molecule concentration is
then calculated by the mathematics model constructed in the light of standard sample. In the end, the
data report form, which will assist clinic diagnoses, is printed.
2) System Description
1: Equipment Structure
1.1Structure Picture:
Sample Input Port
Fiber
Sample Plate
Transfer
Drive Unit
-5-
Light Isolating Unit
Printer
Motion Controller
Port Controller
Computer
Photon Counting Unit
Data
Processor
Power Supply
High-voltage
Generator
1.2 Components of Analysis System
Composed of Computer, Data Printer, Port Controller, Motion Controller, Photon Counting Unit,
Fiber Transfer, Sample Plate Drive Unit, Data Processor, Sample Send Port, Power Supply,
High-voltage Generator, etc.
1.3 Explanation for Each Component
Sample Send Port:The only exit between equipment and the outside. Its function is to carry the
sample and to prevent light away from the system.
Sample Plate Drive Unit: In charge of sending sample to the test unit.
Fiber Transfer:Transfer photon signal of single sample to Photon Counting Unit, effectively
avoiding the light pollution among samples.
Photon Counting Unit:Executing emitted photon signal collection and its pretreatment.
Motion Controller:Drive X-axis and Y-axis, send test sample to its corresponding test place, and
control fiber motion and Location Sensor.
Port Controller:In charge of serial data communication between equipment and computer.
High-voltage Generator:Provide Photon Counting Unit with 1400V DC voltage.
Data Processor:Implementing data enlargement, demodulation, threshold control, level inverter
and data buffers.
Computer:The computer controls the system. Through special test software, it controls equipment
motion, collects data, processes data, execute fitting calculation, display test result and
also print it, etc.
Printer:Print test report and data statistical report form.
2: Technique Data
Power Supply Voltage:220V±22V:50Hz±1Hz
Input AC Power:
:300VA
Cross Talk:
Less than 1×10⁻⁴
Linearity range:
50:2,000,000 RLU
-6-
Repeatability:
CV ≤2%
Stability:
CV ≤2%
Sensitivity:
100
Accuracy:
RLU
98%
Test Time:
Less than 5 minutes :1s for sampling; 96test samples:
Dimension:
754mm×550mm×472mm(IIM)/ 644mm×440mm×278mm(IM)
Computer Weight: 25kg(IIM)/15kg(IM)
Safety Type:
Fuse Type:
I,B
2A: 2 pieces:
3: Operation Standard
Quality System:ISO13485
Enterprise Standard:YZB/Min 0210:2005
Production License:Min Food and Drug Administration Permitted No. 20050064
Registration Number:Min Food and Drug Administration Permitted Year 2005 No.2400032
4: Operation Requirement
4.1 Ambient Condition:
Ambient Temperature
Relative Humidity
Atmospheric Pressure
15 :-35 :
≤85% at 25:
860hPa:1060hPa
Keep away from strong magnetic field, strong electric field, water resources and causticity liquid.
4.2 Power Supply:
Power supply must be 220V/50Hz or 110V/60Hz. Its groundwire should be well connected to the
ground. The voltage fluctuation shouldn't exceed 10%. Otherwise, voltage stabilizing device should
be installed.
5: Wastes Treatment
Once test finishes, sterilize the wastes and dispose them properly, such as, remaining fluid of
plate washer, reaction well plate, tip, etc, avoiding harm to human or pollution to environment.
-7-
Standard Operation Rules
1
Purpose
The system and its reagent sets are for ultra-microanalysis, quantitative determination and
qualitative analysis of the chemical compositions of virus antigen, antibody, hormone, peptide, tumor
protein, metabolite and medicine in human blood serum and other body fluid.
2
Applications & Principles
Technical Theory:
Enzyme-labeled Chemiluminescence Immunoassay Technology
Test Procedure:
1:
Competitive ELISA: Solid Phase Chemiluminescence Enzyme Immunoassay, taking
micro plate as its carries, follows the competitive methodology. Antigen is coated in advance onto the
wells of the micro plate. After the test sample is added, free antigen from the test sample and the
HRP-labeled antigen compete for the immobilized antibody-binding sites on the wells. Thus, the
immune compounds consisting of antibody-antigen and antibody-HRP- labeled antigen come into
being on the surface of the micro plate. After unbound antigen and HRP-antigen are washed off by
solution, pre-set chromogenic substrate solution is added to determine the relative luminescence
intensity. The more the free antigen in the sample, the less the amount of conjugated HRP-antigen.
According to the known concentration of the calibration materials and its related luminescence
intensity, dosage-reaction curve is drawn and regression line is available after the fitting process.
Then, the concentration of antigen present in the unknown sample can be calculated.
2:Sandwich ELISA Solid Phase Chemiluminescence Enzyme Immunoassay, taking micro plate
as its carries, follows the sandwich methodology. The methodology uses 2 specific antibodies which
recognize discrete sites on the unknown molecule. The first antibody is precoated onto the wells of the
micro plate. It captures antigen in the blood serum after being added into the sample. The other
antibody, connected with HRP, is allowed to bind to the antigen. Thus, the immune compounds of
antibody -antigen- labeled antibody come into being on the surface of the micro plate. After unbound
-8-
antigen and HRP-antigen-antibody are removed with a wash by solution, chromogenic substrate
solution is added to determine the relative luminescence intensity. According to the relative
luminescence intensity of the known antigen concentration of the calibration materials, standard curve
is drawn and regression line is available via dual-logarithm mathematical model. Then, the
concentration of antigen present in the unknown sample can be calculated.
3
Specifications
1:Hardware System:X-axis & Y-axis Plane Drive System
Composed of X-axis sensor, Y-axis sensor, X-axis stepping motor control, X-axis drive mechanism
and 96-well micro plate pallet. Its function is to cause the plane movement of the 96-well micro plate so as
to make each sample well exactly orient to test site.
2:Hardware System: Photon Read
Composed of such cells transferring, as optical fiber movement, photon accelerating, high-voltage
dispatching and signal pretreatment. Its function is to realize the optical isolating, photon transferring,
light-to-electric conversion and signal-figure processing.
3:Hardware System:System Control
Composed of Y axis motor control, low ripple power supply, three-dimensional drive control, photon
counting and operation, as well as communication interface. It is in charge of movement control, data
processing and data transmission.
4:Hardware System:Embedded Computer System:Only for MS-IIM Series :
Made up of industry control embedded system. Its function is to implement display, data input,
instrument control, fitting operation, database, report forms print, etc.
5:Reagent System
All the reagent sets meet the requirements of quality control system and are certified by Food and Drug
Administration.
5.1 Item Categories
Thyroid Function, Procreation / Internal Secretion, Anemia, Tumor Markers, Congenital Disease,
Hepatitis / AIDS / Virus, Heart and Blood Vessel Disease, Diabetes, TORCH Series.
Package: 48 pieces/box, 96 pieces/box
Period of validity:Reference the date printed on the package. (Usually 1 year:
Valid period since been opened:Reference the date printed on the package.(Usually 60 days:
Reagent pretreatment: No need. Use the reagent directly after the room temperature reaches balance.
Bar code:Inside, there is pre-saved standard curve and parameters for each reagent box determined
by factory.
5.2 Calibration Material
-9-
6-point calibration or 2-point recalibration curve
Calibration frequency: Only 6-point calibration is needed for the same lot number reagent.
Calibration’s Stable period: Reagents sharing the same lot number.
5.3 Quality Control Material
Period of validity:Reference the date printed on the package.
Valid period since been opened:Reference the date printed on the package.
Quality control frequency: It is recommended to carry out the quality control daily.
Stability of the quality control: Dynamic Tracing could be based on this stability.
Diluents, lotion, substrate solution
To provide a perfect, uniform reaction environment as well as to ensure the test result’s accuracy,
please only use the diluents, lotion and substrate solution that are exactly matched with each reagent box.
4
Operation Condition
Ambient Temperature:15:35:
Relative Humidity:≤85% at 25:
Power Supply:220V±22V:50Hz±1Hz or
110V±11V:60Hz±1Hz
5
Equipment Standard Operation Rules
1:
Preparation before running the equipment
1.1 Check whether the power supply is connected.
1.2 Check whether the environment temperature meets the requirement.
1.3 Check whether the printer is connected.
1.4 Check whether there is a 96-well micro plate that has been used before inside the
equipment. If there is one, please take it out.
1.5 Make sure the equipment door is closed.
2:
Start the equipment
1.1 Start the printer
1.2 Start the computer the parting instrument starting operation refer to computer user
manual.
1.3 The equipment practice automatic check for both software and hardware system.
1.4 When check finishes, “Connoted with equipment” is displayed at the bottom left of the
screen. The system is ready.
3:
Reagent preparation and check
3.1 Take reagents out from refrigerator.
3.2 Check whether all the reagents and quality control materials are under the period of validity.
- 10 -
3.3 Check whether the reagents and quality control materials are enough.
3.4 Dilute the lotion according to reagents explanation.
3.5 To Check whether the expendables (pipettes, tips, filter paper and recording paper) are enough.
3.6 If you use micro-plate washer, please start its initialization program after the lotion bottle is
ready.
4:
Test item management
4.1 Add new test item:
A. Bar code inputing
Check whether there is the needed test item in the saved test item list. If the list with out one
saved, add the new test item here:
:Tool: → :Item and data setting:→ :Testing item bar code input:→input the bar code→
auto running → finish
B:Input information:
:Tool:→:Item and data setting:→:Test Item Management:→select the item need to be
modified→modify→ exit→OK
Note: if you are not reagent-open customer, this fuction will only suplly reference scope,
print scope and so on.
4.2 Reagent-open registration:
:Tool:→:Item and data setting:→::Test Item Management:→register→write down the device
number pop-up from the window and fax the number to XMTZD, and note that you want
Reagent-open, you will get the authorization series number→ put in the series number→enter
concentration, unit and analysis method of the test item’s standard point at the right part of the
window. → Close the window
4.3:Optimize the system based on the test item use frequency:
It is not convenient if all the test items are default since there are many saved ones. But
users themselves could set the items with high use frequency as default.
Set default:
:Tool:→:Item and data setting:→::Test Item Management:→:Use this item:
5:
Calibration
5.1 Check the saved standard curve:Use 6-point calibration for items without standard curve.
5.2 Check reagents’ lot number:Use 6-point calibration for reagents with different lot number.
5.3 Use 2-point calibration for those have standard curves and those share the same lot number
5.4 Standard sample calibration:Standard sample should use the same 96-well micro plate
as the test sample and should be determined together with the test sample
- 11 -
6:
Quality Control
6.1 Quality control material: For qualitative analysis, there is negative material and positive
material.
For quantitative determination, there is low, medium and high material.
6.2 Test for quality control material:Use the same test method as the test sample.
6.3 Quality control result:The quality control level must be within stipulated range. (Within 2SD
range, according to reagents explanation; or, according to the range designated by factory.)
6.4 Requirement for quality control:
1. Run all the quality control points after each new lot number reagent is calibrated.:2 for
qualitative analysis, or, 3 for quantitative determination:
2. Run one quality control point each day.
7:
Routine Operation
7.1 Basic operation: Patient information input
Shortcut Operation For research institution
·Fill:96-well Micro Plate Layout Information:
· Right click the mouse to lock sample type
· According to:96-well Micro Plate Layout Information:, left click the mouse once to place sample
or left click the mouse to choose an area to place it.
· Save layout information:
Method 1::File:→:Save Layout Information:
Method 2: Right click the mouse over the layout area→:Save Layout Information:
Standard Operation For hospital
·Set a new case:Use shortcut or:File:→:New Case:
·Fill:96-well Micro Plate Layout Information::According to new case sample order in:96-well
Micro Plate Layout Information:, fill sample No. and other information in turn from A1 to H1, A2
to H2:……:till A12 to H12.
·Sample layout:According to:96-well Micro Plate Layout Information:, drag the sample items in
the new case one by one or the whole items with mouse and drop them into the 96-well micro
plate area at the left part of window.
·Save layout information:
Method 1::File:→:Save:
Method 2: Right click the mouse over the layout area→:Save:
7.2 About patient sample
Put reagents or sample into corresponding reaction wells in turn. Implement incubation,
- 12 -
micro plate wash and luminescence reaction.
7.3 Run test
·Place 96-well micro plate into the equipment.:Pay attention to its posting direction:
· Recheck:96-well Micro Plate Layout Information:with 96-well micro plate layout in program
window
·Click:Run: or :Test:→:Run: to start test.
Picture for your reference:
·Check sample statistical information in the pop-up window.
·Make sure there is no error in the statistical information. Click:Start:
·Wait till it finishes.
7.4 Check test result
·Check basic information::View:→:Layout Information:
·Check sample photon number::View:→:Photon Number:
·Check test result::View:→:Test Result:
·Check test item layout::View:→:Test Item:
·Check Sample No. Layout::View:→:Sample No.:
7.5 Recheck
·Open saved layout information:
Method 1::File:→:history Layout Information:
Method 2: Right click the mouse over layout area→:Open history Layout Information:
·Run test:Click“Begin test”→ Click “Run” sign
7.6 Print test result
·Print test result:Click “Preview” sign of“tool” → you can print the test report, if you want many
page printing you can: Click:File:→print →print report freely
7.7 Save test result
·Save test result:System will save the test result automatically after each test.the saved result is
according to your parameter that setted in system setting: (1) only save photons, not analyze
(2)analyze and saved result (3) automatically build the report preview
7.7 Review history record
·Review previous record::File:→:History Review:
8:
Maintenance
Daily maintenance:Keep 96-well micro plate pallet clear.
Clear the joint of the door to make it closed well.
- 13 -
Weekly maintenance:Open the door and ventilate the equipment for 1-2 hours so as to lower
the interior humidity.
Monthly maintenance:All performance self test:Position sensor, stability and repeatability:
Check the equipment veracity and linearity range with stable light source.
Check whether interface wire is well connected.
Clear mouse touch board
9:
About caution
When failure occurs, such as misoperation, software problem and wrong result, system will
prompt warnings and detailed explanation. Please follow all the instructions to avoid possible
danger to yourself or others and damage to the unit.
10:
Power off
·Take out 96-well micro plate, wipe fluid spattering on the pallet and close the door.
·Put left reagent into its corresponding package, and put it back into refrigerator.
·Clear up operation platform, and properly dispose wastes after killing bacterium.
·Power off computer
·Power off printer
6
Test Standard Operation Rules
1:
Reagents
1.1 Main composition
·Solid-phase coating antigen on 96-well micro plate
·Enzyme compound
·Sample diluents
·Concentrated lotion
·A:B chromogenic substrate
1.2 Preservation condition
Preserve reagents and quality control material at 2:8:.
2:
Parameter setting
System is able to automatically set reagent parameter through scanning bar code on reagent
package.
3:
Sample collection and preservation
3.1 Original sample type
Blood serum or other body fluid:Reference reagent explanation for details:
3.2 Sample amount
According to different test items, sample amount varies from 20 to 100uL.
- 14 -
3.3 Patient preparation
·It is prohibited to use the samples of patients who received rat monoclonal antibody diagnosis or
treatment since those patients have human anti-mouse antibody (HAMA) which will lead to a
pseudo increase or decrease in test result when the sample is tested with rat monoclonal antibody
reagent.
·For some special medicine concentration test, both the valley value concentration and peak value
concentration should be known.
·Pay attention to the analysis with medicine interference.:Reference reagent explanation for details:
3.4 Sample collection method
Usually, vein blood collection
3.5 Sample collection requirement
·Avoid excessive hemolysis. Collection should be conducted under asepsis condition.
·Make sure the centrifugal speed is 10000 round/minute and the time is 10 minutes. Avoid the
interference from granular material.
·Don’t freeze and thaw sample time after time. Thawed sample should suffer low speed oscillation or
upside it down slightly and then mix well so as to obtain stable result. When there is granule material,
red cell and other turbidity mixture in the sample, please first centrifugate it and then begin the test.
3.6 Sample’s stable period and preservation
·Test should be finished within 3 hours since blood serum is obtained.
·Sample can be preserved for 1:14 days at 2::8:.
·For long-term preservation (less than 1 year), blood serum should be separated and be preserved
below -10:.
4:
Operation process
No need to pre-treat reagent. It can be used after the room temperature reaches balance.
5:
Result calculation
5.1 Quantitative analysis
·Set up standard curve according to 4 parameter logistic curve fitting data and get sample
concentration from standard curve calculation.
·Set up standard curve according to spline approximation fitting data and get sample concentration
from standard curve calculation.
5.2 Qualitative analysis
·Get cutoff value from the average luminescence value of 2 negative and positive samples.
Cutoff :CO:::Sample average luminescence value:/2
·Sample result is obtained by letting sample luminescence value divide cutoff value:CO:.
- 15 -
S/CO::Sample luminescence value:/:Cutoff value:
6:
Report format
See appendix I.
7:
Reference range for result analysis
Reference each item’s reagents explanation. Set up normal value reference range according to
practical cases of local people.
8:
Clinic significance
Different items have different significance. See appendix II.
7
How does this system come out?
It originated from MS-Enzyme Chemiluminescence Immunoassay:CLIA:.
8
1:
Notice
Operation interference
1.1 Don’t open the door while equipment is running.
1.2 Don’t start other program during the test.
1.3 Once failure occurs, stop test and conduct :Pallet Out:. Continue the test when problem is fixed.
2:
Reagents and quality control material
2.1 Only use the reagents designated by MS to avoid possible damage to the unit or the influence to
result.
2.2 Use all the reagents within their valid period.
2.3 Strictly follow reagents explanation to preserve and transport reagents.
2.4 Don’t mix up reagents with different lot number.
3:
Expendables
3.1 Disposable tips cannot be used time after time.
3.2 Keep expendables clear.
3.3 Use distilled water and diluents within their valid period.
3.4 Preserve it under its original package condition.
2:
Sample preparation
4.1 Usually adopt vein blood collection. Avoid sample hemolysis.
4.2 Choose sample type according to reagents explanation.
4.3 Preserve and treat sample according to reagents explanation.
4.4 If sample has been freezed, it must be well mixed after thawing. And never freeze and thaw the
sample time after time.
4.5 If there is granule material in the sample, it should be removed by centrifugating. Pay attention to
the possible interference from hemolysis, fat blood and others.
- 16 -
4.6 Provide enough amount of blood according to explanation.
4.7 Avoid sample bubbling or foaming.
4.8 Only human sample can be used.
3:
Explanatory note for result
All the test result should be evaluated and treated by combining clinic data, such as patient symptom,
illness history, related test data and other related information.
To make sure the accuracy of the test result, sample with abnormal result should be retested. It is also
feasible to use other equipments basing on different methodology to retest the sample.
Installation Guidance
1
Installation requirement.
2:
Do not place the unit on an uneven or tilted surface.
3:
Keep the unit away from heat resource or cold resource.
4:
Don’t expose to direct sunshine.
5:
Enough ambient space is required.
6:
Strictly follows the instructions.
2
System Self Test
1:
Check whether power supply is well connected, and turn on system switch in turn.
2:
Check whether the “GATE” indicator light is lit when the door is open, whether the “GATE”
indicator light goes out when the door is closed, as well as whether the equipment is closed
tightly.
- 17 -
3:
Start system self test program and execute comprehensive test in accordance with:Daily
Operation Manual:.
3
System Calibration
If standard deviation in system performance is detected while executing system self test, calibrate
it in accordance with:Troubleshooting:.
4
Parameter Setting
A. System setting: according to “Test item & system parameter management ”in‘Standard
Operation Rules’.
B. Parameter file of the device: ‘Comm.lic’ file, you can Copy document ‘comm. lic’ and paste
to Install directory. It can run normally
5
Training courses for user
Professionals from factory will hold training courses for users. The courses include: installation,
standard operation rules, shortcut use method, daily operation, system maintenance,
troubleshooting, etc.
Course that must be included:Without consulting doctors, users should not make any medical
treatment related decision.
Course include:Precautionary measures on wastes should be taken, including the way of special
disinfection, protection and disposal.
Shortcut User Manual
Precondition of this manual is that:Equipment has been installed in accordance with:Installation::User
has read:Standard Operation Rules::This manual is only for reagent researcher use and hospital operator
use when they encounter emergency.
1
Appliance Preparation
2: Preparing pipettes with different measuring range and adjust them to frequently used range.
3: Preparing disposable tips that match with pipettes.
4: Preparing filter paper for drying 96-well micro plate.
5: Preparing measuring cup, beaker and distilled water for diluting concentrated diluents.
6: Preparing airproof membrane for 96-well micro plate and:96-well Micro Plate Layout
Information:
2
Sample Preparation
Preparing well separated blood serum without turbidity mixture, granule material,
- 18 -
hemolysis and fat blood.
3
Reagents Preparation
Take reagents from refrigerator and wait till room temperature reaches balance. (About 15
minutes)
4
Equipment Preparation
1: Turn on printer and equipment power supply.
2: Door indicator light will change when the door is open and is closed.
3: Place blank well “BL” randomly in layout area and run the test. When the test finishes, the
luminescence value of “BL” should less than 50 RLU.
5
Sample Layout
1: Fill in:96-well Micro Plate Layout Information:with sample number.
2: Set sample in the program layout area in accordance with:96-well Micro Plate Layout
Information:. Use the left button of the mouse to lock sample type and then left click the
mouse to draw an area to set the layout.
3: If there is more than one 96-well micro plate, click icon “
” to save layout
information in turn.
6
Sample Treatment
According to:96-well Micro Plate Layout Information:, put reagent, blood serum, standard
material and quality material into corresponding well. And incubate them within required time
under normal temperature or 37:.
7
Micro Plate Wash
1:After incubation finishes, wash micro plate by hand or use micro plate washer.
2:Dry 96-well micro plate with filter paper when washing is done.
8
Luminescence Reaction
Put equivalent A and B chromogenic substrate solution into each well of 96-well micro plate
from A1 to H1, A2 to H2,……, till A12 to H12.
9
Test
15 minutes later since chromogenic substrate solution is added into the first well, put 96-well
micro plate into equipment and close the door.
Run test program. Check and confirm the sample list in pop-up window again. Then click
:Start:to begin the test.
10
Print
to print the test result.
When test finishes, click icon
- 19 -
Daily Operation Manual
1)
Program Description
1: Operation Environment
1.1Hardware Requirement:
CPU:800MHz: Memory:128M or above:Free Space:100M or above
1.2 Corollary Equipment:Bar code scanner
1.3 Software:Windows98 or Windows 2000/XP:with the support of Office2000 or above.
2: Software Installation(The software is already installed in analyzer before shipping , the step is
for renew installing )
2.1 Start computer and enter Windows 98, Windows2000 or Windows XP.
2.2 Run‘FreeCLIA.exe’in disk that follow with device.
2.3 The software will be installed in D:\ FreeCLIA as default. Or, user can change the installation
directory.
2.4 Installation program will set up shortcut on the desktop of Windows 98/2000/XP and in program
file respectively.
3: Program Function
Double click icon‘FreeCLIA’ :and start the software. Then, Login GUI will show up. :See picture
1:
- 20 -
Picture1
Input User’s Name. The User Name here is only for login. Then enter main interface directly.
:
:
:
:
:
:
:
:
:
Picture 2
:
:See picture 2:.
3.1 Menu::
File Menu
Edit Menu
View Menu
Project Menu
3.2 Frequently Used Tools::
3.3 Frequently Used Tolls on panel::
- 21 -
Tool menu
3.4 Test Item Setting::
Use command in : and : to fix sample type.
3.5 Layout Display::
Display 96-well Micro Plate in manner of 12×8 matrix.
3.6 Basic Sample Information::
Show basic information of the sample selected by mouse.
3.7 Status Column ::
Display online status and coordinate location of layout area.
3.8 Select Data Information ::
Including Patient List:Cases set by New Case Setting:
Standard List:Information input by bar code:
Quality Control List: Data included in program:
Analysis Curve Display and Help System.
First select items in the menu, then execute operation with the help of: and :.
3.9 Filter cases or standards according to selected items, and display the result in:.
3.10 Information List::
Information in the list can be dragged and dropped into Layout Display:.
2)
Basic Operation
1 Sample Placement and Edit
There are three methods for users to place sample in Layout Display::A:Use: and : to set sample
information:B:Use left button of the mouse to drag the samples or standards in Case Information: to
Layout Display:C:Double click the right button of the mouse in Layout Display:, and set detailed
information by Sample Edit.
A:Shortcut tools ::: Group samples information fast settings
First select sample item in ::lock this item in : with the left or right button of the mouse: and
then left click the mouse over layout area to place a single sample or circle an area to place a batch of
sample sharing the same type.
B:Use left button of the mouse to drag the samples or standards in Case Information: to Layout
Display.
Firstly click “New Case”:and input patient information; Secondly select ‘Patient Sample”, test date
- 22 -
and reagent item in :, and click ‘Refresh’; Select a single sample / a batch of samples in Case
Information: , and drag it/them to Layout Display:.
Click ‘Standard sample’, select ‘Item Name’, and click ‘Refresh’ in : ; Select a single standard
sample / a batch of standard samples in Case Information : with the left button of the mouse, and
then drag and drop it/them in Layout Display :.
C:Double click the right button of the mouse over Layout Display:, and set detailed information by
Sample Edit.
Double click the right button of the mouse over Layout Display:, and a window will pop up. (See
picture 20)
Picture 20
First select ‘Sample Type’, and fill in the blank in the window with necessary sample information. After
confirmation, click ‘OK’ to save it.
If any one of the certain patient samples is edited, all the other samples will change consequently. This
is especially useful for a patient with many test items.
After test, if obvious deviation in photon number or calculated concentration is found, retest is
recommended; for those veterans, they could correct the photon number by themselves. Click ‘OK’ to
finish the photon number modification, and begin to retest sample concentration. Since the sample
concentration is acquired through the photon analysis, the method is only available for sample photon
number modification, and it cannot be used for modifying the sample concentration.
As for standard sample information input, just select the bottle number of the standard sample and its
corresponding concentration will be called up automatically by system given that the reagent bar code
information has been correctly input into the system.
2. Usage of Mouse at Layout Area See picture 21
- 23 -
Picture 21
Right click the mouse over layout area:and then a window :See picture 21:will pop up. The function
of its menu in pop-up window is the same as that of the same operation in :Menu and :Tool.
The only difference is that the analysis method is subject to selection, that is, a method can be
selected to analyze the entire item in current plate. This operation is only available for the sample
analysis in layout area, but the analyzed result won’t be saved into databank.
3 Set New Case
3.1 Set new case::See picture 3:
Picture 3
3.2 Under icon:Refresh:, there is icon:Show All: which determines whether to show all the information
or to only show basic information.
3.3 The input of sample No. and test item is necessary, while the case No. input is optional. Only when
Case No., Name, Birth Date and Gender of the test sample are all the same, will system judge that this
sample belongs to a certain person. Hence, it is recommended that user should input complete
information.
3.4 Input cases will be listed and be displayed from small to big in light of their No. Please input sample No.
as follows: Character + 000 + Starting Number. Besides, make the sample No. be able to increase
automatically and also leave enough room for its numeration, e.g.: A001…A005…A010…A016, etc.
3.5 It is recommended to input hospital registration No. in Case No. Column, since Case No. is the only
- 24 -
identification for a patient. If no registration No. is available, don’t leave it blank but input serial no.
3.6 Fill in remark with the information that the program fails to provide.
3.7 Accurate birth date can be input in Age Column. This function is especially useful for child under 1 year
old. For those aren’t required exact birth dates, just input their age.
3.8 User can edit, save or delete information by double clicking the list.
3.9 More than one test item can be selected in Item Choosing Column, thus avoiding bother of
multi-inputting.
Notice:Data input here is only saved into system cache. When the software is started, the system
will clear up previous data and only save the current data. Once test is executed, information in the
list will be saved into databank.
3.10 For more information status ,you can click‘more’like the following picture. For the information
‘Hospital’‘Dept’‘Doctor’item you can press function key F2 to save. And you can press F3 to bring it out
for editing.
4 Data Save
After changing analysis method or editing patient information, we could save this modification into
databank through the “Data Save” function.
5 History Call-back See picture 4
5.1 Open the window and select start date and end date. Then you will see date record displayed at the
- 25 -
right bottom of the window. Click any data record, and a detailed list of the current test will be shown at
the left part of the window.:Plate No.: is the ranking of 96-well micro plate of the daily test.
5.2 History record management:Right click the mouse over the target record to read or delete this record.
Notice:Be careful that this operation is irreversible!
6 Save & Read Plate Information See picture 5
6.1 Save:When more than one 96-well micro plates’
information
needs to be input, use this function to save them
once
according to the No. of each plate. Thus, it is
convenient to
invoke needed plate information.
6.2 Read:According to saved plate No., read information of
the test plate.
6.3 Edit:Delete unnecessary plate information.
7 Pint Setup See picture 6
7.1 Main title and subhead of report should be set when installation is done. Preset font in the computer is
the same as that in printed report.
7.2 Both single-person report and report form is available.
7.3 Click “Save” once all setting is done.
8 Print Report See picture 7
8.1 Function:Print report and report forms.
8.2 Setting:Choose needed items
8.3 Items should be set first. Then click search
and
information of the record that meet the above
requirement
will be displayed.
8.4 Print all record:Click:Print Report:or:Print
Report
Form:
8.5 Print chose record:Click needed record in the list and then click:Print Chose Report:. This function is
only available for report output, but not for report form output.
8.6 If only to print current record, you only click the ‘preview’.
9 Test Result Export See picture 8
- 26 -
9.1 Export current test result into EXCEL
Picture 8
·View:Check current plate information through click “Photon Display”, “ Result Display”, “Item Display”,
“Sample Type Display” respectively at the right bottom.
·Export:First set file name, choose a location and click “Save to EXCEL”.
·Data process:The program will export 4 EXCEL files and automatically open them which facilitates
data statistics process.
9.2 Export batch History information Test Result to EXCEL (See picture9)
Picture 9
Picture 9
·Export Function:same with current data expot function,only different is it can export by bath.
·Operation:First, choose the exported date limit, and select the location and name of the exported file
by clicking “Browse”. Second, click search, and system will list test record and standard data
which meet the above set requirement. Export one item or export all the item is determined by
choosing “Test Data” or “Standard Data”. Then, click “Export”. The export of history data is
done.
10 Edit See picture10
10.1 Cut:Select plate information, and click “Cut”. Thus, this
item is saved into
system cache and the current selected sample is
- 27 -
deleted as well.
Picture 10
10.2 Copy:Save selected item into system cache.
10.3 Paste:Paste data in program cache to designated place.
10.4 Delete:Delete all the current selected sample.
10.5 Clear All: Clear all the sample information in the current layout area. (Be careful!)
Notice:Both single sample operation and multi-sample operation are available. When copying and
pasting sample in specific area, layout form of the copied sample is saved and pasted, that is, if a area “3
x 3” is copied, then this “3 x 3”area is pasted. In a word, the area sample is moved to another place.
11 View See picture 11
View sample information respectively in layout area
through choosing
different items.
11.1 Layout Information:Display sample type in layout area.
St-Standard :BL:Blank Well:Qc:Quality
:Sa:Patient:
Picture 11
Control Material:
11.2 Photon Amount:Display tested sample photon amount in layout area. 11.3 Test Result:Display tested
sample concentration in layout area.
11.4 Test Item:Display sample’s test item layout in layout area.
11.5 Sample No.:Display the layout of sample No. in layout area.
12 Test Menu
12.1 Run:After executing this function, a window will pop up. (See picture 12)
Picture 12
All
the sample information in the current layout area is
shown at the bottom of the window. Carefully check sample No., position, test item and its amount.
After confirming, click “Start”. Then wait till the test finishes.
12.2 Analyze:This is for current test result analysis or history record analysis. After executing this function,
a graph of analysis and reference range will be displayed at the right part of the window.
12.3 Pallet come out:Make pallet come out by hand. When abnormal program termination or sudden power
cut happens, user should move 96-well micro plate pallet to the door by hand.
Notice:There is an order while analyzing, that is, which one is to be analyzed first and which is the next.
While analyzing, program will search whether there is standard material in the sample first. If no standard
- 28 -
material is found, it will execute analysis by directly using the standard in history standard bank; if there
has one, it will judge whether the current standard is no less than 4: if it meets this requirement, program
will execute analysis by directly using current standard; if it doesn’t, program will take out history standard
and the current standard together to execute calculation and analyze it by 2-point calibration.
13 Toolbar
13.1 Test item management
Test item management includes three aspects::Item information setting and analytical method
choosing::Reagent bar code input::Registration of opened reagent access.
:Item information setting and analytical method choosing:See picture 13:
Picture 13
Clicking the item that needs to be set in the left part of
the window, the item basic information will be shown in the right part of the window. Item setting includes:
concentration of standard bottle, unit, standard point amount, analytical method, the range of reference
value and use frequency choosing. The program needs to be restarted after setting.
Use frequency choosing: According to item use frequency, items with high use frequency usually be
set as default value and showed in the layout area
for users’ convenience.
The range of reference value setting should according to the sequence of [sex ,age low limit ,age high
limit, description, refrence low
limit,refrence high limit]
: Reagent bar code input:See picture14:
- 29 -
Picture 14
While inputting data, put cursor in the bar code input area. Scan three rows of bar codes (Inputting bar
code information by hand is also acceptable). The program will analyze automatically (if not, please click
‘Analyze’ button). After confirming, click ‘Input’. Notice: Before being used, every new reagent box has to be
scanned to update the databank.
The reagent bar code contains standard curve. Therefore, the standard curve in the databank will be
updated automatically as long as the scanning is done. After updating standard curve, every box of reagent
just needs a two-point calibration, which facilitates operations and reduces the cost.
Before the access to reagent is opened, reagent parameter can only be inputted by scanning bar code.
: Registration of opened reagent access (See picture15 )
Picture 15
For those have received reagent access, register as follows:
Click ‘register’ button in the picture 14, and a window will show up (picture 15). The upper column of the
window shows the machine information code. User should send the machine information code to the
producer (through telephone, fax, instant message toll, email, etc), and also submit a application by fax.
After authorization, the authorized information code will be sent to the user. Put the received information
code into the column below. Click ‘ok’. At the time, another window (See picture 16) will pop up, indicating
the successful registration. Finally, restart the program and input reagent information by hand.
:System parameter (Picture 17)
Testing Process installed option, after completion of the trial is necessary to preserve the photon
number. For further analysis is not necessary for the preservation depends on how you choose, in addition,
Health costs automatic plate test records whether an advance copy of the report, but also by you to
determine
Barcode reagent conditions for the opening of registration, and based on your company's needs, whether
open to the possibility.
- 30 -
System parameters : the need to explain the meaning of some of the parameters automatically emptied
records list : This new medical record for each will be emptied and all the new records before today's
provisional data You are unlikely to affect the testing of test records, test access to records from the
historical record. This means that if elections of this, the new system will retain the provisional your records.
Reference to the scope of the report showed : As a unit in a unit, According to the different needs in
reference to whether the scope of a further additional information, by your decision, but the amendments, If
printed out, you need to re-analyze and record-keeping can be shown in the report single out
Initialization of Pin4,7 : This is your analysis to determine the type. installed by the general staff will be able
to better determine that the principal purpose of the instrument and whether the line. 2:00 calibration
conditions to be this : if you open the case, you every time you test, analysis, Printing plate when all the
current projects must contain two or more than two standard before they can conduct tests computing or
printing operation.
Automatic distribution of horizontal plate : This is mainly targeted to the washer. As part washer only
horizontal washer, and if we caused each of the eight hole vertical line washer will become a problem. So,
you can use a horizontal arrangement of the automatic 12 holes to be tested. Pay attention to statements
such as : installation of air under the tacit consent. If you need to print reports or statements that the "results
of this examination can only sample for this" message, Please print the contents to be completed here.
:User manager(Picture 18):
The initial use’s password is ‘Admin’ : that users have administrator authority, can be any set up, if
the use of authority Guest user groups, the other can be operated. Only users [install] and [management]
can not operate
- 31 -
Picture 18
13.2 Save as standard curve:See picture 19:
Picture 19
Save the current 96-well micro plate standard sample information into the system standard bank. If
there already have such standard information in the bank, then replace it. The latest standard curve will be
adopted in later analyses.
Standard information of each item will be shown in the window. Select corresponding item in the
drop-down menu at the left top, and then both standard information and graph of this item will be shown.
After confirming, click “Save as Standard Curve”. At the time window written ‘Saved Successfully’ will pop
up.
The current 96-well micro plate standard data can be saved as BMP images.
Notice: The function is used for: A: If standard curve of current 96-well micro plate data is
comparatively good, save it into standard bank. As for the nest plate, user only needs to make 2-point
calibration; B:If current standard curve is not so good, invoke history record and save the standard curve in
history record again.
13.3 View standard curve
:See picture 20:
Picture 20
View saved standard curve and relative data in databank, analyze the same group of standard data
with different fitting methods, thus learning the applicability of different fitting methods.
One could find out the rule of standard point data by clicking “Data View” during analysis. For example,
increasing and decreasing rules of the standard point concentration as well as the increasing and reducing
rules of the standard point luminescence value.
13.4 Compression and repair database
In the time of Add the database or delete, etc, the database will have a lot of data redundancy, Therefore,
- 32 -
we can use this function to extend the database compression smaller, in the need for the network database
is necessary, and the main database file compression : FreeData.mdb documents.
13.5 Instrument calibration
This is a function added to version 1.0.0.203. main purpose is to facilitate the installation or user use the
standard
source for this instrument calibration. (see picture
21)
Picture 21
Mmethods of
operation : 1)The first hole to test the position
2)regulating gain coefficient 3) test the current photon 4) if photon [test] close to the standard photon 5)
save the parameter to document 6) finish
13.6 Help
You can press F1 to start the help document, and also can clik ‘help’to start the document. If bing out this
interface(see picture 22) that means the help document of software has lost or be damaged .
Picture 22
- 33 -
Maintenance Manual
·Daily maintenance: Wipe the 96-well mirco plate pallet to keep it clean.
Clear the joint of the door to make it closed well.
After test finishes, power off the system and cover the equipment with dustproof fabric.
·Weekly maintenance:Open the door and ventilate the equipment for 1-2 hours so as to lower the interior
humidity.
·Monthly maintenance:All performance self test:Position sensor, stability and repeatability:
Check the equipment veracity and lineariry range with stable light source.
Check whether interface wire is well connected.
Clear mouse touch board
Trouble shooting
·Door switch failure:
Failure:Indicator light remains light after the door is closed.
Solution:1:Check the joint of the door to make sure there is no eyewinker;
2:Manually press the door switch and observe whether the indicator light is off;
3:Check whether the door switch works.
·X-axis position locating failure:
Failure: X-axis clashes when moving.
Solution:Reset or turn off the equipment, open the door and move the pallet by hand. If the pallet
is unable to be moved, check whether there is any obstacle; if it moves, begin the test again.
If it still clashes, open the equipment and check X-axis position sensor.
·Y-axis position locating failure:
Failure: Y-axis clashes when moving, or, the pallet clashes when it comes out.
Solution:Reset or turn off the equipment, open the door and move the pallet by hand. If the pallet
is unable to be moved, check whether there is any obstacle; if it moves, begin the test again.
If it still clashes, open the equipment and check Y-axis position sensor.
·Optical fiber motion failure:
Failure:Cross talk among adjacent wells is great, or the sound of optical fiber motion cannot be
heard.
Solution:1:Turn off equipment and retest:
2:Open equipment and check whether magnet supply power of the optical fiber motion is
- 34 -
well connected.
·Fail to be protected from light:
Failure: Big error occurs when determining some low value, or, background noise exceeds 50
relative luminescence unit.
Solution:1:Check whether there is eyewinker at the door;
2:Check whether the signal interface at the back of the equipment is well connected;
3:Check whether there is any crack in the equipment shell.
·Communication failure:
Failure:The equipment cannot connect to computer.
Solution:1:Check whether the communications setting is right:
2:Check whether the communication cable is well connected;
3:Check whether reset switch works;
4:Start equipment communication connection of the system self test program.
·Mouse touch pad failure:
Failure: Mouse arrowhead is unable to move or move abnormally.
Solution:1:Use a exterior mouse instead of the touch pad:
2:If step 1 doesn’t work, open the equipment and remove mouse board connect wire.
·No photon number in test result
Failure:All the test data is zero, or, the data is invariable .
Solution:1:Check equipment carefully in case there is serious light leakage:
2:Observe whether high voltage indicator light VH is lit during the test. If VH is lit, check
whether the high voltage interface is well connected; If not, check the high voltage
control circuit.
·Test result error
Failure:Big error occurs, that is, low value cannot be determined or no photon number is shown
when testing high value;
Solution:1:Start self test program, use stable light source and reset equipment parameter;
2:Start “Comprehensive Test” to check and adjust the equipment performance thoroughly.
·Power shut down with trouble
Failure:seriously influence the test result’s accuracy.
Solution:1.Start the ‘parameter calibration’, use steady light source to newly set device parameter
or derectly reduce the plus coefficient
2. Start [Testing Tool],Adjust and inspect device performance across-the-board.
- 35 -
- 36 -