1
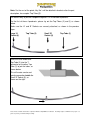
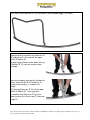
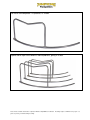
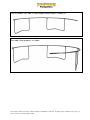
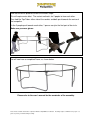
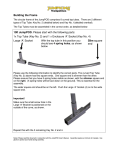
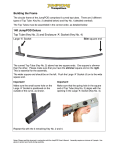
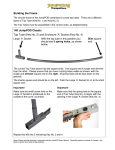
User’s Manual Update: Building the Frame
The circular frame of the JumpPOD comprises 8 curved top tubes. There are 2 different
types of Top Tube: Key No. 2 (detailed below) and Key No. 1(detailed overleaf).
The Top Tubes must be assembled in the correct order, as detailed below.
12ft JumpPOD Classic / Deluxe. Please start with the following parts:
1x Top Tube (Key No. 2) and 1 x Enclosure ‘A’ Socket (Key No. 4)
Slim square end
Large ‘A’ Socket
Please use the following information to identify the correct parts. The curved Top Tube
(Key No. 2) above has two square ends. One square end is slimmer than the other.
Please make sure you have the slimmer square end on the right. This is essential for the
assembly.
The wider square end should be on the left. Push the Large ‘A’ Socket (4) on to the wide
square end, as shown above,
Important!
Important!
Make sure the small screw hole on the
Large ‘A’ Socket is positioned on the
outside of the curve, as shown.
Make sure that the spring hole in the square
end of Top Tube (Key No. 2) aligns with the
opening in the Large ‘A’ Socket (Key No. 4).
Repeat this with the 3 remaining Key No. 2 and 4.
Notes: Please read this document in conjunction with the JumpPOD User’s Manual. Assembly requires a minimum of 2 people. Use
gloves to protect your hands during assembly.
12ft JumpPOD Classic / Deluxe. Please then take the following parts:
1 x Top Tube (Key No. 1) with ‘B’ Socket (Key No. 3)
Small ‘B’ Socket
Square end
The curved top tube above will have the Small ‘B’ Socket already attached, as shown
above.
Detached ‘B’ Sockets?
If the ‘B’ Socket has come off, please assemble Key No. 2 and Key No. 4 first, as shown
on the previous page.
Then position Top Tube (Key No. 1) as shown above. Please pay close attention to the
spring hole locations.
There will be 5 spring holes on each side of the Top Tube (Key No. 1), giving 10 in total.
Counting from left to right, please make sure the 10th spring hole is face down in the
square end, on the right hand side of Top Tube (Key No. 1), as shown below.
Once Top Tube (Key No. 1) is in this position, push the Small ‘B’ Socket onto the square
end on the left, as shown above.
Please ensure that the left hand square end is pushed all the way through the Small ‘B’
Socket, so it is flush with the edge of the Small ‘B’ Socket.
Repeat this with the 3 remaining Key No. 1 and 3.
Notes: Please read this document in conjunction with the JumpPOD User’s Manual. Assembly requires a minimum of 2 people. Use
gloves to protect your hands during assembly.
Note: For the rest of the guide, Key No.’s will be detailed in brackets after the part
description, for example ‘Top Tube (1)’.
The easiest way to put the trampoline together is in 4 individual quadrants.
For the first of these 4 quadrants, please lay out the Top Tubes (2) and (1) as shown
below.
Make sure the ‘A’ and ‘B’ Sockets are securely attached, as shown in the previous
steps.
Large ‘A’
Socket (4)
Top Tube (2)
Small ‘B’
Socket (3)
Top Tube (1)
Insert the small end of one
Top Tube (2) into the Tconnector on the other Top
Tube (1) to join the tubes, as
shown below.
This will create a male and
female connection inside the
Small ‘B’ Socket (3), as
shown on the right.
Notes: Please read this document in conjunction with the JumpPOD User’s Manual. Assembly requires a minimum of 2 people. Use
gloves to protect your hands during assembly.
Now take 1 x Leg Extension ‘A’ (6) and insert it into the Large ‘A’ Socket (4) of the left hand
Top Tube (2).
Take the Centre Leg (7) and insert this into the Leg Extension ‘A’ (6), as shown.
Notes: Please read this document in conjunction with the JumpPOD User’s Manual. Assembly requires a minimum of 2 people. Use
gloves to protect your hands during assembly.
Then take a Leg Extension ‘B’ (5), and attach it to the Centre Leg (7) as shown.
Now grasp the free end of Leg Extension ‘B’
(5) and pull until it lines up with the open
Small ‘B’ Socket (3).
By placing your hands further down the Leg
Extension ‘B’ (5), you can increase your
leverage.
You can also place your feet on the top rails
either side of the Small ‘B’ Socket (3) to
steady the assembly, as shown in the
image.
Pull the Leg Extension ‘B’ (5) into the open
Small ‘B’ Socket (3). Once you have
inserted the Leg Extension ‘B’ (5), push
down firmly on the Centre Leg (7) to ensure
a tight fit.
Notes: Please read this document in conjunction with the JumpPOD User’s Manual. Assembly requires a minimum of 2 people. Use
gloves to protect your hands during assembly.
You have now completed 1 x quadrant, as shown.
Repeat these steps to assemble 3 more quadrants, giving 4 in total.
Notes: Please read this document in conjunction with the JumpPOD User’s Manual. Assembly requires a minimum of 2 people. Use
gloves to protect your hands during assembly.
This next step will require at least 2 people. Make sure you are wearing gloves.
Turn the 4 x quadrants over and join 2 sections to together as shown.
The spring holes in the end of the Top Tubes will line up with the openings in the top face
of the Large ‘A’ Socket (4). If this does not happen please check the layout of your Top
Tubes, as shown in the first steps.
Notes: Please read this document in conjunction with the JumpPOD User’s Manual. Assembly requires a minimum of 2 people. Use
gloves to protect your hands during assembly.
Push the end of Top Tube (2) into the open end of Large ‘A’ Socket (4)
Then add a third quadrant, as shown.
Notes: Please read this document in conjunction with the JumpPOD User’s Manual. Assembly requires a minimum of 2 people. Use
gloves to protect your hands during assembly.
Now add the fourth quadrant to form the circular shape.
This will require extra effort. The easiest method is for 2 people to face each other.
Then hold the Top Tubes either side of the sockets and both push towards the centre of
the trampoline.
As the 2 people push towards each other, 1 person can join the final part of the circle.
Make sure you wear gloves.
You will now have a completed Frame, as shown below.
Please refer to the user’s manual for the remainder of the assembly.
Notes: Please read this document in conjunction with the JumpPOD User’s Manual. Assembly requires a minimum of 2 people. Use
gloves to protect your hands during assembly.