1
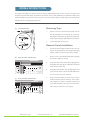
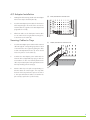
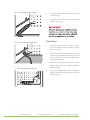
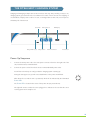
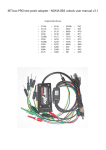
JAR INTELLIGENT CART SOLUTIONS
OWNER’S MANUAL
VERSION 3.0 | SB-5XXXB, SB-63XXB
THANK YOU!
JAR Systems, LLC has now been designing and manufacturing mobile solutions for
education and training for more than ten years! We’ve grown a lot since our inception
and it’s been highly rewarding to see that some of the first carts that we ever sold are still
being used in schools across the country.
Our mission has always been to seamlessly integrate IT hardware and software for a more
enjoyable and truly unique teaching and learning experience. We aim to innovate higher
quality, easier to use, more effective charging and storage solutions and every satisfied
customer is measure of our success in pursuing this mission. So, we would like to say,
“Thank You!” for your purchase and continued support.
“We aim to innovate higher quality, easier to use, more effective
charging and storage solutions”
JAR Systems, LLC www.JAR-Systems.com
Call: 866-393-4202 for assistance.
MANUAL CONTENTS
Before First Use. . . . . . . . . . . . . . . . . . . . . . . . . . . . . . . . . . . . . . 03
Transportation
Setup and General Tips
General Safety Advice . . . . . . . . . . . . . . . . . . . . . . . . . . . . . . . . . . 04
Quick Tour. . . . . . . . . . . . . . . . . . . . . . . . . . . . . . . . . . . . . . . . . 05
Components & Care . . . . . . . . . . . . . . . . . . . . . . . . . . . . . . . . . . . 06
Included Components
Cleaning the Mobile Cart Enclosure
Wiring Instructions and Setup . . . . . . . . . . . . . . . . . . . . . . . . . . . . . . 07
Removing Trays
Network Switch Instructions
A/C Adapter Instructions
Securing Cables to Trays
Intelligent Charging System . . . . . . . . . . . . . . . . . . . . . . . . . . . . . . . 10
Power Up Sequence
Charging of Devices
Printer/AUX Devices
Management Mode
Distributing and Returning Devices. . . . . . . . . . . . . . . . . . . . . . . . . . . . 13
Distributing Devices
Returning Devices
Connecting to an External Network
Frequently Asked Questions . . . . . . . . . . . . . . . . . . . . . . . . . . . . . . . 15
Technical Specifications. . . . . . . . . . . . . . . . . . . . . . . . . . . . . . . . . . 17
Warranty Information. . . . . . . . . . . . . . . . . . . . . . . . . . . . . . . . . . . 18
2
BEFORE FIRST USE
Transportation
•
Close and lock all doors before moving the JAR Intelligent Cart Solution.
•
Before transport, unplug the power cord from the wall outlet and from the mobile cart.
•
Never move the mobile cart on your own. Always transport the cart with a second person who
is physically able to assist.
•
Never attempt to transport the mobile cart over steps. Use elevators or ramps.
•
Before moving the mobile cart, release the brake latches on both of the front wheels.
•
Push, do not pull the cart to move it.
•
Only when all of the above conditions have been met will the mobile cart be safe to transport
over even surfaces.
Setup and General Tips
•
Connect the JAR Intelligent Cart Solution to a properly installed 120V 15A power outlet only. It
is recommended that you have a qualified electrician test the circuit before you plug the mobile
cart in for use.
•
Do not plug the JAR Intelligent Cart Solution into a power outlet if the power cord, power strips,
or any other cable is damaged or shows signs of wear or misuse. Repairs should be made only
by a qualified electrician.
•
•
Ensure that the power cable lies flat on the floor to minimize the risk of tripping or falling.
Connect devices and their equipment to the JAR Intelligent Cart Solution only via the supplied
power strips, located inside the rear of the cart.
•
Always lock both the rear and front doors when the JAR Intelligent Cart Solution is not in use.
This will prevent unauthorized access to the equipment.
•
Store the JAR Intelligent Cart Solution in a cool, dry area and avoid exposure to direct sunlight
at all times.
JAR Systems, LLC www.JAR-Systems.com
Call: 866-393-4202 for assistance.
GENERAL SAFETY ADVICE
PLEASE READ AND OBSERVE ALL INSTRUCTIONS
Before operating your mobile cart for the first time, read these important guidelines. It is important that
these guidelines are followed to prevent personal injury or damage to the equipment.
•
Before using the JAR Intelligent Cart Solution, please read and observe all operating instructions
of the equipment you will be using in combination with the mobile cart.
•
Do not use the JAR Intelligent Cart Solution for anything other than charging or storing mobile
devices. Keep food and drinks away from the cart at all times.
•
Do not use an extension cord with this or any other mobile cart.
•
Unplug the JAR Intelligent Cart Solution from the power outlet when it has finished charging. This
mobile cart should only be connected to the power outlet with the intent of charging laptops
inside the cart.
•
Children are often unaware of hazards associated with electrical devices and the JAR Intelligent
Cart Solution must, therefore, always be used by an adult or with adult supervision.
•
Do not allow anyone to sit, stand, or climb on the cart..
•
Do not attempt to lift the cart.
•
Do not block fans or vent openings.
4
QUICK TOUR
The illustrations below show the parts of the standard JAR Intelligent Cart Solution and the terms that
are used for these parts throughout this user manual.
Intelligent Charging System
Pull-Out Trays
Lockable Sliding Doors
5” Locking Caster
FRONT VIEW OF CART
Power Strips
REAR, TOP LEFT VIEW OF CART
Serial Number and Product Information
Main Power Connection
REAR, BOTTOM LEFT VIEW OF CART
JAR Systems, LLC www.JAR-Systems.com
Call: 866-393-4202 for assistance.
COMPONENTS & CARE
Included
•
Mobile cart enclosure
•
Power cord
•
Intelligent Charging System
•
Four keys—Two for front doors and two for
back doors
•
Wiring accessories—Velcro ties, cable ties,
and cable clips
Cleaning the Mobile Cart Enclosure
Before starting any cleaning, ensure that the JAR Intelligent Cart Solution is switched off and that the
power plug and cable are removed from the power outlet.
Clean the JAR Intelligent Cart Solution with a dry cloth or with mild detergent. Do not use cleaning
agents containing organic solvents such as alcohol or acetone.
6
WIRING INSTRUCTIONS
This guide is intended as a reference point for wiring a JAR Intelligent Cart Solution, however, scenarios may
vary based on particular device specifications and needs. It is recommended that you start with a sample tray
setup and adjust it until it performs with your devices as needed. After that, the sample tray setup can be quickly
replicated for the remaining trays and carts.
(a)
SIDE VIEW OF CART
Removing Trays
1. Release levers are located inside the tracks on both
the left and right sides of the tray. To remove the
Left side
tray, pull the left lever up and press the right lever
down, while pulling the tray away from the cart (a).
Right side
2. Set the trays aside for later use.
Network Switch Installation
1. A network switch may be installed in the rear, top
right of the cart, parallel to the Intelligent Charging
System. Install it to face the back of the cart (b).
(b)
REAR, TOP RIGHT VIEW OF CART
2.
Use the screws or mounting brackets that accompany
the switch to affix it to the cart.
3. The power cable of the switch may be plugged into
the AUX power strip, which is labeled and located
inside the rear of the cart.
4. Plug CAT5 network cables into the appropriate slots
of the network switch to allow external LAN outlets
to connect the cart to the network.
(c)
REAR, TOP RIGHT VIEW OF CART
5. Plug one network cable per each device into the
network switch. Run them down the center of the
cart, assigning one cable to each pull-out tray. Feed
each cable through the openings to the front of the
cart to later secure them to the trays (c).
JAR Systems, LLC www.JAR-Systems.com
Call: 866-393-4202 for assistance.
A/C Adapter Installation
1. Starting from the bottom up, attach each A/C adapter
(d)
REAR, BOTTOM LEFT VIEW OF CART
(e)
FRONT, BOTTOM LEFT VIEW OF CART
with a velcro strip to the back panel (d).
2. Feed the A/C adapter power cables for the devices
all the way through to the inside of the cart. Use the
network cables as a guide. Set the A/C adapter wall
plugs aside for now (d).
3. Affix both cables to the back panel with a cable
tie. Use either the left or right small mounting hole,
located next to the cables (d).
Securing Cables to Trays
1. Feed the A/C adapter power cable and the network
cable through the corresponding clip that is located
on the wall of the cart. Tighten by pulling the cable
tie that is already attached to the clip. There should
not be any tension on the cables (e).
3. Combine the A/C adapter power cable with the
network cable (if applicable) by tying a cable tie
around them. Do this once half way between the
cable clip and back panel and again between the
wall clip and fully pulled out tray (e).
4. Attach a cable clip to the pull-out tray sideways, so
(f)
that the cables can run through it. Line it up with
the back of the tray and leave space to the left of
it. This space will allow the cables to slide when the
pull-out tray is pushed in or pulled out (f).
8
(g)
REAR, BOTTOM LEFT VIEW OF CART
5.
The cables should extend forwards when the tray
is pulled out (g).
6. The cables should retract when the tray is pushed
back into the cart (h).
(h)
REAR, BOTTOM LEFT VIEW OF CART
Final Steps
1. Locate the network and power connector on your
devices and determine the best way to position
them on each tray.
2. Once you have determined the ideal way to position
the devices, attach additional cable clips on the tray
and use cable ties to ensure that the cables remain
in the appropriate spots.
3. Attach the A/C adapter wall plugs to the A/C
adapters and use cable ties to attach the cables to
the back panel (i).
(i)
REAR, BOTTOM LEFT VIEW OF CART
4. Plug the A/C adapter wall plugs into the power
strips inside the cart. Start with the first outlet from
the bottom up (i).
JAR Systems, LLC www.JAR-Systems.com
Call: 866-393-4202 for assistance.
THE INTELLIGENT CHARGING SYSTEM
Charging and managing multiple devices has never been this easy. This powerful, yet easy to use
charging system gives teachers and IT coordinators full control of their cart. No more tripping of
circuit breakers, multiple power cords for one cart, or uncharged devices. Best of all, it even improves
the battery life of the devices!
Power LED
Charge LEDs 1,2,3,4
Manage Button
Charge Button
LED Display
AUX Power Button
Reset Button
Power Up Sequence
1. Connect the main power cord to the cart’s power connection found on the right side of the
cart, near the bottom, toward the back.
2. Connect the power cord of the mobile cart to a 15A standard wall power outlet.
You will hear a short beep to notify you that the charging system is starting up.
During the start up process you will notice that all LEDs on the power unit will flash.
After about five seconds the unit is operational, which will be indicated by the illuminated
Power LED.
The Power LED is located in the center of the power unit (see picture above).
This light will remain on when the cart is plugged in to indicate to the user that the cart is
receiving power and is ready for use.
10
Charging of Devices
A) Start Charging
1 2 3 4
1. Once the cart is powered on, press the Charge Button.
The LED in the Charge Button will light up and charging has started.
The four Charging Quadrant LEDs (1,2,3,4) will indicate which power strip is currently active.
In charging mode you might see any combination of 1,2,3 or all 4 flashing simultaneously.
The power unit will control this charging process automatically and ensure that all devices inside
the cart are charged the quickest and most efficient way possible. No user input required.
B) When Charging is Complete
When the charging process is complete, all four (4) Charging Quadrant LEDs above the
Charge Button will be solid green and flash in a sequence from right to left every two seconds.
At this point, all devices are completely charged and power to all power strips has been turned
off. You are now ready to use all of your devices.
C)
Restart Charging
1.
To start charging again, press the Charge Button once to clear the LED screen.
2.
Press the Charge Button a second time to be charging.
D) Stop Charging at Any Time
1. Press the Charge Button to turn the system off at any time during the charging sequence.
The system will stop charging all devices. It is now safe to disconnect the power cord.
To resume charging, simply press the Charge Button again.
Printer/AUX Devices
A) Turn On Printer/AUX Devices
AUX
1. Connect auxiliary devices to the AUX power strip found inside the back of the cart.
2. Follow the instructions found under POWER UP SEQUENCE.
The blue Power LED will indicate that the cart is ready.
3. Press the AUX Power Button.
The AUX Power Button will light up.
JAR Systems, LLC www.JAR-Systems.com
Call: 866-393-4202 for assistance.
This will turn on all devices connected to the AUX power strip found inside the back of the cart.
This button will only be operational when charging has not yet started.
This button cannot be pressed if charging has started. However, if you require devices to be on
while charging the devices you can press this button before initiating a charging cycle. Doing so
might increase the time needed to charge the devices.
B) Turn Off Printer/AUX Devices
1. Press the AUX Power Button.
The LED will turn off and all devices attached to the AUX power strip will power down.
Management Mode
A) Start Management Mode
1. Follow the instructions found under POWER UP SEQUENCE.
The blue Power LED will indicate that the cart is ready.
2. Press the Manage Button.
The LED in the Manage Button will light up as well as the AUX Power Button.
The first step in enabling the notebooks inside the cart to be remotely managed is to ensure that
they are charged. Therefore, the cart will first evaluate the state of all notebooks and if necessary,
charge the notebooks. No user input required.
After all notebooks are properly charged, the cart will turn on the network switch that is connected
to the AUX power strip found in the back of the cart and will activate all notebook power strips
to ensure that the notebooks receive power. This will enable a select group of notebooks to
receive the WoL signal via the installed network switch. Please keep in mind that this will require
additional software i.e. Altiris, HP Client Manager, etc.
B) Stop Management Mode
1. Press the Manage Button.
The LED will turn off and the cart will go into standby.
For more information on how the system works in general and why it charges the notebooks
quicker, please see Frequently Asked Questions or call us at (866) 393 4202.
12
DISTRIBUTING & RETURNING DEVICES
During training sessions or classes, device operation is cordless. Power is supplied by the charged
batteries. Please refer to device documentation for accurate information on battery operating times.
Distributing Devices
1.
Open both sliding doors in the front of the cart.
2.
Pull out a single pull-out tray.
3.
Remove the power plug from the device.
4.
Release the network cable, if applicable.
5.
Take hold of the device with both hands and remove it from the tray.
6.
Place the device on the student’s desk.
7.
Turn on the device.
8.
Push the pull-out tray back into the cart.
The devices are now ready for use. Please bear in mind that the devices need to be recharged for use
in the next instruction/training unit.
The use of the mobile cart, including plugging in or unplugging devices, plugging in or unplugging
the main power cord, operating the power button, or engaging or releasing the caster locks, must be
done with adult supervision.
Only pull out one pull-out tray at a time. Immediately after removing the device from the tray and
placing it on a solid surface, push the tray back into the cart.
Never pull more than one tray out of the mobile cart at a time.
Always load the cart from the bottom up. Do not load anything but your devices on a tray.
Observe the maximum loading capacity of this mobile cart. Never load a printer onto a tray.
Do not put anything on top of the cart.
FRONT VIEW OF CART
JAR Systems, LLC www.JAR-Systems.com
Call: 866-393-4202 for assistance.
Returning Devices
After class, all devices should be returned to the JAR Intelligent Cart Solution.
1. Close all programs or applications and shut down each device.
2. Open both sliding doors of the JAR Intelligent Cart Solution.
3. Pull out a single pull-out tray.
4. Place the device on the tray.
5. Connect the power cable to the device.
6. Insert the network cable into the RJ 45 connector of the device, if applicable.
7. Push the pull-out tray back into the cart.
Ensure that both the power adapter and the network cable are securely plugged into the device, if
applicable. Otherwise, the battery of the device will fail to charge and/or remote management of the
device will not be possible via the network.
Connecting to an External Network
If your location has a local area network, you can link the JAR Intelligent Cart Solution to the network via
one of the two network sockets (RJ 45) on the bottom left side of the unit. Because devices are directly
linked to the network, they can be serviced centrally by a system administrator through the network.
1. Pull down the cover of the RJ-45 socket.
2. Plug one end of the network cable into the RJ 45 socket of the JAR Intelligent Cart Solution.
3. Connect the other end of the network cable to your external network connection.
FRONT VIEW OF CART
REAR, BOTTOM LEFT VIEW OF CART
14
FREQUENTLY ASKED QUESTIONS
What type of warranty comes with the cart?
All of our carts come with a warranty that covers the entire cart, including the electrical components
and Intelligent Charging System for 5 years (power cord excluded). If you are in need of service, simply
contact your local reseller or call us at (866) 393-4202. We are here to help. More warranty information
can be found inside the back cover of this manual.
Can I extend this warranty?
Yes, the original purchaser has the option to extend the warranty on each cart purchase at any time
during the standard warranty period.
How much weight is supported on each pull-out tray?
Our high-quality ball bearing slides are made to last and support up to 16 lbs of weight per tray. They
will easily support any mobile computing device available on the market.
How much room is on each pull-out tray?
Our trays are 410mm D x 363mm W x 90mm H or 16.14” D x 14.29” W x 3.54” H with exception of the
SB-6310B cart trays, which are 20” D x 14.29” W x 2” H. In short, 99.9% of all devices used for teaching
and training will fit on our pull-out trays. Smaller devices can typically be doubled up on the trays and
therefore you are able to fit more devices (up to 36) into a cart with a smaller footprint.
Where can I store a printer?
Our SB-5300B, SB-5345B, and SB-5900B carts are designed to accommodate a securely mounted
printer on top of the cart. A printer can be installed inside the SB-5400B cart if you remove trays to
make room. Because weight is always a concern for teachers and users, and printing is only used 20%
of the time the cart is used, we recommend that printers are not moved with the cart. Make them
available via the network in strategic locations throughout the building and you will be a hero. Lighter
carts will get used more.
How does the Intelligent Charging System work?
The Intelligent Charging System is the fastest, most efficient way to charge multiple devices with their
A/C adapters. Our system does not use any pre-defined timers that cycle blindly between two power
strips of 15 devices each for a pre-defined time frame. This method takes way too long to charge
devices—and that is not what you need.
JAR Systems, LLC www.JAR-Systems.com
Call: 866-393-4202 for assistance.
Every time you press the charge button in our cart, the system evaluates the battery status of all devices
inside the cart and charges them the quickest way possible. It continues to monitor the charging and
adjust immediately to a change in configuration. Power sensors and many lines of code help the system
to continuously improve the charging of all devices.
Even better, we designed the system to easily be updated and improved. So when that ultra-thin, pocketsize, hybrid powered foldable netpad comes around you are ready with a cart solution to charge it.
What are the benefits of the Intelligent Charging System?
Well, that one is easy. Devices are charged quicker and therefore you can use them more often. This in
return will not only make the students happy but also administrators because it increases the availability
of your devices for class time instruction.
This also allows teachers to stop worrying about the cart and concentrate on their curriculum and how
best to utilize the devices to improve student learning.
Can I automate charging or remote management?
Yes, you can. Our system can be configured to automatically start when the user plugs in the cart. This
further simplifies the use of the cart by removing the need to press the charging button at the end of
the day. Please contact us at (866) 393-4202 to discuss your options.
How do I reset the circuit breaker?
In the unlikely event that our Intelligent Charging System encounters any issues beyond regular use,
i.e. somebody misuses the cart by plugging in unsupported devices, our system is protected by its
own circuit breaker. The circuit breaker is the little black button on the front of the unit. It will trip and
pop out, protecting the unit. Simply press it back in to reset and use the cart again. Before you do,
however, please consult the manual and ensure everything is plugged in properly and no unsupported
devices are connected to the cart.
Have more questions?
Give us a call at (866) 393-4202 or visit our website www.JAR-Systems.com
for product information and specials.
16
TECHNICAL SPECIFICATIONS
Tray Dimensions SB-5XXXX
Width
363mm14.29”
Depth
410mm 16.14”
Tray Dimensions SB-6310B
Width
369mm14.5”
Depth
510mm 20”
Height
47mm2”
Power Connection
Input voltage: 120 V AC (+- 10%)
Input frequency: 60 Hz
Operating Environment
Temperature range: 5-40° C
Air humidity: 20-80% rel. air humidity, non-condensing
Storage
Temperature range: -10 to 50° C
Air humidity: 5-80% rel. air humidity, non-condensing
JAR Systems, LLC www.JAR-Systems.com
Call: 866-393-4202 for assistance.
WARRANTY INFORMATION
This warranty covers any defects in material or workmanship in this mobile cart. This warranty extends
to the original consumer of the product only. The warranty lasts for five years from date of purchase
for the entire mobile cart (excluding the power cord). JAR Systems LLC will replace the product with a
new or refurbished product, repair the product, send replacement parts, or refund the purchase price
you paid for the product, at JAR Systems LLC’s discretion. This warranty does not cover a product that
has been damaged by accident, unreasonable use, neglect, tampering or other causes not arising
from defects in material or workmanship.
ANY IMPLIED WARRANTIES LAST ONLY AS LONG AS THE WARRANTY PERIODS LISTED ABOVE.
This includes but is not limited to the implied warranties or merchantability and fitness. Some states
do not allow limitations on how long an implied warranty lasts, so this limitation may not apply to
you. JAR SYSTEMS LLC’s RESPONSIBILITY IS LIMITED TO THE ACTIONS LISTED ABOVE AND
NOTHING ELSE.
This warranty does not cover, and JAR Systems LLC will not be responsible for, any damages you may
have due to loss of use of the product, or any other costs or expenses incurred by you or anyone
else who uses the product, whether due to defects, breach of contract, negligence, strict liability
or otherwise. JAR SYSTEMS IS NOT LIABLE FOR ANY INDIRECT, SPECIAL, INCIDENTAL OR
CONSEQUENTIAL DAMAGES RELATED TO THE PRODUCT OR THIS WARRANTY. Some states do
not allow the exclusion or limitations or consequential or incidental damages, so these limitations or
exclusions may not apply to you.
If you have any questions about this warranty or the products please call us at 1-866-393-4202.
This warranty gives you specific legal rights and you may also have other rights that vary from state
to state. This warranty is governed by the laws of Florida, excluding its conflict of laws principles,
unless your state requires that its law be used.
PLEASE REGISTER YOUR JAR INTELLIGENT CART SOLUTION ONLINE.
www.JAR-Systems.com/Support/Product-Registration
At JAR Systems it is our singular focus to create
the best charging and storage solutions for mobile
devices. Benefitting from over 10 years of industry
experience, we stand behind our products with our
five-year warranty and excellence in customer service.
If you are ever in need of service, simply contact your
local reseller or call us at (866)393-4202.
18
PO Box 75 | Tallevast, FL | 34270 | USA
Tel: (866) 393 4202 | Fax: (941) 870 4859
www.JAR-Systems.com