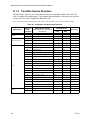
1
SK-6324
Fire Control Panel
Installation and
Operation Manual
Part Number 151117C, 03/01
Content
Section 1
Overview
1.1
1.2
...................................................................................................................................................... 1-1
SK-6324 Description ................................................................................................................................ 1-1
How to Contact Silent Knight .................................................................................................................. 1-1
Section 2
Agency Requirements
2.1
2.2
............................................................................................................... 2-1
FCC Warning ........................................................................................................................................... 2-1
Underwriters Laboratories (UL) .............................................................................................................. 2-1
2.2.1 Requirements for All Installations .................................................................................................... 2-1
2.2.2 Requirements for Local Protected Fire Alarm Systems ................................................................... 2-1
Section 3
Before You Begin Installing
3.1
3.2
3.3
3.4
3.5
3.6
3.7
3.8
3.9
............................................................................................... 3-1
What's in the Box? ................................................................................................................................... 3-1
Optional Accessories ................................................................................................................................ 3-2
SK-6324 Board Layout ............................................................................................................................ 3-3
Electrical Specifications ........................................................................................................................... 3-4
Environmental Specifications .................................................................................................................. 3-4
Mounting the SK-6324 ............................................................................................................................. 3-5
Assembly .................................................................................................................................................. 3-6
Wiring Specifications ............................................................................................................................... 3-7
Calculating Current Draw and Standby Battery ...................................................................................... 3-8
3.9.1 Worksheet Requirements .................................................................................................................. 3-8
Filling in the Current Draw Worksheet, Table 3-6 (Section 3.9.3) ............................................... 3-8
3.9.2 Maximum Battery Standby Load ...................................................................................................... 3-8
3.9.3 Current Draw Worksheet .................................................................................................................. 3-9
Section 4
Hardware Installation
.................................................................................................................. 4-1
4.1
4.2
4.3
AC Power ................................................................................................................................................. 4-1
Battery Connection .................................................................................................................................. 4-2
Initiation Circuit Installation .................................................................................................................... 4-3
4.3.1 Contact Wiring .................................................................................................................................. 4-3
4.3.2 Two-Wire Smoke Detector Wiring ................................................................................................... 4-3
4.3.3 Four-Wire Smoke Detector ............................................................................................................... 4-4
4.3.4 Notification Circuit Installation ........................................................................................................ 4-6
4.4 Alarm and Trouble Relays ....................................................................................................................... 4-6
4.5 Auxiliary Power Circuit ........................................................................................................................... 4-6
4.6 Door Release Wiring ................................................................................................................................ 4-7
151117
i
Model SK-6324 Fire Control Panel Installation/Operation Manual
4.7
Optional Accessories Installation ............................................................................................................. 4-8
4.7.1 Wiring Expansion Devices To the Control Panel ............................................................................. 4-8
4.8 SK-2866 LED Annunciator Installation .................................................................................................. 4-9
4.8.1 Electrical Specifications ................................................................................................................... 4-9
4.8.2 Wiring the SK-2866 to the SK-6324 Control Panel ......................................................................... 4-9
4.8.3 Setting the SK-2866’s Address ....................................................................................................... 4-10
4.8.4 Mounting the SK-2866 ................................................................................................................... 4-10
4.9 SK-2880 Installation .............................................................................................................................. 4-12
4.9.1 SK-2880 Specifications .................................................................................................................. 4-12
4.9.2 Connecting the SK-2880 to the Control Panel ................................................................................ 4-13
4.9.3 Setting the SK-2880 Address .......................................................................................................... 4-13
4.9.4 Open Collector Outputs (P1, P2, and P3) ....................................................................................... 4-15
4.9.5 Wiring SK-2880 Open Collector Outputs ...................................................................................... 4-17
4.9.6 SK-2880 Input Switches and Relay Wiring .................................................................................... 4-17
4.9.7 Mounting the SK-2880 ................................................................................................................... 4-18
Section 5
System Configuration
Section 6
System Operation
6.1
6.2
................................................................................................................ 5-1
............................................................................................................................ 6-1
Meaning of LEDs ..................................................................................................................................... 6-1
Operation Keys (Switches) ...................................................................................................................... 6-3
Appendix A
Compatible Devices
..................................................................................................................... A-1
A.1
Smoke Detectors ..................................................................................................................................... A-1
A.1.1 Enhanced Mode ............................................................................................................................ A-1
A.1.2 Two-Wire Smoke Detectors ......................................................................................................... A-2
Four-Wire Smoke Detectors ......................................................................................................... A-3
A.2 Notification Appliances .......................................................................................................................... A-4
General Terms and Conditions ........................................................................................................13
Repair and RA Procedure ................................................................................................................13
Advanced Replacement Policy ........................................................................................................13
Limited Warranty ............................................................................................................................14
ii
151117
Section 1
Overview
1.1
SK-6324 Description
The Model SK-6324 is a four zone, 24-volt fire control panel having the following features:
•
Six Class B Zone inputs.
•
2.5 amp power supply.
•
Three notification circuits rated at 2.5 amp max.
•
Dedicated alarm and trouble relays.
•
Auxiliary power output (.5 amp max.) for powering special applications, such as door
holders.
•
Enhanced Verification Mode, a built-in feature that distinguishes two-wire smoke
detectors from pull stations.
•
Housed in a 12.75"W x 15"H x 3.25"D metal cabinet.
•
Cabinet supports two 7.0 AH backup batteries.
1.2
How to Contact Silent Knight
If you have a question or encounter a problem not covered in this manual, contact Silent
Knight Technical Support at 800-328-0103 (or 612-493-6455). To order parts, contact Silent
Knight Sales at 800-446-6444 (or 612-493-6435).
151117
1-1
Model SK-6324 Fire Control Panel Installation/Operation Manual
1-2
151117
Section 2
Agency Requirements
2.1
FCC Warning
This device has been verified to comply with FCC Rules Part 15. Operation is subject to the
two following conditions: (1) This device may not cause radio interference, and (2) This
device must accept any interference received, including interference that may cause undesired
operation.
2.2
Underwriters Laboratories (UL)
The SK-6324 is UL listed as a control unit for use in NFPA 72 systems. If the SK-6324 and
its accessories are to be used as part of a UL installation, carefully read the UL requirements
in this section. For more information on NFPA 72 standards, refer to the NFPA National Fire
Alarm Code, 1996 Edition.
2.2.1
Requirements for All Installations
General requirements are described in this section. When installing an individual device,
refer to the specific section of the manual for additional requirements.
1. All field wiring must be installed in accordance with NFPA 70 National Electric Code.
2. Use UL listed smoke detectors and notification appliances compatible with the SK-6324
from those specified in the Appendix to this manual.
3. If you are using the smoke verification feature:
•
Do not use smoke detectors with built-in alarm verification.
•
Select "Enhanced Mode" if the installation includes pull stations or water flow
switches.
4. A full system checkout must be performed any time the panel is programmed.
5. UL installations using Class B wiring require the use of a Model 7628 EOL resistor
assembly.
2.2.2
Requirements for Local Protected Fire Alarm
Systems
At least one UL listed supervised notification appliance must be used.
2-1
Model Fire Control Panel Installation/Operation Manual
2-2
Section 3
Before You Begin Installing
3.1
What's in the Box?
The Model SK-6324 ships with the following hardware:
Table 3-1: Contents of Shipping Box
Containing
Main Part
Part
Quantity/Item
1 Cabinet
122509
Panel Bag
Hardware Bag
P/N 7648
1 Transformer
Model
Number
120 Vrms @ 60Hz
1 Control Board
063240
1 Installation Manual
151117
2 #8 Screws
119152
2 #8 Nuts
119538
3 Self-tapping Screws
119296
1 Earth Ground Wire
140668
1 Eight Inch Tie Wrap
120504
1 Battery Wire Harness
130420
1 battery Jumper
140694
115061
or a
230 Vrms at 50Hz
115031
1 Viewing Bezel
122558
6 End-of-line Resistors
111682
Note: See Section 3.7 for assembly instructions.
151117
3-1
Model SK-6324 Fire Control Panel Installation/Operation Manual
3.2
Optional Accessories
Table 3-2 is a list of optional accessories that can be used with the Model SK-6324 Fire
Control Panel.
Table 3-2: Option Accessories for the SK-6324
Model
Number
3-2
Name
Description
SK-2880
Input/Output (I/O) Module
Used to drive customized annunciators and interface devices.
SK-2866
LED Annunciator
Remote LED annunciator with Silence and Reset keyswitch
inputs.
SK-2104
Dialer
Used to communicate alarms, trouble and supervisories to
central station. Offers 5 different reporting formats 3/1, 4/2,
BFSK, SIA, and Contact ID.
7628
UL listed End-of-line
(EOL) Resistor.
EOL resistor required for UL installations.
151117
Before You Begin Installing
3.3
SK-6324 Board Layout
Figure 3-1 shows the SK-6324 circuit board including location of terminals, connectors, dip
switches, and LEDs.
Annunciator
AC Power
Connector
Programming
DIP Switches
On-Board
Piezo Sounder
Serial
Communication
Terminals
Backup
Battery
Connector
Trouble &
Alarm Relays
3 Notification
Appliance
Circuits
Zone Inputs
Auxiliary
Power
Output
Figure 3-1 Model SK-6324 Layout
151117
3-3
Model SK-6324 Fire Control Panel Installation/Operation Manual
3.4
Electrical Specifications
Table 3-3: Electrical Specifications
Circuit
Rating
Primary AC
*120 Vrms at 60 Hz, or 230 Vrms at 50 Hz
@ 1.5 Amps
Total External DC Load
2.5A @ 24 VDC
+24V Auxiliary Power
24 VDC, 0.5 A max.
Trouble & Alarm Relays
2.5 A @ 30 VDC resistive
Notification Appliance Power
24 VDC, 2.5 A max.
Smoke Detector Power
24 VDC, 1.0 A max.
Battery Charging Voltage
27.3 VDC
Maximum Battery Charging Current
750 mA
Minimum Low Battery Detect
20.4 V
Minimum Low AC Detect
100 Vrms at 60 Hz, full load
Note: * When ordering, specify your voltage requirements.
3.5
Environmental Specifications
Table 3-4: Environmental Specifications
Storage Temperature:
-4° - 167° F (-20 - 75 ° C)
Operating Temperature:
32° - 120° F (0° - 49 ° C)
Humidity:
10 - 85% non-condensing
It is important to protect the SK-6324 control panel from water. To prevent water damage, the
following conditions should be AVOIDED when mounting the units:
3-4
•
Do not mount directly on exterior walls, especially masonry walls (condensation)
•
Do not mount directly on exterior walls below grade (condensation)
•
Protect from plumbing leaks
•
Protect from splash caused by sprinkler system inspection ports
•
Do not mount in areas with humidity-generating equipment (such as dryers, production
machinery)
151117
Before You Begin Installing
3.6
Mounting the SK-6324
Read the environmental specifications in Section 3.5 before mounting the cabinet.
The panel should be accessible to main drop wiring runs. It should be mounted as close to the
center of the building as possible and located within a secured area, but should be accessible
for testing and service. End-users responsible for maintaining the panel should be able to hear
alarms and troubles. When selecting a location, keep in mind that the panel itself is the main
source of alarm and trouble annunciation.
Mount the cabinet so it is firmly secured to the wall surface. When mounting the cabinet on
concrete, especially when moisture is expected, attach a piece of 3/4-inch plywood to the
concrete surface and then attach the cabinet to the plywood. Also mount any other modules to
the plywood.
Follow these steps to mount the control panel cabinet:
1. Place the cabinet on the mounting surface, level the cabinet and mark the top two mounting holes.
2. Screw the top two mount screws about 3/4 of the way into the mounting surface.
3. Hang the control panel cabinet on the top mounting screws through the top mounting
screw keyholes.
12-1/2”
11”
Top Mounting
Screw Keyholes
15”
Bottom
Mounting Holes
Figure 3-2 Cabinet Mounting Holes
4. Insert the bottom two mounting screws into the cabinet’s bottom mounting holes.
5. Tighten all four mounting screws until the cabinet is properly secured.
6. Insert all cabinet components. See Section 3.7.
151117
3-5
Model SK-6324 Fire Control Panel Installation/Operation Manual
3.7
Assembly
The components listed in Table 3-1 are all packed with in the cabinet and require some
assembly. Follow these steps to assemble the components inside the cabinet:
1. Remove keys from small manila envelope taped to the top of the cabinet.
2. Unlock the cabinet door.
3. Remove the packing material and the SK-6324 components.
4. Snap the bezel into the opening in the front of the cabinet. See Figure 3-3.
Transformer
Installation
Side View of
Slotted Stand-Off
Bezel
Insertion
Cabinet
Door
CPU Mounting
Screws
Figure 3-3 Assembly Diagram for the SK-6324
Note: The bezel will fit in only one way.
5. With the two #8 Screws and the two #8 nuts (with built in washers), mount the transformer
in the holes in the upper left hand corner of the cabinet. See Figure 3-3.
6. With the three Self-trapping screws mount the control board on the cabinet stand-offs.
Note: See Section 4 for transformer connections and battery connections.
3-6
151117
Before You Begin Installing
3.8
Wiring Specifications
Induced noise (transfer of electrical energy from one wire to another) can cause false alarms
or interfere with control panel operation in other ways.
To avoid induced noise, follow these guidelines:
•
Isolate input wiring from high current output and power wiring. Do not pull one multiconductor cable for the entire panel. Instead, separate the wiring as follows:
High current input/output:AC power and notification device wiring
Low current input/output:Annunciator and zone loop wiring
•
Do not pull wires from different groups through the same conduit. If you must run them
together, do so for as short a distance as possible or use shielded cable. Connect the shield
to circuit ground at the panel. You must route high and low voltages separately.
•
Route the wiring within the cabinet around the perimeter of the cabinet. It should not cross
the printed circuit board where it could induce noise into the sensitive microelectronics or
pick up unwanted RF noise from the high speed circuits. See Figure 3-4 for an example.
•
High frequency noise, such as that produced by the inductive reactance of a speaker or
bell, can also be reduced by running the wire through ferrite shield beads or by wrapping it
around a ferrite toroid.
Figure 3-4 Wire Routing Example
151117
3-7
Model SK-6324 Fire Control Panel Installation/Operation Manual
3.9
Calculating Current Draw and Standby Battery
This section is for helping you determine the current draw and standby battery needs for your
installation.
3.9.1
Worksheet Requirements
The following steps must be taken when determining SK-6324 current draw and standby
battery requirements.
Filling in the Current Draw Worksheet, Table 3-6 (Section 3.9.3)
1. For the SK-6324, the worst case current draw is listed for the panel and is recorded in the
table at Line A.
2. Add up the current draw for all smoke detectors and record in the table at Line B.
3. Add up all notification appliance loads and record in the table at Line C.
4. Any additional devices should be recorded at Line D.
5. Make sure that the alarm current without the panel (Lines B-D) does not exceed 2.5 A.
The total alarm current (including the panel, Lines A-D) should not exceed 2.75 A.
6. Complete the remaining instructions in Table 3-6 for determining battery size requirements.
3.9.2
Maximum Battery Standby Load
Table 3-5 shows the maximum battery standby load for the SK-6324 based on 24 hours of
standby. The standby load calculations of line D in the Current Draw Calculation Worksheet
(Table 3-6) must be less than the number shown in Table 3-5 for the battery size used and
standby hours required.
Table 3-5: Maximum Battery Standby Load
3-8
Rechargeable Battery Size
Max. Load for 24 hrs.
Standby, 5 mins. Alarm
Max. Load for 60 hrs.
Standby, 5 mins. Alarm
7 AH
270 mA
110 mA
151117
Before You Begin Installing
3.9.3
Current Draw Worksheet
Use this worksheet to determine current requirements during alarm/battery standby operation.
(Copy this page if additional space is required.)
Table 3-6: Current Draw Calculations
Device
Number of
Devices
Current per Device
Standby
Current
Alarm
Current
For each device, use this formula: This Column XThis column=Current per number of devices
1
Standby:
90 mA
90 mA
SK-6324 Panel
Alarm:
295 mA
295 mA
Current Subtotals:
90 mA
295 mA
Refer to device manual for current ratings. See Appendix to this manual for max.
Smoke Detectors
# per loop.
Standby:
mA
mA
Alarm:
mA
mA
Standby:
mA
mA
Alarm:
mA
mA
Standby:
mA
mA
Alarm:
mA
mA
Standby:
mA
mA
Alarm:
mA
mA
Standby:
mA
mA
Alarm:
mA
mA
Standby:
mA
mA
Alarm:
mA
mA
Current Subtotals:
mA
mA
Refer
to
device
manual
for
number
of
devices
and
current
ratings.
Notification Devices
A
B
Alarm:
Alarm:
Alarm:
C
mA
mA
mA
Current Subtotals:
mA
mA
mA
mA
mA
Accessory Devices
SK-2866
SK-2880
SK-2104
D
Standby:
35 mA
Alarm:
85 mA
Standby:
35 mA
Alarm:
680 mA
Standby:
35 mA
Alarm: 70 mA (while dialing)
Current Subtotals:
mA
mA
mA
mA
mA
mA
mA
mA
*Additional Devices
Standby:
Alarm:
Standby:
Alarm:
E
F
G
H
I
J
K
mA
mA
mA
mA
Current Subtotals:
Total current rating of all devices in system (add TOTALS OF A-E) X .001:
Number of standby hours. (24 or 60 for NFPA 72, chapter 1, 1-5.2.5):
Total standby AH
Multiply lines F (standby current) and G:
Alarm sounding period in hours. (For example, 5 minutes = .0833 hours)
Total alarm AH
Multiply lines F (alarm current) and I:
Total AH required
Add lines H and J. (AH = Ampere Hours)
mA
mA
mA
mA
A
H
AH
mA
mA
A
H
AH
AH
Note: If you are using door holders, you do not need to consider door holder current for alarm current because
power is removed during that time. However, during normal operation, door holders draw current and
must be included in the total standby current that can be drawn from the panel.
Note: Total standby current must not exceed maximum Battery standby load listed in Table 3-5.
151117
3-9
Model SK-6324 Fire Control Panel Installation/Operation Manual
3-10
151117
Section 4
Hardware Installation
4.1
AC Power
At installation, connect the transformer AC inputs to the AC power source as shown in Figure
4-1. It may be necessary for a professional electrician to make this connection.
The AC inputs are rated as 120 VAC, 60 Hz (for transformer P/N 115061) or 230 VAC,50 Hz
(for transformer P/N 115031). See Table 3-1 for more information.
Transformer
Yellow
Tie Wrap
White
AC Pow er
Connector
Control Panel
To AC
Power
Black
Green
Earth Ground
Figure 4-1 AC Power Connection
151117
4-1
Model SK-6324 Fire Control Panel Installation/Operation Manual
4.2
Battery Connection
The SK-6324 battery charge capacity is 7.0 AH. Use two 12V batteries of the same AH rating.
Determine the correct AH rating as per your current load calculation (see Table 3-6).
Wire batteries in series to produce a 24-volt equivalent. Do not parallel batteries to increase
the AH rating.
Note: The SK-6324 cabinet supports two 7.0 AH batteries.
Backup Battery
Connector
Battery jumper (P/N 140694),
shipped with the Control Panel.
Figure 4-2 Battery Connection
4-2
151117
Hardware Installation
4.3
4.3.1
Initiation Circuit Installation
Contact Wiring
Wire normally open contacts as shown in Figure 4-3. This is the type of wiring that would
typically be used for water flow switches, heat detectors and other normally open devices.
Supervised
Power Limited
UL Listed
Figure 4-3 N.O. Contact Wiring
4.3.2
Two-Wire Smoke Detector Wiring
Figure 4-4 shows how to connect two-wire smoke detectors to the SK-6324 loops. The figure
uses Silent Knight's SLK-24F with HSB-224 base as an example. You can use any detector
that has been UL listed for compatibility with the SK-6324. Refer to the Appendix for a list of
compatible devices. Refer to Section 5 for configuration options.
Compatibility ID 24F
UL Listed
Supervised
Power Limited
Figure 4-4 Two-Wire Smoke Detector Wiring
151117
4-3
Model SK-6324 Fire Control Panel Installation/Operation Manual
4.3.3
Four-Wire Smoke Detector
Figure 4-5 shows how to connect four-wire smoke detectors to the SK-6324 loops. The figure
uses Silent Knight's SLK-24F with HSC-4R base as an example. You can use any UL listed
device. Refer to the Appendix for a list of compatible devices. Information on selecting zone
configuration options is in Section 5.
Supervised
Power Limited
UL Listed
Figure 4-5 Four-Wire Smoke Detector Wiring
4-4
151117
Hardware Installation
4.3.4
Notification Circuit Installation
Notification appliances used with the SK-6324 must be UL listed for compatibility with the
SK-6324. Refer to the list in the Appendix at the end of this manual for a list of compatible
devices.
For proper operation, you must use polarized notification devices with a model 7628 4.7k
ohm end-of-line (EOL) resistor on each loop. Select ANSI output pattern, if desired. Output is
configured as steady (continuous sound) at the factory. See Section 5 for information on
changing the pattern.
Supervised
Power Limited
Figure 4-6 Notification Circuit Installation
4.4
Alarm and Trouble Relays
The SK-6324 has built-in relays for alarm and trouble. The alarm relay is energized during
any alarm condition. The trouble relay is energized during any trouble or supervisory trouble
condition. Each relay has three terminals (N.O., Common, and N.C.). Refer to Figure 3-1 for
location of these terminals.
4.5
Auxiliary Power Circuit
The SK-6324 has a power limited auxiliary power circuit which can source up to .5A. The
terminal is labeled “AUX PWR”. Refer to Figure 3-1 for location of this terminal.
151117
4-5
Model SK-6324 Fire Control Panel Installation/Operation Manual
4.6
Door Release Wiring
Figure 4-7 shows how to configure a door release using an ESL DH series door holder.
Unsupervised
Power Limited
Figure 4-7 Door Release Wiring
4-6
151117
Hardware Installation
4.7
Optional Accessories Installation
This section describes how to install the optional accessories compatible with the SK-6324
control panel. The control panel can have one SK-2104 dialer and up to four other accessory
devices (any combination) connected to the serial bus.
Model
Number
SK-2866
SK-2880
Name
Description
Remote LED Annuncaitor
Remote LED annunciator with system reset and silence key
switch inputs. See Section 4.8.
Input/Output (I/O) Module
Used to drive customized annunciators and interface devices.
See Section 4.9.
Dialer
Used to communicate alarms, trouble and supervisories to
central station. Offers 5 different reporting formats 3/1, 4/2,
BFSK, SIA, and Contact ID.
SK-2104
Note: See SK-2104 Installation manual P/N 151102
to install this accessory.
4.7.1
Wiring Expansion Devices To the Control Panel
The control panel uses a three wire connection to all of the compatible expansion devices (see
Table 3-2).
Connect all the expansion devices to the control panel as follows:
Table 4-1: Control Panel Wiring Connections
151117
Control Panel
Terminals
To
Expansion Device
Terminal
-
-
+
+
D (Data)
D (Data)
4-7
Model SK-6324 Fire Control Panel Installation/Operation Manual
4.8
SK-2866 LED Annunciator Installation
The following instructions are a quick reference guide, refer to the control panel installation
manual SK-6324 (P/N 151117) for detailed system information.
4.8.1
Electrical Specifications
Table 4-2 lists the electrical specifications for the SK-2866.
Table 4-2: Electrical Specifications
Circuit
Max. Loop Resistance:
Max. Current:
Operating Voltage:
4.8.2
Rating
Data
50Ω
-
50Ω
+
50Ω
Alarm:
85 mA
Standby:
35 mA
24 VDC
Wiring the SK-2866 to the SK-6324 Control Panel
Note: Installation and wiring of this device must be done in accordance with NFPA 72 and local ordinances.
Follow these steps to properly wire the SK-2866 to the SK-6324 Control Panel:
1. Remove AC power from the panel by unplugging the AC power connector form the control panel (See Section 4.1).
2. Disconnect the backup battery from the control panel (See Section 4.2).
3. Terminate the wiring as shown in Figure 4-8. See also Table 4-3.
Figure 4-8 SK-2866 Connection to the SK-6324
4-8
151117
Hardware Installation
Table 4-3: SK-2866 Wiring Connections
4.8.3
SK-2866
Terminals
SK-6324
Terminals
D (Data)
D (Data)
+
+
-
-
Setting the SK-2866’s Address
The range of valid addresses is 0-3. Each device requires a unique address. Set the dip
switches as shown in Table 4-4. See Figure 4-8 for dip switch location.
Table 4-4: Addresses Per Dip Switch Setting
Dip Switch
Both
4.8.4
Position
Address
Open (off)
0
One
Closed (on)
1
Two
Closed (on)
2
Both
Closed (on)
3
Mounting the SK-2866
The SK-2866 mounts in a standard 3-gang electrical box.
Follow these steps to mount the SK-2866:
1. Make sure that the SK-2866 is properly wired to the control panel. See Figure 4-8.
2. Slide the printed annunciator label into place on the SK-2866. The label fits between the
LEDs and the clear plastic plate. See Figure 4-9.
151117
4-9
Model SK-6324 Fire Control Panel Installation/Operation Manual
3. Place the SK-2866 into the standard 3-gang electrical box. See Figure 4-9.
Slide Printed
Annunciator
Label
4” Square
Electrical Box
Cover Plate
Screw
SK-2866
Cover Plate
Figure 4-9 Mounting the SK-2866
4. Place the cover plate over the top of the SK-2866 and align the holes. See Figure 4-9.
5. Insert the four cover plate screws into the four screw holes on the standard 3-gang electrical box.
6. Screw the four cover plate screws into the cover plate until the cover plate fits firmly
against the SK-2866 and the electrical box. Do Not over tighten.
4-10
151117
Hardware Installation
4.9
SK-2880 Installation
The SK-2880 is an Input/Output module. The SK-2880 has 34 pre-defined open collector
outputs (see Table 4-7) that can be used to drive LEDs, interface with other controls or
systems, or control one of the three built-in Form C relays. See Figure 4-10, Figure 4-12 and
Figure 4-13.
The SK-2880 also has two supervised inputs used for Reset and Silence. See Figure 4-13.
Serial Communication
Terminals
Status
LED
Terminal
Strip 1
Open Collector
Outputs
Device ID
Dip Switches
Terminal
Strip 2
Reset/Silence
Switch Inputs
Form C
Relay 1
Form C
Relay 3
Form C
Relay 2
Figure 4-10 Components of the SK-2880 I/O Module
4.9.1
SK-2880 Specifications
Table 4-5: Specifications
Circuit
Max. Loop Resistance:
Max. Current:
151117
Rating
Data
25Ω
-
25Ω
+
25Ω
Alarm:
35 mA
Standby:
35 mA
Open Collector:
20 mA each or 680 mA total.
Operating Voltage:
24 VDC
Operating Temperature:
32° - 120° F (0° - 49° C)
Form C Relays
2.5 A @ 30 VDC Resistive
4-11
Model SK-6324 Fire Control Panel Installation/Operation Manual
Table 4-5: Specifications
Circuit
Silence/Reset Inputs
4.9.2
Rating
Max. Short
Circuit Current:
2.8 mA
Connecting the SK-2880 to the Control Panel
The control panel communicates to the I/O module through the Serial Interface (see also
Section 4.7.1). Figure 4-11 illustrates how to properly wire the I/O module to the Serial
Interface.
Supervised
Power Limited
SK-2880
Figure 4-11 I/O Module Wiring
4.9.3
Setting the SK-2880 Address
The range of valid addresses is 0-3. Each device requires a unique address. Set the dip
switches as shown in Table 4-6. See Figure 4-11 for dip switch location.
Table 4-6: SK-2880 Addresses Per Dip Switch Setting
Dip Switch
4-12
Position
Address
Both
Open (off)
0
One
Closed (on)
1
Two
Closed (on)
2
Both
Closed (on)
3
151117
Hardware Installation
4.9.4
Open Collector Outputs (P1, P2, and P3)
Each pin on the Pin Connectors (P1, P2, and P3) have a predefined output. Table 4-7 lists the
Pin Connectors and describes what each pin outputs.
Table 4-7: Pin-outs for Open Collector Outputs
Pin
Connector
P1
Pin 2
151117
Pin Number
Output
Pin 1
Pin 2
Zone 1 Alarm/Supervisory
Zone 1 Trouble
Pin 3
Zone 1 Clean-Me Trouble
Pin 4
Pin 5
Zone 2 Alarm/Supervisory
Zone 2 Trouble
Pin 6
Zone 2 Clean-Me Trouble
Pin 7
Pin 8
Zone 3 Alarm/Supervisory
Zone 3 Trouble
Pin 9
Zone 3 Clean-Me Trouble
Pin 10
Pin 11
Zone 4 Alarm/Supervisory
Zone 4 Trouble
Pin 12
Zone 4 Clean-Me Trouble
Pin 1
Pin 2
Zone 5 Alarm/Supervisory
Zone 5 Trouble
Pin 3
Zone 5 Clean-Me Trouble
Pin 4
Pin 5
Zone 6 Alarm/Supervisory
Zone 6 Trouble
Pin 6
Zone 6 Clean-Me Trouble
Pin 7
Zone 1 & 2 Pre-Alarm
Pin 8
Zone 3 & 4 Pre-Alarm
Pin 9
Zone 5 & 6 Pre-Alarm
Pin 10
System Status
Pin 11
Pin 12
+24 VDC
GND
Description
Outputs when there is an alarm or supervisory on Zone 1.
Outputs when a trouble condition exists on Zone 1.
Outputs when a “Clean-Me” type detector indicates a
Clean-me trouble on Zone 1.
Outputs when there is an alarm or supervisory on Zone 2.
Outputs when a trouble condition exists on Zone 2.
Outputs when a “Clean-Me” type detector indicates a
Clean-me trouble on Zone 2.
Outputs when there is an alarm or supervisory on Zone 3.
Outputs when a trouble condition exists on Zone 3.
Outputs when a “Clean-Me” type detector indicates a
Clean-me trouble on Zone 3.
Outputs when there is an alarm or supervisory on Zone 4.
Outputs when a trouble condition exists on Zone 4.
Outputs when a “Clean-Me” type detector indicates a
Clean-me trouble on Zone 4.
Outputs when there is an alarm or supervisory on Zone 5.
Outputs when a trouble condition exists on Zone 5.
Outputs when a “Clean-Me” type detector indicates a
Clean-me trouble on Zone 5.
Outputs when there is an alarm or supervisory on Zone 6.
Outputs when a trouble condition exists on Zone 6.
Outputs when a “Clean-Me” type detector indicates a
Clean-me trouble on Zone 6.
Outputs when zones 1 or 2 is in alarm (not both), and cross
alarm for zones 1 and 2 is enabled.
Outputs when zones 3 or 4 is in alarm (not both), and cross
alarm for zones 3 and 4 is enabled.
Outputs when zones 5 or 6 is in alarm (not both), and cross
alarm for zones 5 and 6 is enabled.
Steady output when system is O.K. Off during a trouble,
alarm or supervisory condition.
Positive 24 DC voltage output.
Circuit Ground
4-13
Model SK-6324 Fire Control Panel Installation/Operation Manual
Table 4-7: Pin-outs for Open Collector Outputs
Pin
Connector
Pin Number
Output
Pin 1
Pin 2
Pin 3
NAC 1 Trouble
NAC 2 Trouble
NAC 3 Trouble
Pin 4
Dialer Trouble
Pin 5
Expander Trouble
Pin 6
Alarm Silenced
Pin 7
Low AC
Pin 8
Low Battery
Pin 9
Ground Fault
Pin 10
Walk Test Active
Pin 11
Piezo Output
Pin 12
Local Trouble
Pin 3
4-14
Description
Outputs when a trouble condition exists on NAC 1.
Outputs when a trouble condition exists on NAC 2.
Outputs when a trouble condition exists on NAC 3.
Outputs when any type of trouble occurs with the dialer,
such as, no line voltage or a communication failure.
Outputs when one of the Serial Devices connected to the
control panel is in trouble.
Outputs when an alarm has been silenced.
Outputs if the control panel looses AC power or AC power
drops below the control panels low AC threshold.
Outputs when the backup battery voltage drops below 20.4
VDC.
Outputs when the control panel detects a ground fault
condition.
Outputs when the control panel is in walk test mode.
Outputs correspond to any trouble condition output from
the control panel.
Outputs if the end-of-line resistor on the Reset or silence
inputs not detected or if a serial communication problem
occurs between this device and the control panel.
151117
Hardware Installation
4.9.5
Wiring SK-2880 Open Collector Outputs
Figure 4-12 illustrates examples of how to configure the open collector outputs on the I/O
module for your uses.
Provided by the UL
Listed Graphic Annunciator
LED
Current Limiting
Resistor Must be
at Least 1 KΩ
Dry Contact Relay
To P2, Pin 11 or
+ on Terminal Strip 1
Figure 4-12 Output Configurations
4.9.6
SK-2880 Input Switches and Relay Wiring
This section describes the components of terminal strip 2 (see Figure 4-10) on the SK-2880.
Terminal strip 2 provides two input switches (Reset & Silence) and three Form C relay. Figure
4-13 illustrates how to configure the inputs switches and the Form C Relays.
Any Open
Collector Output
4.7 KΩ
UL
Listed
EOL
Model
7628
Power Limited
4.7 KΩ
Dry Contact outputs
Supervised
must be connected
Power Limited
to a power limited
source.
Figure 4-13 Wiring Examples for Input Switches and Form C Relays
Note: Reset and Silence switches must be UL recognized switches. Reset and Silence switches must be in the same
room as the UL Listed Graphic Annunciator.
151117
4-15
Model SK-6324 Fire Control Panel Installation/Operation Manual
4.9.7
Mounting the SK-2880
The I/O module must be mounted by itself in a UL Listed (for Fire Protective Signal)
accessory cabinet.
Follow these steps to mount the SK-2880:
1. Remove the SK-2880’s cover. A small screw driver can be used.
2. Remove the SK-2880 circuit board from the base by pushing outward on the base retaining tabs and lift the circuit board out. See Figure 4-14.
Circuit
Board
Base
Retaining
Tabs
Base
Figure 4-14 Circuit Board and Plastic Base Components
3. Mount the plastic base in a UL listed enclosure using any of the mounting holes in the
plastic base. See Figure 4-15 for locations of base mounting holes.
Mounting
Holes
Mounting
Holes
Mounting
Holes
Figure 4-15 Base Mounting Holes
4. Replace the SK-2880 circuit board back into the base.
5. Verify the proper wire termination and then snap the I/O module cover in place.
4-16
151117
Section 5
System Configuration
To configure the SK-6324 system set the dipswitch that controls the option you want to
select. The following chart shows how to program the dipswitches that control system, zone,
and notification appliance operation. Refer to Figure 3-1 for location of the dipswitches.
Important!
When you change a dipswitch, be sure to power down the panel. Dipswitch changes will be
recognized on power up only.
Table 5-1: DIP Switch Programming
Options
Zone 1
Dip Switch
Number
1
Feature
Enhanced Mode On
1 On
Enhanced Mode Off
1 Off
Alarm Verification On
2 On
Alarm Verification Off
Zone Types
151117
Switch
Number
2 Off
3 Off
Fire Zone
4 Off
3 On
Supervisory Zone
4 Off
Water Flow Zone No 3 Off
Delay
4 On
3 On
Water Flow Zone
With Delay
4 On
Comments
Enhanced mode. Use when both pull
stations and detectors will be used in the
same zone.
Normal mode. Use when 2- or 4-wire
smoke detectors and smoke verification
are used in the same zone.
Alarm Verification
Note: Do not use with smoke
detectors that have verification builtin.
No verification
Refer to “General Options” to program
the Water Flow delay time.
5-1
Model SK-6324 Fire Control Panel Installation/Operation Manual
Table 5-1: DIP Switch Programming
Options
Zone 2
Dip Switch
Number
1
Feature
Enhanced Mode On
5 On
Enhanced Mode Off
5 Off
Alarm Verification On
6 On
Alarm Verification Off
Zone Types
Zone 3
2
6 Off
7 Off
Fire Zone
8 Off
7 On
Supervisory Zone
8 Off
Water Flow Zone No 7 Off
Delay
8 On
7 On
Water Flow Zone
With Delay
8 On
Enhanced Mode On
1 On
Enhanced Mode Off
1 Off
Alarm Verification On
2 On
Alarm Verification Off
Zone Types
5-2
Switch
Number
2 Off
3 Off
Fire Zone
4 Off
3 On
Supervisory Zone
4 Off
Water Flow Zone No 3 Off
Delay
4 On
3 On
Water Flow Zone
With Delay
4 On
Comments
Enhanced mode. Use when both pull
stations and detectors will be used in the
same zone.
Normal mode. Use when 2- or 4-wire
smoke detectors and smoke verification
are used in the same zone.
Alarm Verification
Note: Do not use with smoke
detectors that have verification builtin.
No verification
Refer to “General Options” to program
the Water Flow delay time.
151117
System Configuration
Table 5-1: DIP Switch Programming
Options
Zone 4
Dip Switch
Number
2
Feature
Enhanced Mode On
5 On
Enhanced Mode Off
5 Off
Alarm Verification On
6 On
Alarm Verification Off
Zone Types
Zone 5
3
6 Off
7 Off
Fire Zone
8 Off
7 On
Supervisory Zone
8 Off
Water Flow Zone No 7 Off
Delay
8 On
7 On
Water Flow Zone
With Delay
8 On
Enhanced Mode On
1 On
Enhanced Mode Off
1 Off
Alarm Verification On
2 On
Alarm Verification Off
Zone Types
151117
Switch
Number
2 Off
3 Off
Fire Zone
4 Off
3 On
Supervisory Zone
4 Off
Water Flow Zone No 3 Off
Delay
4 On
3 On
Water Flow Zone
With Delay
4 On
Comments
Enhanced mode. Use when both pull
stations and detectors will be used in the
same zone.
Normal mode. Use when 2- or 4-wire
smoke detectors and smoke verification
are used in the same zone.
Alarm Verification
Note: Do not use with smoke
detectors that have verification builtin.
No verification
Refer to “General Options” to program
the Water Flow delay time.
Enhanced mode. Use when both pull
stations and detectors will be used in the
same zone.
Normal mode. Use when 2- or 4-wire
smoke detectors and smoke verification
are used in the same zone.
Alarm Verification
Note: Do not use with smoke
detectors that have verification builtin.
No verification
Refer to “General Options” to program
the Water Flow delay time.
5-3
Model SK-6324 Fire Control Panel Installation/Operation Manual
Table 5-1: DIP Switch Programming
Options
Zone 6
Dip Switch
Number
3
Output
Options
4
General
Options
5
5-4
Feature
Switch
Number
Enhanced Mode On
5 On
Enhanced Mode Off
5 Off
Alarm Verification On
6 On
Alarm Verification Off
6 Off
7 Off
Fire Zone
8 Off
7 On
Supervisory Zone
8 Off
Zone Types
Water Flow Zone No 7 Off
Delay
8 On
7 On
Water Flow Zone
With Delay
8 On
NAC 1 Silence
1 On
NAC 1 Non-Silencing
1 Off
NAC 1 ANSI
2 On
NAC 1 Steady
2 Off
NAC 2 Silence
3 On
NAC 2 Non-Silencing
3 Off
NAC 2 ANSI
4 On
NAC 2 Steady
4 Off
NAC 3 Silence
5 On
NAC 3 Non-Silencing
5 Off
NAC 3 ANSI
6 On
NAC 3 Steady
6 Off
Annunciator Installed
7 On
No Annunciator Installed
7 Off
Dialer Installed
8 On
No Dialer Installed
8 Off
Water Flow Delay 90 Seconds
1 On
Water Flow Delay 45 Seconds
1 Off
NAC circuits unsilenceable for
2 On
water flow alarms
NAC circuits silenceable for water
2 Off
flow alarms
Comments
Enhanced mode. Use when both pull
stations and detectors will be used in the
same zone.
Normal mode. Use when 2- or 4-wire
smoke detectors and smoke verification
are used in the same zone.
Alarm Verification
Note: Do not use with smoke
detectors that have verification builtin.
No verification
Refer to “General Options” to program
the Water Flow delay time.
Note: If this feature turned on the
NAC 3 Pre-Alarm Enabled
3 On
NAC 3 Pre-Alarm Disabled
3 Off
NAC 3 Sounds for Supervisories
4 On
NAC 3 No Sound for Supervisories
4 Off
NAC 3 will not sound for alarms.
Note: If this feature turned on the
NAC 3 will not sound for alarms.
151117
Section 6
System Operation
The annunciator on the SK-6324 board is used for all system operation. It contains the
switches (Figure 6-2) for enabling silencing, resetting, and so on. The LEDs (Figure 6-1) that
indicate system status are also located on the annunciator.
Figure 6-1 On-Board Annunciator
6.1
Meaning of LEDs
The chart below explains the meaning of LEDs on the system board.
Table 6-1: Meaning of LEDs
LED (Color)
Function
AC POWER (green)
ON = Good AC
OFF = Low AC trouble condition and it was acknowledged
FLASHING = Unacknowledged AC Low trouble condition
GENERAL TROUBLE
(yellow)
ON = System trouble
OFF = System OK
FLASHING = At least one serial device is in trouble
DOUBLE FLASHING = Two types of serial devices are in trouble.
SYSTEM SILENCED
(yellow)
ON = System audible output has been silenced
OFF = Nothing silenced
FLASHING = Partially silenced
Comments
If flashing press the ACK button to
acknowledged the condition.
Audible trouble activations will clear
automatically when the condition resets.
Audible alarm signals have to be
manually reset.
Note: Silencing an alarm will
cause a general trouble condition.
151117
6-1
Model SK-6324 Fire Control Panel Installation/Operation Manual
Table 6-1: Meaning of LEDs
LED (Color)
Function
Comments
WALK TEST (yellow)
ON = Walk test is in progress
OFF = Walk test is off.
FLASHING = Walk test is on and at least one zone is not ready
Allow approximately 47 seconds between
detector tests.
In walk test when a detector is tripped it
will cause an alarm for two seconds, then
the control panel will drop power to the
loop for seven seconds to reset the
detector. Then an additional 38 seconds is
needed to restore the detector.
If verification is used the time between
detector test will be about 2 minutes and
30 seconds.
GROUND FAULT (yellow)
ON = Ground fault condition exists and was acknowledged
OFF = No fault
FLASHING = A unacknowledged ground fault condition detected
If flashing press the ACK button to
acknowledged the condition.
LOW BATTERY (yellow)
ON = Battery low condition that has been acknowledged
OFF = Good battery condition
FLASHING = An unacknowledged battery low condition exists
If flashing press the ACK button to
acknowledged the condition.
ZONE 1
Through
ZONE 6
ALARM (red)
ON = Zone in alarm which has been acknowledged
OFF = No Alarm
FLASHING = Zone in alarm has not yet been acknowledged
If flashing press the ACK button to
acknowledged the condition.
SUPERVISORY
(yellow)
ON = Zone has a supervisory condition which has been
acknowledged (self-restoring condition)
OFF = No supervisory condition exists
FLASHING = Supervisory trouble detected on that zone that has
not yet been acknowledged
If flashing press the ACK button to
acknowledged the condition.
TROUBLE
(yellow)
ON = Zone has a trouble condition which has been acknowledged
OFF = No zone trouble
FLASHING = Zone has a trouble condition not yet acknowledged
DOUBLE FLASHING = Zone was disabled
If flashing press the ACK button to
acknowledged the condition.
CLEAN ME FLASHING = Indicates that the smoke detector needs A “Clean Me Flash” is a flash with a long
cleaning
LED on Time and a short LED off time
indicating that the smoke detector needs
cleaning. Applies only to smoke detectors
with the CLEAN ME feature. The “Clean
Me” flash starts after the trouble
condition has been acknowledge.
NAC 1
Through
NAC 3
6-2
ACTIVE
(yellow)
ON = NAC is active during an alarm
OFF = NAC is not active during alarm
TROUBLE
(yellow)
ON = NAC has a trouble condition and was acknowledged
If flashing press the ACK button to
OFF = No trouble condition
acknowledged the condition.
FLASHING = NAC has a trouble condition not yet acknowledged
DOUBLE FLASHING = Circuit was disabled
151117
System Operation
6.2
Operation Keys (Switches)
All system operation are performed from the on-board touchpad (switches) as described in the
chart below.
Figure 6-2 On-Board Touchpad (Switches)
Table 6-2: Operations and Instructions
Operation
Keystrokes
To disable a notification appliance
circuit.
Press the appropriate [NAC DISABLE] key. The NAC circuit will be disabled and
the corresponding TROUBLE LED will Double Flash. This function is not available
during an alarm condition.
To re-enable a notification circuit
Press The appropriate [NAC DISABLE] again.
Disable a zone.
Press the appropriate [ZONE DISABLE] key. The zone will be disabled and the
corresponding TROUBLE LED will Double Flash. This function is not available
during an alarm or supervisory condition.
To re-enable a zone.
Press the appropriate [ZONE DISABLE] again.
Begin Walk Test
Press [WALK TEST]. Walk Test LED turns on.
Note: Walk test will not activate if the control panel has a trouble, alarm,
or supervisory condition.
End Walk Test
(The test ends automatically after 10
minutes of no system activity.)
Press [WALK TEST].
Acknowledge condition (alarm,
supervisory, trouble)
Press [ACK]. The corresponding LED will change from blinking to steady for the
duration of the condition. Except for CLEAN ME trouble indications.
Silence Panel
Press [SILENCE]. This will silence the on-board PZT and all active NAC circuits
that have been configured as "silenceable".
Perform system reset
Press [RESET]. Resets alarms, supervisories, troubles and all LEDs.
To send a dialer test to your central
station.
Press the [DIALER TEST] button.
To reset the dialer.
Press the [DIALER RESET] button.
151117
6-3
Model SK-6324 Fire Control Panel Installation/Operation Manual
6-4
151117
Appendix A
Compatible Devices
This section of the manual lists devices (smoke detectors and notification appliances) that are
compatible with theSK-6324. Silent Knight if you have a question about whether a device not
listed here is compatible.
A.1 Smoke Detectors
This section of the manual contains information about smoke detectors that are compatible
with the SK-6324.
SK-6324
Identifier
Voltage Range
24F
17.3-28 VDC
Note: The maximum number of smoke detectors per zone is determined by both the current draw and the impedance of the smoke detector. If too many smoke detectors are used on any zone, false alarms could occur.
Do not mix different models of detectors on any zone; false alarms could occur.
A.1.1 Enhanced Mode
Enhanced mode allows the installer to use pull stations on a loop that has been programmed
for Enhanced Alarm Verification. If a single detector goes into alarm it will start the alarm
verification cycle. If a pull station is activated any time during the alarm verification cycle and
after the control panel re-applies loop power (power will drop for seven seconds to restore
detector during verification), the panel will go into immediate alarm and discontinue the
verification cycle.
Warning! Do not mix different models or manufacturers of smoke detectors on the input loops.
151117
A-1
Model SK-6324 Fire Control Panel Installation/Operation Manual
A.1.2 Two-Wire Smoke Detectors
The table below lists two-wire smoke detectors that are compatible with the SK-6324. The
table is organized by manufacturer. The columns show the number of detectors per loop that
can be used. Two-wire Compatibility Indentifier 24F.
Note: The check mark by manufacturers name indicates that this device can be used in enhanced mode.
Table A-1: Compatible Two-Wire Smoke Detectors
Manufacturer
Apollo
Enhance
Mode
Compatible
Detection Systems
ESL
Falcon
A-2
Model Name or Number
(Base model name or number in
parentheses.)
Compatibility ID
# per Loop
Head
Base
55000-350 (45681-200)
55000-350
45681-200
24 / loop
55000-250 (45681-200)
55000-250
45681-200
24 / loop
DS250 (MB2W or MB2WL)
B
A
18 / loop
DS250HD (MB2W or MB2WL)
B
A
18 / loop
DS250TH (MB2W or MB2WL)
B
A
18 / loop
429C (S10A)
N/A
S10A
30 / loop
429CRT (S11A)
N/A
S11A
30 / loop
429CST (S11A)
N/A
S11A
30 / loop
429CT (S10A)
N/A
S10A
30 / loop
521B
N/A
S10A/S11A
40 / loop
521BXT
N/A
S10A/S11A
40 / loop
609U01-11
S10
S00
40 / loop
609U02-11
S10
S00/S03
40 / loop
611U (601U or 602U)
S10
S00/S03
40 / loop
611UD (601U or 602U)
S10
S00/S03
40 / loop
611UT (601U or 602U)
S10
S00/S03
40 / loop
612U (601U or 602U)
S10
S00/S03
40 / loop
612UD (601U or 602U)
S10
S00/S03
40 / loop
711U (701E or 701U)
N/A
S10A
25 / loop
712U (701E or 701U)
N/A
S10A
25 / loop
713-5U (702E or 701U)
N/A
S10A
25 / loop
713-6U (702E or 701U)
N/A
S10A
25 / loop
721-U (S10A)
N/A
S10A
30 / loop
721-UT (S10A)
N/A
S10A
30 / loop
525
FDT1
N/A
17 / loop
525T
FDT1
N/A
17 / loop
151117
Table A-1: Compatible Two-Wire Smoke Detectors
Manufacturer
Enhance
Mode
Compatible
System Sensor
Model Name or Number
(Base model name or number in
parentheses.)
Compatibility ID
# per Loop
Head
Base
1100
A
N/A
20 / loop
1400
A
N/A
20 / loop
1451 (B401B)
A
A
20 / loop
2300T
A
N/A
20 / loop
2300
A
N/A
20 / loop
2300TB
A
N/A
20 / loop
2400
A
N/A
20 / loop
2451 (B401B)
A
N/A
20 / loop
2451DH (DH 400)
A
N/A
20 / loop
2451TH (B401B)
A
N/A
20 / loop
Four-Wire Smoke Detectors
Table A-2: Compatible Four-Wire Smoke Detectors
Manufacturer
151117
Model
Silent Knight
SD-P24F with SD-B4@ base
Detection Systems
DS200/DS200HD
MB200
ESL
445 Series
449 Series
Gentex
624
824
2040-24 Power Supervision Unit
System Sensor
1851B
2851/2851BTH
DH200ADCD
A-3
Model SK-6324 Fire Control Panel Installation/Operation Manual
A.2 Notification Appliances
The chart below lists notification appliances compatible with the SK-6324
Table A-3: Compatible Notification Devices
Manufacturer
A-4
Model
Type
Faraday
446X 12/24VDC
Vibrating Bell
Faraday
476X 12/24VDC
Vibrating Bell
Faraday
477X 12/24VDC
Single Stroke Bell
Faraday
5303B-0-14-( )-DC
Chime (flush)
Faraday
5304B-0-14-( )-DC
Chime (surface)
Faraday
5305B-0-4-( )-DC
Chime (ceiling)
Faraday
5306B-0-14-( )-24-DC
Chime/Strobe (flush)
Faraday
5307B-0-14-( )-24-DC
Chime/Strobe (surface)
Faraday
5308B-0-4-( )-24-DC
Chime/Strobe (ceiling)
Faraday
5333B-0-14-24-DC
Multi-Tone Horn (flush)
Faraday
5334B-0-14-24-DC
Multi-Tone Horn (surface)
Faraday
5336B-( )-14-24-DC
Multi-Tone Horn/Strobe (flush)
Faraday
5337B-( )-14-24-DC
Multi-Tone Horn/Strobe (surface)
Faraday
5338B-( )-4-24-DC
Multi-Tone Horn/Strobe (ceiling)
Faraday
5343B-0-14-24-DC
Single Tone Horn/Strobe (flush)
Faraday
5344B-0-14-24-DC
Single Tone Horn/Strobe (surface)
Faraday
5345B-0-4-24-DC
Single Tone Horn/Strobe (ceiling)
Faraday
5348B-( )-4-24-DC
Single Tone Horn/Strobe (ceiling)
Faraday
5373B-0-14-24-DC
8-Tone Horn/Strobe (flush)
Faraday
5374B-0-14-24-DC
8-Tone Horn/Strobe (surface)
Faraday
5375B-0-4-24-DC
8-Tone Horn/Strobe (ceiling)
Faraday
5376B-0-14-24-DC
8-Tone Horn/Strobe (flush)
Faraday
5377B-0-14-24-DC
8-Tone Horn/Strobe (surface)
Faraday
5378B-0-4-24-DC
8-Tone Horn/Strobe (ceiling)
Faraday
5405B-0-14-24-DC
Sync Control Unit
Faraday
5508B-( )-14-24-DC
Single Gang Sync Strobe (flush)
Faraday
5521B-( )-14-24-DC
4” Square Sync Strobe (surface)
Faraday
5522B-( )-14-24-DC
4” Square Sync Strobe (flush)
Faraday
6126B-U-14-24 VDC
Horn/Strobe
Faraday
6223B-0-14-24-DC
Horn (flush)
Faraday
6224B-0-14-24-DC
Horn (surface)
Faraday
6225B-0-4-24-DC
Horn (ceiling)
Faraday
6226B-( )-14-24-DC
Horn/Strobe (flush)
Faraday
6227B-( )-14-24-DC
Horn/Strobe (surface)
151117
Table A-3: Compatible Notification Devices
Manufacturer
Model
Type
Faraday
6228B-( )-4-24-DC
Horn/Strobe (ceiling)
Faraday
6243B-0-14-24-DC
Electron-Mechanical Horn (flush)
Faraday
6244B-0-14-24-DC
Electron-Mechanical Horn (surface)
Faraday
6245B-0-4-24-DC
Electron-Mechanical Horn (ceiling)
Faraday
6246B-( )-14-24-DC
Electron-Mechanical Horn/Strobe (flush)
Faraday
6247B-( )-14-24-DC
Electron-Mechanical Horn/Strobe (surface)
Faraday
6248B-( )-4-24-DC
Electron-Mechanical Horn/Strobe (ceiling)
Faraday
6300B-0-14-24-DC
Mini-Horn (flush)
Faraday
6301B-0-14-24-DC
Mini-Horn (surface)
Faraday
6302B-( )-4-24-DC
Mini-Horn (ceiling)
Faraday
6310B-0-14-24-DC
Mini-Horn/Strobe/Strobe (flush)
Faraday
6311B-0-14-24-DC
Mini-Horn/Strobe/Strobe (surface)
Faraday
6312B-( )-14-24-DC
Mini-Horn/Strobe/Strobe (ceiling)
Faraday
6320B-0-14-24-DC
Sync Mini Horn/Strobe (1 gang)
Faraday
6321B-0-14-24-DC
Sync Mini Horn/Strobe (1,2 gang)
Faraday
6322B-( )-14-24-DC
Mini Horn/Sync Strobe (1,2 gang, 4SQ)
Federal Signal
450
Horn
Federal Signal
VALS
Horn/Strobe
Gentex
GX90-4
Horn
Gentex
GXS-4-15-1
Strobe
Gentex
GXS-4-1575
Strobe
Gentex
GX90S-4-15
Horn
Gentex
GX90S-4-1575
Horn
Gentex
HG124
Horn
Gentex
SHG24-1575
Horn/Strobe
Gentex
SHG24-15
Horn/Strobe
Gentex
GMH-24-X
Horn
Gentex
GMS-24-X
Horn/Strobe
Gentex
GMS-24-X
Horn/Strobe
Gentex
G0T24
Horn
Gentex
G0S24-X
Horn
Gentex
WGMS-24-X
Horn/Strobe
System Sensor
MASS241
Horn/Strobe
System Sensor
MASS24110ADA
Horn/Strobe
System Sensor
MASS2415ADA
Horn/Strobe
System Sensor
MASS2475ADA
Horn/Strobe
System Sensor
SS4110ADA
Strobe
System Sensor
SS2415ADA
Strobe
151117
A-5
Model SK-6324 Fire Control Panel Installation/Operation Manual
Table A-3: Compatible Notification Devices
Manufacturer
A-6
Model
Type
System Sensor
SS2475ADA
Strobe
System Sensor
PS2415ADA
Mini-Horn/Strobe
System Sensor
PS241575ADA
Mini-Horn/Strobe
System Sensor
PS24110ADA
Mini-Horn/Strobe
System Sensor
PS2475ADA
Mini-Horn/Strobe
Wheelock
46T-G4-24-R
Bell
Wheelock
46T-G6-24-R
Bell
Wheelock
46T-G10-24-R
Bell
Wheelock
46T-G6-24-WS-24-HF-R
Strobe/Bell
Wheelock
46T-G10-24-WS-24-HF-R
Strobe/Bell
Wheelock
46T-G6-24-WH-24-HF-R
Strobe/Bell
Wheelock
46T-G10-24-WH-24-HF-R
Strobe/Bell
Wheelock
7001T-12\24-W-FR
Strobe Horn
Wheelock
7002T-12\24-W-FR
Strobe Horn
Wheelock
AES-DL1-R
Multitone Horn
Wheelock
AES-EL1-R
Multitone Horn
Wheelock
AES-DL1-WS-24-VF-R
Multitone Horn
Wheelock
AES-EL1-WS-24-VF-R
Multitone Horn
Wheelock
AES-DL1-WH-24-VF-R
Multitone Horn
Wheelock
AES-EL1-WH-24-VF-R
Multitone Horn
Wheelock
AES-DL1-WM-24-VF-R
Multitone Horn
Wheelock
AES-EL1-WM-24-VF-R
Multitone Horn
Wheelock
AH-24-R
Horn
Wheelock
AH-24WP-R
Horn
Wheelock
AMT-12\24-R
Strobe Horn
Wheelock
AMT-24-LS-VFR
Strobe Horn
Wheelock
AMT-24-LSM-VFR
Strobe Horn
Wheelock
AMT-24-IS-VFR
Strobe Horn
Wheelock
AS2415W-FR
Audible Strobe
Wheelock
AS241575W-FR
Audible Strobe
Wheelock
AS2430W-FR
Audible Strobe
Wheelock
AS2475W-FR
Audible Strobe
Wheelock
AS24110W-FR
Audible Strobe
Wheelock
AS2415C-FW
Audible Strobe
Wheelock
AS2430C-FW
Audible Strobe
Wheelock
AS2475C-FW
Audible Strobe
Wheelock
AS24100C-FW
Audible Strobe
Wheelock
AS-2415-VFR
Strobe Horn
151117
Table A-3: Compatible Notification Devices
Manufacturer
Model
Type
Wheelock
AS-241575-VFR
Strobe Horn
Wheelock
AS-2430-VFR
Strobe Horn
Wheelock
AS-2475-VFR
Strobe Horn
Wheelock
AS-24110-HFR
Strobe Horn
Wheelock
SM-12/24-R
Strobe Horn Controller
Wheelock
DSM-12/24-R
Strobe Horn Controller
Wheelock
CF-BF1
Chime
Wheelock
CF-BF1-R
Chime
Wheelock
CH70-24-R
Chime
Wheelock
CH90-24-W
Chime
Wheelock
CH70-2415W-FR
Chime Strobe
Wheelock
CH70-241575W-FR
Chime Strobe
Wheelock
CH70-2430W-FR
Chime Strobe
Wheelock
CH70-2475W-FR
Chime Strobe
Wheelock
CH70-24110W-FR
Chime Strobe
Wheelock
CH-CF1
Chime
Wheelock
CH-CF1-R
Chime
Wheelock
CH-CF1-W
Chime
Wheelock
CH-DF1
Chime
Wheelock
CH-DF1-R
Chime
Wheelock
CH-BF1-WS-24-HF-R
Strobe Chime
Wheelock
CH-CF1-LS-24
Strobe Chime
Wheelock
CH-CF1-MS-24
Strobe Chime
Wheelock
CH-CF1-IS-24
Strobe Chime
Wheelock
CH-CF1-LS-24-CFW
Strobe Chime
Wheelock
CH-CF1-MS-24-CFW
Strobe Chime
Wheelock
CH-CF1-IS-24-CFW
Strobe Chime
Wheelock
CH-CF1-WS-24-CF-W
Strobe Chime
Wheelock
CH-DF1-LS-24
Strobe Chime
Wheelock
CH-DF1-MS-24
Strobe Chime
Wheelock
CH-DF1-IS-24
Strobe Chime
Wheelock
CH-DF1-LS-24-VFR
Strobe Chime
Wheelock
CH-DF1-LSM-24-VFR
Strobe Chime
Wheelock
CH-DF1-MS-24-VFR
Strobe Chime
Wheelock
CH-DF1-IS-24-VFR
Strobe Chime
Wheelock
CH-DF1-WM-24-VFR
Strobe Chime
Wheelock
CH-DF1-WS-24-VF-R
Strobe Chime
Wheelock
DSM-12/24
Sync Module
151117
A-7
Model SK-6324 Fire Control Panel Installation/Operation Manual
Table A-3: Compatible Notification Devices
Manufacturer
A-8
Model
Type
Wheelock
EH-DL1-R
Electronic Horn
Wheelock
EH-EL1-R Electronic Horn
Electronic Horn
Wheelock
EHS-DL1-W-VF-R
Strobe Horn (single input)
Wheelock
EHS-EL1-W-VF-R
Strobe Horn (single input)
Wheelock
EH-DL1-WS-24-VF-R
Strobe Horn (dual input)
Wheelock
EH-EL1-WS-24-VF-R
Strobe Horn (dual input)
Wheelock
EH-DL1-WH-24-VF-R
Strobe Horn (dual input)
Wheelock
EH-EL1-WH-24-VF-R
Strobe Horn (dual input)
Wheelock
EH-DL1-WM-24-VF-R
Strobe Horn (dual input)
Wheelock
EH-EL1-WM-24-VF-R
Strobe Horn (dual input)
Wheelock
HSW-24-HFR
Remote Strobe
Wheelock
HS2W-24-HFR
Remote Strobe
Wheelock
HSPW-24-HFR
Remote Strobe
Wheelock
IS-24-VFR
Remote Strobe
Wheelock
IS1-24-VFR
Remote Strobe
Wheelock
IS3-24-VFR
Remote Strobe
Wheelock
ISP-24-HFR
Remote Strobe
Wheelock
LS-24-VFR
Remote Strobe
Wheelock
LS1-24-VFR
Remote Strobe
Wheelock
LS3-24-VFR
Remote Strobe
Wheelock
LSP-24-HFR
Remote Strobe
Wheelock
LSM-24-VFR
Remote Strobe
Wheelock
LS1M-24-VFR
Remote Strobe
Wheelock
LS3M-24-VFR
Remote Strobe
Wheelock
LSPM-24-VFR
Remote Strobe
Wheelock
MS-24-VFR
Remote Strobe
Wheelock
MS1-24-VFR
Remote Strobe
Wheelock
MS3-24-VFR
Remote Strobe
Wheelock
MSP-24-HFR
Remote Strobe
Wheelock
MB-G6-24-R
Motor Bell
Wheelock
MB-G10-24-R
Motor Bell
Wheelock
MBS-G6-24-W-HF-R
Motor Bell with Strobe
Wheelock
MBS-G10-24-W-HF-R
Motor Bell with Strobe
Wheelock
MIZ-24-R
Mini-Horn
Wheelock
MIZ-24-W
Mini-Horn
Wheelock
MIZ-24-LS-VFR
Mini-Horn/Strobe
Wheelock
MIZ-24-LSM-VFR
Mini-Horn/Strobe
Wheelock
MIZ-24-MS-VFR
Mini-Horn/Strobe
151117
Table A-3: Compatible Notification Devices
Manufacturer
Model
Type
Wheelock
MIZ-24-HSW-HFR
Mini-Horn/Strobe
Wheelock
MIZ-24-IS-VFR
Mini-Horn/Strobe
Wheelock
MIZ-24-WS-VF-R
Mini-Horn/Strobe
Wheelock
MIZ-24-WS-VF-W
Mini-Horn/Strobe
Wheelock
MIZ-24-WH-VF-W
Mini-Horn/Strobe
Wheelock
MIZ-24-WM-VF-W
Mini-Horn/Strobe
Wheelock
MT-12/24-R
Strobe Horn
Wheelock
MT4-12/24-R
Multitone Appliance
Wheelock
MT4-115-R
Multitone Appliance
Wheelock
MT-24-LS-VFR
Strobe Horn
Wheelock
MT-24-LSM-VFR
Strobe Horn
Wheelock
MT-24-MS-VFR
Strobe Horn
Wheelock
MT-24-IS-VFR
Strobe Horn
Wheelock
MT-24-SL-VFR
Strobe Horn
Wheelock
MT-24-SLM-VFR
Synch. Multitone Strobe
Wheelock
MT-24-WM
Strobe
Wheelock
MT-24-WM-VF-R
Horn
Wheelock
MT-24-WM-VFR
Strobe Horn
Wheelock
NH-12/24-R
Horn
Wheelock
NS-2415W-FR
Strobe Horn
Wheelock
NS-241575W-FR
Strobe Horn
Wheelock
NS-2430W-FR
Strobe Horn
Wheelock
NS-2475W-FR
Strobe Horn
Wheelock
NS-24110W-FR
Strobe Horn
Wheelock
NS4-2415W-FR
Strobe Horn
Wheelock
NS4-241575W-FR
Strobe Horn
Wheelock
NS4-2430W-FR
Strobe Horn
Wheelock
NS4-2475W-FR
Strobe Horn
Wheelock
NS4-24110W-FR
Strobe Horn
Wheelock
RS-2415W-FR
Strobe
Wheelock
RS-2415W-FR
Strobe
Wheelock
RS-241575W-FR
Strobe
Wheelock
RS-2415-HFR
Strobe
Wheelock
RSP-2415-VFR
Strobe
Wheelock
RS-241575-VFR
Strobe
Wheelock
RSP-241575-VFR
Strobe
Wheelock
RS-2430-VFR
Strobe
Wheelock
RS-2430-HFR
Strobe
151117
A-9
Model SK-6324 Fire Control Panel Installation/Operation Manual
Table A-3: Compatible Notification Devices
Manufacturer
Model
Type
Wheelock
RS-2475-VFR
Strobe
Wheelock
RSP-2475-HFR
Strobe
Wheelock
RS-24110-HFR
Strobe
Wheelock
RSP-24110-HFR
Strobe
Wheelock
RSS-2415W-FR
Strobe
Wheelock
RSS-241575W-FR
Strobe
Wheelock
RSS-2430W-FR
Strobe
Wheelock
RSS-2475W-FR
Strobe
Wheelock
RSS-24110W-FR
Strobe
Wheelock
RSS-2415C-FW
Strobe
Wheelock
RSS-2430C-FW
Strobe
Wheelock
RSS-2475C-FW
Strobe
Wheelock
RSS-24100C-FW
Strobe
Wheelock
RSSP-2415W-FR
Strobe
Wheelock
RSSP-241575-FR
Strobe
Wheelock
RSSP-2430W-FR
Strobe
Wheelock
RSSP-2475W-FR
Strobe
Wheelock
RSSP-24110W-FR
Strobe
Wheelock
SL-24-VFR
Synchronized Remote Strobe
Wheelock
SL1-24-VFR
Synchronized Remote Strobe
Wheelock
SL3-24-VFR
Synchronized Remote Strobe
Wheelock
SLP-24-VFR
Synchronized Remote Strobe
Wheelock
SLM-24-VFR
Synchronized Remote Strobe
Wheelock
SL1M-24-VFR
Synchronized Remote Strobe
Wheelock
SL3M-24-VFR
Synchronized Remote Strobe
Wheelock
SLPM-24-VFR
Synchronized Remote Strobe
Wheelock
SHW-24-VFR
Synchronized Remote Strobe
Wheelock
SH2W-24-VFR
Synchronized Remote Strobe
Wheelock
SHPW-24-VFR
Synchronized Remote Strobe
Wheelock
SCM-24-R
Controller for Synchronized Strobes
Wheelock
SM-12/24-R
Sync Module
Wheelock
SR-2415-VFR
Sync Strobe
Wheelock
SRP-2415-HFR
Sync Strobe
Wheelock
SR-241575-VFR
Sync Strobe
Wheelock
SRP-241575-VFR
Sync Strobe
Wheelock
SR-2475-VFR
Sync Strobe
Wheelock
SR-2475-HFR
Sync Strobe
Wheelock
SR-24110-HFR
Sync Strobe
A-10
151117
Table A-3: Compatible Notification Devices
Manufacturer
Model
Type
Wheelock
SRP-24110-HFR
Sync Strobe
Wheelock
V7001T-12\24-W-FR
Strobe Horn
Wheelock
WM3T-24-FR
Remote Strobe
Wheelock
WM3T-24-VFR
Remote Strobe
Wheelock
WS1T-24-FR
Strobe
Wheelock
WS3T-24-FR
Strobe
Wheelock
WST-24-FR
Strobe
151117
A-11
Model SK-6324 Fire Control Panel Installation/Operation Manual
A-12
151117
Silent Knight Fire Product Warranty and Return Policy
General Terms and Conditions
• All new fire products manufactured by Silent Knight after September 1, 1997 have a limited warranty period of 18 months from the date of manufacture against defects in materials and workmanship. See limited warranty statement for details.
•
This limited warranty does not apply to those products that are damaged due to misuse,
abuse, negligence, or have been modified in any manner whatsoever.
Repair and RA Procedure
• All products that are returned to Silent Knight for credit or repair require a RA (Return
Authorization) number. Call Silent Knight Customer Service at 800-446-6444 or 612-4936435 between 8:00 A.M. and 5:00 P.M. CST, Monday through Friday to obtain a return
authorization number. Silent Knight Technical Support is available at 800-328-0103
between 8:00 A.M. and 6:00 P.M. CST, Monday through Friday.
•
RA number must be prominently displayed on the outside of the shipping box. See return
address example under Advanced Replacement Policy.
•
All products returned to Silent Knight must be sent freight pre-paid. After product is processed, Silent Knight will pay for shipping product back to customer.
•
Return the Silent Knight product circuit board only. Products that are returned in cabinets
will be charged an additional $20 to cover the extra shipping and handling costs over
board only returns. Do not return batteries. Silent Knight has the authority to determine if
a product is repairable. Products that are deemed un-repairable will be returned to the customer.
•
Product that is returned that has a board date code more than 18 months from date of manufacture will be repaired and the customer will be assessed the standard Silent Knight
repair charge for that model.
•
A detailed description of the problem should be included with each return.
Advanced Replacement Policy
• Silent Knight offers an option of advance replacement for fire product printed circuit
boards that fail during the 18 month warranty period.
•
For advance replacement of a defective board call Silent Knight at 800-446-6444 or
612-493-6435 to obtain a RA (Return Authorization) number and request advanced
replacement.
•
Customers must use a MasterCard or Visa credit card to get an advance replacement.
•
A new or refurbished board will be shipped to the customer. The customer will initially be
billed for the replacement board but a credit will be issued after the repairable board is
received at Silent Knight.
•
The defective board must be returned within 30 days of shipment of replacement board for
customer to receive credit. No credit will be issued if the returned board was damaged due
to misuse or abuse.
151117
Model SK-6324 Fire Control Panel Installation/Operation Manual
•
Repairs and returns should be sent to:
Silent Knight
Attn: Repair Department
7550 Meridian Circle
Maple Grove, MN 55369-4927
RA Number:___________________
Limited Warranty
Silent Knight warrants that the products of its manufacture shall be free from defects in
materials or workmanship for 18 months from the manufacturing date code on the printed
circuit board, if such goods have been properly installed, are subject to normal proper use, and
have not been modified in any manner whatsoever. Upon return of the defective product,
Silent Knight will, at its sole discretion, either repair or replace, at no cost, such goods as may
be of defective material or workmanship. Customers outside the United States are to return
products to their distributor for repair.
SILENT KNIGHT SHALL NOT UNDER ANY CIRCUMSTANCES BE LIABLE FOR
ANY INCIDENTAL OR CONSEQUENTIAL DAMAGES ARISING FROM LOSS OF
PROPERTY OR OTHER DAMAGE OR LOSSES OWING TO THE FAILURE OF SILENT
KNIGHT SECURITY SYSTEMS PRODUCTS BEYOND THE COST OF REPAIR OR
REPLACEMENT OF ANY DEFECTIVE PRODUCTS.
SILENT KNIGHT MAKES NO WARRANTY OF FITNESS OR MERCHANTABILITY
AND NO OTHER WARRANTY, ORAL OR WRITTEN, EXPRESS OR IMPLIED,
BEYOND THE 18 MONTH WARRANTY EXPRESSLY SPECIFIED HEREIN.
151117
SK-6324 Basic Operating Instructions P/N 151119 Rev. A
These instructions must be framed and displayed next to the SK-6324 panel in accordance
with NFPA 72 fire code for Local Fire Alarm System.
LED (Color)
Function
Comments
ON = Good AC
OFF = Low AC trouble condition and it was acknowledged
FLASHING = Unacknowledged AC Low trouble condition
GENERAL TROUBLE (yellow)
ON = System trouble
OFF = System OK
FLASHING = At least one serial device is in trouble
DOUBLE FLASHING = Two types of serial devices are in trouble.
WALK TEST (yellow)
ON = Walk test is in progress
OFF = Walk test is off.
FLASHING = Walk test is on and at least one zone is not ready
Allow approximately 47 seconds between detector tests.
In walk test when a detector is tripped it will cause an alarm for two
seconds, then the control panel will drop power to the loop for seven
seconds to reset the detector. Then an additional 38 seconds is needed
to restore the detector.
If verification is used the time between detector test will be about 2
minute and 30 seconds.
SYSTEM SILENCED (yellow)
ON = System audio output has been silenced
OFF = Nothing silenced
FLASHING = Partially silenced
When condition that caused audio activation clears, this condition will
clear automatically.
Note: Silencing an alarm will cause a general trouble condition.
GROUND FAULT (yellow)
ON = Ground fault condition exists and was acknowledged
OFF = No fault
FLASHING = A ground fault condition detected
If flashing press the ACK button to acknowledged the condition.
LOW BATTERY (yellow)
ON = Battery low condition that has been acknowledged
OFF = Good battery condition
FLASHING = Battery low condition
If flashing press the ACK button to acknowledged the condition.
ZONE 1
Through
ZONE 6
ALARM (red)
ON = Zone in alarm which has been acknowledged
OFF = No Alarm
FLASHING = Zone in alarm has not yet been acknowledged
If flashing press the ACK button to acknowledged the condition.
SUPERVISORY
(yellow)
ON = Zone has a supervisory condition which has been acknowledged (selfrestoring condition)
OFF = No supervisory condition exists
FLASHING = Supervisory trouble detected on that zone that has not yet been
acknowledged
If flashing press the ACK button to acknowledged the condition.
Cut Along the Dotted Line
AC POWER (green)
TROUBLE (yellow) ON = Zone has a trouble condition which has been acknowledged
OFF = No zone trouble
FLASHING = Zone has a trouble condition not yet acknowledged
DOUBLE FLASHING = Zone was disabled
CLEAN ME FLASHING = Indicates that the smoke detector needs cleaning
NAC 1
Through
NAC 3
ACTIVE (yellow)
If flashing press the ACK button to acknowledged the condition.
If flashing press the ACK button to acknowledged the condition.
A “Clean Me Flash” is a flash with a long LED on Time and a short
LED off time indicating that the smoke detector needs cleaning.
Applies only to smoke detectors with the CLEAN ME feature. The
“Clean Me” flash starts after the trouble condition has been
acknowledge.
ON = NAC is active during an alarm
OFF = NAC is not active during alarm
TROUBLE (yellow) ON = NAC has a trouble condition and was acknowledged
OFF = No trouble condition
FLASHING = NAC is in trouble
DOUBLE FLASHING = Circuit was disabled
Operation
If flashing press the ACK button to acknowledged the condition.
Keystrokes
Disable notification appliance circuit.
To re-enable the circuit, press [NAC DISABLE] again.
Press the appropriate [NAC DISABLE] key. The NAC circuit will be disabled and the corresponding
TROUBLE LED will Double Flash. This function is not available during an alarm condition.
Disable a zone
To re-enable the circuit, press [ZONE DISABLE] again.
Press the appropriate [ZONE DISABLE] key. The zone will be disabled and the corresponding TROUBLE
LED will Double Flash. This function is not available during an alarm or supervisory condition.
Begin Walk Test
Press [WALK TEST]. Walk Test LED turns on.
Note: Walk test will not activate if the control panel has a trouble, alarm, or supervisory condition.
End Walk Test
(The test ends automatically after 10 minutes of no system
activity.)
Press [WALK TEST].
NOTE: The Walk Test feature is not operational during an alarm, supervisory or any system trouble condition.
Acknowledge condition (alarm, supervisory, trouble)
Press [ACK]. The corresponding LED will change from blinking to steady for the duration of the condition.
Except for CLEAN ME trouble indications.
Silence Panel
Press [SILENCE]. This will silence the on-board PZT and all active NAC circuits that have been configured
as "silenceable".
Perform system reset
Press [RESET]. Resets alarms, supervisories, troubles and all LEDs.
To send a dialer test to your central station.
Press the [DIALER TEST] button.
To reset the dialer.
Press the [DIALER RESET] button.
For Service Contact:
Cut Along the Dotted Line
7550 Meridian Circle
Maple Grove, MN 55369-4927
763-493-6455
1-800-328-0103
Fax: 763-493-6475
© 2001 Silent Knight
Part Number 151117C, 03/01