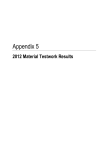
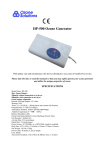
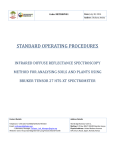
1
DO501Handheld DO2 Monitor User Manual http://www.ohdesigns.co.uk [email protected] O&H Designs 35 Barton Rd Barlestone Warwickshire CV13 0ER England Tel - 01455 290 620 DO501 User Manual Contents PG Introduction 3 Safety 3 Battery Charging 3 General 3 Specifications 4 Abbreviations 4 Initial Usage 4 LCD Display 5 Unit Set-up and Operation 6 Measurement Display Units 6 Setting Salinity 7 Setting Atmospheric Pressure 8 Recall Stored Data 9 Clear Screen Menu 9 Backlight 10 Auto Power Down 10 Taking Readings 11 Calibration 12 Change P.I.N 15 Platinum Resistance Probe 15 Probe Temperature Coefficient 15 Service & Warranty 16 DO501 User Manual_C 2 DO501 User Manual 1. Introduction The DO501 is an advanced microprocessor controlled Dissolved Oxygen meter. It will provide long periods of service and can be used in monitoring or logging applications. It can be used for measuring dissolved Oxygen (DO2) levels in tanks, ponds and lakes and is ideal for spot checking areas that are prone to low DO2allowing corrective action such as aeration to be put in place. The system can also be used to measure DO2 in both static and transportation tanks on vehicles where flow meters alone cannot guarantee DO2 levels. 2. Safety The manufacturer has designed this product to be safe when operated correctly. Please take care to read any safety instructions as these have been designed to protect the user from personal injury and the equipment from damage. O&H Designs are not responsible for errors in usage or connection and accept no responsibility for consequential losses. 3. Charging the DO501 The DO501 contains an inbuilt NimH high capacity battery. This should be first charged for 20 hours. Subsequent charges of 12-14 hours are performed in normal use. Only use the 12V charger provided with the DO501 kit. 4. General Usage The DO501 contains sensitive electronics, however, the unit is robust and will stand knocks and drops. Do not open the top lid of the unit as the environmental seal will be damaged and warranty voided. When the probe is stored, replace the protective cap provided with the kit. Do not leave the probe (and meter) in a car or van on a hot day as excessive temperatures will dry out the fluid in the probe. Treat the DO501 as a precision instrument and replace in the protective case when not in use. DO501 User Manual_C 3 DO501 User Manual 5. Specifications Conformity.......................... EN61010, EN61326-1, 97/23/EC CE marked Environmental Temperature (Electronics).................................................... 0°to 50°C Storage.......................................................................... -20° to 50°C Sealing..................................................................................... IP65 Weight (approximate)............................................................. 470gms Dimensions Width................................................................................... 100 mm Height................................................................................... 190mm Depth..................................................................................... 38mm Power supply NimH internal battery.............................................................7.2VDC Consumption..................................................................... 0.05 watts Battery life at 20°C .............................................................120 hours Measurement parameters Probe type..................................................................Sealed Galvanic Probe lead length(max).............................................................. 2.1m Probe operating temperature range ..................................... 0° to 40°C DO2 range ....................................................................... 0 to 40mg/l DO2accuracy (instrument minus probe).......................3% rdg ±0.1mg/l DO2display resolution ............................................................ 0.1mg/l Maximum Probe Depth........................................................... 2.5 mtrs Pressure sensor accuracy.......................................................±2 mbar Temperature accuracy..............................................................±0.8°C 6. Abbreviations Note: Abbreviations are the same in singular or plural. DO2 AC RTD °C Kms gms mb Dissolved Oxygen Alternating Current Resistive Temperature Device Degrees Celsius Kilometers grammes millibar LCD DC mg/l P.C IP KCL ppt Liquid Cystal Display Direct Current milligrams per litre Personal Computer Ingress Protection Potassium Chloride Parts per Thousand 7. Initial Usage Connect the DO2probe to the 6 way connectoron the rear of the DO501. Ensure this is only finger tight. If charging is required, use the charger port on the top of the unit. Pressing the power switch will turn the unit on and the DO501 will go through a self test.The default display units are % saturation of DO2. When the unit is powered up allow at least 1 minute for stabilisation. DO501 User Manual_C 4 DO501 User Manual Instrument LCD display Battery charge level indicator (bar graph). Full charge represents approximately 120 hours of continuous operation. When the charger is connected, the charge level indicator icon becomes dynamic, indicating that the battery is charging. The dynamic display stops when the battery is fully charged. Backlight is switched on when a star logo is present in the display, this indicates that the backlight is turned on automatically when any key is pressed). Backlight remains on for the period set under set-up (default = 1 min). Temperature probe reading (used to compensate DO2 reading). Units will be as set-up (default = °C). Dissolved oxygen reading (default = % Sat). Salinity correction level (ppt). manually entered under set-up, (default = 0). Barometric pressure display, (default = mbar). Used to automatically compensate the DO2reading for barometric pressure/altitude changes) DO501 User Manual_C 5 DO501 User Manual 8. Set-up and Operation When in the normal measurement mode (main screen displayed), pressing and holding the key for approx 1 sec will store the current screen in the next available memory. Confirmation that the screen has been stored is given by the screen temporarily switching to reverse video. At the time of supply, the instrument is set-up with the following, factory set default parameters: Temperature units °C Pressure units mbar D.O. Units %Sat Backlight ON, 1 min on time duration Power down ON, 10 min 9. Measurement Units The units set-up menu allows the D.O., Temperature and Pressure units to be selected (default units given first). Dissolved Oxygen units, % Sat, mg/l, mV Temperature units, °C or °F Pressure units, mbar, psi, ft or m From the main screen, press the: Menu/OK button menu OK Select units to change Use the keys Press the menu OK DO, Temperature, Pressure to select preferred units menu OK key to accept new units DO501 User Manual_C 6 DO501 User Manual 10. Setting Salinity If required,this value can be adjusted if the DO501 is to be used in regions with brackish water or directly in seawater. DO501 Accuracy cannot be guaranteed at high salinities. From the main screen, press the: Menu/OK button menu OK Use the keys Select Salinity to scroll through the menu. menu OK The display will show the default of 0 parts per thousand(ppt) Use the keys to adjust if required. Press the key menu Press the key Esc OK to accept the salinity reading. to quit back to normal readings The table below shows the effects of salinity on the readings and the factor the DO501 will apply. Salinity ppt 0 5 10 15 20 25 30 35 Factor 1 0.97 0.94 0.91 0.88 0.85 0.83 0.8 DO501 User Manual_C 7 DO501 User Manual 11. Atmospheric pressure If required,this value can be manually adjusted. This can correct for errors due to large variations in altitude or depressions in weather fronts. If the pressure is set to autothe internal pressure sensor will automatically correct for variations whilst in mg/l & ppm of dissolved oxygen From the main screen, press the: Menu/OK button menu OK Use the keys Select Manual to scroll through the menu. menu OK The display will show the default of 1013 mbar(1 atm) Use the keys Press the key to adjust if required. menu OK to accept the pressure reading. Alternatively, in the pressure menu: Use the keys Press the key to select Auto. Esc to quit back to normal readings The effects of adjustment of pressure are shown below. The DO501 will apply the relevant correction factors. (m)height 0 100 200 300 400 500 Pressure (mmHg) 760 750 741 732 723 714 DO501 User Manual_C Factor 1 1.01 1.03 1.04 1.05 1.06 8 DO501 User Manual 12. Recall Stored Data This instrument has a 40 location memory, used for storing operational readings. Data stored during operation is accessed for transcription purposes from the first page of the top level menu under Recall. From the main screen, press the: Menu/OK button menu OK Use the keys to scroll through the menu. menu Select Recall OK View Data is selected automatically After pressing the Menu/OK key Using the keys Scroll through the stored screens location by location. Stored screens are presented in reverse video and a camera icon, together with a memory location number is displayed in place of the battery level indicator. Clear Screen Memory To clear the screen memory, from the main screen Press the Menu/OK key, Use the keys Press the to select Yes or No. menu OK to accept or reject It is recommended that after transcribing the data, the memory be cleared, leaving it clear for another day’s operation. Operating procedures vary within organisations but if the memory is not cleared, subsequent data saves will be placed in the next available memory location. After all 40 locations have been written to, subsequent save operations will start to overwrite upwards from Location 1. DO501 User Manual_C 9 DO501 User Manual 13. Backlight The instrument is equipped with a backlight which can be set-up to come on for a preset period (1 to 99 sec), whenever any key is pressed. To conserve battery power, the default setting is 10 sec, after which period the backlight goes off. Alternatively, the backlight can be set to permanently off. From the main screen, press the: Menu/OK menu OK button Use the keys to scroll through the menu. Select Backlight menu OK and follow the key sequence When entering a timing period, holding the appropriate (up) or (down) arrow key will apply either continuous increments or decrements to the entered value until the key is released. Single presses of either provide a single increment or decrement. 14. Auto Powerdown The instrument is equipped with an auto powerdown feature, designed to conserve battery power. This feature can be set to either on or off. When set to on, if the instrument is switched on and no controls are operated for a preset period (10 min default) the main display will give a 30 second warning that the instrument is about to switch off “Powerdown in 30seconds”. Pressing any key during this period cancels the powerdown operation and resets the timer. Timer range is 1 to 99 minutes. Alternatively, the auto Powerdown feature can be switched off. After it has been switched on, the instrument will then remain on until it is either manually switched off, or until the battery is fully discharged. From the main screen, press the: Menu/OK menu OK Use the keys DO501 User Manual_C button to scroll through the menu. 10 DO501 User Manual menu Select Powerdown OK and follow the key sequence When entering a timing period, holding the appropriate (up) or (down) arrow key will apply either continuous increments or decrements to the entered value until the key is released. Single presses of either provide a single increment or decrement. Set-up Display Contrast The instrument’s display contrast can be adjusted with this utility. The display contrast is automatically corrected for varying temperatures. From the main screen, press the: Menu/OK menu button OK Use the keys to scroll through the menu. menu Select Contrast OK Use the keys Press the 15. to optimise the display. menu OK key to accept or reject Taking Readings Ensure that the protective sealing cap is removed prior to deployment. During operation, place the probe in a vertical position with the probe tip facing downwards. This is indicatedon the side of the Probe housing. When positioning the probe in the water to be measured,take care to locate away from the direct influence of aerators. Actual position in a water course is dependant on depth profile, width and length, therefore actual placement postion will be found by ‘in-situ’testing. To achieve greatest accuracy, when in water to be measured, move the probe ina figure of eight motion to allow gentle movement of water across the probe tip. DO501 User Manual_C 11 DO501 User Manual 16. Calibration All DO501 systems are supplied with a full calibration at 0% &100% water saturated air at 1013mb pressure. All normal readings are in mg/l. It is recommended that the sensor is recalibrated at 2week intervals or less to maintain accuracy. A ‘Quick Cal’ before use will guarantee maximum accuracy from the probe and electronics. Regular checks are necessary. Use a soft brush or moistened tissue to remove any dirt or debris from the probe tip. The probe is a Galvanic type and thus requires KCL solution for filling. Life expectancy in normal use is approx 60 months. Membranes can be changed as required. DO NOT: • • • • • Direct high-pressure water jets onto the probe tip as this could damage the membrane. Use abrasive wipes on the probe membrane. Clean the probe with any chemicals or solvents. Allow contact with the membrane whilst calibrating the 100% point. Take readings directly after immersion in water. Allow at least 3 mins for the DO2 probe tip and internal compensation to stabilise. DO: • • • • • • Use clean de-ionised water to clean probe tip. Use of a soft brush is advised. Position the probe in a vertical position during calibration. Allow 5 mins before calibration to allow the DO2probe to reach equilibrium with ambient conditions. Replace the protective cap when not in use or in storage. Use water saturated air when calibrating the 100% point. Gently dry excess water from the probe tip prior to adjustment. General Two calibration procedures are applicable to this instrument, a full calibration, and a ‘Quick Cal’(daily) calibration. A full calibration is a two-point calibration carried out at 0% saturation and 100% saturation. Full calibration should be carried out at yearly intervals or whenever a new probe is fitted to the instrument. ‘Quick Cal’daily calibrations are carried out only at the 100% saturation point, prior to commencing work with the instrument. DO501 User Manual_C 12 DO501 User Manual 17. Method Calibration should ideally be carried out in a temperature range of 1525°C Full Calibration Procedure The following items will be required for the full calibration procedure. (a) Saturated sodium sulphite solution (zero point calibrant) (b) De-ionised water Ensure that the protective cap is moved from the end of the probe. Switch on the instrument. Ensure that the instrument D.O. units are set to %Sat. From the main screen, press the: Menu/OK button menu OK Use the keys to scroll through the menu. menu Select Calibration OK Use the keys enter the calibration PIN 116 NOTE: The initial PIN is set to 116. This can be changed by the user. Press the Use Press the menu OK key to accept or reject the arrow key to select, Dissolved O2 0% menu OK key to accept Place the probe in the sodium sulphite solution and allow the D.O reading to stabilise. The actual display reading at this 0% level is shown to the left of the window and may not be exactly zero. Press the menu OK key to accept the 0% calibration DO501 User Manual_C 13 DO501 User Manual Remove the probe from the sodium sulphite solution, rinse well with de-ionised water and dry the probe tip with a soft tissue. Press the ESC key to return to the calibration menu. Then, select Dissolved O2 100% and press the Menu/OK key. Note: There is a time-out period on all menu displays so if the instrument display has reverted to the main screen, the calibration menu will have to be re-selected. Being now placed in air, the probe reading will start to rise towards100%. The actual display reading from the probe is shown to the left of the window showing 100.0% and may not reach 100%. Wait whilst the reading is still rising (even if it rises above 100%) and when it stabilizes: menu Press the OK key to accept the 100% calibration Use the keys Select select Yes at the OK to accept prompt. menu OK The probe calibration procedure is now complete. Press ESC three times to return to the main display. For ‘Quick Cal’, daily calibrations are carried out only at the 100% saturation point, prior to commencing work with the instrument. Refilling the probe with electrolyte If the DO501 is supplied with a refillable probe type, then occasionally check that fluid is present in the probe end cap. The DO501 is supplied with a smallbottle of electrolyte and can be used to refill the probe as follows: Unscrew the endcap anticlockwise, discard the existing fluid. Check the end of the electrode for excessive deposits. The white coating is a normal reaction between the disimilar metals used in the probe. This can be cleaned with a fine wet/dry cloth 1000 grit or higher Fill the end cap ½ way with electrolyte and reattach to the probe. DO NOT OVERTIGHTEN If a new end cap is fitted allow a couple of hours for the membrane to stabilse. DO501 User Manual_C 14 DO501 User Manual Do not refill the probe in direct sunlight 18. Calibration PIN number The calibration PIN number is designed to protect the instrument’s calibration from being inadvertently changed or lost. The PIN number can be changed (within the range 1 to 9999) as follows. Setting Zero as a PIN number effectively removes the PIN protection. From the main screen, press the: Menu/OK menu OK button Use the keys Select Calibration to scroll through the menu. menu OK Use the keys enter the calibration PIN 116 NOTE: The initial PIN is set to 1. Use the keys select Change PIN enter the new PIN number and press Menu/OK. If Zero is set as a PIN, PIN protection is effectively removed. Press 19. Esc Platinum Resistance Probe (Temperature) This reading is factory calibrated and should not require recalibration during normal service life of the probe. Contact O&H Designs for details of re-calibration 20. Probe Temperature Coefficent (T.C) Do not adjust this value as the probe will display incorrect readings at differing temperatures. DO501 User Manual_C 15 DO501 User Manual The reading is factory calibrated and should not require recalibration during normal service life of the probe. Contact O&H Designs for details of re-calibration 21. Service &Warranty For more information on the DO501, contact us directly or an approved agent. O&H Designs Guarantees the unit to be free of defects for a period of 12 months from date of manufacture. This does not cover damage to the probe tip caused by unreasonable use. This warranty excludes incidental or consequential damages arising from the use of this product O&H Designs provides a service capability for their products. Replacement probes and other spare parts are available direct. O&H Designs also offers a recalibration service for all environmental parameters. This can be on any interval as required by the customer. 2012 O&H Designs http://www.ohdesigns.co.uk [email protected] DO501 User Manual_C O&H Designs 35 Barton Rd Barlestone Warwickshire CV13 0ER England Tel - 01455 290 620 16