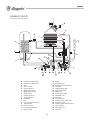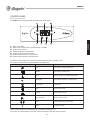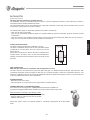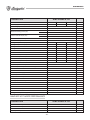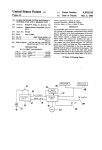
1
E AR SO” N EG D’U S N TO CO RET I S IB GA O”L E HE E TT PR ERT ENT A H T NS E T DED R L’I IG. U SU HAN S E L K A A ” IS M L SE NUA A E PL MA USER DE SE E UE AL “U R TH Q U E OS MAN M OV “ A IO OG N EL UAR R E S S LO EGU R. U R S T EN ” AL O US CALDAIA MURALE A GAS CON BOLLITORE AD ACCUMULO - ALTO RENDIMENTO - MODULANTE WALL-MOUNTED GAS BOILER WITH STORAGE WATER HEATER - HIGH EFFICIENCY - MODULATING CALDERA MURAL DE GAS CON INTERCAMBIADOR DE ACUMULACIÓN - ALTO RENDIMIENTO - MODULANTE LIBRETTO DI INSTALLAZIONE E MANUTENZIONE INSTALLATION AND MAINTENANCE MANUAL MANUAL DE INSTALACIÓN Y MANTENIMIENTO 24 MBS W TOP 28 MBS W TOP 32 MBS W TOP Congratulations... ... on your excellent choice. Thank you for choosing our products. LAMBORGHINI CALORECLIMA is daily committed to seeking innovative technical solutions to satisfy every need. Constant presence of our products on the Italian and international markets is assured by a widespread network of Agents and Dealers assisted by “LAMBORGHINI SERVICE” (Technical Service) who assures qualified service and maintenance of the boiler. WARRANTY The ALMA MBS W TOP boilers enjoy a SPECIFIC WARRANTY as of the date of validation by your local Technical Service. We therefore invite you to timely contact the above mentioned Technical Service, who will set up the boiler FREE OF CHARGE on the conditions specified in the WARRANTY CERTIFICATE provided with the boiler, which we suggest you read carefully. CONFORMITY The ALMA MBS W TOP boilers are in conformity with: • • • • Gas Directive 90/396/EEC Efficiency Directive 92/42/EEC (✫✫✫) Electromagnetic Compatibility Directive 89/336/EEC Low Voltage Directive 73/23/EEC. 0694 For the production serial number, refer to the technical data plate of the boiler. LAMBORGHINI CALOR S.p.A. Dott. Felice Bo’ (General Manager) ________________________________ - 44 - CONTENTS CONTENTS GENERAL Page 46 DESCRIPTION “ 47 OPTIONAL ACCESSORIES “ 47 MAIN COMPONENT STRUCTURE “ 48 DIMENSIONS “ 49 CIRCULATOR “ 49 TECHNICAL DATA “ 50 SANITARY HOT WATER PERFORMANCE “ 50 IDENTIFICATION “ 53 HYDRAULIC CIRCUIT “ 54 CONTROL PANEL “ 55 DISPLAY “ 56 PARAMETER PROGRAMMING “ 57 DESCRIPTION OF OPERATION AND FUNCTIONS “ 58 WIRING DIAGRAMS “ 63 INSTALLATION PRODUCT RECEIPT Page 65 HANDLING “ 65 HYDRAULIC CONNECTION “ 66 INSTALLATION “ 67 TURNING ON “ 68 FLUE GAS EXHAUST CONNECTION “ 69 ELECTRICAL CONNECTIONS “ 73 TURNING OFF “ 75 CHECKS AND ADJUSTMENTS “ 76 OPERATION WITH DIFFERENT TYPES OF GAS “ 80 “ 82 MAINTENANCE MAINTENANCE - 45 - ENGLISH SAFETY WARNINGS AND RULES GENERAL SAFETY WARNINGS AND RULES • The instruction manuals provided form an integral part of the boiler and consequently must be carefully kept and must ALWAYS accompany the boiler, even in the case of transfer to another owner or user or transfer to another system. In the event of damage or loss, request another copy from your local Technical Service. • After unpacking, check the integrity and completeness of the supply, and if anything does not correspond, contact the Agency which sold you the boiler. • The boiler must be installed by a qualified company in accordance with Law 46 of 5 March 1990. After installation this company issues a declaration of conformity as proof of workmanlike installation, i.e. in compliance with the current regulations and instructions provided by the manufacturer in the instruction manual that accompanies the boiler. • The boiler may only be used for the purpose for which it was designed as specified by the manufacturer. The manufacturer cannot be contractually or extra-contractually be held responsible for damage caused by persons, animals or things, or installation, adjustment and maintenance errors, or improper use. • In the event of water leaks, disconnect the boiler from the electrical power supply, cut off the water supply and promptly notify Technical Service or professionally qualified personnel. • Periodically check that the operating pressure of the hydraulic system is between 1 and 1.5 bar. If otherwise, contact Technical Service or professionally qualified personnel. • It is recommended to service and clean the boiler at least once a year. These operations must be carried out exclusively by professionally qualified and authorised personnel. PROHIBITIONS • DO NOT allow children or incapable and unassisted persons to make adjustments. • DO NOT activate electrical devices or equipment such as switches, electrical appliances, etc. if you can smell fuel or unburnt fuels. In this case: - air the room by opening the doors and windows - close the fuel cut-off device - promptly have Technical Service or professionally qualified personnel intervene. • DO NOT touch the boiler if you are barefoot and parts of your body are wet. • DO NOT carry out any technical or cleaning operation before having disconnected the boiler from the electrical power supply by positioning the main switch on OFF. • DO NOT modify the safety or adjustment devices without the authorisation and instructions from the boiler manufacturer. • DO NOT pull, detach or twist electrical cables leading from the boiler, even if they are disconnected from the electrical power supply. • DO NOT tap or reduce the size of the vents of the room where the boiler is installed. The vents are essential for proper combustion. • DO NOT leave flammable containers and substances in the room where the boiler is installed. • DO NOT litter the packaging material and keep it away from children as it is a potential hazard. It must be disposed of in accordance with current legislation. - 46 - GENERAL DESCRIPTION ALMA 24-28-32 MBS W TOP Sealed chamber boiler suitable for heating and production of sanitary hot water. It is equipped with an electronic control unit for automatic ignition and ionising electrode flame control. For reasons of safety, the efficiency of the electric fan is controlled by a pressure switch. The flue gas exhaust may essentially be made up of: - A pipe concentric to the air intake pipe - A split pipe for flue gas exhaust and combustion air intake. WARNINGS • Intervention of the safety devices indicates a potentially hazardous malfunction, therefore, immediately contact Technical Service. Technical Service may replace the safety devices, exclusively using original components of the manufacturer. Refer to the spare parts catalogue provided with the boiler. After any repair, check proper functioning of the boiler. • THE BOILER MAY NOT, EVEN TEMPORARILY, BE STARTED IF THE SAFETY DEVICES ARE NOT FUNCTIONING OR HAVE BEEN TAMPERED WITH. • Only OPTIONAL ACCESSORIES The ALMA MBS W TOP boilers may be equipped with the following accessories to be ordered separately (see price list): •Flue gas exhaust accessories •Hydraulic connection kit •Natural gas to LPG conversion kit •LPG to natural gas conversion kit •Fitting template kit •Remote control kit •External sensor kit - 47 - ENGLISH The boilers operate fully automatically and the gas flow is controlled by an electronic control unit with the following characteristics: - continuous modulation on both circuits - possibility of adjusting the heat output - possibility of adjusting slow ignition. The models are equipped with: - no-water pressure switch - full safety thermostat - high-efficiency flue gas exchanger. GENERAL MAIN COMPONENT STRUCTURE ALMA MBS W TOP 1 2 3 4 5 6 7 8 9 10 11 12 13 14 15 16 17 18 19 20 - 48 - Sanitary water expansion tank Water heater sensor Heating expansion tank. Delivery sensor Circulator 3-way electric valve Safety flow switch Modulating coil Gas valve Sanitary water unit - 8 bar safety valve - Flow regulator - Check valve - Inspection filter Stainless steel water heater Flue gas pressure switch Flue gas fan Flue gas exchanger Full safety thermostat Ignition electrode Control electrodes Burner Automatic bypass Combustion test ports GENERAL DIMENSIONS mm Ø 80 split Ø 100 concentric ENGLISH Ø 80 intake CIRCULATOR Output (mbar) Output/head available to the system Flow rate (l/h) Minimum safety flow switch activation ∆P 1,2 m. - 49 - GENERAL TECHNICAL DATA DESCRIPTION ALMA 24 MBS W TOP Fuel G20 Gas supply pressure (nominal) 20 Boiler category Type of boiler Nominal heating power (Qn) G30 28-30 G31 37 II2H3+ B22 - C12 - C32 - C42 - C52 - C62 - C82 maximum 26 minimum 10,68 kW Max/min useful efficiency at Pn 93,7/88,3 Useful efficiency at 30% of Pn Flue gas temperature (∆T) at Pn max 105 Flue gas mass flow rate at Pn max 0,009 Flue gas temperature (∆T) at Pn min Flue gas mass flow rate at Pn min CO2 at Pn max CO2 at Pn min 87 106 0,009 0,010 78 92 0,004 3,5 3,46 3,45 46,5 NOx at Pn max (0% of O2) 268 NOx at Pn min (0% of O2) 107 0,004 CO at Pn max (0% of O2) CO at Pn min (0% of O2) 90,7 0,004 7,6 50,5 210 Class NOx Maximum permitted temperature Maximum permitted pressure for heating circuit Boiler water content Water heater water content 9 134 116 379 232 2 8,8 233 90 % % mg/kWh mg/kWh °C bar 50 l 2 140 8 1 5,45 Mantle loss at Pn max 0,85 Noise 46 Energy efficiency marking (EEC 92/42) kg/s 3 Stack loss with burner on at Pn max ∆p minimum at air pressure switch °C kg/s mg/kWh 113 X4D Stack loss with burner off % °C 374 Degree of electrical protection Heating expansion tank preload % mg/kWh 230~50 Heating expansion tank volume kW 116 Electrical power supply Electrical power absorbed kW kW 24,36 minimum mbar 12,1 maximum Useful nominal output (Pn) 0,1 0,9 l V~Hz W IP l bar % % % mbar dB ★★★ SANITARY HOT WATER PERFORMANCE DESCRIPTION ALMA 24 MBS W TOP Continuous delivery without flow limiter ∆T=30°C 11,4 Peak draw in the first 10 min. 157 Continuous delivery with flow limiter 12 Sanitary water pressure 8 - 50 - l/min l/min bar GENERAL DESCRIPTION ALMA 28 MBS W TOP G20 Gas supply pressure (nominal) 20 Boiler category Type of boiler Nominal heating power (Qn) Useful nominal output (Pn) G30 28-30 G31 37 II2H3+ B22 - C12 - C32 - C42 - C52 - C62 - C82 maximum 30.4 minimum kW 12.6 kW 28.45 Max/min useful efficiency at Pn 93.6/88.7 Useful efficiency at 30% of Pn Flue gas temperature (∆T) at Pn max 107.5 Flue gas mass flow rate at Pn max 0.011 Flue gas temperature (∆T) at Pn min 89.5 Flue gas mass flow rate at Pn min 0.004 CO2 at Pn min 3.36 CO2 at Pn max CO at Pn max (0% of O2) CO at Pn min (0% of O2) NOx at Pn max (0% of O2) NOx at Pn min (0% of O2) 7.8 69 61 338 173 Class NOx Maximum permitted temperature Maximum permitted pressure for heating circuit Boiler water content Water heater water content 90.9 110 107 0.011 0.011 92 91 0.004 0.004 4 3.9 9.24 139 100 412 219 2 8.75 86 100 404 219 90 Stack loss with burner off Mantle loss at Pn max ∆p minimum at air pressure switch Noise Energy efficiency marking (EEC 92/42) °C kg/s kg/s % % mg/kWh mg/kWh mg/kWh mg/kWh °C l 2 l X4D Heating expansion tank preload % °C 50 Degree of electrical protection Stack loss with burner on at Pn max % bar 230~50 Heating expansion tank volume kW 3 Electrical power supply Electrical power absorbed kW 14.2 maximum minimum mbar 153 8 1 5.6 0.1 0.8 1.8 47 V~Hz W IP l bar % % % mbar dB ★★★ SANITARY HOT WATER PERFORMANCE DESCRIPTION ALMA 28 MBS W TOP Continuous delivery without flow limiter ∆T=30°C 13,3 Peak draw in the first 10 min. 172 Continuous delivery with flow limiter - Sanitary water pressure 8 - 51 - l/min l/min bar ENGLISH Fuel GENERAL DESCRIPTION ALMA 32 MBS W TOP Fuel G20 Gas supply pressure (nominal) 20 Boiler category Type of boiler Nominal heating power (Qn) Useful nominal output (Pn) G30 28-30 G31 37 II2H3+ B22 - C12 - C32 - C42 - C52 - C62 - C82 maximum 34.5 maximum 32.4 minimum minimum Max/min useful efficiency at Pn Flue gas temperature (∆T) at Pn min Flue gas mass flow rate at Pn max Flue gas mass flow rate at Pn min CO2 at Pn max CO2 at Pn min CO at Pn max (0% of O2) 83.5 0.012 0.004 7.46 2.84 61.5 CO at Pn min (0% of O2) 86.7 NOx at Pn min (0% of O2) 190 NOx at Pn max (0% of O2) 219 Class NOx Maximum permitted temperature Maximum permitted pressure for heating circuit Boiler water content Water heater water content kW 12.19 kW 90.7 99 101 103 0.013 0.013 87 88 0.005 0.005 3.2 3.3 8.22 156 235 290 165 2 7.71 98 207 281 162 90 Stack loss with burner off Mantle loss at Pn max ∆p minimum at air pressure switch Noise Energy efficiency marking (EEC 92/42) °C kg/s kg/s % % mg/kWh mg/kWh mg/kWh mg/kWh °C l 2 X4D Heating expansion tank preload % °C 50 Degree of electrical protection Stack loss with burner on at Pn max % bar 230~50 Heating expansion tank volume kW 3 Electrical power supply Electrical power absorbed kW 14 93.7/87.1 Useful efficiency at 30% of Pn Flue gas temperature (∆T) at Pn max mbar 155 8 1 5.5 0.1 0.8 1.88 47 l V~Hz W IP l bar % % % mbar dB ★★★ SANITARY HOT WATER PERFORMANCE DESCRIPTION ALMA 32 MBS W TOP Continuous delivery without flow limiter ∆T=30°C 15,2 Peak draw in the first 10 min. 192 Continuous delivery with flow limiter - Sanitary water pressure 8 - 52 - l/min l/min bar GENERAL IDENTIFICATION ENGLISH The ALMA boiler is identifiable by the labels on the packaging and the TECHNICAL DATA PLATE found inside the boiler as shown in the figure. WARNING • Tampering with, removing, missing identification plates or anything else that does not allow certain identification of the product makes any installation and maintenance operation difficult. - 53 - GENERAL HYDRAULIC CIRCUIT A B C D E 1 2 3 4 5 6 7 8 9 10 11 12 13 14 15 16 17 18 19 20 21 22 23 24 25 26 27 28 29 Sanitary hot water outlet Sanitary cold water inlet Gas System return System delivery Magnesium anode Water heater sensor Water heater Ignition electrode Control electrode Exchanger Fan Flue gas pressure switch Thermometer Delivery sensor Full safety thermostat Return sensor - 54 - Burner Expansion tank Automatic air escape valve Circulator Heating safety valve Safety flow switch Filling cock 3-way electric valve Modulating coil Gas valve Pressure outlet Sanitary water safety valve Non-return valve Sanitary water expansion tank Flow regulator Discharge cock Vent cock GENERAL CONTROL PANEL D P1 P2 P3 P4 P5 P6 ENGLISH The ALMA boilers are equipped with the instruments shown below. Boiler status display Boiler function selection button (Summer/Winter - ON/OFF) Cyclic function selection Heating temperature increase button Heating temperature decrease button Sanitary water temperature increase button Sanitary water temperature decrease button The display shows 3 digits and some symbols that indicate the boiler operating mode. The symbols and their functions are indicated in the table below: Symbol Name Meaning Cock Fixed: boiler in sanitary water mode Radiator Fixed: boiler in heating mode Flame Fixed: burner on Flashing: burner on in maintenance function Temperature The parameter displayed is a temperature Locked flame Boiler locked Winter Boiler in winter mode Summer Boiler in summer mode Curves (K factor) Fixed: external temperature display Flashing: set point curve Arrows Communication with remote control Letter t Test function active During normal operation the heating delivery temperature is displayed in °C. In the event of a display failure, the system continues functioning with the previous settings. - 55 - GENERAL DISPLAY Button Function P1 Pressing the button for 3 seconds the following functions are displayed: Summer ----> Winter Holding the button pressed down for 3 seconds the boiler switches off. P2 Pressing the button the following information is cyclically displayed: Sanitary water temperature Heating temperature Return to main menu. With external sensor (optional): Sanitary water temperature Heating temperature External temperature display K parameter value display Return to main menu Symbol Summer Winter and flashing and flashing with flashing flashing and “K” value fixed The info window is displayed for a maximum of 15 seconds if no button is pressed and then returns to the main view. Holding the button pressed down for 10 seconds the “Test” function is accessed. Upon activation, the display is reset for a few seconds after which heating is activated at full power for 15 minutes with the temperature set to 85°C. t flashing When this function is active, the sanitary water mode is disabled. The function is deactivated (OFF) by holding the button P1 pressed down or after 15 minutes if no button is pressed. With remote control (optional): The presence of the remote control is indicated on the display with the symbols shown on the side. P3 Pressing the button the heating temperature is increased (max 83°C). If the external sensor is present, see the functions on page 61. P4 Pressing the button the heating temperature is decreased (min. 30°C). If the external sensor is present, see the functions on page 61. P5 Pressing the button the sanitary water temperature is increased (max 60°C). P6 Pressing the button the sanitary water temperature is decreased (min. 30°C). Display lighting The system provides for backlighting which is activated for 4 seconds when any one button is pressed and remains on during display of parameter programming. A flashing signal indicates that there is a board fault. - 56 - GENERAL ENGLISH PARAMETER PROGRAMMING Simultaneously press the buttons P2 and P3 for 10s to access the programming menu where the left digit indicates the parameter number, and the centre and right digits the parameter value. When the programming menu has been accessed, the left digit will blink; use the P3 and P4 buttons to change the parameter number, and the P5 and P6 buttons to change the value which will immediately be stored. While changing the parameter, the system will check that the permitted limits are not exceeded. Parameters displayed: 1 2 3 4 5 6 7 8 9 0 Boiler model - 0 Fast with plates - 1 Bithermal - 2 Thermo+Water heater - 3 Water heater Gas type selection - 0 Natural gas - 1 LPG Maximum heat output: Range 0-100% (preset to 100%) Heating restart timing: Range 0-20 = tmin 0-10 (preset to 4 = 2 min) Ignition power: Range 0-75% (preset to natural gas 40% and LPG 35%) Heating temperature adjustment range (preset to 1=30 - 83°C). Range 0=30 - 45°C (floor heating) Heating pump post-circulation time setting: Range 0-20 (0-10 minutes) (Preset to 4 = 2 minutes) Anti-Legionella function activation with boiler/water heater: 1 active, 0 inactive (preset to 1) Do not use. (parameter not handled “--”) Water heater pump post-circulation time setting: Range 0-20 (0-10 minutes) (preset to 4=2 minutes). To exit the menu, press the P1 button or wait 20s without pressing any button. - 57 - GENERAL WARNINGS For each operating mode one or more symbols appear on the LCD display. In the event of a fault, the display will show a code whose meaning is summarised in the following table: Fault Failed ignition lock Safety thermostat intervention lock No water Air pressure switch (MCS)/flue gas thermostat (MC) NTC heating sensor fault NTC sanitary water sensor fault Code 01 02 03 05 07 09 LOCK/RESET If the boiler fails to ignite at the first attempt, there is an interventilation time and then a further two ignition attempts. For LPG boilers only 1 ignition attempt remains active. When this time has elapsed and ignition has failed, a non-volatile locking stop occurs (stored). “Failed ignition lock 01” fault. Reset the boiler by simultaneously pressing the P1 and P2 buttons. Remember that you can only reset the boiler a maximum of 5 consecutive times both from the boiler control panel and from a remote control. After this, the boiler can only be reset: - after 1h (1 additional reset every hour is permitted); - by cutting the power. DESCRIPTION OF OPERATION AND FUNCTIONS HEATING MODE The heating operating mode starts if requested by the ambient thermostat and if the operating selector is set to “WINTER”. The circulator, fan (MBS) and switching valve are activated and, after checking that there is air flow, burner ignition is requested. When the “slow ignition time” from flame detection has elapsed, the burner power goes to the minimum value set and reaches the maximum value within about 50 seconds. The burner stops when the set heating temperature has been reached or when the ambient thermostat intervenes. The intervention of the ambient thermostat also activates a post-circulation cycle (heating) after which the circulator is turned off and the switching valve returns to the sanitary water position. WATER HEATER ELECTRIC SWITCHING VALVE The sanitary water mode with water heater starts when the water heater sensor reads a temperature lower than the “water heater ON temperature”. The switching valve is then driven into sanitary water position and the system pump is activated, and both remain active even at the end of the water heater request for post-circulation. In the event of concurrent requests, the water heater is given priority and at the end the switching valve is switched to heating and water heater post-circulation is reset. During operation in sanitary water mode, the switching valve relay remains in rest position. - 58 - GENERAL HEATING PUMP ANTI-LOCKING FUNCTION An anti-locking function activates the circulator for 30 seconds every 24 hours of inactivity. Following a power failure, the first anti-locking intervention occurs after 1 hour of inactivity. The function is active even when operation is locked and the selector is set to OFF. ANTI-LEGIONELLA FUNCTION In the boiler version with water heater the anti-Legionella function can be activated/deactivated by acting on the display. The function is activated once every two weeks (336 hours), forcing the water heater setpoint to 70°C, and is deactivated when the water temperature in the water heater remains > 70°C for 15 min. Should a sanitary water request reduce the temperature to a value < 70°C, the time already elapsed is stored. When the temperature once again exceeds 70°C, the function continues from the time previously elapsed until reaching 15 min. A timer is in any case activated when the anti-Legionella function starts and deactivates the function after a maximum time of 30 minutes. The timer does not stop if sanitary water is drawn. ANTI-FREEZE FUNCTION The boiler is equipped with an anti-freeze function. When the water temperature read by the delivery sensor drops to below the “pump activation temperature for anti-freeze”, the pump is activated to put the water back into circulation. Should the temperature drop even further to the “burner activation temperature for anti-freeze”, also the burner will start waiting for the delivery temperature to exceed the “anti-freeze deactivation temperature” beyond which the burner is turned off and a post-circulation cycle is activated. The function remains active even if the heating selector is set to OFF, SUMMER and WINTER. Description Circulator activation temperature for anti-freeze Circulator deactivation temperature for anti-freeze Burner activation temperature for anti-freez Anti-freeze function deactivation temperature Burner output during anti-freeze Post-circulation for intervention of anti-freeze function 8 10 6 15 minimum 200 - 59 - °C °C °C °C s ENGLISH SWITCHING VALVE ANTI-LOCKING FUNCTION An anti-locking function activates the switching valve for 30 seconds every 24 hours of inactivity. Following a power failure, the first anti-locking intervention occurs after 1 hour of inactivity. The function is active even when operation is locked and the selector is set to OFF. GENERAL FAN AND AIR FLOW CHECK (MBS MODELS) If an ignition request is received, the system checks for the absence of air flow (contact open) of the flue gas pressure switch, and if the test is passed the fan is activated. When air flow is detected (contact closed) the ignition sequence is started. If no air is detected for 15 seconds (e.g. fan failure) a fault is signalled and the system waits for the air detection signal. Each time the burner is turned off, a post-ventilation cycle is run for 10 seconds. If a new ignition request arrives during this period, the fan remains active, and if air flow is detected, the re-ignition phase starts. In the event of a lock with post-ventilation still in progress, a reset is permitted (the warning disappears), but the boiler can only be restarted after the system reset time has elapsed. At each power on/reset, the system automatically checks the type of boiler. If there is a heat request and air is detected when the fan is off, a fault is signalled. WATER CHECK In the case of a boiler/water heater with switching valve, pump circulation is checked via a flow switch connected to the same inlet as the water pressure switch and the following test cycle is activated. If there is a heat request, the circulator is activated. If the circulation safety microswitch is switched, the ignition sequence is started. Otherwise, the circulator continues operating for 6 minutes, after which it is alternately activated for 15s and deactivated for 45s in order to prevent overheating the circulator. The circulator ON/OFF cycles continue until circulation is detected. If the circulator is inactive for more than 30 minutes, the first ON cycle is extended to 6 minutes. The failed circulation fault is displayed during the OFF periods of the circulator. It is not checked whether the circulation safety microswitch is in short-circuit. TEST FUNCTION Activate the function by holding down the INFO button for 10 seconds or by acting on the parameter from the remote control. While the function is active, the display shows the delivery temperature (blinking) and the symbol “t” while the burner is driven at maximum power. The function is deactivated when the test function time has elapsed (15 minutes), or by setting the boiler to OFF. A concurrent sanitary water request activates heat dissipation through the sanitary water circuit activating the tap symbol on the display. SENSOR FAULT In the event of a delivery sensor fault (break or short-circuit), the burner is immediately turned off and the fault signalled. In the case of operation in heating mode, if the burner was on, a post-circulation cycle is run. A sensor short-circuit is detected when the resistance is less than about 200 Ohm A sensor break is detected when the resistance values are Rntc >> 34 Kohm. In the fast boiler model with plate exchanger, provision has been made for operation with one sensor in the event of a fault due to failure or short-circuit of the sanitary water sensor. The fault is displayed but the boiler continues functioning in sanitary water and heating mode. - 60 - GENERAL HEATING MODE WITH EXTERNAL SENSOR (OPTIONAL) Operation is the same as in normal heating mode with the difference that the delivery temperature is calculated in relation to the external temperature read by the sensor and the K factor. The K factor is set with the P3 and P4 buttons. HEATING TEMPERATURE INCREASE BUTTON HEATING TEMPERATURE DECREASE BUTTON ENGLISH System delivery (°C) P3 P4 External temperature (°C) N.B.: The graphs show the temperature trend with the normal heating setpoint range. If the heating range for a floor-mounted system were selected, the curves would fall within the temperature range for the floor however maintaining the same “K” slope. EXTERNAL SENSOR INSTALLATION The external sensor, which can be requested as optional, is used to improve the operating performance of the boiler. It must be installed on an external wall, possibly north-facing, and in any case in a position protected against sunlight and/or other heat sources. - 61 - GENERAL OPERATION WITH REMOTE CONTROL (OPTIONAL) The boiler can be operated with a RC03.54 remote control. The RC03.54 remote control is an intelligent hourly programmer complete with ambient sensor suitable for adjustment and control of wall-mounted gas boilers for heating and production of sanitary hot water mainly for installation in residential buildings. With the remote control connected to the boiler, the controls are divided as follows: Controls on control panel: - Operating mode selector: OFF/SUMMER/WINTER - Parameter setting menu - Reset (see “LOCK/RESET on page 58) The following controls are managed by the remote control: - Sanitary water temperature setting - Delivery temperature setting. If communication is interrupted or the remote terminal is disconnected, the system continues operating for a certain time with the same setting as before the interruption waiting for communication to be re-established (“communication timeout”). If communication is not re-established after the timeout, the system goes into normal operating mode as if the remote control were not connected, resuming all the controls. As well as the programming function the remote control also allows: - Setting and displaying the parameters 1 Boiler model - 0 Fast with plates - 1 Bithermal - 2 Thermo+Water heater - 3 Water heater 2 Gas type selection - 0 Natural gas - 1 LPG 3 Maximum heat output: Range 0-100% (preset to 100%) 4 Heating restart timing: Range 0-20 = tmin 0-10 (preset to 4 = 2 min) 5 Ignition power: Range 0-75% (preset to natural gas 40% and LPG 35%) 6 Heating temperature adjustment range (preset to 1=30 - 83°C). Range 0=30 - 45°C (floor heating) 7 Heating pump post-circulation time setting: Range 0-20 (0-10 minutes)(Preset to 4 = 2 minutes) 8 Anti-Legionella function activation with boiler/water heater: 1 active, 0 inactive (preset to 1) 9 Activation/deactivation of the test function: 1 Active; 0 Inactive (preset to 0) 10 Do not use - Displaying the faults (see “parameter programming” on page 57). The K value settings described on page 61 are exclusively done from the remote control. ELECTRICAL CONNECTION The remote control is connected directly to the board as shown in the connection diagram. Electrical characteristics of the communication line: Number of wires: 2 to be connected to the TA contacts (ambient thermostat) Cable type: bipolar (*) Maximum line length: 50 metres Maximum cable resistance: 2x5Ώ Polarity: no polarity. (*) In environments with high electrical noise, a screened or twisted cable must be used. - 62 - GENERAL WIRING DIAGRAMS ALMA MBS W TOP WHITE RED BR CI DY EA ER MVG PA FL RE SE SM SB TA TS V3 VE VG L N T1 Burner Circulator Display Ignition electrode Combustion control electrode Gas valve modulator Air pressure switch Safety flow switch (water) Resistor External sensor (optional) - 63 - Delivery sensor Water heater sensor Ambient thermostat Safety thermostat 3-way valve Fan Gas valve Line Neutral Ignition transformer ENGLISH BLACK GENERAL INTEGRATED FLAME CONTROL Electronic flame control unit intended for direct ignition of the main burner by means a capacitive discharge spark generator and flame detection control by means of the ionisation phenomenon. OPERATING SEQUENCE When the request contact is closed and after checking for the presence of air (MBS) or closure of the flue gas thermostat (MB), the self-test starts during which the flame amplifier and the components associated with safety functions are tested. An amplifier failure due to a flame detected condition or failure of a component that performs a safety function inhibits the start of the ignition sequence. After the self-test time the safety time starts during which the spark generating device and the gas electrovalve output are powered. If the burner is ignited and the flame signal detected, the spark is maintained active for a time equal to the post-ignition time (at maximum up to the end of Ts). If the flame goes out during Ts, the spark is reactivated. When the safety time has elapsed, the operating condition is reached. If ignition fails at the first attempt, there is an interventilation time and then a further two ignition attempts. When this time has elapsed and ignition has failed, a non-volatile locking stop occurs: the power to the gas electrovalve control output and the spark generating device is cut. The double attempt is repeated after a further flame detection phase and at each power-on (after 1h). TIMES AND OPERATING PROGRAM - Self-test time: - Safety time: - Intervention time at power off: 2.2s +10% / -10% A 230VAC 25°C 10s < 1s SAFETY TESTS - At startup and at each periodic inspection the safety functions of the electronic control must be checked. - Run an operating cycle without fuel and check that the locking stop occurs with relative signalling at the end of the “Safety time”. - Run an operating cycle with fuel and check after the safety time has elapsed that when the gas flow is cut off and the cycle is repeated, the locking stop occurs. - Check that the intervention of the regulators, limiters or safety devices stop operation in conformity with the type of application and the operating modes. CHECKING THE IONISATION CURRENT (CONTROL UNIT) The ionisation current must be at least 3-4 times the minimum value ( 4-6µA). To check the ionisation current use a multimeter with full scale of 200ìA DC. Should the flame signal be insufficient, check that the end of the detection electrode is fully immersed in the flame and that the burner body is properly connected to the earth of the control electronics. - 64 - INSTALLATION PRODUCT RECEIPT The boiler is delivered packed in one protective cardboard box. AA ENGLISH The bag (A) inside the cardboard box contains the following material: - Installation and maintenance manual - User’s manual - System manual - Warranty certificate - Hydraulic test certificate - Exploded diagram of spare parts - Paper fitting template. WARNING • The instruction manuals form an integral part of the boiler. It is recommended to read them before installing and starting the boiler and to keep them at hand for subsequent consultation. HANDLING After unpacking, manually handle the boiler; tilt and lift it gripping at the points indicated in the figure. WARNINGS • Use appropriate safety devices. • DO NOT litter the packaging material and keep it away from children as it is a potential hazard. It must be disposed of in accordance with current legislation. - 65 - INSTALLATION HYDRAULIC CONNECTION After securing the support hooks, position the template so that it sits flush with the wall. Starting from the end unions previously fitted on the template, proceed with installation of all the pipes: system delivery, system return, cold water, hot water, and possibly also gas and electric line with ambient thermostat. Having fitted the pipes, screw on the end unions and fit normal closed caps to continue with the hydraulic system test. The template can be removed or left on the wall, since after the wall finishing operations (plastering or tiles) it will be completely sunk into the wall. Only the two support hooks will remain outside the finished wall as well as an opening in correspondence to the couplings. Position the boiler on the two support hooks up against the finished wall using the holes on the rear of the boiler body and fasten the two check nuts on the hooks. Then continue with the hydraulic connection using the pipes provided, cutting them to size according to the distance between the unions on the boiler and the unions on the template on the wall. TIPS AND SUGGESTIONS TO PREVENT VIBRATION AND NOISE IN THE SYSTEMS - Avoid using pipes with small diameters. - Avoid using small-radius elbows and large crosssection reducers. - It is recommended to hot wash the system in order to eliminate the impurities coming from the pipes and radiators (in particular oils and greases) which may damage the circulator. C Electrical power supply G Gas F Boiler feed water AE Electrical power supply M System delivery pipe R System return pipe GS Support hooks FX Extra fastening holes Ø 3/4” (in the boiler) Ø 1/2” (in G./connections) Ø 1/2” (cold) Ø Ø Ø Ø 3/4” 3/4” 10 mm. 11 mm. N.B. Use female hydraulic couplings. - 66 - INSTALLATION INSTALLATION The boiler must be installed by qualified persons. The installation must be in conformity with the provisions of the law regarding evacuation of the combustion products in accordance with the REGULATIONS IN FORCE. The combustible gases must be evacuated through a pipe with a diameter not less than that on the boiler and it must be connected to a flue suited to the system capacity. PLACE OF INSTALLATION The boiler has been designed for installation in homes. The place of installation must be free of dust, flammable objects or materials or corrosive gases. The room must be dry and not subject to frost. If the boiler is enclosed in or fitted on the side of cabinets, leave enough space to be able to carry out the normal maintenance activities. The figure shows the minimum space to be left around the boiler. GAS CONNECTION Make the gas connection in accordance with the regulations in force. The boiler must be connected with an approved rigid metal pipe or a flexible stainless steel pipe with continuous wall. Corrugated metal pipes must be installed so that they do not exceed a length of 2000 mm at maximum extension. The boilers are calibrated and tested to operate with NATURAL GAS and LIQUID GAS category II 2H3+ at a nominal pressure of 20 mbar, 28/30 mbar and 37 mbar, respectively. SYSTEM STARTUP - Bleed the air from the system. - Check that there are no gas leaks (use a soapy solution or similar product). CHARACTERISTICS OF THE BOILER WATER If the water is hard and aggressive, LAMBORGHINI recommends installation of a proportional polyphosphate feeder (DOP/B) to prevent possible scaling in the boiler. Water treatment is essential in the following cases: - Widely extended systems (with large amounts of water). - Frequent infeed of make-up water into the system. - Sanitary water circuits. Should the system need to be drained partially or completely, subsequently fill it with treated water. - 67 - ENGLISH The following rules apply for dimensioning between the boilers and the flues: - They must be easy to dismantle. - They must be hermetically sealed and made of a material suitable to resist the combustion products and their possible condensation. - They must not have any regulating devices (valves). If these devices have already been fitted, they must be removed. - They must not protrude from the flue but stop before its internal face. INSTALLATION TURNING ON FILLING THE SYSTEM Slowly open the feed cock until the system reaches a pressure of 1.5 bar indicated on the hydrometer and then close it. Check that the cap on the automatic air escape valve positioned on the circulator is loosened, and repeatedly activate the circulator to release the air in the circuit. TURNING ON Open the gas cock and turn the selector to the desired position. The burner will automatically turn on. Should the burner fail to turn on, check if the locking warning light is on and, if so, turn the selector to the RESET position so that the ignition operation is repeated. Subsequently, adjust the heating and sanitary water temperature as desired using the dedicated selectors. - 68 - INSTALLATION FLUE GAS EXHAUST CONNECTION The boiler operates by combustion in a sealed chamber and therefore does not require any particular ventilation, and can also be housed in compartments, storerooms, technical spaces, etc. There are also various possibilities for exhaust of the combustion products and intake of air from the outside. The boiler can be fitted with two types of basic intake/exhaust systems. - Concentric exhaust/intake - Split exhaust/intake ENGLISH The boiler can therefore be connected to concentric flues, ventilation flues, separate stacks, etc. by means of the kits provided. Some possible solutions are schematised below. EXHAUST/INTAKE 1 Concentric from roof C32 2 Concentric from terrace C32 3 Split into separate flues C42 4 Concentric with connection to concentric flues C42 5 Concentric from external wall C12 6 Split from terrace C52 7 Split from single flue C82 8 Split C62 For positioning and the distances of the draft terminals from windows, doors, etc. consult the regulations in force. - 69 - INSTALLATION INSTALLATION CONCENTRIC VENT Fit the concentric elbow positioning it in the desired direction, fit the seal onto it and then fit the appropriate baffle (see table below). Fit the air intake and flue gas exhaust pipes respecting the dimensions indicated in the respective installation diagram. The flue gas exhaust pipe must be fitted slightly sloping to the outside. WALL VENT EXHAUST Air baffle Concentric vent: maximum length 3m Baffle installation CONCENTRIC VENT length (m) 0,5 ÷ 1 >1÷3 24 MBS Baffle Ø 77 mm Baffle Ø 88 mm 32 MBS Baffle Ø 78 mm Baffle Ø 82 mm Baffle Ø 87 mm 28 MBS Baffle for coaxial pipes Fit the baffle on the 60Ø aluminium stub pipe of the upper boiler flange. WARNING • Use only and exclusively Lamborghini Caloreclima air intake/flue gas exhaust kits. - 70 - NO Baffle (standard hole) INSTALLATION SPLIT VENT: Flue gas Air Remove the closing cap ENGLISH Air Baffle Maximum length (intake+delivery) 30m Risk of condensate formation after 9m of flue gas exhaust pipe The boiler can be connected to a separate air/flue gas duct system for venting from the roof as shown in the figure on the side. Numerous accessories are available on request to satisfy the various installation requirements The components most frequently used are listed in the table. SPLIT VENT 24 MBS 28 MBS 0,5 ÷ 5 length (m) > 5 ÷ 20 > 20 ÷ 30 Baffle Ø 44 mm Baffle Ø 48 mm NO Baffle (standard hole) Baffle Ø 44 mm Baffle Ø 50 mm NO Baffle (standard hole) SCARICO SDOPPIATO lunghezza (m) 32 MBS 0,5 ÷ 10 10 ÷ 30 Baffle Ø 50 mm NO Baffle (standard hole) Remove the air intake closing cap. Fit the two 80Ø flanged stub pipes with relative seals. If necessary, fit the baffle below the air intake stub pipe as shown in the figure. WARNING • Use only and exclusively Lamborghini Caloreclima air intake/flue gas exhaust kits. - 71 - INSTALLATION 1 - Fully define the layout of the split stack system, including the accessories and outlet terminals. 2 - Consult the following table and identify the metres by which the flue length is reduced with each component fitted depending on the installation position. 3 - Check that the total sum of the reduced length is smaller than or equal to the maximum permitted value: 30 m. Table of reduced flue lengths after fitting pipes and accessories Reduced length in metres Image Component Intake Vertical vent Horizontal vent 1 1 1 Accessories 80Ø male-female pipe 60Ø 45°elbow 1,2 2,2 80Ø 90° male-female elbow 1,5 2,5 Condensate trap / 3 3 80Ø wind-resistant terminal for combustion products / / / 80Ø air intake protection terminal 2 / / 80/125 roof vent + TEE reducer for separate ducts / WARNINGS • Use only and exclusively Lamborghini Caloreclima air intake/flue gas exhaust kits. - 72 - 12 INSTALLATION ELECTRICAL CONNECTIONS The boiler must be connected to a 230V - 50Hz single-phase + earth power supply respecting the LINE-NEUTRAL polarity. The connection must be made using a bipolar magnetothermal switch with contact opening of at least 3.5 mm. During installation or if the power cable is replaced, provide for an earth cable 2 m longer than the other cables. The boiler power cable may not be replaced by the user. Have it replaced by professionally qualified persons only. If the power cable is replaced, a cable type “HAR H05 vv-F” 3x1.00mm2 must be used. The system must be in conformity with the safety regulations in force. Make all the earth connections to an efficient earthing system. WARNINGS • It is prohibited to use gas and/or water pipes to earth the boiler. • The manufacturer is not liable for any damage caused by failure to earth the boiler and inobservance of the wiring diagram specifications. To access the electric panel where the power terminal board and the ambient thermostat and external sensor connections are housed, carry out the following operations: - Cut the power to the boiler - Undo the screws (1) on the plastic front panel - 73 - ENGLISH It is obligatory to: 1 - Respect the L (Phase) - N (Neutral) connection 2 - Use cables with a cross-section equal to or greater than 1.5 mm2 3 - Refer to the wiring diagrams in this manual for any electrical operation 4 - Make the earth connections to an efficient earthing system. INSTALLATION - Open the instrument panel - To remove the instrument panel lid remove the screws (2) - 74 - INSTALLATION TURNING OFF EXTENDED PERIODS OF INACTIVITY If the boiler is to remain inactive for a long period of time, close the gas cock and cut the power to the boiler. TEMPORARY TURNING ON/OFF This can be achieved in one of the following two ways: - From the ambient thermostat. - From the adjustment potentiometers (on the instrument panel). WARNING circulator might be locked. In this case, unscrew the front cap and turn the motor shaft underneath with a screwdriver. Subsequently, at power on, activate the pump anti-locking function. - 75 - ENGLISH • When the boiler is new or after a long period of inactivity, the INSTALLATION CHECKS AND ADJUSTMENTS ALMA 24 MBS W TOP DESCRIPTION Nominal supply pressure maximum Pressure at nozzles minimum Flow rate Burner nozzles Gas baffle P.C.I. (*) Wobbe index G20 (natural gas) 20 11,3 1,8 2,7 1,25 - 8127 34,02 G30 (LPG) 28 - 30 25,4 4,6 0,78 0,77 4,5 29000 116,09 G31 (LPG) 37 33 6 1 0,77 4,5 22000 88 (*) Temperature: 15°C - Pressure: 1013 mbar. BURNER PRESSURE CURVE -OUTPUT EFFICIENCY Burner pressure outlet Permitted adjustment range (see parameter adjustment). Slow ignition adjustment: 3 mbar for G20 (natural gas) 7.5 mbar for G30-G31 (LPG) - 76 - mbar mbar mbar m /h Ø mm Ø mm kcal/m MJ/m 3 3 3 INSTALLATION ALMA 28 MBS W TOP G20 (natural gas) 20 13,5 2 3,2 1,25 - 8127 34,02 G30 (LPG) 28 - 30 28,3 5,5 0,9 0,77 - 29000 116,09 G31 (LPG) 37 36,2 7,6 1,2 0,77 - 22000 88 (*) Temperature: 15°C - Pressure: 1013 mbar. BURNER PRESSURE CURVE -OUTPUT EFFICIENCY Burner pressure outlet Permitted adjustment range (see parameter adjustment). Slow ignition adjustment: 3 mbar for G20 (natural gas) 7.5 mbar for G30-G31 (LPG) - 77 - mbar mbar mbar m /h Ø mm Ø mm kcal/m MJ/m 3 3 3 ENGLISH DESCRIPTION Nominal supply pressure maximum Pressure at nozzles minimum Flow rate Burner nozzles Gas baffle P.C.I. (*) Wobbe index INSTALLATION ALMA 32 MBS W TOP DESCRIPTION Nominal supply pressure maximum Pressure at nozzles minimum Flow rate Burner nozzles Gas baffle P.C.I. (*) Wobbe index G20 (natural gas) 20 12,5 1,2 3,74 1,35 - 8127 34,02 (*) Temperature: 15°C - Pressure: 1013 mbar. G30 (LPG) 28 - 30 27,5 4 1,03 0,82 - 29000 116,09 G31 (LPG) 37 35,2 6 1,35 0,82 - 22000 88 mbar mbar mbar m /h Ø mm Ø mm kcal/m MJ/m 3 3 3 BURNER PRESSURE CURVE -OUTPUT EFFICIENCY Burner pressure outlet Permitted adjustment range (see parameter adjustment). Slow ignition adjustment: 3 mbar for G20 (natural gas) 7.5 mbar for G30-G31 (LPG) The maximum pressure during boiler heating is adjusted via the control panel. After all the calibration operations have been completed, close and seal the pressure outlet used. Calibration of slow ignition is electronic and adjustable (for optimisation and gas change) via the control panel. The boilers leave the factory calibrated and set up to operate with G20 (natural gas) or G30/G31 (LPG). - 78 - INSTALLATION CHECKING COMBUSTION AND EFFICIENCY OF THE AIR PRESSURE SWITCH ENGLISH To access the flue gas analysis flange operate as follows: - Undo the screw (A) and remove the rubber cap (B): P1 = flue gas port; P2 = air port. Checking the efficiency of the air pressure switch - Loosen the two screws inside the pressure outlets (C) using a screwdriver. - Connect the two pressure outlet couplings to a pressure gauge by means of rubber hoses. - Measure the pressure drop. The value obtained must not be less than the minimum p (see technical data table) in order not to run the risk of the boiler turning off. - After the check remove the rubber hoses and refit the screws. After the checks, press the button to select the type of operation. The boilers can operate with natural gas (G20) or LPG (G30/G31) and are already adjusted at the factory as shown on the technical data plate and no calibration is therefore required. All the checks must exclusively be carried out by Lamborghini Technical Service. - 79 - INSTALLATION OPERATION WITH DIFFERENT TYPES OF GAS The boiler is set up and adjusted at the factory to operate with G20 or G30/G31 as indicated on the technical data plate and the packaging. Should the boiler need to be used with a gas different from that for which it was set up at the factory, a specific kit must be installed to be ordered separately. For conversion operate as follows: - Remove the cover and open the sealed chamber. - Undo the retaining screws (1) and remove the burner (2). - Replace all the burner nozzles (3) with the nozzles provided in the conversion kit, checking that the diameter is as shown in the tables on pages 76-77-78, and interpose the seals. Then proceed as follows: For the conversion from G20 to G30/G31: - Select the type of gas on the control panel. - The boiler automatically adjusts programming of the maximum power and the ignition power for G30-G31; should further adjustments be necessary, operate as described in the paragraph “Adjusting the gas pressures”. 1 2 3 4 5 6 7 The minimum gas pressure at the burner must be mechanically adjusted; disable the pressure regulator by screwing down the nut (H) and continue as described on the next page. For the conversion from G30/G31 to G20: - Select the type of gas on the control panel. - The minimum and maximum pressure must be mechanically adjusted in the order described below. - The boiler automatically adjusts programming of the maximum power and the ignition power for G20; should further adjustments be necessary, operate as described in the paragraph “Adjusting the gas pressures”. Adjusting the maximum pressure The gas pressure at the burner must be checked through the pressure outlet positioned on the gas valve outlet pipe using a water pressure gauge or a micro pressure gauge. - Remove the protection cover (G). - Screw down (to increase) or unscrew (to decrease) the adjusting nut (H). - 80 - Retaining screws Burner Nozzles Burner pipe Seal Possible gas baffle (see pages 76-77-78) Gas valve INSTALLATION As proof of conversion apply the adhesive label provided in the conversion kit above the technical data plate bearing the information on the gas for which the boiler was set up at the factory. - 81 - ENGLISH Adjusting the minimum pressure The gas pressure at the burner must be checked through the pressure outlet positioned on the gas valve outlet pipe using a water pressure gauge or a micro pressure gauge - Remove the protection cover (G). - Disconnect the power cable (12V) from the modulating coil. - Adjust the minimum pressure to the value indicated in the table below, screwing down (to increase) or unscrewing (to decrease) the adjusting screw (I). - Reconnect the power cable (12V) of the modulating coil. - Seal the regulator with a cover (G). MAINTENANCE MAINTENANCE In order to assure that the boiler remains functional and efficient within the limits laid down by current legislation and/or regulations, the boiler must be subjected to regular inspection. The frequency of inspection depends on the installation and utilisation conditions, however an annual inspection by persons authorised by Lamborghini Service is recommended. It is important to remember that the operations may only be carried out by persons that have the necessary qualifications by law and specific knowledge in the field of safety, efficiency, environmental hygiene and combustion. The same persons must also be up to date on the constructive and functional characteristics aimed at proper maintenance of the boiler. If working or carrying out maintenance on structures in the vicinity of flue gas ducts and/or flue gas exhaust devices and their accessories, turn off the boiler, and when the work has been completed, have their efficiency checked by qualified persons. IMPORTANT: Before starting any cleaning or maintenance operation on the boiler, cut the power by turning off the boiler switch and the main power switch, and cut off the gas supply by closing the cock on the boiler. Having said that, the type of operations may be the following: - Removing any oxidation from the burners. - Removing any scale from the exchangers. - Checking and cleaning the fan. - Checking the connections between the various flue gas exhaust and air intake pipes. - Cleaning the pipes in general. - Checking the outside appearance of the boiler. - Checking that the boiler turns on and off and its operation both in sanitary water and in heating mode. - Checking the seal of the gas and water unions and connection pipes. - Checking the gas consumption at maximum and minimum output. - Checking the position of the ignition electrode. - Checking the position of the detection electrode. - Checking the combustion and efficiency parameters. - Checking the no-gas safety switch. - Checking the hydraulic system pressure. - Checking the expansion tank efficiency. - Checking functioning of the adjustment and safety thermostats. - Checking functioning of the circulation pump. - Checking that there are strictly no gas leaks from the system and combustion gas leaks from the draft hood or the boiler/stack union. - Checking the gas flow rate. • DO NOT clean the boiler and/or its parts with easily flammable substances (e.g. petrol, alcohol, etc.). • DO NOT clean the panels, painted parts and plastic parts with paint thinners. Use only soap and water to clean the panels. - 82 - MAINTENANCE TROUBLESHOOTING Failed ignition Fault - No gas Cause Remedy - Check that the gas flow to the boiler is regular and that the air has been bled from the pipes Safety thermostat tripped No water - Gas valve defective - Power supply disturbances - Check and replace the gas valve - Check the earthing - Delivery sensor not active - Check proper positioning and functioning of the delivery sensor - No system circulation - Check the circulator - Feed pressure too low - Restore the pressure by opening the feed cock - Check the system - Replace the sensor - Water leak from the system - Sensor damaged Air pressure switch tripped - Pressure switch contact remains - Check the pressure switch - Check that the connection pipes closed between the pressure switch and the fan are free of condensate - Check that the air and flue gas ducts are not obstructed - Check the fan Flue gas thermostat tripped (flue control) - No flue draft Heating sensor failure - Sensor damaged or in short- - Check the wiring or replace the circuit sensor Sanitary water sensor failure - Sensor damaged or in short- - Check the wiring or replace the circuit sensor Smell of unburnt gas and poor burner combustion - Gas consumption too high - The pilot flames tend to go out - Adjust the gas flow rate - Check and act on the pressure stabilizer of the gas valve - The flame has yellow spots - Check that the burner air ducts and Venturi are perfectly clean - 83 - - Check that the flue duct is not obstructed - Check that the room where the boiler is installed is adequately ventilated - Check the wiring or replace the flue gas thermostat ENGLISH - Detection or ignition electrode - Check the electrode wiring and malfunction that the electrodes are positioned properly and do not have any scale BRUCIATORI CALDAIE MURALI E TERRA A GAS GRUPPI TERMICI IN GHISA E IN ACCIAIO GENERATORI DI ARIA CALDA TRATTAMENTO ACQUA CONDIZIONAMENTO Le illustrazioni e i dati riportati sono indicativi e non impegnano. La LAMBORGHINI si riserva il diritto di apportare senza obbligo di preavviso tutte le modifiche che ritiene più opportuno per l'evoluzione del prodotto. The illustrations and data given in this manual are approximate and not binding. LAMBORGHINI reserves the right to make any modifications it sees fit for product development without prior notice. Las ilustraciones y los datos indicados son meramente indicativos y no constituyen vínculo alguno. LAMBORGHINI se reserva el derecho de aportar, sin obligación de aviso previo, todas las modificaciones que considere oportunas para la evolución del producto. LAMBORGHINI CALOR S.p.A. VIA STATALE, 342 44047 DOSSO (FERRARA) ITALIA TEL. ITALIA 0532/359811 - EXPORT 0532/359913 FAX ITALIA 0532/359952 - EXPORT 0532/359947 Libretto cod. 97.50743.0/1 (12/06) l de re e n na zionseg o n tte Co ’us e aORE: le d s a te T or LLA anu c A a T All. INS nte m e N: f thICIA al is sig rese TE o N on N nu il p’UTE nti TECH ma R l e l t a at N his SE he ATIOhat t he U t r Fo TALLure t to t el r S ar so g IN ke s ove e u l de Entr a el manded n r ió R: ha nc DO al pa e t A u a L la A an A INSTe m t sr. sen RIO e UA r p US al CALDAIA MURALE A GAS CON BOLLITORE AD ACCUMULO - ALTO RENDIMENTO - MODULANTE WALL-MOUNTED GAS BOILER WITH STORAGE WATER HEATER - HIGH EFFICIENCY - MODULATING CALDERA MURAL DE GAS CON INTERCAMBIADOR DE ACUMULACIÓN - ALTO RENDIMIENTO - MODULANTE LIBRETTO UTENTE USER MANUAL MANUAL DE USO 24 MBS W TOP 28 MBS W TOP 32 MBS W TOP Congratulations... ... on your excellent choice. Thank you for choosing our products. LAMBORGHINI CALORECLIMA is daily committed to seeking innovative technical solutions to satisfy every need. Constant presence of our products on the Italian and international markets is assured by a widespread network of Agents and Dealers assisted by “LAMBORGHINI SERVICE” (Technical Service) who assures qualified service and maintenance of the boiler. WARRANTY The ALMA MBS W TOP boilers enjoy a SPECIFIC WARRANTY as of the date of validation by your local Technical Service. We therefore invite you to timely contact the above mentioned Technical Service, who will set up the boiler FREE OF CHARGE on the conditions specified in the WARRANTY CERTIFICATE provided with the boiler, which we suggest you read carefully. CONFORMITY The ALMA MBS W TOP boilers are in conformity with: • • • • Gas Directive 90/396/EEC Efficiency Directive 92/42/EEC (✫✫✫) Electromagnetic Compatibility Directive 89/336/EEC Low Voltage Directive 73/23/EEC. 0694 For the production serial number, refer to the technical data plate of the boiler. LAMBORGHINI CALOR S.p.A. Dott. Felice Bo’ (General Manager) ________________________________ - 24 - CONTENTS CONTENTS GENERAL Page 26 DESCRIPTION “ 27 OPTIONAL ACCESSORIES “ 27 TECHNICAL DATA “ 28 SANITARY HOT WATER PERFORMANCE “ 28 IDENTIFICATION “ 31 CONTROL PANEL “ 32 DISPLAY “ 33 PARAMETER PROGRAMMING “ 34 DESCRIPTION OF OPERATION AND FUNCTIONS “ 35 MAINTENANCE “ 41 - 25 - ENGLISH SAFETY WARNINGS AND RULES USER MANUAL SAFETY WARNINGS AND RULES • The instruction manuals provided form an integral part of the boiler and consequently must be carefully kept and must ALWAYS accompany the boiler, even in the case of transfer to another owner or user or transfer to another system. In the event of damage or loss, request another copy from your local Technical Service. • After unpacking, check the integrity and completeness of the supply, and if anything does not correspond, contact the Agency which sold you the boiler. • The boiler must be installed by a qualified company in accordance with Law 46 of 5 March 1990. After installation this company issues a declaration of conformity as proof of workmanlike installation, i.e. in compliance with the current regulations and instructions provided by the manufacturer in the instruction manual that accompanies the boiler. • The boiler may only be used for the purpose for which it was designed as specified by the manufacturer. The manufacturer cannot be contractually or extra-contractually be held responsible for damage caused by persons, animals or things, or installation, adjustment and maintenance errors, or improper use. • In the event of water leaks, disconnect the boiler from the electrical power supply, cut off the water supply and promptly notify Technical Service or professionally qualified personnel. • Periodically check that the operating pressure of the hydraulic system is between 1 and 1.5 bar. If otherwise, contact Technical Service or professionally qualified personnel. • It is recommended to service and clean the boiler at least once a year. These operations must be carried out exclusively by professionally qualified and authorised personnel. PROHIBITIONS • DO NOT allow children or incapable and unassisted persons to make adjustments. • DO NOT activate electrical devices or equipment such as switches, electrical appliances, etc. if you can smell fuel or unburnt fuels. In this case: - air the room by opening the doors and windows - close the fuel cut-off device - promptly have Technical Service or professionally qualified personnel intervene. • DO NOT touch the boiler if you are barefoot and parts of your body are wet. • DO NOT carry out any technical or cleaning operation before having disconnected the boiler from the electrical power supply by positioning the main switch on OFF. • DO NOT modify the safety or adjustment devices without the authorisation and instructions from the boiler manufacturer. • DO NOT pull, detach or twist electrical cables leading from the boiler, even if they are disconnected from the electrical power supply. • DO NOT tap or reduce the size of the vents of the room where the boiler is installed. The vents are essential for proper combustion. • DO NOT leave flammable containers and substances in the room where the boiler is installed. • DO NOT litter the packaging material and keep it away from children as it is a potential hazard. It must be disposed of in accordance with current legislation. - 26 - USER MANUAL DESCRIPTION ALMA 24-28-32 MBS W TOP Sealed chamber boiler suitable for heating and production of sanitary hot water. It is equipped with an electronic control unit for automatic ignition and ionising electrode flame control. For reasons of safety, the efficiency of the electric fan is controlled by a pressure switch. The flue gas exhaust may essentially be made up of: - A pipe concentric to the air intake pipe - A split pipe for flue gas exhaust and combustion air intake. WARNINGS • Intervention of the safety devices indicates a potentially hazardous malfunction, therefore, immediately contact Technical Service. Technical Service may replace the safety devices, exclusively using original components of the manufacturer. Refer to the spare parts catalogue provided with the boiler. After any repair, check proper functioning of the boiler. • THE BOILER MAY NOT, EVEN TEMPORARILY, BE STARTED IF THE SAFETY DEVICES ARE NOT FUNCTIONING OR HAVE BEEN TAMPERED WITH. • Only OPTIONAL ACCESSORIES The ALMA MBS W TOP boilers may be equipped with the following accessories to be ordered separately (see price list): •Flue gas exhaust accessories •Hydraulic connection kit •Natural gas to LPG conversion kit •LPG to natural gas conversion kit •Fitting template kit •Remote control kit •External sensor kit - 27 - ENGLISH The boilers operate fully automatically and the gas flow is controlled by an electronic control unit with the following characteristics: - continuous modulation on both circuits - possibility of adjusting the heat output - possibility of adjusting slow ignition. The models are equipped with: - no-water pressure switch - full safety thermostat - high-efficiency flue gas exchanger. USER MANUAL TECHNICAL DATA DESCRIPTION ALMA 24 MBS W TOP Fuel G20 Gas supply pressure (nominal) 20 Boiler category Type of boiler Nominal heating power (Qn) G30 28-30 G31 37 II2H3+ B22 - C12 - C32 - C42 - C52 - C62 - C82 maximum 26 minimum 10,68 kW Max/min useful efficiency at Pn 93,7/88,3 Useful efficiency at 30% of Pn Flue gas temperature (∆T) at Pn max 105 Flue gas mass flow rate at Pn max 0,009 Flue gas temperature (∆T) at Pn min Flue gas mass flow rate at Pn min CO2 at Pn max CO2 at Pn min 87 106 0,009 0,010 78 92 0,004 3,5 3,46 3,45 46,5 NOx at Pn max (0% of O2) 268 NOx at Pn min (0% of O2) 107 0,004 CO at Pn max (0% of O2) CO at Pn min (0% of O2) 90,7 0,004 7,6 50,5 210 Class NOx Maximum permitted temperature Maximum permitted pressure for heating circuit Boiler water content Water heater water content 9 134 116 379 232 2 8,8 233 90 % % mg/kWh mg/kWh °C bar 50 l 2 140 8 1 5,45 Mantle loss at Pn max 0,85 Noise 46 Energy efficiency marking (EEC 92/42) kg/s 3 Stack loss with burner on at Pn max ∆p minimum at air pressure switch °C kg/s mg/kWh 113 X4D Stack loss with burner off % °C 374 Degree of electrical protection Heating expansion tank preload % mg/kWh 230~50 Heating expansion tank volume kW 116 Electrical power supply Electrical power absorbed kW kW 24,36 minimum mbar 12,1 maximum Useful nominal output (Pn) 0,1 0,9 l V~Hz W IP l bar % % % mbar dB ★★★ SANITARY HOT WATER PERFORMANCE DESCRIPTION ALMA 24 MBS W TOP Continuous delivery without flow limiter ∆T=30°C 11,4 Peak draw in the first 10 min. 157 Continuous delivery with flow limiter 12 Sanitary water pressure 8 - 28 - l/min l/min bar USER MANUAL DESCRIPTION ALMA 28 MBS W TOP G20 Gas supply pressure (nominal) 20 Boiler category Type of boiler Nominal heating power (Qn) Useful nominal output (Pn) G30 28-30 G31 37 II2H3+ B22 - C12 - C32 - C42 - C52 - C62 - C82 maximum 30.4 minimum kW 12.6 kW 28.45 Max/min useful efficiency at Pn 93.6/88.7 Useful efficiency at 30% of Pn Flue gas temperature (∆T) at Pn max 107.5 Flue gas mass flow rate at Pn max 0.011 Flue gas temperature (∆T) at Pn min 89.5 Flue gas mass flow rate at Pn min 0.004 CO2 at Pn min 3.36 CO2 at Pn max CO at Pn max (0% of O2) CO at Pn min (0% of O2) NOx at Pn max (0% of O2) NOx at Pn min (0% of O2) 7.8 69 61 338 173 Class NOx Maximum permitted temperature Maximum permitted pressure for heating circuit Boiler water content Water heater water content 90.9 110 107 0.011 0.011 92 91 0.004 0.004 4 3.9 9.24 139 100 412 219 2 8.75 86 100 404 219 90 Stack loss with burner off Mantle loss at Pn max ∆p minimum at air pressure switch Noise Energy efficiency marking (EEC 92/42) °C kg/s kg/s % % mg/kWh mg/kWh mg/kWh mg/kWh °C l 2 l X4D Heating expansion tank preload % °C 50 Degree of electrical protection Stack loss with burner on at Pn max % bar 230~50 Heating expansion tank volume kW 3 Electrical power supply Electrical power absorbed kW 14.2 maximum minimum mbar 153 8 1 5.6 0.1 0.8 1.8 47 V~Hz W IP l bar % % % mbar dB ★★★ SANITARY HOT WATER PERFORMANCE DESCRIPTION ALMA 28 MBS W TOP Continuous delivery without flow limiter ∆T=30°C 13,3 Peak draw in the first 10 min. 172 Continuous delivery with flow limiter - Sanitary water pressure 8 - 29 - l/min l/min bar ENGLISH Fuel USER MANUAL DESCRIPTION ALMA 32 MBS W TOP Fuel G20 Gas supply pressure (nominal) 20 Boiler category Type of boiler Nominal heating power (Qn) Useful nominal output (Pn) G30 28-30 G31 37 II2H3+ B22 - C12 - C32 - C42 - C52 - C62 - C82 maximum 34.5 maximum 32.4 minimum minimum Max/min useful efficiency at Pn Flue gas temperature (∆T) at Pn min Flue gas mass flow rate at Pn max Flue gas mass flow rate at Pn min CO2 at Pn max CO2 at Pn min CO at Pn max (0% of O2) 83.5 0.012 0.004 7.46 2.84 61.5 CO at Pn min (0% of O2) 86.7 NOx at Pn min (0% of O2) 190 NOx at Pn max (0% of O2) 219 Class NOx Maximum permitted temperature Maximum permitted pressure for heating circuit Boiler water content Water heater water content kW 12.19 kW 90.7 99 101 103 0.013 0.013 87 88 0.005 0.005 3.2 3.3 8.22 156 235 290 165 2 7.71 98 207 281 162 90 Stack loss with burner off Mantle loss at Pn max ∆p minimum at air pressure switch Noise Energy efficiency marking (EEC 92/42) °C kg/s kg/s % % mg/kWh mg/kWh mg/kWh mg/kWh °C l 2 X4D Heating expansion tank preload % °C 50 Degree of electrical protection Stack loss with burner on at Pn max % bar 230~50 Heating expansion tank volume kW 3 Electrical power supply Electrical power absorbed kW 14 93.7/87.1 Useful efficiency at 30% of Pn Flue gas temperature (∆T) at Pn max mbar 155 8 1 5.5 0.1 0.8 1.88 47 l V~Hz W IP l bar % % % mbar dB ★★★ SANITARY HOT WATER PERFORMANCE DESCRIPTION ALMA 32 MBS W TOP Continuous delivery without flow limiter ∆T=30°C 15,2 Peak draw in the first 10 min. 192 Continuous delivery with flow limiter - Sanitary water pressure 8 - 30 - l/min l/min bar USER MANUAL IDENTIFICATION ENGLISH The ALMA boiler is identifiable by the labels on the packaging and the TECHNICAL DATA PLATE found inside the boiler as shown in the figure. WARNING • Tampering with, removing, missing identification plates or anything else that does not allow certain identification of the product makes any installation and maintenance operation difficult. - 31 - USER MANUAL CONTROL PANEL The ALMA boilers are equipped with the instruments shown below. D P1 P2 P3 P4 P5 P6 Boiler status display Boiler function selection button (Summer/Winter - ON/OFF) Cyclic function selection Heating temperature increase button Heating temperature decrease button Sanitary water temperature increase button Sanitary water temperature decrease button The display shows 3 digits and some symbols that indicate the boiler operating mode. The symbols and their functions are indicated in the table below: Symbol Name Meaning Cock Fixed: boiler in sanitary water mode Radiator Fixed: boiler in heating mode Flame Fixed: burner on Flashing: burner on in maintenance function Temperature The parameter displayed is a temperature Locked flame Boiler locked Winter Boiler in winter mode Summer Boiler in summer mode Curves (K factor) Fixed: external temperature display Flashing: set point curve Arrows Communication with remote control Letter t Test function active During normal operation the heating delivery temperature is displayed in °C. In the event of a display failure, the system continues functioning with the previous settings. - 32 - USER MANUAL DISPLAY P2 Pressing the button the following information is cyclically displayed: Sanitary water temperature Heating temperature Return to main menu. With external sensor (optional): Sanitary water temperature Heating temperature External temperature display K parameter value display Return to main menu Symbol Summer Winter and flashing and flashing with flashing flashing and “K” value fixed The info window is displayed for a maximum of 15 seconds if no button is pressed and then returns to the main view. Holding the button pressed down for 10 seconds the “Test” function is accessed. Upon activation, the display is reset for a few seconds after which heating is activated at full power for 15 minutes with the temperature set to 85°C. t flashing When this function is active, the sanitary water mode is disabled. The function is deactivated (OFF) by holding the button P1 pressed down or after 15 minutes if no button is pressed. With remote control (optional): The presence of the remote control is indicated on the display with the symbols shown on the side. P3 Pressing the button the heating temperature is increased (max 83°C). If the external sensor is present, see the functions on page 38. P4 Pressing the button the heating temperature is decreased (min. 30°C). If the external sensor is present, see the functions on page 38. P5 Pressing the button the sanitary water temperature is increased (max 60°C). P6 Pressing the button the sanitary water temperature is decreased (min. 30°C). Display lighting The system provides for backlighting which is activated for 4 seconds when any one button is pressed and remains on during display of parameter programming. A flashing signal indicates that there is a board fault. - 33 - ENGLISH Button Function P1 Pressing the button for 3 seconds the following functions are displayed: Summer ----> Winter Holding the button pressed down for 3 seconds the boiler switches off. USER MANUAL PARAMETER PROGRAMMING Simultaneously press the buttons P2 and P3 for 10s to access the programming menu where the left digit indicates the parameter number, and the centre and right digits the parameter value. When the programming menu has been accessed, the left digit will blink; use the P3 and P4 buttons to change the parameter number, and the P5 and P6 buttons to change the value which will immediately be stored. While changing the parameter, the system will check that the permitted limits are not exceeded. Parameters displayed: 1 2 3 4 5 6 7 8 9 0 Boiler model - 0 Fast with plates - 1 Bithermal - 2 Thermo+Water heater - 3 Water heater Gas type selection - 0 Natural gas - 1 LPG Maximum heat output: Range 0-100% (preset to 100%) Heating restart timing: Range 0-20 = tmin 0-10 (preset to 4 = 2 min) Ignition power: Range 0-75% (preset to natural gas 40% and LPG 35%) Heating temperature adjustment range (preset to 1=30 - 83°C). Range 0=30 - 45°C (floor heating) Heating pump post-circulation time setting: Range 0-20 (0-10 minutes) (Preset to 4 = 2 minutes) Anti-Legionella function activation with boiler/water heater: 1 active, 0 inactive (preset to 1) Do not use. (parameter not handled “--”) Water heater pump post-circulation time setting: Range 0-20 (0-10 minutes) (preset to 4=2 minutes). To exit the menu, press the P1 button or wait 20s without pressing any button. - 34 - USER MANUAL WARNINGS For each operating mode one or more symbols appear on the LCD display. In the event of a fault, the display will show a code whose meaning is summarised in the following table: Code 01 02 03 05 07 09 LOCK/RESET If the boiler fails to ignite at the first attempt, there is an interventilation time and then a further two ignition attempts. For LPG boilers only 1 ignition attempt remains active. When this time has elapsed and ignition has failed, a non-volatile locking stop occurs (stored). “Failed ignition lock 01” fault. Reset the boiler by simultaneously pressing the P1 and P2 buttons. Remember that you can only reset the boiler a maximum of 5 consecutive times both from the boiler control panel and from a remote control. After this, the boiler can only be reset: - after 1h (1 additional reset every hour is permitted); - by cutting the power. DESCRIPTION OF OPERATION AND FUNCTIONS HEATING MODE The heating operating mode starts if requested by the ambient thermostat and if the operating selector is set to “WINTER”. The circulator, fan (MBS) and switching valve are activated and, after checking that there is air flow, burner ignition is requested. When the “slow ignition time” from flame detection has elapsed, the burner power goes to the minimum value set and reaches the maximum value within about 50 seconds. The burner stops when the set heating temperature has been reached or when the ambient thermostat intervenes. The intervention of the ambient thermostat also activates a post-circulation cycle (heating) after which the circulator is turned off and the switching valve returns to the sanitary water position. WATER HEATER ELECTRIC SWITCHING VALVE The sanitary water mode with water heater starts when the water heater sensor reads a temperature lower than the “water heater ON temperature”. The switching valve is then driven into sanitary water position and the system pump is activated, and both remain active even at the end of the water heater request for post-circulation. In the event of concurrent requests, the water heater is given priority and at the end the switching valve is switched to heating and water heater post-circulation is reset. During operation in sanitary water mode, the switching valve relay remains in rest position. - 35 - ENGLISH Fault Failed ignition lock Safety thermostat intervention lock No water Air pressure switch (MCS)/flue gas thermostat (MC) NTC heating sensor fault NTC sanitary water sensor fault USER MANUAL HEATING PUMP ANTI-LOCKING FUNCTION An anti-locking function activates the circulator for 30 seconds every 24 hours of inactivity. Following a power failure, the first anti-locking intervention occurs after 1 hour of inactivity. The function is active even when operation is locked and the selector is set to OFF. SWITCHING VALVE ANTI-LOCKING FUNCTION An anti-locking function activates the switching valve for 30 seconds every 24 hours of inactivity. Following a power failure, the first anti-locking intervention occurs after 1 hour of inactivity. The function is active even when operation is locked and the selector is set to OFF. ANTI-LEGIONELLA FUNCTION In the boiler version with water heater the anti-Legionella function can be activated/deactivated by acting on the display. The function is activated once every two weeks (336 hours), forcing the water heater setpoint to 70°C, and is deactivated when the water temperature in the water heater remains > 70°C for 15 min. Should a sanitary water request reduce the temperature to a value < 70°C, the time already elapsed is stored. When the temperature once again exceeds 70°C, the function continues from the time previously elapsed until reaching 15 min. A timer is in any case activated when the anti-Legionella function starts and deactivates the function after a maximum time of 30 minutes. The timer does not stop if sanitary water is drawn. ANTI-FREEZE FUNCTION The boiler is equipped with an anti-freeze function. When the water temperature read by the delivery sensor drops to below the “pump activation temperature for anti-freeze”, the pump is activated to put the water back into circulation. Should the temperature drop even further to the “burner activation temperature for anti-freeze”, also the burner will start waiting for the delivery temperature to exceed the “anti-freeze deactivation temperature” beyond which the burner is turned off and a post-circulation cycle is activated. The function remains active even if the heating selector is set to OFF, SUMMER and WINTER. Description Circulator activation temperature for anti-freeze Circulator deactivation temperature for anti-freeze Burner activation temperature for anti-freez Anti-freeze function deactivation temperature Burner output during anti-freeze Post-circulation for intervention of anti-freeze function 8 10 6 15 minimum 200 - 36 - °C °C °C °C s USER MANUAL WATER CHECK In the case of a boiler/water heater with switching valve, pump circulation is checked via a flow switch connected to the same inlet as the water pressure switch and the following test cycle is activated. If there is a heat request, the circulator is activated. If the circulation safety microswitch is switched, the ignition sequence is started. Otherwise, the circulator continues operating for 6 minutes, after which it is alternately activated for 15s and deactivated for 45s in order to prevent overheating the circulator. The circulator ON/OFF cycles continue until circulation is detected. If the circulator is inactive for more than 30 minutes, the first ON cycle is extended to 6 minutes. The failed circulation fault is displayed during the OFF periods of the circulator. It is not checked whether the circulation safety microswitch is in short-circuit. TEST FUNCTION Activate the function by holding down the INFO button for 10 seconds or by acting on the parameter from the remote control. While the function is active, the display shows the delivery temperature (blinking) and the symbol “t” while the burner is driven at maximum power. The function is deactivated when the test function time has elapsed (15 minutes), or by setting the boiler to OFF. A concurrent sanitary water request activates heat dissipation through the sanitary water circuit activating the tap symbol on the display. SENSOR FAULT In the event of a delivery sensor fault (break or short-circuit), the burner is immediately turned off and the fault signalled. In the case of operation in heating mode, if the burner was on, a post-circulation cycle is run. A sensor short-circuit is detected when the resistance is less than about 200 Ohm A sensor break is detected when the resistance values are Rntc >> 34 Kohm. In the fast boiler model with plate exchanger, provision has been made for operation with one sensor in the event of a fault due to failure or short-circuit of the sanitary water sensor. The fault is displayed but the boiler continues functioning in sanitary water and heating mode. - 37 - ENGLISH FAN AND AIR FLOW CHECK (MBS MODELS) If an ignition request is received, the system checks for the absence of air flow (contact open) of the flue gas pressure switch, and if the test is passed the fan is activated. When air flow is detected (contact closed) the ignition sequence is started. If no air is detected for 15 seconds (e.g. fan failure) a fault is signalled and the system waits for the air detection signal. Each time the burner is turned off, a post-ventilation cycle is run for 10 seconds. If a new ignition request arrives during this period, the fan remains active, and if air flow is detected, the re-ignition phase starts. In the event of a lock with post-ventilation still in progress, a reset is permitted (the warning disappears), but the boiler can only be restarted after the system reset time has elapsed. At each power on/reset, the system automatically checks the type of boiler. If there is a heat request and air is detected when the fan is off, a fault is signalled. USER MANUAL HEATING MODE WITH EXTERNAL SENSOR (OPTIONAL) Operation is the same as in normal heating mode with the difference that the delivery temperature is calculated in relation to the external temperature read by the sensor and the K factor. The K factor is set with the P3 and P4 buttons. HEATING TEMPERATURE INCREASE BUTTON HEATING TEMPERATURE DECREASE BUTTON System delivery (°C) P3 P4 External temperature (°C) N.B.: The graphs show the temperature trend with the normal heating setpoint range. If the heating range for a floor-mounted system were selected, the curves would fall within the temperature range for the floor however maintaining the same “K” slope. EXTERNAL SENSOR INSTALLATION The external sensor, which can be requested as optional, is used to improve the operating performance of the boiler. It must be installed on an external wall, possibly north-facing, and in any case in a position protected against sunlight and/or other heat sources. - 38 - USER MANUAL OPERATION WITH REMOTE CONTROL (OPTIONAL) The boiler can be operated with a RC03.54 remote control. The RC03.54 remote control is an intelligent hourly programmer complete with ambient sensor suitable for adjustment and control of wall-mounted gas boilers for heating and production of sanitary hot water mainly for installation in residential buildings. With the remote control connected to the boiler, the controls are divided as follows: Controls on control panel: - Operating mode selector: OFF/SUMMER/WINTER - Parameter setting menu - Reset (see “LOCK/RESET on page 35) If communication is interrupted or the remote terminal is disconnected, the system continues operating for a certain time with the same setting as before the interruption waiting for communication to be re-established (“communication timeout”). If communication is not re-established after the timeout, the system goes into normal operating mode as if the remote control were not connected, resuming all the controls. As well as the programming function the remote control also allows: - Setting and displaying the parameters 1 Boiler model - 0 Fast with plates - 1 Bithermal - 2 Thermo+Water heater - 3 Water heater 2 Gas type selection - 0 Natural gas - 1 LPG 3 Maximum heat output: Range 0-100% (preset to 100%) 4 Heating restart timing: Range 0-20 = tmin 0-10 (preset to 4 = 2 min) 5 Ignition power: Range 0-75% (preset to natural gas 40% and LPG 35%) 6 Heating temperature adjustment range (preset to 1=30 - 83°C). Range 0=30 - 45°C (floor heating) 7 Heating pump post-circulation time setting: Range 0-20 (0-10 minutes)(Preset to 4 = 2 minutes) 8 Anti-Legionella function activation with boiler/water heater: 1 active, 0 inactive (preset to 1) 9 Activation/deactivation of the test function: 1 Active; 0 Inactive (preset to 0) 10 Do not use - Displaying the faults (see “parameter programming” on page 34). The K value settings described on page 61 are exclusively done from the remote control. ELECTRICAL CONNECTION The remote control is connected directly to the board as shown in the connection diagram. Electrical characteristics of the communication line: Number of wires: 2 to be connected to the TA contacts (ambient thermostat) Cable type: bipolar (*) Maximum line length: 50 metres Maximum cable resistance: 2x5Ώ Polarity: no polarity. (*) In environments with high electrical noise, a screened or twisted cable must be used. - 39 - ENGLISH The following controls are managed by the remote control: - Sanitary water temperature setting - Delivery temperature setting. USER MANUAL Adjusting the minimum pressure The gas pressure at the burner must be checked through the pressure outlet positioned on the gas valve outlet pipe using a water pressure gauge or a micro pressure gauge - Remove the protection cover (G). - Disconnect the power cable (12V) from the modulating coil. - Adjust the minimum pressure to the value indicated in the table below, screwing down (to increase) or unscrewing (to decrease) the adjusting screw (I). - Reconnect the power cable (12V) of the modulating coil. - Seal the regulator with a cover (G). As proof of conversion apply the adhesive label provided in the conversion kit above the technical data plate bearing the information on the gas for which the boiler was set up at the factory. - 40 - USER MANUAL MAINTENANCE In order to assure that the boiler remains functional and efficient within the limits laid down by current legislation and/or regulations, the boiler must be subjected to regular inspection. The frequency of inspection depends on the installation and utilisation conditions, however an annual inspection by persons authorised by Lamborghini Service is recommended. It is important to remember that the operations may only be carried out by persons that have the necessary qualifications by law and specific knowledge in the field of safety, efficiency, environmental hygiene and combustion. The same persons must also be up to date on the constructive and functional characteristics aimed at proper maintenance of the boiler. If working or carrying out maintenance on structures in the vicinity of flue gas ducts and/or flue gas exhaust devices and their accessories, turn off the boiler, and when the work has been completed, have their efficiency checked by qualified persons. - Removing any oxidation from the burners. - Removing any scale from the exchangers. - Checking and cleaning the fan. - Checking the connections between the various flue gas exhaust and air intake pipes. - Cleaning the pipes in general. - Checking the outside appearance of the boiler. - Checking that the boiler turns on and off and its operation both in sanitary water and in heating mode. - Checking the seal of the gas and water unions and connection pipes. - Checking the gas consumption at maximum and minimum output. - Checking the position of the ignition electrode. - Checking the position of the detection electrode. - Checking the combustion and efficiency parameters. - Checking the no-gas safety switch. - Checking the hydraulic system pressure. - Checking the expansion tank efficiency. - Checking functioning of the adjustment and safety thermostats. - Checking functioning of the circulation pump. - Checking that there are strictly no gas leaks from the system and combustion gas leaks from the draft hood or the boiler/stack union. - Checking the gas flow rate. • DO NOT clean the boiler and/or its parts with easily flammable substances (e.g. petrol, alcohol, etc.). • DO NOT clean the panels, painted parts and plastic parts with paint thinners. Use only soap and water to clean the panels. - 41 - ENGLISH IMPORTANT: Before starting any cleaning or maintenance operation on the boiler, cut the power by turning off the boiler switch and the main power switch, and cut off the gas supply by closing the cock on the boiler. Having said that, the type of operations may be the following: USER MANUAL TROUBLESHOOTING Failed ignition Fault - No gas Cause Remedy - Check that the gas flow to the boiler is regular and that the air has been bled from the pipes - Detection or ignition electrode - Check the electrode wiring and malfunction that the electrodes are positioned properly and do not have any scale Safety thermostat tripped No water - Gas valve defective - Power supply disturbances - Check and replace the gas valve - Check the earthing - Delivery sensor not active - Check proper positioning and functioning of the delivery sensor - No system circulation - Check the circulator - Feed pressure too low - Restore the pressure by opening the feed cock - Check the system - Replace the sensor - Water leak from the system - Sensor damaged Air pressure switch tripped - Pressure switch contact remains - Check the pressure switch - Check that the connection pipes closed between the pressure switch and the fan are free of condensate - Check that the air and flue gas ducts are not obstructed - Check the fan Flue gas thermostat tripped (flue control) - No flue draft Heating sensor failure - Sensor damaged or in short- - Check the wiring or replace the circuit sensor Sanitary water sensor failure - Sensor damaged or in short- - Check the wiring or replace the circuit sensor Smell of unburnt gas and poor burner combustion - Gas consumption too high - The pilot flames tend to go out - Adjust the gas flow rate - Check and act on the pressure stabilizer of the gas valve - The flame has yellow spots - Check that the burner air ducts and Venturi are perfectly clean - 42 - - Check that the flue duct is not obstructed - Check that the room where the boiler is installed is adequately ventilated - Check the wiring or replace the flue gas thermostat BRUCIATORI CALDAIE MURALI E TERRA A GAS GRUPPI TERMICI IN GHISA E IN ACCIAIO GENERATORI DI ARIA CALDA TRATTAMENTO ACQUA CONDIZIONAMENTO Le illustrazioni e i dati riportati sono indicativi e non impegnano. La LAMBORGHINI si riserva il diritto di apportare senza obbligo di preavviso tutte le modifiche che ritiene più opportuno per l'evoluzione del prodotto. The illustrations and data given in this manual are approximate and not binding. LAMBORGHINI reserves the right to make any modifications it sees fit for product development without prior notice. Las ilustraciones y los datos indicados son meramente indicativos y no constituyen vínculo alguno. LAMBORGHINI se reserva el derecho de aportar, sin obligación de aviso previo, todas las modificaciones que considere oportunas para la evolución del producto. LAMBORGHINI CALOR S.p.A. VIA STATALE, 342 44047 DOSSO (FERRARA) ITALIA TEL. ITALIA 0532/359811 - EXPORT 0532/359913 FAX ITALIA 0532/359952 - EXPORT 0532/359947 Libretto cod. 97.50743.0/1 (12/06)