1
CH 03214
Caution
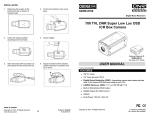
DOME Camera
1. Do not attempt to disassemble the camera.
In order to prevent electric shock, do not remove screws or cover.
2. Handle the camera with care.
The camera could be damaged by improper handling or storage
3. Do not expose the camera to rain or moisture, or try to operate in wet
areas.
Take immediate action if the camera becomes wet. Turn the power off and
request service to qualified personnel. Moisture can damage the camera and
also create a risk of electric shock.
4. Do not use strong or abrasive detergents when cleaning the camera body.
Use a dry cloth to clean the camera when dirty. In case the dirt is hard to
remove, use a mild detergent and wipe gently.
5. Never point the camera toward the sun.
Whether the camera is used outdoor or not, never point it toward the sun. Use
with caution when operating the camera in the vicinity of spot lights or other
bright lights and light reflecting objects.
3 - axis
CAUTION
RISK OF ELECTRIC SHOCK
DO NOT OPEN
!
CAUTION: TO REDUCE THE RISK OF ELECTRIC SHOCK, DO NOT REMOVE
COVER OR BACK. NO USER SERVICEABLE PARTS INSIDE. REFER
SERVICING TO QUALIFIED SERVICE PERSONNEL.
!
SA 1966
6. Do not operate the camera beyond its temperature, humidity, or power
source ratings.
Do not use the camera in an extreme environment where high temperature or
high humidity exists. Use the camera under conditions where temperatures are
between 14 o F~122 o F (-10 oC~+50 o C), and humidity is below 85%,
CAUTION:
To prevent electric shocks and risk of fire hazards,
DO NOT use other than specified power source.
To prevent fire or shock hazard, do not expose the unit to rain or moisture. The symbol is intended to alert
the user to the presence of important operating and maintenance (servicing) instructions in the literature
accompanying the appliance.
The symbol is intended to alert the user to the presence of uninsulated "dangerous voltage" within the
product's enclosure that may be sufficient magnitude to constitute a risk of electric shock to persons.
WARNING This equipment has been tested and found to comply with the limits for a Class A. Digital
device. Pursuant to part 15 of the FCC Rules. These limits are designed to provide reasonable protection
against harmful interference when the equipment is operated in a commercial environment. This equipment
generates, uses, and can radiate radio frequency energy, and if not installed and used in accordance with
the instruction manual, it may cause harmful interference to radio communications. Operation of this
equipment in a residential area is likely to cause harmful interference in which case the user will be required
to correct the interference at own expense.
CAUTION Any changes or modifications in construction of this device which are not expressly
approved by the party responsible for compliance could void the user's authority to operate the equipment.
SA 1965
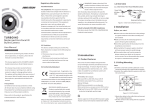
Diagram & Adjustment
Installation
Angle Adjustment
Installation
1. Pan adjustment : Grasp the lens cover and then adjust direction to the
right or left. ('D' -180˚~+180˚)
2. Tilt adjustment : Grasp the lens cover and then adjust direction to the
up or down ('A' : 18˚~90˚ or 'B' 21˚~90˚)
3. Roll adjustment : grasp the lens cover and then rotate ('C' : -180˚~+180)
1. Opening the dome : Push the latch button.
Removing Mount Bracket
SCREW TP1
4X30 3EA
1. Push the button inside of main
body and turn the main body
counterclockwise.
2. Detach the main body from mount
2. Removing the dome : Lift the dome case.
3. Camera installation & Lens adjustment.
1) Fix the mount bracket with supplied
screw on ceiling or wall mount.
Note : The camera front sign is on the
mount bracket.
2) Attach the main body to the mount
bracket by rotating it.
3) By turning the ①(Tele-Wide) knob,
you can access a range of focal lengths
4) Since then, by turning the
②(Near-Far) knob, you can set the focus
5) Reassemble dome case.
Composition
<Focus Adjustment>
Main Product User Manual
Mount Bracket
Screws & Anchor
OSD Menu Structure 1
Setup Menu
Default Set
Lens
DC
Exposure
Shutter : Brightness : AGC : Middle
Sens_up : Auto
BLC : Off
DWDR : Off
Specification
Menu
DC / Manual
Shutter : FLK, 1/50~1/100000, MANUAL(x256)
Brightness : 0~100 Level
Off / Low / Middle / High
Off / Auto (2 ~ 256 Level)
Off / BLC / HSBLC
Off / Indoor / Outdoor
Return
White Bal
ATW
ATW / AWB / AWC / Manual / Indoor / Outdoor
Manual(R Gain : Level adjust / B Gain: Level adjust)
Day/Night
Auto
Auto : Delay / S-Level / E-Level
EXT : B/W : Burst Off/On
Color : -
3DNR
On
On(Limit : 0 ~ 100 Level Selectable) / Off
Special
Refer to the
next Table
(Structure 2)
Adjust
Sharpness :
Blue :
Red :
0~31 Level Selectable
0~100 Level Selectable
0~100 Level Selectable
Reset
-
Set a manufacture state
Exit
-
Saves all the SETUP Menu and then exits
Camera Title
D-Effect
RS485
Motion
Privacy
Default Set
Off
Freeze : Off
Mirror : Off
D-Zoom : Off
Gamma : 0.45
Neg. Image: Off
Cam ID
ID Display
Baudrate
Off
Off
Sync
INT
Language
English
Return
-
Type
Image Sensor
Effective Pixel
Cell Size
Resolution
TV Type
Sync. Type
Scanning System
Scanning Frequency H.
Scanning Frequency V.
Video Out
Gamma Characteristic
Min. Illumination
S/N Ratio
Gain Control
Shutter
Test Illumination Area
Current Consumption
Supplied Voltage
Reverse Polarity Protection
Lens
Operation Temp
Preservation Temp
Dimension
Weight
Menu
Off / On
On / Off
Off / Mirror / V-Flip / Rotate
On (D-Zoom x 32 / PAN ±100 / TILT ±100) / Off
0.05 ~ 1.0 Selectable
Off / On
Return
1 ~ 255 Selectable
Off / On
2400 / 4800 / 9600 / 19200 / 38400 / 57600
On : Area Select (1 ~ 4)
Area Display (On / Off)
Left / Right (0 ~ 100)
Width (0 ~ 100)
Top / Bottom (0 ~ 100)
Height (0 ~ 100)
Sensitivity (0 ~ 40)
Motion View (Off/On)
On : Area Select (1 ~ 8)
Area Display (On / Off)
Left / Right (0 ~ 100)
Width (0 ~ 100)
Top / Bottom (0 ~ 100)
Height (0 ~ 100)
Color (0 ~ 15)
INT / LL
English/Japanese/Chinese/Korean
Return to the SETUP menu
CH 03214
Dome Camera
1/3" Sony SUPER HAD II CCD
768(H) x 494(V)
6.35µm(H) x 7.4µm(V)
HORI. Color 530 TV Line
NTSC
Internal
2:1 Interlace
15.734 KHz
59.94 Hz
1.0 Vp-p (Sync. Negative) Termination 75Ω
γ = 0.45 typ.
0.1Lux (F1.2)
45dB or More (AGC OFF)
Automatic
1/60 ~ 1/100,000 sec
AVERAGE TEST ILLUMINANCE BY FRONT VIEW
120mA Max.
Regulated DC 12V ± 15%
Yes
3.6mm
-10 ~ 50 °C (14 ~ 122 °F)
-20 ~ 60 °C (-4 ~ 140 °F)
123.1mm(W) X 123.5mm(D) X 84.8mm(H)
Approx. 350g
Special Function
Function
OSD Menu Structure 2
Special Menu
Model
Day & Night
BLC
Blemish Compensation
Sens-up
OSD Language
Motion Detection
DNR
Digital Zoom
Privacy
Mirror(H-REV)
Flip(V-REV)
Freeze
Sharpness
Condition
Color/BW/Auto/EXT
BLC/HSBLC/OFF & DWDR selectable
256 Point(Even 128 point, Odd 128 point)
Auto/Off(Selectable limit x2 ~ x256)
English/Korean/Chinese/Japanese
On/Off (4 Zone)
Off/On (0~100 Level Adjustable)
On(x32)/Off
On/Off(8 Zone)
On/Off(Horizontal)
On/Off(Vertical)
On/Off
Level Adjustable
Troubleshooting
If you have a trouble operating your camera, refer to the following.
If the guidelines do not enable you to solve the problem, contact an authorized technician.
The image does not
appear on the screen.
Check the power source for the monitor and camera
and assure that the voltage and polarity are properly
connected and being supplied correctly.
The image on the
screen is dark.
Check if the lens is stained. If dirty, clean the lens
with a soft, clean cloth.
Adjust the contrast feature of the monitor and DC level.
The surface of the
camera case is hot and
a black line appears on
the screen.
Check if you have connected the camera to a proper
power source and if there is no problem with the power,
turn the unit off immediately and seek assistance from
our After Service department.
The screen blinks a lot.
Check if the camera is pointed toward the sun or a
fluorescent lamp.
Adjust the angle or location of the camera if too much
light is coming into the screen.