1
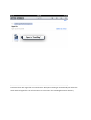
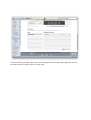
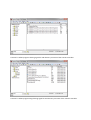
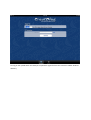
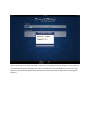
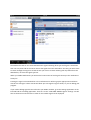
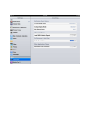
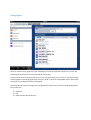
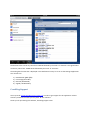
CrestDiag
User Manual
Date: 7/1/2011
Version: 1.1
by Control Concepts
Table of Contents
Introduction ............................................................................................................................................ 3
Signal Files............................................................................................................................................... 3
Connection ............................................................................................................................................ 11
Favorites ............................................................................................................................................... 12
Debugging Your Program ....................................................................................................................... 14
Stimulating Signals ................................................................................................................................ 17
Digital Signals .................................................................................................................................... 17
String Signal....................................................................................................................................... 18
Analog Signals ................................................................................................................................... 19
CrestDiag Support ................................................................................................................................. 21
Introduction
CrestDiag© is an iPad application that helps you diagnose Crestron® 2-Series and 3-Series control
systems. In order to diagnose the system you will need to get the most recent “signal” file that was
generated when you compiled the code on to your iPad. You will also need to make sure your iPad can
connect to the controller that you wish to debug. This manual will explain several methods for getting
the signal file on to your iPad. It will also show you how to select the signals to debug and how to
stimulate the signals to debug your programming. This program performs some of the same features as
Crestron’s own debugger program found in Crestron’s Toolbox applications.
Signal Files
Signal files are created when you compile the Crestron program using Crestron’s SIMPL Windows
programming tool. You can find them in the same directory that the compiled program is located. The
signal file ends with “.sig”. In order to use the application you must get the signal file on the iPad prior to
connecting it with the controller. There are actually four ways to get a signal file on to your iPad.
1) Email to one of your iPad managed email accounts. Using the iPad email client it will allow you
to open CrestDiag by pressing the email attached file. Once the application is open, you will
notice the signal file has been automatically selected.
2) When using iTunes, you can select the “app” menu from your iPad device sync settings. You will
notice CrestDiag in the “File Sharing” section. Dragging files into the CrestDiag Documents
window will upload the signal files into the application. Once the file is in your CrestDiag
document folder, you can select the signal file from the signal file selection section on the
connection page.
3) Using Cloud Services like Dropbox©. Dropbox is a free service when using less than 2GB of
storage. Dropbox has a free iphone/ipad app that will prompt you to open CrestDiag when you
select a stored signal file from its list.
4) Using Crestron’s toolbox program, you can copy the signal file into the SIMPL directory on the
controller. CrestDiag can upload the file automatically when you turn “on” the upload feature
from the connection page. In the future Crestron’s SIMPL Windows programming tool will allow
the signal file to be downloaded automatically when you download your program. Since the 3Series controller allows multiple programs to be loaded and running at the same time. The
SIMPL directory contains additional directories. They all start with “App”, make sure you put
your signal file in the appropriate directory that is associated with its correct program.
iPad Email client with signal file as an attachment. Will open CrestDiag an automatically will select the
email attached signal file. You will also notice it is also now in the CrestDiag document directory.
iTunes’ File Sharing, showing “demo.sig” as a CrestDiag document. Drag and drop signal files into the
Document directory to get the files on to your iPad.
Dropbox© Cloud services application prompting to open CrestDiag© with signal file from list.
Crestron’s Toolbox program showing signal file and directory structure of the 2-Series controller.
Crestron’s Toolbox programming showing signal file and directory structure of the 3-Series controller.
Once the signal files are on the controllers in the appropriate directory, you can turn on the upload
switch and connect to the controller. CrestDiag will upload and read the signal file and ready it for your
use.
Opening the file list using the signal file controls, you will see all the signal files that are stored in
CrestDiag’s Document Directory.
Turning on the upload switch will attempt to upload the signal file from the controller’s SIMPL windows
directory.
When connecting to a 3-Series controller, if more than one program has been loaded, it will prompt you
to choose which program to debug. This is why it is important to put the signal file in the correct “App”
directory. If you have the upload switch enabled, it will attempt to find the signal file in that program’s
directory.
Connection
Once you have the signal file on your iPad you now can make a connection to the controller. The iPad
must be connected to WIFI in order to connect to the controller on the local network. CrestDiag has a
little search glass on the connection page; this will attempt to find all the Crestron controllers that are
on your local subnet.
Selecting a controller from the searched list will assign it to the connection text box and close the search
list. Since some networks are large and complex, your controller may not actually show up in the list.
Scroll through the list too see all controllers CrestDiag has found. If your controller does not show up in
the list, this does not mean you cannot connect to it, just means that more than likely it is not on the
same subnet. Go ahead and manually enter in the controller’s IP address and press “Connect”.
The controllers with the “Star” next to the IP address indicate that the IP address is already in your
favorite list. The IP addresses with the “Plus” means you can press and add it to your favorite list.
Favorites
Favorites are a way for you to manage the controllers that you use every day. You will be allowed to
store virtually an unlimited amount of controllers in your favorite list.
To add a controller to your Favorites’ list, press the “Plus” button that is associated with an IP Address
from the search section on your connection page. This will automatically switch CrestDiag to the
Favorites page and prepare the form to add this controller to your list.
You can also press the “Add” button on the Favorites page, manually enter in the IP Address and name,
than press save.
To edit the name associated with a saved controller, simply press the entry in the table and the edit
form will display, manually change the name and press save.
To delete one or more controllers from your list, press the “Edit” button. Then select each controller
from the list that you wish to delete.
Pressing the “Connection” icon associated with the Favorite controller, will automatically select the
controller for connection, and switch you to the connection page.
Debugging Your Program
Once connected to your controller, it is really best to hold the iPad in Landscape mode. You will notice
four tabs on the left and the large detail view on the right. The first three tabs “hold” the signals that
were found in the signal file. The “fourth” tab, the “Watched” list, is the list of signals that will be
debugged with this program. By default, no signals are in the watched list, you must select the signals to
debug from the String, Digital and Analog signal list. Only the signals that have been assigned to the
watch list will be debugged. Pressing the Signals in the list will highlight the sunglasses associated with
that Signal, indicating that the Signal is now in the Watch list. Pressing the signal again will remove it
from the Watched list.
In order to debug the program, you must “Enable” notification on the detail view section. You can
add/delete signals from the Watched list at any time.
The Watched list has an icon associated with each signal indicating what type each signal is associated
with. You can press edit on the tab to remove the signals from the watched list. This way you won’t have
to search through the larger list to find the one you want to remove. Deleting will only delete from the
Watched list, not from the signal type lists.
When you Enable Notifications you will see the known status of each signal show up in the notifications
history list.
Pressing the signal in the watched list or the notifications list will bring up the appropriate stimulation
controls for that signal. These controls will allow you to change the signals values, so you can debug your
program.
If you need to debug signals that are found in your SIMPL modules, go to the settings application on the
iPad and find the CrestDiag application. Then turn on the “Load SIMPL Module Signals” settings. You will
have to disconnect and reconnect in order for the module signals to be displayed.
Stimulating Signals
Digital Signals
Once you select a Digital signal from your watched list or from the notification history list, you will see
the Digital control display at the top of the detail view section.
Pressing “Push”, will set the digital signal high for as long as you hold down the “Push” button. Releasing
the button will cause the signal to go low.
Pressing “Set High” will set the signal high, and will keep it high until either the programming or another
control is selected to change its state.
Pressing “Set Low” will set the signal low, and will keep it low until either the programming or another
control is selected to change its state.
Pressing “Pulse High” will pulse the state high than return it to the low state after a short period of time.
Pressing “Pulse Low” will pulse the state low than return to the high state after a short period of time.
String Signal
Once you select a String signal from your watched list or from the notification history list, you will see
the String control display at the top of the detail view section.
Using the same Crestron String syntax you use in your programming, you can enter in a String message
to be assigned to that String signal when you press “Send”. You do not need double quotes around your
string data; if you add them they will be ignored.
The String data format that is displayed in the Notification history list is set via the Settings Application.
Your choices are:
1) ASCII/hex
2) Hex
3) ASCII Printable Characters only.
Analog Signals
Analog signals stimulate controls will allow you to enter in the analog value in four formats,
hexadecimal, decimal, percentage and signed decimal.
Hexadecimal can be any value starting from 0000-ffff followed by a small “h”. You must have 4 digits in
front of the “h” character.
Percentage can be any value from 0 – 100 followed by the percentage character.
The decimal value can be any value from 0-65535 followed by the small “d” character. The signed value
can be any value from -32768-32767 followed by the small “d” character.
The Analog data format that is displayed in the Notification history list is set via the Settings Application.
Your choices are:
1)
2)
3)
4)
Hexadecimal (000h-ffffh)
Percentage (0%-100%)
Decimal (0d-65535d)
Signed (-32768-32767)
CrestDiag Support
You may email [email protected] in order to get support for this application. Please
send any enhancement ideas you may have. All are welcome.
Thank you for purchasing this software, CrestDiag support team.