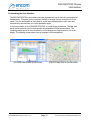
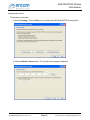
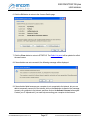
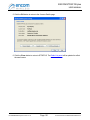
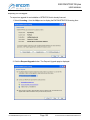
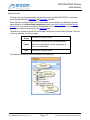
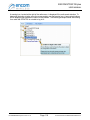
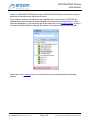
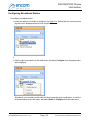
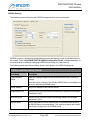
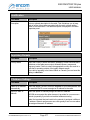
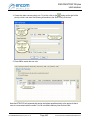
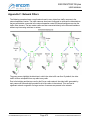
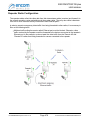
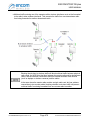
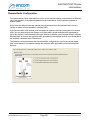
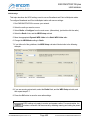
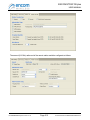
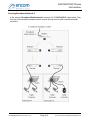
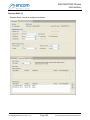
1
ENCOM STRATOS plus
USER MANUAL
For ENCOM STRATOS plus Version 2.1.71
Toll Free:
1-800-617-3487
Worldwide:
(403) 230-1122
Fax:
(403) 276-9575
Web:
www.encomwireless.com
© 2010-2015 Encom Wireless Data Solutions Inc.
ENCOM STRATOS plus
USER MANUAL
Table of Contents
11
Chapter 1: Introduction
ENCOM Radio
...................................................................................................................................
Network Overview
11
Broadband Radio
..........................................................................................................................................................
Netw ork
12
Point-to-Point..........................................................................................................................................................
Radio Netw ork
13
Mesh Radio Netw
..........................................................................................................................................................
ork
14
Point-to-Multipoint
..........................................................................................................................................................
Radio Netw ork
16
17
Chapter 2: Installation
System Requirements
................................................................................................................................... 17
Downloading...................................................................................................................................
STRATOS Software
17
Installing STRATOS
...................................................................................................................................
Software
18
Network Setup
................................................................................................................................... 21
Chapter 3: Connecting to a Radio
23
Powering the...................................................................................................................................
Radio
24
Connecting Directly
...................................................................................................................................
to Your Computer
25
Connecting Using
...................................................................................................................................
a Switch or Router
26
Chapter 4: Using ENCOM STRATOS
27
Running ENCOM
...................................................................................................................................
STRATOS
27
Radio Login ...................................................................................................................................
Form
28
User Interface
................................................................................................................................... 29
Custom izing the
..........................................................................................................................................................
User Interface
31
Resizing a.........................................................................................................................................................
Panel
32
Repositioning
.........................................................................................................................................................
a Panel
33
Menu Bar
.......................................................................................................................................................... 36
File Menu Commands
......................................................................................................................................................... 36
Change Login Credentials...
......................................................................................................................................... 36
Import -> Radio List
......................................................................................................................................... 37
Import -> Map Tiles
......................................................................................................................................... 39
Export -> Radio List
......................................................................................................................................... 41
Export -> Map Tiles
......................................................................................................................................... 42
Exit
......................................................................................................................................... 43
View Menu.........................................................................................................................................................
Commands
44
Panels
......................................................................................................................................... 44
Restore Original .........................................................................................................................................
Layout
45
Radio Menu
.........................................................................................................................................................
Commands
46
Configure
......................................................................................................................................... 46
Change Passw ord
......................................................................................................................................... 47
Add to Ping Test......................................................................................................................................... 48
RADIUS Monitor ......................................................................................................................................... 49
Terminal Connect......................................................................................................................................... 51
For ENCOM STRATOS plus Version 2.1.71
Page 3
© 2010-2015 Encom Wireless Data Solutions Inc.
ENCOM STRATOS plus
USER MANUAL
Terminal Disconnect
......................................................................................................................................... 51
Add
......................................................................................................................................... 52
Find
......................................................................................................................................... 53
Delete
......................................................................................................................................... 54
Assign Static IP Address
......................................................................................................................................... 55
Restore to Factory
.........................................................................................................................................
Defaults
57
Upgrade Firmw are
......................................................................................................................................... 59
Reboot
......................................................................................................................................... 61
Folder Menu
.........................................................................................................................................................
Commands
62
Rename
......................................................................................................................................... 62
Add Folder
......................................................................................................................................... 63
Delete
......................................................................................................................................... 63
Tools Menu.........................................................................................................................................................
Commands
64
System Settings ......................................................................................................................................... 64
Services - Discovery
................................................................................................................................... 66
Services - Monitoring
................................................................................................................................... 67
IP Address Conflict
...................................................................................................................................
Form
69
Recovering from...................................................................................................................................
an IP Address Conflict
70
User Interface - ...................................................................................................................................
General
71
User Interface - ...................................................................................................................................
RSSI Thresholds
74
User Interface - ...................................................................................................................................
CCQ Thresholds
76
Netw orking - Mail
...................................................................................................................................
Server
78
Netw orking - Proxy
...................................................................................................................................
Server
80
Notifications - Alerts
................................................................................................................................... 82
Notifications - Recipients
................................................................................................................................... 84
Miscellaneous - ...................................................................................................................................
Database
86
Status - Logging................................................................................................................................... 87
Status - Performance
................................................................................................................................... 89
Help Menu.........................................................................................................................................................
Commands
90
Help Topics
......................................................................................................................................... 90
Licensing
......................................................................................................................................... 91
Requesting a New
...................................................................................................................................
License
93
Activating a New...................................................................................................................................
License
95
Performing a Manual
...................................................................................................................................
Activation
99
Requesting a License
...................................................................................................................................
Upgrade
102
Upgrading an Existing
...................................................................................................................................
License
104
Performing a Manual
...................................................................................................................................
Upgrade
108
About...
......................................................................................................................................... 111
Panels
.......................................................................................................................................................... 112
Alerts Panel
......................................................................................................................................................... 112
Sorting the Alerts
.........................................................................................................................................
List
113
Alerts Panel Context
.........................................................................................................................................
Menu
113
Radio List.........................................................................................................................................................
Panel
114
Item Search Box......................................................................................................................................... 115
Display Type Tabs
......................................................................................................................................... 116
Radio Tree View
......................................................................................................................................... 117
Selecting Radios
......................................................................................................................................... 120
Selecting Single...................................................................................................................................
Radios
120
Selecting a Single
...................................................................................................................................
Folder
121
Selecting a Range
...................................................................................................................................
of Radios
122
Selecting Multiple
...................................................................................................................................
Radios
122
Selecting a Range
...................................................................................................................................
of Folders
123
Selecting Multiple
...................................................................................................................................
Folders
124
Moving Radios and
.........................................................................................................................................
Folders
125
For ENCOM STRATOS plus Version 2.1.71
Page 4
© 2010-2015 Encom Wireless Data Solutions Inc.
ENCOM STRATOS plus
USER MANUAL
Moving a Single...................................................................................................................................
Radio or Folder
125
Moving a group...................................................................................................................................
of Radios or Folders
125
Setting the location
.........................................................................................................................................
of a radio
126
Adding Radios to
.........................................................................................................................................
a Ping Test
128
Show ing and Hiding
.........................................................................................................................................
Radios on the Map
129
Radio List Context
.........................................................................................................................................
Menu
131
Map View.........................................................................................................................................................
Panel
132
Map Toolbar ......................................................................................................................................... 133
Map Display ......................................................................................................................................... 137
Map Popup Help
................................................................................................................................... 138
Panning and Zooming
................................................................................................................................... 138
Selecting a Radio
................................................................................................................................... 139
Map Context Menu
................................................................................................................................... 140
Setting the Location
...................................................................................................................................
of a Radio
141
Moving a Radio...................................................................................................................................
on the Map
142
Item Properties
.........................................................................................................................................................
Panel
143
Wireless .........................................................................................................................................................
Link Status Panel
144
Wireless Link Status
.........................................................................................................................................
Toolbar
145
Wireless Link Status
.........................................................................................................................................
Table
148
Wireless Link Status
.........................................................................................................................................
Bars
152
Wireless Link RSSI
.........................................................................................................................................
Colors
153
Wireless Link CCQ
.........................................................................................................................................
Colors
155
Sorting the Wireless
.........................................................................................................................................
Link Status List
156
Wireless Link Context
.........................................................................................................................................
Menu
156
Bandw ith.........................................................................................................................................................
Test Panel
157
Netw ork Traffic
.........................................................................................................................................................
Panel
161
Ping Test.........................................................................................................................................................
Panel
162
Carrying Out a Ping
.........................................................................................................................................
Test
164
Sorting the Ping.........................................................................................................................................
Test List
165
Ping Test Context
.........................................................................................................................................
Menu
165
Tasks Panel
......................................................................................................................................................... 166
Task List Context
.........................................................................................................................................
Menu
168
Spectrum.........................................................................................................................................................
Scan Panel
169
Terminal Panel
......................................................................................................................................................... 173
Terminal Toolbar
......................................................................................................................................... 174
Configuring...................................................................................................................................
Broadband Radios
175
Basic Settings
..........................................................................................................................................................
Tab
177
Location Tab.......................................................................................................................................................... 180
Radio Tab .......................................................................................................................................................... 183
Radio Settings
......................................................................................................................................................... 184
Master Radio Setup
......................................................................................................................................... 188
Repeater Radio.........................................................................................................................................
Setup
189
Remote Radio Setup
......................................................................................................................................... 191
WDS Setup
......................................................................................................................................................... 193
Wireless .........................................................................................................................................................
Security Settings
196
Static Security Settings
......................................................................................................................................... 198
Dynamic Security
.........................................................................................................................................
Settings
200
Netw ork Tab.......................................................................................................................................................... 203
Time Settings
......................................................................................................................................................... 204
Spanning.........................................................................................................................................................
Tree Protocol Settings
206
Netw ork Filter
.........................................................................................................................................................
Settings
208
DHCP Server
.........................................................................................................................................................
Settings
209
SNMP Settings
......................................................................................................................................................... 211
QoS Settings
......................................................................................................................................................... 213
For ENCOM STRATOS plus Version 2.1.71
Page 5
© 2010-2015 Encom Wireless Data Solutions Inc.
ENCOM STRATOS plus
USER MANUAL
Specifying a QoS
.........................................................................................................................................
Priority Rule
216
RADIUS Settings
......................................................................................................................................................... 219
VLAN Settings
......................................................................................................................................................... 221
About Tab .......................................................................................................................................................... 224
Export and Im
..........................................................................................................................................................
port Buttons
225
Exporting.........................................................................................................................................................
the Radio Configuration
226
Importing .........................................................................................................................................................
the Radio Configuration
227
Configuring...................................................................................................................................
Point-to-Point Radios
230
Basic Settings
..........................................................................................................................................................
Tab
232
Location Tab.......................................................................................................................................................... 235
Radio Tab .......................................................................................................................................................... 238
Radio Settings
......................................................................................................................................................... 239
Wireless .........................................................................................................................................................
'N' Settings
242
Wireless .........................................................................................................................................................
Security Settings
243
Static Security Settings
......................................................................................................................................... 245
Dynamic Security
.........................................................................................................................................
Settings
247
Netw ork Tab.......................................................................................................................................................... 250
Time Settings
......................................................................................................................................................... 251
DHCP Server
.........................................................................................................................................................
Settings
253
SNMP Settings
......................................................................................................................................................... 255
QoS Settings
......................................................................................................................................................... 257
Specifying a QoS
.........................................................................................................................................
Priority Rule
260
RADIUS Settings
......................................................................................................................................................... 263
VLAN Settings
......................................................................................................................................................... 265
About Tab .......................................................................................................................................................... 268
Export and Im
..........................................................................................................................................................
port Buttons
269
Exporting.........................................................................................................................................................
the Radio Configuration
270
Importing .........................................................................................................................................................
the Radio Configuration
271
Configuring...................................................................................................................................
Mesh Radios
274
Basic Settings
..........................................................................................................................................................
Tab
276
Location Tab.......................................................................................................................................................... 279
Radio Tab .......................................................................................................................................................... 282
Radio Settings
......................................................................................................................................................... 283
MAC Access
.........................................................................................................................................................
Settings
286
Wireless .........................................................................................................................................................
'N' Settings
289
Wireless .........................................................................................................................................................
Security Settings
290
Static Security Settings
......................................................................................................................................... 292
Dynamic Security
.........................................................................................................................................
Settings
294
Netw ork Tab.......................................................................................................................................................... 297
Time Settings
......................................................................................................................................................... 298
DHCP Server
.........................................................................................................................................................
Settings
300
SNMP Settings
......................................................................................................................................................... 302
Encom Mesh
.........................................................................................................................................................
Protocol Settings
304
QoS Settings
......................................................................................................................................................... 305
Specifying a QoS
.........................................................................................................................................
Priority Rule
308
RADIUS Settings
......................................................................................................................................................... 311
VLAN Settings
......................................................................................................................................................... 313
About Tab .......................................................................................................................................................... 316
Export and Im
..........................................................................................................................................................
port Buttons
317
Exporting.........................................................................................................................................................
the Radio Configuration
318
Importing .........................................................................................................................................................
the Radio Configuration
319
Configuring...................................................................................................................................
Point-to-Multipoint Radios
322
Basic Settings
..........................................................................................................................................................
Tab
324
For ENCOM STRATOS plus Version 2.1.71
Page 6
© 2010-2015 Encom Wireless Data Solutions Inc.
ENCOM STRATOS plus
USER MANUAL
Location Tab.......................................................................................................................................................... 327
Radio Tab .......................................................................................................................................................... 330
Radio Settings
.........................................................................................................................................................
(N Cards)
331
Master Radio Setup
.........................................................................................................................................
(N Cards)
336
Repeater Radio.........................................................................................................................................
Setup (N Cards)
337
Remote Radio Setup
.........................................................................................................................................
(N Cards)
339
Radio Settings
.........................................................................................................................................................
(A and B/G Cards)
341
Master Radio Setup
.........................................................................................................................................
(A and B/G Cards)
345
Repeater Radio.........................................................................................................................................
Setup (A and B/G Cards)
346
Remote Radio Setup
.........................................................................................................................................
(A and B/G Cards)
348
WDS Setup
......................................................................................................................................................... 350
Wireless .........................................................................................................................................................
'N' Settings
353
Wireless .........................................................................................................................................................
Security Settings (N Mode)
354
Dynamic Security
.........................................................................................................................................
Settings (N Mode)
356
Wireless .........................................................................................................................................................
Security Settings (A and B/G Modes)
357
Static Security Settings
.........................................................................................................................................
(A and B/G Modes)
359
Dynamic Security
.........................................................................................................................................
Settings A and B/G Modes)
361
Netw ork Tab.......................................................................................................................................................... 364
Time Settings
......................................................................................................................................................... 365
Spanning.........................................................................................................................................................
Tree Protocol Settings
367
Netw ork Filter
.........................................................................................................................................................
Settings
369
DHCP Server
.........................................................................................................................................................
Settings
370
SNMP Settings
......................................................................................................................................................... 372
QoS Settings
......................................................................................................................................................... 374
Specifying a QoS
.........................................................................................................................................
Priority Rule
377
RADIUS Settings
......................................................................................................................................................... 380
VLAN Settings
......................................................................................................................................................... 382
About Tab .......................................................................................................................................................... 385
Export and Im
..........................................................................................................................................................
port Buttons
386
Exporting.........................................................................................................................................................
the Radio Configuration
387
Importing .........................................................................................................................................................
the Radio Configuration
388
Chapter 5: Setting up a Broadband Network
392
Assigning IP...................................................................................................................................
Addresses
393
Setting up the
...................................................................................................................................
Master Radio
394
Setting up the
...................................................................................................................................
Remote Radio
395
Testing the ...................................................................................................................................
Wireless Connection
396
Deploying the
...................................................................................................................................
Radios
397
Optimizing to
...................................................................................................................................
Minimize Noise Interference
399
402
Appendix A: RF Exposure
FCC
................................................................................................................................... 402
Health Canada
................................................................................................................................... 402
Appendix B: Declaration of Conformity
FCC
404
................................................................................................................................... 404
Warning (Part
...................................................................................................................................
15.21)
404
Industry Canada
................................................................................................................................... 404
For ENCOM STRATOS plus Version 2.1.71
Page 7
© 2010-2015 Encom Wireless Data Solutions Inc.
ENCOM STRATOS plus
USER MANUAL
Appendix C: Spanning Tree Protocol
406
Selecting the
...................................................................................................................................
STP Preferred Root
409
STP / RSTP...................................................................................................................................
Network Considerations
412
Appendix D: Quality of Service (QoS)
414
QoS Recommentation
...................................................................................................................................
Matrix
418
Using Priority
...................................................................................................................................
Queues to Ensure Access to Radios
419
Using WMM...................................................................................................................................
to Simplify Radio Configuration
422
Master and Rem
..........................................................................................................................................................
ote Radio Configuration
424
Repeater Radio
..........................................................................................................................................................
Configuration
426
Using WMM...................................................................................................................................
to Improve Video Traffic
427
Master and Rem
..........................................................................................................................................................
ote Radio Configuration
429
Repeater Radio
..........................................................................................................................................................
Configuration
432
Using DSCP...................................................................................................................................
to Simplify Radio Configuration
433
Master and Rem
..........................................................................................................................................................
ote Radio Configuration
435
Repeater Radio
..........................................................................................................................................................
Configuration
438
Using DSCP...................................................................................................................................
and WMM to Improve Video Traffic
439
Master and Rem
..........................................................................................................................................................
ote Radio Configuration
441
Repeater Radio
..........................................................................................................................................................
Configuration
444
Using WMM...................................................................................................................................
to Support VLAN Priority Traffic
445
448
Appendix E: VLAN Support
VLAN Components
................................................................................................................................... 448
Example VLAN
...................................................................................................................................
Setup
450
ENCOM Radio
...................................................................................................................................
VLAN Support
452
Specifying a ..........................................................................................................................................................
Managem ent VLAN
453
Client Tagging
.......................................................................................................................................................... 454
Client Tagging
..........................................................................................................................................................
w ith a Managem ent VLAN
456
Pruning VLANs
.......................................................................................................................................................... 458
VLAN Pruning
.........................................................................................................................................................
for Performance
459
VLAN Pruning
.........................................................................................................................................................
for Security
460
Detailed VLAN
...................................................................................................................................
Configuration Example
462
VLAN Enabled
..........................................................................................................................................................
Sw itch #1 Configuration
464
Radio 1 VLAN
..........................................................................................................................................................
Configuration
465
Radio 2 VLAN
..........................................................................................................................................................
Configuration
466
Radio 3 VLAN
..........................................................................................................................................................
Configuration
467
Radio 4 VLAN
..........................................................................................................................................................
Configuration
468
Radio 5 VLAN
..........................................................................................................................................................
Configuration
469
VLAN Enabled
..........................................................................................................................................................
Sw itch #2 Configuration
470
472
Appendix F: Network Filters
Master Radio
...................................................................................................................................
Configuration
475
Repeater Radio
...................................................................................................................................
Configuration
478
Remote Radio
...................................................................................................................................
Configuration
481
For ENCOM STRATOS plus Version 2.1.71
Page 8
© 2010-2015 Encom Wireless Data Solutions Inc.
ENCOM STRATOS plus
USER MANUAL
Appendix G: Securing Your Wireless
Network
482
General Security
...................................................................................................................................
Considerations
482
Set the Adm..........................................................................................................................................................
inistrative Passw ord
483
Secure Radio..........................................................................................................................................................
Configuration Settings
484
Broadband
.........................................................................................................................................................
and Point-to-Multipoint radios
484
Radio Settings (N
.........................................................................................................................................
Cards)
484
Radio Settings (A
.........................................................................................................................................
and B/G Cards)
487
WDS Settings ......................................................................................................................................... 490
Wireless Security
.........................................................................................................................................
Settings (N Cards)
492
Wireless Security
.........................................................................................................................................
Settings (A and B/G Cards)
496
Mesh radios
......................................................................................................................................................... 498
Radio Settings (Mesh
.........................................................................................................................................
Radios)
498
MAC Access Settings
......................................................................................................................................... 501
Wireless Security
.........................................................................................................................................
Settings
502
Detailed Security
...................................................................................................................................
Example
504
Securing Broadband
..........................................................................................................................................................
Netw ork 1
506
Master Radio
.........................................................................................................................................................
(1)
508
Remote Radios
.........................................................................................................................................................
(2, 3 and 4)
511
Securing Broadband
..........................................................................................................................................................
Netw ork 2
514
Master Radio
.........................................................................................................................................................
(5)
516
Pepeater .........................................................................................................................................................
Radio (6)
518
Repeater .........................................................................................................................................................
Radio (7)
520
Remote Radio
.........................................................................................................................................................
(8)
522
Remote Radio
.........................................................................................................................................................
(9)
524
Adding Security
...................................................................................................................................
to an Existing Network
526
Prerequisites
..........................................................................................................................................................
(Netw ork Diagram )
527
Security Update
..........................................................................................................................................................
Order
529
Incorrect .........................................................................................................................................................
Update Order
530
Correct Update
.........................................................................................................................................................
Order
531
Update Order
.........................................................................................................................................................
Example
533
Securing the..........................................................................................................................................................
Netw ork
534
Configuring
.........................................................................................................................................................
WPA2 Wireless Encryption
534
Assigning.........................................................................................................................................................
a Secure Passw ord
536
For ENCOM STRATOS plus Version 2.1.71
Page 9
© 2010-2015 Encom Wireless Data Solutions Inc.
ENCOM STRATOS plus
USER MANUAL
Chapter 1: Introduction
This guide describes the operation of the ENCOM STRATOS Network Visualization and
Management System. ENCOM STRATOS is a Microsoft Windows based application that is used to
manage ENCOM broadband, point-to-point and mesh radios.
With ENCOM STRATOS, you can:
Manage your ENCOM radios with a friendly user interface
Remotely and configure your ENCOM radios
View and optimize your wireless network performance
Diagnose network and communication issues
This guide contains instructions, suggestions and information that will help you set up your radios
and achieve optimal performance from your equipment.
ENCOM Radio Network Overview
ENCOM provides four distinct types of radios. These are:
Standard broadband radios
Point-to-point high-capacity radios
Mesh radios
Point-to-Multipoint radios
Although each type of radio is targeted at a particular application, they are flexible enough to be used
in other roles if required. Click on the appropriate link for more information on a specific radio type.
For ENCOM STRATOS plus Version 2.1.71
Page 11
© 2010-2015 Encom Wireless Data Solutions Inc.
ENCOM STRATOS plus
USER MANUAL
Broadband Radio Network
A broadband network consists of a single master radio that is connected to your private network,
and one or more remote radios. The master radio handles the communication between the devices
connected to the remote radios and the monitoring and control software installed in your network
operations center. If the network has to span long distances, one or more repeaters are used to
connect the master to the remote radios.
The following diagram shows a typical broadband radio network:
For information on configuring ENCOM broadband radios, refer to the following topic:
Configuring Broadband Radios
For ENCOM STRATOS plus Version 2.1.71
Page 12
© 2010-2015 Encom Wireless Data Solutions Inc.
ENCOM STRATOS plus
USER MANUAL
Point-to-Point Radio Network
A point-to-point network provides a long-distance, high-speed, backhaul for communications
between the devices connected to the remote radios and the monitoring and control software
installed in your network operations center.
The following diagram shows a typical broadband radio network:
For information on configuring ENCOM point-to-point radios, refer to the following topic:
Configuring Point-to-Point Radios
For ENCOM STRATOS plus Version 2.1.71
Page 13
© 2010-2015 Encom Wireless Data Solutions Inc.
ENCOM STRATOS plus
USER MANUAL
Mesh Radio Network
A mesh radio network consists of an arbitrary number of radios that can automatically manage their
communication links. The main advantages of a mesh network, as opposed to the more traditional
forms, are as follows:
The network is self-forming (links are automatically formed between radios).
The network is self-healing (if a radio fails, the remaining radios automatically reconfigure
themselves to route packets around the failed radio).
Routing algorithms in the radios automatically select the best path to use for routing packets.
ENCOM mesh radios provide a flexible solution for implementing mesh radios. In particular:
You can specify whether the radios are used solely for meshing, for client access only, or
both.
Different antennas can be used based on the network design and communication
requirements.
The system can support multiple gateways (this provides redundancy for the wired link to your
network operations center).
Simplified configuration using the ENCOM STRATOS application.
Secure communication using the latest WPA and WPA2 encryption technologies.
For ENCOM STRATOS plus Version 2.1.71
Page 14
© 2010-2015 Encom Wireless Data Solutions Inc.
ENCOM STRATOS plus
USER MANUAL
The following diagram shows a mesh radio network that is based on dual-radio nodes:
In this example:
The first radio (shown in green) of each node is used for the mesh.
The second radio (shown in red) of each node is used for local client access.
Two radios (shown in blue) are wired to the private network to provide redundant access to
the network.
Note: This example shows a simple mesh scenario. Other topologies, some that are simpler, and
some that are more complicated, are supported.
For information on configuring ENCOM point-to-point radios, refer to the following topic:
Configuring Mesh Radios
For ENCOM STRATOS plus Version 2.1.71
Page 15
© 2010-2015 Encom Wireless Data Solutions Inc.
ENCOM STRATOS plus
USER MANUAL
Point-to-Multipoint Radio Network
A point-to-multipoint network consists of a single master radio that is connected to your private
network, and one or more remote radios. The master radio handles the communication between the
devices connected to the remote radios and the monitoring and control software installed in your
network operations center. The range of the network can be extended by using dual point-tomultipoint radios, or two single point-to-multipoint radios connected back-to-back via their Ethernet
interfaces.
The following diagram shows a typical point-to-multipoint radio network:
For information on configuring ENCOM point-to-multipoint radios, refer to the following topic:
Configuring Point-to-Multipoint Radios
For ENCOM STRATOS plus Version 2.1.71
Page 16
© 2010-2015 Encom Wireless Data Solutions Inc.
ENCOM STRATOS plus
USER MANUAL
Chapter 2: Installation
System Requirements
ENCOM STRATOS was created to run on a wide variety of computers, from netbooks that can be
used by field personnel to high-powered, multi-monitor workstations used in the network operations
center.
In order to run ENCOM STRATOS, your computer must meet the following minimum requirements:
Windows XP SP3, Vista, Windows 7 or Windows 8 operating system
Microsoft .Net Framework 4.0 (full version, not the client profile)
1 GB RAM
1 GB free hard drive space
Video card with a minimum 1024 x 600 resolution
Downloading STRATOS Software
ENCOM STRATOS is available for download from the ENCOM Wireless website. To download
ENCOM STRATOS:
1. Go to the ENCOM STRATOS web page. It can be found at:
http://www.encomwireless.com/stratos
2. Click on the 'Download STRATOS' link.
3. Enter the appropriate information in the registration page, and press the Send button to
request your copy of ENCOM STRATOS.
4. An email with a download link will be sent to the email address you specified in the registration
page.
If you have trouble downloading or installing STRATOS, please contact ENCOM technical support,
using any of the following options:
Email:
[email protected]
Phone:
800-617-3487
403-230-1122
Fax:
403-276-9575
For ENCOM STRATOS plus Version 2.1.71
Page 17
© 2010-2015 Encom Wireless Data Solutions Inc.
ENCOM STRATOS plus
USER MANUAL
Installing STRATOS Software
Although ENCOM STRATOS will run under a standard user account, you will need
administrator privileges to install the application. Please contact your IT department
if you are unable to install STRATOS due to account restrictions.
After downloading STRATOS from the ENCOM website:
1. Double click the EncomStratos Vx.x.x.msi file to start the installation process (where x.x.x is
the STRATOS version number).
2. The ENCOM STRATOS Setup Wizard will appear and will guide you through the installation
of the application to your computer
Press the Next button to proceed.
For ENCOM STRATOS plus Version 2.1.71
Page 18
© 2010-2015 Encom Wireless Data Solutions Inc.
ENCOM STRATOS plus
USER MANUAL
3. Select the folder on your computer where you would like ENCOM STRATOS to be installed.
You can also instruct the setup wizard to install STRATOS for all users or the currently
logged in user. Note that in both cases, you still need to have administrator privileges in order
to successfully install the application.
Press the Next button to proceed.
4. Check the desired shortcut options. Note that a shortcut will always be created under
Programs -> Encom -> Stratos in the Windows Start menu.
Press the Next button to proceed.
For ENCOM STRATOS plus Version 2.1.71
Page 19
© 2010-2015 Encom Wireless Data Solutions Inc.
ENCOM STRATOS plus
USER MANUAL
5. The final confirmation page is shown.
Press the Next button to proceed.
6. ENCOM STRATOS will be installed on your computer.
Enter the appropriate administrator account credentials if you are prompted to do so.
7. When the installation has completed, press the Close button to exit the installation wizard.
8. ENCOM STRATOS is now installed on your computer.
For ENCOM STRATOS plus Version 2.1.71
Page 20
© 2010-2015 Encom Wireless Data Solutions Inc.
ENCOM STRATOS plus
USER MANUAL
Network Setup
ENCOM STRATOS makes use of certain network services to carry out its configuration and
management tasks. Because of this, you must configure your network's firewalls and routers to
allow access to these services.
In particular, the following ports must be opened between the radios and the computer on which
ENCOM STRATOS is running:
Service
Protocol
Port
ICMP (Ping)
Not Applicable
Not Applicable
FTP
TCP
20, 21
SSH
TCP
22
ENCOM Mesh Interface
UDP
1966
ENCOM Mesh Interface
TCP
1968
ENCOM Radio Heartbeat
UDP
5678
ENCOM Radio Interface
TCP
8291
ENCOM Radio Interface
TCP
8728
ENCOM Radio Interface
UDP
20561
ENCOM Radio Heartbeat packets are broadcast packets. Because of
this, they are not able to pass through routers or firewalls.
This means that the STRATOS automatic radio discovery feature may
not work if a router or firewall is present between the computer running
STRATOS and the radios. In this case, you need to use the Add or Find
radio functions to manually add the radios to the radio list.
For ENCOM STRATOS plus Version 2.1.71
Page 21
© 2010-2015 Encom Wireless Data Solutions Inc.
ENCOM STRATOS plus
USER MANUAL
For ENCOM STRATOS plus Version 2.1.71
Page 22
© 2010-2015 Encom Wireless Data Solutions Inc.
ENCOM STRATOS plus
USER MANUAL
Chapter 3: Connecting to a Radio
In order to communicate with a radio, ENCOM STRATOS needs either:
A direct connection to the radio's ethernet port.
A direct connection to the ethernet port of a master or gateway radio that has a wireless
connection to the radio you want to connect to.
The following topics describe how to set up a direct connection to the radio:
Powering the Radio
Connecting Directly to Your Computer
Connecting Using a Switch or Router
For ENCOM STRATOS plus Version 2.1.71
Page 23
© 2010-2015 Encom Wireless Data Solutions Inc.
ENCOM STRATOS plus
USER MANUAL
Powering the Radio
ENCOM radios are powered by a Power-over-Ethernet (PoE) Injector. Power-over-Ethernet
technology provides the ethernet communications and the radio power over a single, standard
Ethernet cable. A typical PoE injector is shown below::
PoE Injectors typically contain 3 sockets:
A standard power cable socket.
An RJ-45 style Ethernet socket.
An RJ-45 style PoE socket.
Connect one end of the power cable into the PoE injector and the other into a 120 VAC power
source. An LED will illuminate when the PoE injector receives power.
If you are connecting the radio directly to your computer, use an Ethernet crossover cable to
connect your computer to the Ethernet socket on the PoE injector. If you are connecting the radio to
your network, use a standard Ethernet cable to connect your network router or switch to the
Ethernet socket on the PoE Injector.
Finally, use a standard Ethernet cable to connect the radio's Ethernet port to the PoE socket on the
PoE Injector.
The PoE socket is normally (but not always) marked with a warning label.
Never plug a network cable that connects directly to your network or computer into
the PoE socket. Doing this could damage your computer or network device.
When installing a radio in the field, the PoE Injector must be installed inside of a
cabinet or building to protect it from the weather.
For ENCOM STRATOS plus Version 2.1.71
Page 24
© 2010-2015 Encom Wireless Data Solutions Inc.
ENCOM STRATOS plus
USER MANUAL
Connecting Directly to Your Computer
When provisioning a new radio, or working on a radio in the field, you will need to connect the radio
directly to your computer.
The following diagram shows a typical direct connection to the radio:
In this scenario, the computer is connected to the Ethernet port of a Power-over-Ethernet (PoE)
injector using an Ethernet crossover cable.
A standard Ethernet cable is used to connect the radio to the PoE injector.
For ENCOM STRATOS plus Version 2.1.71
Page 25
© 2010-2015 Encom Wireless Data Solutions Inc.
ENCOM STRATOS plus
USER MANUAL
Connecting Using a Switch or Router
If you have access to an Ethernet switch, you can set up the connection to the radio using the
switch. This removes the need for an Ethernet crossover cable.
The same type of connection is also used if the radio has been deployed and is already connected
to your network infrastructure.
The following diagram shows a typical connection using a switch (a router could also be used):
In this scenario, the computer and the PoE injector are connected to the switch using standard
Ethernet cables.
A standard Ethernet cable is used to connect the radio to the PoE injector.
For ENCOM STRATOS plus Version 2.1.71
Page 26
© 2010-2015 Encom Wireless Data Solutions Inc.
ENCOM STRATOS plus
USER MANUAL
Chapter 4: Using ENCOM STRATOS
Running ENCOM STRATOS
You can run ENCOM STRATOS using any of the following methods
Select Programs -> Encom -> Stratos -> Stratos from the Windows Start menu
If you requested that a STRATOS shortcut be installed on your desktop, you can start
STRATOS by double-clicking the desktop icon:
If you requested that a STRATOS shortcut be installed in the QuickLaunch panel, you can start
STRATOS by clicking on the QuickLaunch icon:
For ENCOM STRATOS plus Version 2.1.71
Page 27
© 2010-2015 Encom Wireless Data Solutions Inc.
ENCOM STRATOS plus
USER MANUAL
Radio Login Form
When you run ENCOM STRATOS, you will be presented with the Radio Login Credentials form:
Enter the user name and password used to login to your radios. This information will be used by
STRATOS whenever it needs to access the radios. If the user names or passwords differ from
radio to radio, you will be prompted to enter the individual radio's login credentials when required.
By default, the User Name is admin and the Password field is left blank.
Press the Login button to accept the login credentials and log into STRATOS.
For ENCOM STRATOS plus Version 2.1.71
Page 28
© 2010-2015 Encom Wireless Data Solutions Inc.
ENCOM STRATOS plus
USER MANUAL
User Interface
The following screen shot shows the main window of a typical ENCOM STRATOS session:
The main features of the STRATOS user interface include:
A Menu Bar at the top of the window that allows you to access most of the application's
features.
A Radio List panel that contains the list of ENCOM radios available in your network.
A Map View panel that shows the physical locations of your radios on a map.
An Item Properties panel that displays important information on the folder or radio that is
currently selected in the radio list.
A Wireless Link Status panel that displays the state of the Wireless links of the radio that is
currently selected in the radio list.
A Bandwidth Test panel that allows you to carry out performance tests against the radio that is
currently selected in the radio list.
A Network Traffic panel that allows you to visualize the traffic on the wired and wireless links of
the radio that is currently selected in the radio list.
A Ping Test panel that allows you to perform ping latency tests on selected radios.
A Spectrum Scan panel that shows a profile of the wireless activity within the vicinity of the
radio that is currently selected in the radio list.
For ENCOM STRATOS plus Version 2.1.71
Page 29
© 2010-2015 Encom Wireless Data Solutions Inc.
ENCOM STRATOS plus
USER MANUAL
A Task List panel that displays the status of long running tasks.
An Alerts panel that displays the various alarm messages that can be generated by
STRATOS.
A Terminal panel that allows you to interact with the radio that is currently selected using a
text-based terminal interface.
For ENCOM STRATOS plus Version 2.1.71
Page 30
© 2010-2015 Encom Wireless Data Solutions Inc.
ENCOM STRATOS plus
USER MANUAL
Customizing the User Interface
The ENCOM STRATOS user interface consists of panels that can be resized and repositioned
independently. This gives you the maximum flexibility to arrange the user interface to suit your
needs. The size and location of each panel is saved when the application is shut down and
automatically restored when you run the application again.
A common scenario is to run ENCOM STRATOS on a dual display workstation. The Map View
panel can be detached from the main window and expanded to fit the second display. The
remaining panels are left in the main window, but are arranged to make maximum use of the
display. The following screen shots show an example of this arrangement:
STRATOS main window on first monitor
For ENCOM STRATOS plus Version 2.1.71
Page 31
STRATOS Map View on second monitor
© 2010-2015 Encom Wireless Data Solutions Inc.
ENCOM STRATOS plus
USER MANUAL
Resizing a Panel
To resize a panel:
1. Position the mouse pointer in the space between two panels. Depending on the location of the
two panels, the mouse pointer will turn into a vertical or horizontal resize cursor.
2. Click and hold down the mouse button, and then drag the mouse in the desired direction.
3. The panel on either side of the mouse pointer will be resized accordingly.
For ENCOM STRATOS plus Version 2.1.71
Page 32
© 2010-2015 Encom Wireless Data Solutions Inc.
ENCOM STRATOS plus
USER MANUAL
Repositioning a Panel
To reposition a panel:
1. Select the panel by clicking and holding down the left mouse button on the panel's title bar.
If the panel is currently part of a tabbed group, click and hold the left mouse button on the
panel's tab.
2. Drag the panel with the mouse. This action will detach the window’s panel from its current
location and allow you to select a new location for the panel. When you have moved the panel
to its desired location, release the mouse button.
For ENCOM STRATOS plus Version 2.1.71
Page 33
© 2010-2015 Encom Wireless Data Solutions Inc.
ENCOM STRATOS plus
USER MANUAL
3. While you are dragging the panel, drop targets are displayed in the STRATOS main window.
4. If you move the mouse pointer over a drop target, a gray overlay is displayed that shows the
new position of the panel.
For ENCOM STRATOS plus Version 2.1.71
Page 34
© 2010-2015 Encom Wireless Data Solutions Inc.
ENCOM STRATOS plus
USER MANUAL
5. The drop targets close to the edges of the STRATOS main window (shown below) will cause
the panel to be docked at the edge of the main window.
6. The drop targets that are clustered together (shown below) will cause the panel to be docked
inside of the panel on which the mouse window is hovering.
7. If you release the mouse button when the mouse pointer is not hovering over a drop target,
the panel will be left floating. You can move a floating panel to any location inside or outside of
the main window.
For ENCOM STRATOS plus Version 2.1.71
Page 35
© 2010-2015 Encom Wireless Data Solutions Inc.
ENCOM STRATOS plus
USER MANUAL
Menu Bar
The main menu bar provides access to most of the ENCOM STRATOS functions. Many of these
functions can also be accessed by context sensitive menus that are available in the various user
interface panels.
File Menu Commands
Change Login Credentials...
When you run ENCOM STRATOS, you are prompted for the radios' login credentials. The
credentials are used by STRATOS whenever it needs to access the radios.
If you entered the wrong information, STRATOS will not be able to log into the radios, and will
prompt you for the credentials when required. To address this situation, you can either:
Close down STRATOS and run it again, entering the correct credentials when prompted.
Select the Change Login Credentials... item from the File menu and enter the correct
credentials at the prompt. This option is useful if you don't want to shut down the application.
When you select the Change Login Credentials... menu item, the Radio Login Credentials form
is shown:
Enter the appropriate login credentials, and then click the Login button to accept them. STRATOS
will now use the new credentials when it tries to login to the radios.
For ENCOM STRATOS plus Version 2.1.71
Page 36
© 2010-2015 Encom Wireless Data Solutions Inc.
ENCOM STRATOS plus
USER MANUAL
Import -> Radio List
Select Import -> Radio List from the File menu to replace the contents of the radio list panel with
the contents of a previously saved radio list database file. (Use the Export Radio List function to
create such a database file.)
This function is useful in cases where you want to restore the radio list from a backup copy or
transfer radio information from one workstation to another.
To import a radio list database:
1. Select Import -> Radio List from the File menu. You will be prompted to open a radio
database file:
2. Select the file that contains the radio list you want to import, and then press the Open button.
3. STRATOS will check the file you selected to ensure that it contains a valid radio list database.
If the file is not valid, the following prompt is displayed:
4. If you selected a valid radio list database file, the contents of the radio list panel will be
replaced with the contents of the selected database file.
For ENCOM STRATOS plus Version 2.1.71
Page 37
© 2010-2015 Encom Wireless Data Solutions Inc.
ENCOM STRATOS plus
USER MANUAL
Starting with ENCOM STRATOS V1.3.0, radio list databases are identified with the .
sdf file extension. Previous versions of STRATOS used the .s3db file extension.
For ENCOM STRATOS plus Version 2.1.71
Page 38
© 2010-2015 Encom Wireless Data Solutions Inc.
ENCOM STRATOS plus
USER MANUAL
Import -> Map Tiles
Select Import -> Map Tiles from the File menu to add the contents of a previously saved map tile
database to the local map tile cache. (Use the Export Map Tiles function to create such a database
file.)
This function is useful in cases where you want to use STRATOS on a computer that does not have
Internet access. Simply export the map tiles from a workstation that has access to on-line maps,
and import them into the computer that does not have Internet access. That way, you will have
access to those sections of the map that have been cached.
To import a map tile database:
1. Select Import -> Map Tiles from the File menu. You will be prompted to open a map tile
database file:
2. Select the file that contains the map tiles you want to import, and then press the Open
button.
3. STRATOS will check the file you selected to ensure that it contains a valid map tile database.
If the file is not valid, the following prompt is displayed:
For ENCOM STRATOS plus Version 2.1.71
Page 39
© 2010-2015 Encom Wireless Data Solutions Inc.
ENCOM STRATOS plus
USER MANUAL
4. If you selected a valid map tile database file, the Task List panel will be activated and shown if
it was hidden.
5. A new task will be added to the task list. It will show the progress of the import function:
6. If the import is successful, the computer's map tile database will have been updated. The task
item will indicate that the map tiles have been successfully imported:
Starting with ENCOM STRATOS V1.4.0, map tile databases are identified with the .
gmdb file extension. Previous versions of STRATOS used the .s3db file extension.
The .s3db map tile databases are no longer compatible with ENCOM STRATOS,
and attempts to import these files will fail.
For ENCOM STRATOS plus Version 2.1.71
Page 40
© 2010-2015 Encom Wireless Data Solutions Inc.
ENCOM STRATOS plus
USER MANUAL
Export -> Radio List
Select Export -> Radio List from the File menu to save the current radio information to a database
file. The following information is saved:
The radios displayed in the radio list panel.
The folder structure of the radio list panel.
Last known configuration settings of all radios displayed in the radio list panel.
This function is useful for making backups of the current radio network state. Use the Import Radio
List function to restore the radio information from a saved database file.
To export the radio information:
1. Select Export -> Radio List from the File menu. You will be prompted to save the radio
database file:
2. Enter the name of the export file in the File name field, and then press the Save button.
Starting with ENCOM STRATOS V1.3.0, radio list databases are identified with the .
sdf file extension. Previous versions of STRATOS used the .s3db file extension.
For ENCOM STRATOS plus Version 2.1.71
Page 41
© 2010-2015 Encom Wireless Data Solutions Inc.
ENCOM STRATOS plus
USER MANUAL
Export -> Map Tiles
Select Export -> Map Tiles from the File menu to save the currently cached map tiles to a
database file.
This function is useful in cases where you want to use STRATOS on a computer that does not have
Internet access. Simply export the map tiles from a workstation that has access to on-line maps,
and import them into the computer that does not have Internet access. That way, you will have
access to those sections of the map that have been cached. Use the Import Radio List function to
load the map tiles from a saved database file.
To export the cached map tiles:
1. Select Export -> Map Tiles from the File menu. You will be prompted to save the radio
database file:
2. Enter the name of the export file in the File name field, and then press the Save button.
3. The Task List panel will be activated and shown if it was hidden.
4. A new task will be added to the task list. It will show the progress of the export function:
For ENCOM STRATOS plus Version 2.1.71
Page 42
© 2010-2015 Encom Wireless Data Solutions Inc.
ENCOM STRATOS plus
USER MANUAL
5. If the export is successful, the task item will indicate that the map tile database has been
successfully saved:
Starting with ENCOM STRATOS V1.4.0, map tile databases are identified with the .
gmdb file extension. Previous versions of STRATOS used the .s3db file extension.
The .s3db map tile databases are no longer compatible with ENCOM STRATOS,
and attempts to import these files will fail.
Exit
Select Exit from the File menu to shut down ENCOM STRATOS.
For ENCOM STRATOS plus Version 2.1.71
Page 43
© 2010-2015 Encom Wireless Data Solutions Inc.
ENCOM STRATOS plus
USER MANUAL
View Menu Commands
Panels
Selecting Panels from the View menu displays the list of available user interface panels.
Selecting an item that is checked will hide the associated panel. Conversely, selecting an item that
is not checked will show the associated panel.
The Alerts panel is normally hidden. It is automatically displayed when an alert is generated by
STRATOS. See the System Settings form's Alerts topic for a list of alerts that can be generated by
STRATOS.
The Task List panel is normally hidden. It is automatically displayed when you use a function that
triggers a long running task (such as the Restore to Factory Default or Upgrade Firmware
functions). These tasks run in the background, and display their progress in the task list.
For ENCOM STRATOS plus Version 2.1.71
Page 44
© 2010-2015 Encom Wireless Data Solutions Inc.
ENCOM STRATOS plus
USER MANUAL
Restore Original Layout
Select Restore Original Layout from the View menu to reset the user interface panels to their
original locations and sizes.
This function is useful if you have moved and hidden panels, and you no longer find the layout
useable. All but the task panel will be made visible. The panels will be laid out as follows:
For ENCOM STRATOS plus Version 2.1.71
Page 45
© 2010-2015 Encom Wireless Data Solutions Inc.
ENCOM STRATOS plus
USER MANUAL
Radio Menu Commands
Configure
Select Configure from the Radio menu to display the radio's configuration form.
If the radio is currently on-line, STRATOS will:
Log into the radio
Get the radio's current configuration
Display the radio's current configuration in the radio configuration form
If the radio is not currently on-line, STRATOS will:
Inform you that the radio is off-line
Prompt you to view the radio's last know configuration
Display the radio's last known configuration in the radio configuration form (you will not be able
to make changes to the settings)
The broadband, mesh, point-to-point and point-to-multipoint radios have very different configuration
settings. Because of this, a separate configuration section is provided for each radio type. Refer to
the appropriate section for more information:
Configuring Broadband Radios
Configuring Point-to-Point Radios
Configuring Mesh Radios
Configuring Point-to-Multipoint Radios
For ENCOM STRATOS plus Version 2.1.71
Page 46
© 2010-2015 Encom Wireless Data Solutions Inc.
ENCOM STRATOS plus
USER MANUAL
Change Password
Select Change Password from the Radio menu to change the radio's current login password.
When then Change Password menu item is selected, the Change Password form is displayed:
Enter the new password in the New Password and Confirm Password fields, and press OK to
proceed.
A wait form will be displayed while the radio's login password is changed:
After the password has been successfully changed, the Change Password form is automatically
closed.
For ENCOM STRATOS plus Version 2.1.71
Page 47
© 2010-2015 Encom Wireless Data Solutions Inc.
ENCOM STRATOS plus
USER MANUAL
Add to Ping Test
Select Add to Ping Test from the Radio menu to add the selected radios to a ping test session.
A ping test consists of periodically sending ICMP messages (pings) to a group of radios and
recording the latency of the responses. It is used for getting a qualitative analysis of your network's
performance.
To carry out a ping test:
1. Select one or more radios, or one of more folders, in the Radio List panel. For information on
selecting multiple radios or folders, refer to the Selecting Radios topic.
2. Select Add to Ping Test from the Radio menu.
3. The Ping Test panel will be activated and shown if it was hidden.
4. The ping test will automatically start, using the radios that you have selected.
For more information regarding the ping test, refer to the Ping Test panel topic.
For ENCOM STRATOS plus Version 2.1.71
Page 48
© 2010-2015 Encom Wireless Data Solutions Inc.
ENCOM STRATOS plus
USER MANUAL
RADIUS Monitor
Select RADIUS Monitor from the Radio menu to display the current state of the RADIUS requests
made by the radio.
When then RADIUS Monitor menu item is selected, the RADIUS Monitor form is displayed:
The following tables describe information displayed in the RADIUS Monitor form.
Radio Identification
Field Name
Description
Name
The friendly name assigned to the radio.
IP Address
The IP address assigned to the radio.
Primary RADIUS Server / Backup RADIUS Server
Field Name
Description
Address
The IP address of the RADIUS server against which the radio is
authenticating.
Requests
The number of authentication requests made by the radio to the RADIUS
server.
For ENCOM STRATOS plus Version 2.1.71
Page 49
© 2010-2015 Encom Wireless Data Solutions Inc.
ENCOM STRATOS plus
USER MANUAL
Accepts
The number of authentication requests that were accepted by the
RADIUS server.
Rejects
The number of authentication requests that were rejected by the RADIUS
server. This normally means that users tried to log in using invalid
credentials (user name or password).
Resends
The number of times that the radio had to resubmit authentication
requests. A large quantity of resends typically means that the RADIUS
Timeout setting in the radio configuration form is too low, and needs to
be increased.
Timeouts
The number of times that authentication requests timed out waiting for the
RADIUS server to respond. This usually indicates that the RADIUS server
could not be reached (e.g. the server may not be working, it may be
blocked by a firewall, the RADIUS Server Address setting in the radio
configuration form is incorrect).
Bad Replies
This normally indicates that the RADIUS Shared Secret setting in the
radio configuration form is incorrect.
Reset Button
Click the Reset button to clear all of the RADIUS monitor statistics.
Click the Close button to hide the RADIUS Monitor form.
The RADIUS Monitor form is used to help diagnose problems the radio is having accessing the
RADIUS servers. The Primary RADIUS Server and Backup RADIUS Server panels will only be
enabled if the associated RADIUS server is enabled in the radio's configuration form.
Refer to the following topics for more information on setting up the radio to use RADIUS for
authentication:
Broadband Radio RADIUS Settings
Point-to-Point Radio RADIUS Settings
Mesh Radio RADIUS Settings
Point-to-Multipoint Radio RADIUS Settings
Refer to ENCOM STRATOS RADIUS Configuration Guide, available separately, for more
information on setting up and using a RADIUS server with your radio network.
For ENCOM STRATOS plus Version 2.1.71
Page 50
© 2010-2015 Encom Wireless Data Solutions Inc.
ENCOM STRATOS plus
USER MANUAL
Terminal Connect
Select Terminal Connect from the Radio menu to log into the selected radio using a terminal
window.
When the Terminal Connect menu item is selected, the Terminal panel is displayed:
This panel allows you to interact with the radio using a text-based terminal interface.
Refer to the Terminal Panel topic for more information on using the terminal window.
Terminal Disconnect
Select Terminal Disconnect from the Radio menu to close and hide the terminal panel.
For ENCOM STRATOS plus Version 2.1.71
Page 51
© 2010-2015 Encom Wireless Data Solutions Inc.
ENCOM STRATOS plus
USER MANUAL
Add
Select Add from the Radio menu to manually add a radio to the radio list.
This function is useful if a radio cannot be discovered by ENCOM STRATOS. This situation can
occur if a router or firewall is blocking the radio heartbeat packets.
Note: In order for this function to work, STRATOS must be able to communicate with the radio via
IP protocols. You must know the radio's IP address, and any routers or firewalls between the radio
and STRATOS must be configured to let the appropriate services through (see the Network Setup
topic for more details).
To manually add a radio to STRATOS application:
1. In the Radio List panel, select the folder in which the new radio will be added. (If you do not
select a folder, the new radio will be added to the 'Default' folder.)
2. Select Add from the Radio menu. The Add Radio form is displayed:
3. Enter the radio's IP address in the IP Address field, as shown in the following example:
4. Click on the Find button.
5. A wait form is displayed while STRATOS probes for a radio at the IP address you specified.
6. If STRATOS is successful, the radio will be added to the radio list.
For ENCOM STRATOS plus Version 2.1.71
Page 52
© 2010-2015 Encom Wireless Data Solutions Inc.
ENCOM STRATOS plus
USER MANUAL
Find
Select Find from the Radio menu to find radios within a specified range of IP addresses. This
operation is also referred to as an IP sweep, since it will probe all of the IP addresses in the range
you specify.
This function is useful if the radios cannot be discovered by ENCOM STRATOS. This situation can
occur if a router or firewall is blocking the radio heartbeat packets.
Note: In order for this function to work, STRATOS must be able to communicate with the radios via
IP protocols. Any routers or firewalls found between the radio and STRATOS must be configured to
let the appropriate services through (see the Network Setup topic for more details).
To find the radios in a range of IP addresses:
In the Radio List panel, select the folder in which the new radios will be added. (If you do not select a
folder, the new radios will be added to the 'Default' folder.)
1. Select Add from the Radio menu. The Find Radios form is displayed:
2. Select the type of search you want to perform. Two options are available:
If you select Search the specified range of IP addresses, you need to enter the start and
end IP addresses in the Range to Search options, as shown in the following example:
If you select Search the specified subnet, you need to enter the network address and the
network mask in the Range to Search options, as shown in the following example:
For ENCOM STRATOS plus Version 2.1.71
Page 53
© 2010-2015 Encom Wireless Data Solutions Inc.
ENCOM STRATOS plus
USER MANUAL
Alternatively, you can specify the IP address and network mask in CIDR format (IP Address/
Mask Bits) in the IP address field. In this case, the Subnet mask field is not used, and is
disabled:
All of these examples will perform the same search.
3. Click on the Start button.
4. The Task List panel will be activated and shown if it was hidden.
5. A new task will be added to the task list. It will show the progress of the search:
6. New radios will be added to the radio list as they are found.
During the search, STRATOS will attempt to login to the radios using the
credentials you specified in the Radio Login form. If a radio's login credentials are
not the same, the login process will fail, and the radio will not be added to the radio
list.
Delete
Select Delete from the Radio menu to remove the selected radio from the radio list. This function
can be used to remove radios that are no longer active.
Note: If you remove an active radio from the list, STRATOS will add it back when it receives a
heartbeat message from the radio.
For ENCOM STRATOS plus Version 2.1.71
Page 54
© 2010-2015 Encom Wireless Data Solutions Inc.
ENCOM STRATOS plus
USER MANUAL
Assign Static IP Address
Select Assign Static IP Address from the Radio menu to change the radio's IP address.
This function is used to change the IP address of a radio when its IP address is incompatible with
the network on which STRATOS is running.
A common use for this function is to change the IP address of a radio that you have just received
from ENCOM. A new radio will be configured with a default IP address (usually 192.168.0.250). If
your local network is not compatible with the radio's default IP address, the radio may be discovered
by STRATOS, but it will not be possible for STRATOS to communicate with it. You have to change
the default address to an address that is compatible with your local network in order to be able to
communicate with the radio.
Note: This function should not be used when STRATOS can communicate with the radio. In this
case, use the Configure function to change the radio's IP address.
To assign a static IP Address to a radio:
1. Select the radio you want to change from the Radio List panel.
2. Select Assign Static IP Address from the Radio menu. The Assign Static IP Address form
is displayed:
3. Enter the radio's login credentials in the User Name and Current Password fields.
By default, the User Name is admin and the Current Password field is left blank.
4. Enter the radio's new IP address in the IP Address field, and a suitable network mask in the
Network Mask field. You can also enter the address of the Default Gateway used by the
radio to access services outside of the local network.
For ENCOM STRATOS plus Version 2.1.71
Page 55
© 2010-2015 Encom Wireless Data Solutions Inc.
ENCOM STRATOS plus
USER MANUAL
You should consult your I.T. department if you are not sure what to enter in these fields.
5. Click the OK button.
6. The Task List panel will be activated and shown if it was hidden.
7. A new task will be added to the task list. It will show the progress of the IP address
assignment process:
8. If the assignment is successful, and STRATOS is able to communicate with the radio, the
task item will indicate that the radio is available:
9. If the task was not successful, make sure that you are assigning a compatible IP address.
Also, make sure that any routers or firewalls that are between the radio and STRATOS are
configured properly (see the Network Setup topic for more details).
For ENCOM STRATOS plus Version 2.1.71
Page 56
© 2010-2015 Encom Wireless Data Solutions Inc.
ENCOM STRATOS plus
USER MANUAL
Restore to Factory Defaults
Select Restore to Factory Defaults from the Radio menu to return the radio to its initial from-thefactory state.
This function is useful if a radio has been misconfigured and is no longer working properly. This
function will restore it to a basic operating state.
To restore a radio to its factory default configuration:
1. Select the radio you want to restore from the Radio List panel.
2. Select Restore to Factory Defaults from the Radio menu.
3. STRATOS will download the radio's current configuration.This process will normally take a
few seconds to complete. During this time, a wait form is displayed:
4. When the radio's configuration has been obtained, the radio configuration form is displayed:
5. Under most circumstances, the Frequency Band and Radio Model fields are fixed and
cannot be changed. In cases where they can be changed, select the appropriate options.
6. The IP Address, Network Mask and Default Gateway fields are populated with the radio's
current settings. Make the appropriate changes as required.
7. Click the OK button.
For ENCOM STRATOS plus Version 2.1.71
Page 57
© 2010-2015 Encom Wireless Data Solutions Inc.
ENCOM STRATOS plus
USER MANUAL
8. The Task List panel will be activated and shown if it was hidden.
9. A new task will be added to the task list. It will show the progress of the restore process:
10.If the restore process is successful, and STRATOS is able to communicate with the radio,
the task item will indicate that the radio has been restored:
For ENCOM STRATOS plus Version 2.1.71
Page 58
© 2010-2015 Encom Wireless Data Solutions Inc.
ENCOM STRATOS plus
USER MANUAL
Upgrade Firmware
Select Upgrade Firmware from the Radio menu to upgrade (or downgrade) a radio's firmware.
Note: Upgrading or downgrading a radio will not affect its configuration. It is therefore safe to
upgrade a radio that is installed in the field.
To upgrade a radio's firmware:
1. Select the radio you want to upgrade from the Radio List panel.
2. Select Upgrade Firmware from the Radio menu. The Upgrade Firmware form is displayed:
The form will display a list of all firmware available in the specified folder. Due to license
restrictions enforced by the radio, not all firmware versions can be used for upgrade.
3. By default, STRATOS looks in the 'My Documents\Encom Wireless\Firmware' folder for
firmware upgrade files. If you have installed the upgrade files in a different folder, enter the
folder name in the Folder that contains the firmware image files field, or click the
button at the right of that field, and select the folder from the Browse For Folder form that is
displayed.
4. Select the firmware version you want to upgrade or downgrade to.
5. Click the OK button.
6. The Task List panel will be activated and shown if it was hidden.
For ENCOM STRATOS plus Version 2.1.71
Page 59
© 2010-2015 Encom Wireless Data Solutions Inc.
ENCOM STRATOS plus
USER MANUAL
7. A new task will be added to the task list. It will show the progress of the upgrade process:
8. If the upgrade is successful, and STRATOS is able to communicate with the radio, the task
item will indicate that the radio has been successfully upgraded:
For ENCOM STRATOS plus Version 2.1.71
Page 60
© 2010-2015 Encom Wireless Data Solutions Inc.
ENCOM STRATOS plus
USER MANUAL
Reboot
Select Reboot from the Radio menu to restart the selected radio.
To reboot a radio:
1. Select the radio you want to reboot from the Radio List panel.
2. Select Reboot from the Radio menu. You will be prompted for permission to reboot the
radio:
3. Click the Yes button.
4. The Task List panel will be activated and shown if it was hidden.
5. A new task will be added to the task list. It will show the progress of the reboot process:
6. After the radio has been restarted and is back on-line, the task item will indicate that the radio
has been successfully rebooted:
For ENCOM STRATOS plus Version 2.1.71
Page 61
© 2010-2015 Encom Wireless Data Solutions Inc.
ENCOM STRATOS plus
USER MANUAL
Folder Menu Commands
Rename
Select Rename from the Folder menu to change the name of the selected folder.
Note: You can rename any folder that you have created yourself. You cannot rename the Default
folder that is created by ENCOM STRATOS.
To rename a folder:
1. Select the folder you want to rename from the Radio List panel.
2. Select Rename from the Folder menu. The Rename Folder form is displayed:
3. Enter the new folder name in the New Folder Name field.
4. Press OK to save the new folder name.
For ENCOM STRATOS plus Version 2.1.71
Page 62
© 2010-2015 Encom Wireless Data Solutions Inc.
ENCOM STRATOS plus
USER MANUAL
Add Folder
Select Add Folder from the Folder menu to add a new folder to the Radio List.
To add a new folder:
1. In the Radio List panel, select an existing folder in which to place the new folder.
2. Select Add Folder from the Folder menu.
If you want to create a top level folder (a folder that is not contained in a parent folder), click
the right mouse button outside of the radio list items, and select Add Folder from the pop-up
menu that is displayed, as shown in the following example:
The Add Folder form is displayed:
3. Enter the appropriate name in the New Folder Name field.
4. Press OK to create the new folder.
Delete
Select Delete from the Folder menu to delete the folder that is selected in the Radio List panel.
Note: You cannot delete a folder that contains radios (you must delete the radios that it contains
first). Also, you cannot delete the Default folder that is created by ENCOM STRATOS.
For ENCOM STRATOS plus Version 2.1.71
Page 63
© 2010-2015 Encom Wireless Data Solutions Inc.
ENCOM STRATOS plus
USER MANUAL
Tools Menu Commands
System Settings
Select System Settings from the Tools menu to display the System Settings form. This form
allows you to configure a number of system options.
The system settings are logically grouped using a tree style interface. Click on an item in the tree to
display the associated settings. The following topics describe the available settings:
Services
Discovery
Monitoring
User Interface
General
RSSI Thresholds
CCQ Thresholds
Networking
Mail Server
Proxy Server
Notifications
Alerts
Recipients
Miscellaneous
Database
Status
Logging
For ENCOM STRATOS plus Version 2.1.71
Page 64
© 2010-2015 Encom Wireless Data Solutions Inc.
ENCOM STRATOS plus
USER MANUAL
Performance
For ENCOM STRATOS plus Version 2.1.71
Page 65
© 2010-2015 Encom Wireless Data Solutions Inc.
ENCOM STRATOS plus
USER MANUAL
Services - Discovery
The following screen shot shows the Discovery panel of the System Settings form:
The following table describes the individual discovery settings.
Radio Discovery
Field Name
Description
Automatically try to
discover radios
every...
Under normal operation, ENCOM radios generate a heartbeat message
every minute.
Heartbeat messages are used by ENCOM STRATOS to determine if a
new radio has appeared on the network. If the heartbeat from a new radio
is received, STRATOS automatically adds the radio to the Radio List.
In certain cases, such as a bench configuration or testing environment, it
may not be practical to wait for the self-generated heartbeat to be
received.
Checking this option will cause STRATOS to actively request heartbeat
messages at the specified frequency. This can significantly reduce the
amount of time you have to wait for the radio to be discovered by
STRATOS.
Note: This feature is of little value in a production environment, and could
cause a slight degradation in performance in larger networks. It should
therefore be left disabled in such an environment.
For ENCOM STRATOS plus Version 2.1.71
Page 66
© 2010-2015 Encom Wireless Data Solutions Inc.
ENCOM STRATOS plus
USER MANUAL
Services - Monitoring
The following screen shot shows the Monitoring panel of the System Settings form:
The following table describes the individual monitor settings.
Radio Monitoring
Field Name
Description
Automatically check
radios every...
Check this option to periodically verify that the radios in the network are
on-line, and to determine the wireless links present between the radios.
When this option is enabled STRATOS will send ping requests to all of
the radios in the network at the specified frequency.
Radios that respond will be shown as being on-line in the Radio List panel
(green or yellow state icon). Radios that do not respond will be shown as
off-line (red state icon).
As well, the lines on the map that show the wireless connections between
the radios will be updated to reflect the current condition of the wireless
links.
Note: Because this feature is important to the operation of the STRATOS
network monitoring functions, it should not be disabled.
IP Address Conflict Monitoring
Field Name
Description
Automatically check
conflict every...
Check this option to periodically check for IP address conflicts (where two
or more radios that have been assigned the same IP address).
If an IP address conflict is detected, an IP Address Conflict form is
For ENCOM STRATOS plus Version 2.1.71
Page 67
© 2010-2015 Encom Wireless Data Solutions Inc.
ENCOM STRATOS plus
USER MANUAL
displayed that indicates the radios that have been assigned the same IP
address.
Note: This feature only checks for IP address conflicts between ENCOM
radios. Other devices in the network (such as cameras, traffic controllers
and other devices) could be assigned the same IP address, but
STRATOS would not be able to detect such conflicts.
For ENCOM STRATOS plus Version 2.1.71
Page 68
© 2010-2015 Encom Wireless Data Solutions Inc.
ENCOM STRATOS plus
USER MANUAL
The IP Address Conflict form displays the radios that have been assigned the same IP address, as
shown in the following example:
The following table describes the fields found in the IP Address Conflict form.
Field Name
Description
IP address conflict list
The IP address conflict list shows the IP addresses that are in conflict,
and the MAC addresses and names of the radios that have been
assigned the same IP address.
See the Recovering from an IP Address Conflict topic for information on
addressing the issue.
Postpone for...
Select the amount of time to wait before the IP Address Conflict form is
re-displayed (if the address conflict has not been resolved).
OK button
Press the OK button to postpone the re-display of the IP Address Conflict
form (if the address conflict has not been resolved).
Cancel button
Press the Cancel button to close the IP Address Conflict form. The form
will be re-displayed at the next IP Address Check interval if the address
conflict is not resolved.
For ENCOM STRATOS plus Version 2.1.71
Page 69
© 2010-2015 Encom Wireless Data Solutions Inc.
ENCOM STRATOS plus
USER MANUAL
If radios are assigned the same IP address, STRATOS will have great difficulty interacting with
them. Anything that communicates with the radio via its IP address, including the radio configuration
form, will not work reliably. Because of this, you will need to change the IP address of the radios so
that they are no longer in conflict. One or more of the following procedures can be used to do this:
1. If there is no router between the computer running STRATOS and the radios, use the Assign
Static IP Address function to change the IP address of one or more or the radios that are in
conflict.
2. If you cannot use the Assign Static IP Address function:
a) Power off all but one of the radios that are in conflict.
b) Change the IP address of the radio that is still powered using the radio configuration form.
a) Repeat steps a-b for the remaining radios that are in conflict.
3. If one or more of the radios that are in conflict are no longer present on the network (e.g. they
were being used for testing or were replaced by a new radio), simply delete them from the
radio list.
For ENCOM STRATOS plus Version 2.1.71
Page 70
© 2010-2015 Encom Wireless Data Solutions Inc.
ENCOM STRATOS plus
USER MANUAL
User Interface - General
The following screen shot shows the General panel of the System Settings form:
The following table describes the individual user interface settings.
Radio List
Field Name
Description
Show firmware
upgrade warnings
If checked, warning indicators (small triangular icons) are displayed in the
Radio List panel to let you know that a radio's firmware should be
upgraded to the recommended version.
If not checked, the warning indicators are only displayed if a radio's
firmware must be upgraded in order to be compatible with ENCOM
STRATOS.
Show folder
checkboxes
If checked, checkboxes will be displayed next to the folders in the radio list
panel, as shown in the example below. Radio icons will be displayed on
the map view panel only if:
A valid geographical location has been assigned to the radio.
The checkbox associated with the folder that contains the radio is
checked.
For ENCOM STRATOS plus Version 2.1.71
Page 71
© 2010-2015 Encom Wireless Data Solutions Inc.
ENCOM STRATOS plus
USER MANUAL
If not checked, checkboxes are not displayed in the radio list panel, as
shown in the example below. Icons for all radios that have been assigned
valid geographical locations will be shown on the map view panel.
Radios are assigned a geographical location in the Location tab of the
Radio Configuration form.
Audio Prompts
Field Name
Description
Play a sound when a
long-running task has
completed
If checked, STRATOS will beep when a task that takes a significant
amount of time to complete is finished. Examples of such tasks include:
Assign Static IP Address
Upgrade Firmware
Find Radios
For ENCOM STRATOS plus Version 2.1.71
Page 72
© 2010-2015 Encom Wireless Data Solutions Inc.
ENCOM STRATOS plus
USER MANUAL
User Settings
Field Name
Description
Allow user to change
radio configurations
If checked, ENCOM STRATOS will allow you to modify the configuration
of any radio that is on-line.
If not checked, STRATOS will not allow you to modify the configuration of
any radio. However, you will still be able to view the current configuration
of radios that are on-line.
Disabling this feature provides a handy way to prevent users from making
changes to the radio's configuration, but still allow them to view the radio's
current configuration.
For ENCOM STRATOS plus Version 2.1.71
Page 73
© 2010-2015 Encom Wireless Data Solutions Inc.
ENCOM STRATOS plus
USER MANUAL
User Interface - RSSI Thresholds
The following screen shot shows the RSSI Thresholds panel of the System Settings form:
The RSSI threshold settings allow you to specify the colors to use for the following items in the
STRATOS user interface:
Wireless Link Status panel Status column
Wireless Link Status panel RSSI bars
Map View wireless link connection lines
Because of differences between the two technologies, different thresholds are used for the
Wireless-N and legacy A/B/G radio cards. Click the Wireless-N tab to access the Wireless-N
settings, and click the A/B/G tab to access the legacy radio card settings.
The following table describes the individual RSSI threshold settings. Note that for all settings:
To change the color, click the associate
button in the Color column, and select the desired
color from the color picker that is displayed.
To change the threshold, enter a new value in the RSSI (dBm) column, or click on the
buttons to change the value.
Setting Name
Description
Poor Signal
Set the color to display when the signal strength is less than the specified
RSSI value.
An RSSI value below the Poor Signal threshold indicates that the signal
strength is too low. The connection will probably not be stable, and will
have low throughput.
For ENCOM STRATOS plus Version 2.1.71
Page 74
© 2010-2015 Encom Wireless Data Solutions Inc.
ENCOM STRATOS plus
USER MANUAL
Low Signal
Set the color to display when the signal strength is less than the specified
RSSI value, but higher than the Poor Signal value.
An RSSI value between the Poor Signal and Low Signal thresholds
indicates that the signal strength is low. The connection will be marginal,
and may not have good throughput.
Good Signal
Set the color to display when the signal strength is less than the specified
RSSI value, but higher than the Low Signal value.
An RSSI value between the Low Signal and Good Signal thresholds
indicates that the signal strength is optimal. The wireless connection
should be stable, and will have good throughput.
Over Range
Set the color to display when the signal strength is greater than the Good
Signal value.
An RSSI value above the Good Signal threshold indicates that the signal
strength is too high. The connection may not be stable, and may not have
good throughput.
Inactive
Set the color to display when no signal strength information is available for
a static link (i.e. the link is defined, but there is no wireless connection
between the radios).
Static links can be defined for Broadband or Point-to-Multipoint radios.
Either define a static WDS link (for master radios) or specify a parent
radio (for remotes).
For Broadband radios, refer to the following topics:
Broadband Radio WDS Setup
Broadband Remote Radio Setup
For Point-to-Multipoint radios, refer to the following topics:
Point-to-Multipoint Radio WDS Setup
Point-to-Multipoint Remote Radio Setup
Default button
Click the Default button to restore the color and threshold settings to their
factory default values.
For ENCOM STRATOS plus Version 2.1.71
Page 75
© 2010-2015 Encom Wireless Data Solutions Inc.
ENCOM STRATOS plus
USER MANUAL
User Interface - CCQ Thresholds
The following screen shot shows the CCQ Thresholds panel of the System Settings form:
The CCQ threshold settings allow you to specify the colors to use for the following items in the
STRATOS user interface:
Wireless Link Status panel CCQ bars
Map View wireless link connection lines
The following table describes the individual CCQ threshold settings. Note that for all settings:
To change the color, click the associate
button in the Color column, and select the desired
color from the color picker that is displayed.
To change the threshold, enter a new value in the CCQ (%) column, or click on the
to change the value.
buttons
Setting Name
Description
Poor Signal
Set the color to display when the signal quality is less than the specified
CCQ value.
A CCQ value below the Poor Signal threshold indicates that the signal
quality is bad. The connection will probably not be stable, and will have
low throughput.
Low Signal
Set the color to display when the signal quality is less than the specified
CCQ value, but higher than the Poor Signal value.
A CCQ value between the Poor Signal and Low Signal thresholds
indicates that the signal quality is low. The connection will be marginal,
For ENCOM STRATOS plus Version 2.1.71
Page 76
© 2010-2015 Encom Wireless Data Solutions Inc.
ENCOM STRATOS plus
USER MANUAL
and may not have good throughput.
Good Signal
Set the color to display when the signal quality is greater than the Low
Signal value.
A CCQ value above the Low Signal value indicates that the signal quality
is good. The wireless connection should be stable, and will have good
throughput.
Inactive
Set the color to display when no signal strength information is available for
a static link (i.e. the link is defined, but there is no wireless connection
between the radios).
Static links can be defined for Broadband or Point-to-Multipoint radios.
Either define a static WDS link (for master radios) or specify a parent
radio (for remotes).
For Broadband radios, refer to the following topics:
Broadband Radio WDS Setup
Broadband Remote Radio Setup
For Point-to-Multipoint radios, refer to the following topics:
Point-to-Multipoint Radio WDS Setup
Point-to-Multipoint Remote Radio Setup
Default button
Click the Default button to restore the color and threshold settings to their
factory default values.
For ENCOM STRATOS plus Version 2.1.71
Page 77
© 2010-2015 Encom Wireless Data Solutions Inc.
ENCOM STRATOS plus
USER MANUAL
Networking - Mail Server
STRATOS supports an alerting mechanism that is able to send emails to specific recipients when a
network event occurs (a radio going off-line, the strength of a wireless signal being too low, etc.). In
order to send out the emails, STRATOS requires access to an SMTP (Simple Mail Transfer
Protocol) mail server.
Configuring the mail server settings requires knowledge of your network environment, and of the
mail server in particular. You will need to consult your I.T. department for the required settings.
The following screen shot shows the Mail Server panel of the System Settings form:
The following table describes the individual mail server settings.
Mail Server Settings
Field Name
Description
Enable
If checked, STRATOS will attempt to send notification e-mails to the a list
of recipients when an alert is generated.
Recipients are defined in the Recipients panel of the System Settings
form.
Alerts are configured in the Alerts panel of the System Settings form.
Server Address
Enter the address of the SMTP server. This can be specified as an IP
address (192.168.1.100) or a DNS name (smtp.mycompany.com).
Port
Enter the IP port on which the SMTP server accepts connections for
outgoing mail.
Enable SSL
Check this setting if the SMTP server requires that connections be
secured by SSL.
For ENCOM STRATOS plus Version 2.1.71
Page 78
© 2010-2015 Encom Wireless Data Solutions Inc.
ENCOM STRATOS plus
USER MANUAL
Authentication
Select the type of authentication required by the SMTP server. One of the
following options can be used:
Authentication
Description
None
No authentication is required. No user name or
password are specified.
Auto
Automatically chooses the best authentication
method available. Note that this option may not
always work. You may need to select a specific
authentication type instead.
Plain
PLAIN authentication is used (the user name and
password are not encrypted).
Digest-MD5
DIGEST-MD5 authentication is used.
CRAM-MD5
CRAM-MD5 authentication is used.
Login
LOGIN authentication is used (the user name and
password are not encrypted).
NTLM
Authentication used by Microsoft servers.
GSSAPI
Kerberos-based authentication.
User Name
Enter the user name used to log into the SMTP server. This is often the
user name of an account created on the mail server specifically for
STRATOS.
Password
Enter the password used to log into the SMTP server.
"From" Address
Enter the e-mail address that will be used to identify the source of the email. This is often the e-mail address of an account created on the mail
server specifically for STRATOS.
For ENCOM STRATOS plus Version 2.1.71
Page 79
© 2010-2015 Encom Wireless Data Solutions Inc.
ENCOM STRATOS plus
USER MANUAL
Networking - Proxy Server
The Map View panel requires an Internet connection to access the map tiles from the various map
service providers. If the computer on which STRATOS is running is directly connected to the
Internet, there is usually no problem in accessing the tiles. If a proxy server is being used, and your
computer is properly configured, STRATOS can normally make use of the system proxy settings to
access the tiles via the proxy server.
In some cases, STRATOS may not be able to use your computer's proxy settings, and will not be
able to access the Internet. In such cases, you may need to configure the proxy settings manually to
gain access to the map tiles.
Configuring the proxy settings requires knowledge of your network environment, and of the proxy
server in particular. You will need to consult your I.T. department for the required settings.
The following screen shot shows the Proxy Server panel of the System Settings form:
The following table describes the individual proxy server settings.
Proxy Server Settings
Field Name
Description
Use system proxy
settings
This is the default setting. STRATOS will attempt to access the Internet
using your computer's proxy settings.
Manual proxy
configuration
Select this option if STRATOS is not able to access the map tiles. You
will need to configure the remaining options in order to access the Internet
through your proxy server.
Server Address
Enter the IP or DNS address of your proxy server.
Port
Enter the port number (on the proxy server) used to access the Internet
using the HTTP protocol.
For ENCOM STRATOS plus Version 2.1.71
Page 80
© 2010-2015 Encom Wireless Data Solutions Inc.
ENCOM STRATOS plus
USER MANUAL
User Name
Enter the user name used to authenticate with the proxy server (if
authentication is used).
Password
Enter the password used to authenticate with the proxy server (if
authentication is used).
For ENCOM STRATOS plus Version 2.1.71
Page 81
© 2010-2015 Encom Wireless Data Solutions Inc.
ENCOM STRATOS plus
USER MANUAL
Notifications - Alerts
STRATOS can generate a number of alerts that notify you of problems with your network.
When an alert condition is occurs, STRATOS will:
Add the alert to the Alerts panel (and automatically show the panel).
If the Mail Server is enabled, send a notification e-mail to each recipient in the Recipients list.
The following screen shot shows the Alert Settings panel of the System Settings form:
The following table describes the individual alert settings.
Alert Settings
Field Name
Description
Radio is offline
Check this option to get notified that a radio has been offline for the
specified amount of time.
Radio is back online
Check this option to get notified that a radio has been online for the
specified amount of time.
This alert is only generated if a Radio is offline alert was previously
generated for the radio.
RSSI reading
Check this option to get notified that the signal strength of one or more
wireless links have been lower than the specified value for the specified
amount of time.
CCQ reading
Check this option to get notified that the signal quality of one or more
wireless links have been lower than the specified value for the specified
amount of time.
For ENCOM STRATOS plus Version 2.1.71
Page 82
© 2010-2015 Encom Wireless Data Solutions Inc.
ENCOM STRATOS plus
USER MANUAL
Data rate
Check this option to get notified that the data rate of one or more wireless
links have been lower than the specified value for the specified amount of
time.
For ENCOM STRATOS plus Version 2.1.71
Page 83
© 2010-2015 Encom Wireless Data Solutions Inc.
ENCOM STRATOS plus
USER MANUAL
Notifications - Recipients
The following screen shot shows the Recipients panel of the System Settings form:
The following table describes the individual recipient settings.
Recipient List
Field Name
Description
Recipient list
Contains the list of recipients that have been defined. Notifications will be
sent to all recipients in the list if the mail server and the recipient are
enabled.
Add button
Click the Add button to add a new recipient to the list. When clicked, the
Recipient Information panel is enabled:
Enter the appropriate information, and click the Submit button to add the
new recipient to the list.
If you do not wish to add a new recipient, click the Cancel button.
Delete button
Click the Delete button to remove the selected recipient from the list.
For ENCOM STRATOS plus Version 2.1.71
Page 84
© 2010-2015 Encom Wireless Data Solutions Inc.
ENCOM STRATOS plus
USER MANUAL
Change button
Click the Change button to change the information associated with the
selected recipient. When clicked, the Recipient Information panel is
enabled, and the recipient's information displayed:
Make the appropriate changes, and click the Submit button to save the
changes.
If you do not wish to make changes, click the Cancel button.
Recipient Information
Field Name
Description
Email address
Enter the email address of the recipient.
Enable
Check this setting to enable the recipient. Notification message are only
sent to enabled recipients.
First name
Enter the first name of the recipient.
Last name
Enter the last name of the recipient.
Test button
Click the Test button to send a test email to the recipient using the SMTP
server specified in the Mail Server panel.
The Test button is disabled if the mail server is not enabled.
Submit button
Click the Submit button to accept a new recipient, or changes made to an
existing recipient.
Cancel button
Click the Cancel button if you do not want to add or change a recipient.
For ENCOM STRATOS plus Version 2.1.71
Page 85
© 2010-2015 Encom Wireless Data Solutions Inc.
ENCOM STRATOS plus
USER MANUAL
Miscellaneous - Database
The following screen shot shows the Database panel of the System Settings form:
The following table describes the individual database settings.
Radio Database
Field Name
Description
Automatically save
When checked, ENCOM STRATOS will automatically save all of the radio
radio information to the information that it has collected to a database. When STRATOS is shut
database
down and subsequently run, it will use this stored information to populate
the Radio List panel, Map View panel and other user interface elements.
It will also allow you to view the last known configuration of radios that are
off-line.
If this option is not checked, no radio data is saved. If STRATOS is shut
down and subsequently run, the radio list will be empty.
Disabling this option is useful in factory and bench provisioning settings,
where it is not desirable to retain the list of radios that have been
configured by STRATOS.
For ENCOM STRATOS plus Version 2.1.71
Page 86
© 2010-2015 Encom Wireless Data Solutions Inc.
ENCOM STRATOS plus
USER MANUAL
Status - Logging
STRATOS allows you to log various types of communications between STRATOS and ENCOM
radios. This feature is useful in diagnosing issues in radios that have been installed in the field. Note
that logging should only be turned on when requested by ENCOM technical support personnel.
The logging function should be disabled as soon as it is no longer required. It can
create very large files and can significantly reduce the performance of STRATOS.
The following screen shot shows the Logging panel of the System Settings form:
The following table describes the logging settings.
Logging options
Field Name
Description
Enable
Check to enable logging of data sent between STRATOS and one or
more radios.
Log file folder
Enter or select the folder in which the log files will be placed.
The name of the log files that are created are of the form:
yyyymmdd-hhmmss.log
where:
For ENCOM STRATOS plus Version 2.1.71
Page 87
© 2010-2015 Encom Wireless Data Solutions Inc.
ENCOM STRATOS plus
USER MANUAL
yyyy is the year in which the log file was created
mm is the month in which the log file was created
dd is the day in which the log file was created
hh is the hour at which the log file was created
mm is the minute at which the log file was created
ss is the second at which the log file was created
A new log file is created whenever STRATOS is run.
Radio filtering
Field Name
Description
MAC Address(es)
Enter the MAC address of the radio that you want to log.
If you need to log the communication of more than one radio, enter the
MAC address of each radio, separated with commas.
If left blank, the communications for ALL radios is logged.
Interface options
Field Name
Description
SSH command
interface
Check to log SSH based communications.
API command
interface
Check to log API based communications.
MAC Telnet interface
Check to log MAC Telnet based communications.
FTP transfers
Check to log the start and end of FTP file transfers. Note that the content
of the files is not included in the log.
For ENCOM STRATOS plus Version 2.1.71
Page 88
© 2010-2015 Encom Wireless Data Solutions Inc.
ENCOM STRATOS plus
USER MANUAL
Status - Performance
The performance panel displays the current state of the various queues that are present in
STRATOS. The information displayed can be of use to ENCOM technical support personnel when
diagnosing STRATOS performance issues.
The following screen shot shows the Performance panel of the System Settings form:
To view the state of a particular queue, simply select it from the Performance Option list. The
Historical Trending chart displays the number of commands currently in the queue.
For ENCOM STRATOS plus Version 2.1.71
Page 89
© 2010-2015 Encom Wireless Data Solutions Inc.
ENCOM STRATOS plus
USER MANUAL
Help Menu Commands
Help Topics
Select Help Topics from the Help menu to display the ENCOM STRATOS on-line help.
For ENCOM STRATOS plus Version 2.1.71
Page 90
© 2010-2015 Encom Wireless Data Solutions Inc.
ENCOM STRATOS plus
USER MANUAL
Licensing
Select Licensing... from the Help menu to display the ENCOM STRATOS licensing form. This
form allows you to request and install licenses that enable advanced monitoring features for a
specific number of ENCOM radios.
The advanced features are:
Display of wireless link lines on the map
Display of radio status halos on the map
Detection and notification of alarm conditions
A new installation of STRATOS supports advanced features for up to 5 radios. To support more
than 5 radios, you need to purchase the appropriate license level, and activate the license using the
licensing form.
If your network contains more radios than are supported by the current license, STRATOS will
automatically choose the radios that will participate in the advanced monitoring functions. These
radios are identified by a symbol at the right of the radio's name in the Radio List panel. As well, a
'License Exceeded' indicator is displayed at the bottom of the panel to alert you to the situation.
Preference will be given to on-line radios. If an off-line radio was initially licensed, and STRATOS
detects that an unlicensed radio has come on-line, the off-line radio's license is re-assigned to the
on-line radio.
For ENCOM STRATOS plus Version 2.1.71
Page 91
© 2010-2015 Encom Wireless Data Solutions Inc.
ENCOM STRATOS plus
USER MANUAL
If you have acquired and activated a license that supports all of the radios in your network, the
symbols are no longer displayed in the radio list panel, and the 'License Exceeded' indicator is no
longer displayed.
Refer to the following topics for more information on STRATOS licensing:
Requesting a New License
Activating a New License
Performing a Manual Activation
Requesting a License Upgrade
Upgrading an Existing License
Performing a Manual Upgrade
For ENCOM STRATOS plus Version 2.1.71
Page 92
© 2010-2015 Encom Wireless Data Solutions Inc.
ENCOM STRATOS plus
USER MANUAL
Requesting a New License
To request a license for a new installation of STRATOS:
1. Select Licensing... from the Help menu to display the ENCOM STRATOS licensing form:
2. Click the Request License button. The Request License page is displayed:
For ENCOM STRATOS plus Version 2.1.71
Page 93
© 2010-2015 Encom Wireless Data Solutions Inc.
ENCOM STRATOS plus
USER MANUAL
3. Select the license that supports the number of radios in your network. You can start with a
small license, and upgrade to a larger license as you add more radios to your network.
4. Order your license from your ENCOM sales representative (or use the contact information
shown in step 2).
If an e-mail client is installed on your computer, click on the [email protected]
link to create a pre-populated license request e-mail:
Please include the following information with your request:
Company name
Contact name
Contact email address
Purchase Order number (if you are using a purchase order)
5. When your request has been processed, an activation serial number will be sent to the email
address that you specified in the request.
Refer to the Activating a New License topic for instructions on activating your license.
For ENCOM STRATOS plus Version 2.1.71
Page 94
© 2010-2015 Encom Wireless Data Solutions Inc.
ENCOM STRATOS plus
USER MANUAL
Activating a New License
To activate a new license:
1. Select Licensing... from the Help menu to display the ENCOM STRATOS licensing form:
2. Click the Activate License button. The Activate License page is displayed:
For ENCOM STRATOS plus Version 2.1.71
Page 95
© 2010-2015 Encom Wireless Data Solutions Inc.
ENCOM STRATOS plus
USER MANUAL
3. Enter the serial number you received from ENCOM in the serial number field. Alternatively,
you can copy and paste the serial number from your email to the serial number field.
4. Click on the Activate License button to activate your license. STRATOS will attempt to
contact the ENCOM licensing server to perform the activation:
5. If the activation was successful, a confirmation message will be displayed:
For ENCOM STRATOS plus Version 2.1.71
Page 96
© 2010-2015 Encom Wireless Data Solutions Inc.
ENCOM STRATOS plus
USER MANUAL
6. Click the OK button to return to the License Details page.
7. Click the Close button to return to STRATOS. The Radio List panel will be updated to reflect
the new license.
8. If the activation was not successful, the following message will be displayed:
9. If the activation failed because your computer is not connected to the Internet, but you are
able to temporarily connect it to the Internet, click on the No button to dismiss the message,
connect your computer to the Internet, and then click on the Activate License button again.
Contact your IT department if you need help connecting your computer to the Internet.
For ENCOM STRATOS plus Version 2.1.71
Page 97
© 2010-2015 Encom Wireless Data Solutions Inc.
ENCOM STRATOS plus
USER MANUAL
10.If the activation failed because your computer is not connected to the Internet, and you are
not able to connect it to the Internet, you will need to perform a manual activation. Click the
Yes button to proceed. The Manual Activation Request page is displayed:
11.Click the Create Activation Request File button to create the request file.
12.Email the request file to your ENCOM sales representative for processing. Please include the
following information with your request:
Company name
Contact name
Contact email address
13.When your request has been processed, a license activation file will be sent to the email
address that you specified in the request.
Refer to the Performing a Manual Activation topic for instructions on manually activating your
license.
For ENCOM STRATOS plus Version 2.1.71
Page 98
© 2010-2015 Encom Wireless Data Solutions Inc.
ENCOM STRATOS plus
USER MANUAL
Performing a Manual Activation
To perform a manual license activation:
1. Select Licensing... from the Help menu to display the ENCOM STRATOS licensing form:
2. Click the Finish Manual Activation button. The Manual Activation page is displayed:
For ENCOM STRATOS plus Version 2.1.71
Page 99
© 2010-2015 Encom Wireless Data Solutions Inc.
ENCOM STRATOS plus
USER MANUAL
3. Click the Import Activation File button, and select the license activation file that you received
from ENCOM when prompted:
4. If the activation was successful, a confirmation message will be displayed:
For ENCOM STRATOS plus Version 2.1.71
Page 100
© 2010-2015 Encom Wireless Data Solutions Inc.
ENCOM STRATOS plus
USER MANUAL
5. Click the OK button to return to the License Details page.
6. Click the Close button to return to STRATOS. The Radio List panel will be updated to reflect
the new license.
For ENCOM STRATOS plus Version 2.1.71
Page 101
© 2010-2015 Encom Wireless Data Solutions Inc.
ENCOM STRATOS plus
USER MANUAL
Requesting a License Upgrade
To request an upgrade for an installation of STRATOS that is already licensed:
1. Select Licensing... from the Help menu to display the ENCOM STRATOS licensing form:
2. Click the Request Upgrade button. The Request Upgrade page is displayed:
For ENCOM STRATOS plus Version 2.1.71
Page 102
© 2010-2015 Encom Wireless Data Solutions Inc.
ENCOM STRATOS plus
USER MANUAL
3. Select the license that supports the number of radios in your network.
4. Order your license upgrade from your ENCOM sales representative (or use the contact
information shown in step 2).
If an e-mail client is installed on your computer, click on the [email protected]
link to create a pre-populated upgrade request e-mail:
Please include the following information with your request:
Company name
Contact name
Contact email address
Purchase Order number (if you are using a purchase order)
5. When your request has been processed, a confirmation of the upgrade will be sent to the
email address that you specified in the request.
Refer to the Upgrading an Existing License topic for instructions on upgrading your license.
For ENCOM STRATOS plus Version 2.1.71
Page 103
© 2010-2015 Encom Wireless Data Solutions Inc.
ENCOM STRATOS plus
USER MANUAL
Upgrading an Existing License
To upgrade an existing license:
1. Select Licensing... from the Help menu to display the ENCOM STRATOS licensing form:
2. Click the Upgrade License button. The Upgrade License page is displayed:
For ENCOM STRATOS plus Version 2.1.71
Page 104
© 2010-2015 Encom Wireless Data Solutions Inc.
ENCOM STRATOS plus
USER MANUAL
3. Click on the Upgrade License button to upgrade your license. STRATOS will attempt to
contact the ENCOM licensing server to perform the upgrade:
4. If the upgrade was successful, a confirmation message will be displayed:
5. Click the OK button to return to the License Details page.
For ENCOM STRATOS plus Version 2.1.71
Page 105
© 2010-2015 Encom Wireless Data Solutions Inc.
ENCOM STRATOS plus
USER MANUAL
6. Click the Close button to return to STRATOS. The Radio List panel will be updated to reflect
the new license.
7. If the upgrade was not successful, the following message will be displayed:
8. If the upgrade failed because your computer is not connected to the Internet, but you are able
to temporarily connect it to the Internet, click on the No button to dismiss the message,
connect your computer to the Internet, and then click on the Upgrade License button again.
Contact your IT department if you need help connecting your computer to the Internet.
9. If the activation failed because your computer is not connected to the Internet, and you are not
able to connect it to the Internet, you will need to perform a manual activation. Click the Yes
button to proceed. The Manual Upgrade Request page is displayed:
10.Click the Create Upgrade Request File button to create the request file.
For ENCOM STRATOS plus Version 2.1.71
Page 106
© 2010-2015 Encom Wireless Data Solutions Inc.
ENCOM STRATOS plus
USER MANUAL
11.Email the request file to your ENCOM sales representative for processing. Please include the
following information with your request:
Company name
Contact name
Contact email address
12.When your request has been processed, a license upgrade file will be sent to the email
address that you specified in the request.
Refer to the Performing a Manual Upgrade topic for instructions on manually upgrading your
license.
For ENCOM STRATOS plus Version 2.1.71
Page 107
© 2010-2015 Encom Wireless Data Solutions Inc.
ENCOM STRATOS plus
USER MANUAL
Performing a Manual Upgrade
To perform a manual license upgrade:
1. Select Licensing... from the Help menu to display the ENCOM STRATOS licensing form:
2. Click the Finish Manual Upgrade button. The Manual Upgrade page is displayed:
For ENCOM STRATOS plus Version 2.1.71
Page 108
© 2010-2015 Encom Wireless Data Solutions Inc.
ENCOM STRATOS plus
USER MANUAL
3. Click the Import Upgrade File button, and select the license upgrade file that you received
from ENCOM when prompted:
4. If the upgrade was successful, a confirmation message will be displayed:
For ENCOM STRATOS plus Version 2.1.71
Page 109
© 2010-2015 Encom Wireless Data Solutions Inc.
ENCOM STRATOS plus
USER MANUAL
5. Click the OK button to return to the License Details page.
6. Click the Close button to return to STRATOS. The Radio List panel will be updated to reflect
the new license.
For ENCOM STRATOS plus Version 2.1.71
Page 110
© 2010-2015 Encom Wireless Data Solutions Inc.
ENCOM STRATOS plus
USER MANUAL
About...
Select About... from the Help menu to display information about ENCOM STRATOS.
For ENCOM STRATOS plus Version 2.1.71
Page 111
© 2010-2015 Encom Wireless Data Solutions Inc.
ENCOM STRATOS plus
USER MANUAL
Panels
Alerts Panel
The Alerts panel displays alert messages that have been generated by STRATOS. It is normally
hidden, and is automatically displayed when an alert is generated.
The background of the Alerts panel is normally white, but turns red when alerts are present.
The following table describes the information that is displayed for each alert shown in the list.
Column
Description
Radio
The name of the radio that caused the alert to be generated. If the alert is
not associated with a particular radio, "<Not Applicable>" is displayed.
MAC Address
The radio's MAC address.
IP Address
The radio's IP address.
Alert
The condition that caused the alert to be generated.
Started At
The time at which the condition was detected.
Refer to the following topics for more information regarding the features of the Ping Test panel:
Sorting the Alerts List
Alerts Panel Context Menu
Alerts are not stored in the STRATOS database. If STRATOS is shut down, all alerts
shown in the panel will be lost.
If you want to keep a history of the alerts generated by STRATOS, you should define
a recipient and set up a connection to an e-mail server. You can then keep records of
the alerts using your email client.
For ENCOM STRATOS plus Version 2.1.71
Page 112
© 2010-2015 Encom Wireless Data Solutions Inc.
ENCOM STRATOS plus
USER MANUAL
Sorting the Alerts List
You can sort the Alerts list by clicking the left mouse button on any of the table headers.
When you click on one of the headers, an arrow is displayed that indicates the direction of the sort.
Click once to sort in ascending order, and click again to sort in descending order.
Alerts Panel Context Menu
To display the Alerts Panel context menu, click the right mouse button anywhere on the Alerts
Panel panel. The following context menu is displayed:
The following table describes the commands available in the context menu.
Command
Description
Select Radio
Selects the radio that is associated with the selected alert. This
option is grayed out if an alert is not currently selected, or if more
than one alert is currently selected.
Alternatively, you can double-click the left mouse button on an alert
to select the associated radio.
Remove Selected Alerts (Del) Removes the selected alerts from the list. This option is grayed out
if an alert is not currently selected.
Remove All Alerts
For ENCOM STRATOS plus Version 2.1.71
Remove all alerts from the list.
Page 113
© 2010-2015 Encom Wireless Data Solutions Inc.
ENCOM STRATOS plus
USER MANUAL
Radio List Panel
The Radio List panel contains the list of all radios known to ENCOM STRATOS. By default, it
appears on the left-hand side of the STRATOS main window.
The radio list panel contains the following user interface items:
Item search box
Display type tabs
Radio tree view
Refer to the following topics for more information regarding the features of the Radio List panel:
Selecting Radios
Moving Radios and Folders
Setting the Location of a Radio
Adding Radios to a Ping Test
Showing and Hiding Radios on the Map
Radio List Context Menu
For ENCOM STRATOS plus Version 2.1.71
Page 114
© 2010-2015 Encom Wireless Data Solutions Inc.
ENCOM STRATOS plus
USER MANUAL
Item Search Box
The search box allows you to search the radio list based on a complete or partial match of the
characters entered in the search box.
To use this feature:
1. Enter the text you want to find in the search box, as shown in the following example:
The search is not case sensitive (searching for "mesh" or "MESH" will find the same items).
2. Click the
button at the right of the search box, or press the Enter key on the keyboard, to
perform the search.
3. The first item in the radio list that contains the search text will be selected, as shown in the
following example:
4. Click the
button, or press the Enter key, again to find the next matching item:
If the last matching item is currently selected, the search will resume from the beginning of
the list.
For ENCOM STRATOS plus Version 2.1.71
Page 115
© 2010-2015 Encom Wireless Data Solutions Inc.
ENCOM STRATOS plus
USER MANUAL
Display Type Tabs
The tabs at the top of the radio list allow you to display the radios in three formats: radio name, radio
IP address and radio MAC address. Simply click on the appropriate tab to change the view.
Note: The radios are always sorted alphabetically within their parent folders.
For ENCOM STRATOS plus Version 2.1.71
Page 116
© 2010-2015 Encom Wireless Data Solutions Inc.
ENCOM STRATOS plus
USER MANUAL
Radio Tree View
The radio tree view shows the radios that were discovered by ENCOM STRATOS, or that were
manually added using the Add Radio and Find Radio functions.
Each radio item contains a state icon, the radio name, and a warning icon (displayed if the radio
needs attention). If the Show folder checkboxes option in the User Interface tab of the System
Settings form is checked, a checkbox is displayed next to the folder icons. This checkbox allows
you to show or hide the radio icons in the map view panel.
The state icon, located at the left of the radio name, shows the current state of the radio. The color
of the icon indicates one of three states:
Green
The radio is currently on-line.
The radio is currently on-line, but needs attention.
Yellow
Red
Place the mouse pointer over the warning icon to
show more information.
The radio is currently off-line.
The following screen shot shows examples of the state icons:
For ENCOM STRATOS plus Version 2.1.71
Page 117
© 2010-2015 Encom Wireless Data Solutions Inc.
ENCOM STRATOS plus
USER MANUAL
A warning icon, located at the right of the radio name, is displayed if the radio needs attention. To
determine the action to take, move the mouse pointer over the warning icon. A pop-up help balloon
will be displayed that explains the nature of the problem. The following example shows the warning
for a radio that STRATOS is not able to log in to:
For ENCOM STRATOS plus Version 2.1.71
Page 118
© 2010-2015 Encom Wireless Data Solutions Inc.
ENCOM STRATOS plus
USER MANUAL
Version 2 of ENCOM STRATOS (also known as ENCOM STRATOS plus) introduces a number of
advanced monitoring features that require licensing.
If your network contains more radios than are supported by the current license, STRATOS will
automatically choose the radios that will participate in the advanced monitoring functions. These
radios are identified by a symbol at the right of the radio's name in the Radio List panel. As well, a
'License Exceeded' indicator is displayed at the bottom of the panel to alert you to the situation.
Please refer to the Licensing topic for more information on licensing the advanced monitoring
features.
For ENCOM STRATOS plus Version 2.1.71
Page 119
© 2010-2015 Encom Wireless Data Solutions Inc.
ENCOM STRATOS plus
USER MANUAL
Selecting Radios
The radio tree view allows you to select one or more radios using the mouse. Refer to the following
topics for more information:
Selecting Single Radios
Selecting a Single Folder
Selecting a Range of Radios
Selecting Multiple Radios
Selecting a Range of Folders
Selecting Multiple Folders
Selecting Single Radios
To select a single radio, simply click the left mouse button on the radio name. The contents of the
Map View panel, Item Properties panel, Wireless Link Status panel and Network Traffic panel are
automatically update to reflect the newly selected radio.
For ENCOM STRATOS plus Version 2.1.71
Page 120
© 2010-2015 Encom Wireless Data Solutions Inc.
ENCOM STRATOS plus
USER MANUAL
Selecting a Single Folder
To select a single folder, click the left mouse button on the folder name. The Wireless Link Status
panel and Network Traffic panel are automatically disabled. The contents of the Item Properties
panel are automatically updated to provide information on the newly selected folder.
Selecting a folder will automatically select all of the radios found in that folder, and in any sub-folders
within the selected folder. This provides an easy way to select a group of radios to use with certain
ENCOM STRATOS functions, such as the Ping Test.
In the following example, the Mesh Network folder has been selected, which implies that the Mesh
Radio 1, Mesh Radio 2 and Mesh Radio 3 radios are also selected:
For ENCOM STRATOS plus Version 2.1.71
Page 121
© 2010-2015 Encom Wireless Data Solutions Inc.
ENCOM STRATOS plus
USER MANUAL
Selecting a Range of Radios
To select a range of radios, use the following procedure:
1. Click the left mouse button on the first radio in the range. The first radio will be highlighted.
2. Press and hold down the Shift key on the keyboard.
3. Click the left mouse button on the last radio in the range. All of the radios between the first
radio and the last radio will be selected.
Note: All radios in the range must reside in the same folder in order for this technique to work.
Selecting Multiple Radios
To select multiple radios, use the following procedure:
1. Click the left mouse button on the first radio. The radio will be highlighted.
2. Press and hold down the Ctrl key on the keyboard.
3. Click the left mouse button on each of the other radios to select. In the following example, the
Mesh Radio 1 and Mesh Radio 3 radios were selected.
Note: All radios must reside in the same folder in order for this technique to work.
For ENCOM STRATOS plus Version 2.1.71
Page 122
© 2010-2015 Encom Wireless Data Solutions Inc.
ENCOM STRATOS plus
USER MANUAL
Selecting a Range of Folders
To select a range of folders, use the following procedure:
1. Click the left mouse button on the first folder in the range. The first folder will be highlighted.
2. Press and hold down the Shift key on the keyboard.
3. Click the left mouse button on the last folder in the range. All of the folders between the first
folder and the last folder will be selected. By implication, all of the radios in the selected
folders will also be selected.
Note: All folders in the range must reside in the same parent folder in order for this technique to
work.
For ENCOM STRATOS plus Version 2.1.71
Page 123
© 2010-2015 Encom Wireless Data Solutions Inc.
ENCOM STRATOS plus
USER MANUAL
Selecting Multiple Folders
To select multiple folders, use the following procedure:
1. Click the left mouse button on the first folder. The folder will be highlighted.
2. Press and hold down the Ctrl key on the keyboard.
3. Click the left mouse button on each of the other folders to select. In the following example,
the Default and Point-to-Point Network folders were selected. By implication, all of the
radios in the selected folders will also be selected.
Note: All folders must reside in the same parent folder in order for this technique to work.
For ENCOM STRATOS plus Version 2.1.71
Page 124
© 2010-2015 Encom Wireless Data Solutions Inc.
ENCOM STRATOS plus
USER MANUAL
Moving Radios and Folders
ENCOM STRATOS allows you to arrange the radios and folders in the radio list to suit your
requirements. Refer to the following topics for more information:
Moving a Single Radio or Folder
Moving a group of Radios or Folders
Moving a Single Radio or Folder
To move a single radio or a single folder:
1. Click and hold the left mouse button on the item you want to move.
2. Drag the item to the folder to which to want to move the item.
3. Release the mouse button.
4. The item will be moved to the folder on which you released the mouse button.
Moving a group of Radios or Folders
To move a group of radios or folders:
1. Select a group of radios or a group of folders as described in the Selecting Radios topic.
2. Click and hold the left mouse button on one of the items you selected.
3. Drag the items to the folder to which to want to move them.
4. Release the mouse button.
5. The items will be moved to the folder on which you released the mouse button.
For ENCOM STRATOS plus Version 2.1.71
Page 125
© 2010-2015 Encom Wireless Data Solutions Inc.
ENCOM STRATOS plus
USER MANUAL
Setting the location of a radio
To set the location of a radio on the map:
1. Make sure that the Map View panel is visible.
2. Click and hold the left mouse button on the radio you want to locate.
3. Drag the radio to the desired location on the map. When dragging over the map, the drag
cursor will show the icon currently associated with the device.
4. Release the mouse button to locate the radio on the map. The radio's latitude and longitude
are set to the pointed end of the radio icon.
5. The radio's configuration settings will be updated with the new location.
For ENCOM STRATOS plus Version 2.1.71
Page 126
© 2010-2015 Encom Wireless Data Solutions Inc.
ENCOM STRATOS plus
USER MANUAL
Because the radio's location is stored in the radio's configuration settings, it must be
on-line in order for its location to be set.
You can only set the location of one radio at a time. Dragging two or more radios to
the map will not work.
For ENCOM STRATOS plus Version 2.1.71
Page 127
© 2010-2015 Encom Wireless Data Solutions Inc.
ENCOM STRATOS plus
USER MANUAL
Adding Radios to a Ping Test
To add radios to a ping test:
1. Select one or more radios, or one of more folders, in the Radio List panel. For information on
selecting multiple radios or folders, refer to the Selecting Radios topic.
2. Select Add to Ping Test from the radio list context menu.
3. The Ping Test panel will be activated and shown if it was hidden.
4. The radios that were selected, or that are found in the folders that were selected, will be
added to the Ping Test panel.
5. The ping test will automatically start if it is not already running.
Alternatively:
1. Make sure that the Ping Test panel is visible.
2. Select one or more radios, or one of more folders, in the Radio List panel. For information on
selecting multiple radios or folders, refer to the Selecting Radios topic.
3. Click and hold the left mouse button on one of the items you selected.
4. Drag the items to the Ping Test panel.
5. Release the mouse button.
6. The radios that were selected, or that are found in the folders that were selected, will be
added to the Ping Test panel.
7. The ping test will automatically start if it is not already running.
For ENCOM STRATOS plus Version 2.1.71
Page 128
© 2010-2015 Encom Wireless Data Solutions Inc.
ENCOM STRATOS plus
USER MANUAL
Showing and Hiding Radios on the Map
If your network contains a large number of radios, you may find that the map display becomes very
crowded. ENCOM STRATOS helps you address this problem by allowing you to selectively display
groups of radios.
To enable this feature, check the Show folder checkboxes option in the User Interface tab of the
System Settings form.
When enabled, checkboxes will be displayed at the left of each folder in the radio list, as shown in
the following example:
In the following example, all of the folders are checked, and all of the radio icons are shown in the
map:
For ENCOM STRATOS plus Version 2.1.71
Page 129
© 2010-2015 Encom Wireless Data Solutions Inc.
ENCOM STRATOS plus
USER MANUAL
In the following example, the Default and Point-to-Point Network folders are unchecked. Only the
icons for the radios in the Mesh Network folder are shown in the map:
For ENCOM STRATOS plus Version 2.1.71
Page 130
© 2010-2015 Encom Wireless Data Solutions Inc.
ENCOM STRATOS plus
USER MANUAL
Radio List Context Menu
To display the radio list context menu, click the right mouse button anywhere inside of the radio tree
view. Depending on where you click, the appropriate menu will be displayed.
If you click on a folder, the following
context menu is displayed:
If you click on a radio, the following
context menu is displayed:
If you click on empty space, the
following context menu is displayed:
The context menu provides a convenient way to access functions that are already available in the
main menu bar.
For more information on the individual context menu items, click the left mouse button on the menu
item text in the screenshots shown above.
For ENCOM STRATOS plus Version 2.1.71
Page 131
© 2010-2015 Encom Wireless Data Solutions Inc.
ENCOM STRATOS plus
USER MANUAL
Map View Panel
The Map View panel allows you to see the location of your radios on a map. A typical map display,
showing the location of five radios, is shown below.
The map panel contains two user interface elements:
Map Toolbar
Map Display
For ENCOM STRATOS plus Version 2.1.71
Page 132
© 2010-2015 Encom Wireless Data Solutions Inc.
ENCOM STRATOS plus
USER MANUAL
Map Toolbar
The map toolbar allows you to control the look and behavior of the map.
The following table describes the options and controls found in the map toolbar:
Field Name
Description
Map Provider
The left-hand drop down list box allows you to choose the map provider
and the map style.
In addition to regular road maps, several map providers support satellite
image-based maps. These are useful at spotting landmarks that can help
you locate or find a radio.
Zoom Bar
The zoom bar allows you to zoom the map display in or out.
With the zoom bar, you can:
Use the (-) button to zoom out.
Use the (+) button to zoom in.
Use the slider to zoom in or out.
Alternatively, click the left mouse pointer on the map to select it, and then
use the mouse wheel to zoom in or out.
Caching Mode
The map display consists of a number of image tiles that are downloaded
from the map provider and displayed on your computer.
The caching mode determines how the map tiles are used by your
computer. Three caching modes are available:
1. Server Only: No caching is performed. The map tiles are always
requested from the server. This option is typically slower than the
other options, and is not usually recommended.
2. Server and Cache: The map tiles will be downloaded from the
map provider and stored on your computer. If present, stored tiles
are used to render the map. New tiles are requested from the server
as required. This option should be used if your computer is normally
connected to the internet.
3. Cache Only: Only the stored tiles are used to render the map. This
option is recommended for computers that don't have access to the
Internet.
For ENCOM STRATOS plus Version 2.1.71
Page 133
© 2010-2015 Encom Wireless Data Solutions Inc.
ENCOM STRATOS plus
USER MANUAL
Grayscale
Icon Size
Click the Grayscale button to toggle the map between color and grayscale
modes. Setting the map to grayscale can make it easier to discern the
radio state indicators and the wireless link lines.
The icon size bar allows you to change the size of the icons displayed on
the map.
With the icon size bar, you can:
Use the (-) button to decrease the size of the icons.
Use the (+) button to increase the size of the icons.
Use the slider to change the icon sizes.
Click the Radio State button to show or hide the map radio state
indicators.
Radio State
The radio state indicators are displayed as a colored circle behind the
radio icons. The color of the indicators match the color of the state
indicators in the Radio List panel.
In the following example, the radio state indicators show that two radios
are on-line (green), and one is off-line (red):
For ENCOM STRATOS plus Version 2.1.71
Page 134
© 2010-2015 Encom Wireless Data Solutions Inc.
ENCOM STRATOS plus
USER MANUAL
Note: The radio state indicators are only displayed for radios that are
licensed. See the Licensing topic for more information on obtaining a
license for your radio network.
Link Type
The Link Type drop down list box allows you to specify the nature of the
wireless links shown between the radios.
One of the following options can be chosen:
Link Type
Description
None
No lines are displayed on the map.
RSSI
The lines represent the RSSI (signal strength) of
the wireless links between the radios.
The color of the line represents the worst of the
receive or transmit signal strengths. For example, if
the the receive signal strength is good, but the
transmit signal strength is poor, the line color will
represent the poor signal strength.
The color of the lines are set in the RSSI
Thesholds panel of the System Settings form.
CCQ
The lines represent the CCQ (signal quality) of the
wireless links between the radios.
The color of the line represents the worst of the
receive or transmit signal quality. For example, if
the the receive signal quality is good, but the
transmit signal quality is poor, the line color will
represent the poor signal quality.
For ENCOM STRATOS plus Version 2.1.71
Page 135
© 2010-2015 Encom Wireless Data Solutions Inc.
ENCOM STRATOS plus
USER MANUAL
The color of the lines are set in the CCQ
Thesholds panel of the System Settings form.
Note: The wireless link lines are only displayed for radios that are
licensed. See the Licensing topic for more information on obtaining a
license for your radio network
Zoom All Button
Click on the Zoom All button to show all of the radios in the map display.
This function will automatically zoom and re-center the map so that all of
the radios are visible on the map.
Note: If the Show folder checkboxes option in the System Settings form is
checked, only those radios associated with the folders that are checked
will be shown on the map.
Copy to Clipboard
Button
Click on the Copy to Clipboard button to copy the current map view to
the Windows clipboard. You can then paste this copy into most Windows
applications that support embedded pictures.
For ENCOM STRATOS plus Version 2.1.71
Page 136
© 2010-2015 Encom Wireless Data Solutions Inc.
ENCOM STRATOS plus
USER MANUAL
Map Display
The map display shows the actual road or satellite map. Icons are overlayed on the map to show
the location and state of your radios:
Refer to the following topics for more information on the map display:
Popup Help
Panning and Zooming
Selecting a Radio
Map Context Menu
Adding a Radio to the Map
Moving a Radio on the Map
For ENCOM STRATOS plus Version 2.1.71
Page 137
© 2010-2015 Encom Wireless Data Solutions Inc.
ENCOM STRATOS plus
USER MANUAL
Map Popup Help
Placing your mouse pointer over a radio icon will display a popup-up help balloon that shows some
important information about the radio.
Panning and Zooming
To pan the map (move it up, down, left or right), click and hold the left mouse button on the map.
The mouse pointer will change to a directional cursor, as shown in the following example:
Move the mouse to pan the map in the desired direction. Release the mouse button when you are
finished.
To zoom the map, click the left mouse pointer on the map, and then use the mouse wheel to zoom
in or out.
For ENCOM STRATOS plus Version 2.1.71
Page 138
© 2010-2015 Encom Wireless Data Solutions Inc.
ENCOM STRATOS plus
USER MANUAL
Selecting a Radio
Click the left mouse button on the radio icon to select the radio. A large circle (larger than the state
indicator circle) is displayed behind the radio to highlight the fact that it has been selected. The color
of the highlight circle matches the color of the radio state indicator displayed in the Radio List panel.
When you select a radio, the contents of the Radio List panel, Item Properties panel, Wireless Link
Status panel and Network Traffic panel are automatically updated to reflect the newly selected radio.
For ENCOM STRATOS plus Version 2.1.71
Page 139
© 2010-2015 Encom Wireless Data Solutions Inc.
ENCOM STRATOS plus
USER MANUAL
Map Context Menu
Click the right mouse button on the radio icon to display the map's context menu. This menu allows
you to perform some common operations on the selected radio.
The context menu provides a convenient way to access functions that are already available in the
main menu bar.
For more information on the individual context menu items, click the left mouse button on the menu
text in the screenshot shown below:
Note that you can double-click the left mouse button on the radio icon to display the Radio
Configuration form.
For ENCOM STRATOS plus Version 2.1.71
Page 140
© 2010-2015 Encom Wireless Data Solutions Inc.
ENCOM STRATOS plus
USER MANUAL
Setting the Location of a Radio
To add radios to a ping test:
1. Select one or more radios, or one of more folders, in the Radio List panel. For information on
selecting multiple radios or folders, refer to the Selecting Radios topic.
2. Select Add to Ping Test from the radio list context menu.
3. The Ping Test panel will be activated and shown if it was hidden.
4. The radios that were selected, or that are found in the folders that were selected, will be
added to the Ping Test panel.
5. The ping test will automatically start if it is not already running.
Alternatively:
1. Make sure that the Ping Test panel is visible.
2. Select one or more radios, or one of more folders, in the Radio List panel. For information on
selecting multiple radios or folders, refer to the Selecting Radios topic.
3. Click and hold the left mouse button on one of the items you selected.
4. Drag the items to the Ping Test panel.
5. Release the mouse button.
6. The radios that were selected, or that are found in the folders that were selected, will be
added to the Ping Test panel.
7. The ping test will automatically start if it is not already running.
For ENCOM STRATOS plus Version 2.1.71
Page 141
© 2010-2015 Encom Wireless Data Solutions Inc.
ENCOM STRATOS plus
USER MANUAL
Moving a Radio on the Map
To move a radio to a new location on the map:
1. Press and hold down the Shift key.
2. Click and hold the left mouse button on the radio you want to move.
3. Drag the radio to its new location.
4. Release the mouse button.
5. Release the Shift key.
6. The new location will be saved to the radio.
Because the radio's location is stored in the radio's configuration settings, it must be
on-line in order for its location to be set.
For ENCOM STRATOS plus Version 2.1.71
Page 142
© 2010-2015 Encom Wireless Data Solutions Inc.
ENCOM STRATOS plus
USER MANUAL
Item Properties Panel
The Item Properties panel displays a list of useful information associated with the selected folder or
radio.
Folder Properties
Radio Properties
The panel is divided into two sections.
The top section contains the list of properties and their current values.
The bottom section contains a more detailed description of the currently selected property.
To select a property, simply click the left mouse button on the property name or value in the top
section.
The example at the left shows the properties listed for a folder that is selected in the Radio List
panel. The bottom section contains the description of the Number of Radios property that is
selected in the top section.
For ENCOM STRATOS plus Version 2.1.71
Page 143
© 2010-2015 Encom Wireless Data Solutions Inc.
ENCOM STRATOS plus
USER MANUAL
Wireless Link Status Panel
The Wireless Link Status panel displays the state of the wireless connections between the currently
selected radio and the other radio or radios that are connected to it.
The information displayed in the Wireless Link Status panel is especially helpful when aligning the
radio antennas (see the Deploying the Radios section for more information an aligning antennas).
The wireless link status panel contains the following user interface elements:
Wireless Link Status Toolbar
Wireless Link Status Table
Wireless Link Status Bars
Refer to the following topics for more information regarding the features of the Wireless Link Status
panel:
Wireless Link RSSI Colors
Wireless Link CCQ Colors
Sorting the Wireless Link Status List
Wireless Link Context Menu
For ENCOM STRATOS plus Version 2.1.71
Page 144
© 2010-2015 Encom Wireless Data Solutions Inc.
ENCOM STRATOS plus
USER MANUAL
Wireless Link Status Toolbar
The Wireless Link Status toolbar allows you to control the local and remote (on-radio) antenna
alignment functions.
The following table describes the options and controls found in the map toolbar:
Field Name
Description
Local Alignment
Enable
The local antennal alignment button allows you to start and stop the local
antenna alignment sound.
To enable the local antenna alignment, click the Enable button (the button
text will change to Disable ).
If a wireless link is present in the Wireless Link Status table, a sound will
be played through the computer's speakers that reflects the transmitted
signal strength of the selected wireless link.
A higher pitch indicates a higher signal strength, and a lower pitch
indicates a lower signal strength.
To align the antenna of a radio:
Click the Enable button to start the antenna alignment process.
Select the radio (this is normally a radio that has a directional
antenna).
Select the wireless link to monitor (if the radio has more than one
active link).
Move the antenna to the left and right, as well as up and down, until
the highest pitch sound is encountered.
To stop the antenna alignment sound, click the Disable button.
Volume Control
The volume control allows you to increase or decrease the volume of the
antenna alignment sound.
With the volume control, you can:
Use the (-) button to decrease the volume.
Use the (+) button to increase the volume.
Use the slider to increase or decrease the volume.
For ENCOM STRATOS plus Version 2.1.71
Page 145
© 2010-2015 Encom Wireless Data Solutions Inc.
ENCOM STRATOS plus
USER MANUAL
The volume control only affects the antenna alignment sound. It will not
affect other sounds that are being played through your computer's
speaker.
On-Radio Alignment
Enable
The on-radio antenna alignment button allows you to enable the on-radio
antenna alignment tool.
The on-radio alignment tool is accessed through the radio's external audio
jack. The audio jack is compatible with most stereo headphones or ear
buds.
A periodic beep indicates the transmitted signal strength of the radio's
wireless links. A higher pitch indicates a higher signal strength, and a
lower pitch indicates a lower signal strength.
The on-radio antenna alignment tool is always active. By default, the
alignment tool reflects the signal strength of the the first link on the first
wireless interface (Radio 1), identified by the 'Default' indication in the
Wireless Link Status table's Align column.
To instruct the alignment tool to monitor another link:
Select the link in the Wireless Link Status table.
Click the Enable for 30 minutes button.
The pitch of the beeps will now reflect the signal strength of the
selected link.
The Wireless Link Status table's Align column will show a
countdown timer on the link for which the alignment tool is active.
When the countdown timer reaches 0, the on-radio alignment tool
reverts to the 'Default' link.
For ENCOM STRATOS plus Version 2.1.71
Page 146
© 2010-2015 Encom Wireless Data Solutions Inc.
ENCOM STRATOS plus
USER MANUAL
The remote (on-radio) alignment function is only available on newer Encom radio
models. If the selected radio does not support this functionality, STRATOS will not
display the On-Radio Alignment option.
For ENCOM STRATOS plus Version 2.1.71
Page 147
© 2010-2015 Encom Wireless Data Solutions Inc.
ENCOM STRATOS plus
USER MANUAL
Wireless Link Status Table
The wireless link status table contains the list of currently active wireless connections.
The following table describes the information that is displayed for each wireless connection:
Column
Description
Status
Displays the status of the wireless connection, based on the connection's
current signal strength reading.
The color of the status indicator matches the color displayed in the signal
strength (RSSI) graph. The colors can be changed in the RSSI Threshold
panel of the System Settings graph.
Align
Indicates the wireless link that the On-Radio Alignment tool is currently
monitoring.
Under normal circumstances, the first link on the first wireless interface
(Radio 1) is automatically selected for monitoring. This link is identified by
the 'Default' indication in the Align column.
If you send a command instructing the radio to monitor a specific link
(using the Enable for 30 minutes button in the Wireless Link Status
toolbar), the Align column will show a countdown timer on the link for
which the alignment tool is active.
Note that the Align column will be empty under the following conditions:
The On-Radio Alignment tool is in its default state, and there are no
links active on the first wireless interface.
For ENCOM STRATOS plus Version 2.1.71
Page 148
© 2010-2015 Encom Wireless Data Solutions Inc.
ENCOM STRATOS plus
USER MANUAL
The link selected for monitoring using the Enable for 30 minutes
button is no longer active.
The radio does not support the On-Radio Alignment tool. In this
case, the Enable for 30 minutes button is not available in the
toolbar.
Interface
The wireless interface card on which the wireless connection is
established.
The radio's first wireless card is displayed as Radio 1, the second card
as Radio 2, and so on.
Radio Name
The name of the radio at the other end of the wireless connection. This is
the name given to the radio when it was configured.
MAC Address
The MAC address of the radio at the other end of the wireless connection.
For broadband radios, a single MAC address is assigned to all of the
wireless interface cards.
For mesh, point-to-point and point-to-multipoint radios, each wireless
interface card has its own MAC address.
IP Address
The IP address of the radio at the other end of the wireless connection.
Each radio is assigned a single IP address, regardless of the number of
wireless interface cards it has.
Tx/Rx Rate (Mbps)
The raw transmit and receive data rates of the wireless connection.
The data rates can be shown in a number of different formats, as
described in the following table:
Format
Description
48
The raw throughput, in megabits per second.
54*2
This is displayed for 40 MHz channels. It
indicates a raw throughput of 108 (54 * 2)
megabits per second.
54/2
This is displayed for 10 MHz channels. It
indicates a raw throughput of 27 (54 / 2)
megabits per second.
48/4
This is displayed for 5 MHz channels. It
indicates a raw throughput of 12 (48 / 4)
megabits per second.
For ENCOM STRATOS plus Version 2.1.71
Page 149
© 2010-2015 Encom Wireless Data Solutions Inc.
ENCOM STRATOS plus
USER MANUAL
11-SP
The 'SP' indicates that the link is operating in
Short Preamble mode. This is a special lowoverhead mode for 802.11b connections.
The '11' indicates a raw throughput of 11
megabits per second.
104.0-HT
The 'HT' indicates that the radio is operating in
High Throughput (Wireless-N) mode.
The '104.0' indicates a raw throughput of 104
megabits per second.
Tx/Rx Strength (dBm) The current transmit and receive signal strength of the wireless
connection. Refer to the Wireless Link RSSI Colors topic for information
on the colors used in the signal strength graph.
Tx/Rx CCQ (%)
The current transmit and receive connection quality. Refer to the Wireless
Link CCQ Colors topic for information on the colors used in the
connection quality graph.
Uptime
The amount of time that the wireless connection has been active. This
value is reset to 00:00:00 if the connection is dropped for any reason.
Chain 0 [dBm]
The current transmit and receive signal strength for the 1st antenna of a
Wireless-N radio card.
If the radio card associated with the connection is not a Wireless-N card,
the 1st antenna chain is not enabled, or the 1st antenna chain is not
present, "--/--" is displayed.
Chain 1 [dBm]
The current transmit and receive signal strength for the 2nd antenna of a
Wireless-N radio card.
If the radio card associated with the connection is not a Wireless-N card,
the 2nd antenna chain is not enabled, or the 2nd antenna chain is not
present, "--/--" is displayed.
Chain 2 [dBm]
The current transmit and receive signal strength for the 3rd antenna of a
Wireless-N radio card.
If the radio card associated with the connection is not a Wireless-N card,
the 3rd antenna chain is not enabled, or the 3rd antenna chain is not
present, "--/--" is displayed.
Distance
The length of the wireless link, shown in miles and kilometers.
The distance is based on the location of the radios on the map. If the
For ENCOM STRATOS plus Version 2.1.71
Page 150
© 2010-2015 Encom Wireless Data Solutions Inc.
ENCOM STRATOS plus
USER MANUAL
radios are not correctly placed on the map, this value will not be correct.
If either of the radios at each end of the link is not located on the map,
<Unknown> is displayed.
For ENCOM STRATOS plus Version 2.1.71
Page 151
© 2010-2015 Encom Wireless Data Solutions Inc.
ENCOM STRATOS plus
USER MANUAL
Wireless Link Status Bars
The bottom section of the Wireless Link Status panel contains a set of bar graphs that display the
signal strength (RSSI) and client connection quality (CCQ) of the wireless link that is selected in
Wireless Link Status table.
For connections that are associated with a Wireless-N radio card, a small panel is displayed at the
left of the bar graphs. The panel allows you to select a specific antenna chain whose signal strength
will be displayed in the RSSI chart. This feature can help you align the antennas associated with the
Wireless-N connections.
For ENCOM STRATOS plus Version 2.1.71
Page 152
© 2010-2015 Encom Wireless Data Solutions Inc.
ENCOM STRATOS plus
USER MANUAL
Wireless Link RSSI Colors
The color of the signal strength (RSSI) bars in the Wireless Link Status panel indicates the relative
strength of the signal. By default, the following colors are used:
Color
Description
The signal strength is much too low. The connection will
probably not be stable, and will have low throughput.
The signal strength too low. The connection will be marginal,
and may not have good throughput.
The signal strength is within the optimal range. The wireless
connection should be stable, and will have good throughput.
The signal strength is too high. The connection will be marginal,
and may not have good throughput.
For Wireless-N radio cards, the following levels are used by default:
Color
Signal Strength
-75 dBm or lower
-75 dBm to -60 dBm
-60 dBm to -35 dBm
above -35 dBm
For ENCOM STRATOS plus Version 2.1.71
Page 153
© 2010-2015 Encom Wireless Data Solutions Inc.
ENCOM STRATOS plus
USER MANUAL
For other radio cards, the following levels are used by default:
Color
Signal Strength
-85 dBm or lower
-85 dBm to -70 dBm
-70 dBm to -40 dBm
above -40 dBm
You can change the default colors and thresholds in the RSSI Threshold panel in the System
Settings form.
For ENCOM STRATOS plus Version 2.1.71
Page 154
© 2010-2015 Encom Wireless Data Solutions Inc.
ENCOM STRATOS plus
USER MANUAL
Wireless Link CCQ Colors
The color of the client connection quality (CCQ) bars in the Wireless Link Status panel indicate the
relative quality of the signal. By default, The following colors are used:
Color
Description
The signal quality is bad. The connection will probably not be
stable, and will have low throughput.
The signal quality is not very good. The connection will be
marginal, and may not have good throughput.
The signal quality is good. The wireless connection should be
stable, and will have good throughput.
The following levels are used in the CCQ graph by default:
Color
Signal Strength
30% or lower
30% to 50%
above 50%
You can change the default colors and thresholds in the CCQ Threshold panel in the System
Settings form.
A low CCQ reading usually indicates that something is interfering with the signal.
This could be physical problem (such as terrain, buildings or trees that are in the
signal path), or a congestion problem (other radios operating on the same
frequency and in close proximity to the ENCOM radio).
For ENCOM STRATOS plus Version 2.1.71
Page 155
© 2010-2015 Encom Wireless Data Solutions Inc.
ENCOM STRATOS plus
USER MANUAL
Sorting the Wireless Link Status List
You can sort the wireless link status list by clicking the left mouse button on one of the following
table headers:
Interface
Radio Name
MAC Address
IP Address
When you click on one of these headers, an arrow is displayed that indicates the direction of the
sort.
Click once to sort in ascending order, and click again to sort in descending order.
Wireless Link Context Menu
To display the Wireless Link Status Test context menu, click the right mouse button on a link in the
Wireless Link Status Table. The following context menu is displayed:
The following table describes the commands available in the context menu.
Command
Description
Select Connected Radio
Selects the radio associated with the link. The STRATOS user
interface will be updated to reflect the newly selected radio.
You can also select the radio associated with the link by doubleclicking the left mouse button on the link.
For ENCOM STRATOS plus Version 2.1.71
Page 156
© 2010-2015 Encom Wireless Data Solutions Inc.
ENCOM STRATOS plus
USER MANUAL
Bandwith Test Panel
The Bandwidth Test panel is used to determine the throughput of the wireless connections between
the currently selected radio and the other radio or radios that are connected to it.
To check the throughput of a wireless connection:
1. Make sure that the Bandwidth Test panel is visible. If it is not currently visible:
· In the main menu, navigate to the View -> Panels item, and verify that the Bandwidth Test
option is checked.
· If the Bandwidth Test panel is hidden behind another panel, click on the Bandwidth Test tab to
bring it to the front of the other panels:
2. In the Radio List, select the radio that is closest to the computer running the ENCOM
STRATOS application. This is either the radio that is connected to your network via its Ethernet
port, or the radio that is the least number of wireless connections (hops) from your computer.
For ENCOM STRATOS plus Version 2.1.71
Page 157
© 2010-2015 Encom Wireless Data Solutions Inc.
ENCOM STRATOS plus
USER MANUAL
3. Specify the IP address of the remote radio in the IP Address list.
The drop-down list allows you to select the IP address of a remote radio that is wirelessly
connected to your radio. If you want to test against a radio that is not directly connected to your
radio (e.g. if your radio is wirelessly connected to a repeater, but you want to test against the
remote radio to which the repeater is connected), manually type in the IP address of the
remote radio. Please refer to the following diagram for more info.
4. Specify the rate at which you want to perform the test from the Max Speed list.
By default, this is set to the max possible value in order to help you determine the maximum
throughput available on the wireless link. You can choose a different value from the drop-down
list, or type in a value if you want to specify a rate that is not in the list. When entering a custom
rate, use the 'k' and 'm' suffixes to specify kilobit and megabit rates, as shown in the following
examples:
Value entered
Rate used for test
500000
500 kilobits per second
6000000
6 megabits per second
1200k
1.2 megabits per second
3m
3 megabits per second
For ENCOM STRATOS plus Version 2.1.71
Page 158
© 2010-2015 Encom Wireless Data Solutions Inc.
ENCOM STRATOS plus
USER MANUAL
5. Select the direction in which the bandwidth test is to be performed from the Direction list.
To get a true understanding about the capacity of a link, you should run two bandwidth tests:
one in the Transmit direction, and one in the Receive direction.
When performing a combined Receive/Transmit test at the max possible speed, it is common
for the link to polarize so most of the traffic is in one direction. This behavior will give you an
incorrect impression of the link's quality.
6. Click the Start button to start the test. The button text will automatically change to 'Stop'.
7. The graph at the right in the Bandwidth Test panel will show the short term trending of the
throughput. The following screen shots show typical results for the transmit and receive tests.
For ENCOM STRATOS plus Version 2.1.71
Page 159
© 2010-2015 Encom Wireless Data Solutions Inc.
ENCOM STRATOS plus
USER MANUAL
8. The values displayed at the left of the Bandwidth Test panel show the current and averaged
bandwidth throughput. The following screen shots show typical results for the transmit and
receive tests.
9. Press the Stop button to stop the test. The button text will automatically change to 'Start'.
Do not be too concerned with fluctuations that appear on the graph; the average
numbers listed to the left of the graph are more important. Adding the average
numbers gives you the link’s effective throughput.
The available bandwidth depends on the channel mode you selected when configuring
the radio. A smaller channel mode allows for greater link distances at the cost of lower
bandwidth. A larger channel mode allows for shorter link distances but at greater
bandwidth.
The available bandwidth can be affected by the signal strength, since a low signal
strength can translate into low link rates.
If you have configured a maximum link rate (in the Basic Settings tab of the radio
configuration form) with a low value, you will limit your available bandwidth.
For ENCOM STRATOS plus Version 2.1.71
Page 160
© 2010-2015 Encom Wireless Data Solutions Inc.
ENCOM STRATOS plus
USER MANUAL
Network Traffic Panel
The Network Traffic panel displays the amount of traffic between the currently selected radio and
the other radio or radios that are connected to it.
The table at the left shows all interfaces available on the radio. This includes the ethernet interfaces
as well as the wireless interfaces.
For master and mesh radios, the traffic on each card is broken down to the individual wireless links
that are formed between the wireless cards and the remote radios. In the example above, the Radio
1 interface has two wireless connections associated with it: wds1 and wds3. The wireless card's
overall data rates consist of the sum of the data rates for all of the wireless links associated with the
card.
The radio's first wireless card is displayed as Radio 1, the second card as Radio 2, and so on.
The graph at the right shows the short term trending of the traffic for the item that is selected in the
table. Click the left mouse button on an item in the table to select it.
The following table describes the information that is displayed for each connection.
Column
Description
Interface
The interface being monitored.
Tx
The number of bytes transmitted on the interface.
Rx
The number of bytes received on the interface.
Tx Packets
The number of packets transmitted on the interface.
Rx Packets
The number of packets received on the interface.
For ENCOM STRATOS plus Version 2.1.71
Page 161
© 2010-2015 Encom Wireless Data Solutions Inc.
ENCOM STRATOS plus
USER MANUAL
Ping Test Panel
The Ping Test panel displays the results of an on-going ping test.
A ping test consists of periodically sending ICMP message (pings) to a group of radios and
recording the latency of the responses. The latency is the interval between the time at which the
ICMP message is sent and the time at which the response is received.
To stop the ping test, click on the Stop button. The button text will automatically change to 'Start'.
To start the ping test, click on the Start button. The button text will automatically change to 'Stop'.
The Reset button allows you to restart the test while it is running. All of the statistics shown in the
list are automatically reset to 0.
The following table describes the information that is displayed for each radio participating in the ping
test.
Column
Description
Radio
The name assigned to the radio. The icon at the left of the radio name
indicates the state of the test for the radio. One of the following icons is
displayed:
Icon
State
No ICMP packets have been sent to the radio yet.
An ICMP packet has been sent to the radio, but the response
had not been received yet. STRATOS will wait a maximum of
2 seconds for a response before proceeding to the next
radio.
The radio responded in a timely fashion to the last ICMP
packet sent to it.
The radio did not respond to the last ICMP packet sent to it.
IP Address
The IP address of the radio.
For ENCOM STRATOS plus Version 2.1.71
Page 162
© 2010-2015 Encom Wireless Data Solutions Inc.
ENCOM STRATOS plus
USER MANUAL
Column
Description
Sent
The number of ICMP packets sent to the radio.
Received
The number of replies received from the radio.
(%)
The percentage of replies received from the radio. 100% means that a
reply was received for each ICMP packet sent to the radio.
min (ms)
The minimum latency encountered during the test.
max (ms)
The maximum latency encountered during the test.
avg (ms)
The average latency encountered during the test.
cur (ms)
The latency encountered during the last round of ICMP packets sent to the
radio.
Refer to the following topics for more information regarding the features of the Ping Test panel:
Carrying Out a Ping Test
Sorting the Ping Test List
Ping Test Context Menu
For ENCOM STRATOS plus Version 2.1.71
Page 163
© 2010-2015 Encom Wireless Data Solutions Inc.
ENCOM STRATOS plus
USER MANUAL
Carrying Out a Ping Test
To carry out a ping test:
1. Select one or more radios, or one of more folders, in the Radio List panel. For information on
selecting multiple radios or folders, refer to the Selecting Radios topic.
2. Select Add to Ping Test from the Radio menu.
3. The Ping Test panel will be activated and shown if it was hidden.
4. The radios that were selected, or that are found in the folders that were selected, will be
added to the Ping Test panel.
5. The ping test will automatically start if it is not already running.
Alternatively:
1. Make sure that the Ping Test panel is visible.
2. Select one or more radios, or one of more folders, in the Radio List panel. For information on
selecting multiple radios or folders, refer to the Selecting Radios topic.
3. Click and hold the left mouse button on one of the items you selected.
4. Drag the items to the Ping Test panel.
5. Release the mouse button.
6. The radios that were selected, or that are found in the folders that were selected, will be
added to the Ping Test panel.
7. The ping test will automatically start if it is not already running.
For ENCOM STRATOS plus Version 2.1.71
Page 164
© 2010-2015 Encom Wireless Data Solutions Inc.
ENCOM STRATOS plus
USER MANUAL
Sorting the Ping Test List
You can sort the ping test list by clicking the left mouse button on any of the table headers.
When you click on one of the headers, an arrow is displayed that indicates the direction of the sort.
Click once to sort in ascending order, and click again to sort in descending order.
Ping Test Context Menu
To display the Ping Test context menu, click the right mouse button anywhere on the ping test list.
The following context menu is displayed:
The following table describes the commands available in the context menu.
Command
Description
Remove Radios (Del)
Removes the selected radios from the list. If no more radios are left,
the ping test is automatically stopped.
Remove All Radios
Removes all radios from the list, and stops the ping test if it is currently
running.
For ENCOM STRATOS plus Version 2.1.71
Page 165
© 2010-2015 Encom Wireless Data Solutions Inc.
ENCOM STRATOS plus
USER MANUAL
Tasks Panel
The Tasks panel displays the current state of long-running tasks.
Tasks that are displayed in the Tasks panel include:
Configure Radio
Find Radio
Assign Static IP Address
Restore to Factory Defaults
Upgrade Firmware
The following table describes the information that is displayed for each task shown in the list.
Column
Description
Status
The icon at the left of the task name indicates the state of the task. One of
the following icons is displayed:
Icon
State
The task is currently in progress.
The task completed successfully.
The task did not complete successfully.
Radio Name
The name of the radio on which the task is being performed. If the task is
not associated with a particular radio, "<Not Applicable>" is displayed.
Task
Short description of the task being performed.
Phase
The current phase of the task being performed. Most long running tasks
consist of two phases:
The operation requested (e.g. upgrading the firmware)
Waiting for the radio to restart
Progress
The progress of the current phase. Since most tasks take an
For ENCOM STRATOS plus Version 2.1.71
Page 166
© 2010-2015 Encom Wireless Data Solutions Inc.
ENCOM STRATOS plus
USER MANUAL
Column
Description
indeterminate amount of time to complete, this is a rough estimate.
Final Status
Indicates the state of the task when it has finished. If the task was not
successful, the error that caused the task to fail is displayed.
Started At
The time at which the task was started.
Finished At
The time at which the task completed.
Refer to the following topics for more information regarding the features of the Ping Test panel:
Task List Context Menu
For ENCOM STRATOS plus Version 2.1.71
Page 167
© 2010-2015 Encom Wireless Data Solutions Inc.
ENCOM STRATOS plus
USER MANUAL
Task List Context Menu
To display the Task List context menu, click the right mouse button anywhere on the Task List
panel. The following context menu is displayed:
The following table describes the commands available in the context menu.
Command
Description
Remove Task
Removes the currently selected and finished task from the list. This
option is grayed out if a finished task is not currently selected.
Remove Finished Tasks
Removes all finished tasks from the list.
Cancel Task
Allows you to cancel the task that is currently selected. This option is
grayed out if a task is not currently selected, or if the selected task is
already finished.
Note: Canceling a task during the Restart Radio phase will not have
any effect on the outcome of the task, since the actual operation has
already been carried out. (STRATOS is simply waiting for the radio to
come back on-line after being restarted.)
For ENCOM STRATOS plus Version 2.1.71
Page 168
© 2010-2015 Encom Wireless Data Solutions Inc.
ENCOM STRATOS plus
USER MANUAL
Spectrum Scan Panel
The Spectrum Scan panel allows you to visualize the external wireless traffic that exists in a radio's
frequency band. You can use this information to decide the best frequency to assign to the radio. In
most situations, you want to use a frequency that has the least amount of traffic, as interference
from external sources will adversely affect a wireless connection's effective bandwidth.
The spectrum scan function uses one of the radio's wireless interface cards to
scan for external wireless traffic. When the spectrum scan function is started, any
wireless connections associated with that wireless interface are dropped.
If you are not directly connected to the radio using an Ethernet cable, and the
wireless interface you selected for the scan is the only connection between the
radio and your network, you will either:
Temporarily lose connection to the radio when you start the scan.
Permanently lose connection to the radio when it switches to a channel mode
that is different from channel mode of the repeater or master radio with which
it communicates.
Because of these scenarios, ENCOM recommends that this function only be used
when STRATOS is directly connected to the radio with an Ethernet cable.
A typical Spectrum Scan panel is shown below:
To view the wireless traffic in the vicinity of a radio:
1. Make sure that the Spectrum Scan panel is visible. If it is not currently visible:
· In the main menu, navigate to the View -> Panels item, and verify that the Spectrum Scan
option is checked.
For ENCOM STRATOS plus Version 2.1.71
Page 169
© 2010-2015 Encom Wireless Data Solutions Inc.
ENCOM STRATOS plus
USER MANUAL
· If the Spectrum Scan panel is hidden behind another panel, click on the Spectrum Scan tab to
bring it to the front of the other panels:
2. In the Radio List, select the radio you want to use for the spectrum scan.
3. Select the wireless interface to use from the drop-down list box in the upper left-hand corner of
the Spectrum Scan panel.
4. When you select a wireless interface, all of the channel modes supported by the wireless
interface card are automatically checked:
If you do not want STRATOS to scan all channel modes, simply uncheck the channel modes
you do not wish to scan.
5. Press the Start button to start the scan. The button text will automatically change to 'Start'.
STRATOS will cycle through each of the selected channel modes at 10 second intervals. The
wireless interface card will be configured to use the appropriate channel mode for each scan. If
you lose connection to the radio due to a channel mode change, it may no longer be possible
to communicate with it. If this occurs, you will need to recover the radio using one of the
following techniques:
Connect an Ethernet cable to the radio, and use STRATOS to change its channel mode
back to the original setting.
For ENCOM STRATOS plus Version 2.1.71
Page 170
© 2010-2015 Encom Wireless Data Solutions Inc.
ENCOM STRATOS plus
USER MANUAL
Modify the configuration of the radios between STRATOS and the lost radio so that it is
possible to communicate with the lost radio. In this case, you may have to change the
channel mode of all the intermediate radios, starting with the radio closest to the lost radio,
to the channel mode of the lost radio. Since you may not know the channel mode currently
assigned to the lost radio, you may need to try different channel modes until you find the
right one. Once you are able to communicate with the lost radio, restore the channel
modes of all radios, starting with the lost radio and ending with the radio closest to the
computer on which STRATOS is running.
6. While the spectrum scan is active, the Scanning and Noise Floor fields (below the Start/Stop
button) will show the active channel mode and the approximate noise floor:
The noise floor shows the minimum signal strength required for the radio to discriminate
between a valid signal and background noise. In practice, the signal strength of a wireless
connection should be at least 20 dB above the signal floor in order for the connection to be
stable.
7. While the spectrum scan is active, the strength of the wireless traffic for each frequency
channel is displayed in the graph. The red bars show the current strength of the wireless
traffic, and horizontal black lines shows the maximum signal strength encountered (in dBm),
as shown in the following screen shot:
For ENCOM STRATOS plus Version 2.1.71
Page 171
© 2010-2015 Encom Wireless Data Solutions Inc.
ENCOM STRATOS plus
USER MANUAL
If you have selected more than one channel mode, STRATOS will cycle through each of the
selected channel modes at 10 second intervals. The graph will display the traffic encountered in
the currently active channel mode. If there is no traffic in the active channel mode, the graph is
left blank. The following graphs show a typical spectrum scan session where all of the channel
modes are being scanned:
5 MHz Channel Mode
10 MHz Channel Mode
20 MHz Channel Mode
40 MHz Channel Mode
8. In order to get a good idea of the maximum wireless traffic in your area, you should let the
spectrum scan run for a reasonable period of time (at least a couple of minutes).
9. Press the Stop button to stop the scan. The button text will automatically change to 'Start'.
Due to the way in which Wireless-N technology is implemented, the 20-MHz and
40-MHz channel modes will display the same information when the spectrum scan
is being performed with a Wireless-N radio card.
For ENCOM STRATOS plus Version 2.1.71
Page 172
© 2010-2015 Encom Wireless Data Solutions Inc.
ENCOM STRATOS plus
USER MANUAL
Terminal Panel
The Terminal panel allows you to interact with the currently selected radio using an SSH based
terminal session. The panel is only visible when the terminal session is active.
The terminal panel is meant to be used for troubleshooting issues with the help of ENCOM technical
support personnel. A description of the terminal commands available to the radio is beyond the
scope of this document.
To connect to a radio using the terminal panel:
1. Select the radio you want to connect to from the Radio List.
2. Select Radio -> Terminal Connect from the STRATOS menu.
3. When connected, enter the appropriate commands using the keyboard. Press the 'Enter' key
to execute the commands.
To disconnect from the radio, perform one of the following:
Click on the
at the right of the panel's title bar.
Select Radio -> Terminal Disconnect from the STRATOS menu.
Enter the 'quit' command in the terminal window.
Refer to the following topics for more information regarding the features of the Ping Test panel:
Terminal Toolbar
For ENCOM STRATOS plus Version 2.1.71
Page 173
© 2010-2015 Encom Wireless Data Solutions Inc.
ENCOM STRATOS plus
USER MANUAL
Terminal Toolbar
The terminal toolbar allows you to change the look of the terminal window, and to interact with the
Windows clipboard.
The following table describes the options and controls found in the map toolbar:
Field Name
Description
Connected to...
The left-hand label displays the name of the radio to which the terminal is
connected.
Copy to Clipboard
button
Click on the Copy to Clipboard button to copy the selected text from the
terminal display to the Windows clipboard.
To select text in the terminal display:
1. Press and hold down the left mouse button at the start of the block
of text you want to copy.
2. Drag the mouse to the end of the block of text you want to copy.
3. Release the left mouse button.
4. Click the Copy to Clipboard button to copy the highlighted text.
Paste from Clipboard
button
Color Scheme
Click the Paste from Clipboard button to paste text from the Windows
clipboard to the terminal.
The right-hand drop down list box allows you to choose the color style for
the terminal window text.
For ENCOM STRATOS plus Version 2.1.71
Page 174
© 2010-2015 Encom Wireless Data Solutions Inc.
ENCOM STRATOS plus
USER MANUAL
Configuring Broadband Radios
To configure a broadband radio:
1. Locate the radio you would like to configure in the Radio List. Ensure that it is currently on-line
(a green icon is displayed at the left of an on-line radio):
2.
3. Click the right mouse button on the radio name, and select Configure from the pop-up menu
that is displayed:
Alternatively, you can either double-click the left mouse button on the radio name, or click the
left mouse button on the radio name, and select Radio -> Configure from the main menu.
For ENCOM STRATOS plus Version 2.1.71
Page 175
© 2010-2015 Encom Wireless Data Solutions Inc.
ENCOM STRATOS plus
USER MANUAL
4. STRATOS will download the radio's current configuration. This process will normally take a
few seconds to complete. During this time, a wait form is displayed:
5. When the radio's configuration has been obtained, the radio configuration form is displayed:
The configuration settings are logically grouped using a tabbed interface. The following topics
describe the settings found in each tab:
Basic Settings tab
Location tab
Radio tab
Network tab
About tab
For ENCOM STRATOS plus Version 2.1.71
Page 176
© 2010-2015 Encom Wireless Data Solutions Inc.
ENCOM STRATOS plus
USER MANUAL
Basic Settings Tab
The following screen shot shows the basic configuration settings tab for a broadband radio:
The following tables describe the settings found in each group in the basic settings tab.
Identification
Field Name
Description
Radio Name
Enter a name used to identify the radio (up to a maximum of 64
characters). The name you enter will be displayed in the radio list, and in
all other places where a reference to the radio is made:
Radio MAC Address
Displays the MAC address assigned to the radio. (This is essentially the
MAC address of the radio's first Ethernet adapter.)
For ENCOM STRATOS plus Version 2.1.71
Page 177
© 2010-2015 Encom Wireless Data Solutions Inc.
ENCOM STRATOS plus
USER MANUAL
Identification
Field Name
Description
Description
Enter an optional description for the radio. This field allows you to keep
track of ad-hoc information associated with the radio, without adding
clutter to the radio name. The radio description is displayed in the radio
properties panel:
Regulatory Domain
Field Name
Description
Country Name
Select the country in which the radio is operating. Certain countries have
limitations on the radio power output, allowed frequency ranges and
frequency bands. Failure to select the appropriate country can result in a
radio that is operating outside of the legally allowed ranges.
If the radio is operating in the United States or Canada, you can leave this
setting to <Not Set>.
IP Address Settings
Field Name
Description
Obtain an IP address
automatically
Select this option if a DHCP server is available on your radio network, and
you want the DHCP server to assign an IP address to the radio.
Specify a static IP
address
Select this option to manually assign the radio's IP address.
ENCOM recommends this option because it provides for a more secure
network (especially if you have not enabled wireless security).
Note: It is important that each radio in the network is assigned a different
IP address. Network performance can suffer greatly if two or more radios
are assigned the same IP address.
For ENCOM STRATOS plus Version 2.1.71
Page 178
© 2010-2015 Encom Wireless Data Solutions Inc.
ENCOM STRATOS plus
USER MANUAL
IP Address Settings
Field Name
Description
IP Address
Enter the IP address of the radio. This is an Internet Protocol version 4
(IPv4) address, specified in dotted notation, as shown in the following
example:
Network Mask
Enter the network mask. This is an Internet Protocol version 4 (IPv4)
address, specified in dotted notation, as shown in the following example:
Default Gateway
Enter the IP address of the radio or router that allows the radio to connect
with devices that are outside of their local LAN or VLAN. This is an Internet
Protocol version 4 (IPv4) address, specified in dotted notation, as shown
in the following example:
Note that the default gateway's IP address must be in the same subnet as
the radio's IP address.
For ENCOM STRATOS plus Version 2.1.71
Page 179
© 2010-2015 Encom Wireless Data Solutions Inc.
ENCOM STRATOS plus
USER MANUAL
Location Tab
The following screen shot shows the location settings tab for a broadband radio:
The following table describes the settings found in the location tab.
Field Name
Description
Get location from GPS Select this option if you want the radio to get its location from the built-in
GPS receiver.
This option is not available if the radio does not contain a GPS receiver.
Manually specify
location
Select this option if you want to manually specify the location of the radio.
Latitude
Enter the latitude at which the radio is located, in decimal degrees. This
value is positive in the northern hemisphere and negative in the southern
hemisphere.
Alternatively, hold down the Shift key and click the left mouse button on
the map to set the radio's position. This process will automatically update
the Latitude field.
Longitude
Enter the longitude at which the radio is located, in decimal degrees. This
value is positive in the eastern hemisphere and negative in the western
hemisphere.
Alternatively, hold down the Shift key and click the left mouse button on
the map to set the radio's position. This process will automatically update
For ENCOM STRATOS plus Version 2.1.71
Page 180
© 2010-2015 Encom Wireless Data Solutions Inc.
ENCOM STRATOS plus
USER MANUAL
the Longitude field.
Icon Color
Select the color of the radio icon. You can use the icon color to visually
group radios by radio type, geographical location, VLAN association, etc.
Icon Style
Select the style of the radio icon. Four icon styles are currently available:
Icon
Radio Type
Generic radio
Master radio
Remote radio
Repeater radio
Dual radio
Embedded map
The embedded map allows you to see the current location of the radio. A
green marker shows the location assigned to the radio.
To set a new location:
For ENCOM STRATOS plus Version 2.1.71
Page 181
© 2010-2015 Encom Wireless Data Solutions Inc.
ENCOM STRATOS plus
USER MANUAL
Press and hold down the Shift key on your computer's keyboard.
Click the left mouse button at the location you want to assign to the
radio.
The green marker will move to the selected position.
Note: Refer to the Map Panel topic for more information on the embedded
map features.
Street Address
Enter the street address of the radio, if applicable. This information is
optional.
For ENCOM STRATOS plus Version 2.1.71
Page 182
© 2010-2015 Encom Wireless Data Solutions Inc.
ENCOM STRATOS plus
USER MANUAL
Radio Tab
ENCOM broadband radios contain at least one, and as many as four, wireless radio modules. Each
wireless radio module is configured in its own tab. The first radio module is configured in the Radio
1 tab, the second radio is configured in the Radio 2 tab, and so on.
The following screen shot shows the radio settings tab for a broadband radio:
Because the wireless radio settings are somewhat involved, the radio configuration tab is split up
into three sub-tabs. The following topics describe the settings found in each sub-tab:
Radio Settings sub-tab
WDS Setup sub-tab
Wireless Security sub-tab
For ENCOM STRATOS plus Version 2.1.71
Page 183
© 2010-2015 Encom Wireless Data Solutions Inc.
ENCOM STRATOS plus
USER MANUAL
Radio Settings
The following screen shot shows the wireless radio settings tab for a broadband radio:
The following tables describe the settings found in each group in the wireless radio settings tab.
General
Field Name
Description
Enable Radio
Uncheck this option to disable the wireless radio card. A disabled radio
card will not be able to form wireless links with other radios.
If you uncheck this option, all of the other options in the Radio Settings tab
will be disabled.
Identification
Field Name
Description
Radio Model
Displays the model number of the wireless radio card. This information is
useful when troubleshooting issues with the radio.
Wireless MAC
Address
Displays the MAC address assigned to the wireless radio card. For
broadband radios, the MAC address of the wireless radio cards are
identical to the MAC address of the radio's Ethernet interface.
For ENCOM STRATOS plus Version 2.1.71
Page 184
© 2010-2015 Encom Wireless Data Solutions Inc.
ENCOM STRATOS plus
USER MANUAL
Radio Network Setup
Field Name
Description
Network Type
Identifies the radio network type. This setting cannot be changed for
broadband radios.
Network SSID
Enter a name used to identify the network in which the wireless radio will
take part. The Network SSID is case sensitive, and may contain spaces.
Note: You should change the default SSID assigned at the factory to a
unique SSID for your network. You can minimize interference between
adjacent networks by assigning a unique SSID for each network.
Important: All radios that participate in the same network must be
assigned the same Network SSID.
Hide SSID
Check this option to prevent the Network SSID from being broadcast by
the wireless radio. This prevents external devices from being able to
discover the network's SSID (and potentially connect to it).
Radio Mode
Select the radio mode based on the location of the radio with respect to
the network operations center.
Refer to the following topics for more information on radio mode options
that are available:
Master Radio Setup
Repeater Radio Setup
Remote Radio Setup
Allow Clients
Check this option to allow external 802.11 compliant devices, such as
laptops, WiFi cameras, etc. to connect to the radio.
Note: This option is not compatible with the eMax protocol. If checked, the
eMax protocol is automatically disabled.
Note: Since most 802.11 compliant devices only support 20 MHz
channels, you should set the Channel Mode option to 20 MHz when you
select this option.
Note: This option is only available for Master and Repeater radios.
Remote radios do not support client devices.
For ENCOM STRATOS plus Version 2.1.71
Page 185
© 2010-2015 Encom Wireless Data Solutions Inc.
ENCOM STRATOS plus
USER MANUAL
Radio Network Setup
Field Name
Description
Channel Mode
This option allows you to set the width of the frequency channel you are
using.
Selecting a smaller frequency for the Channel Mode increases the
distance over which you can establish a wireless link, at the cost of
reduced bandwidth. For most applications, a 40 MHz channel mode is
acceptable.
Note: If you check the Allow Clients option to support 802.11 compliant
devices, you should choose the 20 MHz channel mode.
802.11 Client
Check this option if the radio needs to connect to a non-Encom WiFi
network.
Enable eMax Protocol
Check this option to enable the eMax protocol.
The eMax protocol is a proprietary protocol that increases bandwidth and
security on the wireless network.
Note: Due to compatibility issues, the eMax protocol cannot be used if
there is a repeater in the network, or if 802.11 clients need to be
supported by the radio.
Using Repeater
Check this option if there is a repeater in the network.
Enable Roaming
Refer to the Radio Mode topics (see links above) for information on this
option.
Parent Radio MAC
Address
Refer to the Radio Mode topics (see links above) or information on this
option.
Radio Parameter Setup
Field Name
Description
Frequency Band
Displays the nominal frequency at which the radio operates. This option
can be changed if the radio card supports more than one band.
Channel
Select the radio's operating frequency.
In Auto-Frequency mode, a master radio automatically searches for the
frequency that has the least activity. It then selects that frequency and
uses it to communicate with the repeater or remote radios.
For the most stable link, you should select a specific frequency from the
list of available frequencies. (You can use the STRATOS Spectrum Scan
For ENCOM STRATOS plus Version 2.1.71
Page 186
© 2010-2015 Encom Wireless Data Solutions Inc.
ENCOM STRATOS plus
USER MANUAL
Radio Parameter Setup
Field Name
Description
panel to determine the channel that has the least amount of activity in the
vicinity of the radio.)
If a repeater is present in the network, both the master and repeater
radios must be set to the same specific frequency.
Remote radios are always configured to run in Auto-Frequency mode.
They will automatically adjust their operating frequencies to match the
master's.
Wireless Link Rate
Select the rates at which the radio will communicate with the other radios
in the network.
The default setting for this option is Adaptive.
The Adaptive link rate automatically adjusts the radio's data rate to
account for the current network conditions. It typically provides the most
reliable network performance.
A fixed rate helps reduce data latency, and may be used if the
performance of the link is more important than the reliability.
If you select a fixed rate, a second drop-down list box is displayed, as
shown in the following example:
Select the minimum allowed bit rate from the left-hand list, and the
maximum allowed rate from the right-hand list.
Regardless of the range you specify, the 6 Mbps rate will always be
included in the list of allowable rates. This allows the radio to fall back to
the lowest bit rate if it is not able to maintain the higher bit rates.
Output Power
Select the wireless radio's output power.
Unless constrained by the Regulatory Domain that the radio is operating
in, you should use the Maximum power setting when the radio is
deployed in the field.
If the radio is being provisioned or tested in a bench environment, you
should use the Low power setting.
For ENCOM STRATOS plus Version 2.1.71
Page 187
© 2010-2015 Encom Wireless Data Solutions Inc.
ENCOM STRATOS plus
USER MANUAL
Master Radio Setup
Select the Master option for the radio that is located closest to the network operations center. This
radio is usually connected to the network via the Ethernet port.
The master radio controls the flow of data in the network and serves as the network’s
synchronization source. Each broadband network has only one master radio. All the other radios
must be configured as either remote or repeater radios.
If the network contains a repeater radio, check the Using Repeater option (note that this option is
only available when the eMax Protocol is disabled).
For ENCOM STRATOS plus Version 2.1.71
Page 188
© 2010-2015 Encom Wireless Data Solutions Inc.
ENCOM STRATOS plus
USER MANUAL
Repeater Radio Setup
Select the Repeater option for a radio that provides a link between the master and remote radios.
When this option is selected, the Using Repeater option is automatically checked, and the Enable
eMax Protocol option is unchecked (the eMax protocol cannot be used when there is a repeater in
the network).
By default, the Enable Roaming option is checked. This causes the repeater radio to automatically
detect and communicate with the master radio.
If you encounter connectivity issues between the repeater and the master radio, you may want to
manually select the master radio to which the remote will connect. To do this, uncheck the Enable
Roaming option. The Parent Radio MAC Address option will be displayed.
Enter the MAC address of the master radio in the Parent Radio MAC Address option.
For ENCOM STRATOS plus Version 2.1.71
Page 189
© 2010-2015 Encom Wireless Data Solutions Inc.
ENCOM STRATOS plus
USER MANUAL
Alternatively, click on the
button at the right of the MAC address field. The Select Radio form will
be displayed. This form lets you choose the master from the list of radios that are currently
connected to the repeater.
Note that installing a repeater will reduce the network throughput by half. It should only
be used when there is no other option available, or if the reduction in performance is
not important.
For ENCOM STRATOS plus Version 2.1.71
Page 190
© 2010-2015 Encom Wireless Data Solutions Inc.
ENCOM STRATOS plus
USER MANUAL
Remote Radio Setup
Select the Remote option for a radio that is as the end of the broadband network.
If the network contains a repeater, check the Using Repeater option (note that this option is only
available when the eMax Protocol is disabled).
By default, the Enable Roaming option is checked. This causes the remote radio to automatically
detect and communicate with the master or repeater.
If you encounter connectivity issues between the remote radio and the master or repeater, you may
want to manually select the radio to which the remote will connect. To do this, uncheck the Enable
Roaming option. The Parent Radio MAC Address option will be displayed.
Enter the MAC address of the master or repeater to which the remote will connect in the Parent
Radio MAC Address option.
For ENCOM STRATOS plus Version 2.1.71
Page 191
© 2010-2015 Encom Wireless Data Solutions Inc.
ENCOM STRATOS plus
USER MANUAL
Alternatively, click on the
button at the right of the MAC address field. The Select Radio form will
be displayed. This form lets you choose the parent from the list of radios that are connected to the
current radio.
For ENCOM STRATOS plus Version 2.1.71
Page 192
© 2010-2015 Encom Wireless Data Solutions Inc.
ENCOM STRATOS plus
USER MANUAL
WDS Setup
The following screen shot shows the WDS Setup tab for a broadband radio:
The settings on this tab are used to specify the WDS (Wireless Distribution System) connections
that are allowed to form with other radios in the network.
The following tables describe the settings found in each group in the WDS Setup tab.
WDS Settings
Field Name
Description
WDS Mode
Select the method used to determine if an external radio is allowed to
form a wireless connection with the radio being configured. One of the
following options can be used:
For ENCOM STRATOS plus Version 2.1.71
WDS Mode
Description
Dynamic
All connections from other radios will be
accepted. This is the default, and recommended,
setting.
Static
Only those connections listed in the Static WDS
Links table will be allowed to form.
Disabled
No connections from other radios will be
accepted. This defeats the purpose of a wireless
network, and is not recommended.
Page 193
© 2010-2015 Encom Wireless Data Solutions Inc.
ENCOM STRATOS plus
USER MANUAL
WDS Setup
Field Name
Description
Dynamic WDS Links
This list contains the list of WDS links that are currently active.
(Move button)
Click on the Move button to convert dynamic WDS links to static links.
The links will be transferred from the Dynamic WDS Links list to the
Static WDS Links list.
To convert dynamic WDS links to static WDS links:
1. Select one or more links in the Dynamic WDS Links table. To
select a link, check the associated check box. In the following
example, the first WDS link is selected.
2. Click on the Move button to convert the selected dynamic links to
static links.
Static WDS Links
This list contains the list of WDS links that are allowed to form.
Click on the Add button to manually add the MAC address of a remote
radio to the static WDS list.
(Add button)
When selected, the following form is displayed:
Specify the MAC address of the radio you want to allow, and press the
OK button. The new MAC address will be added to the Static WDS Links
list.
Note: If you add the MAC address of a radio that is not known to ENCOM
STRATOS, only the MAC address will be displayed in the disallowed list. If
the radio is known to STRATOS, the associated IP Address and radio
name will be included. Both scenarios are shown in the following
example:
For ENCOM STRATOS plus Version 2.1.71
Page 194
© 2010-2015 Encom Wireless Data Solutions Inc.
ENCOM STRATOS plus
USER MANUAL
WDS Setup
Field Name
Description
Click on the Remove button to remove links from the static WDS list.
(Remove button)
To remove static WDS links:
1. Select one or more links in the Static WDS Links table. To select a
link, check the associated check box. In the following example, the
first WDS link is selected.
2. Click on the Remove button to remove the selected static links.
The following table describes the information that is displayed in the Dynamic and Static WDS Link
tables:
Column
Description
MAC Address
The MAC address of the remote radio.
IP Address
The IP address of the remote radio.
Radio Name
The name assigned to the remote radio.
Interface
Identifies the wireless radio module on the remote radio. The first radio
module is Radio 1, the second radio module is Radio 2, etc.
Tx/Rx Strength
The transmit and receive signal strengths, in dBm, of the wireless
connection between this radio and the remote radio.
For ENCOM STRATOS plus Version 2.1.71
Page 195
© 2010-2015 Encom Wireless Data Solutions Inc.
ENCOM STRATOS plus
USER MANUAL
Wireless Security Settings
The following screen shot shows the wireless security settings tab for a broadband radio:
The Wireless Security Type group allows you to specify the security protocols used to protect the
wireless communication links. You can choose from the following options:
Wireless Security Types
Option
Description
Disabled
Select this option if you do not want to enable security.
This option is not recommended since it allows anyone that has
knowledge of the Network's SSID to connect to the network.
Static
This option enables wireless encryption that uses static keys.
This is an older technology that is not as secure as the Dynamic option. It
can, however, provide for a more stable network.
Dynamic
This option enables wireless encryption that uses dynamically allocated
keys.
This option provides the most secure communication link.
RADIUS MAC
Authentication
Check this option if you use a RADIUS server for authentication.
A Remote Authentication Dial in User Service (RADIUS) server acts as a
centralized access and authorization point for network service. The
authentication service is then handled by the RADIUS server instead of
the ENCOM radios.
For ENCOM STRATOS plus Version 2.1.71
Page 196
© 2010-2015 Encom Wireless Data Solutions Inc.
ENCOM STRATOS plus
USER MANUAL
Important: The security settings must be the identical for all radios on the network. Radios that
have different security settings will not be able to communicate with each other.
Note: Encom Wireless Data Solutions highly recommends that you confer with your I.T.
department to determine the appropriate level of security for your network.
The Static and Dynamic security options contain additional settings that need to be configured. The
following topics describe these in more detail:
Static Security Options
Dynamic Security Options
For ENCOM STRATOS plus Version 2.1.71
Page 197
© 2010-2015 Encom Wireless Data Solutions Inc.
ENCOM STRATOS plus
USER MANUAL
Static Security Settings
The following screen shot shows the static security options for a broadband radio:
The following table describes the static security options found in the Wireless Security Settings tab:
Static Security Options
Field Name
Description
Encryption Level
Select the encryption level to use. Three options are available:
Option
Description
64-bit WEP
Uses a 40-bit encryption key coupled with a 24-bit
initialization vector. This option is considered to be
obsolete, and should only be used for compatibility
with existing infrastructure.
128-bit WEP
Uses a 104-bit encryption key coupled with a 24-bit
initialization vector. This option is more secure than
64-bit WEP, but still suffers from deficiencies in the
WEP algorithm. It should only be used for
compatibility with existing infrastructure.
128-bit AES
Uses the 128-bit AES block encryption algorithm
couple with the CBC-MAC block chaining technique
for added security. This is the most secure of the
three static security options.
For ENCOM STRATOS plus Version 2.1.71
Page 198
© 2010-2015 Encom Wireless Data Solutions Inc.
ENCOM STRATOS plus
USER MANUAL
Active Key
Select the encryption key to use. Although you can define up to four static
encryption keys, only one key can be active.
Encryption Key (1-4)
Enter the hexadecimal character sequence to use for the encryption key.
Hexadecimal characters include the decimal digits (0-9) and the letters AF.
The number of characters you need to enter depends on the Encryption
Level you have specified. An indicator, located below the Active Key list,
will indicate the number of characters you have to enter:
For ENCOM STRATOS plus Version 2.1.71
Page 199
© 2010-2015 Encom Wireless Data Solutions Inc.
ENCOM STRATOS plus
USER MANUAL
Dynamic Security Settings
The following screen shot shows the dynamic security options for a broadband radio:
The following tables describe the dynamic security options found in the Wireless Security Settings
tab:
Authentication Types
Field Name
Description
WPA Personal
Check this option to enable WPA personal authentication. You must also
enter a pre-shared key used for the authentication process.
WPA2 Personal
Check this option to enable WPA2 personal authentication. You must also
enter a pre-shared key used for the authentication process.
WPA Enterprise
Check this option to enable WPA enterprise authentication. This option
does not require a pre-shared key.
WPA2 Enterprise
Check this option to enable WPA2 enterprise authentication. This option
does not require a pre-shared key.
For ENCOM STRATOS plus Version 2.1.71
Page 200
© 2010-2015 Encom Wireless Data Solutions Inc.
ENCOM STRATOS plus
USER MANUAL
Authentication Types
Field Name
Description
EAP Method
Specify the authentication protocol to use. Two options are available:
Option
Description
Pass Through
Authentication requests are relayed to a RADIUS
server.
EAP-TLS
TLS certificates are used for authentication.
This option is only used by the WPA Enterprise and WPA2 Enterprise
authentication types. It is hidden if no enterprise option is selected.
TLS Mode
Specify how TLS certificates are to be used. Two options are available:
Option
Description
Use Dynamic
Certificates
TLS certificates are negotiated dynamically using
anonymous Diffie-Hellman MODP 2048 bit
algorithm.
Use Imported
Certificates
A TLS certificate that has been imported into the
radio is used.
This option is only used when the EAP Method is set to EAP-TLS. It is
hidden if the EAP-TLS option is not selected.
For ENCOM STRATOS plus Version 2.1.71
Page 201
© 2010-2015 Encom Wireless Data Solutions Inc.
ENCOM STRATOS plus
USER MANUAL
Encryption Algorithms
Field Name
Description
Unicast Ciphers
Check the ciphers that can be used to encrypt frames sent to individual
radios. Two options are available.
Option
Description
TKIP
Temporal Key Integrity Protocol. An encryption
protocol that is compatible with legacy WEP
equipment, but enhanced to correct some WEP
flaws.
This option should only be used for networks that
contain legacy WEP devices.
AES-CCM
A more secure WPA encryption protocol, based on
the reliable AES (Advanced Encryption Standard).
Use this option is preferred if the there are no
legacy WEP devices in the network.
Group Ciphers
Check the ciphers that can be used to encrypt frames broadcast to all
radios. Two options are available.
Option
Description
TKIP
Temporal Key Integrity Protocol. An encryption
protocol that is compatible with legacy WEP
equipment, but enhanced to correct some WEP
flaws.
This option should only be used for networks that
contain legacy WEP devices.
AES-CCM
A more secure WPA encryption protocol, based on
the reliable AES (Advanced Encryption Standard).
Use this option is preferred if the there are no
legacy WEP devices in the network.
Miscellaneous
Field Name
Description
Group Key Update
Time
The interval at which the dynamically generated keys are updated.
For ENCOM STRATOS plus Version 2.1.71
Page 202
© 2010-2015 Encom Wireless Data Solutions Inc.
ENCOM STRATOS plus
USER MANUAL
Network Tab
The following screen shot shows the network settings tab for a broadband radio:
Because a large number of configuration options are available, the network configuration tab is split
up into a number of sub-tabs. The following topics describe the settings found in each sub-tab:
Time Settings
Spanning Tree Protocol Settings
Network Filter Settings
DHCP Server Settings
SNMP Settings
QoS (Quality of Service) Settings
RADIUS Settings
VLAN Settings
For ENCOM STRATOS plus Version 2.1.71
Page 203
© 2010-2015 Encom Wireless Data Solutions Inc.
ENCOM STRATOS plus
USER MANUAL
Time Settings
The following screen shot shows the Time settings tab for a broadband radio:
The following table describes the time settings.
Time Synchronization
Field Name
Description
Synchronize radio time Select one of the following options to set the system clock:
using
Option
Description
Nothing
The radio's time will only be synchronized when a
configuration change is made by STRATOS.
NTP Server
The radio will synchronize its internal clock to the
specified NTP server time at regular intervals.
GPS Receiver
The radio will synchronize its internal clock from
the built-in GPS receiver.
Note: This option is only available if the radio
contains a GPS receiver.
Primary NTP Server
Specify the IP address of the NTP server used to synchronize the radio's
internal clock. This is an Internet Protocol version 4 (IPv4) address,
specified in dotted notation, as shown in the following example:
For ENCOM STRATOS plus Version 2.1.71
Page 204
© 2010-2015 Encom Wireless Data Solutions Inc.
ENCOM STRATOS plus
USER MANUAL
Note: This option is only enabled when the NTP Server option is
selected.
Secondary NTP
Server
If applicable, specify the IP address of the secondary NTP server. This is
an Internet Protocol version 4 (IPv4) address, specified in dotted notation,
as shown in the following example:
If there is no secondary NTP server in your network, enter "0.0.0.0" in this
field.
Note: This option is only enabled when the NTP Server option is
selected.
System Clock
Field Name
Description
Time Zone
Select the time zone in which the radio is operating.
Note that the time zone has no effect on the operation of the radio, and
does not need to be set for normal operation.
If the time zone is not set, the radio defaults to UTC time.
For ENCOM STRATOS plus Version 2.1.71
Page 205
© 2010-2015 Encom Wireless Data Solutions Inc.
ENCOM STRATOS plus
USER MANUAL
Spanning Tree Protocol Settings
The following screen shot shows the Spanning Tree Protocol settings tab for a broadband radio:
The spanning tree protocols are used to prevent the formation of loops that can interfere with the
proper operation of the radio network. Refer to Appendix C: Spanning Tree Protocol for more
information on the this subject, and for guidance in designing a radio network that uses STP or
RSTP.
The following table describes the spanning tree protocol settings.
Spanning Tree Protocol
Field Name
Description
Spanning Tree
Protocol
The Spanning Tree Protocol (STP) is a protocol that provides link
management to prevent undesirable loops from appearing in the network.
You can select from one of the following options:
Option
Description
Disabled
STP is not enabled. This is the default setting.
STP
STP is enabled.
Rapid STP
Rapid STP is enabled. This is an enhanced version
of the STP protocol that provides for faster
spanning tree convergence after a topology
change.
You would normally use this option if you want to
For ENCOM STRATOS plus Version 2.1.71
Page 206
© 2010-2015 Encom Wireless Data Solutions Inc.
ENCOM STRATOS plus
USER MANUAL
use STP in your network.
Preferred Root
Check this option if you want the radio to be preferred over other radios
when the network is negotiating which radio to use as the STP root.
Bridge Priority
The STP priority that is assigned to the radio. This setting is managed by
STRATOS, and cannot be changed manually.
This information can be useful if you have other STP or RSTP enabled
devices in your network (such as switches and routers), and you need to
configure them to interact with the ENCOM radios.
For ENCOM STRATOS plus Version 2.1.71
Page 207
© 2010-2015 Encom Wireless Data Solutions Inc.
ENCOM STRATOS plus
USER MANUAL
Network Filter Settings
The following screen shot shows the Network Filter tab for a broadband radio:
The network filters are used to block multicast traffic from being forwarded by the radio. This can
enhance the performance of your radio network, by eliminating unnecessary network traffic.
The following table describes the network filter settings.
Network Traffic Filtering
Field Name
Description
Block incoming
Check this option to prevent multicast traffic arriving on the radio's
multicast traffic on the Ethernet port from being forwarded to the radio's wireless interfaces.
Ethernet port
Block outgoing
Check this option to prevent multicast traffic arriving on the radio's
multicast traffic on the wireless interfaces from being forwarded to the radio's Ethernet port.
Ethernet port
Block multicast traffic
between wireless
connections
Check this option to prevent multicast traffic arriving on one of the radio's
physical radio cards, WDS links or client wireless connections from being
forwarded to the other radio cards, WDS links or client wireless
connections.
Note that some network protocols (such as those used by traffic cameras) use multicast packets to
operate. Because of this, you must be careful when disabling these settings.
Refer to Appendix F: Network Filters for more information on setting up the network filters.
For ENCOM STRATOS plus Version 2.1.71
Page 208
© 2010-2015 Encom Wireless Data Solutions Inc.
ENCOM STRATOS plus
USER MANUAL
DHCP Server Settings
The following screen shot shows the DHCP server tab for a broadband radio:
The following tables describe the DHCP server settings.
DHCP Server
Field Name
Description
Enable DHCP Server
Check this option to enable the radio's DHCP server. When this option is
enabled, the radio will assign IP addresses to any other radio, or any other
other device, that is configured to obtain their IP addresses dynamically.
Important: Severe network instability can occur if there is more than one
DHCP server present in a network or network segment. Do not enable
this option if a router or another radio is already acting as a DHCP server.
DHCP Server Settings
Field Name
Description
DHCP Address Range Specify the start and end range of the IP addresses that will be provided
by the DHCP server, as shown in the following example:
In this example, IP addresses in the 192.168.1.100 - 192.168.1.200 range
will be assigned to devices that use dynamic addressing. IP addresses
outside this range would be manually assigned to devices that do not use
dynamic addressing.
For ENCOM STRATOS plus Version 2.1.71
Page 209
© 2010-2015 Encom Wireless Data Solutions Inc.
ENCOM STRATOS plus
USER MANUAL
DHCP Server Settings
Field Name
Description
Network Mask
Enter the network mask that will be assigned to the devices that use
dynamic IP addressing. This is an Internet Protocol version 4 (IPv4)
address, specified in dotted notation, as shown in the following example:
Gateway Address
Enter the IP Address of the default gateway that will be assigned to the
devices that use dynamic IP addressing. This is an Internet Protocol
version 4 (IPv4) address, specified in dotted notation, as shown in the
following example:
The default gateway is the radio or router that provides access to devices
outside of the local network.
DNS Server Address
Enter the IP Address of the DNS server that will be assigned to the
devices that use dynamic IP addressing. This is an Internet Protocol
version 4 (IPv4) address, specified in dotted notation, as shown in the
following example:
If there is no DNS server available in your network, enter "0.0.0.0" in this
field.
WINS Server Address
Enter the IP Address of the WINS server that will be assigned to the
devices that use dynamic IP addressing. This is an Internet Protocol
version 4 (IPv4) address, specified in dotted notation, as shown in the
following example:
If there is no WINS server available in your network, enter "0.0.0.0" in this
field.
For ENCOM STRATOS plus Version 2.1.71
Page 210
© 2010-2015 Encom Wireless Data Solutions Inc.
ENCOM STRATOS plus
USER MANUAL
SNMP Settings
The following screen shot shows the SNMP tab for a broadband radio:
The following tables describe the SNMP service settings.
SNMP Service
Field Name
Description
Enable SNMP Service Check this option enable the radio's SNMP (Simple Network Management
Protocol) agent.
When this option is enabled, diagnostic information can be obtained from
the radio using any SNMP based network monitoring application.
SNMP Service Settings
Field Name
Description
Host IP
Enter the IP address of the computer on which the network monitoring
application is running, as shown in the following example:
Setting this option will prevent any other computer from being able to
access the radio's SNMP information.
If you want to allow any computer that is on your network to access the
radio's SNMP information, enter "0.0.0.0" in this field.
Community Name
The community name used to access the radio's SNMP agent. This is set
For ENCOM STRATOS plus Version 2.1.71
Page 211
© 2010-2015 Encom Wireless Data Solutions Inc.
ENCOM STRATOS plus
USER MANUAL
to 'public', and cannot be changed.
Only read operations are permitted.
Contact Information
Enter the contact information of the individual responsible for the network,
if applicable.
Location Information
Enter the location of the radio, if applicable.
For ENCOM STRATOS plus Version 2.1.71
Page 212
© 2010-2015 Encom Wireless Data Solutions Inc.
ENCOM STRATOS plus
USER MANUAL
QoS Settings
The following screen shot shows the QoS (Quality of Service) settings tab for a broadband radio:
The Quality of Service settings allow you to prioritize the various types of network traffic so that
important traffic is processed ahead of less important traffic.
Under normal conditions, all network data packets have an equal opportunity to be forwarded by the
radio. This works well for some applications (such as file transfers or web browsing) but it is not
adequate for traffic that is sensitive to network latency and throughput reductions (such as voice or
video streaming). QoS allows you to address this issue by giving the time sensitive traffic a larger
share of the network bandwidth.
Refer to Appendix D: Quality of Service for more detailed information on the prioritization
mechanisms supported by the ENCOM radios.
The following tables describe the Quality of Service settings.
Network Traffic Prioritization
Field Name
Description
Enable
Check this option to enable priority queue based QoS features.
Priority rules are used to specify the priority of specific types of traffic.
Lower priority traffic is dropped in preference to higher priority traffic when
the radio becomes heavily loaded.
Use WMM
Check this option to set the priority of incoming packets to the incoming
WMM priority (or to the incoming VLAN priority if VLANs are being used).
WMM is used to prioritize certain type of traffic, such as VOIP (Voice Over
For ENCOM STRATOS plus Version 2.1.71
Page 213
© 2010-2015 Encom Wireless Data Solutions Inc.
ENCOM STRATOS plus
USER MANUAL
IP) and video streams, that are sensitive to network latency and capacity
issues.
Note: The WMM/VLAN priorities must be set by the device that creates
the network data packets or by the router or switch that provides access
to the ENCOM radio network.
Use DSCP Priorities
Check this option to set the priority of incoming packets to the DSCP
priority of the incoming data packets.
Note: The DSCP priorities must be set by the device that creates the
network data packets or by the router or switch that provides access to
the ENCOM radio network.
Priority Rules
Field Name
Description
Priority Rule List
By default, ENCOM STRATOS will assign the highest priority to the radio
management traffic.
Other types of network traffic can be assigned to specific priority queues
by creating custom priority rules. The Priority Rules list displays the
custom priority rules that you have defined.
When defining a priority rule, you specify the type of traffic that the rule is
to act upon, and the priority to assign to the matching traffic.
In the following example, two priority rules have been defined:
The shaded cells contain the criteria that must be matched in order for a
network data packet to be affected by the rule. Matching data packets will
be assigned the New Priority (and optionally the New DSCP value)
defined in the rule.
The priority rule list is sorted by the New Priority column, in descending
order.
The following table describes the information that is displayed in the
Priority Rules list:
Column
Description
To delete a rule, first check it, and then click on
the Remove button at the right of the Priority
Rule list to actually delete it.
For ENCOM STRATOS plus Version 2.1.71
Page 214
© 2010-2015 Encom Wireless Data Solutions Inc.
ENCOM STRATOS plus
USER MANUAL
Name
A short description that identifies the type of
network traffic associated with the rule.
Protocol
The protocol to match.
Port(s)
The IP port or ports to match. If blank, traffic on
any port is affected by the rule.
Source
Address(es)
The address or addresses that the data packets
must originate from.
Destination
Address(es)
The address or addresses that the data packets
are being forwarded to.
DSCP
The DSCP value of the incoming packets to
match. If blank, the DSCP priority is ignored by
the rule.
New Priority
The priority to assign to the packets that match
the specified criteria.
New DSCP
The DSCP value to assign to the packets that
match the specified criteria.
Click the Add button to create a new priority rule. Enter the appropriate
rule settings in the QoS Priority Rule form that is displayed.
(Add button)
Select a priority rule, and then click on the Edit button to modify the rule
settings.
(Edit button)
Alternatively, you can double-click on the rule you want to modify.
To delete a rule, first check it, and then click on the Remove button to
actually delete it.
(Remove button)
For ENCOM STRATOS plus Version 2.1.71
Page 215
© 2010-2015 Encom Wireless Data Solutions Inc.
ENCOM STRATOS plus
USER MANUAL
Specifying a QoS Priority Rule
The following screen shot shows the QoS Priority Rule form for a broadband radio:
The QoS Priority Rule form allows you to define a traffic priority rule.
The following tables describe the QoS rule settings.
Rule
Field Name
Description
Name
Enter a short description that identifies the type of network traffic
associated with the rule.
Matching Criteria
Field Name
Description
Protocol
Specify the protocol that the rule will apply to. You can select one of the
following values:
Protocol
Description
All
All network traffic will be matched.
When you select this option, one or both of the
Source Address and Destination Address
fields must be set. Otherwise, all of the network
traffic flowing through the radio would match the
For ENCOM STRATOS plus Version 2.1.71
Page 216
© 2010-2015 Encom Wireless Data Solutions Inc.
ENCOM STRATOS plus
USER MANUAL
rule.
Ports
UDP
The rule will only affect UDP traffic.
TCP
The rule will only affect TCP traffic.
Optionally specify the port or ports associated with the network traffic
that the rule will apply to. You can specify the ports using one of the
following formats:
Format
Example
Single Port
1000
Multiple Ports
1000,2000
Port Range
1000-2000
Multiple Port Ranges
1000-2000,3000-4000
If this value is not specified, the rule will apply to all traffic of the
selected protocol type.
Source Address(es)
Optionally specify the address or addresses that the data packets must
originate from. You can specify the addresses using one of the
following formats:
Format
Example
Single IPV4 Address
192.168.1.100
IPV4 Address Range
192.168.1.100-192.168.1.200
IPV4 CIDR Subnet
192/168.1.1/24
If this value is not specified, the rule will apply to all destination
addresses.
Destination Address(es)
Optionally specify the address or addresses that the data packets are
being forwarded to. You can specify the addresses using one of the
following formats:
For ENCOM STRATOS plus Version 2.1.71
Format
Example
Single IPV4 Address
192.168.1.100
Page 217
© 2010-2015 Encom Wireless Data Solutions Inc.
ENCOM STRATOS plus
USER MANUAL
IPV4 Address Range
192.168.1.100-192.168.1.200
IPV4 CIDR Subnet
192/168.1.1/24
If this value is not specified, the rule will apply to all destination
addresses.
DSCP
Optionally specify the DSCP (Differentiated Services Code Point) value
in the IP header that the rule will apply to.
You can select a predefined DSCP value from the drop-down list, or
enter a number between 0 and 63.
If this value is not specified, the rule will apply to all DSCP values.
Action
Field Name
Description
Set priority to
The priority to assign to the packets that match the specified criteria.
The higher the priority value, the higher the priority assigned to the
associated network traffic.
Set DSCP to
Optionally specify the DSCP (Differentiated Services Code Point) value
to assign to the packets that match the specified criteria.
You can select a predefined DSCP value from the drop-down list, or
enter a number between 0 and 63.
If this value is not specified, no change will be made to the packet's
DSCP value.
For ENCOM STRATOS plus Version 2.1.71
Page 218
© 2010-2015 Encom Wireless Data Solutions Inc.
ENCOM STRATOS plus
USER MANUAL
RADIUS Settings
The following screen shot shows the RADIUS settings tab for a broadband radio:
RADIUS is used to centralize the authentication of users that attempt to login to the radio and/or to
the network. Refer to ENCOM STRATOS RADIUS Configuration Guide, available separately, for
more information on setting up and using a RADIUS server with your radio network.
The following tables describe the settings found in each group in the RADIUS settings tab.
Primary and Secondary Server
Field Name
Description
Enable RADIUS
Server
Check this setting to enable the associated RADIUS server (Primary or
Backup).
If the radio cannot connect to the primary RADIUS server, it will attempt to
connect to the backup RADIUS server.
Server Address
Enter the IP address of the RADIUS server.
Authentication Port
Enter the IP port on which RADIUS authentication requests are accepted.
The default is 1812.
Accounting Port
Enter the IP port on which RADIUS accounting updates are accepted.
The default is 1813.
Shared Secret
Enter a string that is used to obfuscate the user password that is sent to
the RADIUS server for authentication. This value must match the Shared
Secret that is configured in the RADIUS server.
For ENCOM STRATOS plus Version 2.1.71
Page 219
© 2010-2015 Encom Wireless Data Solutions Inc.
ENCOM STRATOS plus
USER MANUAL
Domain
Enter the Microsoft Windows domain of the user. Only use if the RADIUS
server requires domain validation.
Timeout
Enter the maximum amount of time (in milliseconds) to wait for a
response from the RADIUS server before resending an authentication
request.
The default is 300 ms. You may need to increase this if your RADIUS
server is slow to respond to authentication requests.
Use RADIUS to login
to the radio
Check this option to use RADIUS to authenticate radio login requests.
When this option is enabled, the radio will check with the RADIUS server
if it does not find the specified user in its local user database.
User RADIUS to login Check this option to use RADIUS to authenticate client devices that wish
to the wireless network to attach to your network (e.g. for access to the network operations center
or to your corporate LAN).
If you select this option, you will need to check the RADIUS MAC
Authentication setting for each of the radio cards that clients will use to
connect to the network.
Common Settings
Field Name
Description
Default Access Rights Select the access rights to assign to the user if the RADIUS server is not
configured to respond to an authentication request with the user's group
name.
The following table describes the options that are available for this setting:
Option
Description
View Settings
The user will be able to inspect the radio's
configuration settings, but will not be able to
make any changes.
Change Settings
The user will be able to inspect and change
the radio's configuration settings.
This setting is ignored if the RADIUS server responds to an authentication
request with the user's group name.
RADIUS Accounting
Check this option to send RADIUS accounting packets to the RADIUS
server. This information is normally used for user billing, and is not usually
needed for typical ENCOM radio networks.
For ENCOM STRATOS plus Version 2.1.71
Page 220
© 2010-2015 Encom Wireless Data Solutions Inc.
ENCOM STRATOS plus
USER MANUAL
VLAN Settings
The following screen shot shows the VLAN settings tab for a broadband radio:
VLANs (Virtual LANs) are used to improve the performance, and possibly the security, of a radio
network. Refer to Appendix E: VLAN Support for more information on implementing a VLAN-based
network.
The following tables describe the settings found in each group in the VLAN settings tab.
Management VLAN
Field Name
Description
Tagged Management
Data
By default, the radio can be managed by connections over the native
(non-tagged) VLAN.
To be able to manage the radio using a specific VLAN, check this option,
and enter the appropriate management VLAN ID in the VLAN ID field.
VLAN ID
Enter the ID of the management VLAN (a number in the range 1-4095 is
required).
Client Tagging
Field Name
Description
Tag Client Data
Normally, all of the radio's interfaces (wireless and Ethernet) act as VLAN
trunks (i.e. they carry the network traffic for all VLANs). If a normal, nonVLAN aware device is plugged into the radio's Ethernet port, its network
traffic will not be tagged, and it will not be able to communicate with
For ENCOM STRATOS plus Version 2.1.71
Page 221
© 2010-2015 Encom Wireless Data Solutions Inc.
ENCOM STRATOS plus
USER MANUAL
devices that are part of a VLAN.
Check this option to set up the radio's Ethernet port as an access port for
a specific VLAN. This gives devices connected to the Ethernet port
access to the other devices in the specified VLAN.
VLAN ID
Enter the ID of the client VLAN to (a number in the range 1-4095 is
required).
VLAN Priority
The priority to assign to the packets originating from the Ethernet port.
The higher the priority value, the higher the priority assigned to the
associated network traffic.
Note: In order to prioritize the wireless network traffic using the VLAN
priority, the appropriate QoS options need to be configured. See the Using
WMM to Support VLAN Priority Traffic topic for more information.
Management Address (Wireless)
Field Name
Description
IP Address
Enter the IP address used to access the radio via its wireless interfaces.
This is an Internet Protocol version 4 (IPv4) address, specified in dotted
notation, as shown in the following example:
If the Tagged Management Data option is checked, this IP address
should be compatible with the management VLAN's network address
range.
Network Mask
Enter the network mask of the network used to access the radio via its
wireless interfaces. This is an Internet Protocol version 4 (IPv4) address,
specified in dotted notation, as shown in the following example:
If the Tagged Management Data option is checked, this mask should
be compatible with the management VLAN's network mask.
For ENCOM STRATOS plus Version 2.1.71
Page 222
© 2010-2015 Encom Wireless Data Solutions Inc.
ENCOM STRATOS plus
USER MANUAL
Default Gateway
Enter the IP address of the radio, router or switch that allows this radio to
connect with devices that are outside of their local LAN or VLAN. This is
an Internet Protocol version 4 (IPv4) address, specified in dotted notation,
as shown in the following example:
If the Tagged Management Data option is checked, this IP address
would normally be the IP address of the network's gateway radio, or the IP
address of the router or switch used to access external networks.
Access Port Address (Ethernet)
Field Name
Description
IP Address
Enter the IP address used to access the radio via its Ethernet interface.
This is an Internet Protocol version 4 (IPv4) address, specified in dotted
notation, as shown in the following example:
If the Tag Client Data option is checked, this IP address should be
compatible with the client VLAN's network address range.
Network Mask
Enter the network mask of the network used to access the radio via its
Ethernet interface. This is an Internet Protocol version 4 (IPv4) address,
specified in dotted notation, as shown in the following example:
If the Tag Client Data option is checked, this mask should be
compatible with the client VLAN's network mask.
Pruning
Field Name
Description
Prune VLANs
Check this option to prevent the radio for forwarding network traffic
associated with specific VLAN IDs.
VLAN IDs
Enter one or more VLAN IDs to prune. Separate individual IDs with
commas.
Any incoming network traffic that matches the specified VLAN IDs will be
dropped by the radio.
For ENCOM STRATOS plus Version 2.1.71
Page 223
© 2010-2015 Encom Wireless Data Solutions Inc.
ENCOM STRATOS plus
USER MANUAL
About Tab
The following screen shot shows the About tab for a broadband radio:
This tab displays information regarding the radio's hardware and firmware. It does not contain any
user editable fields.
For ENCOM STRATOS plus Version 2.1.71
Page 224
© 2010-2015 Encom Wireless Data Solutions Inc.
ENCOM STRATOS plus
USER MANUAL
Export and Import Buttons
The Export and Import buttons in the lower left-hand corner of the radio configuration form allow
you to save the radio's configuration settings to a file, and to update the radio's configuration
settings from a previously saved configuration file.
Refer to the following topics for more information on these functions:
Exporting the Radio Configuration
Importing the Radio Configuration
For ENCOM STRATOS plus Version 2.1.71
Page 225
© 2010-2015 Encom Wireless Data Solutions Inc.
ENCOM STRATOS plus
USER MANUAL
Exporting the Radio Configuration
The Export function is used to save the radio's current settings to a configuration profile file. This
allows you to:
Make a backup copy of the radio's configuration.
Save the radio's configuration to a profile or template file for use in configuring other radios.
To export a radio's configuration:
1. From the radio's configuration form, click on the Export button. The Save configuration profile
file form is displayed:
2. Specify the name of the file you want to save the radio's configuration settings to, and then
press the Save button to save the settings.
By default, STRATOS saves configuration profile files in the 'My Documents\Encom
Wireless\Profiles' folder.
For ENCOM STRATOS plus Version 2.1.71
Page 226
© 2010-2015 Encom Wireless Data Solutions Inc.
ENCOM STRATOS plus
USER MANUAL
Importing the Radio Configuration
The Import function allows you to update the radio's settings from a previously saved configuration
profile file. This function allows you to:
Restore the radio's configuration from a backup file. This can be useful when you have to
replace a radio in the field.
Apply the settings from one radio to another. This can be used to provision new radios quickly,
and ensure that they are compatible with other radios in the network.
To configure a radio using a saved configuration file:
1. From the radio's configuration form, click on the Import button. The Select configuration
profile file form is displayed:
2. Select the configuration profile you want to import, and press the Open button.
For ENCOM STRATOS plus Version 2.1.71
Page 227
© 2010-2015 Encom Wireless Data Solutions Inc.
ENCOM STRATOS plus
USER MANUAL
3. The Import Radio Settings form will be displayed:
4. The Radio Module Assignments group allows you to specify how the radio module settings
are applied:
The Target Radio Modules column lists the wireless radio modules that are present on the
radio.
The Profile Radio Modules column shows the options that are available for each wireless
interface that is present on the radio. STRATOS will find the best match between the profile
and target radio modules, and will assign these by default. You can change the default
assignments by selecting the appropriate items from the list boxes.
In the example shown above, STRATOS applied the matching radio modules from the profile
to the target radio modules. If you didn't want to disturb the configuration of the second radio
module, then you would select the Don't Copy option from the second list box, as shown
below:
For ENCOM STRATOS plus Version 2.1.71
Page 228
© 2010-2015 Encom Wireless Data Solutions Inc.
ENCOM STRATOS plus
USER MANUAL
5. The Settings to Copy options allow you to specify what settings to import from the
configuration profile:
These are described further in the following table:
Option
Description
Copy all settings
Use this option when you need to configure a radio so that it
matches the configuration profile exactly.
This option is most often used when configuring a replacement
radio, or you want to restore the radio's configuration from a backup.
Copy common
settings
Use this option to exclude those settings that are unique to the
radio.
This option is most often used when you are adding a new radio to a
network, and you want to configure it to match the other radios in
the network.
The following items will not get copied over from the profile file to
the radio:
Radio name
Radio Description
Radio latitude, longitude and street address
Radio static IP address
Parent radio MAC address
Static WDS assignments
6. Press the OK button to apply the profile settings to the radio.
7. Make any changes to the imported settings in the radio configuration form.
8. Press the Save button on the radio configuration form to save the settings to the radio.
For ENCOM STRATOS plus Version 2.1.71
Page 229
© 2010-2015 Encom Wireless Data Solutions Inc.
ENCOM STRATOS plus
USER MANUAL
Configuring Point-to-Point Radios
To configure a point-to-point radio:
1. Locate the radio you would like to configure in the Radio List. Ensure that it is currently on-line
(a green icon is displayed at the left of an on-line radio):
2. Click the right mouse button on the radio name, and select Configure from the pop-up menu
that is displayed:
Alternatively, you can either double-click the left mouse button on the radio name, or click the
left mouse button on the radio name, and select Radio -> Configure from the main menu.
For ENCOM STRATOS plus Version 2.1.71
Page 230
© 2010-2015 Encom Wireless Data Solutions Inc.
ENCOM STRATOS plus
USER MANUAL
3. STRATOS will download the radio's current configuration. This process will normally take a
few seconds to complete. During this time, a wait form is displayed:
4. When the radio's configuration has been obtained, the radio configuration form is displayed:
The configuration settings are logically grouped using a tabbed interface. The following topics
describe the settings found in each tab:
Basic Settings tab
Location tab
Radio tab
Network tab
About tab
For ENCOM STRATOS plus Version 2.1.71
Page 231
© 2010-2015 Encom Wireless Data Solutions Inc.
ENCOM STRATOS plus
USER MANUAL
Basic Settings Tab
The following screen shot shows the basic configuration settings tab for a point-to-point radio:
The following tables describe the settings found in each group in the basic settings tab.
Identification
Field Name
Description
Radio Name
Enter a name used to identify the radio (up to a maximum of 64
characters). The name you enter will be displayed in the radio list, and in
all other places where a reference to the radio is made.
Radio MAC Address
Displays the MAC address assigned to the radio. (This is essentially the
MAC address of the radio's first Ethernet adapter.)
For ENCOM STRATOS plus Version 2.1.71
Page 232
© 2010-2015 Encom Wireless Data Solutions Inc.
ENCOM STRATOS plus
USER MANUAL
Identification
Field Name
Description
Description
Enter an optional description for the radio. This field allows you to keep
track of ad-hoc information associated with the radio, without adding
clutter to the radio name. The radio description is displayed in the radio
properties panel:
Regulatory Domain
Field Name
Description
Country Name
Select the country in which the radio is operating. Certain countries have
limitations on the radio power output, allowed frequency ranges and
frequency bands. Failure to select the appropriate country can result in a
radio that is operating outside of the legally allowed ranges.
If the radio is operating in the United States or Canada, you can leave this
setting to <Not Set>.
IP Address Settings
Field Name
Description
Obtain an IP address
automatically
Select this option if a DHCP server is available on your radio network, and
you want the DHCP server to assign an IP address to the radio.
Specify a static IP
address
Select this option to manually assign the radio's IP address.
ENCOM recommends this option because it provides for a more secure
network (especially if you have not enabled wireless security).
Note: It is important that each radio in the network is assigned a different
IP address. Network performance can suffer greatly if two or more radios
are assigned the same IP address.
For ENCOM STRATOS plus Version 2.1.71
Page 233
© 2010-2015 Encom Wireless Data Solutions Inc.
ENCOM STRATOS plus
USER MANUAL
IP Address Settings
Field Name
Description
IP Address
Enter the IP address of the radio. This is an Internet Protocol version 4
(IPv4) address, specified in dotted notation, as shown in the following
example:
Network Mask
Enter the network mask. This is an Internet Protocol version 4 (IPv4)
address, specified in dotted notation, as shown in the following example:
Default Gateway
Enter the IP address of the radio or router that allows the radio to connect
with devices that are outside of their local LAN or VLAN. This is an Internet
Protocol version 4 (IPv4) address, specified in dotted notation, as shown
in the following example:
Note that the default gateway's IP address must be in the same subnet as
the radio's IP address.
For ENCOM STRATOS plus Version 2.1.71
Page 234
© 2010-2015 Encom Wireless Data Solutions Inc.
ENCOM STRATOS plus
USER MANUAL
Location Tab
The following screen shot shows the location settings tab for a point-to-point radio:
The following table describes the settings found in the location tab.
Field Name
Description
Get location from GPS Select this option if you want the radio to get its location from the built-in
GPS receiver.
This option is not available if the radio does not contain a GPS receiver.
Manually specify
location
Select this option if you want to manually specify the location of the radio.
Latitude
Enter the latitude at which the radio is located, in decimal degrees. This
value is positive in the northern hemisphere and negative in the southern
hemisphere.
Alternatively, hold down the Shift key and click the left mouse button on
the map to set the radio's position. This process will automatically update
the Latitude field.
Longitude
Enter the longitude at which the radio is located, in decimal degrees. This
value is positive in the eastern hemisphere and negative in the western
hemisphere.
Alternatively, hold down the Shift key and click the left mouse button on
the map to set the radio's position. This process will automatically update
For ENCOM STRATOS plus Version 2.1.71
Page 235
© 2010-2015 Encom Wireless Data Solutions Inc.
ENCOM STRATOS plus
USER MANUAL
the Longitude field.
Icon Color
Select the color of the radio icon. You can use the icon color to visually
group radios by radio type, geographical location, VLAN association, etc.
Icon Style
Select the style of the radio icon. Four icon styles are currently available:
Icon
Radio Type
Generic radio
Master radio
Remote radio
Repeater radio
Dual radio
Embedded map
The embedded map allows you to see the current location of the radio. A
green marker shows the location assigned to the radio.
To set a new location:
For ENCOM STRATOS plus Version 2.1.71
Page 236
© 2010-2015 Encom Wireless Data Solutions Inc.
ENCOM STRATOS plus
USER MANUAL
Press and hold down the Shift key on your computer's keyboard.
Click the left mouse button at the location you want to assign to the
radio.
The green marker will move to the selected position.
Note: Refer to the Map Panel topic for more information on the embedded
map features.
Street Address
Enter the street address of the radio, if applicable. This information is
optional.
For ENCOM STRATOS plus Version 2.1.71
Page 237
© 2010-2015 Encom Wireless Data Solutions Inc.
ENCOM STRATOS plus
USER MANUAL
Radio Tab
ENCOM point-to-point radios contain a single wireless radio module. This module is configured in
the Radio 1 tab.
The following screen shot shows the radio settings tab for a point-to-point radio:
Because the wireless radio settings are somewhat involved, the radio configuration tab is split up
into three sub-tabs. The following topics describe the settings found in each sub-tab:
Radio Settings sub-tab
Wireless 'N' sub-tab
Wireless Security sub-tab
For ENCOM STRATOS plus Version 2.1.71
Page 238
© 2010-2015 Encom Wireless Data Solutions Inc.
ENCOM STRATOS plus
USER MANUAL
Radio Settings
The following screen shot shows the wireless radio settings tab for a point-to-point radio:
The following tables describe the settings found in each group in the wireless radio settings tab.
General
Field Name
Description
Enable Radio
Uncheck this option to disable the wireless radio card. A disabled radio
card will not be able to form wireless links with other radios.
If you uncheck this option, all of the other options in the Radio Settings tab
will be disabled.
Identification
Field Name
Description
Radio Model
Displays the model number of the wireless radio card. This information is
useful when troubleshooting issues with the radio.
Wireless MAC
Address
Displays the MAC address assigned to the wireless radio card. For pointto-point radios, the MAC address of the wireless radio card is different
than the MAC address of the radio's Ethernet interface.
For ENCOM STRATOS plus Version 2.1.71
Page 239
© 2010-2015 Encom Wireless Data Solutions Inc.
ENCOM STRATOS plus
USER MANUAL
Radio Network Setup
Field Name
Description
Network Type
Identifies the radio network type. This setting cannot be changed for pointto-point radios.
Network SSID
Enter a name used to identify the network in which the wireless radio will
take part. The Network SSID is case sensitive, and may contain spaces.
Note: You should change the default SSID assigned at the factory to a
unique SSID for your network. You can minimize interference between
adjacent networks by assigning a unique SSID for each network.
Important: All radios that participate in the same network must be
assigned the same Network SSID.
Hide SSID
Check this option to prevent the Network SSID from being broadcast by
the wireless radio. This prevents external devices from being able to
discover the network's SSID (and potentially connect to it).
Radio Mode
Select the radio mode based on the location of the radio with respect to
the network operations center.
Select the Master option for the radio that is located closest to the
network operations center. This radio is usually connected to the network
operation center via the Ethernet port.
Select the Remote option for the remote radio.
Channel Mode
This option allows you to set the width of the frequency channel you are
using.
Selecting a smaller frequency for the Channel Mode increases the
distance over which you can establish a wireless link, at the cost of
reduced bandwidth.
Since point-to-point radios are intended for use as high-capacity backhaul devices, a 40 MHz channel mode is recommended under normal
circumstances.
Radio Parameter Setup
Field Name
Description
Frequency Band
Displays the nominal frequency at which the radio operates. This option is
set at the factory and cannot be changed.
Channel
Select the radio's operating frequency.
Note: You can set the frequency of the master radio to a specific value.
For ENCOM STRATOS plus Version 2.1.71
Page 240
© 2010-2015 Encom Wireless Data Solutions Inc.
ENCOM STRATOS plus
USER MANUAL
Radio Parameter Setup
Field Name
Description
Remote radios can only be set to Auto-Frequency, since they are
designed to follow the frequency of the master radio.
Wireless Link Rate
Point-to-point radios use an adaptive algorithm to choose the best bit rate
for the current link conditions. This setting is for your information only, and
cannot be changed.
Output Power
Select the wireless radio's output power.
Unless constrained by the Regulatory Domain that the radio is operating
in, you should use the Maximum power setting when the radio is
deployed in the field.
If the radio is being provisioned or tested in a bench environment, you
should use the Low power setting.
For ENCOM STRATOS plus Version 2.1.71
Page 241
© 2010-2015 Encom Wireless Data Solutions Inc.
ENCOM STRATOS plus
USER MANUAL
Wireless 'N' Settings
The following screen shot shows the wireless 'N' settings tab for a point-to-point radio:
ENCOM offers point-to-point radios that support up to 3 antennas. STRATOS will automatically
display the number of antennas that are supported by your radio in the Antenna Chains group.
The following table describes the settings found in each group in the wireless 'N' settings tab.
Antenna Chains
Field Name
Description
Transmit
Specify the antennas to use for transmitting data. Check the Chain option
to enable the associated antenna, and uncheck it to disable the antenna.
For optimal performance, you should enable all of the antennas supported
by your radio.
Receive
Specify the antennas to use for receiving data. Check the Chain option to
enable the associated antenna, and uncheck it to disable the antenna.
For optimal performance, you should enable all of the antennas supported
by your radio.
For ENCOM STRATOS plus Version 2.1.71
Page 242
© 2010-2015 Encom Wireless Data Solutions Inc.
ENCOM STRATOS plus
USER MANUAL
Wireless Security Settings
The following screen shot shows the wireless security settings tab for a point-to-point radio:
The Wireless Security Type group allows you to specify the security protocols used to protect the
wireless communication links. You can choose from the following options:
Wireless Security Types
Option
Description
Disabled
Select this option if you do not want to enable security.
This option is not recommended since it allows anyone that has
knowledge of the Network's SSID to connect to the network.
Static
This option enables wireless encryption that uses static keys.
This is an older technology that is not as secure as the Dynamic option. It
can, however, provide for a more stable network.
Dynamic
This option enables wireless encryption that uses dynamically allocated
keys.
This option provides the most secure communication link.
RADIUS MAC
Authentication
Check this option if you use a RADIUS server for authentication.
A Remote Authentication Dial in User Service (RADIUS) server acts as a
centralized access and authorization point for network service. The
authentication service is then handled by the RADIUS server instead of
the ENCOM radios.
For ENCOM STRATOS plus Version 2.1.71
Page 243
© 2010-2015 Encom Wireless Data Solutions Inc.
ENCOM STRATOS plus
USER MANUAL
Important: The security settings must be the identical for all radios on the network. Radios that
have different security settings will not be able to communicate with each other.
Note: Encom Wireless Data Solutions highly recommends that you confer with your I.T.
department to determine the appropriate level of security for your network.
The Static and Dynamic security options contain additional settings that need to be configured. The
following topics describe these in more detail:
Static Security Options
Dynamic Security Options
For ENCOM STRATOS plus Version 2.1.71
Page 244
© 2010-2015 Encom Wireless Data Solutions Inc.
ENCOM STRATOS plus
USER MANUAL
Static Security Settings
The following screen shot shows the static security options for a point-to-point radio:
The following table describes the static security options found in the Wireless Security Settings tab:
Static Security Options
Field Name
Description
Encryption Level
Select the encryption level to use. Only one option is available for point-topoint radios.
Option
Description
128-bit AES
Uses the 128-bit AES block encryption algorithm
couple with the CBC-MAC block chaining technique
for added security. This is the most secure of the
three static security options.
Active Key
Select the encryption key to use. Although you can define up to four static
encryption keys, only one key can be active.
Encryption Key (1-4)
Enter the hexadecimal character sequence to use for the encryption key.
Hexadecimal characters include the decimal digits (0-9) and the letters AF.
The number of characters you need to enter depends on the Encryption
Level you have specified. An indicator, located below the Active Key list,
For ENCOM STRATOS plus Version 2.1.71
Page 245
© 2010-2015 Encom Wireless Data Solutions Inc.
ENCOM STRATOS plus
USER MANUAL
Static Security Options
Field Name
Description
will indicate the number of characters you have to enter:
For ENCOM STRATOS plus Version 2.1.71
Page 246
© 2010-2015 Encom Wireless Data Solutions Inc.
ENCOM STRATOS plus
USER MANUAL
Dynamic Security Settings
The following screen shot shows the dynamic security options for a point-to-point radio:
The following tables describe the dynamic security options found in the Wireless Security Settings
tab:
Authentication Types
Field Name
Description
WPA Personal
Check this option to enable WPA personal authentication. You must also
enter a pre-shared key used for the authentication process.
WPA2 Personal
Check this option to enable WPA2 personal authentication. You must also
enter a pre-shared key used for the authentication process.
WPA Enterprise
Check this option to enable WPA enterprise authentication. This option
does not require a pre-shared key.
WPA2 Enterprise
Check this option to enable WPA2 enterprise authentication. This option
does not require a pre-shared key.
For ENCOM STRATOS plus Version 2.1.71
Page 247
© 2010-2015 Encom Wireless Data Solutions Inc.
ENCOM STRATOS plus
USER MANUAL
Authentication Types
Field Name
Description
EAP Method
Specify the authentication protocol to use. Two options are available:
Option
Description
Pass Through
Authentication requests are relayed to a RADIUS
server.
EAP-TLS
TLS certificates are used for authentication.
This option is only used by the WPA Enterprise and WPA2 Enterprise
authentication types. It is hidden if no enterprise option is selected.
TLS Mode
Specify how TLS certificates are to be used. Two options are available:
Option
Description
Use Dynamic
Certificates
TLS certificates are negotiated dynamically using
anonymous Diffie-Hellman MODP 2048 bit
algorithm.
Use Imported
Certificates
A TLS certificate that has been imported into the
radio is used.
This option is only used when the EAP Method is set to EAP-TLS. It is
hidden if the EAP-TLS option is not selected.
For ENCOM STRATOS plus Version 2.1.71
Page 248
© 2010-2015 Encom Wireless Data Solutions Inc.
ENCOM STRATOS plus
USER MANUAL
Encryption Algorithms
Field Name
Description
Unicast Ciphers
Check the ciphers that can be used to encrypt frames sent to individual
radios. The following option is available.
Option
Description
AES-CCM
A more secure WPA encryption protocol, based on
the reliable AES (Advanced Encryption Standard).
Use this option is preferred if the there are no
legacy WEP devices in the network.
This TKIP option is not available in point-to-point devices.
Group Ciphers
Check the ciphers that can be used to encrypt frames broadcast to all
radios. The following option is available.
Option
Description
AES-CCM
A more secure WPA encryption protocol, based on
the reliable AES (Advanced Encryption Standard).
Use this option is preferred if the there are no
legacy WEP devices in the network.
This TKIP option is not available in point-to-point devices.
Miscellaneous
Field Name
Description
Group Key Update
Time
The interval at which the dynamically generated keys are updated.
For ENCOM STRATOS plus Version 2.1.71
Page 249
© 2010-2015 Encom Wireless Data Solutions Inc.
ENCOM STRATOS plus
USER MANUAL
Network Tab
The following screen shot shows the network settings tab for a point-to-point radio:
Because a large number of configuration options are available, the network configuration tab is split
up into a number of sub-tabs. The following topics describe the settings found in each sub-tab:
Time Settings
DHCP Server Settings
SNMP Settings
QoS (Quality of Service) Settings
RADIUS Settings
VLAN Settings
For ENCOM STRATOS plus Version 2.1.71
Page 250
© 2010-2015 Encom Wireless Data Solutions Inc.
ENCOM STRATOS plus
USER MANUAL
Time Settings
The following screen shot shows the NTP settings tab for a point-to-point radio:
The following table describes the time synchronization settings.
Time Synchronization
Field Name
Description
Synchronize radio time Select one of the following options to set the system clock:
using
Option
Description
Nothing
The radio's time will only be synchronized when a
configuration change is made by STRATOS.
NTP Server
The radio will synchronize its internal clock to the
specified NTP server time at regular intervals.
GPS Receiver
The radio will synchronize its internal clock from
the built-in GPS receiver.
Note: This option is only available if the radio
contains a GPS receiver.
Primary NTP Server
Specify the IP address of the NTP server used to synchronize the radio's
internal clock. This is an Internet Protocol version 4 (IPv4) address,
specified in dotted notation, as shown in the following example:
For ENCOM STRATOS plus Version 2.1.71
Page 251
© 2010-2015 Encom Wireless Data Solutions Inc.
ENCOM STRATOS plus
USER MANUAL
Note: This option is only enabled when the NTP Server option is selected.
Secondary NTP
Server
If applicable, specify the IP address of the secondary NTP server. This is
an Internet Protocol version 4 (IPv4) address, specified in dotted notation,
as shown in the following example:
If there is no secondary NTP server in your network, enter "0.0.0.0" in this
field.
Note: This option is only enabled when the NTP Server option is selected.
System Clock
Field Name
Description
Time Zone
Select the time zone in which the radio is operating.
Note that the time zone has no effect on the operation of the radio, and
does not need to be set for normal operation.
If the time zone is not set, the radio defaults to UTC time.
For ENCOM STRATOS plus Version 2.1.71
Page 252
© 2010-2015 Encom Wireless Data Solutions Inc.
ENCOM STRATOS plus
USER MANUAL
DHCP Server Settings
The following screen shot shows the DHCP server tab for a point-to-point radio:
The following table describes the DHCP server settings.
DHCP Server
Field Name
Description
Enable DHCP Server
Check this option to enable the radio's DHCP server. When this option is
enabled, the radio will assign IP addresses to any other radio, or any other
other device, that is configured to obtain their IP addresses dynamically.
Important: Severe network instability can occur if there is more than one
DHCP server present in a network or network segment. Do not enable
this option if a router or another radio is already acting as a DHCP server.
DHCP Server Settings
Field Name
Description
DHCP Address Range Specify the start and end range of the IP addresses that will be provided
by the DHCP server, as shown in the following example:
For ENCOM STRATOS plus Version 2.1.71
Page 253
© 2010-2015 Encom Wireless Data Solutions Inc.
ENCOM STRATOS plus
USER MANUAL
DHCP Server Settings
Field Name
Description
In this example, IP addresses in the 192.168.1.100 - 192.168.1.200 range
will be assigned to devices that use dynamic addressing. IP addresses
outside this range would be manually assigned to devices that do not use
dynamic addressing.
Network Mask
Enter the network mask that will be assigned to the devices that use
dynamic IP addressing. This is an Internet Protocol version 4 (IPv4)
address, specified in dotted notation, as shown in the following example:
Gateway Address
Enter the IP Address of the default gateway that will be assigned to the
devices that use dynamic IP addressing. This is an Internet Protocol
version 4 (IPv4) address, specified in dotted notation, as shown in the
following example:
The default gateway is the radio or router that provides access to devices
outside of the local network.
DNS Server Address
Enter the IP Address of the DNS server that will be assigned to the
devices that use dynamic IP addressing. This is an Internet Protocol
version 4 (IPv4) address, specified in dotted notation, as shown in the
following example:
If there is no DNS server available in your network, enter "0.0.0.0" in this
field.
WINS Server Address
Enter the IP Address of the WINS server that will be assigned to the
devices that use dynamic IP addressing. This is an Internet Protocol
version 4 (IPv4) address, specified in dotted notation, as shown in the
following example:
If there is no WINS server available in your network, enter "0.0.0.0" in this
field.
For ENCOM STRATOS plus Version 2.1.71
Page 254
© 2010-2015 Encom Wireless Data Solutions Inc.
ENCOM STRATOS plus
USER MANUAL
SNMP Settings
The following screen shot shows the SNMP tab for a point-to-point radio:
The following tables describe the SNMP service settings.
SNMP Service
Field Name
Description
Enable SNMP Service Check this option enable the radio's SNMP (Simple Network Management
Protocol) agent.
When this option is enabled, diagnostic information can be obtained from
the radio using any SNMP based network monitoring application.
SNMP Service Settings
Field Name
Description
Host IP
Enter the IP address of the computer on which the network monitoring
application is running, as shown in the following example:
Setting this option will prevent any other computer from being able to
access the radio's SNMP information.
If you want to allow any computer that is on your network to access the
radio's SNMP information, enter "0.0.0.0" in this field.
For ENCOM STRATOS plus Version 2.1.71
Page 255
© 2010-2015 Encom Wireless Data Solutions Inc.
ENCOM STRATOS plus
USER MANUAL
Community Name
The community name used to access the radio's SNMP agent. This is set
to 'public', and cannot be changed.
Only read operations are permitted.
Contact Information
Enter the contact information of the individual responsible for the network,
if applicable.
Location Information
Enter the location of the radio, if applicable.
For ENCOM STRATOS plus Version 2.1.71
Page 256
© 2010-2015 Encom Wireless Data Solutions Inc.
ENCOM STRATOS plus
USER MANUAL
QoS Settings
The following screen shot shows the QoS (Quality of Service) settings tab for a point-to-point radio:
The Quality of Service settings allow you to prioritize the various types of network traffic so that
important traffic is processed ahead of less important traffic.
Under normal conditions, all network data packets have an equal opportunity to be forwarded by the
radio. This works well for some applications (such as file transfers or web browsing) but it is not
adequate for traffic that is sensitive to network latency and throughput reductions (such as voice or
video streaming). QoS allows you to address this issue by giving the time sensitive traffic a larger
share of the network bandwidth.
Refer to Appendix D: Quality of Service for more detailed information on the prioritization
mechanisms supported by the ENCOM radios.
The following tables describe the Quality of Service settings.
Network Traffic Prioritization
Field Name
Description
Enable
Check this option to enable priority queue based QoS features.
Priority rules are used to specify the priority of specific types of traffic.
Lower priority traffic is dropped in preference to higher priority traffic when
the radio becomes heavily loaded.
Use WMM
Check this option to set the priority of incoming packets to the incoming
WMM priority (or to the incoming VLAN priority if VLANs are being used).
WMM is used to prioritize certain type of traffic, such as VOIP (Voice Over
IP) and video streams, that are sensitive to network latency and capacity
For ENCOM STRATOS plus Version 2.1.71
Page 257
© 2010-2015 Encom Wireless Data Solutions Inc.
ENCOM STRATOS plus
USER MANUAL
issues.
Note: The WMM/VLAN priorities must be set by the device that creates
the network data packets or by the router or switch that provides access
to the ENCOM radio network.
Use DSCP Priorities
Check this option to set the priority of incoming packets to the DSCP
priority of the incoming data packets.
Note: The DSCP priorities must be set by the device that creates the
network data packets or by the router or switch that provides access to
the ENCOM radio network.
Priority Rules
Field Name
Description
Priority Rule List
By default, ENCOM STRATOS will assign the highest priority to the radio
management traffic.
Other types of network traffic can be assigned to specific priority queues
by creating custom priority rules. The Priority Rules list displays the
custom priority rules that you have defined.
When defining a priority rule, you specify the type of traffic that the rule is
to act upon, and the priority to assign to the matching traffic.
In the following example, two priority rules have been defined:
The shaded cells contain the criteria that must be matched in order for a
network data packet to be affected by the rule. Matching data packets will
be assigned the New Priority (and optionally the New DSCP value)
defined in the rule.
The priority rule list is sorted by the New Priority column, in descending
order.
The following table describes the information that is displayed in the
Priority Rules list:
Column
Description
To delete a rule, first check it, and then click on
the Remove button at the right of the Priority
Rule list to actually delete it.
Name
For ENCOM STRATOS plus Version 2.1.71
A short description that identifies the type of
Page 258
© 2010-2015 Encom Wireless Data Solutions Inc.
ENCOM STRATOS plus
USER MANUAL
network traffic associated with the rule.
Protocol
The protocol to match.
Port(s)
The IP port or ports to match. If blank, traffic on
any port is affected by the rule.
Source
Address(es)
The address or addresses that the data packets
must originate from.
Destination
Address(es)
The address or addresses that the data packets
are being forwarded to.
DSCP
The DSCP value of the incoming packets to
match. If blank, the DSCP priority is ignored by
the rule.
New Priority
The priority to assign to the packets that match
the specified criteria.
New DSCP
The DSCP value to assign to the packets that
match the specified criteria.
Click the Add button to create a new priority rule. Enter the appropriate
rule settings in the QoS Priority Rule form that is displayed.
(Add button)
Select a priority rule, and then click on the Edit button to modify the rule
settings.
(Edit button)
Alternatively, you can double-click on the rule you want to modify.
To delete a rule, first check it, and then click on the Remove button to
actually delete it.
(Remove button)
For ENCOM STRATOS plus Version 2.1.71
Page 259
© 2010-2015 Encom Wireless Data Solutions Inc.
ENCOM STRATOS plus
USER MANUAL
Specifying a QoS Priority Rule
The following screen shot shows the QoS Priority Rule form for a point-to-point radio:
The QoS Priority Rule form allows you to define a traffic priority rule.
The following tables describe the QoS rule settings.
Rule
Field Name
Description
Name
Enter a short description that identifies the type of network traffic
associated with the rule.
Matching Criteria
Field Name
Description
Protocol
Specify the protocol that the rule will apply to. You can select one of the
following values:
Protocol
Description
All
All network traffic will be matched.
When you select this option, one or both of the
Source Address and Destination Address
fields must be set. Otherwise, all of the network
traffic flowing through the radio would match the
For ENCOM STRATOS plus Version 2.1.71
Page 260
© 2010-2015 Encom Wireless Data Solutions Inc.
ENCOM STRATOS plus
USER MANUAL
rule.
Ports
UDP
The rule will only affect UDP traffic.
TCP
The rule will only affect TCP traffic.
Optionally specify the port or ports associated with the network traffic
that the rule will apply to. You can specify the ports using one of the
following formats:
Format
Example
Single Port
1000
Multiple Ports
1000,2000
Port Range
1000-2000
Multiple Port Ranges
1000-2000,3000-4000
If this value is not specified, the rule will apply to all traffic of the
selected protocol type.
Source Address(es)
Optionally specify the address or addresses that the data packets must
originate from. You can specify the addresses using one of the
following formats:
Format
Example
Single IPV4 Address
192.168.1.100
IPV4 Address Range
192.168.1.100-192.168.1.200
IPV4 CIDR Subnet
192/168.1.1/24
If this value is not specified, the rule will apply to all destination
addresses.
Destination Address(es)
Optionally specify the address or addresses that the data packets are
being forwarded to. You can specify the addresses using one of the
following formats:
For ENCOM STRATOS plus Version 2.1.71
Format
Example
Single IPV4 Address
192.168.1.100
Page 261
© 2010-2015 Encom Wireless Data Solutions Inc.
ENCOM STRATOS plus
USER MANUAL
IPV4 Address Range
192.168.1.100-192.168.1.200
IPV4 CIDR Subnet
192/168.1.1/24
If this value is not specified, the rule will apply to all destination
addresses.
DSCP
Optionally specify the DSCP (Differentiated Services Code Point) value
in the IP header that the rule will apply to.
You can select a predefined DSCP value from the drop-down list, or
enter a number between 0 and 63.
If this value is not specified, the rule will apply to all DSCP values.
Action
Field Name
Description
Set priority to
The priority to assign to the packets that match the specified criteria.
The higher the priority value, the higher the priority assigned to the
associated network traffic.
Set DSCP to
Optionally specify the DSCP (Differentiated Services Code Point) value
to assign to the packets that match the specified criteria.
You can select a predefined DSCP value from the drop-down list, or
enter a number between 0 and 63.
If this value is not specified, no change will be made to the packet's
DSCP value.
For ENCOM STRATOS plus Version 2.1.71
Page 262
© 2010-2015 Encom Wireless Data Solutions Inc.
ENCOM STRATOS plus
USER MANUAL
RADIUS Settings
The following screen shot shows the RADIUS settings tab for a point-to-point radio:
RADIUS is used to centralize the authentication of users that attempt to login to the radio and/or to
the network. Refer to ENCOM STRATOS RADIUS Configuration Guide, available separately, for
more information on setting up and using a RADIUS server with your radio network.
The following tables describe the settings found in each group in the RADIUS settings tab.
Primary and Secondary Server
Field Name
Description
Enable RADIUS
Server
Check this setting to enable the associated RADIUS server (Primary or
Backup).
If the radio cannot connect to the primary RADIUS server, it will attempt to
connect to the backup RADIUS server.
Server Address
Enter the IP address of the RADIUS server.
Authentication Port
Enter the IP port on which RADIUS authentication requests are accepted.
The default is 1812.
Accounting Port
Enter the IP port on which RADIUS accounting updates are accepted.
The default is 1813.
Shared Secret
Enter a string that is used to obfuscate the user password that is sent to
the RADIUS server for authentication. This value must match the Shared
Secret that is configured in the RADIUS server.
For ENCOM STRATOS plus Version 2.1.71
Page 263
© 2010-2015 Encom Wireless Data Solutions Inc.
ENCOM STRATOS plus
USER MANUAL
Domain
Enter the Microsoft Windows domain of the user. Only use if the RADIUS
server requires domain validation.
Timeout
Enter the maximum amount of time (in milliseconds) to wait for a
response from the RADIUS server before resending an authentication
request.
The default is 300 ms. You may need to increase this if your RADIUS
server is slow to respond to authentication requests.
Use RADIUS to login
to the radio
Check this option to use RADIUS to authenticate radio login requests.
When this option is enabled, the radio will check with the RADIUS server
if it does not find the specified user in its local user database.
User RADIUS to login Check this option to use RADIUS to authenticate client devices that wish
to the wireless network to attach to your network (e.g. for access to the network operations center
or to your corporate LAN).
If you select this option, you will need to check the RADIUS MAC
Authentication setting for each of the radio cards that clients will use to
connect to the network.
Common Settings
Field Name
Description
Default Access Rights Select the access rights to assign to the user if the RADIUS server is not
configured to respond to an authentication request with the user's group
name.
The following table describes the options that are available for this setting:
Option
Description
View Settings
The user will be able to inspect the radio's
configuration settings, but will not be able to
make any changes.
Change Settings
The user will be able to inspect and change
the radio's configuration settings.
This setting is ignored if the RADIUS server responds to an authentication
request with the user's group name.
RADIUS Accounting
Check this option to send RADIUS accounting packets to the RADIUS
server. This information is normally used for user billing, and is not usually
needed for typical ENCOM radio networks.
For ENCOM STRATOS plus Version 2.1.71
Page 264
© 2010-2015 Encom Wireless Data Solutions Inc.
ENCOM STRATOS plus
USER MANUAL
VLAN Settings
The following screen shot shows the VLAN settings tab for a point-to-point radio:
VLANs (Virtual LANs) are used to improve the performance, and possibly the security, of a radio
network. Refer to Appendix E: VLAN Support for more information on implementing a VLAN-based
network.
The following tables describe the settings found in each group in the VLAN settings tab.
Management VLAN
Field Name
Description
Tagged Management
Data
By default, the radio can be managed by connections over the native
(non-tagged) VLAN.
To be able to manage the radio using a specific VLAN, check this option,
and enter the appropriate management VLAN ID in the VLAN ID field.
VLAN ID
Enter the ID of the management VLAN (a number in the range 1-4095 is
required).
Client Tagging
Field Name
Description
Tag Client Data
Normally, all of the radio's interfaces (wireless and Ethernet) act as VLAN
trunks (i.e. they carry the network traffic for all VLANs). If a normal, nonVLAN aware device is plugged into the radio's Ethernet port, its network
traffic will not be tagged, and it will not be able to communicate with
For ENCOM STRATOS plus Version 2.1.71
Page 265
© 2010-2015 Encom Wireless Data Solutions Inc.
ENCOM STRATOS plus
USER MANUAL
devices that are part of a VLAN.
Check this option to set up the radio's Ethernet port as an access port for
a specific VLAN. This gives devices connected to the Ethernet port
access to the other devices in the specified VLAN.
VLAN ID
Enter the ID of the client VLAN to (a number in the range 1-4095 is
required).
VLAN Priority
The priority to assign to the packets originating from the Ethernet port.
The higher the priority value, the higher the priority assigned to the
associated network traffic.
Note: In order to prioritize the wireless network traffic using the VLAN
priority, the appropriate QoS options need to be configured. See the Using
WMM to Support VLAN Priority Traffic topic for more information.
Management Address (Wireless)
Field Name
Description
IP Address
Enter the IP address used to access the radio via its wireless interfaces.
This is an Internet Protocol version 4 (IPv4) address, specified in dotted
notation, as shown in the following example:
If the Tagged Management Data option is checked, this IP address
should be compatible with the management VLAN's network address
range.
Network Mask
Enter the network mask of the network used to access the radio via its
wireless interfaces. This is an Internet Protocol version 4 (IPv4) address,
specified in dotted notation, as shown in the following example:
If the Tagged Management Data option is checked, this mask should
be compatible with the management VLAN's network mask.
For ENCOM STRATOS plus Version 2.1.71
Page 266
© 2010-2015 Encom Wireless Data Solutions Inc.
ENCOM STRATOS plus
USER MANUAL
Default Gateway
Enter the IP address of the radio, router or switch that allows this radio to
connect with devices that are outside of their local LAN or VLAN. This is
an Internet Protocol version 4 (IPv4) address, specified in dotted notation,
as shown in the following example:
If the Tagged Management Data option is checked, this IP address
would normally be the IP address of the network's gateway radio, or the IP
address of the router or switch used to access external networks.
Access Port Address (Ethernet)
Field Name
Description
IP Address
Enter the IP address used to access the radio via its Ethernet interface.
This is an Internet Protocol version 4 (IPv4) address, specified in dotted
notation, as shown in the following example:
If the Tag Client Data option is checked, this IP address should be
compatible with the client VLAN's network address range.
Network Mask
Enter the network mask of the network used to access the radio via its
Ethernet interface. This is an Internet Protocol version 4 (IPv4) address,
specified in dotted notation, as shown in the following example:
If the Tag Client Data option is checked, this mask should be
compatible with the client VLAN's network mask.
Pruning
Field Name
Description
Prune VLANs
Check this option to prevent the radio for forwarding network traffic
associated with specific VLAN IDs.
VLAN IDs
Enter one or more VLAN IDs to prune. Separate individual IDs with
commas.
Any incoming network traffic that matches the specified VLAN IDs will be
dropped by the radio.
For ENCOM STRATOS plus Version 2.1.71
Page 267
© 2010-2015 Encom Wireless Data Solutions Inc.
ENCOM STRATOS plus
USER MANUAL
About Tab
The following screen shot shows the About tab for a point-to-point radio:
This tab displays information regarding the radio's hardware and firmware. It does not contain any
user editable fields.
For ENCOM STRATOS plus Version 2.1.71
Page 268
© 2010-2015 Encom Wireless Data Solutions Inc.
ENCOM STRATOS plus
USER MANUAL
Export and Import Buttons
The Export and Import buttons in the lower left-hand corner of the radio configuration form allow
you to save the radio's configuration settings to a file, and to update the radio's configuration
settings from a previously saved configuration file.
Refer to the following topics for more information on these functions:
Exporting the Radio Configuration
Importing the Radio Configuration
For ENCOM STRATOS plus Version 2.1.71
Page 269
© 2010-2015 Encom Wireless Data Solutions Inc.
ENCOM STRATOS plus
USER MANUAL
Exporting the Radio Configuration
The Export function is used to save the radio's current settings to a configuration profile file. This
allows you to:
Make a backup copy of the radio's configuration.
Save the radio's configuration to a profile or template file for use in configuring other radios.
To export a radio's configuration:
1. From the radio's configuration form, click on the Export button. The Save configuration profile
file form is displayed:
2. Specify the name of the file you want to save the radio's configuration settings to, and then
press the Save button to save the settings.
By default, STRATOS saves configuration profile files in the 'My Documents\Encom
Wireless\Profiles' folder.
For ENCOM STRATOS plus Version 2.1.71
Page 270
© 2010-2015 Encom Wireless Data Solutions Inc.
ENCOM STRATOS plus
USER MANUAL
Importing the Radio Configuration
The Import function allows you to update the radio's settings from a previously saved configuration
profile file. This function allows you to:
Restore the radio's configuration from a backup file. This can be useful when you have to replace
a radio in the field.
Apply the settings from one radio to another. This can be used to provision new radios quickly,
and ensure that they are compatible with other radios in the network.
To configure a radio using a saved configuration file:
1. From the radio's configuration form, click on the Import button. The Select configuration
profile file form is displayed:
2. Select the configuration profile you want to import, and press the Open button.
For ENCOM STRATOS plus Version 2.1.71
Page 271
© 2010-2015 Encom Wireless Data Solutions Inc.
ENCOM STRATOS plus
USER MANUAL
3. The Import Radio Settings form will be displayed:
4. The Radio Module Assignments group allows you to specify how the radio module settings
are applied:
The Target Radio Modules column lists the wireless radio modules that are present on the
radio.
The Profile Radio Modules column shows the options that are available for each wireless
interface that is present on the radio. STRATOS will find the best match between the profile
and target radio modules, and will assign these by default. You can change the default
assignments by selecting the appropriate items from the list boxes.
In the example shown above, STRATOS applied the matching radio modules from the profile
to the target radio modules. If you didn't want to disturb the configuration of the wireless radio
module, then you would select the Don't Copy option from the list box, as shown below:
For ENCOM STRATOS plus Version 2.1.71
Page 272
© 2010-2015 Encom Wireless Data Solutions Inc.
ENCOM STRATOS plus
USER MANUAL
5. The Settings to Copy options allow you to specify what settings to import from the
configuration profile:
These are described further in the following table:
Option
Description
Copy all settings
Use this option when you need to configure a radio so that it
matches the configuration profile exactly.
This option is most often used when configuring a replacement
radio, or you want to restore the radio's configuration from a backup.
Copy common
settings
Use this option to exclude those settings that are unique to the
radio.
This option is most often used when you are adding a new radio to a
network, and you want to configure it to match the other radios in
the network.
The following items will not get copied over from the profile file to
the radio:
Radio name
Radio Description
Radio latitude, longitude and street address
Radio static IP address
6. Press the OK button to apply the profile settings to the radio.
7. Make any changes to the imported settings in the radio configuration form.
8. Press the Save button on the radio configuration form to save the settings to the radio.
For ENCOM STRATOS plus Version 2.1.71
Page 273
© 2010-2015 Encom Wireless Data Solutions Inc.
ENCOM STRATOS plus
USER MANUAL
Configuring Mesh Radios
To configure a mesh radio:
1. Locate the radio you would like to configure in the Radio List. Ensure that it is currently on-line
(a green icon is displayed at the left of an on-line radio):
2. Click the right mouse button on the radio name, and select Configure from the pop-up menu
that is displayed:
Alternatively, you can either double-click the left mouse button on the radio name, or click the
left mouse button on the radio name, and select Radio -> Configure from the main menu.
For ENCOM STRATOS plus Version 2.1.71
Page 274
© 2010-2015 Encom Wireless Data Solutions Inc.
ENCOM STRATOS plus
USER MANUAL
3. STRATOS will download the radio's current configuration. This process will normally take a
few seconds to complete. During this time, a wait form is displayed:
4. When the radio's configuration has been obtained, the radio configuration form is displayed:
The configuration settings are logically grouped using a tabbed interface. The following topics
describe the settings found in each tab:
Basic Settings tab
Location tab
Radio tab
Network tab
About tab
For ENCOM STRATOS plus Version 2.1.71
Page 275
© 2010-2015 Encom Wireless Data Solutions Inc.
ENCOM STRATOS plus
USER MANUAL
Basic Settings Tab
The following screen shot shows the basic configuration settings tab for a mesh radio:
The following tables describe the settings found in each group in the basic settings tab.
Identification
Field Name
Description
Radio Name
Enter a name used to identify the radio (up to a maximum of 64
characters). The name you enter will be displayed in the radio list, and in
all other places where a reference to the radio is made.
Radio MAC Address
Displays the MAC address assigned to the radio. (This is essentially the
MAC address of the radio's first Ethernet adapter.)
For ENCOM STRATOS plus Version 2.1.71
Page 276
© 2010-2015 Encom Wireless Data Solutions Inc.
ENCOM STRATOS plus
USER MANUAL
Identification
Field Name
Description
Description
Enter an optional description for the radio. This field allows you to keep
track of ad-hoc information associated with the radio, without adding
clutter to the radio name. The radio description is displayed in the radio
properties panel:
Regulatory Domain
Field Name
Description
Country Name
Select the country in which the radio is operating. Certain countries have
limitations on the radio power output, allowed frequency ranges and
frequency bands. Failure to select the appropriate country can result in a
radio that is operating outside of the legally allowed ranges.
If the radio is operating in the United States or Canada, you can leave this
setting to <Not Set>.
IP Address Settings
Field Name
Description
Obtain an IP address
automatically
Select this option if a DHCP server is available on your radio network, and
you want the DHCP server to assign an IP address to the radio.
Specify a static IP
address
Select this option to manually assign the radio's IP address.
ENCOM recommends this option because it provides for a more secure
network (especially if you have not enabled wireless security).
Note: It is important that each radio in the network is assigned a different
IP address. Network performance can suffer greatly if two or more radios
are assigned the same IP address.
For ENCOM STRATOS plus Version 2.1.71
Page 277
© 2010-2015 Encom Wireless Data Solutions Inc.
ENCOM STRATOS plus
USER MANUAL
IP Address Settings
Field Name
Description
IP Address
Enter the IP address of the radio. This is an Internet Protocol version 4
(IPv4) address, specified in dotted notation, as shown in the following
example:
Network Mask
Enter the network mask. This is an Internet Protocol version 4 (IPv4)
address, specified in dotted notation, as shown in the following example:
Default Gateway
Enter the IP address of the radio or router that allows the radio to connect
with devices that are outside of their local LAN or VLAN. This is an Internet
Protocol version 4 (IPv4) address, specified in dotted notation, as shown
in the following example:
Note that the default gateway's IP address must be in the same subnet as
the radio's IP address.
Power LED
Field Name
Description
Always On
The external power LED is on as long as the radio is powered.
Note: This option is visible only if the radio supports an external power
indicator LED.
Momentarily on when
radio is powered up
The external power LED is on for 1 minute after the radio is powered, and
is subsequently turned off.
Note: This option is visible only if the radio supports an external power
indicator LED.
For ENCOM STRATOS plus Version 2.1.71
Page 278
© 2010-2015 Encom Wireless Data Solutions Inc.
ENCOM STRATOS plus
USER MANUAL
Location Tab
The following screen shot shows the location settings tab for a mesh radio:
The following table describes the settings found in the location tab.
Field Name
Description
Get location from GPS Select this option if you want the radio to get its location from the built-in
GPS receiver.
This option is not available if the radio does not contain a GPS receiver.
Manually specify
location
Select this option if you want to manually specify the location of the radio.
Latitude
Enter the latitude at which the radio is located, in decimal degrees. This
value is positive in the northern hemisphere and negative in the southern
hemisphere.
Alternatively, hold down the Shift key and click the left mouse button on
the map to set the radio's position. This process will automatically update
the Latitude field.
Longitude
Enter the longitude at which the radio is located, in decimal degrees. This
value is positive in the eastern hemisphere and negative in the western
hemisphere.
Alternatively, hold down the Shift key and click the left mouse button on
For ENCOM STRATOS plus Version 2.1.71
Page 279
© 2010-2015 Encom Wireless Data Solutions Inc.
ENCOM STRATOS plus
USER MANUAL
the map to set the radio's position. This process will automatically update
the Longitude field.
Icon Color
Select the color of the radio icon. You can use the icon color to visually
group radios by radio type, geographical location, VLAN association, etc.
Icon Style
Select the style of the radio icon. Four icon styles are currently available:
Icon
Radio Type
Generic radio
Master radio
Remote radio
Repeater radio
Dual radio
Embedded map
The embedded map allows you to see the current location of the radio. A
green marker shows the location assigned to the radio.
For ENCOM STRATOS plus Version 2.1.71
Page 280
© 2010-2015 Encom Wireless Data Solutions Inc.
ENCOM STRATOS plus
USER MANUAL
To set a new location:
Press and hold down the Shift key on your computer's keyboard.
Click the left mouse button at the location you want to assign to the
radio.
The green marker will move to the selected position.
Note: Refer to the Map Panel topic for more information on the embedded
map features.
Street Address
Enter the street address of the radio, if applicable. This information is
optional.
For ENCOM STRATOS plus Version 2.1.71
Page 281
© 2010-2015 Encom Wireless Data Solutions Inc.
ENCOM STRATOS plus
USER MANUAL
Radio Tab
ENCOM mesh radios contain at least one, and as many as four, wireless radio modules. Each
wireless radio module is configured in its own tab. The first radio module is configured in the Radio
1 tab, the second radio is configured in the Radio 2 tab, and so on.
The following screen shot shows the radio settings tab for a mesh radio:
Because the wireless radio settings are somewhat involved, the radio configuration tab is split up
into three sub-tabs. The following topics describe the settings found in each sub-tab:
Radio Settings sub-tab
MAC Access sub-tab
Wireless 'N' sub-tab
Wireless Security Settings
For ENCOM STRATOS plus Version 2.1.71
Page 282
© 2010-2015 Encom Wireless Data Solutions Inc.
ENCOM STRATOS plus
USER MANUAL
Radio Settings
The following screen shot shows the wireless radio settings tab for a mesh radio:
The following tables describe the settings found in each group in the wireless radio settings tab.
General
Field Name
Description
Enable Radio
Uncheck this option to disable the wireless radio card. A disabled radio
card will not be able to form wireless links with other radios.
If you uncheck this option, all of the other options in the Radio Settings tab
will be disabled.
Identification
Field Name
Description
Radio Model
Displays the model number of the wireless radio card. This information is
useful when troubleshooting issues with the radio.
Wireless MAC
Address
Displays the MAC address assigned to the wireless radio card. For mesh
radios, the MAC address of the wireless radio cards are different than the
MAC address of the radio's Ethernet interface.
For ENCOM STRATOS plus Version 2.1.71
Page 283
© 2010-2015 Encom Wireless Data Solutions Inc.
ENCOM STRATOS plus
USER MANUAL
Radio Network Setup
Field Name
Description
Network Type
Select the role of the mesh radio. One of the following options can be
specified:
Role
Description
Mesh Only
The wireless radio can only connect to other
mesh radios (no clients allowed). This option
provides the most secure and highest
performance link.
Mesh and Clients
The wireless radio can connect to other mesh
radios and can accept connections from client
devices.
This option can be used to allow field
technicians access to the mesh or to allow
wireless devices and sensors to be accessed
from the mesh network.
Clients Only
The wireless radio can only accept
connections from client devices. It cannot
connect to other mesh radios.
This option can be used for stand-alone
applications, such as wireless hot-spots.
Network SSID
Enter a name used to identify the network in which the wireless radio will
take part. The Network SSID is case sensitive, and may contain spaces.
Note: You should change the default SSID assigned at the factory to a
unique SSID for your network. You can minimize interference between
adjacent networks by assigning a unique SSID for each network.
Important: All radios that participate in the same network must be
assigned the same Network SSID.
Hide SSID
Check this option to prevent the Network SSID from being broadcast by
the wireless radio. This prevents external devices from being able to
discover the network's SSID (and potentially connect to it).
Radio Mode
Mesh radios are always considered to be master radios. This setting is
for your information only, and cannot be changed.
For ENCOM STRATOS plus Version 2.1.71
Page 284
© 2010-2015 Encom Wireless Data Solutions Inc.
ENCOM STRATOS plus
USER MANUAL
Radio Network Setup
Field Name
Description
Channel Mode
This option allows you to set the width of the frequency channel you are
using.
Selecting a smaller frequency for the Channel Mode increases the
distance over which you can establish a wireless link, at the cost of
reduced bandwidth.
For most applications 40 MHz is acceptable.
Radio Parameter Setup
Field Name
Description
Frequency Band
Displays the nominal frequency at which the radio operates. This option
can be changed if the radio card supports more than one band.
Channel
Select the radio's operating frequency.
Note: All of the radios in the network must be set to the same frequency
in order for them to communicate with each other.
Wireless Link Rate
Mesh radios use an adaptive algorithm to choose the best bit rate for the
current link conditions. This setting is for your information only, and
cannot be changed.
Output Power
Select the wireless radio's output power.
Unless constrained by the Regulatory Domain that the radio is operating
in, you should use the Maximum power setting when the radio is
deployed in the field.
If the radio is being provisioned or tested in a bench environment, you
should use the Low power setting.
For ENCOM STRATOS plus Version 2.1.71
Page 285
© 2010-2015 Encom Wireless Data Solutions Inc.
ENCOM STRATOS plus
USER MANUAL
MAC Access Settings
The following screen shot shows the MAC Access tab for a mesh radio:
The settings on this tab are used to prevent WDS (Wireless Distribution System) connections from
forming between specific radios. This allows you to disable the generation of weak or undesirable
links. This can help with network stability and throughput.
The following tables describe the settings found in each group in the MAC Access tab.
MAC Access Settings
Field Name
Description
Limit connections to
If checked, WDS connections will not form if the signal strength is less
links with RSSI greater than the specified value. This option is useful for weeding out weak or
than...
intermittent links that can affect the performance of your network.
If not checked, WDS connections will form, regardless of the quality of
the signal.
MAC Access Setup
Field Name
Description
Allowed MAC
Addresses
This list contains the list of WDS links that are currently active.
Click on the Disallow button to disallow specific WDS links. The links will
be transferred from the Allowed MAC Addresses list to the Disallowed
For ENCOM STRATOS plus Version 2.1.71
Page 286
© 2010-2015 Encom Wireless Data Solutions Inc.
ENCOM STRATOS plus
USER MANUAL
(Disallow button)
MAC Addresses list.
Disallowed links will no longer be allowed to form.
To disallow specific dynamic WDS links:
1. Select one or more links in the Allowed MAC Addresses table. To
select a link, check the associated check box. In the following
example, the first WDS link is selected
2. Click on the Disallow button to disallow the selected MAC
addresses.
Disallowed MAC
Addresses
This list contains the list of WDS links that are not allowed to form.
Click on the Add button to manually add the MAC address of a remote
radio to the disallowed list.
(Add button)
When selected, the following form is displayed:
Specify the MAC address of the radio you want to disallow, and press the
OK button. The new MAC address will be added to the Disallowed MAC
Addresses list.
Note: If you add the MAC address for a radio that is not known to ENCOM
STRATOS, only the MAC address will be displayed in the disallowed list. If
the radio is known to STRATOS, the associated IP Address and radio
name will be included. Both scenarios are shown in the following
example:
Click on the Remove button to remove links from the disallowed list.
To remove disallowed links:
For ENCOM STRATOS plus Version 2.1.71
Page 287
© 2010-2015 Encom Wireless Data Solutions Inc.
ENCOM STRATOS plus
USER MANUAL
(Remove button)
1. Select one or more links in the Disallowed MAC Addresses table.
To select a link, check the associated check box. In the following
example, the first WDS link is selected:
2. Click on the Remove button to remove the selected links.
In order for the newly allowed links to form, you have to save the updated
configuration to the radio.
The following table describes the information that is displayed in the Allowed and Disallowed MAC
address tables:
Column
Description
MAC Address
The MAC address of the wireless radio module on the remote radio.
IP Address
The IP address of the remote radio.
Radio Name
The name assigned to the remote radio.
Interface
Identifies the wireless radio module on the remote radio. The first radio
module is Radio 1, the second radio module is Radio 2, etc.
Tx/Rx Strength
The transmit and receive signal strengths, in dBm, of the wireless
connection between this radio and the remote radio.
For ENCOM STRATOS plus Version 2.1.71
Page 288
© 2010-2015 Encom Wireless Data Solutions Inc.
ENCOM STRATOS plus
USER MANUAL
Wireless 'N' Settings
Note that the Wireless 'N' settings tab is only displayed if the associated radio card supports
Wireless N operation.
The following screen shot shows the wireless 'N' settings tab for a mesh radio:
ENCOM offers Wireless-N radio cards that support up to 3 antennas. STRATOS will automatically
display the number of antennas that are supported by your radio in the Antenna Chains group.
The following table describes the settings found in each group in the wireless 'N' settings tab.
Antenna Chains
Field Name
Description
Transmit
Specify the antennas to use for transmitting data. Check the Chain option
to enable the associated antenna, and uncheck it to disable the antenna.
For optimal performance, you should enable all of the antennas supported
by your radio card.
Receive
Specify the antennas to use for receiving data. Check the Chain option to
enable the associated antenna, and uncheck it to disable the antenna.
For optimal performance, you should enable all of the antennas supported
by your radio card.
For ENCOM STRATOS plus Version 2.1.71
Page 289
© 2010-2015 Encom Wireless Data Solutions Inc.
ENCOM STRATOS plus
USER MANUAL
Wireless Security Settings
The following screen shot shows the wireless security settings tab for a mesh radio:
The Wireless Security Type group allows you to specify the security protocols used to protect the
wireless communication links. You can choose from the following options:
Wireless Security Types
Option
Description
Disabled
Select this option if you do not want to enable security.
This option is not recommended since it allows anyone that has
knowledge of the Network's SSID to connect to the network.
Static
This option enables wireless encryption that uses static keys.
This is an older technology that is not as secure as the Dynamic option. It
can, however, provide for a more stable network.
Dynamic
This option enables wireless encryption that uses dynamically allocated
keys.
This option provides the most secure communication link.
RADIUS MAC
Authentication
Check this option if you use a RADIUS server for authentication.
A Remote Authentication Dial in User Service (RADIUS) server acts as a
centralized access and authorization point for network service. The
authentication service is then handled by the RADIUS server instead of
the ENCOM radios.
For ENCOM STRATOS plus Version 2.1.71
Page 290
© 2010-2015 Encom Wireless Data Solutions Inc.
ENCOM STRATOS plus
USER MANUAL
Important: The security settings must be the identical for all radios on the network. Radios that
have different security settings will not be able to communicate with each other.
Note: Encom Wireless Data Solutions highly recommends that you confer with your I.T.
department to determine the appropriate level of security for your network.
The Static and Dynamic security options contain additional settings that need to be configured. The
following topics describe these in more detail:
Static Security Options
Dynamic Security Options
For ENCOM STRATOS plus Version 2.1.71
Page 291
© 2010-2015 Encom Wireless Data Solutions Inc.
ENCOM STRATOS plus
USER MANUAL
Static Security Settings
The following screen shot shows the static security options for a mesh radio:
The following table describes the static security options found in the Wireless Security Settings tab:
Static Security Options
Field Name
Description
Encryption Level
Select the encryption level to use. Three options are available:
Option
Description
64-bit WEP
Uses a 40-bit encryption key coupled with a 24-bit
initialization vector. This option is considered to be
obsolete, and should only be used for compatibility
with existing infrastructure.
128-bit WEP
Uses a 104-bit encryption key coupled with a 24-bit
initialization vector. This option is more secure than
64-bit WEP, but still suffers from deficiencies in the
WEP algorithm. It should only be used for
compatibility with existing infrastructure.
128-bit AES
Uses the 128-bit AES block encryption algorithm
couple with the CBC-MAC block chaining technique
for added security. This is the most secure of the
three static security options.
For ENCOM STRATOS plus Version 2.1.71
Page 292
© 2010-2015 Encom Wireless Data Solutions Inc.
ENCOM STRATOS plus
USER MANUAL
Static Security Options
Field Name
Description
Active Key
Select the encryption key to use. Although you can define up to four static
encryption keys, only one key can be active.
Encryption Key (1-4)
Enter the hexadecimal character sequence to use for the encryption key.
Hexadecimal characters include the decimal digits (0-9) and the letters AF.
The number of characters you need to enter depends on the Encryption
Level you have specified. An indicator, located below the Active Key list,
will indicate the number of characters you have to enter:
For ENCOM STRATOS plus Version 2.1.71
Page 293
© 2010-2015 Encom Wireless Data Solutions Inc.
ENCOM STRATOS plus
USER MANUAL
Dynamic Security Settings
The following screen shot shows the dynamic security options for a mesh radio:
The following tables describe the dynamic security options found in the Wireless Security Settings
tab:
Authentication Types
Field Name
Description
WPA Personal
Check this option to enable WPA personal authentication. You must also
enter a pre-shared key used for the authentication process.
WPA2 Personal
Check this option to enable WPA2 personal authentication. You must also
enter a pre-shared key used for the authentication process.
WPA Enterprise
Check this option to enable WPA enterprise authentication. This option
does not require a pre-shared key.
WPA2 Enterprise
Check this option to enable WPA2 enterprise authentication. This option
does not require a pre-shared key.
EAP Method
Specify the authentication protocol to use. Two options are available:
Option
Description
Pass Through
Authentication requests are relayed to a RADIUS
server.
EAP-TLS
TLS certificates are used for authentication.
For ENCOM STRATOS plus Version 2.1.71
Page 294
© 2010-2015 Encom Wireless Data Solutions Inc.
ENCOM STRATOS plus
USER MANUAL
This option is only used by the WPA Enterprise and WPA2 Enterprise
authentication types. It is hidden if no enterprise option is selected.
TLS Mode
Specify how TLS certificates are to be used. Two options are available:
Option
Description
Use Dynamic
Certificates
TLS certificates are negotiated dynamically using
anonymous Diffie-Hellman MODP 2048 bit
algorithm.
Use Imported
Certificates
A TLS certificate that has been imported into the
radio is used.
This option is only used when the EAP Method is set to EAP-TLS. It is
hidden if the EAP-TLS option is not selected.
Encryption Algorithms
Field Name
Description
Unicast Ciphers
Check the ciphers that can be used to encrypt frames sent to individual
radios. Two options are available.
Option
Description
AES-CCM
A more secure WPA encryption protocol, based on
the reliable AES (Advanced Encryption Standard).
Use this option is preferred if the there are no
legacy WEP devices in the network.
This TKIP option is not available in mesh devices.
Group Ciphers
Check the ciphers that can be used to encrypt frames broadcast to all
radios. Two options are available.
Option
Description
AES-CCM
A more secure WPA encryption protocol, based on
the reliable AES (Advanced Encryption Standard).
Use this option is preferred if the there are no
legacy WEP devices in the network.
This TKIP option is not available in mesh devices.
For ENCOM STRATOS plus Version 2.1.71
Page 295
© 2010-2015 Encom Wireless Data Solutions Inc.
ENCOM STRATOS plus
USER MANUAL
Miscellaneous
Field Name
Description
Group Key Update
Time
The interval at which the dynamically generated keys are updated.
For ENCOM STRATOS plus Version 2.1.71
Page 296
© 2010-2015 Encom Wireless Data Solutions Inc.
ENCOM STRATOS plus
USER MANUAL
Network Tab
The following screen shot shows the network settings tab for a mesh radio:
Because a large number of configuration options are available, the network configuration tab is split
up into a number of sub-tabs. The following topics describe the settings found in each sub-tab:
Time Settings
DHCP Server Settings
SNMP Settings
Encom Mesh Protocol Settings
QoS (Quality of Service) Settings
RADIUS Settings
VLAN Settings
For ENCOM STRATOS plus Version 2.1.71
Page 297
© 2010-2015 Encom Wireless Data Solutions Inc.
ENCOM STRATOS plus
USER MANUAL
Time Settings
The following screen shot shows the NTP settings tab for a mesh radio:
The following table describes the time synchronization settings.
Time Synchronization
Field Name
Description
Synchronize radio time Select one of the following options to set the system clock:
using
Option
Description
Nothing
The radio's time will only be synchronized when a
configuration change is made by STRATOS.
NTP Server
The radio will synchronize its internal clock to the
specified NTP server time at regular intervals.
GPS Receiver
The radio will synchronize its internal clock from
the built-in GPS receiver.
Note: This option is only available if the radio
contains a GPS receiver.
Primary NTP Server
Specify the IP address of the NTP server used to synchronize the radio's
internal clock. This is an Internet Protocol version 4 (IPv4) address,
specified in dotted notation, as shown in the following example:
For ENCOM STRATOS plus Version 2.1.71
Page 298
© 2010-2015 Encom Wireless Data Solutions Inc.
ENCOM STRATOS plus
USER MANUAL
Note: This option is only enabled when the NTP Server option is selected.
Secondary NTP
Server
If applicable, specify the IP address of the secondary NTP server. This is
an Internet Protocol version 4 (IPv4) address, specified in dotted notation,
as shown in the following example:
If there is no secondary NTP server in your network, enter "0.0.0.0" in this
field.
Note: This option is only enabled when the NTP Server option is selected.
System Clock
Field Name
Description
Time Zone
Select the time zone in which the radio is operating.
Note that the time zone has no effect on the operation of the radio, and
does not need to be set for normal operation.
If the time zone is not set, the radio defaults to UTC time.
For ENCOM STRATOS plus Version 2.1.71
Page 299
© 2010-2015 Encom Wireless Data Solutions Inc.
ENCOM STRATOS plus
USER MANUAL
DHCP Server Settings
The following screen shot shows the DHCP server tab for a mesh radio:
The following table describes the DHCP server settings.
DHCP Server
Field Name
Description
Enable DHCP Server
Check this option to enable the radio's DHCP server. When this option is
enabled, the radio will assign IP addresses to any other radio, or any other
other device, that is configured to obtain their IP addresses dynamically.
Important: Severe network instability can occur if there is more than one
DHCP server present in a network or network segment. Do not enable
this option if a router or another radio is already acting as a DHCP server.
DHCP Server Settings
Field Name
Description
DHCP Address Range Specify the start and end range of the IP addresses that will be provided
by the DHCP server, as shown in the following example:
For ENCOM STRATOS plus Version 2.1.71
Page 300
© 2010-2015 Encom Wireless Data Solutions Inc.
ENCOM STRATOS plus
USER MANUAL
DHCP Server Settings
Field Name
Description
In this example, IP addresses in the 192.168.1.100 - 192.168.1.200 range
will be assigned to devices that use dynamic addressing. IP addresses
outside this range would be manually assigned to devices that do not use
dynamic addressing.
Network Mask
Enter the network mask that will be assigned to the devices that use
dynamic IP addressing. This is an Internet Protocol version 4 (IPv4)
address, specified in dotted notation, as shown in the following example:
Gateway Address
Enter the IP Address of the default gateway that will be assigned to the
devices that use dynamic IP addressing. This is an Internet Protocol
version 4 (IPv4) address, specified in dotted notation, as shown in the
following example:
The default gateway is the radio or router that provides access to devices
outside of the local network.
DNS Server Address
Enter the IP Address of the DNS server that will be assigned to the
devices that use dynamic IP addressing. This is an Internet Protocol
version 4 (IPv4) address, specified in dotted notation, as shown in the
following example:
If there is no DNS server available in your network, enter "0.0.0.0" in this
field.
WINS Server Address
Enter the IP Address of the WINS server that will be assigned to the
devices that use dynamic IP addressing. This is an Internet Protocol
version 4 (IPv4) address, specified in dotted notation, as shown in the
following example:
If there is no WINS server available in your network, enter "0.0.0.0" in this
field.
For ENCOM STRATOS plus Version 2.1.71
Page 301
© 2010-2015 Encom Wireless Data Solutions Inc.
ENCOM STRATOS plus
USER MANUAL
SNMP Settings
The following screen shot shows the SNMP tab for a mesh radio:
The following tables describe the SNMP service settings.
SNMP Service
Field Name
Description
Enable SNMP Service Check this option enable the radio's SNMP (Simple Network Management
Protocol) agent.
When this option is enabled, diagnostic information can be obtained from
the radio using any SNMP based network monitoring application.
SNMP Service Settings
Field Name
Description
Host IP
Enter the IP address of the computer on which the network monitoring
application is running, as shown in the following example:
Setting this option will prevent any other computer from being able to
access the radio's SNMP information.
If you want to allow any computer that is on your network to access the
radio's SNMP information, enter "0.0.0.0" in this field.
For ENCOM STRATOS plus Version 2.1.71
Page 302
© 2010-2015 Encom Wireless Data Solutions Inc.
ENCOM STRATOS plus
USER MANUAL
Community Name
The community name used to access the radio's SNMP agent. This is set
to 'public', and cannot be changed.
Only read operations are permitted.
Contact Information
Enter the contact information of the individual responsible for the network,
if applicable.
Location Information
Enter the location of the radio, if applicable.
For ENCOM STRATOS plus Version 2.1.71
Page 303
© 2010-2015 Encom Wireless Data Solutions Inc.
ENCOM STRATOS plus
USER MANUAL
Encom Mesh Protocol Settings
The following screen shot shows the Encom Mesh Protocol tab for a mesh radio:
The following table describes the Encom Mesh Protocol settings.
Gateway Settings
Field Name
Description
Standard Mesh Radio
Select this option of the radio is not physically connected to the Internet.
Gateway Radio
Select this option if the radio is physically connected to the network
operations center via its Ethernet port.
This setting is appropriate when data typically flows from deployed radios,
through the the gateway, to the network operations center. It is not
recommended when most of the traffic is meant to flow from one
deployed radio to another.
Note: Do not select this option if the radio is not connected via its
Ethernet port. Doing so may cause severe network instabilities.
For ENCOM STRATOS plus Version 2.1.71
Page 304
© 2010-2015 Encom Wireless Data Solutions Inc.
ENCOM STRATOS plus
USER MANUAL
QoS Settings
The following screen shot shows the QoS (Quality of Service) settings tab for a mesh radio:
The Quality of Service settings allow you to prioritize the various types of network traffic so that
important traffic is processed ahead of less important traffic.
Under normal conditions, all network data packets have an equal opportunity to be forwarded by the
radio. This works well for some applications (such as file transfers or web browsing) but it is not
adequate for traffic that is sensitive to network latency and throughput reductions (such as voice or
video streaming). QoS allows you to address this issue by giving the time sensitive traffic a larger
share of the network bandwidth.
Refer to Appendix D: Quality of Service for more detailed information on the prioritization
mechanisms supported by the ENCOM radios.
The following tables describe the Quality of Service settings.
Network Traffic Prioritization
Field Name
Description
Enable
Check this option to enable priority queue based QoS features.
Priority rules are used to specify the priority of specific types of traffic.
Lower priority traffic is dropped in preference to higher priority traffic when
the radio becomes heavily loaded.
Use WMM
Check this option to set the priority of incoming packets to the incoming
WMM priority (or to the incoming VLAN priority if VLANs are being used).
WMM is used to prioritize certain type of traffic, such as VOIP (Voice Over
IP) and video streams, that are sensitive to network latency and capacity
For ENCOM STRATOS plus Version 2.1.71
Page 305
© 2010-2015 Encom Wireless Data Solutions Inc.
ENCOM STRATOS plus
USER MANUAL
issues.
Note: The WMM/VLAN priorities must be set by the device that creates
the network data packets or by the router or switch that provides access
to the ENCOM radio network.
Use DSCP Priorities
Check this option to set the priority of incoming packets to the DSCP
priority of the incoming data packets.
Note: The DSCP priorities must be set by the device that creates the
network data packets or by the router or switch that provides access to
the ENCOM radio network.
Priority Rules
Field Name
Description
Priority Rule List
By default, ENCOM STRATOS will assign the highest priority to the radio
management traffic.
Other types of network traffic can be assigned to specific priority queues
by creating custom priority rules. The Priority Rules list displays the
custom priority rules that you have defined.
When defining a priority rule, you specify the type of traffic that the rule is
to act upon, and the priority to assign to the matching traffic.
In the following example, two priority rules have been defined:
The shaded cells contain the criteria that must be matched in order for a
network data packet to be affected by the rule. Matching data packets will
be assigned the New Priority (and optionally the New DSCP value)
defined in the rule.
The priority rule list is sorted by the New Priority column, in descending
order.
The following table describes the information that is displayed in the
Priority Rules list:
Column
Description
To delete a rule, first check it, and then click on
the Remove button at the right of the Priority
Rule list to actually delete it.
Name
For ENCOM STRATOS plus Version 2.1.71
A short description that identifies the type of
Page 306
© 2010-2015 Encom Wireless Data Solutions Inc.
ENCOM STRATOS plus
USER MANUAL
network traffic associated with the rule.
Protocol
The protocol to match.
Port(s)
The IP port or ports to match. If blank, traffic on
any port is affected by the rule.
Source
Address(es)
The address or addresses that the data packets
must originate from.
Destination
Address(es)
The address or addresses that the data packets
are being forwarded to.
DSCP
The DSCP value of the incoming packets to
match. If blank, the DSCP priority is ignored by
the rule.
New Priority
The priority to assign to the packets that match
the specified criteria.
New DSCP
The DSCP value to assign to the packets that
match the specified criteria.
Click the Add button to create a new priority rule. Enter the appropriate
rule settings in the QoS Priority Rule form that is displayed.
(Add button)
Select a priority rule, and then click on the Edit button to modify the rule
settings.
(Edit button)
Alternatively, you can double-click on the rule you want to modify.
To delete a rule, first check it, and then click on the Remove button to
actually delete it.
(Remove button)
For ENCOM STRATOS plus Version 2.1.71
Page 307
© 2010-2015 Encom Wireless Data Solutions Inc.
ENCOM STRATOS plus
USER MANUAL
Specifying a QoS Priority Rule
The following screen shot shows the QoS Priority Rule form for a mesh radio:
The QoS Priority Rule form allows you to define a traffic priority rule.
The following tables describe the QoS rule settings.
Rule
Field Name
Description
Name
Enter a short description that identifies the type of network traffic
associated with the rule.
Matching Criteria
Field Name
Description
Protocol
Specify the protocol that the rule will apply to. You can select one of the
following values:
Protocol
Description
All
All network traffic will be matched.
When you select this option, one or both of the
Source Address and Destination Address
fields must be set. Otherwise, all of the network
traffic flowing through the radio would match the
For ENCOM STRATOS plus Version 2.1.71
Page 308
© 2010-2015 Encom Wireless Data Solutions Inc.
ENCOM STRATOS plus
USER MANUAL
rule.
Ports
UDP
The rule will only affect UDP traffic.
TCP
The rule will only affect TCP traffic.
Optionally specify the port or ports associated with the network traffic
that the rule will apply to. You can specify the ports using one of the
following formats:
Format
Example
Single Port
1000
Multiple Ports
1000,2000
Port Range
1000-2000
Multiple Port Ranges
1000-2000,3000-4000
If this value is not specified, the rule will apply to all traffic of the
selected protocol type.
Source Address(es)
Optionally specify the address or addresses that the data packets must
originate from. You can specify the addresses using one of the
following formats:
Format
Example
Single IPV4 Address
192.168.1.100
IPV4 Address Range
192.168.1.100-192.168.1.200
IPV4 CIDR Subnet
192/168.1.1/24
If this value is not specified, the rule will apply to all destination
addresses.
Destination Address(es)
Optionally specify the address or addresses that the data packets are
being forwarded to. You can specify the addresses using one of the
following formats:
For ENCOM STRATOS plus Version 2.1.71
Format
Example
Single IPV4 Address
192.168.1.100
Page 309
© 2010-2015 Encom Wireless Data Solutions Inc.
ENCOM STRATOS plus
USER MANUAL
IPV4 Address Range
192.168.1.100-192.168.1.200
IPV4 CIDR Subnet
192/168.1.1/24
If this value is not specified, the rule will apply to all destination
addresses.
DSCP
Optionally specify the DSCP (Differentiated Services Code Point) value
in the IP header that the rule will apply to.
You can select a predefined DSCP value from the drop-down list, or
enter a number between 0 and 63.
If this value is not specified, the rule will apply to all DSCP values.
Action
Field Name
Description
Set priority to
The priority to assign to the packets that match the specified criteria.
The higher the priority value, the higher the priority assigned to the
associated network traffic.
Set DSCP to
Optionally specify the DSCP (Differentiated Services Code Point) value
to assign to the packets that match the specified criteria.
You can select a predefined DSCP value from the drop-down list, or
enter a number between 0 and 63.
If this value is not specified, no change will be made to the packet's
DSCP value.
For ENCOM STRATOS plus Version 2.1.71
Page 310
© 2010-2015 Encom Wireless Data Solutions Inc.
ENCOM STRATOS plus
USER MANUAL
RADIUS Settings
The following screen shot shows the RADIUS settings tab for a mesh radio:
RADIUS is used to centralize the authentication of users that attempt to login to the radio and/or to
the network. Refer to ENCOM STRATOS RADIUS Configuration Guide, available separately, for
more information on setting up and using a RADIUS server with your radio network.
The following tables describe the settings found in each group in the RADIUS settings tab.
Primary and Secondary Server
Field Name
Description
Enable RADIUS
Server
Check this setting to enable the associated RADIUS server (Primary or
Backup).
If the radio cannot connect to the primary RADIUS server, it will attempt to
connect to the backup RADIUS server.
Server Address
Enter the IP address of the RADIUS server.
Authentication Port
Enter the IP port on which RADIUS authentication requests are accepted.
The default is 1812.
Accounting Port
Enter the IP port on which RADIUS accounting updates are accepted.
The default is 1813.
Shared Secret
Enter a string that is used to obfuscate the user password that is sent to
the RADIUS server for authentication. This value must match the Shared
Secret that is configured in the RADIUS server.
For ENCOM STRATOS plus Version 2.1.71
Page 311
© 2010-2015 Encom Wireless Data Solutions Inc.
ENCOM STRATOS plus
USER MANUAL
Domain
Enter the Microsoft Windows domain of the user. Only use if the RADIUS
server requires domain validation.
Timeout
Enter the maximum amount of time (in milliseconds) to wait for a
response from the RADIUS server before resending an authentication
request.
The default is 300 ms. You may need to increase this if your RADIUS
server is slow to respond to authentication requests.
Use RADIUS to login
to the radio
Check this option to use RADIUS to authenticate radio login requests.
When this option is enabled, the radio will check with the RADIUS server
if it does not find the specified user in its local user database.
User RADIUS to login Check this option to use RADIUS to authenticate client devices that wish
to the wireless network to attach to your network (e.g. for access to the network operations center
or to your corporate LAN).
If you select this option, you will need to check the RADIUS MAC
Authentication setting for each of the radio cards that clients will use to
connect to the network.
Common Settings
Field Name
Description
Default Access Rights Select the access rights to assign to the user if the RADIUS server is not
configured to respond to an authentication request with the user's group
name.
The following table describes the options that are available for this setting:
Option
Description
View Settings
The user will be able to inspect the radio's
configuration settings, but will not be able to
make any changes.
Change Settings
The user will be able to inspect and change
the radio's configuration settings.
This setting is ignored if the RADIUS server responds to an authentication
request with the user's group name.
RADIUS Accounting
Check this option to send RADIUS accounting packets to the RADIUS
server. This information is normally used for user billing, and is not usually
needed for typical ENCOM radio networks.
For ENCOM STRATOS plus Version 2.1.71
Page 312
© 2010-2015 Encom Wireless Data Solutions Inc.
ENCOM STRATOS plus
USER MANUAL
VLAN Settings
The following screen shot shows the VLAN settings tab for a mesh radio:
VLANs (Virtual LANs) are used to improve the performance, and possibly the security, of a radio
network. Refer to Appendix E: VLAN Support for more information on implementing a VLAN-based
network.
The following tables describe the settings found in each group in the VLAN settings tab.
Management VLAN
Field Name
Description
Tagged Management
Data
By default, the radio can be managed by connections over the native
(non-tagged) VLAN.
To be able to manage the radio using a specific VLAN, check this option,
and enter the appropriate management VLAN ID in the VLAN ID field.
VLAN ID
Enter the ID of the management VLAN (a number in the range 1-4095 is
required).
Client Tagging
Field Name
Description
Tag Client Data
Normally, all of the radio's interfaces (wireless and Ethernet) act as VLAN
trunks (i.e. they carry the network traffic for all VLANs). If a normal, nonVLAN aware device is plugged into the radio's Ethernet port, its network
traffic will not be tagged, and it will not be able to communicate with
For ENCOM STRATOS plus Version 2.1.71
Page 313
© 2010-2015 Encom Wireless Data Solutions Inc.
ENCOM STRATOS plus
USER MANUAL
devices that are part of a VLAN.
Check this option to set up the radio's Ethernet port as an access port for
a specific VLAN. This gives devices connected to the Ethernet port
access to the other devices in the specified VLAN.
VLAN ID
Enter the ID of the client VLAN to (a number in the range 1-4095 is
required).
VLAN Priority
The priority to assign to the packets originating from the Ethernet port.
The higher the priority value, the higher the priority assigned to the
associated network traffic.
Note: In order to prioritize the wireless network traffic using the VLAN
priority, the appropriate QoS options need to be configured. See the Using
WMM to Support VLAN Priority Traffic topic for more information.
Management Address (Wireless)
Field Name
Description
IP Address
Enter the IP address used to access the radio via its wireless interfaces.
This is an Internet Protocol version 4 (IPv4) address, specified in dotted
notation, as shown in the following example:
If the Tagged Management Data option is checked, this IP address
should be compatible with the management VLAN's network address
range.
Network Mask
Enter the network mask of the network used to access the radio via its
wireless interfaces. This is an Internet Protocol version 4 (IPv4) address,
specified in dotted notation, as shown in the following example:
If the Tagged Management Data option is checked, this mask should
be compatible with the management VLAN's network mask.
For ENCOM STRATOS plus Version 2.1.71
Page 314
© 2010-2015 Encom Wireless Data Solutions Inc.
ENCOM STRATOS plus
USER MANUAL
Default Gateway
Enter the IP address of the radio, router or switch that allows this radio to
connect with devices that are outside of their local LAN or VLAN. This is
an Internet Protocol version 4 (IPv4) address, specified in dotted notation,
as shown in the following example:
If the Tagged Management Data option is checked, this IP address
would normally be the IP address of the network's gateway radio, or the IP
address of the router or switch used to access external networks.
Access Port Address (Ethernet)
Field Name
Description
IP Address
Enter the IP address used to access the radio via its Ethernet interface.
This is an Internet Protocol version 4 (IPv4) address, specified in dotted
notation, as shown in the following example:
If the Tag Client Data option is checked, this IP address should be
compatible with the client VLAN's network address range.
Network Mask
Enter the network mask of the network used to access the radio via its
Ethernet interface. This is an Internet Protocol version 4 (IPv4) address,
specified in dotted notation, as shown in the following example:
If the Tag Client Data option is checked, this mask should be
compatible with the client VLAN's network mask.
Pruning
Field Name
Description
Prune VLANs
Check this option to prevent the radio for forwarding network traffic
associated with specific VLAN IDs.
VLAN IDs
Enter one or more VLAN IDs to prune. Separate individual IDs with
commas.
Any incoming network traffic that matches the specified VLAN IDs will be
dropped by the radio.
For ENCOM STRATOS plus Version 2.1.71
Page 315
© 2010-2015 Encom Wireless Data Solutions Inc.
ENCOM STRATOS plus
USER MANUAL
About Tab
The following screen shot shows the About tab for a mesh radio:
This tab displays information regarding the radio's hardware and firmware. It does not contain any
user editable fields.
For ENCOM STRATOS plus Version 2.1.71
Page 316
© 2010-2015 Encom Wireless Data Solutions Inc.
ENCOM STRATOS plus
USER MANUAL
Export and Import Buttons
The Export and Import buttons in the lower left-hand corner of the radio configuration form allow
you to save the radio's configuration settings to a file, and to update the radio's configuration
settings from a previously saved configuration file.
Refer to the following topics for more information on these functions:
Exporting the Radio Configuration
Importing the Radio Configuration
For ENCOM STRATOS plus Version 2.1.71
Page 317
© 2010-2015 Encom Wireless Data Solutions Inc.
ENCOM STRATOS plus
USER MANUAL
Exporting the Radio Configuration
The Export function is used to save the radio's current settings to a configuration profile file. This
allows you to:
Make a backup copy of the radio's configuration.
Save the radio's configuration to a profile or template file for use in configuring other radios.
To export a radio's configuration:
1. From the radio's configuration form, click on the Export button. The Save configuration profile
file form is displayed:
2. Specify the name of the file you want to save the radio's configuration settings to, and then
press the Save button to save the settings.
By default, STRATOS saves configuration profile files in the 'My Documents\Encom
Wireless\Profiles' folder.
For ENCOM STRATOS plus Version 2.1.71
Page 318
© 2010-2015 Encom Wireless Data Solutions Inc.
ENCOM STRATOS plus
USER MANUAL
Importing the Radio Configuration
The Import function allows you to update the radio's settings from a previously saved configuration
profile file. This function allows you to:
Restore the radio's configuration from a backup file. This can be useful when you have to replace
a radio in the field.
Apply the settings from one radio to another. This can be used to provision new radios quickly,
and ensure that they are compatible with other radios in the network.
To configure a radio using a saved configuration file:
1. From the radio's configuration form, click on the Import button. The Select configuration
profile file form is displayed:
2. Select the configuration profile you want to import, and press the Open button.
For ENCOM STRATOS plus Version 2.1.71
Page 319
© 2010-2015 Encom Wireless Data Solutions Inc.
ENCOM STRATOS plus
USER MANUAL
3. The Import Radio Settings form will be displayed:
4. The Radio Module Assignments group allows you to specify how the radio module settings
are applied:
The Target Radio Modules column lists the wireless radio modules that are present on the
radio.
The Profile Radio Modules column shows the options that are available for each wireless
interface that is present on the radio. STRATOS will find the best match between the profile
and target radio modules, and will assign these by default. You can change the default
assignments by selecting the appropriate items from the list boxes.
In the example shown above, STRATOS applied the matching radio modules from the profile
to the target radio modules. If you didn't want to disturb the configuration of the second radio
module, then you would select the Don't Copy option from the second list box, as shown
below:
For ENCOM STRATOS plus Version 2.1.71
Page 320
© 2010-2015 Encom Wireless Data Solutions Inc.
ENCOM STRATOS plus
USER MANUAL
5. The Settings to Copy options allow you to specify what settings to import from the
configuration profile:
These are described further in the following table:
Option
Description
Copy all settings
Use this option when you need to configure a radio so that it
matches the configuration profile exactly.
This option is most often used when configuring a replacement
radio, or you want to restore the radio's configuration from a backup.
Copy common
settings
Use this option to exclude those settings that are unique to the
radio.
This option is most often used when you are adding a new radio to a
network, and you want to configure it to match the other radios in
the network.
The following items will not get copied over from the profile file to
the radio:
Radio name
Radio Description
Radio latitude, longitude and street address
Radio static IP address
Disallowed MAC addresses
6. Press the OK button to apply the profile settings to the radio.
7. Make any changes to the imported settings in the radio configuration form.
8. Press the Save button on the radio configuration form to save the settings to the radio.
For ENCOM STRATOS plus Version 2.1.71
Page 321
© 2010-2015 Encom Wireless Data Solutions Inc.
ENCOM STRATOS plus
USER MANUAL
Configuring Point-to-Multipoint Radios
To configure a point-to-multipoint radio:
1. Locate the radio you would like to configure in the Radio List. Ensure that it is currently on-line
(a green icon is displayed at the left of an on-line radio):
2. Click the right mouse button on the radio name, and select Configure from the pop-up menu
that is displayed:
Alternatively, you can either double-click the left mouse button on the radio name, or click the
left mouse button on the radio name, and select Radio -> Configure from the main menu.
For ENCOM STRATOS plus Version 2.1.71
Page 322
© 2010-2015 Encom Wireless Data Solutions Inc.
ENCOM STRATOS plus
USER MANUAL
3. STRATOS will download the radio's current configuration. This process will normally take a
few seconds to complete. During this time, a wait form is displayed:
4. When the radio's configuration has been obtained, the radio configuration form is displayed:
The configuration settings are logically grouped using a tabbed interface. The following topics
describe the settings found in each tab:
Basic Settings tab
Location tab
Radio tab
Network tab
About tab
For ENCOM STRATOS plus Version 2.1.71
Page 323
© 2010-2015 Encom Wireless Data Solutions Inc.
ENCOM STRATOS plus
USER MANUAL
Basic Settings Tab
The following screen shot shows the basic configuration settings tab for a point-to-multipoint radio:
The following tables describe the settings found in each group in the basic settings tab.
Identification
Field Name
Description
Radio Name
Enter a name used to identify the radio (up to a maximum of 64
characters). The name you enter will be displayed in the radio list, and in
all other places where a reference to the radio is made.
Radio MAC Address
Displays the MAC address assigned to the radio. (This is essentially the
MAC address of the radio's first Ethernet adapter.)
For ENCOM STRATOS plus Version 2.1.71
Page 324
© 2010-2015 Encom Wireless Data Solutions Inc.
ENCOM STRATOS plus
USER MANUAL
Identification
Field Name
Description
Description
Enter an optional description for the radio. This field allows you to keep
track of ad-hoc information associated with the radio, without adding
clutter to the radio name. The radio description is displayed in the radio
properties panel:
Regulatory Domain
Field Name
Description
Country Name
Select the country in which the radio is operating. Certain countries have
limitations on the radio power output, allowed frequency ranges and
frequency bands. Failure to select the appropriate country can result in a
radio that is operating outside of the legally allowed ranges.
If the radio is operating in the United States or Canada, you can leave this
setting to <Not Set>.
IP Address Settings
Field Name
Description
Obtain an IP address
automatically
Select this option if a DHCP server is available on your radio network, and
you want the DHCP server to assign an IP address to the radio.
Specify a static IP
address
Select this option to manually assign the radio's IP address.
ENCOM recommends this option because it provides for a more secure
network (especially if you have not enabled wireless security).
Note: It is important that each radio in the network is assigned a different
IP address. Network performance can suffer greatly if two or more radios
are assigned the same IP address.
For ENCOM STRATOS plus Version 2.1.71
Page 325
© 2010-2015 Encom Wireless Data Solutions Inc.
ENCOM STRATOS plus
USER MANUAL
IP Address Settings
Field Name
Description
IP Address
Enter the IP address of the radio. This is an Internet Protocol version 4
(IPv4) address, specified in dotted notation, as shown in the following
example:
Network Mask
Enter the network mask. This is an Internet Protocol version 4 (IPv4)
address, specified in dotted notation, as shown in the following example:
Default Gateway
Enter the IP address of the radio or router that allows the radio to connect
with devices that are outside of their local LAN or VLAN. This is an Internet
Protocol version 4 (IPv4) address, specified in dotted notation, as shown
in the following example:
Note that the default gateway's IP address must be in the same subnet as
the radio's IP address.
Power LED
Field Name
Description
Always On
The external power LED is on as long as the radio is powered.
Note: This option is visible only if the radio supports an external power
indicator LED.
Momentarily on when
radio is powered up
The external power LED is on for 1 minute after the radio is powered, and
is subsequently turned off.
Note: This option is visible only if the radio supports an external power
indicator LED.
For ENCOM STRATOS plus Version 2.1.71
Page 326
© 2010-2015 Encom Wireless Data Solutions Inc.
ENCOM STRATOS plus
USER MANUAL
Location Tab
The following screen shot shows the location settings tab for a point-to-multipoint radio:
The following table describes the settings found in the location tab.
Field Name
Description
Get location from GPS Select this option if you want the radio to get its location from the built-in
GPS receiver.
This option is not available if the radio does not contain a GPS receiver.
Manually specify
location
Select this option if you want to manually specify the location of the radio.
Latitude
Enter the latitude at which the radio is located, in decimal degrees. This
value is positive in the northern hemisphere and negative in the southern
hemisphere.
Alternatively, hold down the Shift key and click the left mouse button on
the map to set the radio's position. This process will automatically update
the Latitude field.
Longitude
Enter the longitude at which the radio is located, in decimal degrees. This
value is positive in the eastern hemisphere and negative in the western
hemisphere.
Alternatively, hold down the Shift key and click the left mouse button on
For ENCOM STRATOS plus Version 2.1.71
Page 327
© 2010-2015 Encom Wireless Data Solutions Inc.
ENCOM STRATOS plus
USER MANUAL
the map to set the radio's position. This process will automatically update
the Longitude field.
Icon Color
Select the color of the radio icon. You can use the icon color to visually
group radios by radio type, geographical location, VLAN association, etc.
Icon Style
Select the style of the radio icon. Four icon styles are currently available:
Icon
Radio Type
Generic radio
Master radio
Remote radio
Repeater radio
Dual radio
Embedded map
The embedded map allows you to see the current location of the radio. A
green marker shows the location assigned to the radio.
For ENCOM STRATOS plus Version 2.1.71
Page 328
© 2010-2015 Encom Wireless Data Solutions Inc.
ENCOM STRATOS plus
USER MANUAL
To set a new location:
Press and hold down the Shift key on your computer's keyboard.
Click the left mouse button at the location you want to assign to the
radio.
The green marker will move to the selected position.
Note: Refer to the Map Panel topic for more information on the embedded
map features.
Street Address
Enter the street address of the radio, if applicable. This information is
optional.
For ENCOM STRATOS plus Version 2.1.71
Page 329
© 2010-2015 Encom Wireless Data Solutions Inc.
ENCOM STRATOS plus
USER MANUAL
Radio Tab
ENCOM mesh radios contain at least one, and as many as four, wireless radio modules. Each
wireless radio module is configured in its own tab. The first radio module is configured in the Radio
1 tab, the second radio is configured in the Radio 2 tab, and so on.
The following screen shot shows the radio settings tab for a point-to-multipoint radio:
Because the wireless radio settings are somewhat involved, the radio configuration tab is split up
into three sub-tabs. The following topics describe the settings found in each sub-tab:
Radio Settings sub-tab (N-Cards)
Radio Settings sub-tab (A-Cards and B/G Cards)
WDS Setup sub-tab
Wireless 'N' sub-tab
Wireless Security sub-tab (N-Mode)
Wireless Security sub-tab (A-Mode and G-Mode)
For ENCOM STRATOS plus Version 2.1.71
Page 330
© 2010-2015 Encom Wireless Data Solutions Inc.
ENCOM STRATOS plus
USER MANUAL
Radio Settings (N Cards)
The following screen shot shows the wireless radio settings tab for a point-to-multipoint radio that is
provisioned with a Wireless-'N' card:
The following tables describe the settings found in each group in the wireless radio settings tab.
General
Field Name
Description
Enable Radio
Uncheck this option to disable the wireless radio card. A disabled radio
card will not be able to form wireless links with other radios.
If you uncheck this option, all of the other options in the Radio Settings tab
will be disabled.
Identification
Field Name
Description
Radio Model
Displays the model number of the wireless radio card. This information is
useful when troubleshooting issues with the radio.
Wireless MAC
Address
Displays the MAC address assigned to the wireless radio card. For pointto-multipoint radios, the MAC address of the wireless radio cards are
different than the MAC address of the radio's first Ethernet interface.
For ENCOM STRATOS plus Version 2.1.71
Page 331
© 2010-2015 Encom Wireless Data Solutions Inc.
ENCOM STRATOS plus
USER MANUAL
Radio Network Setup
Field Name
Description
Network Type
Identifies the radio network type. This setting cannot be changed for pointto-multipoint radios.
Wireless Mode
The drop-down list at the right of the Network Type setting allows you to
specify the 802.11 mode under which the wireless radio card will operate,
as shown in the following example:
Depending on the type of wireless radio card provisioned in your radio,
one of more of the following options will be available:
Option
Description
A-Only
Operate in the standard 802.11a mode in the
5.8 GHz frequency band.
Client devices cannot attach to the radio.
G-Only
Operate in the standard 802.11g mode in the
2.4 GHz frequency band.
Client devices cannot attach to the radio.
N-Only
Operate in the 802.11n (Wireless-N) mode in
either the 2.4 or 5.8 GHz frequency band.
Client devices cannot attach to the radio.
A/N Clients
Operate in the standard 802.11a and 802.11n
modes in the 5.8 GHz frequency band.
Client devices are able to attach to the radio.
B/G/N Clients
Operate in the standard 802.11b, 802.11g or
802.11n modes in the 2.4 GHz frequency
band.
Client devices are able to attach to the radio.
Network SSID
Enter a name used to identify the network in which the wireless radio will
take part. The Network SSID is case sensitive, and may contain spaces.
Note: You should change the default SSID assigned at the factory to a
For ENCOM STRATOS plus Version 2.1.71
Page 332
© 2010-2015 Encom Wireless Data Solutions Inc.
ENCOM STRATOS plus
USER MANUAL
Radio Network Setup
unique SSID for your network. You can minimize interference between
adjacent networks by assigning a unique SSID to each network.
Important: All radios that participate in the same network must be
assigned the same Network SSID.
Hide SSID
Check this option to prevent the Network SSID from being broadcast by
the wireless radio. This prevents external devices from being able to
discover the network's SSID (and potentially connect to it).
Radio Mode
Select the radio mode based on the location of the radio with respect to
the network operations center.
Note that when operating in Wireless-N mode, the repeater radio mode is
not available.
Refer to the following topics for more information on radio mode options
that are available:
Master Radio Setup
Repeater Radio Setup
Remote Radio Setup
Channel Mode
This option allows you to set the width of the frequency channel you are
using.
Selecting a smaller frequency for the Channel Mode increases the
distance over which you can establish a wireless link, at the cost of
reduced bandwidth.
For most applications 40 MHz is acceptable.
Enable eMax Protocol
Check this option to enable the eMax protocol.
The eMax protocol is a proprietary protocol that increases bandwidth and
security on the wireless network.
Note: Due to compatibility issues, the eMax protocol cannot be used if
there is a repeater in the network, or if 802.11 clients need to be
supported by the radio.
Note: When operating in N-Only mode, the eMax protocol is always
enabled.
Using Repeater
Check this option if there is a repeater in the network.
Note: When operating in N-Only mode, repeaters are not available.
Enable Roaming
Refer to the Radio Mode setup topics (see links above) for information
on this option.
For ENCOM STRATOS plus Version 2.1.71
Page 333
© 2010-2015 Encom Wireless Data Solutions Inc.
ENCOM STRATOS plus
USER MANUAL
Radio Network Setup
Parent Radio MAC
Address
Refer to the Radio Mode setup topics (see links above) or information on
this option.
Radio Parameter Setup
Field Name
Description
Frequency Band
Displays the nominal frequency at which the radio operates. This option
can be changed if the radio card supports more than one band.
Channel
Select the radio's operating frequency.
In Auto-Frequency mode, a master radio automatically searches for the
frequency that has the least activity. It then selects that frequency and
uses it to communicate with the repeater or remote radios.
For the most stable link, you should select a specific frequency from the
list of available frequencies. (You can use the STRATOS Spectrum Scan
panel to determine the channel that has the least amount of activity in the
vicinity of the radio.)
If a repeater is present in the network, both the master and repeater
radios must be set to the same specific frequency.
Remote radios are always configured to run in Auto-Frequency mode.
They will automatically adjust their operating frequencies to match the
master's.
Wireless Link Rate
Select the rates at which the radio will communicate with the other radios
in the network.
When operating in A-Mode or G-Mode, the default setting for this option is
Adaptive. When operating in N-Mode, the link rate is always set to
Adaptive.
The Adaptive link rate automatically adjusts the radio's data rate to
account for the current network conditions. It typically provides the most
reliable network performance.
A fixed rate helps reduce data latency, and may be used if the
performance of the link is more important than the reliability.
If you select a fixed rate, a second drop-down list box is displayed, as
shown in the following example:
Select the minimum allowed bit rate from the left-hand list, and the
maximum allowed rate from the right-hand list.
For ENCOM STRATOS plus Version 2.1.71
Page 334
© 2010-2015 Encom Wireless Data Solutions Inc.
ENCOM STRATOS plus
USER MANUAL
Regardless of the range you specify, the 6 Mbps rate will always be
included in the list of allowable rates. This allows the radio to fall back to
the lowest bit rate if it is not able to maintain the higher bit rates.
Output Power
Select the wireless radio's output power.
Unless constrained by the Regulatory Domain that the radio is operating
in, you should use the Maximum power setting when the radio is
deployed in the field.
If the radio is being provisioned or tested in a bench environment, you
should use the Low power setting.
For ENCOM STRATOS plus Version 2.1.71
Page 335
© 2010-2015 Encom Wireless Data Solutions Inc.
ENCOM STRATOS plus
USER MANUAL
Master Radio Setup (N Cards)
Select the Master option for the radio that is located closest to the network operations center. This
radio is usually connected to the network via the Ethernet port.
The master radio controls the flow of data in the network and serves as the network’s
synchronization source. Each broadband network has only one master radio. All the other radios
must be configured as either remote or repeater radios.
If the network contains a repeater radio, check the Using Repeater option (note that this option is
only available when the eMax Protocol is disabled, and only when running in A-Mode or G-Mode).
For ENCOM STRATOS plus Version 2.1.71
Page 336
© 2010-2015 Encom Wireless Data Solutions Inc.
ENCOM STRATOS plus
USER MANUAL
Repeater Radio Setup (N Cards)
Select the Repeater option for a radio that provides a link between the master and remote radios.
Note that a repeater is only available when running in A-Mode or G-Mode.
When this option is selected, the Using Repeater option is automatically checked, and the Enable
eMax Protocol option is unchecked (the eMax protocol cannot be used when there is a repeater in
the network).
By default, the Enable Roaming option is checked. This causes the repeater radio to automatically
detect and communicate with the master radio.
If you encounter connectivity issues between the repeater and the master radio, you may want to
manually select the master radio to which the remote will connect. To do this, uncheck the Enable
Roaming option. The Parent Radio MAC Address option will be displayed.
Enter the MAC address of the master radio in the Parent Radio MAC Address option.
For ENCOM STRATOS plus Version 2.1.71
Page 337
© 2010-2015 Encom Wireless Data Solutions Inc.
ENCOM STRATOS plus
USER MANUAL
Alternatively, click on the
button at the right of the MAC address field. The Select Radio form will
be displayed. This form lets you choose the master from the list of radios that are currently
connected to the repeater.
Note that installing a repeater will reduce the network throughput by half. It should only
be used when there is no other option available, or if the reduction in performance is
not important.
For ENCOM STRATOS plus Version 2.1.71
Page 338
© 2010-2015 Encom Wireless Data Solutions Inc.
ENCOM STRATOS plus
USER MANUAL
Remote Radio Setup (N Cards)
Select the Remote option for a radio that is as the far end of the point-to-multipoint network.
If the network contains a repeater, check the Using Repeater option (note that this option is only
available when the eMax Protocol is disabled, and only when running in A-Mode or G-Mode).
By default, the Enable Roaming option is checked. This causes the remote radio to automatically
detect and communicate with the master radio.
If you encounter connectivity issues between the remote radio and the master, you may want to
manually select the radio to which the remote will connect. To do this, uncheck the Enable
Roaming option. The Parent Radio MAC Address option will be displayed.
Enter the MAC address of the master or repeater to which the remote will connect in the Parent
Radio MAC Address option.
For ENCOM STRATOS plus Version 2.1.71
Page 339
© 2010-2015 Encom Wireless Data Solutions Inc.
ENCOM STRATOS plus
USER MANUAL
Alternatively, click on the
button at the right of the MAC address field. The Select Radio form will
be displayed. This form lets you choose the parent from the list of radios that are connected to the
current radio.
For ENCOM STRATOS plus Version 2.1.71
Page 340
© 2010-2015 Encom Wireless Data Solutions Inc.
ENCOM STRATOS plus
USER MANUAL
Radio Settings (A and B/G Cards)
The following screen shot shows the wireless radio settings tab for a point-to-multipoint radio that is
provisioned with an A (5.8 GHz) or B/G (2.4 GHz) card:
The following tables describe the settings found in each group in the wireless radio settings tab.
General
Field Name
Description
Enable Radio
Uncheck this option to disable the wireless radio card. A disabled radio
card will not be able to form wireless links with other radios.
If you uncheck this option, all of the other options in the Radio Settings tab
will be disabled.
Identification
Field Name
Description
Radio Model
Displays the model number of the wireless radio card. This information is
useful when troubleshooting issues with the radio.
Wireless MAC
Address
Displays the MAC address assigned to the wireless radio card. For pointto-multipoint radios, the MAC address of the wireless radio cards are
different than the MAC address of the radio's first Ethernet interface.
For ENCOM STRATOS plus Version 2.1.71
Page 341
© 2010-2015 Encom Wireless Data Solutions Inc.
ENCOM STRATOS plus
USER MANUAL
Radio Network Setup
Field Name
Description
Network Type
Identifies the radio network type. This setting cannot be changed for pointto-multipoint radios.
Network SSID
Enter a name used to identify the network in which the wireless radio will
take part. The Network SSID is case sensitive, and may contain spaces.
Note: You should change the default SSID assigned at the factory to a
unique SSID for your network. You can minimize interference between
adjacent networks by assigning a unique SSID to each network.
Important: All radios that participate in the same network must be
assigned the same Network SSID.
Hide SSID
Check this option to prevent the Network SSID from being broadcast by
the wireless radio. This prevents external devices from being able to
discover the network's SSID (and potentially connect to it).
Radio Mode
Select the radio mode based on the location of the radio with respect to
the network operations center.
Refer to the following topics for more information on radio mode options
that are available:
Master Radio Setup
Repeater Radio Setup
Remote Radio Setup
Allow Clients
Check this option to allow external 802.11 compliant devices, such as
laptops, WiFi cameras, etc. to connect to the radio.
Note: This option is not compatible with the eMax protocol. If checked, the
eMax protocol is automatically disabled.
Note: Since most 802.11 compliant devices only support 20 MHz
channels, you should set the Channel Mode option to 20 MHz when you
select this option.
Note: This option is only available for Master and Repeater radios.
Remote radios do not support client devices.
For ENCOM STRATOS plus Version 2.1.71
Page 342
© 2010-2015 Encom Wireless Data Solutions Inc.
ENCOM STRATOS plus
USER MANUAL
Radio Network Setup
Field Name
Description
Channel Mode
This option allows you to set the width of the frequency channel you are
using.
Selecting a smaller frequency for the Channel Mode increases the
distance over which you can establish a wireless link, at the cost of
reduced bandwidth. For most applications, a 40 MHz channel mode is
acceptable.
Note: If you check the Allow Clients option to support 802.11 compliant
devices, you should choose the 20 MHz channel mode.
802.11 Client
Check this option if the radio needs to connect to a non-Encom WiFi
network.
Enable eMax Protocol
Check this option to enable the eMax protocol.
The eMax protocol is a proprietary protocol that increases bandwidth and
security on the wireless network.
Note: Due to compatibility issues, the eMax protocol cannot be used if
there is a repeater in the network, or if 802.11 clients need to be
supported by the radio.
Using Repeater
Check this option if there is a repeater in the network.
Enable Roaming
Refer to the Radio Mode topics (see links above) for information on this
option.
Parent Radio MAC
Address
Refer to the Radio Mode topics (see links above) or information on this
option.
Radio Parameter Setup
Field Name
Description
Frequency Band
Displays the nominal frequency at which the radio operates. This option
can be changed if the radio card supports more than one band.
Channel
Select the radio's operating frequency.
In Auto-Frequency mode, a master radio automatically searches for the
frequency that has the least activity. It then selects that frequency and
uses it to communicate with the repeater or remote radios.
For the most stable link, you should select a specific frequency from the
list of available frequencies. (You can use the STRATOS Spectrum Scan
For ENCOM STRATOS plus Version 2.1.71
Page 343
© 2010-2015 Encom Wireless Data Solutions Inc.
ENCOM STRATOS plus
USER MANUAL
Radio Parameter Setup
Field Name
Description
panel to determine the channel that has the least amount of activity in the
vicinity of the radio.)
If a repeater is present in the network, both the master and repeater
radios must be set to the same specific frequency.
Remote radios are always configured to run in Auto-Frequency mode.
They will automatically adjust their operating frequencies to match the
master's.
Wireless Link Rate
Select the rates at which the radio will communicate with the other radios
in the network.
The default setting for this option is Adaptive.
The Adaptive link rate automatically adjusts the radio's data rate to
account for the current network conditions. It typically provides the most
reliable network performance.
A fixed rate helps reduce data latency, and may be used if the
performance of the link is more important than the reliability.
If you select a fixed rate, a second drop-down list box is displayed, as
shown in the following example:
Select the minimum allowed bit rate from the left-hand list, and the
maximum allowed rate from the right-hand list.
Regardless of the range you specify, the 6 Mbps rate will always be
included in the list of allowable rates. This allows the radio to fall back to
the lowest bit rate if it is not able to maintain the higher bit rates.
Output Power
Select the wireless radio's output power.
Unless constrained by the Regulatory Domain that the radio is operating
in, you should use the Maximum power setting when the radio is
deployed in the field.
If the radio is being provisioned or tested in a bench environment, you
should use the Low power setting.
For ENCOM STRATOS plus Version 2.1.71
Page 344
© 2010-2015 Encom Wireless Data Solutions Inc.
ENCOM STRATOS plus
USER MANUAL
Master Radio Setup (A and B/G Cards)
Select the Master option for the radio that is located closest to the network operations center. This
radio is usually connected to the network via the Ethernet port.
The master radio controls the flow of data in the network and serves as the network’s
synchronization source. Each point-to-multipoint network has only one master radio. All the other
radios must be configured as either remote or repeater radios.
If the network contains a repeater radio, check the Using Repeater option (note that this option is
only available when the eMax Protocol is disabled).
For ENCOM STRATOS plus Version 2.1.71
Page 345
© 2010-2015 Encom Wireless Data Solutions Inc.
ENCOM STRATOS plus
USER MANUAL
Repeater Radio Setup (A and B/G Cards)
Select the Repeater option for a radio that provides a link between the master and remote radios.
When this option is selected, the Using Repeater option is automatically checked, and the Enable
eMax Protocol option is unchecked (the eMax protocol cannot be used when there is a repeater in
the network).
By default, the Enable Roaming option is checked. This causes the repeater radio to automatically
detect and communicate with the master radio.
If you encounter connectivity issues between the repeater and the master radio, you may want to
manually select the master radio to which the remote will connect. To do this, uncheck the Enable
Roaming option. The Parent Radio MAC Address option will be displayed.
Enter the MAC address of the master radio in the Parent Radio MAC Address option.
For ENCOM STRATOS plus Version 2.1.71
Page 346
© 2010-2015 Encom Wireless Data Solutions Inc.
ENCOM STRATOS plus
USER MANUAL
Alternatively, click on the
button at the right of the MAC address field. The Select Radio form will
be displayed. This form lets you choose the master from the list of radios that are currently
connected to the repeater.
Note that installing a repeater will reduce the network throughput by half. It should only
be used when there is no other option available, or if the reduction in performance is
not important.
For ENCOM STRATOS plus Version 2.1.71
Page 347
© 2010-2015 Encom Wireless Data Solutions Inc.
ENCOM STRATOS plus
USER MANUAL
Remote Radio Setup (A and B/G Cards)
Select the Remote option for a radio that is as the end of the point-to-multipoint network.
If the network contains a repeater, check the Using Repeater option (note that this option is only
available when the eMax Protocol is disabled).
By default, the Enable Roaming option is checked. This causes the remote radio to automatically
detect and communicate with the master or repeater.
If you encounter connectivity issues between the remote radio and the master or repeater, you may
want to manually select the radio to which the remote will connect. To do this, uncheck the Enable
Roaming option. The Parent Radio MAC Address option will be displayed.
Enter the MAC address of the master or repeater to which the remote will connect in the Parent
Radio MAC Address option.
For ENCOM STRATOS plus Version 2.1.71
Page 348
© 2010-2015 Encom Wireless Data Solutions Inc.
ENCOM STRATOS plus
USER MANUAL
Alternatively, click on the
button at the right of the MAC address field. The Select Radio form will
be displayed. This form lets you choose the parent from the list of radios that are connected to the
current radio.
For ENCOM STRATOS plus Version 2.1.71
Page 349
© 2010-2015 Encom Wireless Data Solutions Inc.
ENCOM STRATOS plus
USER MANUAL
WDS Setup
The following screen shot shows the WDS Setup tab for a point-to-multipoint radio:
The settings on this tab are used to specify the WDS (Wireless Distribution System) connections
that are allowed to form with other radios in the network.
The following tables describe the settings found in each group in the WDS Setup tab.
WDS Settings
Field Name
Description
WDS Mode
Select the method used to determine if an external radio is allowed to
form a wireless connection with the radio being configured. One of the
following options can be used:
For ENCOM STRATOS plus Version 2.1.71
WDS Mode
Description
Dynamic
All connections from other radios will be
accepted. This is the default, and recommended,
setting.
Static
Only those connections listed in the Static WDS
Links table will be allowed to form.
Disabled
No connections from other radios will be
accepted. This defeats the purpose of a wireless
network, and is not recommended.
Page 350
© 2010-2015 Encom Wireless Data Solutions Inc.
ENCOM STRATOS plus
USER MANUAL
WDS Setup
Field Name
Description
Dynamic WDS Links
This list contains the list of WDS links that are currently active.
(Move button)
Click on the Move button to convert dynamic WDS links to static links.
The links will be transferred from the Dynamic WDS Links list to the
Static WDS Links list.
To convert dynamic WDS links to static WDS links:
1. Select one or more links in the Dynamic WDS Links table. To
select a link, check the associated check box. In the following
example, the first WDS link is selected.
2. Click on the Move button to convert the selected dynamic links to
static links.
Static WDS Links
This list contains the list of WDS links that are allowed to form.
Click on the Add button to manually add the MAC address of a remote
radio to the static WDS list.
(Add button)
When selected, the following form is displayed:
Specify the MAC address of the radio you want to allow, and press the
OK button. The new MAC address will be added to the Static WDS Links
list.
Note: If you add the MAC address of a radio that is not known to ENCOM
STRATOS, only the MAC address will be displayed in the disallowed list. If
the radio is known to STRATOS, the associated IP Address and radio
name will be included. Both scenarios are shown in the following
example:
For ENCOM STRATOS plus Version 2.1.71
Page 351
© 2010-2015 Encom Wireless Data Solutions Inc.
ENCOM STRATOS plus
USER MANUAL
WDS Setup
Field Name
Description
Click on the Remove button to remove links from the static WDS list.
(Remove button)
To remove static WDS links:
1. Select one or more links in the Static WDS Links table. To select a
link, check the associated check box. In the following example, the
first WDS link is selected.
2. Click on the Remove button to remove the selected static links.
The following table describes the information that is displayed in the Dynamic and Static WDS Link
tables:
Column
Description
MAC Address
The MAC address of the remote radio.
IP Address
The IP address of the remote radio.
Radio Name
The name assigned to the remote radio.
Interface
Identifies the wireless radio module on the remote radio. The first radio
module is Radio 1, the second radio module is Radio 2, etc.
Tx/Rx Strength
The transmit and receive signal strengths, in dBm, of the wireless
connection between this radio and the remote radio.
For ENCOM STRATOS plus Version 2.1.71
Page 352
© 2010-2015 Encom Wireless Data Solutions Inc.
ENCOM STRATOS plus
USER MANUAL
Wireless 'N' Settings
Note that the Wireless 'N' settings tab is only displayed if the associated radio card supports
Wireless N operation.
The following screen shot shows the wireless 'N' settings tab for a point-to-multipoint radio:
ENCOM offers Wireless-N radio cards that support up to 3 antennas. STRATOS will automatically
display the number of antennas that are supported by your radio in the Antenna Chains group.
The following table describes the settings found in each group in the wireless 'N' settings tab.
Antenna Chains
Field Name
Description
Transmit
Specify the antennas to use for transmitting data. Check the Chain option
to enable the associated antenna, and uncheck it to disable the antenna.
For optimal performance, you should enable all of the antennas supported
by your radio card.
Receive
Specify the antennas to use for receiving data. Check the Chain option to
enable the associated antenna, and uncheck it to disable the antenna.
For optimal performance, you should enable all of the antennas supported
by your radio card.
For ENCOM STRATOS plus Version 2.1.71
Page 353
© 2010-2015 Encom Wireless Data Solutions Inc.
ENCOM STRATOS plus
USER MANUAL
Wireless Security Settings (N Mode)
The following screen shot shows the wireless security settings tab for a point-to-multipoint radio,
when the Wireless Mode option in the Radio Settings tab is set to 'N-Mode':
The Wireless Security Types group allows you to specify the security protocols used to protect the
wireless communication links. You can choose from the following options:
Wireless Security Types
Option
Description
Disabled
Select this option if you do not want to enable security.
This option is not recommended since it allows anyone that has
knowledge of the network's SSID to connect to the network.
Dynamic
This option enables wireless encryption that uses dynamically allocated
keys.
This option provides the most secure communication link.
RADIUS MAC
Authentication
Check this option if you use a RADIUS server for authentication.
A Remote Authentication Dial in User Service (RADIUS) server acts as a
centralized access and authorization point for network service. The
authentication service is then handled by the RADIUS server instead of
the ENCOM radios.
Important: The security settings must be the identical for all radios on the network. Radios that
have different security settings will not be able to communicate with each other.
For ENCOM STRATOS plus Version 2.1.71
Page 354
© 2010-2015 Encom Wireless Data Solutions Inc.
ENCOM STRATOS plus
USER MANUAL
Note: Encom Wireless Data Solutions highly recommends that you confer with your I.T.
department to determine the appropriate level of security for your network.
The Dynamic security option contains additional settings that need to be configured. The following
topic describes these in more detail:
Dynamic Security Options
For ENCOM STRATOS plus Version 2.1.71
Page 355
© 2010-2015 Encom Wireless Data Solutions Inc.
ENCOM STRATOS plus
USER MANUAL
Dynamic Security Settings (N Mode)
The following screen shot shows the dynamic security options for a point-to-multipoint radio, when
the Wireless Mode option in the Radio Settings tab is set to 'N-Mode':
The following table describes the dynamic security options found in the Wireless Security Settings
tab:
Wireless-N Security Types
Field Name
Description
Pre-Shared Key
Enter a pre-shared key used for the authentication process.
For ENCOM STRATOS plus Version 2.1.71
Page 356
© 2010-2015 Encom Wireless Data Solutions Inc.
ENCOM STRATOS plus
USER MANUAL
Wireless Security Settings (A and B/G Modes)
The following screen shot shows the wireless security settings tab for a point-to-multipoint radio,
when the Wireless Mode option in the Radio Settings tab is set to 'A-Mode' or 'G-Mode':
The Wireless Security Type group allows you to specify the security protocols used to protect the
wireless communication links. You can choose from the following options:
Wireless Security Types
Option
Description
Disabled
Select this option if you do not want to enable security.
This option is not recommended since it allows anyone that has
knowledge of the Network's SSID to connect to the network.
Static
This option enables wireless encryption that uses static keys.
This is an older technology that is not as secure as the Dynamic option. It
can, however, provide for a more stable network.
Dynamic
This option enables wireless encryption that uses dynamically allocated
keys.
This option provides the most secure communication link.
RADIUS MAC
Authentication
Check this option if you use a RADIUS server for authentication.
A Remote Authentication Dial in User Service (RADIUS) server acts as a
centralized access and authorization point for network service. The
authentication service is then handled by the RADIUS server instead of
For ENCOM STRATOS plus Version 2.1.71
Page 357
© 2010-2015 Encom Wireless Data Solutions Inc.
ENCOM STRATOS plus
USER MANUAL
the ENCOM radios.
Important: The security settings must be the identical for all radios on the network. Radios that
have different security settings will not be able to communicate with each other.
Note: Encom Wireless Data Solutions highly recommends that you confer with your I.T.
department to determine the appropriate level of security for your network.
The Static and Dynamic security options contain additional settings that need to be configured. The
following topics describe these in more detail:
Static Security Options
Dynamic Security Options
For ENCOM STRATOS plus Version 2.1.71
Page 358
© 2010-2015 Encom Wireless Data Solutions Inc.
ENCOM STRATOS plus
USER MANUAL
Static Security Settings (A and B/G Modes)
The following screen shot shows the static security options for a point-to-multipoint radio, when the
Wireless Mode option in the Radio Settings tab is set to 'A-Mode' or 'G-Mode':
The following table describes the static security options found in the Wireless Security Settings tab:
Static Security Options
Field Name
Description
Encryption Level
Select the encryption level to use. Three options are available:
Option
Description
64-bit WEP
Uses a 40-bit encryption key coupled with a 24-bit
initialization vector. This option is considered to be
obsolete, and should only be used for compatibility
with existing infrastructure.
128-bit WEP
Uses a 104-bit encryption key coupled with a 24-bit
initialization vector. This option is more secure than
64-bit WEP, but still suffers from deficiencies in the
WEP algorithm. It should only be used for
compatibility with existing infrastructure.
128-bit AES
Uses the 128-bit AES block encryption algorithm
couple with the CBC-MAC block chaining technique
for added security. This is the most secure of the
For ENCOM STRATOS plus Version 2.1.71
Page 359
© 2010-2015 Encom Wireless Data Solutions Inc.
ENCOM STRATOS plus
USER MANUAL
three static security options.
Active Key
Select the encryption key to use. Although you can define up to four static
encryption keys, only one key can be active.
Encryption Key (1-4)
Enter the hexadecimal character sequence to use for the encryption key.
Hexadecimal characters include the decimal digits (0-9) and the letters AF.
The number of characters you need to enter depends on the Encryption
Level you have specified. An indicator, located below the Active Key list,
will indicate the number of characters you have to enter:
For ENCOM STRATOS plus Version 2.1.71
Page 360
© 2010-2015 Encom Wireless Data Solutions Inc.
ENCOM STRATOS plus
USER MANUAL
Dynamic Security Settings A and B/G Modes)
The following screen shot shows the DYNAMIC security options for a point-to-multipoint radio, when
the Wireless Mode option in the Radio Settings tab is set to 'A-Mode' or 'G-Mode':
The following tables describe the dynamic security options found in the Wireless Security Settings
tab:
Authentication Types
Field Name
Description
WPA Personal
Check this option to enable WPA personal authentication. You must also
enter a pre-shared key used for the authentication process.
WPA2 Personal
Check this option to enable WPA2 personal authentication. You must also
enter a pre-shared key used for the authentication process.
WPA Enterprise
Check this option to enable WPA enterprise authentication. This option
does not require a pre-shared key.
WPA2 Enterprise
Check this option to enable WPA2 enterprise authentication. This option
does not require a pre-shared key.
For ENCOM STRATOS plus Version 2.1.71
Page 361
© 2010-2015 Encom Wireless Data Solutions Inc.
ENCOM STRATOS plus
USER MANUAL
Authentication Types
Field Name
Description
EAP Method
Specify the authentication protocol to use. Two options are available:
Option
Description
Pass Through
Authentication requests are relayed to a RADIUS
server.
EAP-TLS
TLS certificates are used for authentication.
This option is only used by the WPA Enterprise and WPA2 Enterprise
authentication types. It is hidden if no enterprise option is selected.
TLS Mode
Specify how TLS certificates are to be used. Two options are available:
Option
Description
Use Dynamic
Certificates
TLS certificates are negotiated dynamically using
anonymous Diffie-Hellman MODP 2048 bit
algorithm.
Use Imported
Certificates
A TLS certificate that has been imported into the
radio is used.
This option is only used when the EAP Method is set to EAP-TLS. It is
hidden if the EAP-TLS option is not selected.
For ENCOM STRATOS plus Version 2.1.71
Page 362
© 2010-2015 Encom Wireless Data Solutions Inc.
ENCOM STRATOS plus
USER MANUAL
Encryption Algorithms
Field Name
Description
Unicast Ciphers
Check the ciphers that can be used to encrypt frames sent to individual
radios. Two options are available.
Option
Description
TKIP
Temporal Key Integrity Protocol. An encryption
protocol that is compatible with legacy WEP
equipment, but enhanced to correct some WEP
flaws.
This option should only be used for networks that
contain legacy WEP devices.
AES-CCM
A more secure WPA encryption protocol, based on
the reliable AES (Advanced Encryption Standard).
Use this option is preferred if the there are no
legacy WEP devices in the network.
Group Ciphers
Check the ciphers that can be used to encrypt frames broadcast to all
radios. Two options are available.
Option
Description
TKIP
Temporal Key Integrity Protocol. An encryption
protocol that is compatible with legacy WEP
equipment, but enhanced to correct some WEP
flaws.
This option should only be used for networks that
contain legacy WEP devices.
AES-CCM
A more secure WPA encryption protocol, based on
the reliable AES (Advanced Encryption Standard).
Use this option is preferred if the there are no
legacy WEP devices in the network.
Miscellaneous
Field Name
Description
Group Key Update
Time
The interval at which the dynamically generated keys are updated.
For ENCOM STRATOS plus Version 2.1.71
Page 363
© 2010-2015 Encom Wireless Data Solutions Inc.
ENCOM STRATOS plus
USER MANUAL
Network Tab
The following screen shot shows the network settings tab for a point-to-multipoint radio:
Because a large number of configuration options are available, the network configuration tab is split
up into a number of sub-tabs. The following topics describe the settings found in each sub-tab:
Time Settings
Spanning Tree Protocol Settings
Network Filter Settings
DHCP Server Settings
SNMP Settings
QoS (Quality of Service) Settings
RADIUS Settings
VLAN Settings
For ENCOM STRATOS plus Version 2.1.71
Page 364
© 2010-2015 Encom Wireless Data Solutions Inc.
ENCOM STRATOS plus
USER MANUAL
Time Settings
The following screen shot shows the NTP settings tab for a point-to-multipoint radio:
The following table describes the time synchronization settings.
Time Synchronization
Field Name
Description
Synchronize radio time Select one of the following options to set the system clock:
using
Option
Description
Nothing
The radio's time will only be synchronized when a
configuration change is made by STRATOS.
NTP Server
The radio will synchronize its internal clock to the
specified NTP server time at regular intervals.
GPS Receiver
The radio will synchronize its internal clock from
the built-in GPS receiver.
Note: This option is only available if the radio
contains a GPS receiver.
Primary NTP Server
Specify the IP address of the NTP server used to synchronize the radio's
internal clock. This is an Internet Protocol version 4 (IPv4) address,
specified in dotted notation, as shown in the following example:
For ENCOM STRATOS plus Version 2.1.71
Page 365
© 2010-2015 Encom Wireless Data Solutions Inc.
ENCOM STRATOS plus
USER MANUAL
Note: This option is only enabled when the NTP Server option is selected.
Secondary NTP
Server
If applicable, specify the IP address of the secondary NTP server. This is
an Internet Protocol version 4 (IPv4) address, specified in dotted notation,
as shown in the following example:
If there is no secondary NTP server in your network, enter "0.0.0.0" in this
field.
Note: This option is only enabled when the NTP Server option is selected.
System Clock
Field Name
Description
Time Zone
Select the time zone in which the radio is operating.
Note that the time zone has no effect on the operation of the radio, and
does not need to be set for normal operation.
If the time zone is not set, the radio defaults to UTC time.
For ENCOM STRATOS plus Version 2.1.71
Page 366
© 2010-2015 Encom Wireless Data Solutions Inc.
ENCOM STRATOS plus
USER MANUAL
Spanning Tree Protocol Settings
The following screen shot shows the Spanning Tree Protocol settings tab for a point-to-multipoint
radio:
The spanning tree protocols are used to prevent the formation of loops that can interfere with the
proper operation of the radio network. Refer to Appendix C: Spanning Tree Protocol for more
information on the this subject, and for guidance in designing a radio network that uses STP or
RSTP.
The following table describes the spanning tree protocol settings.
Spanning Tree Protocol
Field Name
Description
Spanning Tree
Protocol
The Spanning Tree Protocol (STP) is a protocol that provides link
management to prevent undesirable loops from appearing in the network.
You can select from one of the following options:
Option
Description
Disabled
STP is not enabled. This is the default setting.
STP
STP is enabled.
Rapid STP
Rapid STP is enabled. This is an enhanced version
of the STP protocol that provides for faster
spanning tree convergence after a topology
change.
For ENCOM STRATOS plus Version 2.1.71
Page 367
© 2010-2015 Encom Wireless Data Solutions Inc.
ENCOM STRATOS plus
USER MANUAL
You would normally use this option if you want to
use STP in your network.
Preferred Root
Check this option if you want the radio to be preferred over other radios
when the network is negotiating which radio to use as the STP root.
Bridge Priority
The STP priority that is assigned to the radio. This setting is managed by
STRATOS, and cannot be changed manually.
This information can be useful if you have other STP or RSTP enabled
devices in your network (such as switches and routers), and you need to
configure them to interact with the ENCOM radios.
For ENCOM STRATOS plus Version 2.1.71
Page 368
© 2010-2015 Encom Wireless Data Solutions Inc.
ENCOM STRATOS plus
USER MANUAL
Network Filter Settings
The following screen shot shows the Network Filter tab for a point-to-multipoint radio:
The network filters are used to block multicast traffic from being forwarded by the radio. This can
enhance the performance of your radio network, by eliminating unnecessary network traffic.
The following table describes the network filter settings.
Network Traffic Filtering
Field Name
Description
Block incoming
Check this option to prevent multicast traffic arriving on the radio's
multicast traffic on the Ethernet port from being forwarded to the radio's wireless interfaces.
Ethernet port
Block outgoing
Check this option to prevent multicast traffic arriving on the radio's
multicast traffic on the wireless interfaces from being forwarded to the radio's Ethernet port.
Ethernet port
Block multicast traffic
between wireless
connections
Check this option to prevent multicast traffic arriving on one of the radio's
physical radio cards, WDS links or client wireless connections from being
forwarded to the other radio cards, WDS links or client wireless
connections.
Note that some network protocols (such as those used by traffic cameras) use multicast packets to
operate. Because of this, you must be careful when disabling these settings.
Refer to Appendix F: Network Filters for more information on setting up the network filters.
For ENCOM STRATOS plus Version 2.1.71
Page 369
© 2010-2015 Encom Wireless Data Solutions Inc.
ENCOM STRATOS plus
USER MANUAL
DHCP Server Settings
The following screen shot shows the DHCP server tab for a point-to-multipoint radio:
The following table describes the DHCP server settings.
DHCP Server
Field Name
Description
Enable DHCP Server
Check this option to enable the radio's DHCP server. When this option is
enabled, the radio will assign IP addresses to any other radio, or any other
other device, that is configured to obtain their IP addresses dynamically.
Important: Severe network instability can occur if there is more than one
DHCP server present in a network or network segment. Do not enable
this option if a router or another radio is already acting as a DHCP server.
DHCP Server Settings
Field Name
Description
DHCP Address Range Specify the start and end range of the IP addresses that will be provided
by the DHCP server, as shown in the following example:
In this example, IP addresses in the 192.168.1.100 - 192.168.1.200 range
will be assigned to devices that use dynamic addressing. IP addresses
outside this range would be manually assigned to devices that do not use
dynamic addressing.
For ENCOM STRATOS plus Version 2.1.71
Page 370
© 2010-2015 Encom Wireless Data Solutions Inc.
ENCOM STRATOS plus
USER MANUAL
DHCP Server Settings
Field Name
Description
Network Mask
Enter the network mask that will be assigned to the devices that use
dynamic IP addressing. This is an Internet Protocol version 4 (IPv4)
address, specified in dotted notation, as shown in the following example:
Gateway Address
Enter the IP Address of the default gateway that will be assigned to the
devices that use dynamic IP addressing. This is an Internet Protocol
version 4 (IPv4) address, specified in dotted notation, as shown in the
following example:
The default gateway is the radio or router that provides access to devices
outside of the local network.
DNS Server Address
Enter the IP Address of the DNS server that will be assigned to the
devices that use dynamic IP addressing. This is an Internet Protocol
version 4 (IPv4) address, specified in dotted notation, as shown in the
following example:
If there is no DNS server available in your network, enter "0.0.0.0" in this
field.
WINS Server Address
Enter the IP Address of the WINS server that will be assigned to the
devices that use dynamic IP addressing. This is an Internet Protocol
version 4 (IPv4) address, specified in dotted notation, as shown in the
following example:
If there is no WINS server available in your network, enter "0.0.0.0" in this
field.
For ENCOM STRATOS plus Version 2.1.71
Page 371
© 2010-2015 Encom Wireless Data Solutions Inc.
ENCOM STRATOS plus
USER MANUAL
SNMP Settings
The following screen shot shows the SNMP tab for a point-to-multipoint radio:
The following tables describe the SNMP service settings.
SNMP Service
Field Name
Description
Enable SNMP Service Check this option enable the radio's SNMP (Simple Network Management
Protocol) agent.
When this option is enabled, diagnostic information can be obtained from
the radio using any SNMP based network monitoring application.
SNMP Service Settings
Field Name
Description
Host IP
Enter the IP address of the computer on which the network monitoring
application is running, as shown in the following example:
Setting this option will prevent any other computer from being able to
access the radio's SNMP information.
If you want to allow any computer that is on your network to access the
radio's SNMP information, enter "0.0.0.0" in this field.
Community Name
The community name used to access the radio's SNMP agent. This is set
For ENCOM STRATOS plus Version 2.1.71
Page 372
© 2010-2015 Encom Wireless Data Solutions Inc.
ENCOM STRATOS plus
USER MANUAL
to 'public', and cannot be changed.
Only read operations are permitted.
Contact Information
Enter the contact information of the individual responsible for the network,
if applicable.
Location Information
Enter the location of the radio, if applicable.
For ENCOM STRATOS plus Version 2.1.71
Page 373
© 2010-2015 Encom Wireless Data Solutions Inc.
ENCOM STRATOS plus
USER MANUAL
QoS Settings
The following screen shot shows the QoS (Quality of Service) settings tab for a point-to-multipoint
radio:
The Quality of Service settings allow you to prioritize the various types of network traffic so that
important traffic is processed ahead of less important traffic.
Under normal conditions, all network data packets have an equal opportunity to be forwarded by the
radio. This works well for some applications (such as file transfers or web browsing) but it is not
adequate for traffic that is sensitive to network latency and throughput reductions (such as voice or
video streaming). QoS allows you to address this issue by giving the time sensitive traffic a larger
share of the network bandwidth.
Refer to Appendix D: Quality of Service for more detailed information on the prioritization
mechanisms supported by the ENCOM radios.
The following tables describe the Quality of Service settings.
Network Traffic Prioritization
Field Name
Description
Enable
Check this option to enable priority queue based QoS features.
Priority rules are used to specify the priority of specific types of traffic.
Lower priority traffic is dropped in preference to higher priority traffic when
the radio becomes heavily loaded.
Use WMM
Check this option to set the priority of incoming packets to the incoming
WMM priority (or to the incoming VLAN priority if VLANs are being used).
For ENCOM STRATOS plus Version 2.1.71
Page 374
© 2010-2015 Encom Wireless Data Solutions Inc.
ENCOM STRATOS plus
USER MANUAL
WMM is used to prioritize certain type of traffic, such as VOIP (Voice Over
IP) and video streams, that are sensitive to network latency and capacity
issues.
Note: The WMM/VLAN priorities must be set by the device that creates
the network data packets or by the router or switch that provides access
to the ENCOM radio network.
Use DSCP Priorities
Check this option to set the priority of incoming packets to the DSCP
priority of the incoming data packets.
Note: The DSCP priorities must be set by the device that creates the
network data packets or by the router or switch that provides access to
the ENCOM radio network.
Priority Rules
Field Name
Description
Priority Rule List
By default, ENCOM STRATOS will assign the highest priority to the radio
management traffic.
Other types of network traffic can be assigned to specific priority queues
by creating custom priority rules. The Priority Rules list displays the
custom priority rules that you have defined.
When defining a priority rule, you specify the type of traffic that the rule is
to act upon, and the priority to assign to the matching traffic.
In the following example, two priority rules have been defined:
The shaded cells contain the criteria that must be matched in order for a
network data packet to be affected by the rule. Matching data packets will
be assigned the New Priority (and optionally the New DSCP value)
defined in the rule.
The priority rule list is sorted by the New Priority column, in descending
order.
The following table describes the information that is displayed in the
Priority Rules list:
Column
Description
To delete a rule, first check it, and then click on
the Remove button at the right of the Priority
Rule list to actually delete it.
For ENCOM STRATOS plus Version 2.1.71
Page 375
© 2010-2015 Encom Wireless Data Solutions Inc.
ENCOM STRATOS plus
USER MANUAL
Name
A short description that identifies the type of
network traffic associated with the rule.
Protocol
The protocol to match.
Port(s)
The IP port or ports to match. If blank, traffic on
any port is affected by the rule.
Source
Address(es)
The address or addresses that the data packets
must originate from.
Destination
Address(es)
The address or addresses that the data packets
are being forwarded to.
DSCP
The DSCP value of the incoming packets to
match. If blank, the DSCP priority is ignored by
the rule.
New Priority
The priority to assign to the packets that match
the specified criteria.
New DSCP
The DSCP value to assign to the packets that
match the specified criteria.
Click the Add button to create a new priority rule. Enter the appropriate
rule settings in the QoS Priority Rule form that is displayed.
(Add button)
Select a priority rule, and then click on the Edit button to modify the rule
settings.
(Edit button)
Alternatively, you can double-click on the rule you want to modify.
To delete a rule, first check it, and then click on the Remove button to
actually delete it.
(Remove button)
For ENCOM STRATOS plus Version 2.1.71
Page 376
© 2010-2015 Encom Wireless Data Solutions Inc.
ENCOM STRATOS plus
USER MANUAL
Specifying a QoS Priority Rule
The following screen shot shows the QoS Priority Rule form for a point-to-multipoint radio:
The QoS Priority Rule form allows you to define a traffic priority rule.
The following tables describe the QoS rule settings.
Rule
Field Name
Description
Name
Enter a short description that identifies the type of network traffic
associated with the rule.
Matching Criteria
Field Name
Description
Protocol
Specify the protocol that the rule will apply to. You can select one of the
following values:
Protocol
Description
All
All network traffic will be matched.
When you select this option, one or both of the
Source Address and Destination Address
fields must be set. Otherwise, all of the network
traffic flowing through the radio would match the
For ENCOM STRATOS plus Version 2.1.71
Page 377
© 2010-2015 Encom Wireless Data Solutions Inc.
ENCOM STRATOS plus
USER MANUAL
rule.
Ports
UDP
The rule will only affect UDP traffic.
TCP
The rule will only affect TCP traffic.
Optionally specify the port or ports associated with the network traffic
that the rule will apply to. You can specify the ports using one of the
following formats:
Format
Example
Single Port
1000
Multiple Ports
1000,2000
Port Range
1000-2000
Multiple Port Ranges
1000-2000,3000-4000
If this value is not specified, the rule will apply to all traffic of the
selected protocol type.
Source Address(es)
Optionally specify the address or addresses that the data packets must
originate from. You can specify the addresses using one of the
following formats:
Format
Example
Single IPV4 Address
192.168.1.100
IPV4 Address Range
192.168.1.100-192.168.1.200
IPV4 CIDR Subnet
192/168.1.1/24
If this value is not specified, the rule will apply to all destination
addresses.
Destination Address(es)
Optionally specify the address or addresses that the data packets are
being forwarded to. You can specify the addresses using one of the
following formats:
For ENCOM STRATOS plus Version 2.1.71
Format
Example
Single IPV4 Address
192.168.1.100
Page 378
© 2010-2015 Encom Wireless Data Solutions Inc.
ENCOM STRATOS plus
USER MANUAL
IPV4 Address Range
192.168.1.100-192.168.1.200
IPV4 CIDR Subnet
192/168.1.1/24
If this value is not specified, the rule will apply to all destination
addresses.
DSCP
Optionally specify the DSCP (Differentiated Services Code Point) value
in the IP header that the rule will apply to.
You can select a predefined DSCP value from the drop-down list, or
enter a number between 0 and 63.
If this value is not specified, the rule will apply to all DSCP values.
Action
Field Name
Description
Set priority to
The priority to assign to the packets that match the specified criteria.
The higher the priority value, the higher the priority assigned to the
associated network traffic.
Set DSCP to
Optionally specify the DSCP (Differentiated Services Code Point) value
to assign to the packets that match the specified criteria.
You can select a predefined DSCP value from the drop-down list, or
enter a number between 0 and 63.
If this value is not specified, no change will be made to the packet's
DSCP value.
For ENCOM STRATOS plus Version 2.1.71
Page 379
© 2010-2015 Encom Wireless Data Solutions Inc.
ENCOM STRATOS plus
USER MANUAL
RADIUS Settings
The following screen shot shows the RADIUS settings tab for a point-to-multipoint radio:
RADIUS is used to centralize the authentication of users that attempt to login to the radio and/or to
the network. Refer to ENCOM STRATOS RADIUS Configuration Guide, available separately, for
more information on setting up and using a RADIUS server with your radio network.
The following tables describe the settings found in each group in the RADIUS settings tab.
Primary and Secondary Server
Field Name
Description
Enable RADIUS
Server
Check this setting to enable the associated RADIUS server (Primary or
Backup).
If the radio cannot connect to the primary RADIUS server, it will attempt to
connect to the backup RADIUS server.
Server Address
Enter the IP address of the RADIUS server.
Authentication Port
Enter the IP port on which RADIUS authentication requests are accepted.
The default is 1812.
Accounting Port
Enter the IP port on which RADIUS accounting updates are accepted.
The default is 1813.
Shared Secret
Enter a string that is used to obfuscate the user password that is sent to
the RADIUS server for authentication. This value must match the Shared
Secret that is configured in the RADIUS server.
For ENCOM STRATOS plus Version 2.1.71
Page 380
© 2010-2015 Encom Wireless Data Solutions Inc.
ENCOM STRATOS plus
USER MANUAL
Domain
Enter the Microsoft Windows domain of the user. Only use if the RADIUS
server requires domain validation.
Timeout
Enter the maximum amount of time (in milliseconds) to wait for a
response from the RADIUS server before resending an authentication
request.
The default is 300 ms. You may need to increase this if your RADIUS
server is slow to respond to authentication requests.
Use RADIUS to login
to the radio
Check this option to use RADIUS to authenticate radio login requests.
When this option is enabled, the radio will check with the RADIUS server
if it does not find the specified user in its local user database.
User RADIUS to login Check this option to use RADIUS to authenticate client devices that wish
to the wireless network to attach to your network (e.g. for access to the network operations center
or to your corporate LAN).
If you select this option, you will need to check the RADIUS MAC
Authentication setting for each of the radio cards that clients will use to
connect to the network.
Common Settings
Field Name
Description
Default Access Rights Select the access rights to assign to the user if the RADIUS server is not
configured to respond to an authentication request with the user's group
name.
The following table describes the options that are available for this setting:
Option
Description
View Settings
The user will be able to inspect the radio's
configuration settings, but will not be able to
make any changes.
Change Settings
The user will be able to inspect and change
the radio's configuration settings.
This setting is ignored if the RADIUS server responds to an authentication
request with the user's group name.
RADIUS Accounting
Check this option to send RADIUS accounting packets to the RADIUS
server. This information is normally used for user billing, and is not usually
needed for typical ENCOM radio networks.
For ENCOM STRATOS plus Version 2.1.71
Page 381
© 2010-2015 Encom Wireless Data Solutions Inc.
ENCOM STRATOS plus
USER MANUAL
VLAN Settings
The following screen shot shows the VLAN settings tab for a point-to-multipoint radio:
VLANs (Virtual LANs) are used to improve the performance, and possibly the security, of a radio
network. Refer to Appendix E: VLAN Support for more information on implementing a VLAN-based
network.
The following tables describe the settings found in each group in the VLAN settings tab.
Management VLAN
Field Name
Description
Tagged Management
Data
By default, the radio can be managed by connections over the native
(non-tagged) VLAN.
To be able to manage the radio using a specific VLAN, check this option,
and enter the appropriate management VLAN ID in the VLAN ID field.
VLAN ID
Enter the ID of the management VLAN (a number in the range 1-4095 is
required).
Client Tagging
Field Name
Description
Tag Client Data
Normally, all of the radio's interfaces (wireless and Ethernet) act as VLAN
trunks (i.e. they carry the network traffic for all VLANs). If a normal, nonVLAN aware device is plugged into the radio's Ethernet port, its network
traffic will not be tagged, and it will not be able to communicate with
For ENCOM STRATOS plus Version 2.1.71
Page 382
© 2010-2015 Encom Wireless Data Solutions Inc.
ENCOM STRATOS plus
USER MANUAL
devices that are part of a VLAN.
Check this option to set up the radio's Ethernet port as an access port for
a specific VLAN. This gives devices connected to the Ethernet port
access to the other devices in the specified VLAN.
VLAN ID
Enter the ID of the client VLAN to (a number in the range 1-4095 is
required).
VLAN Priority
The priority to assign to the packets originating from the Ethernet port.
The higher the priority value, the higher the priority assigned to the
associated network traffic.
Note: In order to prioritize the wireless network traffic using the VLAN
priority, the appropriate QoS options need to be configured. See the Using
WMM to Support VLAN Priority Traffic topic for more information.
Management Address (Wireless)
Field Name
Description
IP Address
Enter the IP address used to access the radio via its wireless interfaces.
This is an Internet Protocol version 4 (IPv4) address, specified in dotted
notation, as shown in the following example:
If the Tagged Management Data option is checked, this IP address
should be compatible with the management VLAN's network address
range.
Network Mask
Enter the network mask of the network used to access the radio via its
wireless interfaces. This is an Internet Protocol version 4 (IPv4) address,
specified in dotted notation, as shown in the following example:
If the Tagged Management Data option is checked, this mask should
be compatible with the management VLAN's network mask.
For ENCOM STRATOS plus Version 2.1.71
Page 383
© 2010-2015 Encom Wireless Data Solutions Inc.
ENCOM STRATOS plus
USER MANUAL
Default Gateway
Enter the IP address of the radio, router or switch that allows this radio to
connect with devices that are outside of their local LAN or VLAN. This is
an Internet Protocol version 4 (IPv4) address, specified in dotted notation,
as shown in the following example:
If the Tagged Management Data option is checked, this IP address
would normally be the IP address of the network's gateway radio, or the IP
address of the router or switch used to access external networks.
Access Port Address (Ethernet)
Field Name
Description
IP Address
Enter the IP address used to access the radio via its Ethernet interface.
This is an Internet Protocol version 4 (IPv4) address, specified in dotted
notation, as shown in the following example:
If the Tag Client Data option is checked, this IP address should be
compatible with the client VLAN's network address range.
Network Mask
Enter the network mask of the network used to access the radio via its
Ethernet interface. This is an Internet Protocol version 4 (IPv4) address,
specified in dotted notation, as shown in the following example:
If the Tag Client Data option is checked, this mask should be
compatible with the client VLAN's network mask.
Pruning
Field Name
Description
Prune VLANs
Check this option to prevent the radio for forwarding network traffic
associated with specific VLAN IDs.
VLAN IDs
Enter one or more VLAN IDs to prune. Separate individual IDs with
commas.
Any incoming network traffic that matches the specified VLAN IDs will be
dropped by the radio.
For ENCOM STRATOS plus Version 2.1.71
Page 384
© 2010-2015 Encom Wireless Data Solutions Inc.
ENCOM STRATOS plus
USER MANUAL
About Tab
The following screen shot shows the About tab for a point-to-multipoint radio:
This tab displays information regarding the radio's hardware and firmware. It does not contain any
user editable fields.
For ENCOM STRATOS plus Version 2.1.71
Page 385
© 2010-2015 Encom Wireless Data Solutions Inc.
ENCOM STRATOS plus
USER MANUAL
Export and Import Buttons
The Export and Import buttons in the lower left-hand corner of the radio configuration form allow
you to save the radio's configuration settings to a file, and to update the radio's configuration
settings from a previously saved configuration file.
Refer to the following topics for more information on these functions:
Exporting the Radio Configuration
Importing the Radio Configuration
For ENCOM STRATOS plus Version 2.1.71
Page 386
© 2010-2015 Encom Wireless Data Solutions Inc.
ENCOM STRATOS plus
USER MANUAL
Exporting the Radio Configuration
The Export function is used to save the radio's current settings to a configuration profile file. This
allows you to:
Make a backup copy of the radio's configuration.
Save the radio's configuration to a profile or template file for use in configuring other radios.
To export a radio's configuration:
1. From the radio's configuration form, click on the Export button. The Save configuration profile
file form is displayed:
2. Specify the name of the file you want to save the radio's configuration settings to, and then
press the Save button to save the settings.
By default, STRATOS saves configuration profile files in the 'My Documents\Encom
Wireless\Profiles' folder.
For ENCOM STRATOS plus Version 2.1.71
Page 387
© 2010-2015 Encom Wireless Data Solutions Inc.
ENCOM STRATOS plus
USER MANUAL
Importing the Radio Configuration
The Import function allows you to update the radio's settings from a previously saved configuration
profile file. This function allows you to:
Restore the radio's configuration from a backup file. This can be useful when you have to
replace a radio in the field.
Apply the settings from one radio to another. This can be used to provision new radios quickly,
and ensure that they are compatible with other radios in the network.
To configure a radio using a saved configuration file:
1. From the radio's configuration form, click on the Import button. The Select configuration
profile file form is displayed:
2. Select the configuration profile you want to import, and press the Open button.
For ENCOM STRATOS plus Version 2.1.71
Page 388
© 2010-2015 Encom Wireless Data Solutions Inc.
ENCOM STRATOS plus
USER MANUAL
3. The Import Radio Settings form will be displayed:
4. The Radio Module Assignments group allows you to specify how the radio module settings
are applied:
The Target Radio Modules column lists the wireless radio modules that are present on the
radio.
The Profile Radio Modules column shows the options that are available for each wireless
interface that is present on the radio. STRATOS will find the best match between the profile
and target radio modules, and will assign these by default. You can change the default
assignments by selecting the appropriate items from the list boxes.
In the example shown above, STRATOS applied the matching radio modules from the profile
to the target radio modules. If you didn't want to disturb the configuration of the second radio
module, then you would select the Don't Copy option from the second list box, as shown
below:
For ENCOM STRATOS plus Version 2.1.71
Page 389
© 2010-2015 Encom Wireless Data Solutions Inc.
ENCOM STRATOS plus
USER MANUAL
5. The Settings to Copy options allow you to specify what settings to import from the
configuration profile:
These are described further in the following table:
Option
Description
Copy all settings
Use this option when you need to configure a radio so that it
matches the configuration profile exactly.
This option is most often used when configuring a replacement
radio, or you want to restore the radio's configuration from a backup.
Copy common
settings
Use this option to exclude those settings that are unique to the
radio.
This option is most often used when you are adding a new radio to a
network, and you want to configure it to match the other radios in
the network.
The following items will not get copied over from the profile file to
the radio:
Radio name
Radio Description
Radio latitude, longitude and street address
Radio static IP address
Parent radio MAC address
Static WDS assignments
6. Press the OK button to apply the profile settings to the radio.
7. Make any changes to the imported settings in the radio configuration form.
8. Press the Save button on the radio configuration form to save the settings to the radio.
For ENCOM STRATOS plus Version 2.1.71
Page 390
© 2010-2015 Encom Wireless Data Solutions Inc.
ENCOM STRATOS plus
USER MANUAL
For ENCOM STRATOS plus Version 2.1.71
Page 391
© 2010-2015 Encom Wireless Data Solutions Inc.
ENCOM STRATOS plus
USER MANUAL
Chapter 5: Setting up a Broadband Network
This example will show you how to set up a simple broadband network consisting of a master and a
remote radio.
The two radios are linked by a single wireless connection. Directional antennas are used to provided
the best possible range and signal quality.
The following topics describe how to set up the broadband network:
Assigning IP Addresses
Setting up the Master Radio
Setting up the Remote Radio
Testing the Wireless Connection
Deploying the Radios
Optimizing to Minimize Noise Interference
For ENCOM STRATOS plus Version 2.1.71
Page 392
© 2010-2015 Encom Wireless Data Solutions Inc.
ENCOM STRATOS plus
USER MANUAL
Assigning IP Addresses
If you are using new radios, you have to configure them with IP addresses that are compatible with
your private local network. Perform the following steps for each of the radios:
1. Run the ENCOM STRATOS application.
2. Connect the radio directly to your workstation or laptop. (Refer to the Connecting to a Radio
topic for more info.)
3. The radio will automatically be discovered by ENCOM STRATOS and appear in the Radio List
panel.
4. Use the Assign Static IP Address function to assign a new IP address to the radio. The new
address should be compatible with your local network. (The default IP address assigned by
ENCOM is 192.168.0.1).
Make sure that you assign different IP addresses to the master and remote radios.
Assigning the same IP address to two or more radios will negatively affect the
performance of your network, and will interfere with the radio configuration process.
For ENCOM STRATOS plus Version 2.1.71
Page 393
© 2010-2015 Encom Wireless Data Solutions Inc.
ENCOM STRATOS plus
USER MANUAL
Setting up the Master Radio
To set up the master radio:
1) Ensure that the radio has been assigned an IP address that is compatible with your local
network (see the Assigning IP Addresses topic)
2) Double-click on the radio. The Radio Configuration form will be displayed. Enter the appropriate
login credentials if prompted for them. The default user name is "admin" and the default
password is empty.
a) Select the Basic Settings tab. Configure the basic settings as required.
b) Select the Location tab. Choose the desired icon color, and select the Master icon. Select
the appropriate geographical location on the map.
c) Select the Radio 1 Tab. Configure the Radio Network Setup and Radio Parameter Setup
sections.
Because this is a master radio, set the Radio Mode option to Master. The remaining
options can be left to their default values.
d) Press the OK button to save the changes made to the radio configuration.
Most of the settings in the Radio 1 tab must be the same for both the master and
remote radios. If they are different, the two radios may not be able to communicate
with each other.
For ENCOM STRATOS plus Version 2.1.71
Page 394
© 2010-2015 Encom Wireless Data Solutions Inc.
ENCOM STRATOS plus
USER MANUAL
Setting up the Remote Radio
To set up the remote radio:
1) Ensure that the radio has been assigned an IP address that is compatible with your local
network (see the Assigning IP Addresses topic)
2) Double-click on the radio. The Radio Configuration form will be displayed. Enter the appropriate
login credentials if prompted for them. The default user name is "admin" and the default
password is empty.
a) Select the Basic Settings tab. Configure the basic settings as required.
b) Select the Location tab. Choose the desired icon color, and select the Master icon. Select
the appropriate geographical location on the map.
c) Select the Radio 1 Tab. Configure the Radio Network Setup and Radio Parameter Setup
sections.
Because this is a remote radio, set the Radio Mode option to Remote. The remaining
options can be left to their default values.
d) Press the OK button to save the changes made to the radio configuration.
Most of the settings in the Radio 1 tab must be the same for both the master and
remote radios. If they are different, the two radios may not be able to communicate
with each other.
For ENCOM STRATOS plus Version 2.1.71
Page 395
© 2010-2015 Encom Wireless Data Solutions Inc.
ENCOM STRATOS plus
USER MANUAL
Testing the Wireless Connection
After configuring the master and remote radios, and prior to deployment, you should test them in
bench or lab setting. The following steps outline the testing process for the two radios:
1. Connect the master radio directly to your computer via its Ethernet port.
2. Place the remote radio a reasonable distance away from the master. Don't bother aligning the
antennas. In fact, since the radios will be in such close proximity to each other, you may want
to mis-align the antennas so that the signal strength is not too high.
3. Apply power to both radios.
4. Run ENCOM STRATOS on your computer.
5. The master and remote radios should show up in the Radio List panel as being on-line.
6. Select the master radio. The Wireless Link Status panel should display the wireless link
established between the master and remote radios.
7. Perform a Bandwidth Test to verify that the wireless connection is able to transfer data at a
reasonable rate.
For ENCOM STRATOS plus Version 2.1.71
Page 396
© 2010-2015 Encom Wireless Data Solutions Inc.
ENCOM STRATOS plus
USER MANUAL
Deploying the Radios
After the radios have been configured and tested, they are ready to be deployed. The following steps
outline the deployment process for this simple network.
1. Connect the master radio directly to your private network via its Ethernet port.
2. Install the remote radio at the remote location. Mount the remote antenna at the highest
possible location (for example, a tower or the luminaire of a traffic light). Make sure that there
is a clear line of sight between the master and the remote antennas.
3. Manually align the antennas so that they point to each other with reasonable accuracy. Since
the antennas are highly directional, they need to be positioned properly in order for a
connection to be established. Also, make sure that both of the antennas are installed so that
the polarization stickers at the back of the antennas face the same direction.
4. Apply power to both radios.
5. Run ENCOM STRATOS on a computer that is connected to your private network.
6. The master and remote radios should show up in the Radio List panel as being on-line.
7. Make sure that the Wireless Link Status panel is visible. If it is not currently visible:
In the main menu, navigate to the View -> Panels item, and verify that the Wireless Link
Status option is checked.
If the Wireless Link Status panel is hidden behind another panel, click on the Wireless Link
Status tab to bring it to the front of the other panels:
8. In the Radio List, select the master radio (this is the radio that is closest to the computer
running STRATOS). If the antennas are properly aligned, the Wireless Link Status panel
should display the wireless links established between the master and remote radios.
9. Select the wireless link that is associated with the remote radio whose antenna you want to
align.
10.Manually adjust the master and remote antennas by small increments until you get the best
signal strength (RSSI) and connection quality (CCQ) readings. If you must decide, choose a
better connection quality over a better signal strength.
11.Physically tighten the antennas to their mountings. There should be no possibility of the
antenna moving out of alignment due to high winds, loading from ice and snow, etc.).
For ENCOM STRATOS plus Version 2.1.71
Page 397
© 2010-2015 Encom Wireless Data Solutions Inc.
ENCOM STRATOS plus
USER MANUAL
12.Repeat steps 9 and 11 for each antenna pair that you need to align.
Connection Quality is a more important factor than Signal Strength, as it tells you if
the signal will be stable (high connection quality) or unstable (low connection
quality).
You should always attempt to achieve the highest possible Connection Quality for
each radio link in the system.
The signal strength for any particular link should be between -40 dBm and -70 dBm,
with -55 dBm being ideal.
A signal strength above -40 dBm may lead to degraded performance because the
signal is too strong. Lower the radio’s output power to get a suitable signal strength.
A signal strength below -65 dBm could cause intermittent connectivity on the link.
You may need to add a repeater in the network to raise the signal strength to a
suitable value.
For ENCOM STRATOS plus Version 2.1.71
Page 398
© 2010-2015 Encom Wireless Data Solutions Inc.
ENCOM STRATOS plus
USER MANUAL
Optimizing to Minimize Noise Interference
You can minimize noise interference in your network by changing the polarization of the antennas to
the horizontal plane
For integrated antenna systems:
Mount the antenna so the polarization sticker is in the horizontal direction. There is a sticker on
the back of each broadband integrated radio that allows you to determine the direction of the
polarization.
When the radio is mounted with the Ethernet connector facing down, the antenna has a vertical
polarization.
To change to horizontal polarization, rotate the radio's mounting position 90 degrees so that the
Ethernet connector is facing to the right or to the left of the radio.
For ENCOM STRATOS plus Version 2.1.71
Page 399
© 2010-2015 Encom Wireless Data Solutions Inc.
ENCOM STRATOS plus
USER MANUAL
For non-integrated antenna systems:
Non-integrated units do not have polarization stickers, but can be properly oriented by changing
the direction the antenna elements are facing.
If a non-integrated antenna’s elements are pointing up and down (the elements are running
parallel to the pole), it is in the vertical position and has vertical polarization.
To change the polarization to horizontal, rotate the antenna 90 degrees, so the antenna’s
elements are parallel to the ground.
If possible, mount the antenna away from other radio equipment.
It is important to hermetically seal the connectors to prevent water ingress.
If possible, you should install the radios with the Ethernet connector at the
bottom. Make sure that all cables and connectors are appropriately sealed.
For ENCOM STRATOS plus Version 2.1.71
Page 400
© 2010-2015 Encom Wireless Data Solutions Inc.
ENCOM STRATOS plus
USER MANUAL
For ENCOM STRATOS plus Version 2.1.71
Page 401
© 2010-2015 Encom Wireless Data Solutions Inc.
ENCOM STRATOS plus
USER MANUAL
Appendix A: RF Exposure
FCC
This equipment has been designed to comply with FCC RF exposure requirements outlined in Parts
2.1091, 2.1093, and 15.247(b)(4). Deviation from the recommended installation may violate RF
exposure requirements.
To comply with FCC RF exposure requirements for mobile transmitting devices, only use or
install this transmitter at locations where there is at least 23cm (9”) separation distance
between the antenna and all persons.
Health Canada
The installer of this radio equipment must ensure that the antenna is located or pointed such that it
does not emit RF field in excess of Health Canada limits for the general population; consult Safety
Code 6, obtainable from Health Canada’s website at http://dsp-psd.pwgsc.gc.ca/Collection/H46-299-237E.pdf.
For ENCOM STRATOS plus Version 2.1.71
Page 402
© 2010-2015 Encom Wireless Data Solutions Inc.
ENCOM STRATOS plus
USER MANUAL
For ENCOM STRATOS plus Version 2.1.71
Page 403
© 2010-2015 Encom Wireless Data Solutions Inc.
ENCOM STRATOS plus
USER MANUAL
Appendix B: Declaration of Conformity
FCC
This device complies with Part 15 of the FCC Rules. Operation is subject to the following two
conditions:
(1) This device may not cause harmful interference
(2) This device must accept any interference received including interference that may cause
undesired operation.
Warning (Part 15.21)
Changes or modifications not expressly approved by the party responsible for compliance could
void the user’s authority to operate the equipment.
Industry Canada
This device complies with Industry Canada RSS-210 specifications.
For ENCOM STRATOS plus Version 2.1.71
Page 404
© 2010-2015 Encom Wireless Data Solutions Inc.
ENCOM STRATOS plus
USER MANUAL
For ENCOM STRATOS plus Version 2.1.71
Page 405
© 2010-2015 Encom Wireless Data Solutions Inc.
ENCOM STRATOS plus
USER MANUAL
Appendix C: Spanning Tree Protocol
STP (Spanning Tree Protocol) and RSTP (Rapid Spanning Tree Protocol) are used to ensure that
bridge loops are not created between the radios in a network. Loops cause broadcast and multicast
traffic to accumulate in the network until it is unable to transport normal traffic.
STP and RSTP also allow the network to define spare (redundant) links to provide automatic
backup paths if an active link fails, without having to manually enable or disable the spare links.
When STP or RSTP is enabled, the radios in the network will decide amongst themselves which
radio will be the STP root radio. This is the radio toward which all other radios will send their network
traffic.
For ENCOM STRATOS plus Version 2.1.71
Page 406
© 2010-2015 Encom Wireless Data Solutions Inc.
ENCOM STRATOS plus
USER MANUAL
In the following example, a network of radios is organized in a simple loop. The radio that is
physically connected to the network operation center's Ethernet backbone is configured as the
wireless network's STP preferred root.
Although the radios are physically connected in a loop, STP or RSTP will prevent packets from
being infinitely forwarded around the loop. What effectively happens is that one of the radio
connections is automatically blocked to prevent a loop from being formed. In the example, the
blocked link is shown in red.
For ENCOM STRATOS plus Version 2.1.71
Page 407
© 2010-2015 Encom Wireless Data Solutions Inc.
ENCOM STRATOS plus
USER MANUAL
If one of the radios fails, or one of the wireless links becomes compromised, STP or RSTP will
automatically reconfigure the network so that the remaining radios are still able to communicate with
each other. In the following example, a radio has failed (shown in red). The connection that had
previously been blocked is now re-enabled to ensure that the remaining good radios are still able to
communicate.
For ENCOM STRATOS plus Version 2.1.71
Page 408
© 2010-2015 Encom Wireless Data Solutions Inc.
ENCOM STRATOS plus
USER MANUAL
Selecting the STP Preferred Root
When STP or RSTP is enabled, the radios will decide amongst themselves which radio is the STP
root radio. The STP root radio is the radio toward which all other radios will send their network
traffic. In some cases, the radios may not make an optimal decision, and may lead to a network that
is not operating at peak efficiency.
The Preferred Root option allows you to force the network to elect a specific radio as the STP root
radio. You would normally use the following two criteria to determine if a radio should be configured
as an STP preferred root:
The radio is physically connected to the network operation center's Ethernet backbone.
The radio is physically located at the center of a large radio network.
In the first case, it is logical that a radio connected to the Ethernet backbone (i.e. a gateway radio)
be used as the STP root radio. Most of the network traffic will flow through this radio as commands
and controls are sent from the network operations center to the radios, and data is sent from the
radios to the network operations center. Making this radio the STP root will force the radios in the
network to choose the shortest possible path to the network operations center.
For ENCOM STRATOS plus Version 2.1.71
Page 409
© 2010-2015 Encom Wireless Data Solutions Inc.
ENCOM STRATOS plus
USER MANUAL
In the second case, choosing a central radio as the STP root will reduce the number of connections
between a radio and the STP root. This will normally lead to a more stable network. Note that in
such a network, the STP root radio should also be connected to the Ethernet backbone. This setup
will provide the most optimal path between the radios and the network operations center.
It is possible to define more than one preferred root radio for the network. In that case, the network
will choose the most appropriate of the preferred root radios to use as the STP root. If that radio
fails, the network will choose the most appropriate STP root from the remaining preferred root
radios.
For ENCOM STRATOS plus Version 2.1.71
Page 410
© 2010-2015 Encom Wireless Data Solutions Inc.
ENCOM STRATOS plus
USER MANUAL
In the following example, two radios are configured as STP root radios. Under normal operation, the
top radio (shown in red) would be elected by the network as the STP root radio. Because this radio
has failed, the network elects the remaining STP preferred root radio as the actual STP root radio.
The traffic is automatically re-routed to the new STP root radio to ensure that all functioning radios
can still access the network operations center.
For ENCOM STRATOS plus Version 2.1.71
Page 411
© 2010-2015 Encom Wireless Data Solutions Inc.
ENCOM STRATOS plus
USER MANUAL
STP / RSTP Network Considerations
STP and RSTP work best when the network contains a limited number of radios. The larger the
network, the longer it will take for it to stabilize, and the less stable it will be.
The following guidelines should be followed in order to deploy a trouble-free network:
Keep the number of radios in the network below 25. If you need to deploy more radios, you
should create several, smaller networks that are isolated by routers. Ensure that radios in
different networks cannot form WDS connections to each other (e.g. by physically separating
the radios and using directional antennas).
Ensure that there is a maximum of 7 connections separating any two radios in the network.
The following example shows a large network that has been divided into 3 separate segments. In
this example, each segment is connected to the Ethernet backbone via a router. The router
prevents STP control traffic in one segment from interfering with the other segments. Depending on
the capabilities of your router, it would be possible to use a single router, and to configure it so that
each of its Ethernet ports block the STP control traffic between segments. Specific information
regarding the configuration of the routers is beyond the scope of this document.
For ENCOM STRATOS plus Version 2.1.71
Page 412
© 2010-2015 Encom Wireless Data Solutions Inc.
ENCOM STRATOS plus
USER MANUAL
For ENCOM STRATOS plus Version 2.1.71
Page 413
© 2010-2015 Encom Wireless Data Solutions Inc.
ENCOM STRATOS plus
USER MANUAL
Appendix D: Quality of Service (QoS)
The Quality of Service (QoS) settings allow you to prioritize network traffic so that important traffic is
processed ahead of less important traffic.
Under normal circumstances, QoS will not perceptibly affect the behavior of the radio. If the radio
becomes heavily loaded, and is no longer able to handle all of the network traffic that is flowing
through it, the QoS features will automatically start discarding packets associated with the lower
priority traffic in order to maintain the integrity of the high priority traffic. Without QoS, all packets
would have the same probability of being discarded, regardless of their importance.
Although the QoS features will help alleviate issues caused by heavy network traffic,
they are not a substitute for proper network capacity planning. If you find that your
network is constantly congested, you should look at partitioning the network into
smaller segments, adding extra radios to provide more capacity, or replacing
existing radios with higher capacity radios.
ENCOM Radios support several QoS options, as shown in the following screenshot of the radio
configuration form's QoS tab:
The options are described in the following table.
QoS Type
Description
None
If you leave the Enable option unchecked, no QoS features are enabled.
The network traffic will not be prioritized. Under high load conditions, all
packets have the same probability of being discarded, regardless of their
importance. This can lead to difficulties managing the radio with ENCOM
STRATOS, drop-outs in video and audio streams and generally poor
response.
Priority Queues
If you check the Enable option, priority queue based QoS features are
enabled.
When priority queues are enabled, 8 priority queues are used to manage
the network traffic. Each queue is assigned a distinct priority level, in the
range of 0 to 7 (where 0 is the lowest priority and 7 is the highest priority).
Data packets flowing through the radio are assigned to the appropriate
queues based on priority rules. When the radio becomes heavily loaded,
For ENCOM STRATOS plus Version 2.1.71
Page 414
© 2010-2015 Encom Wireless Data Solutions Inc.
ENCOM STRATOS plus
USER MANUAL
the packets in the lower priority queues will be dropped before the traffic in
the higher priority queues. Higher priority traffic will be maintained at the
expense of the lower priority traffic.
ENCOM radio management traffic is always assigned to the highest
priority queue. This ensures that ENCOM STRATOS can always access
the radio in a timely fashion.
Other types of network traffic can be assigned to specific priority queues
by creating custom priority rules. Any remaining traffic is assigned to the
lowest priority queue.
In order to apply priority queue based QoS to the entire network, each radio
in the network must be configured with the same priority rules.
Use WMM
When this option is enabled, priorities are automatically assigned to
incoming packets based on their Wi-Fi Multimedia (WMM) priority. If VLANs
are being used, packet priorities are automatically assigned from the VLAN
priority of incoming packets. Priority queues are still used to manage the
packets, and to ensure that the higher priority traffic is maintained at the
expense of the lower priority traffic.
WMM is a prioritization scheme that is optimized for multimedia
applications, such as Voice over IP (VoIP), video streaming and other
applications that require low-latency and high-throughput.
Even if the radio is not heavily loaded, WMM can improve the quality of
audio and video streams by lessening the effect of (potentially bursty)
lower priority traffic.
The following table shows the type of traffic that is normally assigned to the
WMM priorities:
DSCP priorities
Priority
Traffic Type
0,3
Traffic from devices that lack QoS capabilities, or
traffic that is less sensitive to latency, but may be
affected by long delays.
1,2
Low priority traffic that does not have strict latency
or throughput requirements (e.g. file downloads).
4,5
Higher priority traffic. Normally used for video
streams (to prevent dropped frames and jittery
playback).
6,7
Highest priority. Normally used for VoIP traffic.
When this option is enabled, priorities are automatically assigned to
For ENCOM STRATOS plus Version 2.1.71
Page 415
© 2010-2015 Encom Wireless Data Solutions Inc.
ENCOM STRATOS plus
USER MANUAL
incoming packets based on their DSCP values. Priority queues are still
used to manage the packets, and to ensure that the higher priority traffic is
maintained at the expense of the lower priority traffic.
The following table shows the priorities that are assigned based for the
commonly used DSCP values. As usual, the higher the priority value, the
higher the priority.
DSCP Name
DSCP Value
Priority
CS0
0-7
0
CS1, AF11, AF12, AF13
8-15
1
CS2, AF21, AF22, AF23
16-23
2
CS3, AF31, AF32, AF33
24-31
3
CS4, AF41, AF42, AF43
32-39
4
CS5, EF
40-47
5
CS6
48-55
6
CS7
56-63
7
Use WMM and DSCP When both Use WMM and DSCP priorities options are enabled, priorities
priorities
are automatically assigned to incoming packets based on their DSCP
values, and WMM is used to improve the quality of audio and video
streams.
Refer to the following topic for a matrix that gives you some basic guidance as to what settings to
use for a number of scenarios:
QoS Recommentation Matrix
Refer to the following topics for detailed QoS examples for various network scenarios:
Using Priority Queues to Ensure Access to Radios
Using WMM to Simplify Radio Configuration
Using WMM to Improve Video Traffic
Using DSCP to Simplify Radio Configuration
For ENCOM STRATOS plus Version 2.1.71
Page 416
© 2010-2015 Encom Wireless Data Solutions Inc.
ENCOM STRATOS plus
USER MANUAL
Using DSCP and WMM to Improve Video Traffic
Using WMM to support VLAN Priority Traffic
For ENCOM STRATOS plus Version 2.1.71
Page 417
© 2010-2015 Encom Wireless Data Solutions Inc.
ENCOM STRATOS plus
USER MANUAL
QoS Recommentation Matrix
The following table gives you some basic guidance as to what settings to use for a number of
network scenarios. Note that this is not an exhaustive list. You may need to analyze your network in
order to choose the right options.
QoS Option to use
Requirement
Can be used with eMax
Must support WirelessN mode
Packet priorities must
be propagated through
Ethernet links
VLAN priorities are used
to prioritize traffic
Video and/or VOIP
integrity must be
maintained
For ENCOM STRATOS plus Version 2.1.71
Page 418
© 2010-2015 Encom Wireless Data Solutions Inc.
ENCOM STRATOS plus
USER MANUAL
Using Priority Queues to Ensure Access to Radios
The following diagram shows a typical ENCOM broadband network. In this scenario, a large amount
of video is being produced by the traffic cameras. The quantity of video traffic is great enough to
cause issues with STRATOS, and is causing timeout issues when trying to communicate with the
traffic controllers.
For ENCOM STRATOS plus Version 2.1.71
Page 419
© 2010-2015 Encom Wireless Data Solutions Inc.
ENCOM STRATOS plus
USER MANUAL
It was decided that the video traffic was less important than timely access to the radios and to the
traffic controllers. A priority queue based mechanism was implemented to prevent the video
streams from interfering with STRATOS and with the traffic controllers.
Assuming that the network operations center communicates with the traffic controllers on TCP port
6000, you would configure the radios' QoS settings as follows:
1. Enable the Network Traffic Prioritization option in the radio configuration form's QoS tab.
For ENCOM STRATOS plus Version 2.1.71
Page 420
© 2010-2015 Encom Wireless Data Solutions Inc.
ENCOM STRATOS plus
USER MANUAL
2. Create the traffic controller priority rule. To do this, click on the
button at the right of the
priority rule list, and enter the following information in the QoS Priority Rule form:
3. Press OK to create the new rule.
Since STRATOS will automatically assign the highest possible priority to the protocols that it uses
to communicate with the radios, you do not need to add any rules for that traffic.
To ensure that the network performs reliably, all of the radios in the network should be provisioned
with the same QoS settings.
For ENCOM STRATOS plus Version 2.1.71
Page 421
© 2010-2015 Encom Wireless Data Solutions Inc.
ENCOM STRATOS plus
USER MANUAL
Using WMM to Simplify Radio Configuration
The following diagram shows a simple ENCOM broadband network. In this scenario, a large amount
of video is being produced by the traffic cameras. The quantity of video traffic is great enough to
cause issues with STRATOS, and is causing timeout issues when trying to communicate with the
traffic controllers.
For ENCOM STRATOS plus Version 2.1.71
Page 422
© 2010-2015 Encom Wireless Data Solutions Inc.
ENCOM STRATOS plus
USER MANUAL
It was decided that the video traffic was less important than timely access to the radios and to the
traffic controllers.
By analyzing the network, it was noted that the repeater radios are only used to transfer network
traffic between the network operation center and the devices connected to the remote radios.
Because of this, it is possible to use the WMM QoS option to simplify the configuration of the
repeater radios.
The QoS configuration settings for each of the 5 radios are described in the following topics:
Master and Remote Radio Configuration
Repeater Radio Configuration
Because WMM is not compatible with the eMax protocol, you must disable eMax in
the wireless radio cards (and lose the throughput enhancements available when
eMax is enabled).
If you are using Point-to-Multipoint radios configured for N-Mode operation, you
cannot disable eMax, and therefore cannot use WMM. In that case, use the priority
queue mechanism to implement QoS.
For ENCOM STRATOS plus Version 2.1.71
Page 423
© 2010-2015 Encom Wireless Data Solutions Inc.
ENCOM STRATOS plus
USER MANUAL
Master and Remote Radio Configuration
Assuming that the network operations center communicates with the traffic controllers on TCP port
6000, you would configure the master and remote radios (radios 1, 4 and 5 in the diagram) as
follows:
1. Enable the Network Traffic Prioritization and WMM options in the radio configuration
form's QoS tab.
For ENCOM STRATOS plus Version 2.1.71
Page 424
© 2010-2015 Encom Wireless Data Solutions Inc.
ENCOM STRATOS plus
USER MANUAL
2. Create the traffic controller priority rule. To do this, click on the
button at the right of the
priority rule list, and enter the following information in the QoS Priority Rule form:
3. Press OK to create the new rule.
Note that STRATOS will automatically assign the highest possible priority to the protocols that it
uses to communicate with the radios. You do not need to add any rules for this traffic.
For ENCOM STRATOS plus Version 2.1.71
Page 425
© 2010-2015 Encom Wireless Data Solutions Inc.
ENCOM STRATOS plus
USER MANUAL
Repeater Radio Configuration
The repeater radios (radios 2 and 3 in the diagram) would be configured as follows:
When WMM is enabled, the repeater radios will automatically prioritize the packets received on their
wireless interfaces.There is no reason to specify the custom traffic rules.
For ENCOM STRATOS plus Version 2.1.71
Page 426
© 2010-2015 Encom Wireless Data Solutions Inc.
ENCOM STRATOS plus
USER MANUAL
Using WMM to Improve Video Traffic
The following diagram shows a slightly more complex ENCOM broadband network. In this scenario,
the radio network carries video and traffic controller data, as well as client device data (in this case,
from laptops used by field personnel).
For ENCOM STRATOS plus Version 2.1.71
Page 427
© 2010-2015 Encom Wireless Data Solutions Inc.
ENCOM STRATOS plus
USER MANUAL
Under normal operation, the network is not excessively loaded. However, when several users were
accessing the network with their laptops, it was noted that the network performance degraded, and
the video feeds suffered from dropped frames and jerky behavior.
In order to prevent the laptop traffic from impacting the more important video and controller traffic, it
was decided use the WMM prioritization scheme. This scheme allows the video and traffic
controller protocols to be given higher priority, and has the added benefit of optimizing the video
streams.
By analyzing the network, it was also noted that the repeater radios are only used to transfer
network traffic between the network operation center and the devices connected to the remote
radios. Because of this, it is also possible to use the WMM QoS option to simplify the configuration
of the repeater radios.
The QoS configuration settings for each of the 5 radios, are described in the following topics:
Master and Remote Radio Configuration
Repeater Radio Configuration
Because WMM is not compatible with the eMax protocol, you must disable eMax in
the wireless radio cards (and lose the throughput enhancements available when
eMax is enabled).
If you are using Point-to-Multipoint radios configured for N-Mode operation, you
cannot disable eMax, and therefore cannot use WMM. In that case, use the priority
queue mechanism to implement QoS.
For ENCOM STRATOS plus Version 2.1.71
Page 428
© 2010-2015 Encom Wireless Data Solutions Inc.
ENCOM STRATOS plus
USER MANUAL
Master and Remote Radio Configuration
For this example, assume that:
The network operations center communicates with the traffic controllers on TCP port 6000.
The video cameras stream video on UDP port 5000.
The master and remote radios (radios 1, 4 and 5 in the diagram) would be configured as follows:
1. Enable the Network Traffic Prioritization and WMM options in the radio configuration
form's QoS tab.
For ENCOM STRATOS plus Version 2.1.71
Page 429
© 2010-2015 Encom Wireless Data Solutions Inc.
ENCOM STRATOS plus
USER MANUAL
2. Create the traffic controller priority rule. To do this, click on the
button at the right of the
priority rule list, and enter the following information in the QoS Priority Rule form:
3. Press OK to create the new rule.
For ENCOM STRATOS plus Version 2.1.71
Page 430
© 2010-2015 Encom Wireless Data Solutions Inc.
ENCOM STRATOS plus
USER MANUAL
4. Create the video camera priority rule. To do this, click on the
button at the right of the
priority rule list, and enter the following information in the QoS Priority Rule form:
5. Press OK to create the new rule.
Note that STRATOS will automatically assign the highest possible priority to the protocols that it
uses to communicate with the radios. You do not need to add any rules for this traffic.
For ENCOM STRATOS plus Version 2.1.71
Page 431
© 2010-2015 Encom Wireless Data Solutions Inc.
ENCOM STRATOS plus
USER MANUAL
Repeater Radio Configuration
The repeater radios (radios 2 and 3 in the diagram) would be configured as follows:
When WMM is enabled, the repeater radios will automatically prioritize the packets received on their
wireless interfaces.There is no reason to specify the custom traffic rules.
For ENCOM STRATOS plus Version 2.1.71
Page 432
© 2010-2015 Encom Wireless Data Solutions Inc.
ENCOM STRATOS plus
USER MANUAL
Using DSCP to Simplify Radio Configuration
The following diagram shows a slightly more complex ENCOM broadband network. In this scenario,
the radio network carries video and traffic controller data, as well as client device data (in this case,
from laptops used by field personnel).
For ENCOM STRATOS plus Version 2.1.71
Page 433
© 2010-2015 Encom Wireless Data Solutions Inc.
ENCOM STRATOS plus
USER MANUAL
By analyzing the network, it was noted that the repeater radios are only used to transfer network
traffic between the network operation center and the devices connected to the remote radios.
For performance reasons, pairs of single radios connected via their Ethernet ports are used as
repeaters. WMM is problematic in this scenario since the WMM priorities are lost when the data
packets pass through the Ethernet link. To address this issue, DSCP priorities can be used to
simplify the configuration of the repeater radios.
The QoS configuration settings for each of the 7 radios, are described in the following topics:
Master and Remote Radio Configuration
Repeater Radio Configuration
DSCP can only be used with IP-based traffic. If the protocol used to communicate
with remote devices is not based on the IP-based protocols, use the priority queue
mechanism to implement QoS.
For ENCOM STRATOS plus Version 2.1.71
Page 434
© 2010-2015 Encom Wireless Data Solutions Inc.
ENCOM STRATOS plus
USER MANUAL
Master and Remote Radio Configuration
For this example, assume that:
The network operations center communicates with the traffic controllers on TCP port 6000.
The video cameras stream video on UDP port 5000.
The master and remote radios (radios 1, 4 and 5 in the diagram) would be configured as follows:
1. Enable the Network Traffic Prioritization and DSCP priorities options in the radio
configuration form's QoS tab.
For ENCOM STRATOS plus Version 2.1.71
Page 435
© 2010-2015 Encom Wireless Data Solutions Inc.
ENCOM STRATOS plus
USER MANUAL
2. Create the traffic controller priority rule. To do this, click on the
button at the right of the
priority rule list, and enter the following information in the QoS Priority Rule form:
3. Press OK to create the new rule.
For ENCOM STRATOS plus Version 2.1.71
Page 436
© 2010-2015 Encom Wireless Data Solutions Inc.
ENCOM STRATOS plus
USER MANUAL
4. Create the video camera priority rule. To do this, click on the
button at the right of the
priority rule list, and enter the following information in the QoS Priority Rule form:
5. Press OK to create the new rule.
Note that STRATOS will automatically assign the highest possible priority to the protocols that it
uses to communicate with the radios. You do not need to add any rules for this traffic.
For ENCOM STRATOS plus Version 2.1.71
Page 437
© 2010-2015 Encom Wireless Data Solutions Inc.
ENCOM STRATOS plus
USER MANUAL
Repeater Radio Configuration
The repeater radios (radios 2 and 3 in the diagram) would be configured as follows:
When DSCP priorities are enabled, the repeater radios will automatically prioritize received packets
based on their DSCP values.There is no reason to specify the custom traffic rules.
For ENCOM STRATOS plus Version 2.1.71
Page 438
© 2010-2015 Encom Wireless Data Solutions Inc.
ENCOM STRATOS plus
USER MANUAL
Using DSCP and WMM to Improve Video Traffic
The following diagram shows a slightly more complex ENCOM broadband network. In this scenario,
the radio network carries video and traffic controller data, as well as client device data (in this case,
from laptops used by field personnel).
For ENCOM STRATOS plus Version 2.1.71
Page 439
© 2010-2015 Encom Wireless Data Solutions Inc.
ENCOM STRATOS plus
USER MANUAL
Under normal operation, the network is not excessively loaded. However, when several users were
accessing the network with their laptops, it was noted that the network performance degraded, and
the video feeds suffered from dropped frames and jerky behavior.
In order to prevent the laptop traffic from impacting the more important video and controller traffic, it
was desired to use the WMM prioritization scheme. Unfortunately, WMM priorities are lost when the
data packets pass trough the Ethernet link. To address this issue, DSCP priorities were used to
ensure that the packet priorities were preserved across the Ethernet link. WMM prioritization was
enabled as well to further enhance the quality of the video stream.
The QoS configuration settings for each of the 7 radios, are described in the following topics:
Master and Remote Radio Configuration
Repeater Radio Configuration
DSCP can only be used with IP-based traffic. If the protocol used to communicate
with remote devices is not based on the IP-based protocols, use the priority queue
mechanism to implement QoS.
For ENCOM STRATOS plus Version 2.1.71
Page 440
© 2010-2015 Encom Wireless Data Solutions Inc.
ENCOM STRATOS plus
USER MANUAL
Master and Remote Radio Configuration
For this example, assume that:
The network operations center communicates with the traffic controllers on TCP port 6000.
The video cameras stream video on UDP port 5000.
The master and remote radios (radios 1, 4 and 5 in the diagram) would be configured as follows:
1. Enable the Network Traffic Prioritization, WMM, and DSCP priorities options in the radio
configuration form's QoS tab.
For ENCOM STRATOS plus Version 2.1.71
Page 441
© 2010-2015 Encom Wireless Data Solutions Inc.
ENCOM STRATOS plus
USER MANUAL
2. Create the traffic controller priority rule. To do this, click on the
button at the right of the
priority rule list, and enter the following information in the QoS Priority Rule form:
3. Press OK to create the new rule.
For ENCOM STRATOS plus Version 2.1.71
Page 442
© 2010-2015 Encom Wireless Data Solutions Inc.
ENCOM STRATOS plus
USER MANUAL
4. Create the video camera priority rule. To do this, click on the
button at the right of the
priority rule list, and enter the following information in the QoS Priority Rule form:
5. Press OK to create the new rule.
Note that STRATOS will automatically assign the highest possible priority to the protocols that it
uses to communicate with the radios. You do not need to add any rules for this traffic.
For ENCOM STRATOS plus Version 2.1.71
Page 443
© 2010-2015 Encom Wireless Data Solutions Inc.
ENCOM STRATOS plus
USER MANUAL
Repeater Radio Configuration
The repeater radios (radios 2 and 3 in the diagram) would be configured as follows:
When DSCP priorities are enabled, the repeater radios will automatically prioritize received packets
based on their DSCP values. WMM will further enhance the quality of the video stream. There is no
reason to specify the custom traffic rules.
For ENCOM STRATOS plus Version 2.1.71
Page 444
© 2010-2015 Encom Wireless Data Solutions Inc.
ENCOM STRATOS plus
USER MANUAL
Using WMM to Support VLAN Priority Traffic
The following diagram shows an ENCOM broadband network where VLANs are being used to
segregate the management, traffic controller and video camera network traffic. The quantity of video
traffic is great enough to cause issues with STRATOS, and is causing timeout issues when trying
to communicate with the traffic controllers.
For ENCOM STRATOS plus Version 2.1.71
Page 445
© 2010-2015 Encom Wireless Data Solutions Inc.
ENCOM STRATOS plus
USER MANUAL
It was decided that the video traffic was less important than timely access to the radios and to the
traffic controllers. Because VLANs are already being used to segregate the various types of network
traffic, they can also be used to prioritize the traffic. To do this, the VLAN enabled switches (A, B
and C in the diagram) would be configured to give the appropriate priorities to the camera and
controller traffic:
Network Traffic Type
VLAN Priority
Traffic Controller
7 (highest priority)
Traffic Cameras
5 (high priority)
The WMM prioritization mechanism would be used to prioritize the network traffic over the wireless
links (to ensure that the high priority traffic controller packets are sent at the expense of the lower
priority camera traffic).
Each of the 5 radios in the network would be configured as follows:
For more information on the VLAN capabilities of ENCOM radios, refer to Appendix E: VLAN
Support.
Because WMM is not compatible with the eMax protocol, you must disable eMax in
the wireless radio cards (and lose the throughput enhancements available when
eMax is enabled).
If you are using Point-to-Multipoint radios configured for N-Mode operation, you
cannot disable eMax, and therefore cannot use WMM. In that case, use the priority
queue mechanism to implement QoS.
For ENCOM STRATOS plus Version 2.1.71
Page 446
© 2010-2015 Encom Wireless Data Solutions Inc.
ENCOM STRATOS plus
USER MANUAL
For ENCOM STRATOS plus Version 2.1.71
Page 447
© 2010-2015 Encom Wireless Data Solutions Inc.
ENCOM STRATOS plus
USER MANUAL
Appendix E: VLAN Support
Short for "Virtual LAN", a VLAN is a network of computers, servers and other network devices that
behave as if they are connected to the same wire, even though they may be physically located on
different LAN segments. A LAN segment is a section of the local area network that is used by a
particular workgroup or department, and that is separated from the rest of the LAN by a router or
switch.
Multiple VLANs can coexist on the same physical network, but the devices that are part of a
particular VLAN are invisible to the devices in other VLANs. This behavior can help increase network
security by reducing the number of devices that have access to each other. A compromise in one
VLAN would not affect the resources in the other VLANs.
VLANs can also improve the performance of the network. VLANs can be used to restrict the
dissemination of broadcast and device-to-device traffic between network segments. Network traffic
associated with a particular VLAN will not be forwarded by the switch or router to other network
segments that are associated with other VLANs.
VLAN Components
The following table describes the most common items associated with VLANs.
Term
Description
Access Port
The Ethernet port on a switch, router, or ENCOM radio that provides a
connection for network devices (workstations, cameras, traffic controllers,
etc.).
Trunk Port
The Ethernet port on a switch, router, or ENCOM radio that carries traffic
from more than one VLAN.
Tagging
The process of adding the VLAN ID to a network data packet's Ethernet
header.
VLAN ID
A number used to identify a specific VLAN.
Native VLAN
The VLAN for which the tagging process is not performed. The native VLAN
typically has a VLAN ID of 1.
Default VLAN
The VLAN assigned to an Ethernet port by default. The default VLAN is
typically the native VLAN.
Management VLAN
The VLAN used to manage the switch, router or radio. This VLAN is
assigned an IP address so that the device can be accessed using the
appropriate management tools.
For ENCOM STRATOS plus Version 2.1.71
Page 448
© 2010-2015 Encom Wireless Data Solutions Inc.
ENCOM STRATOS plus
USER MANUAL
The following diagram shows the relationships between these items:
In the example, two VLANs have been defined and assigned to the appropriate access ports:
Management VLAN (ID = 10)
Secure VLAN (ID = 20)
The management VLAN is used to isolate the workstations that are used to view and change the
configuration settings of the switches, routers and radios that are part of the network infrastructure.
The Secure VLAN is used to isolate the workstations that access sensitive resources (both the
workstations and the sensitive resources would be connected to the Secure VLAN).
The Native VLAN is used by non-secured workstations to access the non-sensitive network
resources.
Access to the company network is provided by the trunk port that routes all of the tagged and
untagged VLAN traffic onto the corporate LAN.
For ENCOM STRATOS plus Version 2.1.71
Page 449
© 2010-2015 Encom Wireless Data Solutions Inc.
ENCOM STRATOS plus
USER MANUAL
Example VLAN Setup
The following diagram shows a simple VLAN implementation. For security reasons, it was decided
that the network management, vehicle traffic monitoring and vehicle traffic control functions need to
be segregated.
For ENCOM STRATOS plus Version 2.1.71
Page 450
© 2010-2015 Encom Wireless Data Solutions Inc.
ENCOM STRATOS plus
USER MANUAL
VLAN enabled switch #1 is located in the Network Operations Center. It is configured to support the
management, traffic monitoring and traffic control VLANs on the first three Ethernet ports
respectively. A fourth port, located in the bottom row of Ethernet ports, is configured as the trunk
port. Workstations connected to the first Ethernet port will only see network management data,
workstations connected to the second Ethernet port will only see traffic monitoring data, and
workstations connected to the third Ethernet port will only see traffic control data. The bottom
Ethernet port is configured as a trunk port, and carries data from all VLANs.
VLAN enabled switch #2 is located in a traffic control cabinet. The first Ethernet port is configured as
a trunking port, and carries data from all VLANs. The bottom Ethernet ports are configured to allow
traffic monitoring data to the cameras, and traffic control data to the traffic controller.
The colored lines show the traffic that is present on the various network connections. In this
example, data associated with the cameras (control commands to the cameras and video streams
from the cameras) will be present in the green and black links. The camera data will not be present
in the blue and orange links.
For ENCOM STRATOS plus Version 2.1.71
Page 451
© 2010-2015 Encom Wireless Data Solutions Inc.
ENCOM STRATOS plus
USER MANUAL
ENCOM Radio VLAN Support
By default, VLAN tagged data will flow through ENCOM radios. If you plan to use the ENCOM radios
solely as a carrier (i.e. a wire) between two VLAN enabled switches or routers, you do not have to
make any configuration changes.
If you need the radios to perform specific VLAN related operations, you will need to set the
appropriate configuration options in the VLAN sub-tab of the radio configuration form's Network tab.
The following VLAN operations are supported by the ENCOM radios:
Specifying a Management VLAN
Client tagging
Client Tagging with a Management VLAN
Pruning VLANs
For ENCOM STRATOS plus Version 2.1.71
Page 452
© 2010-2015 Encom Wireless Data Solutions Inc.
ENCOM STRATOS plus
USER MANUAL
Specifying a Management VLAN
By default, ENCOM radios are assigned a single IP address. This IP address is used to manage
and configure the radio using the native (untagged) VLAN.
If you want to use a specific management VLAN to access the radios, you will need to configure the
Management VLAN, Management Address and Access Port Address sections of the radio
configuration form's VLAN sub-tab:
When Management VLAN tagging is enabled, the radio is assigned two IP addresses: a
management address will be used to access the radio using the management VLAN, and an
access port address that will be used to access the radio using untagged traffic. You will be able to
access the radio using either address from either the wireless or Ethernet interfaces. Because of
this, you will need to prevent untagged data from being allowed onto the wireless part of the network
if you want to restrict radio management activities to the management VLAN only.
For ENCOM STRATOS plus Version 2.1.71
Page 453
© 2010-2015 Encom Wireless Data Solutions Inc.
ENCOM STRATOS plus
USER MANUAL
Client Tagging
By default, all of the ENCOM radio interfaces (wireless and Ethernet) operate as VLAN trunks. All
tagged and untagged data will flow through the interfaces unhindered.
If you want to limit the network traffic on the radio's Ethernet port to a specific VLAN, you will need to
configure the the Client Tagging, Management Address and Access Port Address sections of the
radio configuration form's VLAN sub-tab:
When Client Tagging is enabled, the radio is assigned two IP addresses: one address will be used
by the radio's wireless interfaces, and the other will be used for the radio's Ethernet port. Both IP
addresses can be used to manage the radio.
Only tagged network data packets (using VLAN ID 20) are allowed on the Ethernet port. Incoming
packets associated with VLAN ID 20 are automatically untagged and forwarded to the client devices.
Outgoing packets sent by the client devices are automatically tagged with VLAN ID 20.
The management and client IP addresses are assigned to the radio as shown in the following
diagram:
The management IP address, network mask and default gateway must be the compatible with the
other radios in the wireless network.
For ENCOM STRATOS plus Version 2.1.71
Page 454
© 2010-2015 Encom Wireless Data Solutions Inc.
ENCOM STRATOS plus
USER MANUAL
Any devices that are connected to the radio's Ethernet port must be assigned IP addresses and
network masks that are compatible with the specified client VLAN.
For ENCOM STRATOS plus Version 2.1.71
Page 455
© 2010-2015 Encom Wireless Data Solutions Inc.
ENCOM STRATOS plus
USER MANUAL
Client Tagging with a Management VLAN
In this scenario, a specific management VLAN is used to access the radios, and the network traffic
on the radio's Ethernet port is limited to a specific VLAN.
In this case, you will need to configure the Management VLAN, Client Tagging, Management
Address and Access Port Address sections of the radio configuration form's VLAN sub-tab:
Like the case where only the Client Tagging option is enabled, the radio will be assigned two IP
addresses: one address will be used by the radio's wireless interfaces, and the other will be used
for the radio's Ethernet port. Both IP addresses can be used to manage the radio. The only
difference is that the radio management traffic must use the specified management VLAN.
Only tagged network data packets (using VLAN ID 20) are allowed on the Ethernet port. Incoming
packets associated with VLAN ID 20 are automatically untagged and forwarded to the client devices.
Outgoing packets sent by the client devices are automatically tagged with VLAN ID 20.
The management and client IP addresses are assigned to the radio as shown in the following
diagram:
The management IP address, network mask and default gateway must be the compatible with the
other radios in the wireless network.
For ENCOM STRATOS plus Version 2.1.71
Page 456
© 2010-2015 Encom Wireless Data Solutions Inc.
ENCOM STRATOS plus
USER MANUAL
Any devices that are connected to the radio's Ethernet port must be assigned IP addresses and
network masks that are compatible with the specified client VLAN.
For ENCOM STRATOS plus Version 2.1.71
Page 457
© 2010-2015 Encom Wireless Data Solutions Inc.
ENCOM STRATOS plus
USER MANUAL
Pruning VLANs
By default, the ENCOM radios will forward all VLAN traffic to all of the radios to which it is
connected. In certain situations (e.g. for performance or security reasons), you may want to prevent
a radio from forwarding traffic from certain VLANs to other radios. In order to do this, you will need to
configure the VLAN Pruning section of the radio configuration form's VLAN sub-tab:
When VLAN pruning is enabled, packets that are tagged with the VLAN IDs specified in the VLAN
IDs field will not be forwarded to other radios.
Please refer to the following topics for more information on the two most common VLAN pruning
scenarios:
VLAN Pruning for Performance
VLAN Pruning for Security
For ENCOM STRATOS plus Version 2.1.71
Page 458
© 2010-2015 Encom Wireless Data Solutions Inc.
ENCOM STRATOS plus
USER MANUAL
VLAN Pruning for Performance
VLAN pruning can be used to increase the performance of a network by preventing traffic from being
forwarded to radios that do not need it. For example, in the diagram shown below, a radio network
provides coverage for a large town.
To reduce the network traffic overhead, two VLANs were defined: VLAN ID 10, and VLAN ID 20. The
VLANs are used to separate the network traffic associated with the radios in the west side of the
town from the network traffic associated with the radios in the east side of the town.
The gateway radio, and the two downstream radios that are connected to the gateway radio, carry
traffic for both VLANs. The left-hand downstream radio is configured to prune VLAN ID 20, and the
right-hand downstream radio is configured to prune VLAN ID 10. Because of this, only the network
packets associated with VLAN ID 10 are forwarded to the west-side radios, and only the network
packets associated with VLAN ID 20 are forwarded to the west-side radios.
Note that the same effect could be obtained by using a dual radio for the gateway radio, and
specifying a different SSID for each of the radio's wireless interface cards. The east-side radios
would be configured with one of the SSIDs, and the west-side radios would be configured with the
other SSID. Since radios can only communicate with other radios that use the same SSID, this
would effectively isolate the east-side network traffic from the west-side network traffic.
For ENCOM STRATOS plus Version 2.1.71
Page 459
© 2010-2015 Encom Wireless Data Solutions Inc.
ENCOM STRATOS plus
USER MANUAL
VLAN Pruning for Security
VLAN pruning can be used to increase security by preventing access to sensitive network
resources. The following diagram shows a small network.
The radios on the right hand side of the diagram carry sensitive traffic that network administrator
wants to limit access to. The sensitive traffic was assigned to VLAN ID 10, and the remaining traffic
For ENCOM STRATOS plus Version 2.1.71
Page 460
© 2010-2015 Encom Wireless Data Solutions Inc.
ENCOM STRATOS plus
USER MANUAL
assigned to VLAN ID 100. The left-hand radio that is downstream from the gateway radio was
configure to prune VLAN ID 10. This prevents any sensitive traffic from being routed to the remaining
left-hand radios.
Note that the VLAN pruning is configured at each ENCOM radio. It is not compatible with the pruning
functionality of the VLAN Trunking Protocol (VTP) implemented by Cisco switches.
For ENCOM STRATOS plus Version 2.1.71
Page 461
© 2010-2015 Encom Wireless Data Solutions Inc.
ENCOM STRATOS plus
USER MANUAL
Detailed VLAN Configuration Example
The following diagram shows a small radio network that uses VLANs to isolate the network traffic
between network management, vehicle traffic monitoring and vehicle traffic control roles.
For ENCOM STRATOS plus Version 2.1.71
Page 462
© 2010-2015 Encom Wireless Data Solutions Inc.
ENCOM STRATOS plus
USER MANUAL
A management VLAN (ID = 10) is used to configure and monitor the radios, switches and routers in
the network.
Low sensitivity vehicle traffic monitoring data (video feeds) is assigned to VLAN ID 20. More
sensitive vehicle traffic control data is assigned to VLAN ID 30.
Traffic controller data is prevented from being routed to the left hand portion of the network by the
appropriate VLAN pruning setting on radio 2.
The VLAN configuration settings for each of the 5 radios, and for each of the VLAN enabled
switches, are described in the following topics:
VLAN Enabled Switch #1 Configuration
Radio 1 VLAN Configuration
Radio 2 VLAN Configuration
Radio 3 VLAN Configuration
Radio 4 VLAN Configuration
Radio 5 VLAN Configuration
VLAN Enabled Switch #2 Configuration
For ENCOM STRATOS plus Version 2.1.71
Page 463
© 2010-2015 Encom Wireless Data Solutions Inc.
ENCOM STRATOS plus
USER MANUAL
VLAN Enabled Switch #1 Configuration
VLAN enabled switch #1 would normally be located in the Network Operations Center.
The switch is configured to support the management, traffic monitoring and traffic control VLANs on
the first three Ethernet ports respectively. Workstations connected to the first Ethernet port will only
see network management data, workstations connected to the second Ethernet port will only see
traffic monitoring data, and workstations connected to the third Ethernet port will only see traffic
control data.
The bottom Ethernet port is configured as a trunking port, and carries data from all VLANs.
For ENCOM STRATOS plus Version 2.1.71
Page 464
© 2010-2015 Encom Wireless Data Solutions Inc.
ENCOM STRATOS plus
USER MANUAL
Radio 1 VLAN Configuration
The VLAN configuration for Radio 1 would be as follows:
The Management VLAN is enabled and set to VLAN ID 10. The IP address of the radio's wireless
interface is set to a value that is compatible with the other radios in the network.
The radio's Ethernet port is connected to the trunk port on VLAN enabled switch #1. It is assigned
an IP address that can be used for local (on-site) access.
As configured, the radio will carry network traffic from all VLANs.
For ENCOM STRATOS plus Version 2.1.71
Page 465
© 2010-2015 Encom Wireless Data Solutions Inc.
ENCOM STRATOS plus
USER MANUAL
Radio 2 VLAN Configuration
The VLAN configuration for Radio 2 would be as follows:
The Management VLAN is enabled and set to VLAN ID 10. The IP address of the radio's wireless
interface is set to a value that is compatible with the other radios in the network. Although the radio's
Ethernet interface is not used, it is still assigned an IP address that can be used for local (on-site)
access.
To prevent traffic controller data from being routed to the left-hand radios, VLAN ID 20 is pruned by
the radio. Only network traffic from VLAN ID 10 and 30 will be allowed on the left-hand radios.
For ENCOM STRATOS plus Version 2.1.71
Page 466
© 2010-2015 Encom Wireless Data Solutions Inc.
ENCOM STRATOS plus
USER MANUAL
Radio 3 VLAN Configuration
The VLAN configuration for Radio 3 would be as follows:
The Management VLAN is enabled and set to VLAN ID 10. The IP address of the radio's wireless
interface is set to a value that is compatible with the other radios in the network. Although the radio's
Ethernet interface is not used, it is still assigned an IP address that can be used for local (on-site)
access.
As configured, the radio will carry network traffic from all VLANs.
For ENCOM STRATOS plus Version 2.1.71
Page 467
© 2010-2015 Encom Wireless Data Solutions Inc.
ENCOM STRATOS plus
USER MANUAL
Radio 4 VLAN Configuration
The VLAN configuration for Radio 4 would be as follows:
The Management VLAN is enabled and set to VLAN ID 10. The IP address of the radio's wireless
interface is set to a value that is compatible with the other radios in the network.
According to the network diagram, only traffic cameras are connected to this radio. Because of this,
it is possible to perform VLAN tagging within the radio. The radio is therefore configured to tag the
Ethernet traffic with VLAN ID 30. This will present the network traffic from VLAN ID 30 as untagged
data on the radio's Ethernet port. Data sent from the cameras will automatically be tagged with
VLAN ID 30 by the radio. Network traffic from the other VLANs will not be present on the Ethernet
port.
Since the radio's Ethernet interface is directly connected to the cameras, it (and the cameras) must
be assigned an IP address that is compatible with the network address range assigned to VLAN ID
30.
For ENCOM STRATOS plus Version 2.1.71
Page 468
© 2010-2015 Encom Wireless Data Solutions Inc.
ENCOM STRATOS plus
USER MANUAL
Radio 5 VLAN Configuration
The VLAN configuration for Radio 5 would be as follows:
The Management VLAN is enabled and set to VLAN ID 10. The IP address of the radio's wireless
interface is set to a value that is compatible with the other radios in the network.
According to the network diagram, both traffic cameras and controllers are connected to this radio.
Each type of device is assigned to a different VLAN. Since ENCOM radios only support a single
Ethernet port, they are not able to tag traffic for both VLANs. Because of this, a small managed
switch (VLAN enabled switch #2) is used to tag the traffic associated with the devices. The radio's
Ethernet port is connected to the trunk port on the switch. It is assigned an IP address that can be
used for local (on-site) access.
As configured, the radio will carry network traffic from all VLANs.
For ENCOM STRATOS plus Version 2.1.71
Page 469
© 2010-2015 Encom Wireless Data Solutions Inc.
ENCOM STRATOS plus
USER MANUAL
VLAN Enabled Switch #2 Configuration
VLAN enabled switch #2 would normally be located in a cabinet located close to a road or
intersection.
The center port located in the top row of Ethernet ports is configured as a trunk port, and carries
data from all VLANs.
The first and second ports in the bottom row of Ethernet ports is configured to support the traffic
monitoring VLAN (ID = 20). The third port is configured to support the traffic controller VLAN (ID =
30).
For ENCOM STRATOS plus Version 2.1.71
Page 470
© 2010-2015 Encom Wireless Data Solutions Inc.
ENCOM STRATOS plus
USER MANUAL
For ENCOM STRATOS plus Version 2.1.71
Page 471
© 2010-2015 Encom Wireless Data Solutions Inc.
ENCOM STRATOS plus
USER MANUAL
Appendix F: Network Filters
The following example shows a small network used to carry video from traffic cameras to the
network operations center. The traffic cameras have been configured to multicast the video data so
that any workstation connected to the network operation center's Ethernet backbone can view the
traffic video streams. The two master radios are also connected directly to the Ethernet backbone
without any intervening switches or routers.
The green arrows highlight the directions in which the video traffic can flow. By default, the video
traffic will flow unimpeded from any radio to any radio.
Due to the bridging architecture used by the Encom radio network, the video traffic generated by
each camera is automatically forwarded to all of the radios in the network. This can lead to
significant network congestion if a large number of cameras are present in the network.
For ENCOM STRATOS plus Version 2.1.71
Page 472
© 2010-2015 Encom Wireless Data Solutions Inc.
ENCOM STRATOS plus
USER MANUAL
For example, consider the video collected by the camera attached to the 'Remote A2' radio. To
reach the network operation center workstations, the video traffic needs to pass through the
'Repeater A1' and 'Master A' radios. There is no need for the video to be forwarded to any other
radio in the network. The path required by the video is highlighted in green in the following diagram:
By applying the appropriate multicast network filters, you can prevent the video from being
forwarded to radios that do not require it. The following topics describe how to configure the radios
to prevent unnecessary video traffic in the network:
Master Radio Configuration
Repeater Radio Configuration
Remote Radio Configuration
For ENCOM STRATOS plus Version 2.1.71
Page 473
© 2010-2015 Encom Wireless Data Solutions Inc.
ENCOM STRATOS plus
USER MANUAL
When the network filters have been properly configured, the multicast traffic will only be forwarded
to the required upstream radios, as shown in the following diagram:
The green arrows show the direction in which the video traffic can flow. Note that the traffic flows
cleanly between the radios that collect the video and the workstations connected to the network
operation center backbone. Because the unnecessary network traffic has been eliminated, the
network will be able to support more cameras than a network where the multicast traffic is not
filtered.
For ENCOM STRATOS plus Version 2.1.71
Page 474
© 2010-2015 Encom Wireless Data Solutions Inc.
ENCOM STRATOS plus
USER MANUAL
Master Radio Configuration
The master radios collect the video data from their downstream radios (repeaters and remotes) and
forward it to the network operation center workstations via the Ethernet backbone.
In order to prevent unnecessary video traffic from being forwarded to other radios, it is necessary to
filter out the following traffic:
Multicast traffic entering the master radio's Ethernet port must be blocked. Otherwise, video
traffic forwarded by the other master radio would in turn be forwarded to the master radio's
downstream radios. In the example, we do not want the video traffic from 'Master B' radio
being forwarded to the 'Master A' radio and its downstream radios:
For ENCOM STRATOS plus Version 2.1.71
Page 475
© 2010-2015 Encom Wireless Data Solutions Inc.
ENCOM STRATOS plus
USER MANUAL
Multicast traffic entering one of the master radio's wireless interfaces must not be forwarded
to the radio's other wireless interfaces. This prevents the traffic from one downstream radio
from being forwarded to another downstream radio.
Blocking the wireless to wireless traffic will block multicast traffic between
physical radio cards, the WDS links that form between the master radio and its
downstream radios, and the wireless connections that form between wireless
client devices (such as laptops or wireless cameras) and the radios.
In the case where the master radio contains a single radio card, but has
wireless connections to two remote radios, blocking wireless to wireless traffic
will prevent multicast traffic from being forwarded from one remote radio to
another.
For ENCOM STRATOS plus Version 2.1.71
Page 476
© 2010-2015 Encom Wireless Data Solutions Inc.
ENCOM STRATOS plus
USER MANUAL
The following screen shot shows the the network filter configuration to use for the master radios:
For ENCOM STRATOS plus Version 2.1.71
Page 477
© 2010-2015 Encom Wireless Data Solutions Inc.
ENCOM STRATOS plus
USER MANUAL
Repeater Radio Configuration
The repeater radios collect the video data from their downstream radios (remotes) and forward it to
the network operation center workstations via the master radios. They may also collect video data
from one or more cameras directly connected to their Ethernet ports.
In order to prevent unnecessary video traffic from being forwarded to other radios, it is necessary to
filter out the following traffic:
Multicast traffic exiting the master radio's Ethernet port must be blocked. Otherwise, video
traffic received by the repeater would be forwarded to the devices connected to the repeater's
Ethernet port. In the example, we do not want the video traffic from the 'Remote A2' and
'Remote A3' radios from being forwarded to camera connected to the repeater:
For ENCOM STRATOS plus Version 2.1.71
Page 478
© 2010-2015 Encom Wireless Data Solutions Inc.
ENCOM STRATOS plus
USER MANUAL
Multicast traffic entering one of the repeater radio's wireless interfaces must not be forwarded
to the radio's other wireless interfaces. This prevents the traffic from one downstream radio
from being forwarded to another downstream radio.
Blocking the wireless to wireless traffic will block multicast traffic between physical
radio cards, the WDS links that form between the master radio and its downstream
radios, and the wireless connections that form between wireless client devices
(such as laptops or wireless cameras) and the radios.
In the case where the master radio contains a single radio card, but has wireless
connections to two remote radios, blocking wireless to wireless traffic will prevent
multicast traffic from being forwarded from one remote radio to another.
For ENCOM STRATOS plus Version 2.1.71
Page 479
© 2010-2015 Encom Wireless Data Solutions Inc.
ENCOM STRATOS plus
USER MANUAL
The following screen shot shows the the network filter configuration to use for the repeater radio:
For ENCOM STRATOS plus Version 2.1.71
Page 480
© 2010-2015 Encom Wireless Data Solutions Inc.
ENCOM STRATOS plus
USER MANUAL
Remote Radio Configuration
The remote radios collect video data from one or more cameras directly connected to their Ethernet
ports, and forward it to the network operation center workstations via the upstream (repeater or
master) radios.
Since a remote radio will normally maintain a single wireless link to the upstream radio, there is
usually no reason to block wireless to wireless traffic.
If you have wireless client devices (such as laptops or wireless cameras) connected to the remote
radio, you may want to block the wireless to wireless traffic so that multicast traffic generated by
one of the devices is not forwarded to the other devices. In addition, you may want to block outgoing
Ethernet traffic so that the the multicast traffic generated by the wireless devices is not forwarded to
the cameras connected to the Ethernet port.
The following screen shot shows the the network filter configuration to use for the remote radios
(this is only required if you want to manage the multicast traffic generated by the locally attached
devices):
For ENCOM STRATOS plus Version 2.1.71
Page 481
© 2010-2015 Encom Wireless Data Solutions Inc.
ENCOM STRATOS plus
USER MANUAL
Appendix G: Securing Your Wireless Network
General Security Considerations
ENCOM radios provide a vital link between your network operations center and field devices (such
as traffic controllers, traffic cameras, school zone beacons, etc.). To prevent unauthorized agents
from gaining access to, and interfering with, your infrastructure, you need to configure the radios
with the appropriate security settings. This appendix describes the configuration settings that affect
the security of ENCOM radios, and recommendations that will maximize the security of your
network.
In order to protect the entire system, the other devices that make up the network (computers,
routers, switches, traffic controllers, traffic cameras, etc.) also need to be secured. Due to the great
variety of these devices, it is not possible to address them in this document. Please refer to the
documentation that was provided with these devices for more information.
Specific details and recommendations can be found in the following topics:
Set the Administrative Password
Secure Radio Configuration Settings
Broadband and Point-to-Multipoint radios
Radio Settings (N Cards)
Radio Settings (A and B/G Cards)
WDS Settings
Wireless Security Settings (N Cards)
Wireless Security Settings (A and B/G Cards)
Mesh radios
Radio Settings (Mesh Radios)
MAC Access Settings
Wireless Security Settings
For ENCOM STRATOS plus Version 2.1.71
Page 482
© 2010-2015 Encom Wireless Data Solutions Inc.
ENCOM STRATOS plus
USER MANUAL
Set the Administrative Password
By default, the administrative password of an ENCOM radio is blank.You should assign a strong
password to the radio before adding it to your network.
To secure access to the radio:
1. Run ENCOM STRATOS to access your network.
2. Select the radio you want to secure.
3. Select Radio -> Change Password from the main menu. The Change Password form is
displayed:
4. Enter a strong password in the New Password field. The password should be at least 8
characters long, and contain a random combination of upper and lowercase letters, numbers
and punctuation characters (except for the $, “ and ? characters).
5. Enter the same password in the Confirm Password field.
6. Press the OK button to save the new password to the radio.
To more easily manage your network, you should use the same administrative
password for all of your radios.
When you log into STRATOS, it uses the password you enter to log into the
radios in your network. If a radio has been configured with a different password,
a icon is displayed next to the radio in the radio list. STRATOS will not be able
to access the radio until you explicitly log into it. To do this, click the left mouse
button on the radio, and enter the appropriate credentials when prompted to.
For ENCOM STRATOS plus Version 2.1.71
Page 483
© 2010-2015 Encom Wireless Data Solutions Inc.
ENCOM STRATOS plus
USER MANUAL
Secure Radio Configuration Settings
Broadband and Point-to-Multipoint radios
Radio Settings (N Cards)
This topic describes the radio settings used to secure Broadband and Point-to-Multipoint radios
using Wireless-N radio cards.
To configure Broadband and Point-to-Multipoint radios with secure settings:
1. Run ENCOM STRATOS to access your network.
2. Select the radio you want to secure.
3. Select Radio -> Configure from the main menu. (Alternatively, just double-click the radio.)
4. Select the Radio 1 tab, and the Radio Settings sub-tab.
5. Update the settings using the following guidelines:
Setting
Guideline
Network Type
If you don't need to support wireless client devices (e.g. laptops,
smart-phones, wireless cameras), set this option to N-Only or
A-Only.
This prevents client devices from being able to connect to the
radio, making your network harder to compromise.
Network SSID
Use an innocuous word or phrase, or a random combination of
letters, numbers and punctuation (except for the $, \ and “
characters).
This prevents someone that discovers the network from easily
determining the type of radios in the network, who the network
belongs to, or what the network is being used for.
Hide SSID
Check this option to prevent the network SSID from being
broadcast.
This will prevent unauthorized client devices from detecting your
network, and will prevent casual discovery of your network.
If client devices are allowed to connect to the network, they will
have to be manually configured with the SSID.
Channel Mode
For ENCOM STRATOS plus Version 2.1.71
Most wireless-N client devices can only detect networks that are
using 20 MHz or 40 MHz channel modes.
Page 484
© 2010-2015 Encom Wireless Data Solutions Inc.
ENCOM STRATOS plus
USER MANUAL
If you do not need to support client devices, and your network
does not need to handle a high amount of network traffic, you
can set the channel mode to 5 MHz or 10 MHz. This will prevent
casual discovery of your network.
Channel
If using a 5.8 GHz radio, and you do not need to support client
devices, set the channel to a frequency that is not supported by
client devices. This will prevent unauthorized devices from being
able to detect your network.
The following is a list of the 5.8 GHz band frequencies that are
normally supported by client devices in North America:
5180 MHz
5200 MHz
5220 MHz
5240 MHz
5745 MHz
5765 MHz
5785 MHz
5805 MHz
5825 MHz
If using a 2.4 GHz radio, all of the available frequencies are
supported by client devices.
If using a 4.9 GHz radio, none of the available frequencies are
supported by regular client devices (specialized 4.9 GHz client
devices do exist).
Enable eMax Protocol
eMax is a proprietary protocol that increases the bandwidth of
the wireless links.
Since the protocol is not compatible with standard client
devices, these devices will not be able to connect to a network
that is using the eMax protocol.
Enable Roaming
If the radio is configured as a remote, it will by default connect to
any compatible master radio it detects.
To force the remote radio to connect to a specific master radio,
uncheck the Enable Roaming option, and enter or select the
For ENCOM STRATOS plus Version 2.1.71
Page 485
© 2010-2015 Encom Wireless Data Solutions Inc.
ENCOM STRATOS plus
USER MANUAL
MAC address of the master radio in the Parent Radio MAC
Address field.
This will prevent the remote radio from connecting to an
unauthorized master radio that is placed in the vicinity of the
remote.
6. If you follow all of the guidelines, the Radio Settings sub-tab for a master radio will look
similar to the following example:
7. If you are securing a dual radio, select the Radio 2 tab, and the Radio Settings sub-tab, and
then repeat steps 5-6.
8. Press the OK button to save the new radio settings.
For ENCOM STRATOS plus Version 2.1.71
Page 486
© 2010-2015 Encom Wireless Data Solutions Inc.
ENCOM STRATOS plus
USER MANUAL
Radio Settings (A and B/G Cards)
This topic describes the radio settings used to secure Broadband and Point-to-Multipoint radios
using legacy B/G (2.4 GHz) or A (4.9 and 5.8 GHz) radio cards.
To configure Broadband and Point-to-Multipoint radios with secure settings:
1. Run ENCOM STRATOS to access your network.
2. Select the radio you want to secure.
3. Select Radio -> Configure from the main menu. (Alternatively, just double-click the radio.)
4. Select the Radio 1 tab, and the Radio Settings sub-tab.
5. Update the settings using the following guidelines:
Setting
Guideline
Network SSID
Use an innocuous word or phrase, or a random combination of
letters, numbers and punctuation (except for the $, \ and “
characters).
This prevents someone that discovers the network from easily
determining the type of radios in the network, who the network
belongs to, or what the network is being used for.
Hide SSID
Check this option to prevent the network SSID from being
broadcast.
This will prevent unauthorized client devices from detecting your
network, and will prevent casual discovery of your network.
If client devices are allowed to connect to the network, they will
have to be manually configured with the SSID.
Allow Clients
If you don't need to support wireless client devices, leave this
setting unchecked.
This prevents client devices from being able to connect to the
radio, making your network harder to compromise.
Channel Mode
Most A/B/G client devices can only detect networks that are
using the 20 MHz channel mode.
If you do not need to support client devices, you can set the
channel mode to 5 MHz, 10 MHz or 40 MHz. This will prevent
casual discovery of your network.
Channel
For ENCOM STRATOS plus Version 2.1.71
If using a 5.8 GHz radio, and you do not need to support client
Page 487
© 2010-2015 Encom Wireless Data Solutions Inc.
ENCOM STRATOS plus
USER MANUAL
devices, set the channel to a frequency that is not supported by
client devices. This will prevent unauthorized devices from being
able to detect your network.
The following is a list of the 5.8 GHz band frequencies that are
normally supported by client devices in North America:
5180 MHz
5200 MHz
5220 MHz
5240 MHz
5745 MHz
5765 MHz
5785 MHz
5805 MHz
5825 MHz
If using a 2.4 GHz radio, all of the available frequencies are
supported by client devices.
If using a 4.9 GHz radio, none of the available frequencies are
supported by regular client devices (specialized 4.9 GHz client
devices do exist).
Enable eMax Protocol
eMax is a proprietary protocol that increases the bandwidth of
the wireless links.
Since the protocol is not compatible with standard client
devices, these devices will not be able to connect to a network
that is using the eMax protocol.
Enable Roaming
If the radio is configured as a remote, it will by default connect to
any compatible master radio it detects.
To force the remote radio to connect to a specific master radio,
uncheck the Enable Roaming option, and enter or select the
MAC address of the master radio in the Parent Radio MAC
Address field.
This will prevent the remote radio from connecting to an
unauthorized master radio that is placed in the vicinity of the
remote.
For ENCOM STRATOS plus Version 2.1.71
Page 488
© 2010-2015 Encom Wireless Data Solutions Inc.
ENCOM STRATOS plus
USER MANUAL
6. If you follow all of the guidelines, the Radio Settings sub-tab for a master radio will look
similar to the following example:
7. If you are securing a dual radio, select the Radio 2 tab, and the Radio Settings sub-tab, and
then repeat steps 5-6.
8. Press the OK button to save the new radio settings.
For ENCOM STRATOS plus Version 2.1.71
Page 489
© 2010-2015 Encom Wireless Data Solutions Inc.
ENCOM STRATOS plus
USER MANUAL
WDS Settings
This topic describes the WDS settings used to secure Broadband and Point-to-Multipoint radios.
To configure Broadband and Point-to-Multipoint radios with secure settings:
1. Run ENCOM STRATOS to access your network.
2. Select the radio you want to secure.
3. Select Radio -> Configure from the main menu. (Alternatively, just double-click the radio.)
4. Select the Radio 1 tab, and the WDS Setup sub-tab.
5. Move the appropriate Dynamic WDS Links to the Static WDS Links table.
6. Change the WDS Mode setting to Static.
7. If you follow all of the guidelines, the WDS Setup sub-tab will look similar to the following
example:
8. If you are securing a dual radio, select the Radio 2 tab, and the WDS Setup sub-tab, and
then repeat steps 5-7.
9. Press the OK button to save the new radio settings.
WDS settings only apply to master and repeater radios. For remote radios, the
wireless connection can be secured by disabling roaming and setting the parent
For ENCOM STRATOS plus Version 2.1.71
Page 490
© 2010-2015 Encom Wireless Data Solutions Inc.
ENCOM STRATOS plus
USER MANUAL
MAC address. See the Radio Settings (N Cards) or Radio Settings (A and B/G
Cards) topic for more information.
For ENCOM STRATOS plus Version 2.1.71
Page 491
© 2010-2015 Encom Wireless Data Solutions Inc.
ENCOM STRATOS plus
USER MANUAL
Wireless Security Settings (N Cards)
This topic describes the wireless security settings used to secure Broadband and Point-toMultipoint radios using Wireless-N radio cards.
To configure Broadband and Point-to-Multipoint radios with secure settings:
1. Run ENCOM STRATOS to access your network.
2. Select the radio you want to secure.
3. Select Radio -> Configure from the main menu. (Alternatively, just double-click the radio.)
4. Select the Radio 1 tab, and the Wireless Security sub-tab.
5. If you have selected the N-Only option in the Network Type option in the Radio Settings tab,
update the settings using the following guidelines:
Setting
Guideline
Wireless Security Type
Select the Dynamic option.
Pre-Shared Key
Enter the password used to secure the wireless links.
The password should be at least 8 characters long (12 to 16 is
preferable), and contain a random combination of upper and
lowercase letters, numbers and punctuation characters (except
for the $ and “ characters).
For ENCOM STRATOS plus Version 2.1.71
Page 492
© 2010-2015 Encom Wireless Data Solutions Inc.
ENCOM STRATOS plus
USER MANUAL
6. If you follow all of the guidelines, the Wireless Security sub-tab will look similar to the
following example:
7. If you have selected the A-Only, A/N Clients, G-Only or B/G/N Clients option in the Network
Type option in the Radio Settings tab, update the settings using the following guidelines:
Setting
Guideline
Wireless Security
Type
Select the Dynamic option.
WPA Personal
Leave unchecked, unless client devices that support WPA but
don't support WPA2 security must connect to the radio.
WPA Personal PreShared Key
If the WPA Personal option is checked, enter a strong password
in the WPA Personal Pre-Shared Key field.
Static key based security (especially WEP) is no longer
considered secure, and should only be used if client devices that
don't support WPA or WPA2 security must connect to the radio.
The password should be at least 8 characters long (12 to 16 is
preferable), and contain a random combination of upper and
lowercase letters, numbers and punctuation characters (except
for the $ and “ characters).
WPA2 Personal
For ENCOM STRATOS plus Version 2.1.71
Check this option. WPA2 Personal is the most secure option that
Page 493
© 2010-2015 Encom Wireless Data Solutions Inc.
ENCOM STRATOS plus
USER MANUAL
can be easily set up and managed.
WPA2 Personal
Personal Pre-Shared
Key
If the WPA2 Personal option is checked, enter a strong password
in the WPA2 Personal Pre-Shared Key field.
WPA Enterprise
Unless you have set up the IT infrastructure that supports WPA
Enterprise, leave this option unchecked.
WPA2 Enterprise
Unless you have set up the IT infrastructure that supports WPA2
Enterprise, leave this option unchecked.
The password should be at least 8 characters long (12 to 16 is
preferable), and contain a random combination of upper and
lowercase letters, numbers and punctuation characters (except
for the $ and “ characters).
Unicast Ciphers, TKIP Leave unchecked, unless client devices that support WPA but
don't support WPA2 security must connect to the radio.
Unicast Ciphers, AES- Check this option, as it is the most secure encryption algorithm
CCM
supported by the radio.
Group Ciphers, TKIP
Leave unchecked, unless client devices that support WPA but
don't support WPA2 security must connect to the radio.
Group Ciphers, AESCCM
Check this option, as it is the most secure encryption algorithm
supported by the radio.
Group Key Update
Time
Leave at 5 minutes.
For ENCOM STRATOS plus Version 2.1.71
Page 494
© 2010-2015 Encom Wireless Data Solutions Inc.
ENCOM STRATOS plus
USER MANUAL
8. If you follow all of the guidelines, the Wireless Security sub-tab will look similar to the
following example:
9. If you are securing a dual radio, select the Radio 2 tab, and the Wireless Security sub-tab,
and then repeat steps 5-8.
10.Press the OK button to save the new radio settings.
For ENCOM STRATOS plus Version 2.1.71
Page 495
© 2010-2015 Encom Wireless Data Solutions Inc.
ENCOM STRATOS plus
USER MANUAL
Wireless Security Settings (A and B/G Cards)
This topic describes the wireless security settings used to secure Broadband and Point-toMultipoint radios using legacy B/G (2.4 GHz) or A (4.9 and 5.8 GHz) radio cards.
To configure Broadband and Point-to-Multipoint radios with secure settings:
1. Run ENCOM STRATOS to access your network.
2. Select the radio you want to secure.
3. Select Radio -> Configure from the main menu. (Alternatively, just double-click the radio.)
4. Select the Radio 1 tab, and the Wireless Security sub-tab.
5. Update the settings using the following guidelines:
Setting
Guideline
Wireless Security
Type
Select the Dynamic option.
WPA Personal
Leave unchecked, unless client devices that support WPA but don't
support WPA2 security must connect to the radio.
WPA Personal PreShared Key
If the WPA Personal option is checked, enter a strong password in
the WPA Personal Pre-Shared Key field.
Static key based security (especially WEP) is no longer considered
secure, and should only be used if client devices that don't support
WPA or WPA2 security must connect to the radio.
The password should be at least 8 characters long (12 to 16 is
preferable), and contain a random combination of upper and
lowercase letters, numbers and punctuation characters (except for
the $ and “ characters).
WPA2 Personal
Check this option. WPA2 is the most secure option that can be
easily set up and managed.
WPA2 Personal
Pre-Shared Key
If the WPA2 Personal option is checked, enter a strong password in
the WPA2 Personal Pre-Shared Key field.
The password should be at least 8 characters long (12 to 16 is
preferable), and contain a random combination of upper and
lowercase letters, numbers and punctuation characters (except for
the $ and “ characters).
WPA Enterprise
For ENCOM STRATOS plus Version 2.1.71
Unless you have set up the IT infrastructure that supports WPA
Enterprise, leave this option unchecked.
Page 496
© 2010-2015 Encom Wireless Data Solutions Inc.
ENCOM STRATOS plus
USER MANUAL
WPA2 Enterprise
Unless you have set up the IT infrastructure that supports WPA2
Enterprise, leave this option unchecked.
Unicast Ciphers,
TKIP
Leave unchecked, unless client devices that support WPA but don't
support WPA2 security must connect to the radio.
Unicast Ciphers,
AES-CCM
Check this option, as it is the most secure encryption algorithm
supported by the radio.
Group Ciphers,
TKIP
Leave unchecked, unless client devices that support WPA but don't
support WPA2 security must connect to the radio.
Group Ciphers,
AES-CCM
Check this option, as it is the most secure encryption algorithm
supported by the radio.
Group Key Update
Time
Leave at 5 minutes.
6. If you follow all of the guidelines, the Wireless Security sub-tab will look similar to the
following example:
7. If you are securing a dual radio, select the Radio 2 tab, and the Wireless Security sub-tab,
and then repeat steps 5-6.
8. Press the OK button to save the new radio settings.
For ENCOM STRATOS plus Version 2.1.71
Page 497
© 2010-2015 Encom Wireless Data Solutions Inc.
ENCOM STRATOS plus
USER MANUAL
Mesh radios
Radio Settings (Mesh Radios)
This topic describes the radio settings used to secure ENCOM mesh radios.
To configure mesh radios with secure settings:
1. Run ENCOM STRATOS to access your network.
2. Select the radio you want to secure.
3. Select Radio -> Configure from the main menu. (Alternatively, just double-click the radio.)
4. Select the Radio 1 tab, and the Radio Settings sub-tab.
5. Update the settings using the following guidelines:
Setting
Guideline
Network Type
If you don't need to support wireless client devices (e.g. laptops,
smart-phones, wireless cameras), set this option to MeshOnly.
This prevents client devices from being able to connect to the
radio, making your network harder to compromise.
Network SSID
Use an innocuous word or phrase, or a random combination of
letters, numbers and punctuation (except for the $, \ and “
characters).
This prevents someone that discovers the network from easily
determining the type of radios in the network, who the network
belongs to, or what the network is being used for.
Hide SSID
Check this option to prevent the network SSID from being
broadcast.
This will prevent unauthorized client devices from detecting your
network, and will prevent casual discovery of your network.
If client devices are allowed to connect to the network, they will
have to be manually configured with the SSID.
Channel Mode
Most wireless-N client devices can only detect networks that are
using 20 MHz or 40 MHz channel modes, and most A/B/G client
devices can only detect networks that are using the 20 MHz
channel mode.
If you do not need to support client devices, and your network
does not need to handle a high amount of network traffic, you
For ENCOM STRATOS plus Version 2.1.71
Page 498
© 2010-2015 Encom Wireless Data Solutions Inc.
ENCOM STRATOS plus
USER MANUAL
can set the channel mode to 5 MHz or 10 MHz. This will prevent
casual discovery of your network.
For A/B/G radios, use the 40 MHz mode for both security and
maximum bandwidth.
Channel
If using a 5.8 GHz radio, and you do not need to support client
devices, set the channel to a frequency that is not supported by
client devices. This will prevent unauthorized devices from being
able to detect your network.
The following is a list of the 5.8 GHz band frequencies that are
normally supported by client devices in North America:
5180 MHz
5200 MHz
5220 MHz
5240 MHz
5745 MHz
5765 MHz
5785 MHz
5805 MHz
5825 MHz
If using a 2.4 GHz radio, all of the available frequencies are
supported by client devices.
If using a 4.9 GHz radio, none of the available frequencies are
supported by regular client devices (specialized 4.9 GHz client
devices do exist).
For ENCOM STRATOS plus Version 2.1.71
Page 499
© 2010-2015 Encom Wireless Data Solutions Inc.
ENCOM STRATOS plus
USER MANUAL
6. If you follow all of the guidelines, the Radio Settings sub-tab for a mesh radio will look
similar to the following example:
7. If you are securing a dual radio, select the Radio 2 tab, and the Radio Settings sub-tab,
and then repeat steps 5-6.
8. Press the OK button to save the new radio settings.
For ENCOM STRATOS plus Version 2.1.71
Page 500
© 2010-2015 Encom Wireless Data Solutions Inc.
ENCOM STRATOS plus
USER MANUAL
MAC Access Settings
Unlike Broadband or Point-to-Multipoint radios, there is no explicit way to prevent one mesh radio
from connecting to another mesh radio.
As long as the radios are provisioned with the same Network SSID, Channel mode, Channel
(frequency) and wireless security settings, they will be able to connect with each other (which is the
point of a mesh network).
The following example shows the MAC Access settings for a typical mesh radio:
You are able to specify the minimum signal strength required for a connection to be established,
and you can disallow specific radios from being able to connect to the radio. These features are
used to preventing unwanted connections from developing between the radios that are part of the
mesh network.
For ENCOM STRATOS plus Version 2.1.71
Page 501
© 2010-2015 Encom Wireless Data Solutions Inc.
ENCOM STRATOS plus
USER MANUAL
Wireless Security Settings
This topic describes the wireless security settings used to secure mesh radios.
To configure mesh radios with secure settings:
1. Run ENCOM STRATOS to access your network.
2. Select the radio you want to secure.
3. Select Radio -> Configure from the main menu. (Alternatively, just double-click the radio.)
4. Select the Radio 1 tab, and the Wireless Security sub-tab.
5. Update the settings using the following guidelines:
Setting
Guideline
Wireless Security
Type
Select the Dynamic option.
WPA Personal
Leave unchecked, unless client devices that support WPA but don't
support WPA2 security must connect to the radio.
WPA Personal PreShared Key
If the WPA Personal option is checked, enter a strong password in
the WPA Personal Pre-Shared Key field.
Static key based security (especially WEP) is no longer considered
secure, and should only be used if client devices that don't support
WPA or WPA2 security must connect to the radio.
The password should be at least 8 characters long (12 to 16 is
preferable), and contain a random combination of upper and
lowercase letters, numbers and punctuation characters (except for
the $ and “ characters).
WPA2 Personal
Check this option. WPA2 Personal is the most secure option that
can be easily set up and managed.
WPA2 Personal Pre- If the WPA2 Personal option is checked, enter a strong password in
Shared Key
the WPA2 Personal Pre-Shared Key field.
The password should be at least 8 characters long (12 to 16 is
preferable), and contain a random combination of upper and
lowercase letters, numbers and punctuation characters (except for
the $ and “ characters).
WPA Enterprise
For ENCOM STRATOS plus Version 2.1.71
Unless you have set up the IT infrastructure that supports WPA
Enterprise, leave this option unchecked.
Page 502
© 2010-2015 Encom Wireless Data Solutions Inc.
ENCOM STRATOS plus
USER MANUAL
WPA2 Enterprise
Unless you have set up the IT infrastructure that supports WPA2
Enterprise, leave this option unchecked.
Unicast Ciphers,
TKIP
Leave unchecked, unless client devices that support WPA but don't
support WPA2 security must connect to the radio.
Unicast Ciphers,
AES-CCM
Check this option, as it is the most secure encryption algorithm
supported by the radio.
Group Ciphers, TKIP Leave unchecked, unless client devices that support WPA but don't
support WPA2 security must connect to the radio.
Group Ciphers,
AES-CCM
Check this option, as it is the most secure encryption algorithm
supported by the radio.
Group Key Update
Time
Leave at 5 minutes.
6. If you follow all of the guidelines, the Wireless Security sub-tab will look similar to the
following example:
7. If you are securing a dual radio, select the Radio 2 tab, and the Wireless Security sub-tab,
and then repeat steps 5-6.
8. Press the OK button to save the new radio settings.
For ENCOM STRATOS plus Version 2.1.71
Page 503
© 2010-2015 Encom Wireless Data Solutions Inc.
ENCOM STRATOS plus
USER MANUAL
Detailed Security Example
The following diagram shows a typical system used to manage a traffic network. This section
describes the security requirements for the two broadband radio networks, and provides
configuration settings for each each radio. Although this is a simple example, all of the issues
discussed can be applied to larger networks.
For ENCOM STRATOS plus Version 2.1.71
Page 504
© 2010-2015 Encom Wireless Data Solutions Inc.
ENCOM STRATOS plus
USER MANUAL
The following table lists the MAC and IP addresses of the radios. These values are used in the
example radio configurations that follow.
Radio Name
IP Address
Radio Card MAC Address
Broadband Radio Network 1
Radio1
192.168.1.101
Radio Card 1 (2.4 GHz): 00:0D:B9:16:82:B0
Radio Card 2 (5.8 GHz): 04:CA:6D:45:EA:25
Radio 2
192.168.1.102
Radio Card 1 (2.4 GHz): 00:0D:B9:86:14:BA
Radio Card 2 (5.8 GHz): 04:CA:6D:45:3B:4D
Radio 3
192.168.1.103
Radio Card 1 (2.4 GHz): 00:0D:B9:17:51:43
Radio Card 2 (5.8 GHz): 04:CA:6D:23:04:53
Radio 4
192.168.1.104
Radio Card 1 (2.4 GHz): 00:0D:B9:42:17:44
Radio Card 2 (5.8 GHz): 04:CA:6D:24:D3:2F
Broadband Radio Network 2
Radio 5
192.168.1.105
Radio Card 1 (5.8 GHz): 00:0D:F4:12:4A:3B
Radio 6
192.168.1.106
Radio Card 1 (5.8 GHz): 00:0D:F4:2A:F3:4C
Radio 7
192.168.1.107
Radio Card 1 (5.8 GHz): 00:0D:F4:87:C4:13
Radio 8
192.168.1.108
Radio Card 1 (5.8 GHz): 00:0D:F4:12:4A:4C
Radio 9
192.168.1.109
Radio Card 1 (5.8 GHz): 00:0D:F4:17:AC:35
The following topics provide guidance on securing the networks that are composed of ENCOM
broadband radios.
Securing Broadband Network 1
Securing Broadband Network 2
Refer to the Encom PULSE Link User Guide for information on securing the PULSE radio network.
For ENCOM STRATOS plus Version 2.1.71
Page 505
© 2010-2015 Encom Wireless Data Solutions Inc.
ENCOM STRATOS plus
USER MANUAL
Securing Broadband Network 1
In this example, Broadband Radio Network 1 consists of 4 "E-Lite INT 24/58" dual radios.
A single master radio (Radio 1) is directly connected to the Network Operations Center, and is
wirelessly connected to three remote radios (Radio 2, Radio 3 and Radio 4). One of the remote
radios (Radio 4) is connected to a 900 MHz PULSE radio network that provides communications for
the traffic controllers.
For ENCOM STRATOS plus Version 2.1.71
Page 506
© 2010-2015 Encom Wireless Data Solutions Inc.
ENCOM STRATOS plus
USER MANUAL
The 2.4 GHz radio cards (Radio 1) in the E-Lite radios are used for local wireless device access
(for laptops, smart phones, etc.). They are connected to omnidirectional antennas for maximum
local coverage. To simplify access to the 2.4 GHz network, all of the 2.4 GHz radios should be
configured with the same Network Type, Network SSID, Channel Mode and Wireless Security
settings. That way, a client device can connect to any of the 2.4 GHz radios in the network using a
single connection profile.
The 5.8 GHz radio cards (Radio 2) in the E-Lite radios are used for the backbone of the network.
They are connected to the integrated panel antenna for maximum signal range. In order for the
radios in the 5.8 GHz network to communicate with each other, they must be configured with the
same Network Type, Network SSID, Channel Mode, eMax Protocol and Wireless Security
settings.
The configuration settings for each of the 4 radios are shown in the following topics:
Master Radio (1)
Remote Radios (2, 3 and 4)
For ENCOM STRATOS plus Version 2.1.71
Page 507
© 2010-2015 Encom Wireless Data Solutions Inc.
ENCOM STRATOS plus
USER MANUAL
Master Radio (1)
The first (2.4 GHz) radio card of Master Radio 1 would be configured as follows.
For ENCOM STRATOS plus Version 2.1.71
Page 508
© 2010-2015 Encom Wireless Data Solutions Inc.
ENCOM STRATOS plus
USER MANUAL
The second (5.8 GHz) radio card of Master Radio 1 would be configured as follows. Note that the
WDS settings only allow the radio to connect to the three remotes that are part of the network.
For ENCOM STRATOS plus Version 2.1.71
Page 509
© 2010-2015 Encom Wireless Data Solutions Inc.
ENCOM STRATOS plus
USER MANUAL
For ENCOM STRATOS plus Version 2.1.71
Page 510
© 2010-2015 Encom Wireless Data Solutions Inc.
ENCOM STRATOS plus
USER MANUAL
Remote Radios (2, 3 and 4)
The first (2.4 GHz) radio card of the remote radios would be configured as follows. This
configuration is identical to that of the master radio.
For ENCOM STRATOS plus Version 2.1.71
Page 511
© 2010-2015 Encom Wireless Data Solutions Inc.
ENCOM STRATOS plus
USER MANUAL
The second (5.8 GHz) radio card of the remote radios would be configured as follows.
For ENCOM STRATOS plus Version 2.1.71
Page 512
© 2010-2015 Encom Wireless Data Solutions Inc.
ENCOM STRATOS plus
USER MANUAL
For ENCOM STRATOS plus Version 2.1.71
Page 513
© 2010-2015 Encom Wireless Data Solutions Inc.
ENCOM STRATOS plus
USER MANUAL
Securing Broadband Network 2
In this example, Broadband Radio Network 2 consists of 5 "COMMPAKBB58" single radios. They
form the communications backbone used to access devices such as traffic cameras and traffic
controllers.
For ENCOM STRATOS plus Version 2.1.71
Page 514
© 2010-2015 Encom Wireless Data Solutions Inc.
ENCOM STRATOS plus
USER MANUAL
A single master radio (Radio 5) is directly connected to the Network Operations Center. It is
wirelessly connected to two repeater radios (Radio 6 and Radio 7), that are in turn wirelessly
connected to two remote radios (Radio 8 and Radio 9). The remote radios are connected to
switches to which traffic cameras and traffic controllers are connected.
The switches are configured to use VLANs to segregate the camera and traffic controller data. The
radios are configured to use a management VLAN (see the VLAN Support topic for more information
on configuring VLANs).
All of the radios use panel antennas to communicate with each other. Because they are part of the
same network, they must be configured with the same Network Type, Network SSID, Channel
Mode, eMax Protocol and Wireless Security settings. Because cameras typically generate a
significant amount of traffic, the radios will be configured to maximize throughput.
The configuration settings for each of the 4 radios are shown in the following topics:
Master Radio (5)
Repeater Radio (6)
Repeater Radio (7)
Remote Radio (8)
Remote Radio (9)
For ENCOM STRATOS plus Version 2.1.71
Page 515
© 2010-2015 Encom Wireless Data Solutions Inc.
ENCOM STRATOS plus
USER MANUAL
Master Radio (5)
Master Radio 5 would be configured as follows.
For ENCOM STRATOS plus Version 2.1.71
Page 516
© 2010-2015 Encom Wireless Data Solutions Inc.
ENCOM STRATOS plus
USER MANUAL
For ENCOM STRATOS plus Version 2.1.71
Page 517
© 2010-2015 Encom Wireless Data Solutions Inc.
ENCOM STRATOS plus
USER MANUAL
Pepeater Radio (6)
Repeater Radio 6 would be configured as follows.
For ENCOM STRATOS plus Version 2.1.71
Page 518
© 2010-2015 Encom Wireless Data Solutions Inc.
ENCOM STRATOS plus
USER MANUAL
For ENCOM STRATOS plus Version 2.1.71
Page 519
© 2010-2015 Encom Wireless Data Solutions Inc.
ENCOM STRATOS plus
USER MANUAL
Repeater Radio (7)
Repeater Radio 7 would be configured as follows.
For ENCOM STRATOS plus Version 2.1.71
Page 520
© 2010-2015 Encom Wireless Data Solutions Inc.
ENCOM STRATOS plus
USER MANUAL
For ENCOM STRATOS plus Version 2.1.71
Page 521
© 2010-2015 Encom Wireless Data Solutions Inc.
ENCOM STRATOS plus
USER MANUAL
Remote Radio (8)
Remote Radio 8 would be configured as follows.
For ENCOM STRATOS plus Version 2.1.71
Page 522
© 2010-2015 Encom Wireless Data Solutions Inc.
ENCOM STRATOS plus
USER MANUAL
For ENCOM STRATOS plus Version 2.1.71
Page 523
© 2010-2015 Encom Wireless Data Solutions Inc.
ENCOM STRATOS plus
USER MANUAL
Remote Radio (9)
Remote Radio 9 would be configured as follows.
For ENCOM STRATOS plus Version 2.1.71
Page 524
© 2010-2015 Encom Wireless Data Solutions Inc.
ENCOM STRATOS plus
USER MANUAL
For ENCOM STRATOS plus Version 2.1.71
Page 525
© 2010-2015 Encom Wireless Data Solutions Inc.
ENCOM STRATOS plus
USER MANUAL
Adding Security to an Existing Network
Securing an existing ENCOM broadband or mesh network requires that certain configuration
changes be made to all of the radios in the network. When these changes are made to a radio, it will
lose its wireless connection to other radios that have not yet been updated. Because of this, parts of
your network will not be available while you carry out the updates.
Two strategies can be used to update the configuration of your radios: local updates, and remote
updates.
Local Updates:
To perform local updates, you need physical access to the radios. This usually means driving to the
site where a radio is installed, connecting directly to the radio using an Ethernet cable, and using
STRATOS to update its configuration. This process would be repeated for each radio in your
network.
Local updates may be fine for small networks, but could be impractical if you have a large network.
Remote Updates:
To perform remote updates, you need to connect a computer or laptop that is running STRATOS to
your Traffic Management Center’s (TMC) network. This should provide STRATOS with access to
the entire wireless radio network. You can then update the configuration of all radios from one
central location.
The rest of this section describes the procedures required to secure your radios from the TMC.
Note that most of the concepts described are also applicable to local updates.
For ENCOM STRATOS plus Version 2.1.71
Page 526
© 2010-2015 Encom Wireless Data Solutions Inc.
ENCOM STRATOS plus
USER MANUAL
Prerequisites (Network Diagram)
Before you start, you need to understand the layout of your wireless network. This is important to
minimize network disruption while you are enabling the radios’ security features.
The most useful tool for this is a network diagram that identifies:
The radios that are directly connected to your Traffic Management Center (TMC) via an
Ethernet or fiber cable.
The wireless connections between the radios that aren’t directly connected to the TMC.
Any radios that are co-located and connected together via an Ethernet cable or switch, and
that aren’t directly connected to the TMC.
ENCOM strongly suggests that you create a network diagram if one is not already available. It is
invaluable in determining the order in which the radios should be configured.
The following network diagram shows a simple broadband network, and displays the three types of
radios described above:
The
symbols indicate the wireless links between the radios.
For ENCOM STRATOS plus Version 2.1.71
Page 527
© 2010-2015 Encom Wireless Data Solutions Inc.
ENCOM STRATOS plus
USER MANUAL
A wireless network will often be composed of several smaller stand-alone networks, each of which
has one radio connected to the TMC, as shown in the following diagram:
Each stand-alone network can be treated separately. You would normally update all of the radios in
one of the stand-alone networks first, and then proceed to update the other stand-alone networks in
a similar fashion. This will reduce the impact of the security updates to a smaller number of radios.
For ENCOM STRATOS plus Version 2.1.71
Page 528
© 2010-2015 Encom Wireless Data Solutions Inc.
ENCOM STRATOS plus
USER MANUAL
Security Update Order
As mentioned previously, when you make the configuration changes required to secure a radio, it
will lose the wireless connections to any radio that has not yet been updated. In order to update all of
your radios remotely, you will need to perform the updates in a specific order.
You need to change the configuration of the radios furthest from your TMC first, and then work your
way back to the operations center. You will lose connection to the radios after they have been
configured. The connections should be restored once you have configured the radio closest to the
operations center.
If you end up with orphaned radios (radios that can no longer connect to the network, and that
haven’t been configured with the new security settings) you may have to configure them using a
local (Ethernet) connection.
For ENCOM STRATOS plus Version 2.1.71
Page 529
© 2010-2015 Encom Wireless Data Solutions Inc.
ENCOM STRATOS plus
USER MANUAL
Incorrect Update Order
For example, consider the following network:
If you update the master radio first, the wireless link to the repeater will be lost, since the repeater’s
wireless settings are no longer compatible with the master’s new settings. STRATOS will no longer
be able to communicate with either the repeater or the remote, and you will not be able to update
either of those radios.
To recover from this situation, you will have to restore the master radio to its original settings. This
will re-establish the wireless link with the repeater, and allow STRATOS to communicate with the
repeater and remote radios.
For ENCOM STRATOS plus Version 2.1.71
Page 530
© 2010-2015 Encom Wireless Data Solutions Inc.
ENCOM STRATOS plus
USER MANUAL
Correct Update Order
Again consider the following working network:
If you update the remote radio first, the wireless link to the repeater will be lost, since the repeater’s
wireless settings are no longer compatible with the remote’s new settings. However, STRATOS is
still able to communicate with the master and repeater.
You would then update the repeater. The wireless link with the master will be lost, since the
master’s wireless settings are no longer compatible with the repeater’s new settings. STRATOS will
still be able to communicate with the master.
For ENCOM STRATOS plus Version 2.1.71
Page 531
© 2010-2015 Encom Wireless Data Solutions Inc.
ENCOM STRATOS plus
USER MANUAL
Note that the wireless link between the repeater and remote is automatically re-established, since
both radios are now configured with compatible wireless settings.
Finally, you would update the master. The wireless link between the master and repeater will be reestablished, and STRATOS will again be able to communicate will all of the radios.
For ENCOM STRATOS plus Version 2.1.71
Page 532
© 2010-2015 Encom Wireless Data Solutions Inc.
ENCOM STRATOS plus
USER MANUAL
Update Order Example
The following diagram shows a simple system that consists of two stand-alone broadband
networks:
The numbered bullets show the order in which the radios should updated.
Note that all of the radios in the first stand-alone network are configured first, followed by all of the
radios in the second stand-alone network.
Also note that the radios farthest from the TMC are configured first, followed by the radios that are
successively closer to the TMC.
For ENCOM STRATOS plus Version 2.1.71
Page 533
© 2010-2015 Encom Wireless Data Solutions Inc.
ENCOM STRATOS plus
USER MANUAL
Securing the Network
This section describes the procedures required to secure your network.
The most important changes to make are to:
Configure the radios to use the WPA2 Personal wireless encryption scheme
Assign a secure administrative password to the radios
For a more detailed description of the security options, refer to the General Security Considerations
topic.
Configuring WPA2 Wireless Encryption
Radios should be configured to use the WPA2 encryption scheme using the update order
discussed in the Prerequisites topic.
You should always start with the radios farthest from the Traffic Management Center (TMC),
followed by the radios that are successively closer to the TMC.
To secure the wireless links:
1. Run ENCOM STRATOS to access your radio network.
2. Select the radio you want to secure.
a) Select Radio -> Configure from the main menu. (Alternatively, just double-click the
radio.)
b) In the Configure form that is displayed:
i. Select the Radio 1 tab.
ii. Select the Wireless Security sub-tab.
iii. Select the Dynamic security option.
iv. Make sure that the WPA2 Personal option is checked.
v. Make sure that the WPA Personal, WPA Enterprise and WPA2 Enterprise options
remain unchecked.
vi. Enter a strong password in the Pre-Shared Key field. The password should be at
least 8 characters long (12 to 16 is preferable), and contain a random combination of
upper and lowercase letters, numbers and punctuation characters (except for the $
and “ characters).
vii.Make sure that the AES with CBC_MAC (AES-CCM) options are checked.
viii.Make sure that the Temporal key Integrity Protocol (TKIP) options are unchecked.
For ENCOM STRATOS plus Version 2.1.71
Page 534
© 2010-2015 Encom Wireless Data Solutions Inc.
ENCOM STRATOS plus
USER MANUAL
ix. The contents of your wireless security tab should look like this:
x. If you are securing a dual radio, select the Radio 2 tab, and the Radio Settings subtab, and then repeat steps iii-ix.
xi. Press the OK button to save the new security settings to the radio.
c) If the radio you are updating is not directly connected to the TMC, STRATOS will no longer
be able to communicate with it. The radio will eventually go off-line, and the configuration
task will show up as having failed:
This is normal. This radio will become available again when the radio that is connected to
the TMC is updated.
3. Repeat step 2 for the remaining radios in your network.
For ENCOM STRATOS plus Version 2.1.71
Page 535
© 2010-2015 Encom Wireless Data Solutions Inc.
ENCOM STRATOS plus
USER MANUAL
Assigning a Secure Password
Changing a radio’s password has no effect on the wireless links. You can therefore change the
radio passwords in any order, and at any time.
To secure access to the radios:
1. Run ENCOM STRATOS to access your network.
2. Select the radio you want to secure.
a) Select Radio -> Change Password from the main menu.
b) In the Change Password form that is displayed:
i. Enter a strong password in the New Password field. The password should be at least
8 characters long, and contain a random combination of upper and lowercase letters,
numbers and punctuation characters (except for the $, “ and ? characters).
ii. Enter the same password in the Confirm Password field.
iii. Press the OK button to save the new password to the radio.
3. Repeat step 2 for the remaining radios in your network. To more easily manage your network,
you should use the same administrative password for all of your radios.
4. The next time you run STRATOS, you will have to log in using the new administrative
password.
For ENCOM STRATOS plus Version 2.1.71
Page 536
© 2010-2015 Encom Wireless Data Solutions Inc.